Indulge your sweet tooth with our delicious and irresistible dessert recipes! Whether you’re craving decadent chocolate treats, fruity delights, or creamy, dreamy confections, we have something for every occasion.
From classic cakes and homemade cookies to no-bake desserts, rich cheesecakes, and festive holiday treats, our recipes are perfect for special celebrations or everyday sweet cravings.
Need something quick? Try our easy, fuss-free desserts that come together in no time. Whether you love warm baked goods, refreshing frozen sweets, or nostalgic comfort desserts, these recipes are sure to bring a little extra joy to your day! 🍰🍫🍪
Ice Cream Sandwiches Recipe
Table of Contents
Ice Cream Sandwiches Recipe – The Perfect Summer Treat
⚖️
Difficulty
Easy
⏲️
Prep Time
20 mins
🕒
Cook Time
35 mins
⏱️
Total Time
6 hrs 55 mins
🍽️
Servings
8
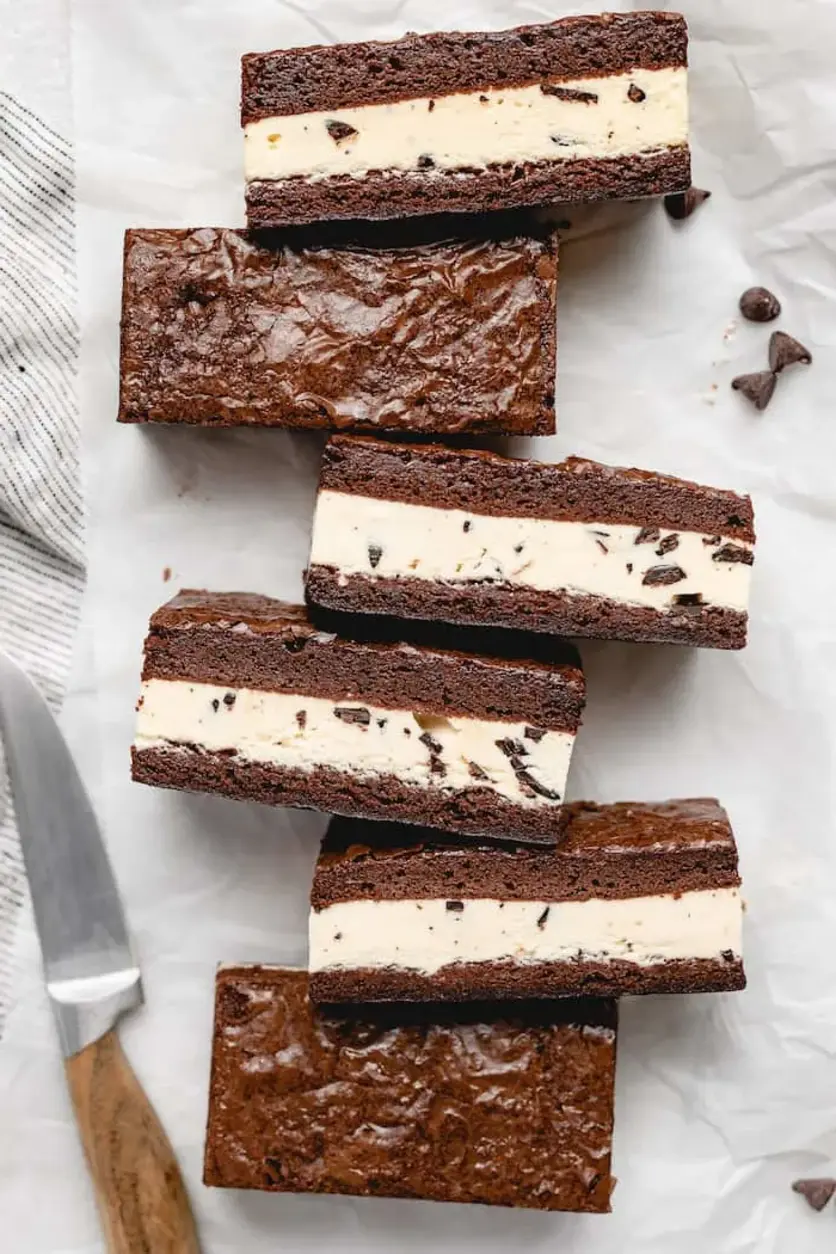
Let me tell you a little secret: the best Ice Cream Sandwiches are made with a brownie that’s both fudgy and firm enough to hold up to a generous scoop of your favorite ice cream. I learned this lesson early on, right in my mother’s kitchen in Morocco, where we’d make a simple version with melted chocolate and warm spices. But it wasn’t until I trained in pastry in Paris that I perfected the technique. Now, here in NYC, I’ve combined those world-class skills with the bold flavors of my childhood to create Ice Cream Sandwiches that are truly something special. This recipe uses a rich, crackly-topped fudge brownie as the base, creating a perfect sandwich that won’t fall apart.
Imagine this: you take one bite and your teeth first meet a delicate, crackled brownie top. Next comes the soft, dense, fudgy interior that’s rich with deep cocoa and buttery vanilla notes. Then the cold, creamy, melting ice cream blends in—creating a moment of pure, cool bliss. The brownie isn’t dry or cakey; it’s dense and moist, providing a perfect contrast to the ice cream. My version uses a double-brownie technique for a full, generous sandwich that delivers an unforgettable texture in every bite—crackly, fudgy, and perfectly chilled.
Growing up, I watched my mother use simple, honest ingredients to create magic. That same philosophy drives me today, but I’ve added French pastry precision—like the exact mixing method for a crackled top—to make this recipe foolproof. I want you to skip the trial and error and get straight to enjoying the perfect Ice Cream Sandwiches. That’s why I’m sharing my tested tips for avoiding a soggy brownie, ensuring the ice cream spreads evenly, and cutting clean, beautiful squares. Trust me, these brownie-based ice cream sandwiches are a game-changer for any Summer dessert spread.
Why This Ice Cream Sandwiches Recipe Is the Best
The Flavor Secret: The real magic lies in the brownie itself. I use a high ratio of butter and brown sugar, creating an intensely rich, fudgy base that’s reminiscent of the best Moroccan pastries. The crackled top is achieved by properly creaming the eggs and sugar, a technique I mastered in Paris. The result is a brownie that’s deeply chocolatey, with a salty edge that perfectly complements any sweet ice cream flavor—whether you prefer classic vanilla bean, rich chocolate, or a fruity strawberry.
Perfected Texture: Many homemade ice cream sandwiches fail because the brownie gets too hard or too crumbly after freezing. My recipe avoids this through a crucial step: using melted butter instead of solid fat and adding a touch of vegetable oil for extra tenderness. The brownies are baked until just barely set in the center, ensuring they remain soft and pliable even after hours in the freezer. This means no more cracked, messy sandwiches—just beautiful, perfect squares.
Foolproof & Fast: This recipe is designed for busy home cooks. The brownie batter comes together in under 15 minutes with a hand mixer, and the hands-off baking time is just 30-40 minutes. The hardest part is waiting for the sandwiches to freeze! I’ve streamlined the assembly by baking the brownies in two separate 8×8 pans, eliminating the need to cut a single slab in half—it’s a little hack I use in my own NYC kitchen to save time and ensure even layers.
Ice Cream Sandwiches Ingredients
Every ingredient here has a purpose. When I go to my local farmers market in NYC, I always look for high-quality unsalted butter and fresh eggs—the foundation of a great fudgy brownie. These are simple, pantry-friendly ingredients that you can find at any American grocery store.
Ingredients List
1 1/2 cups unsalted butter (melted)
2 1/4 cups granulated sugar
1 1/2 cups light brown sugar (packed)
6 large eggs (room temperature)
3 tbsp vegetable oil
2 tbsp pure vanilla extract
2 1/4 cups all purpose flour
1 1/2 cups cocoa powder
1 1/2 tsps salt
1.5 qts favorite ice cream flavor (you can use less, about 3/4 of this is usually enough)
Ingredient Spotlight
Unsalted Butter: This provides the rich fat content that makes the brownies fudgy. I prefer it melted for a denser, chewier texture. In a pinch, you can use salted butter, but reduce the added salt to 1/2 teaspoon. The flavor will be slightly saltier, which works well with chocolate and caramel ice creams.
Cocoa Powder: I use natural unsweetened cocoa powder for its deep, slightly acidic flavor that reacts with the baking soda (not used here) or simply gives a classic brownie taste. You can substitute Dutch-process cocoa for a more mellow, dark chocolate flavor, but the texture will be slightly less fudgy. My favorite brand is Scharffen Berger, which I buy at the Union Square Greenmarket.
Large Eggs: Room-temperature eggs are non-negotiable here. They emulsify better with the butter and sugar, creating that beautiful crackled top. If you forget to take them out of the fridge, place them in a bowl of warm water for 5-10 minutes. This is a simple trick I learned in pastry school in Paris.
Original Ingredient
Best Substitution
Flavor / Texture Impact
Unsalted Butter
Salted Butter (reduce added salt)
Slightly saltier, enhances chocolate flavor
Cocoa Powder (natural)
Dutch-process cocoa
Milder, darker flavor; slightly less fudgy
Large Eggs
Flax eggs (1 tbsp flax + 3 tbsp water per egg)
Denser, less crackly top; vegan option
All-Purpose Flour
Gluten-free 1:1 Baking Flour
Slightly crumblier; still delicious
How to Make Ice Cream Sandwiches — Step-by-Step
Follow these steps closely, and you’ll be rewarded with beautiful, delicious Ice Cream Sandwiches that rival any store-bought version. I’ll guide you through each part with my best tips!
Step 1: Preheat and Prep Pans
Preheat your oven to 350°F (175°C). Grease two 8×8 inch pans generously with butter or baking spray. Line the bottom of each pan with a strip of parchment paper, leaving about 4-6 inches of paper hanging over the sides. This paper will be your life-saver later when you need to lift the brownies out.
💡 emy’s Pro Tip: Use a double layer of parchment paper for extra strength—it slides out easier and won’t tear under the weight of the brownie.
Step 2: Mix Wet Ingredients
In a medium-sized bowl, add the melted butter, granulated sugar, and light brown sugar. Mix using a hand mixer on medium speed until well combined—about 1-2 minutes. The mixture should look glossy and slightly thickened.
Step 3: Add Eggs and Flavor
Add the eggs one at a time, mixing on medium speed after each addition until fully incorporated. This step is crucial for creating that beautiful, crackled top. Mix well! After adding all eggs, the batter should be smooth and emulsified. Then, mix in the vegetable oil and vanilla extract.
⚠️ Common Mistake to Avoid: Don’t rush adding the eggs. If you dump them all in at once, the batter can separate and you’ll lose the crackled effect.
Step 4: Combine Dry Ingredients
In a separate bowl, whisk together the all-purpose flour, cocoa powder, and salt. Reduce the speed of your mixer to low. In intervals, gradually add the dry mixture to the wet mixture, mixing until just combined. Do not overmix—stop as soon as the flour disappears.
💡 emy’s Pro Tip: A few streaks of flour left in the batter are okay. Overmixing develops gluten and results in tough, cakey brownies. We want them fudgy!
Step 5: Bake and Cool
Divide the batter evenly between your two prepared pans (about 2 cups per pan). Use a rubber spatula to gently spread it into an even layer. Bake for 30-40 minutes, or until a toothpick inserted into the center comes out with a few moist crumbs—just barely clean. Do not overbake. Remove from the oven and allow the brownies to cool in the pans for exactly 10 minutes.
⚠️ Common Mistake to Avoid: Overbaking is the #1 mistake. The residual heat will continue cooking the brownies after you pull them out, so err on the side of a slightly underbaked center for the best fudgy texture.
Step 6: Assemble and Freeze
Use the parchment paper to carefully lift one brownie half out onto a cooling rack. Only peel the parchment paper off one of the halves (the one you just lifted out). Let both halves cool completely to room temperature. While that happens, thaw your ice cream at room temperature for 5-10 minutes until it’s spreadable but not melted. Place the parchment-lined brownie half back into its pan. Use a large spoon or rubber spatula to spread the softened ice cream evenly over the top. Use about 3/4 of the ice cream, then add more if you like a thick layer. Invert the second brownie half (the one with the parchment paper still on) and place it over the ice cream, top-side down. Cover tightly with aluminum foil or plastic wrap and freeze for at least 6 hours, but overnight is best for clean cuts.
Step
Action
Duration
Key Visual Cue
1
Preheat oven and prep pans
5 mins
Parchment paper hangs over sides
2
Mix wet ingredients
3 mins
Glossy and thickened
3
Add eggs and flavor
4 mins
Smooth, emulsified batter
4
Combine dry ingredients
2 mins
Just combined, no dry streaks
5
Bake and cool
30-40 mins + 10 mins
Toothpick with moist crumbs
6
Assemble and freeze
6+ hours
Firm, solid block
Serving & Presentation
When you’re ready to serve, remove the assembled block from the freezer and let it sit at room temperature for exactly 5-10 minutes. This softens the edges just enough to make cutting clean and easy. Use the parchment paper to lift the entire block out of the pan onto a cutting board. With a sharp, large chef’s knife, cut into 8 even squares. For the best presentation, wipe the knife clean between cuts. I love serving these on a rustic wooden board—it reminds me of the food markets in Marrakech.
For a show-stopping dessert, drizzle the sandwiches with warm homemade hot fudge sauce and a sprinkle of flaky sea salt. You can also roll the edges in sprinkles, mini chocolate chips, or crushed nuts before serving for a fun, festive look. My children love them for birthday parties, and I often pair them with a strong espresso for a grown-up treat.
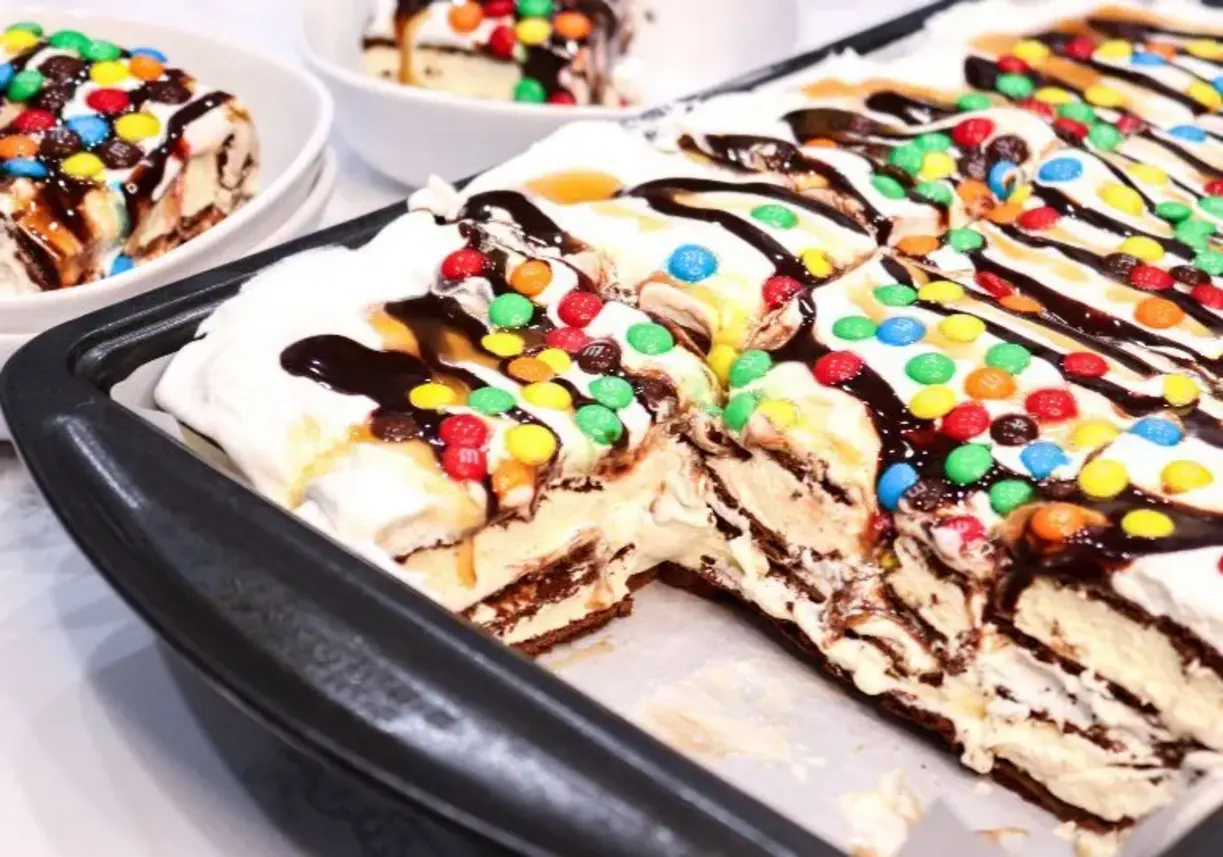
I remember the first time I made this Ice Cream Sandwich Cake—it was a sweltering July afternoon in my tiny New York City apartment, and the air conditioner was fighting a losing battle. My mother’s kitchen in Morocco was always filled with the scent of rose water and cinnamon, but here I was, craving something cold, creamy, and utterly American. This no-bake dessert recipe became my summer salvation: it’s the simplest way to make your own homemade ice cream cake using ice cream sandwiches, and the best part? No oven required. The magic is in the layers: crunchy chocolate wafers, silky Cool Whip, and ribbons of chocolate and caramel—all coming together like a perfect, frosty hug. I’ve been a professional cook for years, trained in Paris and now settled in Brooklyn, and I still make this cake for every backyard barbecue and birthday party. The unique angle here is how the ice cream sandwiches soften just enough to meld into a cake-like texture, making every slice a creamy, decadent masterpiece.
When you cut into this Ice Cream Sandwich Cake, you’ll see those beautiful strata: the chocolate wafers from the sandwiches have softened into a fudgy layer, while the Cool Whip stays light and airy like a cloud. The chocolate syrup provides a deep, rich sweetness, and the caramel adds that buttery, salty edge that makes your taste buds sing. I love drizzling a little extra sauce on top and watching it cascade down the sides—it’s like a messy, beautiful work of art. The mini M&M’s bring a pop of color and a satisfying crunch, reminding me of the candy stalls I’d visit as a child in the Marrakech souk. This cake is the ultimate crowd-pleaser: it’s easy enough for a beginner, but impressive enough for a party. And because it’s frozen, you can make it days ahead—perfect for busy hosts like me who are always juggling deadline and dinner plans.
This version of ice cream cake is truly foolproof. I’ve tested it dozens of times in my own kitchen, using everything from store-brand ice cream sandwiches to premium ones, and the result is always delicious. The key is letting the cake freeze for at least two hours—or overnight if you have the patience. One common mistake is rushing the freezing time; if you slice it too soon, the layers won’t hold together, and you’ll end up with a glorious mess. My Moroccan grandmother always said, “Patience is the secret ingredient,” and she wasn’t wrong. I’ll show you exactly how to line the pan, how to layer for even distribution, and how to get those perfect clean slices every time. This is no-bake cooking at its finest—from my kitchen to yours, I promise this will become your go-to summer dessert.
Why This Ice Cream Sandwich Cake Recipe Is the Best
The Flavor Secret: This Ice Cream Sandwich Cake recipe uses a combination of classic American ingredients—Cool Whip, chocolate syrup, and caramel sauce—that create a nostalgic flavor profile everyone loves. But I’ve added a touch of French know-how: I let the Cool Whip sit at room temperature for just a few minutes before spreading, so it layers more evenly without deflating. Plus, the salted caramel balances the sweetness perfectly, a trick I learned at Le Cordon Bleu in Paris. No other ice cream cake recipe nails this balance of creamy, crunchy, and saucy quite like this one.
Perfected Texture: The texture of this ice cream sandwich cake is what sets it apart. The sandwiches freeze back into a firm, sliceable cake, yet the Cool Whip keeps everything light and fluffy. My chef’s tip: don’t let the ice cream sandwiches thaw completely before assembling. If they’re too soft, they’ll turn into mush; if they’re too hard, they won’t stick together. I’ll show you exactly how to handle them for the perfect bite every time.
Foolproof & Fast: This recipe requires zero baking skills—just patience for freezing. It’s ideal for beginner cooks, kids helping in the kitchen, or anyone who wants a stunning dessert without stress. I’ve made it for last-minute dinner parties and it’s always a hit. The best part? You can customize it endlessly, so it never gets boring.
Ice Cream Sandwich Cake Ingredients
Shopping for this ice cream sandwich cake is a breeze. I pick up my ingredients at the local Trader Joe’s in Union Square, where the ice cream sandwiches are perfectly sized for this recipe. On a trip to the Paris markets, I learned the importance of using high-quality sauces—so I always splurge on Hershey’s chocolate syrup and a good caramel. For the mini M&M’s, I love the bright colors that remind me of the sweets I’d eat at the Marrakech souk as a child. Here’s exactly what you’ll need.
Ingredients List
24 Ice Cream Sandwiches (store-bought or homemade)
16 oz. Container of Cool Whip (thawed but still cold)
8 oz. Hershey’s Chocolate Syrup
8 oz. Caramel Sauce (I prefer salted caramel)
1 Cup Mini M&M’s (or your favorite sprinkles)
Parchment paper for lining the pan (optional but recommended)
Ingredient Spotlight
Ice Cream Sandwiches: These are the backbone of your cake. Look for ones that are roughly 3×3 inches and about 1 inch thick—standard store-bought brands work beautifully. The chocolate wafers soften during freezing to create a fudgy, cake-like layer. If your sandwiches are larger, just arrange them to fit snugly in the pan. For a premium twist, try vanilla bean or chocolate chip ice cream sandwiches.
Cool Whip: This frozen whipped topping is essential for lightness. Let it thaw in the fridge for a few hours, or briefly at room temperature until it’s spreadable but still cold. Do not substitute with homemade whipped cream—it will deflate and make the cake too dense. If you must swap, use a stabilized whipped cream with gelatin.
Chocolate Syrup and Caramel Sauce: These are your flavor workhorses. Hershey’s syrup has the perfect consistency—not too thin, not too thick—and the caramel adds a buttery richness. For a saltier contrast, use a high-quality salted caramel sauce. You can also make your own caramel by melting sugar with butter and cream, but store-bought saves time.
Mini M&M’s: They add a pop of color and a satisfying crunch. If you’re avoiding candy, try crushed Oreos, toffee bits, or rainbow sprinkles. For a more grown-up version, I sometimes use chopped dark chocolate or toasted almonds.
Pairing Type
Suggestions
Why It Works
Side Dish
Fresh berries, whipped cream
Bright acidity cuts through richness
Sauce / Dip
Hot fudge, caramel sauce, chocolate magic shell
Adds extra decadence and texture
Original Ingredient
Best Substitution
Flavor / Texture Impact
Cool Whip
Stabilized whipped cream (with gelatin)
Lighter but less stable; cake may not hold shape as well
Hershey’s Syrup
Homemade chocolate sauce or Nutella
Nutella adds hazelnut flavor; thinner syrups may be more watery
Large chocolate chip cookies with softened ice cream
Texture becomes chewier, less cake-like
How to Make Ice Cream Sandwich Cake — Step-by-Step
Making this ice cream sandwich cake is incredibly straightforward, but a few chef-tested tricks will give you perfect results every time. Let me walk you through each step so you can create a beautiful, sliceable cake that wows everyone.
Step 1: Prepare the Pan
Line a 9×13 inch cake pan with parchment paper, leaving an overhang on two sides. This makes it easy to lift the cake out later. If you don’t have parchment, you can use plastic wrap, but it’s trickier to get smooth results.
💡 emy’s Pro Tip: Wet the pan slightly before pressing the parchment paper—it will stick to the sides so you can work hands-free. This little trick is a lifesaver when you’re rushing!
Step 2: First Layer of Ice Cream Sandwiches
Unwrap 12 ice cream sandwiches and arrange them snugly in the bottom of the pan. Break one in half if needed to fill gaps. They should be slightly cold but not frozen solid—if they’re too hard, let them sit for 5 minutes at room temperature.
⚠️ Common Mistake to Avoid: Don’t let the sandwiches thaw completely! If they’re too soft, they’ll turn into a soupy mess. They should be firm enough to hold their shape but pliable enough to press into the pan.
Step 3: First Layer of Cool Whip
Spread half of the Cool Whip evenly over the first layer of ice cream sandwiches. Use a spatula to create a smooth, even layer. The Cool Whip should be thawed but still cold—if it’s too runny, it will seep between the sandwiches.
💡 emy’s Pro Tip: If the Cool Whip is too stiff, let it sit on the counter for 10 minutes before using. For an airier texture, whip it briefly with a whisk—but don’t overdo it!
Step 4: First Drizzle Layer
Drizzle half of the chocolate syrup and half of the caramel sauce over the Cool Whip. Use a spoon to create ribbons—don’t drown the cake. The goal is to have pockets of syrup that surprise you in every bite.
💡 emy’s Pro Tip: Warm the caramel sauce slightly in the microwave for 10 seconds—it drizzles more easily and won’t create big clumps.
Step 5: Repeat Layers
Repeat steps 2 through 4: add another layer of 12 ice cream sandwiches, then the remaining Cool Whip, and finally the remaining chocolate and caramel drizzle. Press the second layer of sandwiches gently into the Cool Whip to seal.
⚠️ Common Mistake to Avoid: Don’t press too hard—you’ll squish the syrup out. A gentle, even pressure is all you need to get those layers to stick together.
Step 6: Add Toppings
Sprinkle the mini M&M’s evenly over the top. You can also add extra drizzles of chocolate or caramel for a more decadent finish. The toppings should be generous but not overwhelming.
💡 emy’s Pro Tip: Press the M&M’s lightly into the Cool Whip so they stick. If you add them after freezing, they’ll just roll off! For a different look, try rainbow sprinkles or crushed candy bars.
Step 7: Freeze
Place the pan in the freezer for a minimum of 2 hours, or overnight for the best texture. The cake needs to be completely firm before slicing. If you’re in a hurry, at least 2 hours works, but overnight gives you cleaner slices.
⚠️ Common Mistake to Avoid: Don’t skip the freezing time! Cutting into a semi-frozen cake will result in a melty mess that won’t hold its shape. Patience pays off here—think of it as a frozen lasagna of desserts.
Step 8: Serve
Lift the cake out of the pan using the parchment overhang. Let it sit at room temperature for 3–5 minutes to soften slightly—this makes slicing easier. Use a sharp knife, wiping it clean between cuts for neat pieces.
💡 emy’s Pro Tip: Run your knife under hot water and dry it before each slice—it cuts through the frozen layers like butter without cracking the Cool Whip.
Step
Action
Duration
Key Visual Cue
1
Prepare Pan
2 mins
Parchment paper overhang on two sides
2
First Sandwich Layer
5 mins
Sandwiches touch edges with no gaps
3
First Cool Whip Layer
3 mins
Smooth, even coverage
4
First Drizzle
2 mins
Ribbons of chocolate and caramel
5
Repeat Layers
10 mins
Two distinct layers visible
6
Toppings
2 mins
M&M’s evenly distributed
7
Freeze
Min 2 hrs
Firm to the touch
8
Serve
5 mins rest
Clean, neat slices
Serving & Presentation
This ice cream sandwich cake is a showstopper on any dessert table. When I serve it at my Brooklyn rooftop parties, I love to plate it on a large wooden board and drizzle extra chocolate and caramel on top just before serving. The contrast of colors—white Cool Whip, dark syrup, and bright M&M’s—is gorgeous. For an extra touch, I sometimes add fresh strawberries or mint leaves around the base of the cake for a pop of green.
In my mother’s Moroccan kitchen, desserts were always served with a hot cup of mint tea. While this cake is all-American
This Easy Ice Cream Sandwich Cake is the Simple way to make your Own Homemade Ice Cream Cake using Ice Cream Sandwiches.
Ingredients
Scale
24 Ice Cream Sandwiches
16 oz. Container of Cool Whip
8 oz. Hershey's Chocolate Syrup
8 oz. Caramel Sauce
1 Cup Mini M&M's
Instructions
Line a 9×13 Cake Pan with Parchment Paper
Place 12 Unwrapped Ice Cream Sandwiches in the bottom of the Cake Pan
Spread 1/2 of the Cool Whip over the first layer of Ice Cream Sandwiches
Drizzle with Chocolate Syrup and Caramel
Repeat steps 2-4 again adding another layer of Ice Cream Sandwiches, Cool Whip and Chocolate and Caramel Drizzle.
Sprinkle with Mini M&M's or your favorite sprinkles
Place in the freezer for a minimum of 2 hours to harden
Serve immediately out of the freezer!
Coffee Cake
Table of Contents
Coffee Cake with Cheesecake Filling & Streusel Topping – The Ultimate Comfort Dessert
⚖️
Difficulty
Medium
⏲️
Prep Time
30 mins
🕒
Cook Time
75 mins
⏱️
Total Time
4 hrs 45 mins
🍽️
Servings
12–16
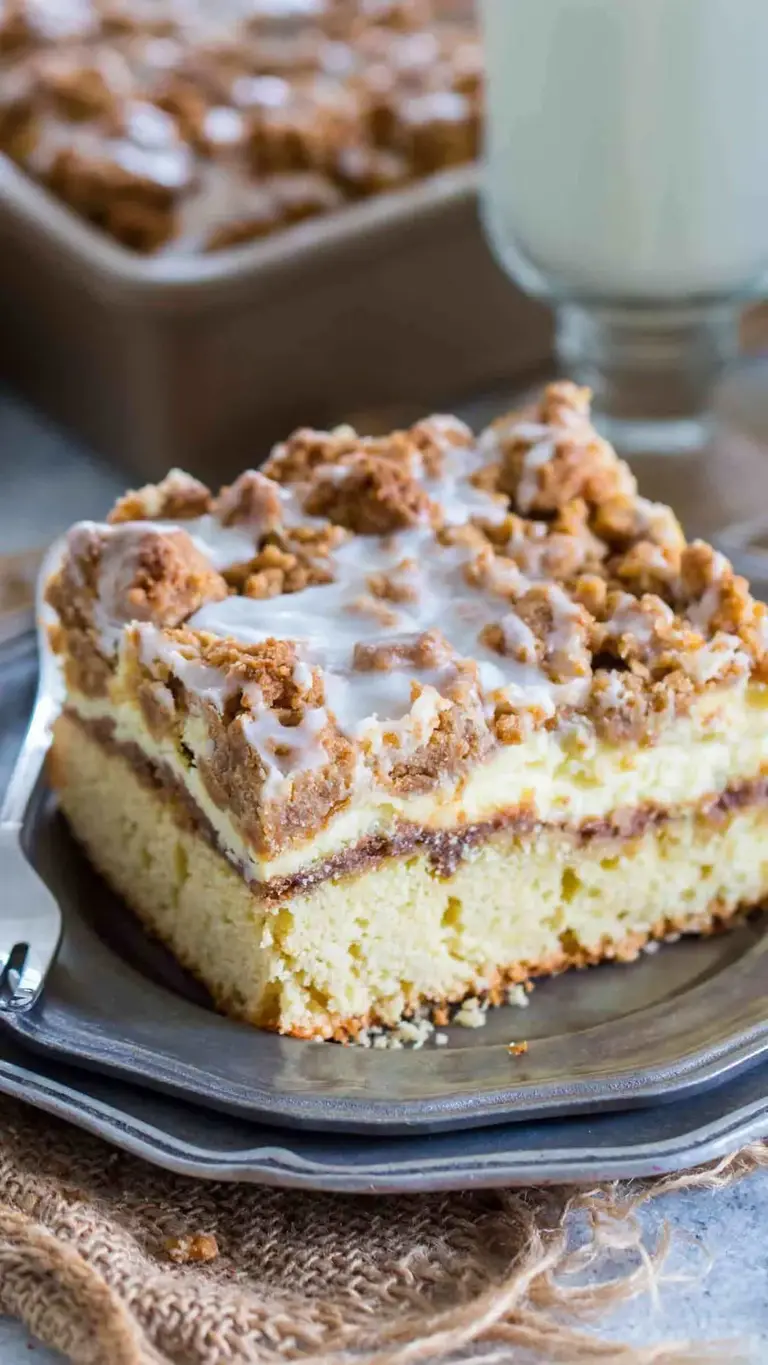
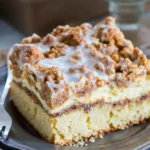
I still remember the first time I made this coffee cake with cheesecake filling in my tiny Parisian apartment. It was a chilly autumn afternoon, and I wanted something that smelled like my mother’s kitchen in Morocco — warm, spiced, and full of comfort. I layered a soft, buttery cake with a rich cinnamon filling, a creamy cheesecake center, and a sweet streusel topping finished with a smooth vanilla glaze. Each bite feels like a hug. That coffee cake recipe is everything I want in a dessert.
Imagine slicing into a tall, golden loaf: the first layer gives you a buttery cake base, then a ribbon of cinnamon-sugar, followed by a luscious, tangy cheesecake layer, and finally a crunchy, buttery streusel crown. The vanilla glaze drips down the sides like a sweet promise. The aroma that fills your kitchen is pure magic — notes of cinnamon, brown sugar, and vanilla dancing together. It’s a dessert that looks spectacular but feels like a warm weekend treat.
What sets my version apart is the triple-layer technique I picked up during my pastry training in Paris. Most coffee cakes are one-note, but this one has layers of flavor and texture that keep you coming back for more. I’ll share my pro tip for keeping the cheesecake layer perfectly creamy and a common mistake that can make your batter overflow. Get ready for a coffee cake that will become your family’s favorite.
Why This Coffee Cake Recipe Is the Best
The flavor secret is in the balance. I use a full cup of brown sugar in the streusel and a tangy cream cheese filling that cuts through the sweetness. Growing up in Morocco, my mother always added a pinch of salt to her sweets, and I do the same here — it makes the cinnamon and vanilla sing. This isn’t just any cake; it’s a layered experience.
The texture is perfected through a technique I learned at Le Cordon Bleu: creaming the butter into the flour first creates a crumb that’s tender yet sturdy enough to hold the cheesecake layer. The buttermilk adds a subtle tang and keeps the cake moist. The streusel, made with melted butter for extra crunch, adds a satisfying contrast to the creamy center.
It’s foolproof because I’ve tested it in my NYC kitchen more times than I can count. Even if you’re a beginner baker, the step-by-step process is straightforward. The key is using a deep 13×9 pan and giving the cheesecake time to set in the fridge. As long as you follow the toothpick test, success is guaranteed.
Coffee Cake Ingredients
I buy my cream cheese from the farmers market in Union Square, and the cinnamon reminds me of the spice souks in Marrakech. Every ingredient here plays a role, and I’ve tested substitutions so you can adapt this cake to what you have on hand.
Ingredients List
2 1/2 cups all-purpose flour
1 cup white granulated sugar
1 teaspoon baking soda
1/2 teaspoon baking powder
1/4 tsp kosher salt
1 cup unsalted butter (softened)
3 eggs (room temperature)
2 teaspoons vanilla extract
1 cup buttermilk
6 tablespoons unsalted butter (softened) — for cinnamon filling
2 tablespoons cinnamon — for cinnamon filling
1 cup all-purpose flour — for cinnamon filling
1 cup packed brown sugar — for cinnamon filling
2 packages (8 oz each) full-fat cream cheese (softened)
1/2 cup white granulated sugar — for cheesecake filling
2 eggs — for cheesecake filling
1 teaspoon vanilla extract — for cheesecake filling
1 cup packed brown sugar — for streusel
1 tablespoon ground cinnamon — for streusel
1/4 tsp kosher salt — for streusel
1/2 cup unsalted butter (melted) — for streusel
2 cups all-purpose flour — for streusel
1 cup powdered sugar — for glaze
2–3 tablespoons milk — for glaze
1 teaspoon vanilla extract — for glaze
Ingredient Spotlight
Cream cheese is the star of the cheesecake layer. Use full-fat for best texture; low-fat will make the filling watery. If you can’t find block cream cheese, use the brick-style, not whipped.
Buttermilk adds moisture and tang. No buttermilk? Mix 1 cup milk with 1 tablespoon lemon juice or white vinegar and let sit for 5 minutes. It works perfectly.
Cinnamon should be fresh. I prefer Ceylon cinnamon for its warm, floral notes. If using cassia cinnamon, reduce the amount slightly — it’s more pungent.
Original Ingredient
Best Substitution
Flavor / Texture Impact
Cream cheese (full-fat)
Neufchâtel (low-fat)
Less rich, slightly drier filling
Buttermilk
Milk + lemon juice
Same tang, slightly thinner
Unsalted butter
Salted butter (reduce added salt by 1/4 tsp)
Slightly saltier; adds complexity
All-purpose flour
Gluten-free 1:1 baking blend
Slightly denser; best with xanthan gum
How to Make Coffee Cake — Step-by-Step
Follow these steps carefully, and you’ll have a showstopper coffee cake that’s worth every minute. Don’t skip the chilling step — it’s essential for clean slices.
Step 1: Prepare the Pan
Grease a deep 13×9-inch baking dish with butter and dust it with flour. This is non-negotiable: you must use a deep pan, otherwise the batter will overflow in the oven. I’ve seen it happen, and it’s a mess.
⚠️ Common Mistake to Avoid: Using a shallow pan. The cheesecake layer expands, and the cake will spill over. Always use a dish that’s at least 2 inches deep.
Step 2: Mix the Dry Cake Base
In a large mixing bowl, whisk together 2 1/2 cups flour, 1 cup sugar, 1 teaspoon baking soda, 1/2 teaspoon baking powder, and 1/4 teaspoon kosher salt. Whisk for 30 seconds to aerate and break up clumps.
💡 emy’s Pro Tip: Sifting isn’t necessary here; whisking does the job and prevents you from dirtying another tool.
Step 3: Cream Butter into Flour
Using an electric hand mixer or stand mixer with the paddle attachment, beat 1 cup of softened unsalted butter into the flour mixture until it resembles coarse crumbs. This takes about 2 minutes. The butter should be fully incorporated but not melted.
Step 4: Add Wet Ingredients
Add 3 room-temperature eggs, 2 teaspoons vanilla extract, and 1 cup buttermilk. Beat on medium speed for 2–3 minutes until the batter is smooth and fluffy. Scrape down the sides as needed.
⚠️ Common Mistake to Avoid: Cold eggs can make the batter seize. Let your eggs sit on the counter for 30 minutes before baking.
Step 5: Layer the Batter and Cinnamon Filling
Pour the batter into the prepared pan and spread it evenly. In a small bowl, combine 6 tablespoons softened butter, 2 tablespoons cinnamon, 1 cup flour, and 1 cup packed brown sugar. Mix with a fork until soft crumbs form. Sprinkle this cinnamon filling evenly over the batter.
Step 6: Make the Cheesecake Layer
In a large mixing bowl, beat 2 packages (16 oz total) softened full-fat cream cheese until creamy. Add 1/2 cup sugar and beat until smooth. Then add 2 eggs and 1 teaspoon vanilla extract, beating for 3–5 minutes until light and fluffy. Scoop this over the cinnamon layer and spread evenly with a spatula.
💡 emy’s Pro Tip: Make sure your cream cheese is at room temperature. Cold cream cheese creates lumps that won’t bake evenly.
Step 7: Prepare the Streusel Topping
In a large bowl, mix 1 cup packed brown sugar, 1 tablespoon cinnamon, and 1/4 teaspoon kosher salt. Add 1/2 cup melted unsalted butter and stir with a fork until combined. Then add 2 cups flour and mix with your hands or a fork until clumps form. Sprinkle evenly over the cheesecake layer.
Step 8: Bake and Test
Bake at 350°F for 60–75 minutes. Do the toothpick test: insert a toothpick into the center; it should come out clean with no raw batter. If the streusel is browning too quickly, tent the pan with foil for the last 15 minutes.
⚠️ Common Mistake to Avoid: Testing too early. The cheesecake layer needs a full 60 minutes to set. Rushing this leads to a gooey center.
Step 9: Cool, Chill, and Glaze
Cool the cake completely on a wire rack, then refrigerate for 3–4 hours. This step is crucial for the cheesecake to settle. Once chilled, make the glaze: whisk 1 cup powdered sugar, 2–3 tablespoons milk, and 1 teaspoon vanilla until smooth. Drizzle over the cake with a fork or spoon.
💡 emy’s Pro Tip: For a thicker glaze that remains white, use only 2 tablespoons of milk. For a thinner, more transparent glaze, use 3 tablespoons.
Step
Action
Duration
Key Visual Cue
1
Grease and flour pan
5 mins
Even coating, no bare spots
2
Mix dry ingredients
2 mins
Uniform color, no lumps
3
Cream butter into flour
2 mins
Crumbly texture
4
Add wet ingredients
3 mins
Smooth, fluffy batter
5
Layer batter + cinnamon filling
5 mins
Even crumb layer
6
Cheesecake layer
5 mins
Smooth, no lumps
7
Streusel topping
5 mins
Clumpy, crumbly
8
Bake
60–75 mins
Toothpick comes out clean
9
Cool and chill
3–4 hrs
Firm, set center
Serving & Presentation
This coffee cake is a showpiece. Slice it into squares and serve at room temperature. The contrast between the cold, creamy cheesecake layer and the warm, buttery streusel is heavenly. I love dusting the plates with a little extra cinnamon and adding a dollop of whipped cream on the side.
For a Moroccan-inspired touch, serve it with a side of fresh mint tea. The floral notes of the tea complement the cinnamon beautifully. In NYC, I often pair it with a dark roast coffee from my local roastery — the bitterness balances the sweetness.
Pairing Type
Suggestions
Why It Works
Side Dish
Fresh berries, whipped cream
Bright acidity cuts richness
Sauce / Dip
Vanilla custard, caramel sauce
Adds extra indulgence
Beverage
Dark roast coffee, chai tea, mint tea
Bitter/spicy notes balance sweetness
Garnish
Mint sprig, cinnamon stick, edible flowers
Adds visual elegance
Make-Ahead, Storage & Reheating
This coffee cake is a lifesaver for busy weekends. I often make it on Friday evening, let it chill overnight, and glaze it Saturday morning. It’s perfect for brunch guests or a Sunday treat without the stress.
Method
Container
Duration
Reheating Tip
Refrigerator
Airtight container
Up to 5 days
Enjoy cold or microwave 20 seconds
Freezer
Wrap in plastic + foil
Up to 3 months
Thaw overnight in fridge, then warm 10 mins at 300°F
Make-Ahead
Baked, unglazed in pan
Up to 2 days
Glaze just before serving
For reheating, I recommend the microwave for a quick fix — about 20 seconds for a single slice. If you’re reheating the whole cake, pop it in a 300°F oven for 10 minutes. The streusel will crisp up again beautifully. Never microwave the whole cake; it will steam and become soggy.
Variations & Easy Swaps
Variation
Key Change
Best For
Difficulty Impact
Apple Cinnamon Coffee Cake
Add 2 cups diced apples to the batter
Fall brunches
Easy (adds 5 mins)
Gluten-Free Coffee Cake
Use 1:1 gluten-free flour blend
Dietary restrictions
Easy (same process)
Chocolate Twist
Add 1/2 cup cocoa powder to streusel
Chocolate lovers
Easy (swap ingredient)
Apple Cinnamon Variation
Fold 2 cups of peeled, diced Granny Smith apples into the cake batter before layering. The apples add a tart, juicy pop that pairs beautifully with the cinnamon. This is a fall favorite in my NYC kitchen — perfect for apple season at the farmers market.
Gluten-Free Coffee Cake
Swap the all-purpose flour for a 1:1 gluten-free baking blend that includes xanthan gum. I’ve tested this with King Arthur’s Measure for Measure, and the texture is almost identical. The cheesecake layer remains creamy, and the streusel stays crunchy. It’s a win for anyone avoiding gluten.
Chocolate Twist
Mix 1/2 cup unsweetened cocoa powder into the streusel before adding the butter. This creates a chocolate-cinnamon crunch that’s irresistible. I recommend using Dutch-process cocoa for a richer flavor. This version is always a hit at birthday brunches.
Can I make this coffee cake without the cheesecake layer?
Absolutely. If you prefer a simpler coffee cake, simply omit the cheesecake filling entirely. Your cake will still have the buttery base, cinnamon filling, and streusel topping. Just reduce the baking time by 10–15 minutes since there’s less moisture. The result is a more traditional coffee cake with a lighter crumb, but it’s still delicious.
How do I keep the cheesecake layer from cracking?
Cracking usually happens when the cheesecake is over-baked or cools too quickly. To avoid it, bake at the recommended temperature and do the toothpick test early — start checking at 60 minutes. After baking, cool the cake gradually on a wire rack, then refrigerate for at least 3 hours. The slow cooling stabilizes the cheesecake and prevents cracks.
What can I use instead of buttermilk in this recipe?
If you don’t have buttermilk, make a quick substitute: add 1 tablespoon of fresh lemon juice or white vinegar to a measuring cup, then fill with whole milk to reach 1 cup. Let it sit for 5 minutes until it thickens and curdles slightly. This works perfectly in this coffee cake recipe, giving you the same tang and moisture without any flavor loss.
Why is my coffee cake batter spilling over in the oven?
This is almost always because your pan is too shallow. This coffee
This coffee cake is everything I want in a dessert. The soft, buttery cake is layered with a rich cinnamon filling, a creamy cheesecake center, and a sweet streusel topping finished with a smooth vanilla glaze. I make this over and over again for family because every bite is pure comfort.
Ingredients
Scale
2 1/2 cup all purpose flour
1 cup white granulated sugar
1 teaspoon baking soda
1/2 teaspoon baking powder
1/4 tsp kosher salt
1 cup unsalted butter (softened)
3 eggs (room temperature)
2 teaspoons vanilla extract
1 cup buttermilk
6 tablespoons unsalted butter (softened)
2 tablespoons cinnamon
1 cup all purpose flour
1 cup packed brown sugar
2 packages (8oz each full fat cream cheese, softened)
1/2 cup white granulated sugar
2 eggs
1 teaspoon vanilla extract
1 cup packed brown sugar
1 tablespoon ground cinnamon
1/4 tsp kosher salt
1/2 cup unsalted butter (melted)
2 cups all purpose flour
1 cup powdered sugar
2 – 3 tablespoons milk
1 teaspoon vanilla extract
Instructions
Grease and dust with flour in a 13×9 baking dish and set aside. Make sure you use a deep pan; otherwise, the batter will overflow in the oven. This is very important.
In a large mixing bowl, whisk together all-purpose flour, sugar, baking powder, baking soda, and salt until combined.
Using an electric hand or stand mixer, beat softened butter into the flour mixture until it is combined and crumbly.
Add eggs, vanilla, and buttermilk and beat until thoroughly combined; the mixture should be fluffy.
Pour the batter into the prepared baking dish and spread it evenly.
Mix the softened butter, flour, sugar, and cinnamon in a small bowl using a fork until soft crumbs form.
Sprinkle the cinnamon evenly over the cake batter. Set aside.
In a large mixing bowl, beat cream cheese; once creamy, beat it in sugar.
Once combined, beat in eggs and vanilla extract until light and fluffy, about 3-5 minutes.
Scoop the cheesecake filling over the cinnamon filling and, using a spatula, spread it evenly.
In a large bowl, mix sugar with cinnamon and salt. Add in the melted butter and combine using a fork.
Once the butter is thoroughly combined, add the flour and mix with a fork or using your hands until thoroughly combined.
Sprinkle streusel topping over the cheesecake layer until evenly distributed.
Bake cake in a 350-degree oven for about 60-75 minutes, until fully cooked. Do the toothpick test! No raw cake batter should come up!
Cool completely, and then refrigerate it for 3-4 hours for the cheesecake layer to settle fully before serving.
Add the powdered sugar to a medium bowl. Add two tablespoons of milk and the vanilla extract. Mix until fully combined with no lumps. If the mixture is too thick, add one more tablespoon of milk. I like the glaze on the thicker side yet pourable, so it will look white and shiny, not transparent.
Use a fork or spoon to drizzle the icing over the cake.
Easy Crème Brûlée Recipe: emy’s Torch Tip – Four-Ingredient French Perfection
⚖️
Difficulty
Easy-Medium
⏲️
Prep Time
15 mins
🕒
Cook Time
40 mins
⏱️
Total Time
4 hrs 55 mins
🍽️
Servings
4
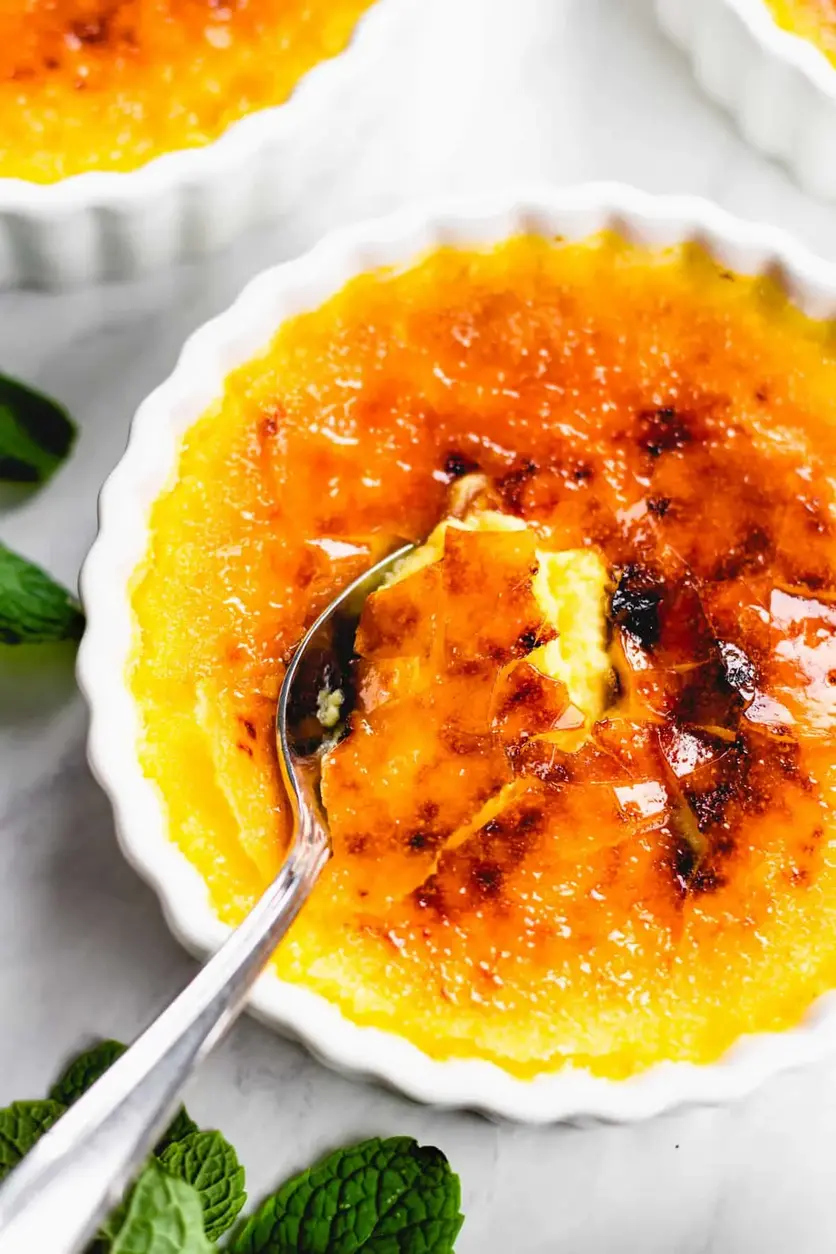
I still remember the first time I cracked the caramelized top of a perfect Crème Brûlée—it was in a tiny pastry shop in Paris, and the sound was like breaking glass on a treasure box. This Easy Crème Brûlée recipe is my love letter to that moment, and my torch tip for a sugar crust that shatters like a dream. With just four ingredients, it turns a classic French dessert into something you can master in your own kitchen, whether you’re in a Manhattan apartment or a home in the heartland.
The custard is silky and rich, with a depth that comes from pure vanilla and the gentle heat of a water bath. When you tap the burnt sugar top with your spoon, it cracks open to reveal a smooth, velvety center that melts on your tongue. That contrast—between the crisp, caramelized shell and the soft, cool custard—is pure magic.
This version comes straight from my years training in Parisian kitchens, where I learned that the secret to a perfect Crème Brûlée isn’t in fancy techniques but in patience and precision. My pro tip for using a kitchen torch ensures you get that even, amber crust without burning the sugar—a common mistake I see all the time.
Why This Crème Brûlée Recipe Is the Best
The Flavor Secret: My Moroccan heritage taught me the power of simple, pure ingredients. Here, the heavy cream and egg yolks create a custard that’s unbelievably rich, while a touch of vanilla extract adds a floral note that lifts the whole dessert. It’s a French classic made with the soul of North African hospitality.
Perfected Texture: I spent years in Paris learning how to temper eggs without scrambling them. The key is adding the warm cream slowly while whisking constantly—a technique that gives you a smooth, lump-free custard every time. The water bath ensures even cooking, so the center stays jiggly and the edges set perfectly.
Foolproof & Fast: This recipe is designed for busy weeknights when you want something impressive without the fuss. With only 15 minutes of prep and four ingredients, it’s simpler than you think. My torch tip makes caramelizing a breeze—no broiler needed, no guesswork.
Crème Brûlée Ingredients
I buy my heavy cream from the Union Square Greenmarket in NYC—it’s grass-fed and tastes like liquid gold. The vanilla extract I bring back from Paris, but any good-quality one works. Just like my mother taught me in her Moroccan kitchen, the best ingredients make the simplest dishes shine.
Ingredients List
6 large egg yolks
1/3 cup (70 grams) granulated sugar
2 cups (480 ml) heavy whipping cream
1 and 1/2 teaspoons pure vanilla extract
2 tablespoons (25 grams) granulated sugar (for the topping)
Ingredient Spotlight
Egg Yolks: They are the heart of the custard, providing richness and structure. Look for bright orange yolks from pasture-raised eggs for the best color and flavor. In a pinch, you can use regular large eggs, but the custard will be paler.
Heavy Whipping Cream: This gives the Crème Brûlée its signature velvety texture. Use cream with at least 36% milk fat. Half-and-half will work but yields a thinner custard—not as luxurious.
Vanilla Extract: Pure vanilla is non-negotiable. It adds a warm, aromatic depth that imitation vanilla can’t match. Use a tablespoon of vanilla bean paste for a more intense flavor and those lovely specks.
Granulated Sugar: Regular white sugar is perfect for both the custard and the topping. For a deeper caramel flavor, try turbinado sugar on top—it’s coarser and gives a more dramatic crunch.
Original Ingredient
Best Substitution
Flavor / Texture Impact
Heavy Whipping Cream
Coconut cream (full fat)
Adds a subtle coconut flavor; texture is slightly less rich
Vanilla Extract
Vanilla bean paste or 1 vanilla bean
More intense vanilla flavor with visible specks; no change in texture
Granulated Sugar (topping)
Turbinado or demerara sugar
Coarser texture, more dramatic crunch; caramelizes well
How to Make Crème Brûlée — Step-by-Step
Don’t be intimidated—this is easier than you think. Just follow these steps, and you’ll have a dessert that rivals any French bistro.
Step 1: Preheat and Prepare
Preheat your oven to 325°F (163°C). Place a large pot of water on the stove to boil—this will be for the water bath, which ensures even gentle cooking.
💡 emy’s Pro Tip: Start boiling the water early so it’s ready when you need it. Cold water in the bath can shock the custard and cause it to cook unevenly.
Step 2: Whisk Egg Yolks and Sugar
In a large mixing bowl, whisk together the 6 egg yolks and 1/3 cup granulated sugar until well blended and it just starts to lighten in color. This should take about 1–2 minutes—stop as soon as it’s pale, not frothy.
⚠️ Common Mistake to Avoid: Over-whisking can incorporate too much air, leading to a bubbly custard. Whisk just until combined and slightly lighter in color.
Step 3: Heat the Cream
Pour the heavy whipping cream into a medium-sized saucepan and heat over medium heat. Stir occasionally until the cream is warm and bubbling around the edges—just before it simmers. Remove from heat and stir in the vanilla extract.
💡 emy’s Pro Tip: Don’t let the cream boil! Overheating can curdle it. Look for small bubbles at the edges and steam rising from the surface.
Step 4: Temper the Eggs
Slowly pour about 1/2 cup of the warm cream into the egg and sugar mixture, whisking constantly. Then, slowly pour in the remaining cream while continuing to whisk until fully combined. If there’s a thin layer of foam on top, skim it off with a spoon.
⚠️ Common Mistake to Avoid: Adding the cream too quickly can scramble the eggs. Go slow and steady—it’s the most important step for a silky custard.
Step 5: Strain and Fill
Strain the mixture through a fine mesh strainer into a clean bowl to catch any cooked egg bits. Then, evenly distribute the custard between four 6-ounce ramekins.
💡 emy’s Pro Tip: Use a ladle to fill the ramekins evenly. I always tap each ramekin gently on the counter to release any air bubbles before baking.
Step 6: Set Up Water Bath
Pour the boiling water into an 8-inch square baking pan (or larger) about 1/3 of the way full. Carefully place the ramekins in the dish—the water should come about halfway up the sides. Add more boiling water if needed.
⚠️ Common Mistake to Avoid: Using a pan that’s too shallow can cause the water to spill over. Use a deep baking dish and handle it with care.
Step 7: Bake and Chill
Bake at 325°F for 35–45 minutes, or until the edges are set and the center is slightly jiggly. Remove from the oven and transfer the ramekins to a wire rack to cool completely. Cover tightly and refrigerate for at least 4 hours or overnight.
💡 emy’s Pro Tip: The custard will continue to cook as it cools, so it’s better to under-bake slightly than over-bake. The center should wobble like jelly when you gently shake the ramekin.
Step 8: Caramelize and Serve
Once chilled, blot the tops with a paper towel to remove moisture. Sprinkle 1 1/2 teaspoons of sugar on each custard, shake it into an even layer, then use a kitchen torch to carefully caramelize the sugar. Allow to harden for 1–2 minutes before serving.
⚠️ Common Mistake to Avoid: Keeping the torch too close can burn the sugar. Hold the flame 2–3 inches away and move it in a circular motion for even melting.
Step
Action
Duration
Key Visual Cue
1
Preheat oven & boil water
10 mins
Oven at 325°F
2
Whisk yolks & sugar
1–2 mins
Pale yellow, slightly thickened
3
Heat cream & vanilla
3–5 mins
Bubbles at edges, steam rising
4
Temper eggs with cream
2–3 mins
Smooth, no scrambled bits
5
Strain & fill ramekins
3 mins
Clear liquid, no lumps
6
Water bath setup
2 mins
Water halfway up ramekins
7
Bake
35–45 mins
Edges set, center jiggly
8
Chill & caramelize
4+ hrs + 1 min
Golden amber top
Serving & Presentation
Serve the Crème Brûlée immediately after caramelizing to enjoy that perfect crack. I like to place each ramekin on a small plate with a demitasse spoon—the contrast of the cold custard and warm, crunchy top is best experienced straight away.
For a touch of NYC flair, I sometimes add a few fresh raspberries or a sprig of mint on the side. The berries’ tartness cuts through the richness beautifully. It’s a simple garnish that elevates the dessert from classic to stunning.
Back in Morocco, we’d serve something similar with orange blossom water and candied almonds—a nod to my roots. For a Parisian twist, pair it with a small glass of Sauternes or a strong espresso.
Pairing Type
Suggestions
Why It Works
Side Dish
Fresh berries, shortbread cookies
Berries add acidity; cookies provide crunch
Sauce / Dip
Raspberry coulis, caramel sauce
Adds fruity sweetness or extra caramel depth
Beverage
Espresso, Sauternes, black tea
Bitter notes balance the rich custard
Garnish
Mint sprig, edible flowers, candied zest
Adds color and a fresh herbal note
Make-Ahead, Storage & Reheating
This Crème Brûlée is perfect for busy NYC evenings—make the custard a day ahead and caramelize just before serving. I often prepare it on a Sunday for a Monday night treat.
Easy Vanilla Crème Brûlée Recipe
Table of Contents
Easy Vanilla Crème Brûlée Recipe – No Torch Needed: A Foolproof Custard with a Perfectly Caramelized Top
⚖️
Difficulty
Easy
⏲️
Prep Time
15 mins
🕒
Cook Time
35 mins
⏱️
Total Time
4 hrs 50 mins
🍽️
Servings
4 servings
I still remember the first time I cracked through a crème brûlée shell in my Parisian culinary school kitchen. The sharp, satisfying sound of caramel shattering under the back of a spoon — it was magic. But here in my NYC apartment, I don’t always have a kitchen torch handy. That’s why I created this easy vanilla crème brûlée recipe: it delivers that same creamy custard and satisfying caramelized top without any special equipment. With just 4 ingredients and a simple broiler technique, this beginner-friendly crème brûlée is proof that French desserts don’t have to be intimidating. The secret lies in a water bath that cradles the custard as it bakes to a silky perfection. Trust me, you’ll never need a torch again.
Imagine a custard so velvety it barely holds its shape — rich with the flavor of real vanilla, yet light on the palate. I can almost smell the warm cream infusing with vanilla extract as it simmers on the stove. The first spoonful yields a contrasting duo: a crisp, caramelized sugar disc that cracks open to reveal a luscious, pale-yellow cream underneath. It’s a dessert that whispers of elegant bistros in Paris and cozy dinners in Manhattan, made right in your own kitchen.
Growing up in Morocco, my mother always taught me that the simplest recipes require the most attention to detail. My easy vanilla crème brûlée recipe honors that lesson. I’m going to show you the key techniques — from tempering the eggs to using a water bath — and a top trick for caramelizing the sugar under your oven’s broiler. A common mistake? Overbaking the custard, which will make it weep liquid. I’ll guide you to that perfect, jiggly center every time. Ready to bring a little Paris into your kitchen? Let’s get started.
Why This Easy Vanilla Crème Brûlée Recipe Is the Best
The Flavor Secret: This recipe draws on the simplicity I learned in Morocco — letting just a few high-quality ingredients shine. We use real vanilla extract for a pure, aromatic vanilla flavor that doesn’t compete with the creamy richness of the custard. In my Paris training, I learned that less is more when it comes to classic desserts. There’s no need for elaborate additions; with the right technique, the flavor is unforgettable.
Perfected Texture: As a professional cook now based in New York City, I’ve tested countless custard recipes. The key to a silky crème brûlée is the water bath, which gently bakes the eggs and cream together without curdling. I insist on a low oven temperature and a ramekin set in hot water to ensure the texture remains smooth and creamy, never rubbery. This technique is non-negotiable for the perfect consistency.
Foolproof & Fast: This easy vanilla crème brûlée recipe is designed for home cooks. With just 4 ingredients and a simple broiler method, it takes less than an hour of active time. Whether you’re a beginner or a seasoned baker, this recipe is approachable and delivers consistent results. It’s the dessert you can whip up without stress and still impress everyone at the table.
Easy Vanilla Crème Brûlée Recipe Ingredients
In my busy NYC life, I love that this recipe uses only a few pantry staples. I often buy my heavy cream at the Union Square Greenmarket, where it’s incredibly fresh. It reminds me of the rich milk from the markets in Marrakech — pure, unadulterated, and full of flavor. Let’s talk about the ingredients you’ll need for this easy vanilla crème brûlée.
Ingredients List
2 cups heavy cream
1 teaspoon vanilla extract
6 egg yolks
1/3 cup granulated sugar
4 tablespoons granulated sugar (for topping)
1 kettle of hot water
Ingredient Spotlight
Heavy Cream: This is the backbone of the custard. It provides richness and fat content necessary for a silky texture. At the grocery store, look for a heavy cream with at least 36% milk fat. I recommend a local brand like Ronnybrook or Organic Valley for the best flavor. If you’re out of heavy cream, you can use a mix of 1 ¾ cups whole milk and ¼ cup melted unsalted butter, but the texture will be slightly less creamy.
Egg Yolks: They give the custard its structure and velvety mouthfeel. I always use large, free-range eggs from a farmers market. It’s important not to over-whisk the yolks with the sugar, which can incorporate too much air and cause bubbles. A gentle hand is key.
Vanilla Extract: Pure vanilla extract is essential. Avoid imitation vanilla, which has a harsh, artificial flavor. I love using Nielsen-Massey or my own homemade vanilla extract for a deeper, more complex aroma. For a twist, you can substitute with a vanilla bean, scraping the seeds into the cream as it heats.
Original Ingredient
Best Substitution
Flavor / Texture Impact
Heavy Cream
1 ¾ cups whole milk + ¼ cup butter
Slightly thinner custard; less rich
Vanilla Extract
Scraped seeds from 1 vanilla bean
More intense, floral vanilla flavor
Egg Yolks
No good substitution — crucial for structure
Texture would be too thin or scrambled
Granulated Sugar
Superfine sugar for faster dissolution
Smoother custard; no gritty residue
How to Make Easy Vanilla Crème Brûlée Recipe — Step-by-Step
Making this easy vanilla crème brûlée recipe is simpler than you think. I’ll walk you through each step with my tested techniques and visual cues. Let’s create that perfect custard together.
Step 1: Preheat and Prepare the Water Bath
Preheat your oven to 325°F. Bring a kettle or pot of water to a boil for the water bath. This ensures even cooking for that creamy texture in your vanilla crème brûlée.
💡 emy’s Pro Tip: Use a deep baking dish that fits your ramekins with at least an inch of space around each. This allows the hot water to circulate evenly, which prevents hot spots and uneven baking.
Step 2: Heat the Cream
In a saucepan over medium heat, combine 2 cups heavy cream and 1 teaspoon vanilla extract. Heat until it just starts to simmer (small bubbles around the edges) — do not boil. Remove from heat and set aside to infuse for 5 minutes.
⚠️ Common Mistake to Avoid: If the cream boils, the milk proteins can scorch, giving your custard a cooked milk flavor. Watch for the first tiny bubbles, then turn off the heat immediately.
Step 3: Whisk the Eggs and Sugar
In a medium bowl, whisk together 6 egg yolks and 1/3 cup granulated sugar until the mixture thickens and turns pale yellow (about 3-5 minutes with a hand whisk or electric mixer on low). This step is key to a smooth custard.
💡 emy’s Pro Tip: The mixture is ready when it falls in a thick ribbon from the whisk. This “ribbon stage” indicates the sugar has dissolved and the yolks have thickened, which helps emulsify the custard later.
Step 4: Temper the Eggs
Gradually pour the warm cream into the egg mixture in a slow stream, whisking constantly to prevent curdling. This tempering technique ensures your easy crème brûlée stays silky. Strain through a fine-mesh sieve if needed to remove any lumps.
⚠️ Common Mistake to Avoid: Adding the cream too quickly can shock the eggs and create scrambled bits. Go slow — a slow, steady stream while whisking is the way to go.
Step 5: Fill Ramekins and Add Water Bath
Divide the custard evenly among 4 shallow ramekins (6-8 oz each). Place them in a large baking dish. Carefully pour the boiling water into the dish until it reaches about ¾ up the sides of the ramekins — creating a water bath for gentle baking.
💡 emy’s Pro Tip: Place the ramekins in the dish before adding the water. Pour water from the kettle into a corner of the dish, not directly over the custards, to avoid splashing.
Step 6: Bake the Custard
Bake at 325°F for 30-35 minutes until the edges are set but the center still jiggles slightly (like Jell-O). Avoid overbaking to keep it creamy. Remove from the oven and water bath, let cool to room temperature, then cover with plastic wrap and refrigerate for at least 4 hours (or overnight for best results).
⚠️ Common Mistake to Avoid: Baking too long will cause the custard to become dense and weep liquid. The jiggle test is your best friend — the center should move like a calm lake, not a stiff disc.
Step 7: Caramelize the Top
Before serving, sprinkle 1 tablespoon granulated sugar evenly over each chilled custard. Use a kitchen torch to melt and caramelize the sugar until golden and bubbly. No torch? Place under your oven’s broiler on high for 1-2 minutes, watching closely to avoid burning. Let sit for 1 minute to harden into a crispy shell.
💡 emy’s Pro Tip: For the broiler method, place ramekins on a baking sheet and position it 4-6 inches from the heating element. Rotate the pan halfway through for even caramelization. You want a deep amber color — any darker and it will taste bitter.
Step 8: Serve Immediately
Serve immediately for that satisfying crack. Top with berries if desired.
⚠️ Common Mistake to Avoid: If you wait too long after caramelizing, the sugar will soften and lose its crack. Serve within 5 minutes of torching or broiling for the best texture experience.
Step
Action
Duration
Key Visual Cue
1
Preheat & prepare water bath
5 mins
Water at a rolling boil
2
Heat cream with vanilla
5 mins
Tiny bubbles around edges
3
Whisk eggs and sugar
3-5 mins
Pale yellow, ribbon stage
4
Temper eggs with warm cream
2 mins
Smooth, no lumps
5
Fill ramekins & add water bath
3 mins
Water reaches ¾ up sides
6
Bake
30-35 mins
Center jiggles like Jell-O
7
Caramelize top
1-2 mins
Golden and bubbly
8
Serve
Immediately
Crack heard when tapping
Serving & Presentation
The beauty of a crème brûlée is its simplicity. I love serving it straight from the ramekin, cracking the caramelized top at the table for a little drama. This easy vanilla crème brûlée is a showstopper on its own, but a few thoughtful accompaniments can elevate it further.
In my NYC kitchen, I often pair it with fresh berries — raspberries or strawberries add a bright acidity that cuts through the rich custard. It reminds me of the fresh fruit my mother would serve after a Moroccan meal. A mint sprig or a dusting of powdered sugar adds a touch of elegance.
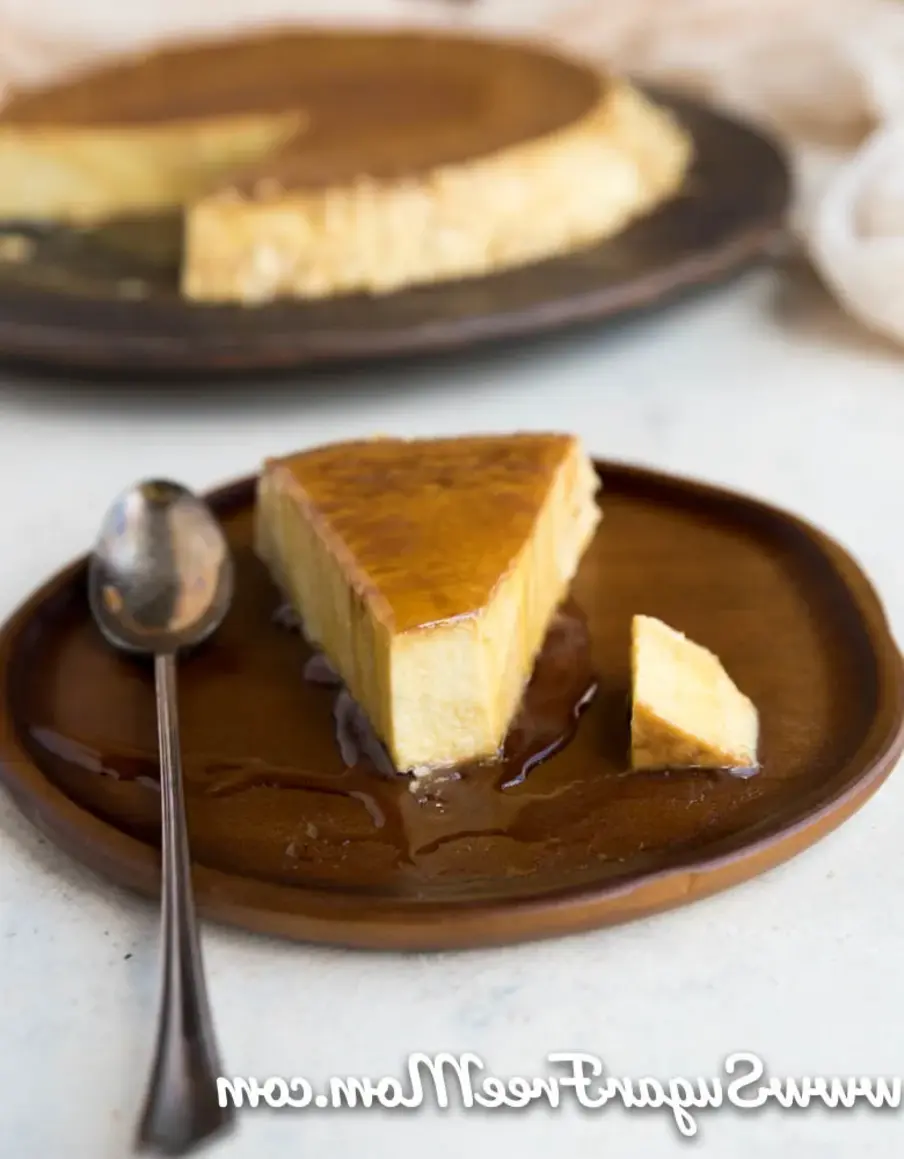
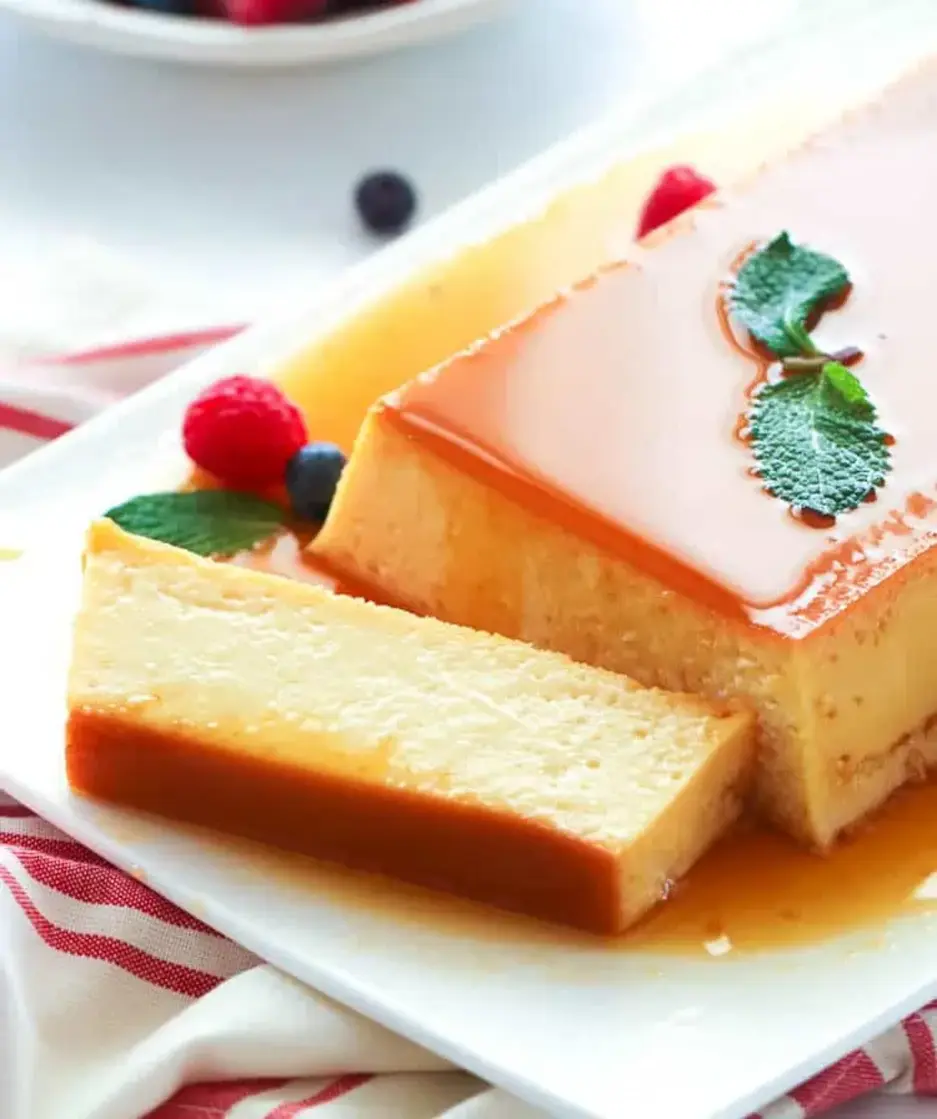
I remember the first time I tasted a perfectly set flan—it was during a summer trip to Madrid with my mother. The golden caramel sauce pooled around the silky custard, and I knew I had to recreate that magic in a healthier way. This Sugar Free Keto Coconut Flan is my tribute to that memory, combining the creamy richness of French crème caramel with the exotic, tropical flavor of coconut. The secret? Using a brown monk fruit allulose sweetener that caramelizes beautifully without any sugar. In this recipe, I show you how to make a luscious, keto-friendly flan that tastes every bit as indulgent as the original, with a silky texture that rivals any classic version.
Imagine slicing through the velvety custard, revealing a pool of amber-colored sauce that glistens like molten gold. The aroma of toasted coconut and vanilla fills your kitchen, while the first spoonful delivers a creamy, melt-in-your-mouth sensation. Unlike many keto desserts that can be gritty or heavy, this flan is incredibly smooth and light. The key is the water bath (bain-marie) technique I learned at Le Cordon Bleu—it ensures gentle, even cooking, preventing curdling and keeping the texture delicate. Each bite is a balance of sweet caramel and rich coconut, with zero sugar crash.
As a New York City–based cook who trained in Paris, I’ve spent years perfecting low-carb desserts that don’t compromise on taste. This flan is my go-to for dinner parties and meal-prep alike. The caramel is made with a simple monk fruit allulose blend that browns to a deep, rich hue without burning. One common mistake? Pouring the custard into a hot caramel, which can cause it to set too fast. I’ll guide you through the slow, patient method that ensures a flawless result every time. Trust me, this recipe will become your new keto staple.
Why This Sugar Free Keto Coconut Flan Recipe Is the Best
The flavor secret lies in the combination of full-fat coconut milk and the unique caramelization of monk fruit allulose. In my Paris training, I learned that the best caramel isn’t just about heat—it’s about the right sugar molecule. Allulose browns and thickens like real sugar, giving this flan a deep, toasty caramel that you’d never guess is sugar-free. I also add a hint of coconut liquid stevia to amplify the tropical notes, creating a dessert that’s complex and satisfying without any artificial aftertaste.
The perfectly smooth texture comes from the classic French bain-marie technique. I place the custard dish inside a roasting pan with hot water that comes halfway up the sides. This gentle heat surrounds the flan, cooking it evenly and preventing the egg proteins from seizing. The result is a silky, almost velvety texture that quivers like a soft pudding. If you’ve struggled with watery or grainy keto custards before, this method is a game-changer.
This recipe is foolproof and fast—even for beginners. With just 15 minutes of prep, you can have the custard in the oven. The hardest part is waiting for it to chill! I’ve tested it with multiple sweeteners and milk alternatives, and the instructions are designed to avoid common pitfalls. Whether you’re a seasoned keto cook or a first-timer, you’ll achieve a stunning, Instagram-worthy flan that everyone at your table will love.
Sugar Free Keto Coconut Flan Ingredients
When I’m shopping for this flan, I head straight to the canned goods aisle at my local NYC market. The quality of coconut milk is everything—I always choose a brand without guar gum or stabilizers, as it gives a cleaner, richer mouthfeel. This recipe also reminds me of my mother’s kitchen in Morocco, where she would use local eggs and fresh coconut milk from the market. I’ve adapted it for American pantries, keeping the ingredients simple and accessible.
Ingredients List
6 large eggs
2 egg yolks (for extra richness)
27 ounces canned coconut milk (or 2 (13.5 ounce each) cans) For best texture, use full-fat, unsweetened coconut milk.
2 tsp vanilla extract
2 tsp coconut liquid stevia (or vanilla stevia)
1/2 cup Monk Fruit Allulose Brown sweetener (or another brown sugar-free sweetener, like Lakanto Golden)
2 tbsp butter (or use ghee or vegan butter for dairy-free)
Ingredient Spotlight
Eggs are the backbone of this flan, providing structure and a silky custard. Use the freshest eggs you can find—free-range or pasture-raised eggs have brighter yolks and a richer flavor. The extra egg yolks add a luxurious creaminess that makes the flan taste decadent. If you have farm eggs from a farmers market, even better.
Coconut milk is the star liquid here, adding body and tropical flavor. Avoid light coconut milk, which will result in a watery flan that won’t set properly. Shake the can well before opening to mix the cream and water. I recommend Thai Kitchen or Chaokoh brands for their consistent thickness. For a different nuttiness, you can use unsweetened almond milk (1:1), but the texture will be slightly less rich.
Monk fruit allulose brown sweetener is my secret weapon for the caramel sauce. It melts and browns exactly like brown sugar, creating a deep, toasty caramel without any bitterness. If you use a different sweetener like erythritol, note that it may recrystallize when chilled. If that happens, simply scrape off the crystals before serving—I show you how.
Butter adds richness to the caramel and helps it thicken. Use unsalted butter to control the salt level. For a dairy-free option, ghee or a high-quality vegan butter stick (like Miyoko’s) works perfectly. Avoid margarine, which can cause the caramel to separate.
Pairing Type
Suggestions
Why It Works
Side Dish
Fresh raspberries, strawberries, or blueberries
Bright acidity balances the richness of the custard
Original Ingredient
Best Substitution
Flavor / Texture Impact
Canned Coconut Milk
Unsweetened almond milk (1:1)
Lighter texture, less coconut flavor; may need more set time
Monk Fruit Allulose Brown Sweetener
Lakanto Golden or erythritol + 1/4 tsp molasses
Erythritol may crystallize when chilled; molasses adds color and flavor but adds minimal carbs
Butter
Ghee or vegan butter stick (Miyoko’s)
Ghee adds a nutty depth; vegan butter works seamlessly for dairy-free
Coconut Liquid Stevia
Vanilla liquid stevia or monk fruit drops
Vanilla stevia enhances the custard’s flavor; monk fruit drops add a different sweetness profile
How to Make Sugar Free Keto Coconut Flan — Step-by-Step
This flan is a little finicky, but I promise you don’t need a pastry degree to nail it. Follow my steps, and you’ll have a stunning dessert that rivals any café. I’ve broken it down into simple actions with my pro tips to keep you on track.
Step 1: Prepare Oven and Dish
Preheat your oven to 325°F. Have a 10-inch pie dish, cake pan, or 10 individual ramekins ready. Place your dish inside a larger roasting pan—this will be your water bath. Starting with a cold oven helps prevent sudden temperature shocks that can crack your flan.
⚠️ Common Mistake to Avoid: Forgetting to set up the water bath before mixing. Do this first to avoid scrambling when the custard is ready.
Step 2: Make the Custard Base
In a stand mixer fitted with the whisk attachment, combine 6 whole eggs, 2 egg yolks, the full can (27 ounces) of coconut milk, 2 teaspoons vanilla extract, and 2 teaspoons coconut liquid stevia. Mix on low to medium speed until everything is well combined—about 1 minute. Do not whip air into the mixture; you want a smooth, homogeneous liquid, not frothy custard. If you over-mix, you’ll incorporate bubbles that create unsightly holes in the finished flan.
💡 emy’s Pro Tip: Strain the custard through a fine-mesh sieve into a clean bowl to remove any unbroken egg whites or bits of cooked egg. This guarantees a flawlessly smooth texture.
Step 3: Make the Caramel Sauce
In a small saucepan over medium-low heat, add 1/2 cup monk fruit allulose brown sweetener and 2 tablespoons butter. Stir constantly until the butter melts and the sweetener dissolves, creating a bubbly, amber-colored sauce—about 2 to 3 minutes. Let it simmer for exactly 1 minute, then remove from heat. Immediately pour the hot caramel into your prepared pie dish or ramekins, swirling gently to coat the bottom evenly. Set aside and let cool just 1 to 2 minutes—no longer, or the caramel will harden and won’t combine with the custard.
⚠️ Common Mistake to Avoid: Simmering the caramel for too long. Allulose can burn quickly, turning bitter. Watch for medium-amber color and tiny bubbles around the edges.
Step 4: Assemble Custard Over Caramel
Slowly pour the custard mixture over the still-warm caramel in the dish. Do not stir—just allow the custard to settle on top. The caramel will be somewhat fluid and may lift slightly, but that’s fine. If you pour too fast, you can displace the caramel. Use a ladle for controlled pouring, and hold it close to the surface.
💡 emy’s Pro Tip: Use the back of a spoon to gently guide the custard over the caramel if any bubbles appear. Tap the dish on the counter once to release trapped air.
Step 5: Bake in Water Bath
Place the pie dish into the larger roasting pan in the oven. Pour 2 cups of hot water (almost boiling) into the bottom of the roasting pan so it comes 1 to 2 inches up the sides of the pie dish. The hot water creates a steam environment that keeps the custard gentle. Bake for 1 hour exactly, or until a knife inserted near the center comes out clean with just a few moist crumbs. The edges should be set but the center may still jiggle slightly.
⚠️ Common Mistake to Avoid: Adding cold water to the bath. Cold water will shock the custard and create an uneven texture. Always use hot water.
Step 6: Cool and Chill
Remove the roasting pan from the oven and lift out the flan dish. Let it cool completely at room temperature on a wire rack—about 1 to 2 hours. Then cover with plastic wrap or a plate and refrigerate for at least 2 hours, but overnight is better. The chilling firms up the custard and allows the caramel to fully saturate the bottom.
💡 emy’s Pro Tip: Patience is key. A fully chilled flan releases more cleanly from the dish. If you skip the cooling step, you risk a messy flip.
Step 7: Unmold and Serve
When ready to serve, run a thin knife around the edges of the dish in a figure-8 motion to loosen. Place a large plate upside down over the dish, then invert quickly. The flan should slide out with a golden caramel sauce pooling around it. If any caramel sticks, gently scrape it onto the plate. If you notice crystallized bits (common with erythritol), simply pick them off with a fork—they’ll be hard and not affect the smooth custard.
⚠️ Common Mistake to Avoid: Not loosening the edges thoroughly. If the flan doesn’t release in one piece, it can break. Use a thin, sharp knife and go around twice.
Step
Action
Duration
Key Visual Cue
1
Preheat oven & set up water bath
5 mins
Oven light shows 325°F; water bath dish ready
2
Mix custard
2 mins
No lumps; smooth and fluid
3
Make caramel sauce
3 mins
Amber color, bubbles around edges
4
Pour custard over caramel
1 min
Custard sits on top; caramel spreads
5
Bake in water bath
60 mins
Knife inserted in center comes out clean
6
Cool & chill
2+ hours
Fully set; no longer jiggly
7
Unmold & serve
2 mins
Flan slides out cleanly with caramel sauce
Serving & Presentation
I love serving this flan on a warm summer evening, with a sprinkle of toasted coconut flakes and a few fresh berries—raspberries or sliced strawberries balance the richness perfectly. The plate should be large enough to let the caramel pool naturally. For an extra touch, add a dollop of lightly whipped cream with a splash of vanilla stevia, or a tiny pinch of sea salt flakes on top of the caramel to enhance the flavors. This dessert feels like a special-occasion treat but comes together with little fuss—it’s perfect for dinner parties, holiday meals, or a decadent weekend indulgence.
In my Paris training, we learned that presentation is half the experience. The flan’s smooth, pale surface contrasts beautifully with the deep amber sauce. I sometimes serve it in individual ramekins for a more elegant look—each guest gets their own inverted flan, with caramel dripping down the sides. At my NYC dinner parties, this flan never lasts long. It pairs wonderfully with unsweetened iced coffee or a glass of crisp sparkling water with lemon.
1/2 cup Monk Fruit Allulose Brown sweetener (or another brown sugar free sweetener of choice)
2 tbsp butter (or use ghee or vegan butter for dairy free)
Instructions
Preheat oven to 325 degrees F.
In a stand mixer, mix the eggs, yolks, coconut milk, vanilla extract, and stevia until well combined. Set aside.
In a small saucepan add the Caramel sauce ingredients and stir until combined over medium low heat, until bubbles form around the edges. Simmer one minute, then pour into a 10 inch pie dish, cake pan or 10 individual ramekins. Swirl around to cover bottom of dish. Let sauce cool just 1-2 minutes before pouring the custard mixture over the caramel sauce.
Place the pie dish into a larger roasting pan and place in the oven. Pour 2 cups of hot water on the bottom of the larger roasting pan so the hot water comes 1-2 inches up the sides of the pie dish.
Bake 1 hour or until a knife inserted near the center comes out clean. Cool to room temperature then refrigerate for two hours or overnight. When ready to serve, loosen edges with a knife and invert onto a large plate. Sometimes erythritol can develop crystallization in the refrigerator. If that happens after you invert the flan onto a plate, simply remove can crystallized pieces from the caramel sauce. Enjoy or keep refrigerated until ready to serve.
Flan Recipe
Table of Contents
Flan Recipe: Creamy Custard with Homemade Caramel – A Silky, Make-Ahead Dessert
⚖️
Difficulty
Medium
⏲️
Prep Time
20 mins
🕒
Cook Time
70 mins
⏱️
Total Time
90 mins
🍽️
Servings
8
I’ll never forget the first time I made a flan recipe in my tiny Parisian apartment. It was a rainy afternoon, and I was reminiscing about the warm, caramel-scented kitchens of my childhood in Morocco. My mother would make a similar custard for special occasions, but it was in culinary school that I learned the French technique—a slow water bath, a gentle hand, and, as my chef instructor said, “letting the caramel speak.” This flan recipe is my love letter to both worlds: the dense, creamy custard of my heritage and the silky, refined finish of French pâtisserie.
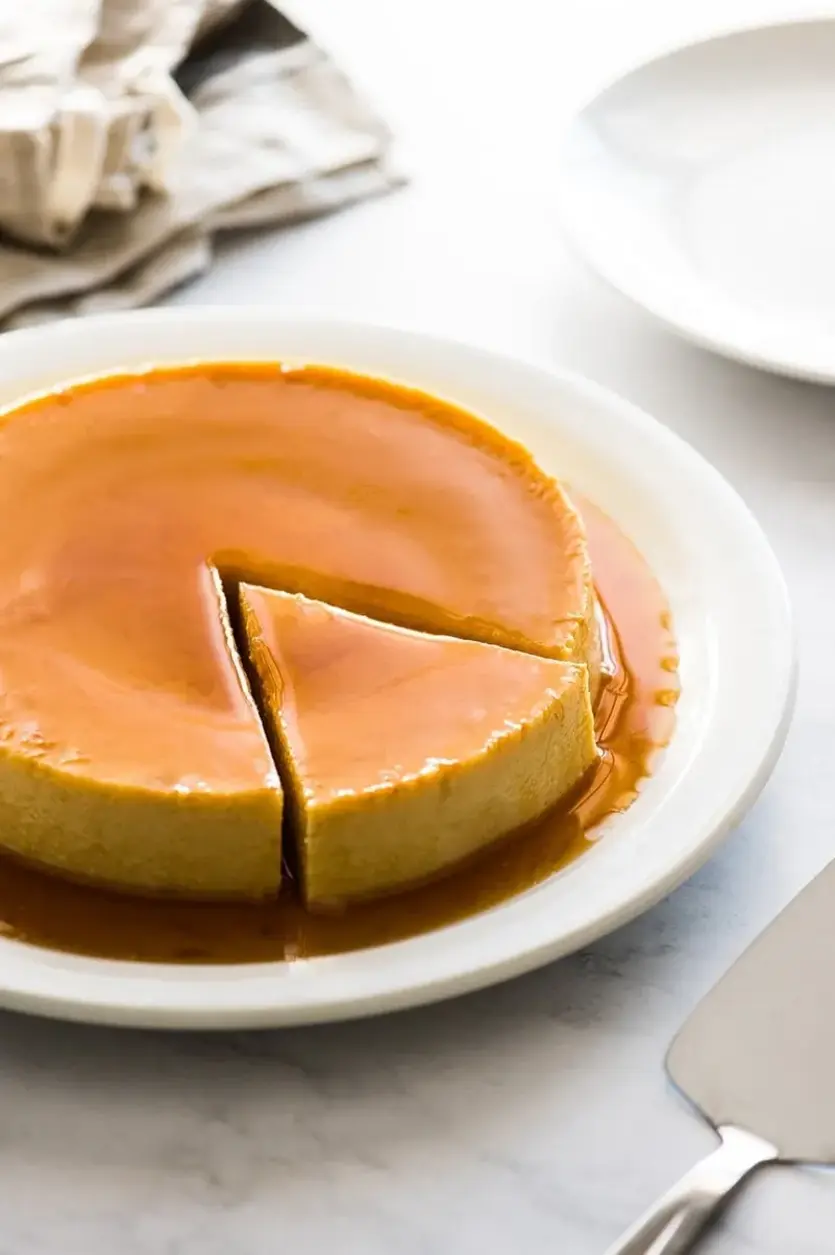
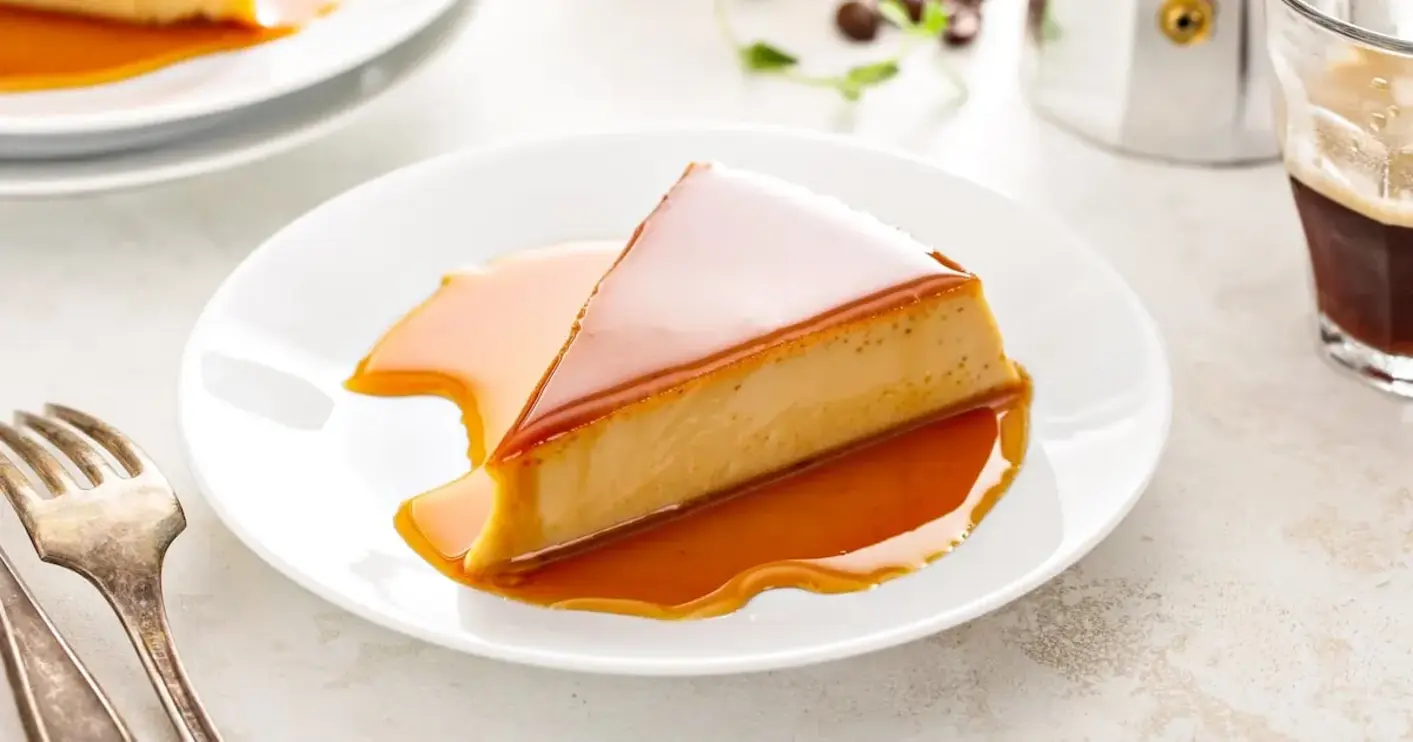
What I love most about this dessert is its beautiful contradiction. It’s rich but never heavy, sweet but balanced by a hint of salt, and firm enough to slice yet so creamy it melts on your tongue. The caramel—made from scratch with just sugar and water—pours out like liquid gold, creating a dramatic pool of sauce that coats each bite. Every spoonful is a journey through textures: the slight resistance of the set custard, the velvety caramel, and the lingering warmth of vanilla and bourbon.
After testing dozens of variations over the years in my NYC kitchen, I’ve found the secret to a truly perfect flan: it’s all in the egg-to-milk ratio and the way you cook the caramel. My version uses a mix of whole eggs and yolks for structure, plus three types of milk for that ultra-creamy crumb. And that splash of bourbon? That’s my personal twist—a nod to the dark rums my Parisian friends used, but with an American bourbon’s smooth vanilla notes. I’ll show you exactly how to avoid the dreaded “rubber” texture and get that jiggle just right.
Why This Flan Recipe Is the Best
The Flavor Secret: In my mother’s Moroccan kitchen, desserts were always about balance—sweet with a whisper of salt, richness cut by a hint of something deeper. I carry that philosophy here. The combination of sweetened condensed milk, evaporated milk, and a touch of whole milk creates a custard that’s far more complex than a simple creme caramel. The bourbon adds a subtle warmth that lingers, while the vanilla rounds everything out. It’s not a child’s flan; it’s a sophisticated, grown-up dessert that still wins over kids.
Perfected Texture: This is where my French training shines. The trick to avoiding a watery or rubbery flan is the temperature—baking at a low 300°F in a water bath creates a gentle, even heat that sets the custard slowly. It’s like the difference between a rushed conversation and one that unfolds naturally. I also insist on straining the custard mixture through a sieve. It removes any bits of egg that could cause a tough, grainy texture, leaving you with a silken, professional-grade result every time.
Foolproof & Fast: Despite its fancy presentation, this flan recipe is forgiving. The caramel can firm up before you pour in the custard? No worries—it will loosen in the oven. The center jiggles a bit when you pull it out? Good—it continues cooking from the residual heat in the water bath. I’ve designed this recipe to work for home cooks who might be nervous about a custard. Follow my steps, and you’ll have a dessert that looks like you spent hours on it, but really only requires a few minutes of active work.
Flan Recipe Ingredients
When I shop for these ingredients at the Union Square Greenmarket, I look for the freshest eggs I can find—they give the custard a richer color and better structure. For the milks, I stick with standard American brands like Carnation for the evaporated and condensed milks; they’re consistent and reliable. The bourbon I use is a small-batch Kentucky bourbon from a local distillery, but any good-quality one (or dark rum) works beautifully.
Ingredients List
¼ cup or 2 fl oz water
¾ cup or 150 g sugar
3 large eggs, plus 4 egg yolks
1 can or 14 oz sweetened condensed milk
1 can or 12 oz evaporated milk
½ cup or 4 fl oz whole milk (half-and-half or 2% milk may be substituted but do not use skim milk)
1 tbsp bourbon (see note)
1 tbsp vanilla extract
½ tsp or 3 g salt
Ingredient Spotlight
Sweetened Condensed Milk: This is the backbone of my flan’s sweetness and creaminess. It’s a concentrated milk-and-sugar syrup that doesn’t need additional stabilization like cornstarch. When buying, make sure you don’t grab evaporated milk by mistake—they live right next to each other in the grocery aisle. Tested substitution: If you’re avoiding canned goods, you can make a homemade version by simmering 1½ cups whole milk with ¾ cup sugar until reduced by half, but it’s not the same texture.
Evaporated Milk: This unsweetened, concentrated milk adds a silky, slightly nutty richness without the added sugar of condensed milk. My trick is to use the full-fat version for the best mouthfeel. Tested substitution: In a pinch, you can replace it with equal parts half-and-half, but the flan will be slightly less rich.
Eggs (Whole + Yolks): This is my chef’s wisdom speaking: whole eggs give structure, while extra yolks add lushness and a stunning golden color. I use pasture-raised eggs from a local farm when I can—the yolks are deep orange and make the custard look like sunshine. Tested substitution: For a leaner flan, you can use 5 whole eggs instead of 3 whole + 4 yolks, but the texture will be slightly more firm and less velvety.
Bourbon: This is my secret weapon. It’s not just about the alcohol—the vanilla and oak notes from a good bourbon deepen the caramel and custard flavors in a way that vanilla extract alone can’t. Tested substitution: Dark rum works beautifully and is more traditional in Latin American flans. You can also use 1 teaspoon of rum extract mixed with 1 tablespoon of milk for an alcohol-free version.
Original Ingredient
Best Substitution
Flavor / Texture Impact
Sweetened Condensed Milk
Home-reduced milk + sugar
Slightly grainy, less creamy
Evaporated Milk
Half-and-half
Less rich but still creamy
Whole Milk
2% milk or half-and-half
Slightly lighter texture
Eggs (3 whole + 4 yolks)
5 whole eggs
More firm, less velvety
Bourbon
Dark rum or rum extract + milk
Subdued boozy note, still delicious
How to Make Flan — Step-by-Step
Here’s the step-by-step guide to making this flan recipe. I’ve broken it down so it’s not overwhelming—just follow each step, and you’ll be rewarded with a stunning, crowd-pleasing dessert.
Step 1: Prepare the Oven
Adjust a rack to the middle position and preheat the oven to 300°F (149°C). This low temperature is key for even custard cooking without curdling.
💡 emy’s Pro Tip: Don’t rush the preheat. A stable oven temperature from the start helps the custard set beautifully.
Step 2: Make the Caramel
In a small heavy saucepan, mix together the sugar and water. Stir continuously over medium heat until the sugar is completely dissolved. Bring to a boil, then reduce to low heat and cook without stirring. Watch the color—it will start to brown around the edges. Swirl the pan occasionally to even it out, and continue cooking until it turns a deep golden brown—like honey.
⚠️ Common Mistake to Avoid: Stirring the caramel after it boils can cause it to seize and turn grainy. Only swirl the pan—no spoon!
Step 3: Pour Caramel into Pan
Remove the pan from the heat and swirl for about 15 to 20 seconds—the caramel will continue to brown from residual heat. Quickly pour it into an ungreased loaf pan, tilting to evenly coat the bottom. Let it stand for about 10 minutes. If the caramel firms up, no worries—it will loosen as it bakes.
💡 emy’s Pro Tip: Use a 9×5-inch loaf pan. An ungreased pan helps the caramel stick and later release cleanly when you unmold.
Step 4: Mix the Custard
In a large bowl, whisk the eggs and yolks until combined. Add the sweetened condensed milk, evaporated milk, whole milk, bourbon, vanilla extract, and salt. Continue whisking until well incorporated. Pour the mixture through a sieve into a large bowl to remove any bits of egg.
⚠️ Common Mistake to Avoid: Skipping the sieve will leave you with small pieces of cooked egg white in your flan. Always strain!
Step 5: Assemble and Bake
Pour the sieged custard mixture into the loaf pan over the caramel. Cover the pan tightly with aluminum foil. Place it in the center of a larger dish—a 9×13-inch baking or roasting pan works well. Pour boiling water into the larger pan to a depth of about 1 inch. Bake at 350°F for about 60-70 minutes, or until the center is just set. The mixture will still jiggle slightly, but it should be mostly firm.
💡 emy’s Pro Tip: I like to leave the flan in the water bath for about an hour after it comes out of the oven. The residual heat gently finishes cooking the center.
Step 6: Cool and Chill
Remove the flan from the water bath and let it cool at room temperature. Once it’s cool enough to handle, wrap it tightly in plastic wrap to prevent it from absorbing fridge odors. Refrigerate for at least 2 hours—or up to 4 days—until the flan is fully firm.
⚠️ Common Mistake to Avoid: Don’t skip the plastic wrap. A bare flan can pick up flavors from other foods in the fridge, like onions or garlic.
Step 7: Unmold and Serve
To unmold, carefully slide a sharp knife around the edges of the pan to loosen the flan. Invert it onto a rimmed platter and let it sit for a minute or two. If it doesn’t come off easily, give it a gentle shake. There may be some caramel sauce left in the pan—scrape it out with a spatula and pour it over the flan. Cut into slices and serve with the extra sauce.
💡 emy’s Pro Tip: Serve the flan slightly chilled but not ice-cold—let it sit at room temperature for 10 minutes before slicing for the most luscious texture.
Step
Action
Duration
Key Visual Cue
1
Preheat oven
15 mins
Oven reaches 300°F
2
Make caramel
8–10 mins
Deep golden honey color
3
Pour caramel into pan
1 min
Caramel coats pan bottom evenly
4
Mix custard
5 mins
Smooth, no lumps after straining
5
Bake in water bath
60–70 mins
Center just set, slight jiggle
6
Cool and chill
2+ hours
Fully firm when shaken
7
Unmold and serve
5 mins
Clean release onto platter
Serving & Presentation
When I serve this flan at a dinner party in my Brooklyn brownstone, I like to make a grand entrance. I unmold it onto a beautiful white platter, letting the caramel cascade down the sides. A few fresh berries—raspberries or blackberries—add a pop of color and a tart contrast that balances the sweetness. I’ll sometimes add a tiny pinch of flaky sea salt like Maldon on top, which is a trick I picked up from a pastry chef in Paris. It elevates the whole experience.
In Morocco, we would serve this with a strong cup of mint tea, but in NYC, I love pairing it with an espresso or a dark roast coffee. For an extra indulgent touch, a dollop of lightly sweetened whipped cream or a scoop of vanilla bean ice cream is wonderful. The key is to keep it simple—let the flan be the star of the show.
Flan Recipe – fancy yet simple to make dessert with a dense yet sturdy creamy sweet custard topped with a made from scratch caramel sauce. Caramelly, sweet, custardy indulgence that melts in your mouth. An incredible make-ahead dessert for all occasions!
Ingredients
Scale
¼ cup or 2 fl oz water
¾ cup or 150 g sugar
3 large eggs, plus 4 egg yolks
1 can or 14 oz sweetened condensed milk
1 can or 12 oz evaporated milk
½ cup or 4 fl oz whole milk (, (half-and-half or 2% milk may be substituted but do not use skim milk))
1 tbsp bourbon ( (see note) )
1 tbsp vanilla extract
½ tsp or 3 g salt
Instructions
Adjust a rack to the middle position and preheat the oven to 300°F (149°C).
Mix together sugar and water in a small heavy saucepan. Stir sugar continuously until sugar is completely dissolved, bring to a boil, reduce to low heat and cook without stirring until the mixture starts to brown up.
Swirl the pan without stirring and continue cooking on low heat until it turns golden brown – it should look like honey.
Remove from the heat and swirl again about 15 to 20 seconds, it will continue to brown.
Quickly pour into an ungreased loaf pan tilting to evenly coat the bottom; let it stand for about 10 minutes (If caramel firms up, no worries. It will loosen up as it bakes.)
Set the loaf pan aside.
Whisk eggs and yolks in a large bowl until combined. Followed by condensed, evaporated and whole milk, rum, vanilla extract, and salt.
Continue whisking until well incorporated. Pour mixture through a sieve into a large bowl to remove any bits of egg.
Next, pour the sieved egg mixture into the loaf pan over the caramel. Cover the loaf pan tightly with aluminum foil.
Place the loaf pan in the center of a larger dish – 9×13-inch baking or roasting pan.
Pour boiling water into larger pan to a depth of about 1 inch. Bake at 350°F for about 60-70 minutes or until center is just set (mixture will still jiggle, but not much, it will continue cooking. Let it sit in a water bath for about an hour, cool enough to handle.
Remove and let it cool at room temperature. Once flan has cooled down, wrap in saran or plastic wrap (this prevents the flan from absorbing any flavors from the fridge).
Place in the refrigerator until flan firms up – about 2 hours or up to 4 days.
Tip: An easy way to unmold flan is to carefully slide a sharp knife around the edges of the pan to loosen up the sides of the pan. Then invert the flan onto a rimmed platter, let it sit for about a minute or two if flan doesnt come off easily. There might be some remainder of sauce stock to the bottom of the pan. Scrape with a spatula and cut flan into slices. Serve with sauce.
Easy Flan Recipe
Table of Contents
Easy Flan Recipe with Only 5 Ingredients – Creamy Caramel Custard Perfected
⚖️
Difficulty
Easy
⏲️
Prep Time
15 mins
🕒
Cook Time
75 mins
⏱️
Total Time
4 hrs 30 mins
🍽️
Servings
8
Growing up in my mother’s kitchen in Morocco, I learned that the most elegant desserts often come from the simplest ingredients. This easy flan recipe is a perfect example — a silky, creamy custard bathed in golden caramel that tastes like it took hours of labor, but comes together with just five pantry staples. I remember the first time I made flan in my tiny Paris apartment during culinary school; my instructor was skeptical of such a humble dessert, but one spoonful of that perfectly set vanilla custard changed her mind. Now, from my NYC kitchen, I’m sharing the very same recipe that has become a staple in my home — because everyone deserves to make a restaurant-quality dessert without the stress.
Imagine slicing into a flan that is so smooth it quivers like a mirror, with a pool of amber caramel that cascades over each serving. The texture is impossibly creamy — rich from the condensed milk, yet light as air from the egg custard. The caramel is deeply toasted, not bitter, offering a sophisticated counterpoint to the sweet, milky custard. It’s the kind of dessert that feels both nostalgic and refined, perfect for a weeknight dinner or a special celebration. Every time I make this, the scent of caramel fills my apartment, and I’m transported back to those cozy evenings in Rabat.
What sets this easy flan recipe apart is the technique I’ve refined over years of cooking. I’ve mastered the perfect water bath that ensures a silky, crack-free surface, and I have a foolproof method for making caramel that won’t seize or burn. In this post, I’ll walk you through every step, share my secret for avoiding that dreaded rubbery texture, and give you a tip for the most luscious custard you’ve ever made. Trust me — if you can whisk eggs and melt sugar, you can make this incredible flan.
Why This Easy Flan Recipe Is the Best
The Flavor Secret: This recipe doesn’t just taste like caramel and vanilla — it tastes like a perfectly balanced dessert. The sweetened condensed milk provides a deep, almost caramel-like richness that complements the egg custard beautifully. My secret is using a high-quality vanilla extract (I bring mine back from a specialty shop near the Union Square Greenmarket) that adds layers of floral, woody notes. The caramel is made from scratch, giving you a pure, toasty flavor that no store-bought topping can match. It’s a simple, honest dessert that lets each ingredient shine.
Perfected Texture: The hallmark of a great flan is its silky, almost velvety texture — not too firm, not too soft. I achieve this by using the exact ratio of whole milk to condensed milk and by baking low and slow in a water bath. The water bath, or bain-marie, insulates the custard from the direct heat of the oven, ensuring it cooks evenly and gently. I also avoid over-whisking the eggs, which can incorporate too much air and cause the flan to become porous. The result? A flan that cuts cleanly, with a texture that melts on your tongue.
Foolproof & Fast: Even if you’ve never made a custard before, this easy flan recipe is designed for success. The ingredients are all common, and the steps are straightforward. I’ve included my best tips for making the caramel without it burning, and for unmolding the flan without a disaster. This is the kind of recipe you can make for a dinner party and feel completely confident. Plus, it’s made ahead of time, so you can relax while your guests are on their way.
Easy Flan Recipe Ingredients
Every time I go to my local bodega in Brooklyn, I can grab everything I need for this flan. It reminds me of the simple, wholesome ingredients my mother would use. The list is short — just five items — but each one plays a crucial role in creating that perfect, creamy custard.
Ingredients List
¾ cup granulated sugar (for the caramel)
4 large eggs (at room temperature)
1 (14-ounce) can sweetened condensed milk
1 ¼ cup whole milk
1 tablespoon vanilla extract
Ingredient Spotlight
Sugar: The caramel is made from plain granulated sugar. It’s important to use white sugar for a clean, unadulterated flavor. In a pinch, you can use raw cane sugar, but the caramel may have a slightly different, more molasses-like taste. For a deeper flavor, I sometimes use a tablespoon of light corn syrup with the sugar when making the caramel — it helps prevent crystallization.
Eggs: Large eggs are the backbone of the custard. They must be at room temperature to blend smoothly with the milks and avoid a shock to the hot caramel. I always buy organic, pasture-raised eggs from the farmers market — the yolks are a brighter orange and give the flan a lovely color. For a lighter custard, you can use 2 whole eggs and 3 egg yolks, but the texture will be slightly richer.
Sweetened Condensed Milk: This is the star that gives flan its signature creamy sweetness. There is no substitute that works perfectly — it’s the key to the texture. If you’re dairy-free, you can try a coconut-based sweetened condensed milk, but the flavor will change. Do not use evaporated milk; it lacks the sugar and viscosity needed for the custard to set properly.
Whole Milk: Whole milk provides the liquid base and fat content that makes the custard smooth. You can substitute 2% milk, but the flan will be slightly less rich. For an extra-decadent version, I sometimes use half-and-half. Avoid skim milk — it creates a watery texture.
Vanilla Extract: Use pure vanilla extract, not imitation. It provides the warm, aromatic flavor that is the heart of the custard. I prefer Mexican vanilla for its creamy, spicy notes, but a good Madagascar bourbon vanilla works beautifully, too.
Pairing Type
Suggestions
Why It Works
Side Dish
Fresh berries, roasted figs, citrus segments
Acid cuts through sweetness
Sauce / Dip
Whipped cream, crème fraîche, caramel sauce
Original Ingredient
Best Substitution
Flavor / Texture Impact
Granulated Sugar (caramel)
Raw cane sugar
Slightly molasses-like flavor; caramel may be darker.
Whole Milk
2% milk or half-and-half
Less rich with 2% milk; creamier with half-and-half.
Sweetened Condensed Milk
Coconut sweetened condensed milk
Coconut flavor, slightly different texture; not a perfect match.
Vanilla Extract
Vanilla bean paste or 1 vanilla bean pod
More pronounced vanilla flavor with visible specks (if using bean).
How to Make Easy Flan — Step-by-Step
Don’t let the caramel-making step intimidate you! With a little patience, you’ll have a gorgeous, golden syrup in no time. Follow these steps, and you’ll be serving a stunning flan that looks like it came from a patisserie.
Step 1: Make the Caramel
Preheat your oven to 350°F. Pour the ¾ cup of granulated sugar into a skillet over medium heat. Stir the sugar continually with a heatproof spatula or wooden spoon. It will begin to brown and clump together — keep stirring! Eventually, the sugar will completely melt and dissolve into a smooth, golden-brown syrup. Remove the syrup from the heat as soon as it has dissolved; it can burn in seconds.
💡 emy’s Pro Tip: Watch the caramel closely as it changes from a light straw color to a deep amber. Once it reaches a rich golden brown (think the color of a penny), remove it immediately. It will continue to darken from residual heat. A burnt caramel will be bitter.
Step 2: Coat the Pan
Working quickly, carefully pour the hot caramel into a 7-inch round pan or a special flan pan (flanera). Tilt the pan so that the entire bottom is evenly coated. Use an oven mitt or potholders to move the pan from side to side if needed. If the caramel hardens too quickly, you can carefully reheat the pan on the stove for a few seconds to soften it again. Set the pan aside to cool and harden.
⚠️ Common Mistake to Avoid: Do not get any water into the hot caramel — it will spatter and can burn you. Also, don’t leave the caramel in a thin layer on the bottom; you want a generous coating to create a good liquid sauce after baking.
Step 3: Make the Custard
In a large mixing bowl, add the 4 eggs, 1 can of sweetened condensed milk, 1 ¼ cups of whole milk, and 1 tablespoon of vanilla extract. Whisk together gently until everything is fully combined. You want to avoid overwhisking — too many air bubbles can make the flan porous. Just whisk until the mixture is smooth and homogenous.
💡 emy’s Pro Tip: For an even smoother custard, you can strain the mixture through a fine-mesh sieve into another bowl before pouring it into the pan. This catches any stray egg membrane or bits of stuff that might have formed, ensuring a perfectly silky texture.
Step 4: Assemble for Baking
Pour the custard mixture into the caramel-coated pan. Cover the top of the pan with the lid (if you have a flanera) or tightly with aluminum foil. Place the pan in a large baking dish. Pour enough hot water into the baking dish so that it reaches about halfway up the sides of the flan pan. Carefully transfer the dish to the oven.
⚠️ Common Mistake to Avoid: Don’t skip the water bath! It is essential for gently cooking the custard and preventing it from curdling or cracking. Make sure the foil or lid is sealed tightly so no water seeps into the flan.
Step 5: Bake and Cool
Bake the flan for 1 hour and 15 minutes. The center should be just set — it will still jiggle slightly when you gently shake the pan. Carefully remove the dish from the oven, then lift the flan pan out of the water bath. Remove the lid or foil and let it cool completely at room temperature.
💡 emy’s Pro Tip: Don’t be alarmed if the flan is still a little jiggly! It will continue to cook with residual heat as it cools. Overbaking will make it tough. Let it cool completely before refrigerating to avoid a rubbery texture.
Step 6: Chill and Unmold
Once cooled, cover the flan with the lid or foil and refrigerate for at least 4 hours, but preferably overnight. Chilling firms up the custard and allows the flavors to meld. To serve, run a knife along the edges of the pan to loosen it. Place a plate or platter on top of the pan, grab both the plate and pan securely, and quickly flip it over. Carefully lift the pan off the flan. The caramel will pool around the flan on the plate.
⚠️ Common Mistake to Avoid: If the flan doesn’t slide out immediately, don’t panic! Place the pan back down and let it sit for a few minutes. You can tap the sides or gently squeeze the pan (if it’s flexible) to help release it. Be patient.
Step
Action
Duration
Key Visual Cue
1
Make Caramel
8–10 mins
Golden-amber syrup
2
Coat Pan
2 mins
Even caramel layer on bottom
3
Make Custard
5 mins
Smooth, pale yellow liquid
4
Assemble & Bake
1 hr 15 mins
Center jiggles, edges set
5
Cool & Chill
4+ hrs
Firm, chilled custard
6
Unmold & Serve
5 mins
Flan releases cleanly onto plate
Serving & Presentation
This easy flan recipe is a showstopper on its own, but a few simple touches elevate it from simple to spectacular. Slice the flan into neat wedges and serve each piece with a generous drizzle of the caramel sauce from the bottom of the plate. I like to add a dusting of flaky sea salt (like Maldon) over the caramel — it cuts the sweetness beautifully and adds a lovely crunch. For a touch of freshness, garnish with a few fresh berries, like raspberries or blueberries, and a sprig of mint.
In my NYC kitchen, I love pairing this flan with a strong cup of espresso or a rich, dark coffee. It’s also wonderful with a dollop of lightly sweetened whipped cream. For a more decadent dessert, you can serve it with a side of fresh fruit compote or a drizzle of chocolate sauce. In Morocco, we sometimes add a few drops of orange blossom water to the custard for a floral twist — it’s a lovely variation that feels very special.
Pairing Type
Suggestions
Why It Works
Side Dish
Fresh berries, mint, flaky sea salt
Adds acidity, freshness, and textural crunch.
Sauce / Dip
Whipped cream, chocolate sauce, berry compote
Enhances richness and adds complementary flavors.
Beverage
Espresso, dark coffee, dessert wine (Pedro Ximenez)
I still remember the first time I tasted coffee flan. It was in a tiny patisserie just off the Place de la Bastille in Paris, during my culinary school days. I had just finished a grueling eight-hour pastry block, and my chef de cuisine, a gruff but brilliant Lyonnaise, pushed a small ramekin toward me. “Go on,” he said. “Taste what technique tastes like.” That single bite was a revelation: the bitter, deep coffee cutting through the sweet, silky custard, all wrapped in a glossy, amber caramel. It was love at first spoonful. Years later, in my New York City kitchen, I still chase that perfect balance — and today, I’m sharing my version of this Coffee Flan Recipe with you. This isn’t just any flan; it’s a coffee flan made with a rich coffee-caramel sauce that infuses every single layer with bold espresso flavor.
When you slice into this coffee flan, the first thing you’ll notice is the texture: impossibly smooth, creamy, and luxurious. The custard itself is a delicate dance of sweetened condensed milk and evaporated milk, enriched with whole eggs and extra yolks for a velvety richness that melts on your tongue. The coffee caramel sauce, made with instant espresso and a touch of water, offers a nuanced, slightly bitter sweetness that cuts through the milky flan perfectly. Each bite is a journey: you get the brittle caramel, the tender custard, and the lingering finish of the coffee. I love serving this after a heavy meal — it’s elegant enough for a dinner party yet simple enough for a weeknight treat. I often bring it to Sunday dinners at my friend’s apartment in Brooklyn, where it disappears faster than any other dessert on the table.
What makes my Coffee Flan Recipe truly stand out is the double dose of coffee — one in the caramel and one in the custard itself. Most recipes only add coffee to one element, but I learned in Paris that layering flavors is the secret to a memorable dessert. The caramel uses instant espresso for a deep, smoky note while the flan base uses a bit more for a clean, bright coffee flavor. 💡 emy’s Pro Tip: Start checking your flan at the 50-minute mark — ovens vary, and a slightly jiggly center is exactly what you want. The most common mistake is overbaking, which makes the custard rubbery. Trust the jiggle! And if you’re nervous about unmolding, don’t worry — I’ll walk you through every step, from making the caramel to that triumphant flip onto the plate.
Why This Coffee Flan Recipe Is the Best
The Flavor Secret: The unique angle here is using two separate infusions of coffee. The caramel gets a concentrated, almost burnt-sugar depth from one teaspoon of instant espresso, while the custard itself is flavored with another two teaspoons for a bright, forward coffee note. This layered approach ensures that you taste coffee in every single bite, not just at the top. It’s a technique I borrowed from a pastry chef in Paris who insisted that “coffee is not a one-note instrument.” She was right.
Perfected Texture: Flan is all about the custard-to-carajoy ratio, and my recipe nails it. Using a combination of whole eggs and extra yolks gives the flan structure without being heavy, while the water bath (bain-marie) ensures gentle, even heat. The result is a texture that is silky, almost like crème caramel, but with the added body from the evaporated milk that I first fell in love with in a Moroccan café — where they served a version topped with a dusting of cinnamon.
Foolproof and Fast: I’ve tested this Coffee Flan Recipe over a dozen times in my tiny NYC kitchen to make sure it is foolproof for home cooks. The caramel is forgiving as long as you watch the color (think “amber, not mahogany”), and the custard comes together with just a whisk — no stand mixer needed. Whether you’re a seasoned baker or a complete beginner, this recipe will build your confidence and impress everyone at the table.
Coffee Flan Ingredients
When I make this Coffee Flan Recipe, I always source my ingredients from the markets near my apartment in the East Village. I love stopping by the Italian specialty shop on 9th Street for the sweetened condensed milk — they import a brand from Parma that is incredibly creamy. But honestly, the basic brands at any US grocery store work perfectly. The key is using full-fat milks; low-fat will compromise the silky texture. The coffee, of course, is non-negotiable — but let’s talk about the specifics.
Ingredients List
1 teaspoon instant espresso (or instant coffee) — for the caramel
1/4 cup water — for the caramel
1/2 cup granulated sugar — for the caramel
2 teaspoons instant espresso (or instant coffee) — for the flan base
1 teaspoon warm water — to dissolve the coffee for the flan base
2 large eggs — for structure
2 large egg yolks — for richness
2 tablespoons granulated sugar — for the flan base
1 can (14 oz) sweetened condensed milk — for sweetness and creaminess
1 can (12 oz) evaporated milk — for a thin, pourable custard
2 teaspoons vanilla extract — for warmth and depth
Ingredient Spotlight
Instant Espresso vs. Instant Coffee: This is the star. Instant espresso, like Medaglia d’Oro or Café Bustelo, has a richer, more intense flavor with less bitterness. If you only have standard instant coffee, use 1.5 teaspoons where I call for 1 teaspoon — the flavor will be milder but still delicious. I always keep a jar of instant espresso in my pantry; it’s a secret weapon for countless desserts.
Sweetened Condensed Milk: This is what gives the flan its signature sweetness and creamy body. Do not substitute with regular milk and sugar — it will not set the same way. Look for the 14-ounce can, often found with baking ingredients. If you’re dairy-free, you can use a tin of sweetened condensed coconut milk (such as Nature’s Charm) but note that the coconut flavor will be present. It’s actually lovely with the coffee.
Evaporated Milk: Unlike condensed milk, evaporated milk is unsweetened and has a slightly cooked, nutty flavor that deepens the custard. It is crucial for the texture. Again, avoid low-fat versions if you can; the full-fat version gives the flan its classic lusciousness.
Eggs: Use large, grade A eggs. The yolks add the necessary fat and emulsifiers to create a smooth custard. If your eggs are extra large, reduce the whole eggs to 1 + 2 yolks. If you’re using medium eggs, add an extra whole egg.
Original Ingredient
Best Substitution
Flavor / Texture Impact
Instant Espresso (caramel)
Instant Coffee (1.5 tsp)
Milder, slightly less complex coffee flavor in caramel
Sweetened Condensed Milk
Sweetened Condensed Coconut Milk
Subtle coconut note; slightly different sweetness profile
Evaporated Milk
Half-and-half (12 oz)
Richer, but thinner custard; slightly less set
Granulated Sugar (caramel)
Coconut Sugar (use same amount)
Caramel will be darker; slightly less sweet, more complex flavor
How to Make Coffee Flan — Step-by-Step
I know flan can feel intimidating, but I promise you it’s more about careful steps than advanced skills. Take your time, and you’ll be rewarded with a spectacular dessert. Here is every detail you need.
Step 1: Prepare the Pan
Preheat your oven to 350°F (175°C). Set a 7-inch round cake pan (or a pie pan) with sides at least 2 inches high inside a larger baking dish or roasting pan, such as a 13×9-inch dish. You will use this to create a water bath later.
⚠️ Common Mistake to Avoid: Using a pan that is too large. A 9-inch pan will make the flan too thin and will cook too quickly, leading to a rubbery texture. Stick to 7 inches for the perfect thickness.
Step 2: Make the Coffee Caramel
In a small saucepan, combine 1 teaspoon of instant espresso and 1/4 cup of water. Heat over medium heat until the coffee has dissolved. Add 1/2 cup of granulated sugar and stir gently. Bring to a gentle boil, swirling the pan occasionally but not stirring, until the sugar has completely dissolved. Let it cook for about 5 minutes, swirling the pan every minute, until the mixture turns a deep golden brown — think the color of a new penny. Remove from heat immediately to prevent scorching.
💡 emy’s Pro Tip: Watch the caramel closely! It goes from golden to burnt very quickly. If you see any small bubbles that look darker than the rest, take it off the heat. Err on the side of a lighter amber — you can always cook it longer, but you cannot fix a burnt caramel.
Step 3: Coat the Pan
Immediately and carefully pour the hot coffee caramel into your prepared 7-inch pan. Swirl the pan so the caramel coats the bottom evenly. Set the pan aside to cool. As the caramel cools, it will harden into a brittle sheet — this is perfectly normal and part of the magic.
⚠️ Common Mistake to Avoid: Pouring the caramel into a cold pan. The pan should be at room temperature. A cold pan will cause the caramel to seize and become grainy.
Step 4: Mix the Flan Base
In a medium-sized mixing bowl, combine the remaining 2 teaspoons of instant espresso with 1 teaspoon of warm water. Whisk until the coffee is completely dissolved. Add the whole eggs, one at a time, whisking thoroughly after each addition. Then add the egg yolks and whisk again until the mixture is smooth and uniform.
💡 emy’s Pro Tip: Whisk the eggs gently. You want to incorporate them, not aerate them. Too many air bubbles will create a flan with holes (called “pockmarks”) and a less silky texture. Use a gentle hand.
Step 5: Combine the Liquids
Once the eggs are fully incorporated, add the 2 tablespoons of granulated sugar and whisk until combined. Now slowly pour in the entire can of sweetened condensed milk, followed by the full can of evaporated milk, and the vanilla extract. Whisk everything together gently until just combined. Be careful: as I mentioned, avoid vigorous mixing to prevent too many bubbles.
⚠️ Common Mistake to Avoid: Pouring the milks in too quickly. A steady stream helps the mixture stay homogenous without splashing, which also avoids bubbles.
Step 6: Assemble and Bake
Carefully pour the flan mixture into the pan over the hardened caramel. Cover the 7-inch pan tightly with aluminum foil. Place the pan inside your larger baking dish. Now, create the water bath: carefully pour hot (not boiling) water into the outer roasting pan until it reaches halfway up the sides of your 7-inch flan pan. Place the entire assembly on the middle rack of the oven. Bake for 50–60 minutes, or until the edges are set and the center jiggles slightly when you gently shake the pan.
💡 emy’s Pro Tip: The jiggle test is the most reliable indicator. A fully set center will not jiggle at all, but that means it’s overbaked. A slight jiggle, about the size of a silver dollar in the very middle, is perfect. The flan will continue to cook as it cools.
Step 7: Cool and Chill
Once the flan is done, carefully remove the entire water bath from the oven. Use tongs to lift the 7-inch pan out of the water bath. Place it on a wire rack and remove the aluminum foil. Allow the flan to cool down to room temperature, which usually takes about 1 hour. Once it’s at room temperature, cover the pan with fresh foil or a lid and transfer it to the refrigerator. Chill for at least 4 hours, but overnight is best. The longer it sits, the more the flavors meld and the texture perfects.
⚠️ Common Mistake to Avoid: Skipping the room temperature step. If you put a hot flan directly into the fridge, it can crack from the thermal shock and collect condensation, which will water down the caramel.
Step 8: Unmold and Serve
When you’re ready to serve, remove the flan from the fridge. If it has been chilling overnight, let it sit at room temperature for about 30 minutes. Run a butter knife carefully around the inside edge of the pan to release any stuck bits. Place a serving plate (a plate with a rim is ideal to catch the syrupy caramel) upside down over the pan. In one swift, confident motion, flip the pan over onto the plate. Gently lift the pan — if the flan does not release, gently push down on the bottom of the pan. You should see the caramel pool beautifully around the flan. Slice and serve immediately, spooning extra caramel sauce on top.
💡 emy’s Pro Tip: If your flan sticks, don’t panic. You can dip the bottom of the pan in a bowl of hot water for 30 seconds to loosen the caramel. This almost always does the trick.
Made with espresso, this silky smooth and creamy flan is perfectly flavored with rich notes of coffee and a sweet coffee-caramel sauce!
Ingredients
Scale
1 teaspoon instant espresso (or coffee)
1/4 cup water
1/2 cup granulated sugar
2 teaspoons instant espresso (or coffee)
1 teaspoon warm water
2 large eggs
2 large egg yolks
2 tablespoons granulated sugar
1 can (14 oz sweetened condensed milk)
1 can (12 oz evaporated milk)
2 teaspoons vanilla extract
Instructions
Preheat oven to 350°F. Set a 7-inch cake (or pie) pan with 2-inch high sides inside of a larger baking pan or casserole dish (such as a 13 x 9-inch dish).
In a small sauce pan, add instant coffee and water and heat until dissolved over medium heat. Add granulated sugar. Bring to a gentle boil, swirling pan several times until sugar is completely dissolved. Cook for about 5 minutes until mixture is golden brown. Careful not to scorch caramel.
Carefully pour coffee caramel sauce into 7-inch pan. Set aside and allow to cool and harden.
In a medium sized mixing bowl, add instant coffee and warm water, whisking until coffee has dissolved. Add eggs one at a time whisking thoroughly between each addition. Continue with egg yolks.
Once all eggs and yolks have been incorporated, add granulated sugar and combine. Add sweetened condensed milk, evaporated milk and vanilla extract whisking gently until combined. Careful to not mix too vigorously to prevent too many bubbles.
Carefully pour flan mixture into prepared pan. Cover baking pan tightly with aluminum foil. Make a water bath by pouring water into larger roasting pan outside of cake pan until water reaches half way up outside of cake pan holding flan.
Place on middle rack and bake for 50-60 minutes, or until set around edges with a slight jiggle in middle.
Once flan is done baking, carefully remove from oven. Carefully remove flan from water bath and set aside. Remove aluminum foil or topper from pan and allow flan to come to room temperature.
When flan is at room temp, replace aluminum foil or top and place into refrigerator for at least 4 hours, or overnight.
When ready to serve, remove flan from fridge, run a butter knife along sides of pan to help release any portion of flan that may have become stuck during baking. Place a large enough plate (preferably with sides) over flan pan and quickly flip over. (Note: If flan has sat in fridge overnight, please remove about 30 minutes before ready to serve)
Once flan has been flipped, gently attempt to lift pan up. If you notice flan has not yet released, gently push down on bottom of pan and gently push sides. This should help release flan onto dish.
Slice and serve immediately, spooning extra Coffee Caramel Sauce on top. Enjoy!
Growing up in Morocco, my mother’s kitchen always smelled of warm spices—cinnamon, anise, and a touch of floral rosewater. But when I moved to New York and trained in Paris, I learned the quiet power of a perfect crème caramel. This Pumpkin Flan is my love letter to both worlds: a classic French custard technique infused with the North African warmth of cinnamon and pumpkin. It’s an autumn dessert that feels elegant yet deeply comforting—the kind of dish that turns a simple dinner into a celebration. And trust me, the creamy, caramel-topped result will have you dreaming of pumpkin season all year long.
Picture this: a slice of flan on your plate, its surface a mirror of deep amber caramel. The first spoonful cuts through the silky custard—velvety, smooth, and cool against your tongue. You taste the sweetness of condensed milk, the earthy richness of pumpkin puree, and the gentle warmth of cinnamon that lingers like a cozy autumn blanket. The caramel sauce pools around the flan, adding a bittersweet contrast that keeps every bite exciting. It’s not overly sweet, thanks to the balance of evaporated milk and cream cheese, which adds a subtle tang and an impossibly lush texture.
I’ve refined this recipe over years of testing in my small NYC kitchen, blending my pastry chef training with the home-cooked heart of Moroccan desserts. The secret? A dollop of cream cheese in the batter gives it a richness that traditional flan never had. I’ll walk you through making a foolproof caramel, mastering the water bath, and achieving that perfect jiggle every time. One common mistake people make is overbaking—don’t! A slightly wobbly center sets into a silky dream as it chills. 🧡
Why This Pumpkin Flan Recipe Is the Best
The Flavor Secret: Most pumpkin flans rely solely on pumpkin pie spice, but I dial it up with a full tablespoon of cinnamon (or pumpkin pie spice) and a hint of vanilla. My Moroccan roots taught me that spice isn’t just an afterthought—it’s the backbone of the dish. The cream cheese in the batter adds a subtle tang that cuts through the sweetness and elevates the pumpkin flavor, making it taste more like a sophisticated dessert than a sugary custard.
Perfected Texture: The Paris-trained side of me insists on a water bath. Baking the flan gently in a bain-marie ensures the custard sets slowly, preventing curdling and creating that iconic silky-smooth, almost pudding-like texture. The caramel is cooked to a deep amber, just short of burning, for a complex, barely-bitter note that balances the rich custard perfectly. You’ll get a slice that holds its shape but melts in your mouth.
Foolproof & Fast: For a dessert this elegant, it’s surprisingly beginner-friendly. We blend everything in a blender—no fuss, no lumps. The water bath does all the work, giving you a restaurant-quality flan with minimal active effort. I’ve tested this in my NYC apartment oven a dozen times, and it never fails. Plus, you can make it a day ahead, which makes it a lifesaver for Thanksgiving or a dinner party.
Pumpkin Flan Ingredients
I pick up my pumpkin puree from the farmers market at Union Square in the fall, but a can of Libby’s works just as well. For cream cheese, I always use Philadelphia—it’s reliably creamy. And the cinnamon? I buy it from a little spice shop in Chinatown, where the aroma hits you from the street. These simple ingredients come together to create something truly special.
Ingredients List
1 cup granulated sugar
4 oz cream cheese (room temperature)
1 cup pumpkin puree
5 eggs (room temperature)
1 can (14 oz) sweetened condensed milk
1 can (12 oz) evaporated milk
1 tablespoon vanilla extract
1 tablespoon cinnamon (or pumpkin pie spice)
Ingredient Spotlight
Pumpkin Puree: It’s the star here, providing earthy sweetness and a velvety texture. Look for 100% pure pumpkin puree, not pumpkin pie filling. Libby’s is my go-to, but homemade puree from a sugar pumpkin works beautifully too. Substitution: Butternut squash puree (roasted and blended) gives a similar sweetness with a slightly nuttier flavor.
Cream Cheese: This is my secret weapon. It adds a subtle tanginess and an extra-creamy mouthfeel that sets this flan apart. Use full-fat, room temperature cream cheese for the smoothest batter. Substitution: Mascarpone cheese works but will make the flan even richer and a bit less firm.
Cinnamon (or Pumpkin Pie Spice): I prefer pure cinnamon for a cleaner flavor, but pumpkin pie spice (a blend of cinnamon, nutmeg, ginger, cloves) adds more complexity. It’s your choice! Substitution: A mix of 1 teaspoon cinnamon, ½ teaspoon nutmeg, and ¼ teaspoon ginger for a homemade pumpkin spice blend.
Evaporated Milk: This unsweetened canned milk gives the flan its signature dense, creamy texture without making it too sweet. It’s not the same as condensed milk—don’t confuse them! Substitution: Half-and-half works, but the flan will be slightly less firm and a bit richer.
Step
Action
Duration
Key Visual Cue
1
Prepare the pan and oven
5 mins
Pan inside larger dish
2
Make coffee caramel
5 mins
Deep golden brown color
3
Coat pan & cool caramel
2 mins
Caramel hardens into a sheet
4
Mix flan base
5 mins
Smooth, fully incorporated mixture
5
Combine all liquids
3 mins
Uniform, pourable custard
6
Bake in water bath
Original Ingredient
Best Substitution
Flavor / Texture Impact
Pumpkin Puree
Butternut Squash Puree
Slightly nuttier, less sweet, same texture.
Cream Cheese
Mascarpone Cheese
Richer, less tangy, softer set.
Cinnamon
Pumpkin Pie Spice
More complex, spiced flavor.
Evaporated Milk
Half-and-Half
Richer, less firm, more custard-like.
How to Make Pumpkin Flan — Step-by-Step
Making flan is easier than you think, and this step-by-step guide will lead you to a perfect, silky result every time. Just follow along, and don’t worry—I’ve included my best tips and common pitfalls to watch for.
Step 1: Prepare the Oven and Pan
Preheat your oven to 350°F. Set a 9-inch cake pan (or pie pan) with 2-inch-high sides inside a larger roasting pan or casserole dish (like a 13×9-inch dish). This setup is your water bath later.
⚠️ Common Mistake to Avoid: Don’t skip the water bath! Baking the flan directly in the oven without a bain-marie will cause it to curdle and become rubbery. Always use a larger pan for the water bath.
Step 2: Make the Caramel
In a small saucepan over medium heat, melt the granulated sugar, stirring often with a wooden spoon or rubber spatula. Watch carefully—sugar can go from golden to burnt in seconds. Remove from heat when it turns a deep, amber color.
💡 emy’s Pro Tip: For a foolproof caramel, wet the sugar with a tablespoon of water before heating. This helps it melt evenly without crystallizing. Also, swirl the pan gently instead of stirring too much.
Step 3: Pour the Caramel
Immediately pour the hot caramel into the bottom of the 9-inch cake pan. Work quickly, tilting the pan to coat the bottom evenly. The caramel will harden as it cools—that’s perfect.
Step 4: Blend the Flan Batter
In a blender, combine the cream cheese (room temperature!), pumpkin puree, eggs, sweetened condensed milk, evaporated milk, vanilla, and cinnamon. Blend until completely smooth and well combined—about 20 seconds. Scrape down the sides if needed.
⚠️ Common Mistake to Avoid: Over-blending can incorporate too much air, causing bubbles in the flan. Blend just until smooth—no more than 30 seconds.
Step 5: Pour and Bake
Pour the flan mixture into the cake pan, over the hardened caramel. Then, place the cake pan in the larger roasting pan and carefully pour hot water into the roasting pan until it reaches halfway up the sides of the cake pan. Bake for 50 minutes, or until the edges are set but the center still has a slight jiggle.
💡 emy’s Pro Tip: Use hot water for the water bath—it helps the flan start cooking immediately and prevents a sudden temperature drop that can cause cracks.
Step 6: Cool and Chill
Remove from the oven and let the flan cool in the water bath for about an hour. Once cool, cover the pan with plastic wrap and refrigerate for at least 2 hours, but overnight is truly best. This allows the flavors to meld and the texture to become perfectly silky.
Step 7: Unmold and Serve
To serve, run a thin knife along the edge of the pan to loosen the flan. Place a large rimmed platter on top, then carefully invert the pan. The caramel will cascade over the flan in a beautiful golden pool. Slice into wedges and serve.
⚠️ Common Mistake to Avoid: Don’t try to unmold a warm flan! It must be fully chilled (at least 4 hours) to hold its shape. Patience is key.
Step
Action
Duration
Key Visual Cue
1
Caramel
5–8 min
Deep amber color
2
Blend Batter
30 sec
Smooth, no lumps
3
Bake
50 min
Set edges, jiggly center
4
Cool in Water Bath
1 hour
Cool to touch
5
Refrigerate
2 hrs–overnight
Firm to touch
Serving & Presentation
Unmolding the flan is always the most dramatic moment—the caramel flows over the custard like a golden river. I love serving it on a simple white platter to let the colors shine. For a touch of Parisian elegance, I add a light dusting of cinnamon on top and a few delicate candied pecans. It’s a dessert that looks like it took hours of fussing, but really, the blender did all the work!
In my NYC kitchen, I often pair this flan with a dollop of lightly sweetened whipped cream or a spoonful of crème fraîche to cut the richness. A sprinkle of flaky sea salt over the caramel takes it to another level—the salty-sweet combo is irresistible. For a Moroccan-inspired touch, I sometimes garnish with toasted sesame seeds or a drizzle of honey.
Pairing Type
Suggestions
Why It Works
Side Dish
Roasted apples, poached pears
Adds texture and a fruity note.
Sauce / Dip
Whipped cream, crème fraîche, caramel sauce
Balances sweetness and adds creaminess.
Beverage
Espresso, chai latte, apple cider
Warm drinks complement the cool custard.
Garnish
Flaky sea salt, candied pecans, sesame seeds
Adds crunch and complexity.
Make-Ahead, Storage & Reheating
This Pumpkin Flan is the ultimate make-ahead dessert for a busy New Yorker like me. I prepare it the night before a dinner party or Thanksgiving, and it’s one less thing to worry about on the day. The flavors actually deepen overnight, so you’re doing yourself a favor by planning ahead!
Method
Container
Hi I'm Emy
I’m passionate about sharing a diverse collection of sweet and savory recipes that I’ve meticulously tested and perfected in my own kitchen.