Irresistible Pecan Caramel Cheesecake: The Perfect Easy Dessert Recipe

Pecan Caramel Cheesecake Recipe – Easy Dessert Idea

⚖️
Difficulty
Medium

⏲️
Prep Time
30 mins

🕒
Cook Time
60 mins

⏱️
Total Time
90 mins

🍽️
Servings
10

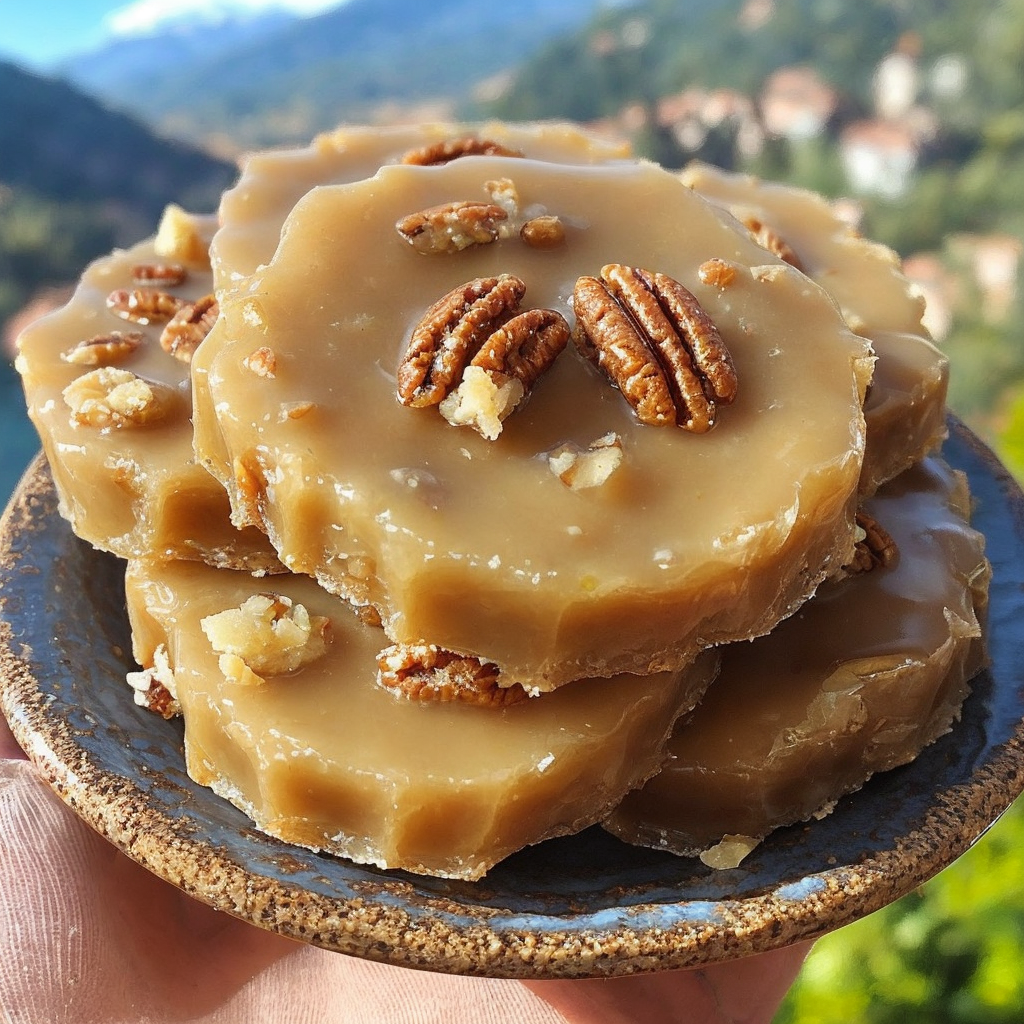
Indulge your senses with this delectable pecan caramel cheesecake recipe. This easy dessert idea is perfect for satisfying your sweet tooth with its creamy texture and rich flavors. Each bite combines the nutty goodness of pecans with a smooth caramel swirl, sitting beautifully atop a buttery crust. Your taste buds will experience a delightful symphony of flavors, making it a show-stopping dessert for any occasion.

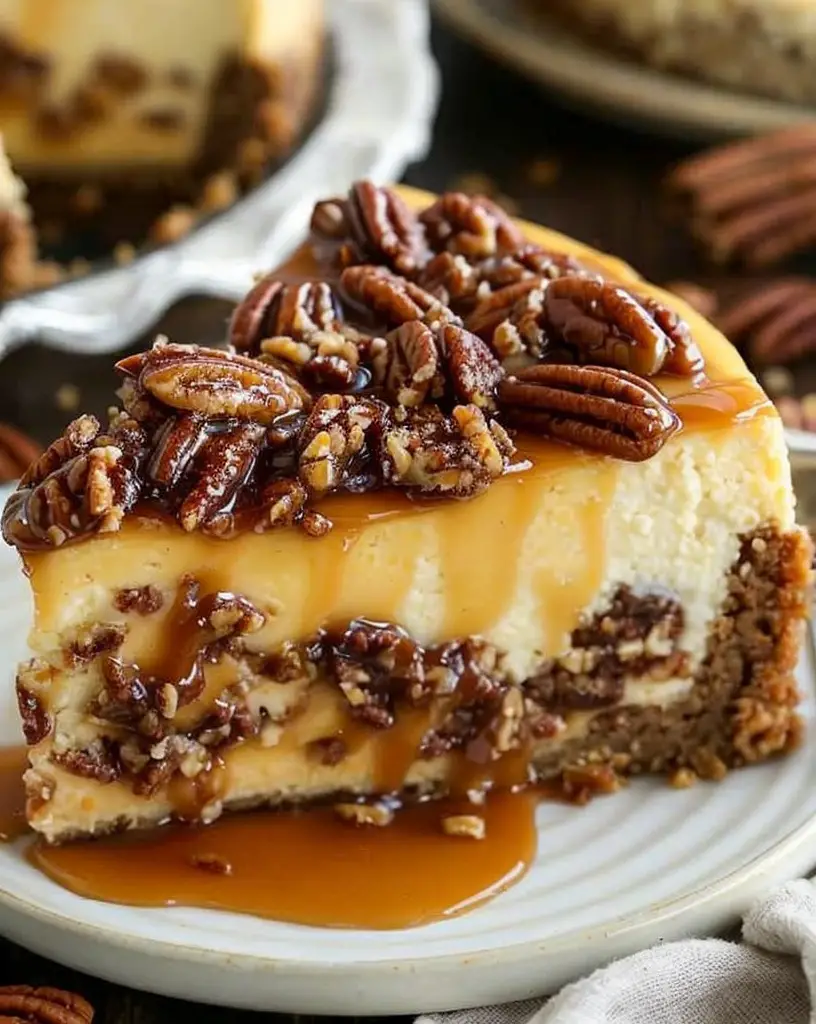
The pecan caramel cheesecake is a true masterpiece that showcases a perfect blend of textures and flavors. Imagine the tangy cream cheese perfectly balancing the sweet caramel, while the toasted pecans add a delightful crunch. Whether you’re serving this as the grand finale to a dinner party or enjoying a cozy evening treat, this cheesecake promises to impress even the most discerning palates. Let this recipe become your go-to dessert for special gatherings or whenever you feel like indulging in something truly extraordinary.

Quick Recipe Highlights

  • Flavor Profile: Immerse in the harmonious blend of nutty pecan, creamy cheese, and luscious caramel sauce.
  • Texture: Experience the creamy and smooth cheesecake complemented by the crunchy pecan topping.
  • Aroma: Delight in the inviting aroma of toasted pecans and rich caramel.
  • Visual Appeal: Feast your eyes on the caramel drizzling over a golden-brown cheesecake laced with pecan pieces.
  • Skill Level Needed: A moderate understanding of baking techniques will yield impeccable results.
  • Special Equipment: Springform pan and a mixer are essential for achieving the perfect consistency.

Recipe Overview

  • Difficulty Level: This recipe is moderately challenging, giving you the satisfaction of creating a gourmet dessert at home.
  • Category: A perfect dessert to conclude any meal, fitting into the treat category.
  • Cuisine: A blend of classic American flavors influences the generous use of nuts and creamy textures.
  • Cost: With affordable and accessible ingredients, this sweet indulgence won’t break the bank.
  • Season: Ideal for fall and winter when comfort food takes center stage and nuts are in season.
  • Occasion: Perfect for holiday gatherings, dinner parties, or a cozy weekend treat.

Why You’ll Love This Recipe


This pecan caramel cheesecake is the epitome of taste and texture, offering a rich, creamy experience balanced by the nutty crunch of pecans. The caramel’s sweetness beautifully complements the tangy cream cheese base, creating an irresistible flavor combination. Whether you’re an accomplished baker or just starting, the step-by-step process demystifies cheesecake making, allowing you to impress with minimal effort.

Convenience and preparation benefits include the cheesecake’s ability to be made ahead, saving you time during busy hosting days. You can prepare this dessert in stages, letting it chill in the refrigerator until you’re ready to serve. Nutritionally, this cheesecake is more than just a sugar-laden treat; the pecans provide healthy fats and proteins, making the indulgence a bit more justifiable.

Moreover, there’s significant social and entertaining value in presenting a homemade dessert masterpiece. This cheesecake has proven to be a conversation starter at gatherings, enhancing the convivial atmosphere with its gourmet appeal. Cost-effectiveness and accessibility round out the reasons to love this recipe—its ingredients are readily available and budget-friendly, ensuring that this decadent dessert doesn’t strain your wallet.

Historical Background and Cultural Significance


Cheesecake has roots tracing back to ancient Greece, where it was considered a food fit for the gods. Over centuries, as it migrated to Europe and eventually North America, it evolved to incorporate local flavors, with Americans introducing the idea of cream cheese-based cheesecake. The pecan caramel version brings a regional twist from the Southern United States, celebrated for its rich, nut-based treats.

Pecans themselves hold a cultural significance in southern cuisine, representing warmth and hospitality. The caramel component complements the buttery, rich nature of the pecan, resulting in a traditional dessert that’s embraced widely during holiday gatherings and family events. This recipe has evolved from a traditional favorite into a modern gourmet dessert, often customized with additional touches like chocolate and varied nut crusts.

Across different regions, variations might include using other nut varieties like walnuts or almonds based on local availability, which subtly alters the taste profile. Such modifications highlight the adaptability of this recipe, reflecting the diverse culinary influences that have shaped the modern pecan caramel cheesecake.

Ingredient Deep Dive


Pecans are the star of this cheesecake, originating from hickory trees native to the southern United States. Their rich, buttery flavor makes them perfect for both sweet and savory dishes, lending a trademark nuttiness that’s hard to replicate. Pecans are an excellent source of healthy unsaturated fats, fiber, and several essential vitamins and minerals.

When selecting pecans, look for those that appear fresh and are kept in airtight containers to preserve their natural oils and prevent staleness. If whole pecans are unavailable, substitutes such as walnuts or almonds could add a unique twist, though they won’t fully replicate the pecans’ distinct flavor. For storage, pecans should be kept in a cool, dry place, ideally refrigerated or frozen, to maintain optimal freshness and flavor.

Cream cheese forms the base of the cheesecake, contributing a silky texture and a slight tang that balances the sweet caramel and nutty pecan. Originally created in America, cream cheese’s smooth consistency helps achieve that classic ultra-creamy cheesecake filling. Nutritionally, it provides calcium and protein, albeit with a fair share of calories and fat, which contribute to the cheesecake’s richness.

When choosing cream cheese, opt for full-fat varieties to ensure the best texture and flavor. Keep it refrigerated and bring to room temperature before blending, ensuring a smooth and lump-free mixture. Substitutions can include mascarpone for a softer texture or quark for a lighter version, although these will alter the final texture and flavor subtly.

Common Mistakes to Avoid

  • Skipping the water bath: It prevents the cheesecake from cracking by providing a gentle and even baking temperature.
  • Using cold ingredients: Ensure all components are at room temperature for a smooth mixture.
  • Overmixing the batter: This can introduce excess air, leading to a puffy and cracked cheesecake.
  • Baking at too high a temperature: Slow and steady wins the race, ensuring a smooth and even bake.
  • Forgetting to chill the cheesecake thoroughly: This step is crucial for the flavors to meld and for easy slicing.
  • Using low-quality pecans: Freshness is key to achieving the best nutty flavor.
  • Overcooking the caramel: This might result in a bitter taste, disrupting the sweet and creamy balance.
  • Insufficient cooling time: Allow ample cooling to avoid a gooey or runny center.

Essential Techniques


Making a pecan caramel cheesecake requires mastering a few key techniques to ensure success. The first is the water bath method, crucial for preventing cracks in the cheesecake. By placing the cheesecake pan in a larger pan filled with hot water, you create a moist baking environment that helps the cake cook evenly. Line the outside of the springform pan with foil to prevent water from seeping in.

Blending the cream cheese smoothly is vital; any lumps can affect the final texture. Use an electric mixer and ensure the cream cheese is at room temperature before starting. Visual cues include a silky batter with no visible chunks. Pay attention to the caramel sauce, which requires steady stirring over controlled heat to caramelize the sugar evenly without burning. A golden-brown hue indicates it’s ready.

Pro Tips for Perfect Pecan Caramel Cheesecake


Achieving a restaurant-quality pecan caramel cheesecake requires a few insider tips. Always toast the pecans before adding them to the cheesecake; it intensifies their flavor and adds a pleasing crunch. For the best crust, ensure you firmly press the graham cracker base into the springform pan to prevent any crumbly disasters.

When creating the caramel, patience is key—avoid stirring excessively once the sugar begins to melt to prevent crystallization. Instead, gently swirl the pan. After your cheesecake has baked and cooled, let it chill for a minimum of four hours or overnight for a firmer texture and easier slicing. Lastly, never skip running a knife around the edge after baking; it ensures a clean release from the pan, maintaining its beautiful shape.

Variations and Adaptations


Regional variations of pecan caramel cheesecake can be as diverse as the ingredients allow. For example, using macadamia nuts can add a Hawaiian twist, while substituting pecans with walnuts can infuse an Italian essence. Seasonal adaptations might include incorporating pumpkin puree for a fall-inspired version, adding a warm, spicy note with cinnamon and nutmeg.

Dietary modifications can make this dessert more inclusive—opt for dairy-free cream cheese and coconut milk caramel for a vegan version without sacrificing the creamy texture and rich flavor. Those following a keto diet might use almond flour for the crust and monk fruit sweetener to reduce carbs, transforming it into a low-carb treat.

Bold flavor variations could introduce elements like dark chocolate swirls or bourbon-infused caramel, providing an adult twist on the classic. Alterations in texture through different crust types or by adding a layer of chocolate ganache can further elevate this dessert experience.

Serving suggestions could focus on both traditional and modern presentations—consider topping each slice with candied pecans and a drizzle of additional caramel for extra flair. Accompaniments like vanilla bean ice cream or a spoonful of fresh whipped cream can enhance the dessert further, while modern plating might include serving individual portions in jars or ramekins for a chic twist.

Wine and Beverage Pairing


Pair your pecan caramel cheesecake with a robust dessert wine, such as a rich Tawny Port or a Sauternes, which complements the sweet caramel and nutty pecans. If wine isn’t your preference, consider pairing with a decaf espresso or a cup of rich, nut-flavored herbal tea, both of which provide a balancing bitterness and enhance the dessert’s sweet elements.

In cooler months, a cozy cup of spiced chai can also pair wonderfully, while a chilled vanilla almond milk or lightly sweetened cold-brew coffee might suit warm weather. Serving temperature is vital—ensuring drinks are chilled or hot as intended enhances the overall tasting experience.

Storage and Shelf Life


Proper storage of pecan caramel cheesecake allows you to enjoy this treat over several days. Once baked, allow the cheesecake to cool at room temperature before refrigerating in an airtight container, where it can remain fresh for up to five days. Always cover the surface with plastic wrap to prevent drying or absorbing fridge odors.

For extended storage, you may freeze individual slices, wrapped in plastic and placed in airtight bags, for up to two months. To serve, allow the slices to thaw in the refrigerator overnight. Signs of spoilage include discoloration, off odors, or a soggy crust. For reheating, particularly the caramel topping, a brief microwave interval can restore its liquid texture without compromising the cheesecake.

Make Ahead Strategies


To streamline preparation for events, consider prepping the components of your pecan caramel cheesecake in advance. You can make the crust and caramel one day and assemble the cheesecake, allowing for necessary chilling ahead of time. During each step, ensure all components are tightly covered and refrigerated.

The flavors tend to deepen after resting, adding more depth with make-ahead techniques. For assembly, having each element ready beforehand allows for a smooth process without last-minute rushes. When adding any fresh toppings or garnishes like whipped cream or additional pecans, apply these just before serving to maintain their freshness and texture.

Scaling Instructions


Whether you’re hosting a large party or an intimate gathering, scaling this recipe is straightforward. To halve the recipe, reduce each ingredient proportionally, and use a smaller springform pan to ensure constant baking proportions—timing adjustments may be necessary to prevent under or overbaking.

Doubling or tripling is equally possible with a large enough baking pan, though it may require extending the baking time. Ensure your oven has an even heat distribution, as larger cheesecakes can disrupt typical baking cycles. With increased quantities, consider spreading the batter across multiple pans for consistent results.

Nutritional Deep Dive


Understanding the nutritional properties of this pecan caramel cheesecake enhances informed indulgence. The macro breakdown includes significant proportions of fats and sugars, characteristic of decadent desserts. However, pecans introduce fiber and good fats, while cream cheese provides calcium and protein.

On the micronutrient front, expect contributions from nuts in terms of magnesium and potassium, alongside calcium from the dairy input, assisting with bone health. Consideration of portion sizes can aid weight management; smaller slices still offer robust flavor satisfaction without significant overconsumption.

Dietary Adaptations


Adapting your pecan caramel cheesecake for dietary needs is achievable without losing its essence. For gluten-free requirements, swap the graham cracker base for a nut and coconut blend. Ensure all fillings are naturally gluten-free, choosing verified products.

A dairy-free version can be crafted by using coconut-based cream cheese and milk alternatives. Vegan variations align with dairy-free measures, incorporating plant-based sweeteners and nuts. For those on a low-carb or keto diet, focus on using erythritol sweeteners and almond meal crust, reducing overall carbohydrate content.

Continuing to cater to specialized diets, those following a paleo regimen should seek unprocessed pecans and make homemade caramel using dates for sweetness. Always consider individual preferences and adjust ingredient brands or types accordingly.

Troubleshooting Guide


Facilitating troubleshooting for common issues can enhance your cheesecake experience. If the texture feels gritty, examine your cream cheese blending technique, ensuring it’s fully softened and integrated without over-whipping. For flavor balance concerns, adjust sugar levels in both filling and caramel, considering additional ingredients like vanilla for depth.

Temperature-related issues, such as a cracked top, may require verifying your oven’s accuracy with a thermometer. Equipment like a water bath adds insulation, stabilizing the cooking environment. When ingredients need substitutions, experiment first with small batches to confirm acceptable results without compromising the dish.

Timing concerns especially relate to baking, where underbaked cheesecakes feel overly soft. Ensure a jiggle test before cooling; the center should wobble slightly. Implement necessary adjustments in cooking or cooling times based on observations.

Recipe Success Stories


Hearing from those who’ve mastered the pecan caramel cheesecake boosts confidence and sparks creativity. Community feedback highlights adaptations such as integrating seasonal fruits or varying nut types. Reader suggestions validate experimenting with flavor nuances, inspiring bakers to tweak components like caramel bases.

In sharing photography tips, enthusiasts recommend natural lighting to fully capture the dessert’s color depth, garnished plates, and topping intricacies. Variation successes encourage follow-through on dietary changes or ingredient substitutions, fostering a supportive baking community.

Frequently Asked Questions

Can I use a pre-made crust?
Yes, a pre-made crust can save time; just ensure it’s high quality and fits the pan size.

What’s the best way to toast pecans?
Spread them onto a baking sheet and toast in the oven at 350°F for about 5-7 minutes, shaking occasionally.

Can I substitute pecans with another nut?
Walnuts or almonds can substitute pecans, although they impart a slightly different flavor.

How do I prevent cheesecake cracks?
Employing a water bath and avoiding overmixing helps prevent common cracking causes.

What kind of caramel should I use?
Opt for a homemade caramel sauce for the best control over sweetness and texture.

How long should I let it cool before serving?
After cooling at room temperature, refrigerate for at least four hours or overnight.

Can I add chocolate to this recipe?
Yes, swirling in melted chocolate before baking or adding a ganache layer enhances flavor depth.

What’s the best way to slice cheesecake?
Use a sharp knife, dipping in hot water between cuts for clean, precise slices.

How can I make this ahead for a party?
Assemble and bake the day before, then garnish just before serving for freshness.

Can I freeze leftovers?
Absolutely, wrap tightly in plastic to prevent frostbite, enjoying thawed portions as desired.

Is there a low-sugar version?
Substitute part of the sugar with erythritol or another sugar alternative, adjusting gradually.

What’s a good non-alcoholic pairing?
Herbal teas like chamomile or nutty rooibos add a fragrant complement to the cheesecake’s flavors.

Additional Resources


Explore related recipes that enhance your pastry repertoire, like triple chocolate cheesecake or lemon blueberry versions. Delve into technique guides to polish caramel-making or perfect water-bath methods. Ingredient insights assist with selecting the best nuts or high-quality cream cheese products.

Equipment recommendations target those ready to invest in top-notch tools like a quality springform pan or stand mixer, ensuring perfect cheesecakes every time. Further interest in seasonal variations inspires experiments beyond the pecan caramel classic, promoting creativity in the kitchen.

Join the Conversation


Engage with our community by sharing your cooking pictures on social media using #PecanCaramelCheesecake. Connect with fellow bakers for real-time feedback and tips. Review this recipe on our blog, outlining your personal experience or adjustments made.

Incorporate photography tips to present visually stunning creations, from plating to lighting, ensuring your desserts resonate with followers. Encourage variations to explore this culinary classic’s possibilities alongside fellow enthusiasts.

The Recipe

Pecan Caramel Cheesecake

Serves: 10

Prep Time: 30 mins

Cook Time: 60 mins

Total Time: 90 mins

Kitchen Equipment Needed

  • Springform pan
  • Electric mixer
  • Baking sheet
  • Mixing bowls
  • Knife

Ingredients

  • 1 cup of toasted pecans
  • 1/2 cup of granulated sugar
  • 1/2 cup of packed brown sugar
  • 3 packages (8 oz each) cream cheese, softened
  • 1 tablespoon of vanilla extract
  • 4 large eggs
  • 1/3 cup of heavy cream
  • 1 1/2 cups of graham cracker crumbs
  • 1/2 cup of melted butter
  • 1/4 teaspoon of salt

Directions

  1. Preheat the oven to 325°F (165°C). Line the outside of a springform pan with foil.
  2. Combine graham cracker crumbs, melted butter, and salt for the crust. Press firmly into the pan’s bottom.
  3. Beat softened cream cheese with granulated and brown sugar until smooth. Add vanilla.
  4. Add eggs one at a time, mixing well after each addition, followed by the heavy cream.
  5. Fold in half of the toasted pecans and pour the filling over the crust.
  6. Place cheesecake pan in a larger pan filled with hot water and bake for one hour, or until set.
  7. Cool the cheesecake at room temperature, then refrigerate for at least four hours.
  8. Top with remaining pecans and drizzle caramel sauce before serving.

Recipe Notes

  • For an added twist, consider adding 1/4 cup of bourbon to the caramel sauce.
  • Ensure all dairy products are at room temperature to prevent lumps in the batter.

Irresistible Pineapple Cowboy Candy Recipe: Sweet and Spicy Delight

Pineapple Cowboy Candy: A Sweet and Spicy Delight

⚖️
Difficulty
Medium

⏲️
Prep Time
20 mins

🕒
Cook Time
60 mins

⏱️
Total Time
80 mins

🍽️
Servings
10

Indulge your taste buds with our Pineapple Cowboy Candy, a tantalizing mix of sweetness from juicy pineapples and the fiery heat of jalapeños. This bold combination makes for an unforgettable flavor explosion, transcending traditional preserves with its vibrant mixture of zesty and sugary notes. Imagine the luxurious golden hue of caramelized pineapples harmonizing with the deep green of jalapeños, making it not only a treat for the palate but a visual delight.

Quick Recipe Highlights

  • Flavor Profile: The Pineapple Cowboy Candy is sweet with a hint of earthiness, thanks to the jalapeños, providing both a vibrant and mellow flavor.
  • Texture: The final product has a delightful chewiness, with the soft pineapple pieces mingling with the crunch of the peppers.
  • Aroma: Aromatic pineapple combined with the sharp, spicy fragrance of jalapeño peppers creates an intoxicating scent.
  • Visual Appeal: The striking contrast between the bright yellow pineapple and the dark green jalapeños is truly mesmerizing.
  • Skill Level Needed: Intermediate cooking skills are required as balancing the flavors and achieving the correct consistency are key.
  • Special Equipment: A large saucepan, sharp knife, and canning jars are essential to execute this recipe perfectly.

Recipe Overview

  • Difficulty Level: This recipe is categorized as medium due to its requirement for precise timing and attention during cooking to avoid burning.
  • Category: Pineapple Cowboy Candy serves both as a condiment and a sweet treat, excellent for enhancing meats or enjoyed solo.
  • Cuisine: Rooted in Southern U.S. culinary tradition, this recipe borrows from classic cowboy cooking, merging classic flavors with a tropical twist.
  • Cost: The ingredients are generally affordable, making this a budget-friendly treat with high yield relative to the price.
  • Season: Best made during summer when pineapples are at their finest and abundant, yet it can be preserved to enjoy all year long.
  • Occasion: Ideal for barbecues or picnics, this candy also excels as a unique gift or party favor for food enthusiasts.

Why You’ll Love This Recipe

The Pineapple Cowboy Candy offers an exciting culinary adventure with its perfect balance of sweetness and heat. The juicy pineapple provides a tropical sweetness that counteracts the spicy kick of jalapeños, creating a symphony of flavors with each bite. In terms of convenience, this recipe is relatively straightforward, allowing you to indulge your creativity without feeling overwhelmed. It brings robust nutritional advantages since pineapples are rich in vitamins, and jalapeños add a metabolic boost. This dish is also a fantastic conversation starter at social gatherings, as it offers a unique twist to traditional fare. Furthermore, its cost-effectiveness and accessibility make it possible to enjoy gourmet flavors without a hefty price tag.

Historical Background and Cultural Significance

Cowboy Candy hails from the Southern United States, traditionally used as a way to preserve the bounty of peppers and unlock flavors through pickling and candying methods. Cultural importance arises as this recipe embodies the inventive spirit of Southern cooks, known for their resourcefulness. Over the years, the addition of pineapple has nurtured its evolution, allowing its influence to stretch beyond its rustic roots, becoming a contemporary gourmet sensation. Regional variations across the Southern U.S. may dictate ingredient ratios, but the core essence of sweet-spicy interplay remains a cherished trademark.

Ingredient Deep Dive

Pineapple is not just a fruit but a symbol of hospitality, prized for its juicy sweetness and culinary versatility. From a nutritional standpoint, it’s low in calories but high in Vitamin C and antioxidants, contributing to health benefits. When selecting pineapples, choose ones that are golden-yellow and fragrant, with no soft spots. The storage of pineapples should be at room temperature or refrigerated once cut. Additions like canned pineapples can substitute fresh ones if needed, though the flavor might slightly differ.

The jalapeño pepper, integral to this recipe for its fiery heat, carries with it a rich legacy in Mexican cuisine. Known for its health benefits, jalapeños provide Vitamin C and capsaicin, which can aid metabolism. Choose firm, smooth peppers for freshness, ideally stored in the refrigerator to maintain their crispiness. If you prefer a milder dish, opting for a similar mild pepper or de-seeding can adjust the heat.

Common Mistakes to Avoid

  • Underestimating time: Ensure the cooking time allows flavors to meld without rushing the process.
  • Incorrect pineapple selection: Use ripe but firm pineapples to prevent mushiness.
  • Insufficient stirring: Regularly stir during cooking to avoid sticking and burning.
  • Over-spicing: Balance the heat with sweetness; adjust jalapeño amount to taste.
  • Improper canning: Follow canning guidelines to prevent spoilage.
  • Neglecting sterilization: Always sterilize jars to ensure food safety.
  • Incorrect storage: Store in a cool, dry place or refrigerate once opened.
  • Ignoring ingredient order: Add ingredients in the correct sequence for optimal flavor meld.

Essential Techniques

Mastering the technique of balancing sweetness and heat in this Pineapple Cowboy Candy recipe is crucial. This requires both patience and observation, ensuring the crispness of jalapeños is retained post-cooking while achieving a consistent syrupy coating on the pineapples. Equally important is safe canning practice to preserve the candy’s vibrancy and prevent spoilage. A keen eye on visual cues, such as the candy’s change in color to a golden hue and thickening syrup, will signal success.

Pro Tips for Perfect Pineapple Cowboy Candy

– Use gloves when handling jalapeños to avoid skin irritation from the capsaicin.
– Incorporate pineapple juice in the cooking liquid for extra depth of flavor.
– Taste your candy before canning to adjust sweetness or heat levels.
– Allow the candy to sit overnight for flavors to deepen before serving.
– Utilize any remaining syrup as a marinade or glaze for grilling.
– For added complexity, incorporate a dash of apple cider vinegar for tanginess.

Variations and Adaptations

Regional adaptations can include the use of chipotle peppers instead for a smoky twist. Seasonal variations involve adding elements like peaches or mangoes when they are in season. For those with dietary preferences, a sugar substitute can be employed for a low-sugar alternative, though the texture may vary slightly. Adjusting basil or mint as herbs can complement the tropical notes, offering a refreshing uplift.

Serving and Presentation Guide

To serve Pineapple Cowboy Candy, try elegant lone servings or as part of a cheeseboard. For plating, use contrasting colored bowls to enhance its visual appeal. Garnishing with sprigs of mint leaves adds both fragrance and color contrast. Accompany with crackers or fresh bread for delightful pairings, while maintaining its vibrancy by serving at room temperature.

Wine and Beverage Pairing

For a wine pairing, opt for a semi-sweet Riesling whose acidity complements the heat while echoing the candy’s sweetness. As a non-alcoholic alternative, sparkling water with a hint of lime offers a refreshing counterbalance. Consider tropical teas such as passion fruit or hibiscus for complementary flavors, serving chilled for extra refreshment.

Storage and Shelf Life

Store unopened jars in a cool, dark place to maintain quality. Once opened, refrigerate and consume within three weeks to enjoy its peak freshness. Containers should be airtight and sterile to prevent spoilage. Indications of spoilage include an off-odor or change in color. If freezing, use appropriate containers to maintain quality, and gently reheat for softened consistency when needed.

Make Ahead Strategies

This Pineapple Cowboy Candy can easily be made ahead, allowing flavors to develop and deepen. Prepare in large batches and preserve through canning, which can then be gradually consumed or distributed over time. Quality isn’t compromised over time with proper storage, ensuring a reliable treat at the ready for gatherings or gifts.

Scaling Instructions

Scaling the recipe involves proportionately increasing or decreasing ingredient amounts, ensuring the flavor balance remains consistent. Adjustments may require larger or additional pots when sizing up and attention to timing to prevent overflow or burning. Storage should always consider available space and consumption rate.

Nutritional Deep Dive

Rich in vitamins and low in fat, Pineapple Cowboy Candy provides a delightful dessert without the guilt. The macro breakdown includes carbohydrates from the sugar and natural fruit sugars, with a peppery kick that adds a negligible amount of protein and fat. Despite its sweetness, the candy remains a relatively low-calorie indulgence, superb for those monitoring weight.

Dietary Adaptations

The recipe lends itself well to gluten-free diets as its base ingredients are naturally celiac-friendly. For a vegan twist, ensure all sugar used is certified vegan. Low-carb enthusiasts might substitute some sugar with an erythritol blend, keeping the caloric intake in check without sacrificing flavor. Flexibility allows it to fit various dietary needs with ease.

Troubleshooting Guide

If encountering texture issues where the candy is too runny, extend cooking time to reduce liquid concentration. A lack of flavor balance can be counteracted by adjusting sugar or jalapeño levels. Temperature problems, such as burning, can be avoided with reduced heat settings. Should equipment challenges arise, alternative utensils like a slow cooker can benefit the process.

Recipe Success Stories

Community feedback praises the vibrant taste and versatile use of this Pineapple Cowboy Candy, providing anecdotes of gift-giving and party offerings. Variations abound, with jalapeños swapped for habaneros in some user adaptations, highlighting creativity. Photography tips include capturing the candy’s translucence in natural light for stunning results on social media.

Frequently Asked Questions

Is Pineapple Cowboy Candy spicy?

While it does have a kick from the jalapeños, sweetness from the pineapple balances the heat.

How long can it be stored?

Unopened, it can be stored for up to a year; once opened, refrigerate and consume within three weeks.

What is the best use for Pineapple Cowboy Candy?

It’s perfect as a topping for nachos, burger garnishes, or as a side for grilled meats.

Can this recipe be made sugar-free?

Yes, sugar substitutes like erythritol can be used, albeit with a different texture.

What fruits can be substituted for pineapple?

Pears or apples can be alternatives, providing different flavor profiles.

Are there alternative peppers if jalapeños are too spicy?

Use poblano peppers or bell peppers for a milder version.

How should spices be adjusted for a milder taste?

Reduce the amount of jalapeños and remove seeds to lower the heat level.

Is it essential to can the candy?

No, it can also be stored in the refrigerator if planning to consume within a short timeframe.

What pairs well with this candy besides meats?

Cream cheese and crackers make a delightful appetizer.

Can other spices be added?

Yes, cinnamon or clove adds unique warmth to the candy.

Additional Resources

Dive into related recipes like Fire-Roasted Jalapeño Salsa to explore more fiery flavor options. Equip yourself with guides on safe canning practices to prolong shelf-life. Gain further understanding of ingredient selection through fruit freshness tips, ensuring top-notch quality in execution.

Join the Conversation

Engage with a vibrant community by sharing your Pineapple Cowboy Candy experiences on social media; our hashtag encourages shared creativity and variations. Discover photography tips to capture its appealing aesthetics in mouthwatering images. Leave feedback or review to guide fellow enthusiasts in their cowboy candy journey, fostering a lively exchange of culinary ideas.

The Recipe

Pineapple Cowboy Candy

Serves: 10

Prep Time: 20 mins

Cook Time: 60 mins

Total Time: 80 mins

Kitchen Equipment Needed

  • Large saucepan
  • Sharp knife
  • Canning jars
  • Rubber gloves (for handling peppers)
  • Wooden spoon

Ingredients

  • 2 cups pineapple chunks
  • 1 cup sliced jalapeños
  • 2 cups granulated sugar
  • 1 cup apple cider vinegar
  • 1 tsp salt
  • 1/2 tsp turmeric

Directions

  1. Peel and slice the pineapple into chunks, ensuring that it is ripe.
  2. Wear gloves and slice the jalapeños, removing seeds if reduced heat is desired.
  3. In a large saucepan, combine sugar, apple cider vinegar, salt, and turmeric over medium heat until sugar dissolves.
  4. Add pineapple and jalapeños to the mixture and bring to a boil.
  5. Reduce heat and simmer for 60 minutes, stirring occasionally, until the liquid thickens to a syrup consistency.
  6. Spoon the mixture into sterilized canning jars, leaving 1/2 inch space from the top.
  7. Seal jars according to safe canning practices and cool at room temperature.

Recipe Notes

  • For a milder version, use de-seeded jalapeños.
  • Leftover syrup can enhance grilled dishes as a glaze.
  • If using canned pineapple, reduce the cooking time slightly.

Irresistible Zucchini Bread Recipe for Moist and Flavorful Loaves

The Best Zucchini Bread: Moist and Flavorful Delight

⚖️
Difficulty
Easy

⏲️
Prep Time
15 mins

🕒
Cook Time
60 mins

⏱️
Total Time
75 mins

🍽️
Servings
8 slices

Imagine slicing into a warm, freshly baked loaf of the best zucchini bread that melts in your mouth with its moist, tender texture and the subtle nutty sweetness that lingers on your palate. This timeless treat blends the wholesome goodness of zucchini with aromatic cinnamon, creating a perfectly spiced bread that’s both comforting and satisfying. Whether you’re enjoying it for breakfast or a delightful afternoon snack, this zucchini bread is a delectable way to savor the end-of-summer bounty.

Zucchini bread is one of those enduringly popular baked goods that manages to make vegetables taste like a real treat. Not only is this bread a sneaky way to incorporate more vegetables into your diet, but it also offers versatility in its pairing options. You can top a slice with a dollop of whipped cream for a dessert-like experience or spread on cream cheese for a savory twist. As you bake, the enticing aroma of cinnamon and vanilla will fill your kitchen, making this a baking experience that truly engages all your senses.

Quick Recipe Highlights

  • Flavor Profile: A balanced blend of warm cinnamon and natural zucchini sweetness.
  • Texture: Moist and tender with a light crumb, perfect for slicing.
  • Aroma: Inviting scents of cinnamon, vanilla, and baked bread fill the air.
  • Visual Appeal: A golden-brown crust with flecks of bright green zucchini throughout.
  • Skill Level Needed: Beginner friendly with simple mixing techniques.
  • Special Equipment: A loaf pan and a grater for the zucchini.

Recipe Overview

  • Difficulty Level: A win for beginners, this recipe requires no special skills.
  • Category: Perfect as a quick bread or snack.
  • Cuisine: Rooted in American comfort baking traditions.
  • Cost: Budget-friendly, using common pantry ingredients.
  • Season: Best in late summer when zucchini is plentiful.
  • Occasion: Ideal for a cozy breakfast or a casual gathering treat.

Why You’ll Love This Recipe


The taste of this zucchini bread is simply irresistible. Each bite is a symphony of warm spices and subtle sweetness, thanks to the perfect blend of cinnamon, sugar, and vanilla. The texture is soft and moist, ensuring the bread stays fresh for days. Even better, the zucchini’s mild flavor adds moisture without overpowering the bread’s delightful taste.

When it comes to prep, the methods are straightforward, requiring basic mixing and grating skills. In just under an hour and a half, you can have a homemade treat freshly out of the oven. The quick prep and cooking time make it a convenient choice for those busy mornings or when you need to whip up a quick dessert.

Nutritionally, zucchini bread offers more than a sweet treat. Zucchini itself is a low-calorie, nutrient-rich vegetable filled with vitamins and fiber. Each slice provides a gentle dose of these nutrients without sacrificing flavor, making it a guilt-free indulgence.

Sharing this bread with friends and family enhances its appeal; it’s a lovely accompaniment to brunch or a wonderful way to welcome guests. Its ability to be dressed up or down with various toppings also adds to its versatility, ensuring there’s no wrong time to serve it.

Finally, using readily available ingredients like zucchini, cinnamon, and sugar makes this recipe both affordable and accessible. Whether you’re a seasoned baker or a novice, you won’t have to stretch your budget to enjoy this delicious zucchini bread.

The Recipe

The Best Zucchini Bread

Serves: 8 slices

Prep Time: 15 mins

Cook Time: 60 mins

Total Time: 75 mins

Kitchen Equipment Needed

  • Loaf pan
  • Grater
  • Mixing bowls
  • Whisk
  • Measuring cups and spoons

Ingredients

  • 1 ½ cups grated zucchini
  • 1 cup sugar
  • 1 large egg
  • 1/3 cup unsalted butter, melted
  • 1 ½ cups all-purpose flour
  • 1 teaspoon baking soda
  • 1 teaspoon ground cinnamon
  • 1/4 teaspoon baking powder
  • 1/2 teaspoon salt
  • 1 teaspoon vanilla extract

Directions

  1. Preheat your oven to 350°F (175°C) and grease a 9×5 inch loaf pan.
  2. In a medium bowl, combine sugar, egg, and melted butter. Whisk until smooth.
  3. Stir in the grated zucchini and vanilla extract.
  4. In another bowl, sift together flour, baking soda, cinnamon, baking powder, and salt.
  5. Gradually add the dry ingredients to the wet ingredients, mixing until just combined.
  6. Pour batter into the prepared loaf pan.
  7. Bake for 55-60 minutes, or until a toothpick inserted into the center comes out clean.
  8. Allow the bread to cool in the pan for 10 minutes, then transfer to a wire rack to cool completely.

Recipe Notes

  • Substitute brown sugar for a deeper flavor.
  • Add nuts or raisins for extra texture.

Indulge in Irresistible Gourmet Thick Peanut Butter Cookies Delight

Gourmet Thick Peanut Butter Cookies: The Ultimate Chewy Delight

⚖️
Difficulty
Easy

⏲️
Prep Time
15 mins

🕒
Cook Time
12 mins

⏱️
Total Time
27 mins

🍽️
Servings
24 cookies

There’s nothing quite like the rich, nutty goodness of a perfectly baked gourmet thick peanut butter cookie. These cookies are the ultimate indulgence for those who crave a luscious blend of sweetness and a deep peanut flavor. With every bite, experience the satisfying chew and a nutty flair that is simply irresistible. These cookies make for a delightful treat that pairs well with a glass of warm milk or a steaming cup of coffee.

Imagine sinking your teeth into a thick cookie that’s both soft and slightly chewy, bursting with rich peanut butter taste. These thick peanut butter cookies are perfect for any occasion, whether you’re enjoying a quiet afternoon or hosting a fun get-together. The golden-brown cookies provide a beautiful contrast to the rich, creamy peanut butter flavor. Let’s dive into the delicious world of these gourmet treats, where every bite is a heavenly experience.

Quick Recipe Highlights

  • Flavor Profile: Expect a delightful balance of sweet and savory, with the robust taste of roasted peanuts shining through each cookie.
  • Texture: These cookies boast a thick and chewy texture, with just the right amount of crunch from the peanuts.
  • Aroma: As they bake, the kitchen fills with the toasty, nutty aroma of peanut butter, tempting you to sneak a taste before they’re even finished.
  • Visual Appeal: Golden brown and chunky, these cookies are visually as inviting as they are tasty, with a rustic homemade look.
  • Skill Level Needed: Easy – Great for bakers of all skill levels. The recipe requires basic measuring and mixing skills.
  • Special Equipment: A sturdy baking sheet and a cooling rack for the perfect cookie-making setup.

Recipe Overview

  • Difficulty Level: This recipe is easy, making it perfect for both novice bakers and experienced pros. The straightforward steps ensure success with minimal effort.
  • Category: These thick cookies fall comfortably into the dessert category but make for excellent snacks or gift treats too.
  • Cuisine: Rooted in American traditions, these cookies carry a nostalgic charm reminiscent of childhood kitchens across the USA.
  • Cost: Baking these gourmet treats is quite cost-effective, with most ingredients readily available at affordable prices.
  • Season: Perfect for year-round baking! They’re especially delightful during cooler months when cozy treats are most appreciated.
  • Occasion: From holiday gatherings to simple family weekends, these cookies fit seamlessly into any occasion, adding a sweet note of joy.

Why You’ll Love This Recipe


The gourmet thick peanut butter cookies are a dream come true for peanut butter lovers. The taste is an impeccable balance of sweet and savory, where the luscious peanut flavor takes center stage. Every bite offers a satisfying chewiness with pockets of crunchy peanuts that add excitement to the texture, making it a standout cookie experience.

Crafted for convenience, this recipe comes together quickly, allowing you to whip up a delicious batch in under half an hour. The ingredients are pantry staples, meaning you can indulge in these delicious cookies whenever the craving hits, with minimal preparation needed. It’s the perfect recipe to involve little ones in the kitchen, making baking a fun and engaging family activity.

Aside from their mouthwatering taste, these cookies offer notable nutritional benefits. Peanuts are a great source of protein and healthy fats, adding a nutritious element to your sweet treat. Enjoy the balance of decadent taste with wholesome nutrition that’s both satisfying and nourishing. These cookies provide an excellent way to sneak in some nutritional goodness while enjoying a delightful dessert.

The social and entertaining value of these cookies cannot be overstated. Whether shared at a party or included in a bake sale, these cookies are sure to be a hit. They’re versatile enough to fit any theme or occasion and bring a homey, comforting vibe to any gathering. Each cookie becomes a sweet offering of warmth and connection among friends and family.

Cost-effectiveness is another reason to love this recipe. With ingredients that are affordable and commonly found, there’s no need for fancy or expensive components. You can easily scale the recipe to feed a crowd, making these cookies a budget-friendly option for entertaining. With such simplicity and effectiveness, baking these gourmet cookies is a win-win for taste and cost!

Historical Background and Cultural Significance


The origin of peanut butter cookies can be traced back to the early 1900s in the United States, a byproduct of peanut farming advancements and the popularization of peanut butter as a health food. George Washington Carver, a pioneer in promoting peanut cultivation, is credited with creating numerous recipes that popularized peanuts, including variations of peanut-based cookies.

Culturally, peanut butter cookies have been a staple in American households, symbolizing comfort and tradition. They’ve become an integral part of holiday baking and childhood memories, often shared during special occasions and family gatherings. The love for these cookies transcends generations, maintaining their status as a beloved classic in the American culinary repertoire.

Over the years, the recipe has evolved to include variations and adaptations. Initially, recipes highlighted simple ingredients and minimal preparation steps. As culinary trends shifted, bakers introduced variations including add-ins like chocolate chips, oats, or spices, each twist bringing new dimensions to the traditional cookie.

Regional variations of peanut butter cookies reflect local tastes and ingredient availability. In some areas, these cookies may incorporate local nuts or sweeteners, enhancing their distinctive qualities while preserving the fundamental peanut taste. These adaptations continue to honor the cookie’s rich heritage while showcasing the creativity and adaptability of bakers around the world.

Ingredient Deep Dive


Peanut butter, the star ingredient of these cookies, carries a rich cultural significance. Originating from the Americas, peanuts were cultivated by indigenous people for centuries before spreading globally. Today, peanut butter enjoys a status as a versatile and beloved spread, a testament to its enduring popularity and adaptability in countless recipes.

Nutritionally, peanut butter is a powerhouse of essential nutrients, offering healthy fats, protein, and fiber. It’s a satisfying ingredient that imparts both flavor and nutrition, providing a sense of fullness and energy. When selecting peanut butter for baking, opt for creamy varieties without added sugars or preservatives to maximize flavor and purity.

Brown sugar, another key component, adds moisture and caramel-like depth to the cookies. Its molasses content elevates the chewiness while contributing to the golden color of the baked cookies. For optimal results, use fresh brown sugar to maintain the right texture and sweetness. Store it in an airtight container to prevent it from hardening or clumping.

In terms of substitutions, you can experiment with nut butters such as almond or cashew for a unique twist, though the classic peanut flavor is hard to beat. Consider nutritional alternatives for sweeteners, such as coconut sugar or honey, to adjust the recipe to dietary preferences, keeping the rich taste and wonderful textures intact.

Common Mistakes to Avoid

  • Avoid overbaking: These cookies should be removed from the oven when they are just golden brown on the edges, as they will continue to firm up on the baking sheet.
  • Using cold ingredients: Ensure that your butter and eggs are at room temperature for a well-mixed and cohesive dough.
  • Skipping the cooling stage: Allow cookies to cool on the baking sheet before transferring to a rack, as moving them too soon can lead to breakage.
  • Incorrect peanut butter type: Stick to creamy peanut butter without added oils or sugars, as natural versions can alter the texture and consistency.
  • Ignoring measurements: Baking is a science—be precise with your ingredients to ensure consistency in taste and texture.
  • Forgetting to adjust for altitude: If you live at a high altitude, consider adjusting baking times and temperatures to compensate for atmospheric differences.
  • Not rotating your pans: Rotate the baking sheets halfway through to ensure even baking and prevent uneven results.
  • Storing improperly: To keep the cookies fresh, store them in an airtight container at room temperature, preventing moisture loss and staling.

Essential Techniques


Creaming the butter and sugars successfully is key. This process introduces air into the batter, creating light and fluffy cookies. Use an electric mixer for consistency and cream for at least 3-5 minutes until the mixture is pale and fluffy. Be careful not to overmix, as this can result in denser cookies.

Mastering the art of measuring flour can significantly change the outcome of your baking. For accuracy, use the spoon and level method where you spoon flour into your measuring cup and level it off with a knife, keeping your cookies light and supple without being dense or heavy.

To ensure even baking, use a cookie scoop to portion out the dough. This ensures uniform size and shape, allowing the cookies to cook evenly and consistently. Invest in a quality scoop to make this task easier and more efficient, providing you with perfectly rounded cookies every time.

Visual cues are important for baking success. Know when your cookies are ready by observing their edges—look for a golden brown color and a slightly set center. If they appear too soft, they may need another minute of baking, but take caution not to overbake, as they will firm up as they cool.

Pro Tips for Perfect Gourmet Thick Peanut Butter Cookies


Ensure your peanut butter is at room temperature before adding to the mixture. This allows for easier incorporation into the dough and a smoother consistency, preventing any unwanted lumps or inconsistencies.

Chill the dough for at least an hour before baking. This helps to prevent spreading and gives the cookies a nice chewy texture. It also allows the flavors to meld, enhancing the overall taste of the cookies.

Experiment with adding chopped peanuts for additional texture. Not only does this amplify the peanut flavor, but it also adds a delightful crunch, making each bite more engaging and satisfying.

Try using a combination of white and brown sugar to get balanced sweetness and moisture. Brown sugar will add a depth of flavor, while white sugar helps in achieving the right spread during baking.

For a fun twist, consider drizzling melted chocolate over the cookies once cooled. This luxurious addition complements the peanut butter flavor and adds an attractive finish to each cookie.

Utilize parchment paper on baking sheets. This prevents sticking and helps with even baking, leading to cleaner cookies and easier cleanup – a winning scenario in any kitchen.

Variations and Adaptations


Regional variations can be expressed by using local versions of peanuts or nut butters, providing a unique taste while respecting regional ingredients. This could draw inspiration from various cultures, such as using cashew butter in regions where cashews are more popular.

Seasonal adaptations include introducing spices like cinnamon or nutmeg during fall or winter, offering additional warmth and depth to the cookies, making them a perfect treat for the festive season and cooler months.

Dietary modifications are easy with this recipe. To make vegan-friendly cookies, substitute the butter with a plant-based alternative and use a flaxseed egg in place of a traditional egg. This provides similar binding qualities while maintaining the desired texture.

Flavor variations are plentiful—consider adding vanilla extract or a touch of sea salt on top before baking for an elevated gourmet touch. Alternatively, add mini chocolate chips for a dash of indulgence.

For those who prefer a softer texture, decrease baking time slightly to maintain a gooey center, contrasting the firm outer edges. This results in a luscious, melt-in-the-mouth experience, reminiscent of a cookie dough bite.

Presentation alternatives can include pressing a fork lightly into the dough before baking for a classic crisscross pattern. This adds an element of visual interest while paying homage to traditional peanut butter cookie aesthetics.

Serving and Presentation Guide


For an elegant presentation, serve these cookies on a white platter lined with a decorative napkin. The contrast highlights the cookies’ golden hues and draws attention to their homemade charm, making them pop visually.

Garnishing with a sprinkle of powdered sugar or a drizzle of dark chocolate syrup adds sophistication, creating an elevated gourmet aesthetic that complements their rich flavor profile beautifully.

Traditional accompaniments include a glass of cold milk or a scoop of vanilla ice cream, providing a creamy counterbalance to the nutty, chewy richness of the cookies. These combinations enhance the overall dessert experience.

Modern serving suggestions incorporate a cookie tower or stack secured with a ribbon, an expression of casual elegance perfect for gifting or as a part of a dessert buffet.

Temperature considerations are crucial for enjoying these cookies at their best. They can be enjoyed warm from the oven for a soft and chewy bite or allowed to cool completely for a firmer texture, depending on personal preference.

Portion control tips involve pre-slicing portions into half-cookies for smaller bites suitable for light snacking or pairing with other treats, maintaining an element of indulgence without excess.

Wine and Beverage Pairing


Pair your gourmet thick peanut butter cookies with a light, fruity wine such as a Riesling or a subtly sweet Moscato. These wines emphasize the nutty aspects without overpowering the cookie’s natural sweet flavors.

For non-alcoholic options, consider a spiced chai latte or a creamy hot chocolate. The spices complement the warm, nutty flavors of the cookies, while the chocolate brings a delightful contrast, enhancing the whole experience.

If coffee or tea is your preference, a robust coffee with nutty undertones or a subtle black tea pairs well. These beverages provide a delightful balance, bringing out the cookie’s more intricate flavor notes while maintaining their own unique appeal.

Temperature plays an essential role in pairing success. Serve beverages slightly chilled or at room temperature to allow the cookie’s warmth to shine through, creating a harmonious gastronomic experience.

Ensure serving suggestions include inviting presentations, such as pairing cookies on a plate with a small taster glass of your chosen beverage or featuring assorted nuts as a garnish, enhancing the sensory and visual appeal.

Storage and Shelf Life


To maintain freshness, store these gourmet cookies in an airtight container at room temperature. They can last up to a week while retaining their chewiness and rich flavor. Avoid exposure to air to prevent them from becoming hard.

Optimal storage requires a cool, dry location away from direct sunlight, preserving their quality and preventing any degradation in taste or texture. Consider using parchment paper between cookie layers to prevent sticking and breakage.

Signs of spoilage include staling or hardness, indicating a loss of texture quality. Check for any change in odor or color, ensuring all ingredients maintain their intended freshness. Cookies can be refreshed briefly in the oven if needed.

Reheating instructions include a short warm-up in an oven set at a low temperature or a quick microwave pass, reviving their just-baked warmth and aroma, making them enjoyable at any preferred temperature.

Freezing guidelines recommend pre-freezing dough balls individually before transferring them to a ziplock bag, making future baking simple and convenient. When ready, bake directly from the freezer, adding a few extra minutes to cooking time.

Make Ahead Strategies


Plan your prep timeline to accommodate chilling the dough, an essential step for flavor development and structure. Have all ingredients and necessary tools ready to maximize efficiency and streamline the baking process.

Storage between steps involves wrapping chilled dough securely in plastic wrap or an airtight container, retaining its moisture and preventing any unwanted drying or contamination during fridge or freezetime.

Quality impact assessment ensures the integrity of your cookies remains high throughout preparation and storage. Use fresh ingredients and follow recipe instructions precisely for consistently excellent results.

Assembly tips include measuring and mixing all dry ingredients in advance for easy incorporation into wet ingredients, reducing prep stress and keeping tasks organized and manageable.

Reheating guidelines stress lightly warming cookies for fresh-baked allure. Cover with foil to retain moisture and prevent over-hardening, optimizing flavor and texture upon serving.

Fresh element additions like adding spices or nuts to dough before baking introduces a personalized touch, making the cookies uniquely yours and delightfully home-styled.

Scaling Instructions


When halving the recipe, adjust ingredient proportions carefully to maintain the original balance in taste and texture. Use precise measurements for best results, ensuring success regardless of batch size.

Doubling or tripling the recipe is perfect for larger gatherings. Ensure you have ample space and equipment to accommodate increased volume, such as larger mixing bowls and additional baking sheets.

Equipment adjustments may involve using multiple baking sheets or cooling racks to avoid overcrowding, enabling even baking and seamless transitions between batches.

Timing modifications might be necessary to accommodate varied batch sizes or oven capacities. Monitor cookies closely during additional batches to maintain quality and consistency throughout.

Storage considerations emphasize using airtight containers and separating layers with parchment paper when increasing batch sizes. This prevents sticking and breakage, extending shelf life effectively.

Nutritional Deep Dive


A macro breakdown reveals these cookies as a balanced treat. They contain carbohydrates for immediate energy, fats for sustained fuel, and proteins beneficial for body repair and maintenance.

Micronutrient analysis showcases notable contributions from peanuts, like vitamin E, niacin, and magnesium—essential elements for smooth digestion and cellular health, enriching the nutrition in each bite.

Health benefits extend beyond simple indulgence. Moderation promotes a balanced diet, and these cookies, enriched with peanut butter, offer satisfying fullness amidst their sweet, nutty delight.

Dietary considerations allow room for customization. Adjust sugar levels for reduced-calorie versions or explore additional fiber options with whole grain flour, aligning recipe output to nutritional goals.

Portion analysis suggests measured consumption for thoughtful enjoyment. Eat in moderation to balance dietary intake and fully appreciate the treat’s carefully curated flavors and textures.

Weight management tips underscore enjoying the cookies alongside varied meals, integrating them into a balanced diet to maintain nutritional harmony while satisfying sweet-tooth cravings.

Dietary Adaptations


For a gluten-free version, substitute traditional flour with gluten-free alternatives like almond or oat flour, ensuring similar texture and flavor while meeting dietary needs effectively.

A dairy-free adjustment involves using plant-based milk and butter varieties, such as coconut oil or almond milk, to maintain excellent taste and texture without animal-derived ingredients.

Vegan bakers can seamlessly replace egg content with flaxseed or chia seed substitutes, creating a cohesive dough that mimics the traditional version without compromising flavor or structure.

Low-carb adaptations recommend substituting sugar with sweeteners like stevia or erythritol, achieving guilt-free satisfaction while retaining the original appeal of these delightful cookies.

Keto adaptations involve exploring high-fat, low-carb alternatives. Using almond or coconut flour provides ample texture support, while stevia substitutes ensure compatibility with keto lifestyle preferences.

Paleo-friendly cookies can emerge using almond butter and date sugar, combining cherished peanut flavors with ingredient alignments that embody paleo dietary principles and maintain authenticity.

FODMAP adjustments hinge on using approved ingredients, like specific glucose substitutes, allowing cookies to adhere to dietary restrictions while remaining flavorful and enjoyable.

Troubleshooting Guide


Texture issues often arise from improper measurements or baking time adjustments. Ensure accurate ingredient proportions and remove from the oven when edges are golden to maintain chewiness.

Flavor balance relies on precise sugar and salt measurements. Taste adjustments stem from experimentation in sweetness or salty contrast, ensuring each bite resonates with desired complexity.

Temperature problems can lead to uneven baking or hardening. Observe oven settings and dough temperature before baking to guarantee accuracy and uniform results across every batch.

Equipment challenges include consideration of baking sheet materials or oven capacity, influencing bake quality and consistency. Adapt placements and sizes to suit your apparatus’s strengths.

Ingredient substitutions often necessitate trial and error. Experimenting with flour or nut butter varieties requires careful attention to liquidity levels and binding properties for successful adaptation.

Timing concerns underline efficient preparation and chilled dough. Plan adequate fridge time to prevent unintended spreading, achieving ideal cooking dynamics for structurally sound cookies.

Recipe Success Stories


Our community of bakers loves sharing success with these gourmet thick peanut butter cookies. Feedback often highlights family bonding time in the kitchen, with kids actively partaking in baking.

Variation successes include unique nut butter combinations and creative flavoring, from honey-drizzles to almond joy twists, showcasing readers’ enthusiasm in adapting the humble classic.

Adaptation stories reveal impressive skill in dietary changes, with vegan, keto, and gluten-free alternatives taking center stage. These variations underline the recipe’s flexibility and user-friendliness.

Reader suggestions prompt innovative interpretations of layering white chocolate or incorporating chia seeds for added benefits, a manifestation of collective creativity and resourcefulness.

Photography tips celebrate visual presentations. Readers pride in showcasing their cookies in dazzling formations and warm hues, capturing rustic appeal and personal achievements in baking.

Frequently Asked Questions

Q1: Can I use chunky peanut butter instead of creamy?
A: Yes, chunky peanut butter can add delightful texture and crunch. Just note that it will change the overall texture slightly, making the cookies a bit crumblier due to the extra nuts.

Q2: How should I store leftover cookies?
A: Store leftover cookies in an airtight container at room temperature for up to a week. Keep them away from direct sunlight to preserve freshness.

Q3: Can I freeze the cookie dough?
A: Absolutely! Freeze cookie dough scoops on a baking sheet, then transfer them to a zip-lock bag once solid. They can be baked directly from frozen, with an extra couple of minutes added to the bake time.

Q4: What alternatives can I use for eggs?
A: Substitute eggs with a flaxseed or chia seed “egg” by mixing 1 tablespoon of ground flaxseed or chia seeds with 2.5 tablespoons of water. Let it sit for a few minutes before adding to the dough.

Q5: How do I prevent my cookies from spreading too much?
A: Ensure your dough is well-chilled before baking, and use fresh baking soda. Both help maintain the cookie’s shape and thickness as they bake.

Q6: What can I add to enhance the flavor?
A: Adding a teaspoon of vanilla extract or a sprinkle of sea salt before baking can enhance flavor depth, balancing the cookie’s natural sweetness and nutty richness.

Q7: Can I bake these cookies on non-stick pans?
A: Yes, but line your pan with parchment paper for best results. This prevents cookies from over-browning and sticking, allowing consistent baking across batches.

Q8: How do I know when the cookies are done?
A: Look for lightly golden-brown edges with centers appearing slightly underbaked. They will continue to cook as they cool, achieving the perfect chewiness.

Q9: Is there a way to make these sugar-free?
A: Yes, you can substitute granulated sugar with sweetener options like stevia or erythritol, keeping an eye on altered consistencies that may arise.

Q10: Can I add chocolate chips?
A: Absolutely! Fold in a cup of your favorite chocolate chips to the dough after mixing. This yields a classic chocolate-peanut butter combination, enhancing cookie indulgence.

Q11: Why is my dough sticky?
A: Sticky dough can result from warm butter or excess mixing. Ensure accurate measuring and chill dough until slightly firm, making it easier to handle.

Q12: Can I make this dough ahead of time?
A: Yes, prepare the dough up to three days in advance, storing it in the refrigerator. Chilled dough enhances flavor development and eases preparation on baking day.

Additional Resources


For those eager to expand their baking repertoire, delve into related recipes such as classic chocolate chip cookies or vibrant oatmeal raisin creations, both embodying universal appeal.

Access comprehensive technique guides that cover essential baking principles, including the art of creaming, identifying stages of doneness, and understanding ingredient interactions for consistent results.

Explore in-depth ingredient information to broaden culinary knowledge, providing insights into the science of baking and the selection of best-fit ingredients, elevating your cookie-making skills.

Consider equipment recommendations that enhance baking success and ease, from non-stick parchment paper to essential measuring tools, each facilitating the creation of high-quality, successful cookies.

Embrace seasonal variations, incorporating regional influences or spice pairings, making your cookies endlessly adaptable. Celebrate a legacy of shared joy, reflected in every recipe variation and cultural nuance.

Join the Conversation


Dive into social media sharing to display your gourmet thick peanut butter cookie creations. Capture their golden, wholesome beauty amidst charming kitchen settings, inspiring fellow baking enthusiasts.

Celebrate photography tips to enhance cookie presentation on platforms like Pinterest or Instagram. Showcase fresh bakes in well-lit environments for truth in color and texture, making each cookie shine.

Encourage feedback and recipe reviews to fuel community growth. Your input can refine shared experience, spark new creativity, and support communal bonding over universally loved baked goods.

Explore community engagement turfs, discussing flavor experiments, resulting treats, and inventive takes on timeworn traditions—each interaction fostering connection and camaraderie.

Empower recipe variations among new bakers by sharing your culinary story. Nurture creative interpretations and inventive combinations as you celebrate each delightful culinary journey and expression of personal flair.

The Recipe

Gourmet Thick Peanut Butter Cookies

Serves: 24 cookies

Prep Time: 15 mins

Cook Time: 12 mins

Total Time: 27 mins

Kitchen Equipment Needed

  • Baking sheets
  • Cooling rack
  • Electric mixer
  • Mixing bowls
  • Cookie scoop
  • Measuring cups and spoons

Ingredients

  • 1 cup creamy peanut butter
  • 1 cup packed brown sugar
  • 1/2 cup granulated sugar
  • 1/2 cup unsalted butter, softened
  • 2 large eggs
  • 2 cups all-purpose flour
  • 1 teaspoon baking powder
  • 1/2 teaspoon baking soda
  • 1/4 teaspoon salt

Directions

  1. Preheat your oven to 350°F (175°C) and line baking sheets with parchment paper.
  2. In a large mixing bowl, cream together peanut butter, brown sugar, granulated sugar, and butter using an electric mixer until light and fluffy.
  3. Add eggs one at a time, beating well after each addition.
  4. In a separate bowl, whisk together flour, baking powder, baking soda, and salt. Gradually add the dry ingredients to the wet ingredients, mixing until combined.
  5. Chill the dough in the refrigerator for at least 30 minutes.
  6. Use a cookie scoop to portion dough onto prepared baking sheets, spacing 2 inches apart. Flatten slightly with the palm of your hand.
  7. Bake for 10 to 12 minutes or until the edges are golden brown.
  8. Let cookies cool on the baking sheets for 5 minutes before transferring them to a cooling rack to cool completely.

Recipe Notes

  • For extra flavorful cookies, consider adding a teaspoon of vanilla extract.
  • If the dough is too sticky to handle, chill longer as needed to firm up.
  • For crisscross patterns, press a fork into the dough balls before baking.

Refreshing Pineapple Strawberry Swirled Slushies for Summer Sipping

Pineapple Strawberry Swirled Slushies: A Refreshing Twist for Your Taste Buds

⚖️
Difficulty
Easy

⏲️
Prep Time
10 mins

🕒
Cook Time
0 mins

⏱️
Total Time
10 mins

🍽️
Servings
4

Pineapple Strawberry Swirled Slushies encapsulate the essence of summer in every sip. These refreshing and vibrant slushies are a perfect blend of sweet strawberries and tangy pineapple, offering a delightful cool-down on a sunny day. The layers create a visually appealing swirled effect that is both Instagram-worthy and irresistible to the taste buds, making it an ideal choice for all ages.

Quick Recipe Highlights

  • Flavor Profile: A lip-smacking mix of sweet, tangy, and slightly tart flavors.
  • Texture: Smooth with icy consistency, punctuated by juicy bits of fruit.
  • Aroma: Fresh tropical scents with a hint of berry sweetness.
  • Visual Appeal: A colorful and swirling blend, topped with vibrant fruit garnishes.
  • Skill Level Needed: Basic blending skills; an easy recipe perfect for beginners.
  • Special Equipment: A high-speed blender or food processor is all you need.

Recipe Overview

  • Difficulty Level: This recipe is easy, requiring just basic blending skills and quick preparation. It’s great for kids and adults alike, making it a fun kitchen project.
  • Category: Best categorized under drinks or desserts due to its sweet and refreshing characteristics.
  • Cuisine: Embodying global fruity flavors, it doesn’t adhere to a specific culinary tradition but reflects a universal appeal.
  • Cost: Relatively low-cost, utilizing common fruits and requiring minimal equipment.
  • Season: Best enjoyed during summer for its cooling properties, but delightful year-round.
  • Occasion: Perfect for outdoor picnics, beach outings, or as a simple mid-day refresher.

Why You’ll Love This Recipe

The Pineapple Strawberry Swirled Slushies offer a taste and texture combination that is truly a summer delight. With the juicy strawberries and tangy pineapples blended to perfection, each sip brings a refreshing burst of fruitiness that is hard to resist. Convenience is key, as you can prepare this delightful drink in just 10 minutes with minimal effort. Packed with vitamins, these slushies are a healthy choice for those looking for a guilt-free indulgence. Whether you’re hosting a summer party or just want a cool treat, these slushies are a social icebreaker, perfect for impressing friends or family. With affordable ingredients and easy preparation, this recipe is accessible to everyone, making it an excellent go-to treat.

Historical Background and Cultural Significance

The concept of slushies has its roots in ancient cultures where ice was gathered from mountain tops for cooling beverages. As trade expanded, the mixing of fruit juices with icy concoctions became popular across Europe and America. Slushies gained commercial popularity in the 20th century with the advent of convenience and fast-food culture. Over the years, these icy beverages have evolved, with pineapple and strawberry versions reflecting tropical influences in a globalized world. Regional variations, such as adding exotic spices or herbs, illustrate how cultures integrate local flavors into this universal treat.

Ingredient Deep Dive

Pineapples, recognized for their tropical sweetness and vibrant color, have a rich history dating back to South America. They are high in vitamin C and bromelain, aiding digestion. Choose ripe, firm pineapples with a sweet aroma for the best results, and store them in a cool, dry place until ready to use. Strawberries, another staple in summer recipes, are celebrated for their antioxidant properties and sweet juiciness. Opt for bright red, firm strawberries for maximum flavor and freshness. They should be stored in the refrigerator and consumed quickly to preserve their taste and texture.

Common Mistakes to Avoid

  • Overblending can lead to a liquidy consistency rather than a slushy one.
  • Using underripe fruit, which results in a less flavorful drink.
  • Forgetting to add sweeteners if the fruit is not sweet enough.
  • Not using frozen fruit, which is crucial for the perfect slushy texture.
  • Letting the slushy sit too long can cause the layers to melt together.
  • Not washing the fruit thoroughly, which may introduce impurities.
  • Missing garnishments, which add a pop of color and flavor.
  • Using a low-power blender unable to crush ice effectively.

Essential Techniques

To achieve the distinct swirled appearance, blend each fruit separately and layer them carefully. This technique ensures a beautiful presentation and a balanced taste profile. Mastering blending times helps create the ideal icy consistency. Avoid overprocessing to maintain those delightful icy crystals. Visual cues, such as a rich color and a slushy texture without lumps, are key indicators of success.

Pro Tips for Perfect Pineapple Strawberry Swirled Slushies

For an extra layer of flavor, freeze pieces of pineapple and strawberries before blending. This adds texture and enhances the fruitiness. If you’re making ahead, store the separate mixtures in the freezer and blend briefly before serving to refresh the texture. Adding a splash of coconut milk creates a creamy variation that complements the tropical flavors beautifully. Reserve a few slices of fruit to use as garnish, serving both as a decorative piece and an infusion of extra freshness. For a more adult version, consider a dash of rum for a tropical cocktail twist. If you’re feeling adventurous, mint leaves blended with strawberries can add a refreshing herby note.

Variations and Adaptations

Explore regional variations by incorporating local fruits like mango or passion fruit for an exotic twist. In cooler months, substitute frozen berries for a winter-friendly option. Adjust for dietary needs by using a sugar substitute for a low-sugar version. Experimenting with additional fruit juices can create unique flavor combinations. For a richer texture, consider blending in a few chunks of banana. As a presentation alternative, serve in hollowed-out pineapple halves for a true tropical experience.

Serving and Presentation Guide

For elegant presentation, serve in tall glasses to show the beautiful swirl effect. Garnish with a tropical fruit slice or a sprig of mint for an eye-catching finishing touch. Accompany with light, crispy snacks for a balanced flavor experience. Use chilled glasses to help maintain the slush’s consistency. Consider serving with colorful reusable straws to add a festive look while being eco-friendly. Ensure portions are even to appreciate the layered flavors fully.

Wine and Beverage Pairing

Pair these slushies with a light, bubbly prosecco to complement their fruity notes. For a non-alcoholic pairing, a glass of iced tea with citrus undertones works beautifully. Serve at icy-cold temperatures to keep the slushies refreshing throughout. If you prefer warm beverages, a mild green tea can cleanse the palate between sips, enhancing the cold treat’s impact. Serve in stylish beverage dispensers to allow guests to help themselves.

Storage and Shelf Life

Store prepared slushies in an airtight container in the freezer if not serving immediately. When storing, ensure the freezer is at a constant temperature to prevent ice crystals from forming. Use BPA-free containers to avoid any unwanted chemicals leaching into the slushies. Check for color changes or off-smells as spoilage signs, and stir well before reheating. For freezing, separate the pineapple and strawberry portions to maintain layers, thawing them slightly before the second blend.

Make Ahead Strategies

Prepare the fruit mixtures separately and freeze for up to a month. Blend again quickly before serving to maintain the slushy consistency. Separate containers prevent blending of flavors and colors, preserving the swirled effect. Partial assembly before serving can streamline the preparation process during events. Reheat partially frozen mixtures only until slushy, avoiding full melting and texture loss. Fresh garnishes should be added right before serving to maintain a vibrant appearance.

Scaling Instructions

To halve the recipe, simply use half the amount of fruit and ice but be mindful of maintaining the correct balance of flavor. Doubling or tripling the recipe requires extra attention to blending times and may necessitate multiple batches. Ensure you have enough freezer space for preparation steps when scaling. Timing modifications may include more preparation steps but should not significantly impact the final texture. Store extra servings separately to maintain optimal condition and layered presentation.

Nutritional Deep Dive

A typical serving of these slushies is low in calories, with significant contributions of vitamin C from strawberries and pineapples. They are also an excellent source of antioxidants, aiding in cellular health and hydration. With minimal added sugars, they fit well within many health-conscious diets. The portion analysis provides a satisfying treat without overindulgence. Balancing natural sugars with high-fiber fruits supports good digestion and energy levels. Weight management strategies include enjoying slushies as a refreshing snack or dessert alternative to higher-calorie options.

Dietary Adaptations

For gluten-free adjustments, ensure no gluten-containing additives in your chosen sweeteners. A dairy-free version is naturally achieved with no dairy content. Vegan adaptation involves using all plant-based ingredients, which aligns with the original recipe. A low-carb modification can include replacing pineapple with lower-carb fruits or using sugar substitutes. To fit a keto diet, carefully balance net carbs from fruit choices. Paleo followers can enjoy these slushies without changes, focusing on whole fruits and natural preparation. A low-FODMAP adaptation is possible by selecting appropriate fruits, such as reducing strawberry amounts.

Troubleshooting Guide

Texture issues may arise if the blender is not powerful enough; ensure ice and fruit are chopped finely before blending. Achieve flavor balance by tasting and adjusting sweetness if needed. Temperature problems may occur if the slushies sit out too long; keep them in the freezer until the last moment. Equipments like a suitable high-speed blender are key to achieving a perfect blend. Ingredient substitutions, like using frozen fruit, can maintain cool temperatures and enhance texture. Timing concerns can be managed by organizing steps efficiently and prepping materials beforehand.

Recipe Success Stories

Our community loves the Pineapple Strawberry Swirled Slushies, often experimenting with their own fruit combinations. One reader added mango, creating a tropical fusion that was a hit at family gatherings. Another variation included a shot of rum for a beach-themed cocktail, received warmly during summer parties. Photography enthusiasts shared tips on capturing the vibrant colors, suggesting natural light for the best results. This interactive community has also suggested adding a splash of lime juice for an extra zing, leading to a delicious tangy version.

Frequently Asked Questions

Q: Can I use any type of blender?

A: Yes, a high-speed blender works best to achieve a smooth texture, but with patience, other blenders can also be used.

Q: How can I make the slushies sweeter?

A: Adjust the sweetness by adding a little honey or agave syrup. Taste as you go to find the right balance for your palate.

Q: Can fresh fruit be used instead of frozen?

A: Yes, but you may need to add more ice for the right consistency.

Q: How do I store leftovers?

A: Store in airtight containers in the freezer. Blend briefly before serving again to achieve the slushy texture.

Q: What if I don’t like pineapple?

A: Substitute with another tropical fruit of your choice, such as mango or passion fruit, for a different flavor.

Q: Is this recipe suitable for children?

A: Absolutely! It’s a refreshing and healthy treat that children can enjoy under supervision.

Q: Can I add alcohol?

A: Yes, spirit like rum or vodka can be added for an adult twist; adjust to taste.

Q: What’s the best way to serve them at a party?

A: Serve in clear glasses to showcase the swirls, and consider adding fruit garnishes for vibrant presentation.

Q: How can I prevent the slushies from melting quickly?

A: Serve immediately after blending, using chilled glasses. Keep away from heat sources to retain their icy texture.

Additional Resources

Check out our other fruit-based slushy recipes for more refreshing ideas, including mango-coconut or berry blend variations. Explore guides on selecting the best kitchen blenders to enhance your smoothie-making skills. Familiarize yourself with seasonal fruit charts to get the freshest and most flavorful ingredients year-round. Consider investing in quality glassware to enhance presentation at gatherings and parties. Dive into our beverage pairing suggestions to broaden your entertaining repertoire.

Join the Conversation

Share your Pineapple Strawberry Swirled Slushies experiments on social media with our community. Our readers love seeing variations and adaptations, so tag us in your posts to join the fun. Join our recipe exchange forum for reviews and tips from fellow slushy enthusiasts. Experiment with photography techniques, such as lighting and angles, to capture your swirled creations beautifully. Engage with our community through comments and discussions, enhancing your kitchen adventure with shared knowledge and inspiration.

The Recipe

Pineapple Strawberry Swirled Slushies

Serves: 4

Prep Time: 10 mins

Cook Time: 0 mins

Total Time: 10 mins

Kitchen Equipment Needed

  • Blender
  • Measuring cups
  • Knife
  • Cutting board

Ingredients

  • 2 cups frozen strawberries
  • 2 cups frozen pineapple chunks
  • 1 cup ice
  • 1-2 tablespoons honey or agave syrup (optional, for sweetness)

Directions

  1. Add frozen strawberries and half of the ice to the blender. Blend until smooth and set aside.
  2. Rinse the blender and add frozen pineapple chunks with remaining ice. Blend until smooth.
  3. In tall glasses, alternate spooning layers of strawberry and pineapple mixtures to create a swirled effect.
  4. Adjust sweetness with honey or agave, if desired, and gently stir to combine flavors without losing the swirl.
  5. Garnish with a slice of pineapples or strawberries and serve immediately.

Recipe Notes

  • For a creamier texture, add a splash of coconut milk to the pineapple mixture.
  • Fresh fruits can be used but add extra ice to maintain the slushy consistency.
  • Experiment with different fruit combinations for unique flavor twists.

Irresistible Homemade Chocolate Ice Cream Recipe for Ultimate Dessert Bliss

The Best Homemade Chocolate Ice Cream Recipe: A Creamy Delight for Every Occasion

⚖️
Difficulty
Medium

⏲️
Prep Time
20 mins

🕒
Cook Time
30 mins

⏱️
Total Time
50 mins

🍽️
Servings
8

Rich, creamy, and full of intense chocolate flavor, The Best Homemade Chocolate Ice Cream is a dessert that promises to indulge your senses. Perfectly chilled and smooth, this ice cream captures the essence of luxury in every scoop. Whether you’re celebrating a special occasion or simply craving a delightful treat, this recipe is your gateway to elevate your dessert game. Imagine relishing each mouthful, the creamy texture melting into a pool of chocolatey bliss, leaving you yearning for more.

This distinctive recipe stands out because of its balance of flavors, achieved by using high-quality cocoa and premium chocolate. With a delicate mix of sweet and bitter, it leaves an exquisite aftertaste that lingers long after you’ve finished. You’ll find this homemade chocolate ice cream to be a comforting classic that transcends seasons, making it ideal for any time of the year.

Quick Recipe Highlights

  • Flavor Profile: A divine blend of rich, dark chocolate with just the right amount of sweetness to create a balanced, indulgent flavor.
  • Texture: Creamy and silky with a luxurious mouthfeel that melts smoothly on your tongue.
  • Aroma: Enticing notes of cocoa and vanilla that fill your kitchen with a welcoming warmth.
  • Visual Appeal: A deep, dark chocolate hue that promises richness in every scoop, adorned with tiny chocolate chunks for added allure.
  • Skill Level Needed: Requires a moderate level of skill, making it accessible for home cooks comfortable with custard-based techniques.
  • Special Equipment: Ice cream maker, thermometer, and a heavy saucepan.

Recipe Overview

  • Difficulty Level: The recipe is moderately challenging, given the need to temper eggs with hot cream to create a custard without scrambling them. Mastering the right temperature is key, but the steps are straightforward with practice.
  • Category: Dessert. This homemade chocolate ice cream falls under the classic dessert category, serving as a fantastic end to any meal.
  • Cuisine: While ice cream is enjoyed worldwide, this recipe is quintessentially Western, drawing on traditional French techniques for creating custard-based ice creams.
  • Cost: Moderate, with the main expenses being high-quality chocolate and cocoa powder. However, the cost per serving is economical given the gourmet result.
  • Season: Suitable for all seasons. In summer, it provides a refreshing escape, while in winter, it offers a comforting, rich dessert.
  • Occasion: Perfect for dinner parties, family gatherings, or as a personal weekend treat. Its universal appeal makes it a crowd-pleaser.

Why You’ll Love This Recipe


When it comes to taste and texture, this chocolate ice cream is unparalleled. The luxurious creaminess of the base combined with the rich, intense chocolate flavor creates an experience that is both satisfying and memorable. The recipe uses both cocoa powder and chocolate chunks, ensuring that each bite is a harmonious blend of smooth texture and unexpected bursts of crunchy chocolate pieces.

Convenience is another highlight of this recipe. Although it requires an ice cream maker, the preparation steps are simple and can be managed easily in a home kitchen. You can prepare the custard ahead of time and churn it in the ice cream maker just before serving, allowing for a hassle-free dessert option. The ingredients listed are common pantry staples, with the exception of premium chocolate, making this an accessible recipe that doesn’t require a special trip to gourmet stores.

Nutritionally speaking, while ice cream is typically indulgent, you can control the quality and quantity of ingredients in this homemade version. The use of natural ingredients like fresh cream and cocoa ensures a more wholesome dessert without artificial additives or preservatives.

This recipe is also social and entertaining. It’s perfect for serving at parties, where guests can engage in the process of preparing and churning the ice cream together. The excitement of watching homemade ice cream come together is unmatched and often a conversation starter.

Cost-effectiveness is a compelling reason to try this recipe. Unlike expensive store-bought gourmet options, you can produce a high-quality ice cream at a fraction of the cost while achieving a superior taste. Investing in a few quality ingredients results in a batch of ice cream that can serve multiple guests, providing great value for money.

Historical Background and Cultural Significance


The origins of chocolate ice cream can be traced back to the late 17th century when chocolate began being used in sweet drinks. The transformation of this drink into a frozen treat was a natural evolution following the invention of ice cream itself. Chocolate ice cream was among the earliest flavors to be made and has held a prestigious place in dessert culture ever since.

Its cultural importance is significant in western cuisine, where it symbolizes indulgence and celebration. Chocolate, as a base ingredient, is often associated with luxury, pleasure, and decadence, making the ice cream version a popular choice for special occasions.

Over time, the recipe for chocolate ice cream has evolved to incorporate different types of chocolate and methods of preparation. From French-style chocolate custard bases to simpler Philadelphia-style recipes that omit eggs, the variations are endless, allowing for culinary creativity.

Regional variations also exist, with Italian gelatos offering their own take using less cream for a denser product. Meanwhile, American versions may prioritize a lighter, airier texture. This adaptability has only increased chocolate ice cream’s ubiquity and beloved status worldwide.

Ingredient Deep Dive


The main ingredient, chocolate, has a rich cultural history dating back to the ancient Mesoamerican cultures, which revered cacao as a sacred plant. Nutritionally, chocolate, especially dark varieties used in this recipe, is rich in antioxidants and minerals like iron and magnesium. When selecting chocolate for your ice cream, opt for high-quality brands with a cocoa content of at least 60% for a robust flavor, and store your chocolate in a cool, dry place to prevent immediate melting.

Cocoa powder also features in this recipe, known for its deep flavor and rich color. It’s an excellent source of dietary fiber and minerals such as zinc and selenium. Selecting unsweetened cocoa powder ensures that you control the sweetness of your ice cream. To maintain freshness, store your cocoa powder in an airtight container in a cool and dry pantry. For those looking for alternatives, carob powder or instant espresso powder can alter the flavor profile interestingly.

Common Mistakes to Avoid

  • Skipping the chilling step after making the custard, which can result in icy texture in your ice cream.
  • Uneven temperatures when tempering the eggs, leading to scrambled eggs in your custard base.
  • Using low-fat milk or cream that results in an unsatisfactorily thin consistency.
  • Not agitating the mixture enough during churning, which can yield ice cream with large ice crystals.
  • Forgetting to strain the custard to remove any cooked egg bits for the smoothest texture.
  • Adding chocolate chunks that are too large, making it difficult to scoop the ice cream.
  • Churning the ice cream while it’s too hot, preventing it from solidifying properly.
  • Not pre-freezing the ice cream maker bowl, leading to improper churning.
  • Using low-quality chocolate which will affect overall flavor.
  • Freezing for too long before serving, resulting in an overly hard consistency.

Essential Techniques


Tempering eggs is crucial in this recipe to prevent scrambling. Slowly add the hot cream to the eggs while whisking vigorously, and this gradual process ensures the eggs thicken without cooking. Another key technique is carefully churning the ice cream mixture in an ice cream maker. Churning incorporates air, preventing the formation of ice crystals and resulting in creamy ice cream. It’s crucial to avoid over-churning as it might lead to a grainy texture. Lastly, mastering the art of cooling the custard before churning is imperative. This step enhances flavor fusion and improves the ice cream’s consistency.

Pro Tips for Perfect Chocolate Ice Cream


It’s essential to select the best quality chocolate for the richest flavor. Always chill your mixture thoroughly before churning to ensure a smooth and creamy texture. To enhance the chocolate taste, consider adding a touch of sea salt or espresso powder. To avoid ice crystals, ensure your container is airtight when storing in the freezer. Allow your ice cream to temper on the counter for a few minutes before scooping for the best texture. Experiment with adding a dash of liquor like rum or whisky as it can enrich the flavor profile. Finally, taste the custard mixture before chilling; adjust the sweetness or chocolate levels at this stage.

Variations and Adaptations


Explore regional variations by incorporating spices like cinnamon for a Mexican twist. For seasonal adaptations, consider mixing in fresh raspberries during summer to add a fruity tang. Dietary modifications can be achieved by using coconut milk instead of cream for a dairy-free version. If you desire more depth in flavor, opt to substitute some cocoa with dark melted chocolate. To alter the texture, add various nuts or seeds for crunch. For presentation, roll scoops in finely chopped mint leaves or edible flowers to enhance aroma and visual appeal.

Serving and Presentation Guide


For plating, use pre-chilled bowls or cups to keep your ice cream cold for longer. A sprinkle of chopped mint or a drizzle of chocolate sauce can serve as fantastic garnishes. Traditional accompaniments include a side of cookies or fresh berries. For a modern touch, serve in waffle bowls for enhanced texture. Ensure that you serve the ice cream at the optimal temperature; allow it to sit for a couple of minutes after taking it out of the freezer to achieve a creamy softness. Lastly, portion control can be easily managed by using a measuring scoop for uniform size servings.

Wine and Beverage Pairing


Dark chocolate ice cream pairs beautifully with a range of beverages. A robust red wine like a Port or a Zinfandel complements its richness. Non-alcoholic alternatives such as a classic iced mocha can highlight the chocolate notes. Consider a velvety espresso or a strong black tea for a caffeine-infused pairing. Pay attention to serving beverages at the right temperature; a warm drink can be comforting in cooler months while a chilled option feels refreshing in the summer. Serve beverages in small amounts beside the ice cream to encourage slow sipping to enjoy both elements fully.

Storage and Shelf Life


To maintain peak freshness, store your chocolate ice cream in an airtight container. A robust freezer container helps keep it at the right temperature and prevents freezer burn. If any icy patches form, scrape them away and seal the container tightly. Check the consistency and flavor if left for more than a month, as homemade ice cream is best consumed within a month for optimal taste. Reheating is unnecessary, simply allow it to sit at room temperature for a few minutes. If intending to freeze batches long-term, label containers with the preparation date.

Make Ahead Strategies


This recipe is perfect for advance preparation. Begin by making the custard base up to two days in advance. Chill it well to infuse flavors over time. For optimal assembly, churn on the day of serving to preserve its freshness. If lacking time, batch making and storing isn’t a problem when you factor in proper freezing techniques to secure it long-term. Adding fresh garnishes, like cocoa nibs or fruit, right before serving elevates both decoration and taste. Always have garnishes prepped and ready to enhance efficiency when serving to a group.

Scaling Instructions


To adjust the recipe for smaller or larger gatherings, remember that ice cream ingredients can be halved or tripled with ease. Ensure kitchen tools like saucepans and bowls are adequate to handle increased volumes when scaling up. With timing, doubling the recipe may require additional churning time, while batch-freezing helps manage space. With storage, utilizing multiple smaller containers allows for consistent serving without unnecessary thawing of excess portions. Scaling down equally demands precision in measurements, so halving ingredients must retain their proportionate balance to avoid overly strong or weak flavors.

Nutritional Deep Dive


Each serving of this chocolate ice cream primarily comprises of fats, carbohydrates, and proteins, rounded to optimize creamy texture and flavor depth. It offers a good source of calcium and energizing carbohydrates, predominantly derived from natural sugars present in both milk and chocolate. On the vitamin front, the presence of antioxidants courtesy of cocoa is beneficial. Those watching caloric consumption should manage portion sizes, as typical servings can be dense due to the rich ingredients. For weight management, integrating this indulgence responsibly with ample physical activity is advisable.

Dietary Adaptations


For gluten-free adaptations, ensure all additional flavorings and any mix-ins like cookie bits are gluten-free certified. A dairy-free version can be concocted using coconut milk or almond milk as substitutes, with an additional starch thickener to achieve custard-like consistency. For a vegan alternative, use soy or oat milk and replace eggs with cornstarch or agar-agar powders. Low-carb or keto conversions can involve sugar replacements like erythritol or stevia while opting for dark chocolates minimal in sugars. For a Low-FODMAP version, choose lactose-free dairy options and no sugar alcohols.

Troubleshooting Guide


If your ice cream turns out grainy, ensure proper temperature is maintained during custard cooking and the mixture is smooth before churning. For flavor imbalance repair, adjust sweetness or salt post-churn as needed. Too firm ice cream suggests over-freezing; temper by leaving it out before serving. Equipment issues arise often with ice cream makers; make sure the bowl is adequately chilled before use. Ingredient substitutions can alter textures; always test small amounts first. If timing disruptions occur, resetting and managing stages with strategic advance preparation helps keep disruptions minimal and quality high.

Recipe Success Stories


Community members have shared their successes, with one reader noting that mixing in crushed peppermint during the holiday season adds a refreshing twist. Others have found delight in experimenting with a splash of bourbon for added warmth. Enthusiasts often praise how easy beginner chefs can dive into chocolate ice cream making through this recipe, despite its custard base challenge. Reader suggestions include enhancing it with chocolate chips for fun textural dynamics, or using flavored instant coffee to tailor undertones further. Capturing perfected scoops in photography showcases its ample richness.

Frequently Asked Questions

1. Can I make this chocolate ice cream without an ice cream maker? Absolutely! You can pour the custard into a shallow container and freeze, stirring every 30 minutes until firm.

2. What can I do if I don’t have a thermometer for checking the custard’s temperature? You can perform the spoon test by coating the back of a spoon with custard. If it leaves a clean line when finger swiped, it’s ready.

3. Can I use a different type of sugar for this recipe? Yes, feel free to replace granulated sugar with coconut or cane sugar, ensuring equal conversions for sweetness level.

4. What should I do if my chocolate seizes while melting? Gradually add a teaspoon of warmed heavy cream and stir continuously to restore texture.

5. How do I prevent a sharp ice cream taste from excess cocoa? Make sure to accurately measure cocoa, adding more sweetness or a dash of salt if cocoa dominates the taste.

6. How can I prevent freezer burn? Store in airtight containers leaving minimal air space and cover the surface with wax paper before sealing.

7. Can I mix other flavors into this base? Certainly, consider swirling with caramel, peanut butter, or fold in roasted nuts for versatile taste experimentation.

8. What’s the best way to serve this dessert at a party? Pre-scoop servings into individual cups and refreeze. Plating becomes seamless and quick for large groups.

9. How can I tell if my ice cream has spoiled? Off or sour odors, noticeable ice crystals, or significant discoloration signal spoilage, prompting proper disposal.

10. Can I adapt this recipe for different chocolate flavors? Yes, switching to white or milk chocolate creates unique variations, as taste balance adjusts accordingly.

11. Is it possible to use non-dairy milk? Non-dairy alternatives are acceptable, yet require stabilizers to match regular custard texture.

12. How can I keep my ice cream smooth without an ice cream maker? Constant stirring while freezing ensures optimal texture, albeit with added labor.

Additional Resources


Explore related recipes like vanilla bean ice cream for more homemade churning adventures. Technique guides delve into custard preparation for silky ice creams, while ingredient articles provide insight into selecting premium cocoa and chocolate. Equipment recommendations like high-performance thermometers ensure successful outcomes. Considering chocolate’s versatility, seasonal variations on dessert pairings enhance understanding of intricate flavor profiles linking desserts with savory menus.

Join the Conversation


Engage with us by sharing your favorite chocolate ice cream photos on social media with #ChocolateIndulgence. Photography tips include capturing during golden hour for vibrant color and texture. Leave recipe reviews and suggestions to help refine and innovate together as a community. Have your own chocolate twists? Share your recipe variations with fellow enthusiasts dedicated to uncovering culinary flexibility. This dynamic interaction fosters camaraderie among dessert aficionados, encouraging creativity.

The Recipe

The Best Homemade Chocolate Ice Cream

Serves: 8

Prep Time: 20 mins

Cook Time: 30 mins

Total Time: 50 mins

Kitchen Equipment Needed

  • Heavy saucepan
  • Whisk
  • Ice cream maker
  • Thermometer
  • Mixing bowls
  • Fine-mesh strainer

Ingredients

  • 2 cups heavy cream
  • 1 cup whole milk
  • 3/4 cup granulated sugar
  • 1/2 cup unsweetened cocoa powder
  • 2 ounces bittersweet chocolate, chopped
  • 4 large egg yolks
  • 1 teaspoon pure vanilla extract
  • Pinch of salt

Directions

  1. In a medium saucepan, combine heavy cream, milk, sugar, and cocoa powder. Heat on medium until just before boiling.
  2. In a separate bowl, whisk the egg yolks until smooth.
  3. Slowly pour the hot cream mixture into the yolks, whisking constantly to prevent curdling.
  4. Return the mixture to the saucepan and cook over low heat, stirring constantly, until it thickens enough to coat the back of a spoon.
  5. Pass the custard through a fine-mesh strainer into a clean bowl.
  6. Stir in chopped chocolate until melted, then add vanilla and salt.
  7. Cover and refrigerate until very cold, at least 2-4 hours or overnight.
  8. Churn mixture in an ice cream maker according to manufacturer’s instructions.
  9. Transfer to a container and freeze until firm, about 2 hours.

Recipe Notes

  • For a smoother texture, ensure thorough chilling before churning.
  • Add a splash of your favorite liqueur during the final step for depth in flavor.

Irresistible Southern Pecan Pralines Recipe for Sweet Lovers Everywhere

Perfect Southern Pecan Pralines: A Sweet Delight for Every Occasion

⚖️
Difficulty
Easy

⏲️
Prep Time
10 mins

🕒
Cook Time
15 mins

⏱️
Total Time
25 mins

🍽️
Servings
24 pralines

The Perfect Southern Pecan Pralines are a decadent treat that brings the sweet flavors of the Southern United States right to your kitchen. These pralines are rich in flavor, carrying notes of caramel and buttery goodness, beautifully complemented by the nutty crunch of pecans. Whether you’re nostalgic for a childhood treat or seeking a new dessert recipe to impress guests, these pralines offer a heavenly experience with every bite.

Rich in tradition, Southern Pecan Pralines are crafted with simple yet flavorful ingredients, such as fresh cream, butter, and sugar, combined into a silky, chewy candy that is hard to resist. Their aroma wafts through the kitchen, making it hard to wait until they cool. Each batch delivers a delightful blend of textures, perfectly capturing the essence of Southern hospitality.

A staple for festive occasions or simple family gatherings, these pecan pralines are a must-try. With their rich history and delectable flavor profile, they connect modern times with culinary traditions. In this post, we’ll delve into what makes these pralines so special, explore their cultural significance, and share tips for launching your candy-making journey.

Quick Recipe Highlights

  • Flavor Profile: A luscious blend of caramelized sugar, creamy butter, and the nutty taste of pecans, providing a warm and indulgent flavor.
  • Texture: Smooth and creamy with a slight chew from the caramelized candy, balanced by the crunchy texture of the whole pecans.
  • Aroma: Rich and buttery with hints of vanilla and toasted pecans, these pralines fill the room with a comforting sweet scent.
  • Visual Appeal: Golden brown with a glossy finish and studded with pecans, these pralines are as enticing on the eyes as they are on the taste buds.
  • Skill Level Needed: Easy enough for beginners, with straightforward steps and simple ingredients.
  • Special Equipment: A heavy-bottomed saucepan and a candy thermometer are essential tools for ensuring perfect consistency every time.

Recipe Overview

  • Difficulty Level: The simplicity of this recipe lies in the stir and pour method. This makes it an excellent choice for beginners and seasoned cooks alike.
  • Category: Sweet treats or confections, perfect for desserts and candy jars.
  • Cuisine: Deeply rooted in the Southern culinary tradition, capturing the essence of classic American sweets.
  • Cost: The ingredients aren’t expensive, making it a cost-effective way to create a luxury treat at home.
  • Season: Ideal for any season, but they are a festive favorite for holidays and gatherings.
  • Occasion: These pralines are perfect for holidays, gifting, or an anytime indulgence.

Why You’ll Love This Recipe


The taste and texture of Southern Pecan Pralines are simply captivating. The combination of melted butter and caramelized sugar yields a divine sweetness, with pecans adding a rich, nutty layer that enriches every bite. The melt-in-your-mouth consistency of these pralines makes it hard to stop at just one.

In terms of convenience, the praline recipe requires minimal ingredients and can be whipped up quickly. With a short prep and cooking time, these sweet delights are an easy addition to any dessert table or gift basket. The simplicity of the process belies the impressiveness of the result.

Southern Pecan Pralines offer a few nutritional perks as well. While they are certainly a treat, pecans bring a load of healthy fats and a slight dietary fiber boost, making these candies a relatively better indulgence compared to other sweet options.

Aside from the taste, Southern Pecan Pralines are a fantastic choice for social gatherings and events. Their appealing texture and rich aromas often spark conversations and can be a hit when shared during festivities and family meals. The nostalgia they evoke makes them universally adored, bridging generational gaps with flavor.

Economically, pralines are a winning choice. The main components like sugar, butter, and pecans are affordable and easy to find, while the impressive result they deliver feels like a high-end treat. You’ll delight guests without breaking the bank, whether for a party favor or a simple homemade gift.

Historical Background and Cultural Significance


The origin of Pecan Pralines can be traced back to the French colony of Louisiana in the 18th century, where settlers combined Old World recipes with local ingredients. The word “praline” itself comes from the French cook, Marshal du Plessis-Praslin. The adaptation of this sweet treat in the Southern states led to the inclusion of pecans, a native nut, which has become synonymous with this confection.

Culturally, Southern Pecan Pralines serve as a symbol of the warm hospitality and rich culinary traditions of the South. Often associated with sumptuous Southern feasts, they are a mainstay in celebrations and come as a testament to the region’s bountiful culinary creativity.

Over time, pralines have evolved from being a luxury candy for the elite to an everyday treat, accessible and beloved by many. The introduction of pecans into the recipe not only localizes it within Southern culture but adds a flavor that is now inseparable from the praline identity.

Regional variations of pralines include different nuts or additional flavorings. Some areas incorporate chocolate or rum to create unique versions while maintaining the core identity of pralines. Whether in New Orleans or Georgia, these candies possess a universal appeal.

Ingredient Deep Dive


Pecans: Pecans are a beloved ingredient in Southern cuisine, celebrated both for their rich history and nutritional benefits. Originating from Native American tribes, pecans were integral to their diet and trading. They are high in monounsaturated fats, which are heart-friendly, and contain antioxidants that help promote overall health. To select the best pecans, look for ones that have a uniform size and a rich golden-brown color. Ensure they are stored in a cool, dry place to maintain freshness, or refrigerate them to prolong shelf life. If necessary, pecans can be substituted with walnuts or almonds, offering a different nuanced taste.

Butter: Butter is a staple ingredient in both cooking and baking, known for imparting richness and flavor. Originating from the dairying traditions of ancient pastoral communities, it’s incredibly versatile. Butter is an excellent source of Vitamin A and other fat-soluble vitamins. When selecting butter, opt for unsalted options to adjust seasoning as needed, and ensure it’s stored in a sealed container in the refrigerator. For a healthier alternative, coconut oil or vegan butter can be substituted without sacrificing much flavor.

Common Mistakes to Avoid

  • Not using a candy thermometer: Achieving the right temperature is crucial. Without precise measurement, you risk the pralines being either too soft or too hard.
  • Overcooking the mixture: This can lead to the pralines becoming grainy. Remove from heat as soon as the correct temperature is reached.
  • Incorrect stirring technique: Stirring too fast after adding pecans can cause unwanted crystallization. Maintain a gentle pace.
  • Skipping the cool-down phase: Letting pralines cool undisturbed ensures a perfect set and texture.
  • Using old pecans: Stale nuts can significantly compromise flavor and texture, so ensure freshness.
  • Inadequate saucepan size: The mixture needs room to expand as it heats. Choose a pan big enough to avoid overflow.
  • Inconsistent ingredient temperature: Allow ingredients to come to room temperature for even cooking.
  • Not preparing the work surface: Pralines need a non-stick or parchment-lined surface for setting.

Essential Techniques


Achieving the perfect consistency is crucial when making pecan pralines. The key lies in cooking the mixture to the right temperature. A candy thermometer becomes indispensable in this process to ensure the mixture reaches the perfect 240°F (soft-ball stage), which guarantees the candy sets properly. Stirring is another essential technique; gentle and even stirring prevents the formation of sugar crystals, ensuring that the pralines remain smooth and creamy when set.

Pro Tips for Perfect Southern Pecan Pralines


Ensure all ingredients are measured and prepped before starting to maintain pace, especially since praline-making is a fast process. Use a heavy-bottomed saucepan for even heat distribution and to prevent the sugar from burning. Adding a teaspoon of lemon juice can prevent crystallization and help maintain a smooth, creamy praline texture. When cooling, ensure that pralines have enough space to lay flat and set properly.

For a sophisticated twist, consider adding a pinch of sea salt or a splash of bourbon to enhance the praline’s flavor profile. If you’re looking for a creamier praline, consider reducing the sugar content slightly while incorporating a little more cream to balance flavor and consistency.

Variations and Adaptations


Southern Pecan Pralines are open to endless variations. Incorporate regional flavors by adding cayenne pepper for a spiced praline or dipping half of a praline in chocolate for a rich, dessert-style candy. For a seasonal touch, add pumpkin spice in the fall, or zest of citrus fruits in the summer.

Dietary adaptations can be achieved with relative ease; use a dairy-free butter and plant-based cream for a vegan-friendly praline, or substitute the sugar with a low-glycemic alternative for a diabetic-friendly version. For a unique twist, fold in dried cranberries or raisins to add a chewy texture variation and a different flavor profile.

Serving and Presentation Guide


The visual appeal of pecan pralines is as delightful as their taste. When serving, consider arranging pralines on a decorative platter with parchment paper separating layers if stacking. To elevate their presentation, drizzle white chocolate over each praline or sprinkle them with finely chopped pecans. Traditional accompaniments might include a warm cup of coffee or tea, while more modern presentations could incorporate assorted seasonal fruits or a selection of cheeses for a contrast in flavors and texture.

Wine and Beverage Pairing


Consider pairing Southern Pecan Pralines with a rich dessert wine such as a Sauternes or a high-quality port, which complement the sweet, nutty flavors beautifully. If you prefer non-alcoholic options, chai tea or a creamy hot chocolate can enhance the pralines’ flavors without overpowering them. Ensure both the wine and non-alcoholic pairings are served at their appropriate temperatures: chilled for the wine and steaming for hot beverages, to fully enjoy the flavor profiles.

Storage and Shelf Life


Store your pecan pralines in an airtight container at room temperature, away from direct sunlight to prevent melting or discoloration. When properly stored, pralines can last for up to a week without significant loss of flavor or texture. To extend their shelf life, you can refrigerate them, although allowing them to return to room temperature before serving is ideal to restore their intended consistency. Avoid freezing pralines as the process can cause undesirable texture changes upon thawing.

Make Ahead Strategies


For optimal convenience, prepare pralines a day in advance of a planned event. The set candies benefit from a full cooling period, enhancing their texture and flavor profile. Keep the pralines separated with parchment paper in an airtight container to prevent sticking or merging. Rewarming isn’t necessary as pralines are best enjoyed at room temperature, but if desired, a brief stay in a warm area can soften them slightly.

Scaling Instructions


Scaling the recipe is straightforward. When doubling or tripling, make sure to use a larger saucepan to prevent overflow. Adjust cooking time slightly as larger batches take longer to reach the required temperature. It’s also prudent to make larger batches in succession rather than all at once to maintain quality and consistency. Store the extra pralines properly sealed to avoid humidity exposure or loss of flavor.

Nutritional Deep Dive


Pecan pralines primarily consist of sugar and fats, with a small protein contribution from the pecans. While they’re an indulgent treat, pecans themselves are known to contain vital nutrients including copper, manganese, vitamin E, and healthy fats that benefit cardiovascular health. With moderation, pralines can be enjoyed as part of a balanced diet. Consider serving smaller portions to manage sugar intake while still indulging in their deliciousness.

Dietary Adaptations


The pecan praline recipe can accommodate various dietary needs without sacrificing much flavor or quality. A gluten-free version is inherently a given, as the traditional recipe contains no wheat products. For a dairy-free or vegan alternative, substitute coconut cream and vegan butter to maintain a lush, creamy texture. To create a lower-carb option, utilize a sugar alternative like erythritol or monk fruit sweetener, keeping in mind textural differences upon setting.

Troubleshooting Guide


If your pralines turn out grainy, ensure that the sugar has been completely dissolved before reaching high temperatures and avoid stirring too vigorously after adding pecans. Sticky praline issues often arise from undercooking or excess humidity during setting; try reheating to the correct temperature and setting again on a cool day. If the mixture doesn’t set, check the accuracy of your thermometer and ensure it reads accurately at other crucial cooking stages.

Recipe Success Stories


Readers have shared commendable success with homemade Southern Pecan Pralines, with feedback highlighting the memorable simplicity and rewarding flavors. Some enthusiasts have taken it further, adding cinnamon or zest for a personal touch, with remarkable results well-received at gatherings. Others suggest deviations such as pressing pralines into small silicone molds for a uniform finish or sandwiching between chocolate-dipped biscuits, creatively expanding their use beyond the candy dish.

Frequently Asked Questions

What is the key to achieving the right praline texture?
The key lies in reaching the exact temperature of 240°F and allowing sufficient cooling time on a non-stick surface for proper setting.

Can I use a different nut if I’m allergic to pecans?
Absolutely! Potential alternatives include walnuts or almonds, though these will alter the traditional flavor profile slightly.

How long will these pralines stay fresh?
Stored in an airtight container, pralines remain fresh for up to a week. Refrigeration can extend this period slightly.

What happens if my pralines don’t harden?
Try reheating the mixture to the correct temperature; improper cooling or under-heating often results in soft pralines.

Is it possible to make these without a candy thermometer?
While possible, it’s challenging to achieve the perfect texture without accurately gauging the temperature, crucial for praline success.

Can you freeze pralines for longer storage?
Freezing is not recommended, as it affects the texture adversely, leading to potential stickiness or crystallization upon thawing.

Are there healthier sugar alternatives for pralines?
Erythritol or monk fruit sweetener can be used, though they may influence setting properties and the final texture.

What should I do if my mixture starts to crystallize?
Adding a few drops of lemon juice can help prevent crystallization by disrupting sugar structure formation.

Can pralines be shipped or gifted?
Yes, they make excellent gifts. When packaged securely in wax paper or cellophane bags, they travel well.

Are pralines suitable for a low-carb diet?
Traditional pralines are high in sugar; however, using alternative sweeteners can mitigate carb load.

Additional Resources


Explore related recipes such as caramel fudge or pecan butter cookies to further enhance your culinary repertoire. Delve into our technique guide for mastering candy-making at home, with tips on achieving perfect texture every time. For an extensive understanding of the key ingredients, read our in-depth article on selecting and storing nuts and natural sweeteners.

Join the Conversation


Share your praline creations and connect with a community of fellow enthusiasts! Engage with us on social media by posting your variations and decoration ideas using the hashtag #PecanPralinePerfect. We encourage recipe reviews and feedback to help refine flavors and techniques. Discover tips from top food photographers to showcase your sweet success with sleek dessert images.

The Recipe

Perfect Southern Pecan Pralines

Serves: 24 pralines

Prep Time: 10 mins

Cook Time: 15 mins

Total Time: 25 mins

Kitchen Equipment Needed

  • Heavy-bottomed saucepan
  • Candy thermometer
  • Wooden spoon
  • Baking sheet lined with parchment

Ingredients

  • 1 cup granulated sugar
  • 1 cup packed light brown sugar
  • 1/2 cup evaporated milk
  • 1/2 cup unsalted butter
  • 2 cups pecan halves
  • 1 tsp vanilla extract

Directions

  1. In a heavy-bottomed saucepan over medium heat, combine granulated sugar, brown sugar, evaporated milk, and butter.
  2. Stir constantly with a wooden spoon until the mixture reaches a rolling boil.
  3. Attach the candy thermometer to the pan and continue to boil without stirring until the mixture reaches 240°F.
  4. Remove from heat and stir in pecans and vanilla extract. Continue stirring until the mixture thickens and becomes creamy.
  5. Drop heaping spoonfuls of the mixture onto the prepared baking sheet. Allow pralines to cool and set completely.

Recipe Notes

  • For added flavor, consider adding a pinch of sea salt or a splash of bourbon when stirring in pecans.

Delicious Ice Cream Tacos: A Cool Twist on Dessert Tacos

Ice Cream Tacos: A Fun and Sweet Delight

⚖️
Difficulty
Easy

⏲️
Prep Time
20 mins

🕒
Cook Time
10 mins

⏱️
Total Time
30 mins

🍽️
Servings
6

Turn your dessert into a fiesta with this delicious Ice Cream Tacos recipe. These sweet and crisp treats are not only a feast for the eyes but also a thrill for the taste buds. With tones of chocolate and vanilla encased in a crispy taco shell, this dessert offers an irresistible fusion of textures and flavors for any ice cream lover. Perfect for parties or a fun family treat, this Ice Cream Tacos recipe will have everyone raving.

Enjoy the delightful contrast of creamy, cold ice cream paired with warm, chocolate-dipped taco shells. Each bite unveils a lovely blend of smooth, rich vanilla ice cream and the satisfying crunch of the shell, drizzled with chocolate and garnished with your favorite toppings. Whether you’re throwing a party or craving a novel dessert, ice cream tacos are an excellent choice to impress your guests and indulge in something delightfully different.

Quick Recipe Highlights

  • Flavor Profile: Expect a perfect blend of sweet and creamy with the ice cream complemented by rich chocolate and crispy shells.
  • Texture: Savor the smooth, velvety ice cream balanced by the crunchy taco shell and chocolate drizzle.
  • Aroma: Enjoy the inviting aromas of vanilla mingling with chocolate, making the dessert even more irresistible.
  • Visual Appeal: The tacos are visually striking, promising a vibrant presentation with colorful toppings.
  • Skill Level Needed: Simple enough for anyone to make, requiring basic kitchen skills with a focus on dessert assembly.
  • Special Equipment: No special tools are needed, just a waffle maker or iron for shaping the tacos.

Recipe Overview

  • Difficulty Level: This recipe is rated as easy, making it ideal for beginners due to its straightforward assembly and minimal cooking steps.
  • Category: Dessert; perfect for those who love creative twists on traditional ice cream servings.
  • Cuisine: A playful fusion of Mexican and American desserts, combining the charm of tacos with the classic attributes of ice cream cones.
  • Cost: Relatively affordable, making use of common ingredients like waffle mix, ice cream, and chocolate for dipping.
  • Season: Best enjoyed in warmer months when cool desserts are not only refreshing but also a treat for summer gatherings.
  • Occasion: Suitable for birthdays, summer parties, or anytime dessert is called for something unique and fun.

Why You’ll Love This Recipe


The Ice Cream Tacos recipe combines the beloved flavors of vanilla and chocolate with the fun, innovative twist of serving them in a taco form. These tacos offer the perfect blend of creamy, cold ice cream with a satisfying, crunchy shell, making each bite a delightful experience. They’re not only delicious but also exceptionally versatile, allowing you to choose your favorite ice cream flavors and toppings.

Preparation is a breeze with this recipe. Basic ingredients like pre-made waffle mix and store-bought ice cream simplify the process, so you spend less time in the kitchen and more time savoring your creation. The ease of combining the ingredients ensures that even the novice cook can impress both themselves and their guests with this fun dessert.

Ice Cream Tacos allow you to indulge without the guilt. You can tailor them to fit your dietary preferences by choosing low-fat or vegan ice cream options. Toppings like fresh fruits provide added nutritional benefits while keeping the treat on the lighter side.

These tacos are not just a dish; they are an experience. They make for a perfect party dessert or a fun family night, where everyone can customize their taco to their liking. This recipe can effortlessly become the highlight of any event.

The cost-effectiveness of this recipe is impressive due to its reliance on staple grocery items. By choosing seasonal ingredients or buying in bulk, you can reduce the costs even further, making it a budget-friendly way to enjoy a gourmet dessert at home.

Historical Background and Cultural Significance


Ice Cream Tacos represent a fusion of cultural backgrounds, drawing from the Mexican tradition of tacos and the ubiquitous love for ice cream found globally. The concept likely evolved from the infinite possibilities of adapting popular foods to create innovative desserts that capture diverse cuisines in a single dish.

Originally, tacos were savory, crafted from corn tortillas and encompassing a variety of fillings. The idea of using them in a dessert form highlights culinary creativity, showing how classic forms can be reimagined to keep up with evolving food trends.

This dessert has gained momentum, especially in the United States, as a beloved treat, often featured at food festivals and markets where traditional and modern converge to excite the palate. The evolution of Ice Cream Tacos showcases how fun adaptations can bring cultures together through food.

Variations of Ice Cream Tacos can be found across different regions, with chefs and home cooks alike putting their spin on the classic, using locally available ingredients or tailoring to fit vegan or gluten-free preferences.

Ingredient Deep Dive


Waffle Mix: Waffle mix provides the foundation for the taco shell, offering a sweet and slightly savory base. Historically, waffles originated from the Middle Ages in Europe, and their versatility makes them perfect for this dessert adaptation. Choosing a high-quality mix ensures a crunchy shell, while storage in a cool, dry place maintains its freshness.

Ice Cream: The star of this recipe, ice cream adds creaminess and depth. It originated as a luxury treat and has become an accessible comfort food. Selecting premium brands results in a smoother texture, while storing at the optimal freezer temperature preserves its consistency. Feel free to explore flavors to adapt the tacos; from classic vanilla to bold coffee, the possibilities are endless.

Chocolate: Used for drizzling and dipping, the quality of chocolate can make or break the dessert. With a rich history dating back to the Aztecs, chocolate is adored worldwide for its depth of flavor. Properly stored, it maintains optimal melting qualities, enhancing both presentation and taste in your Ice Cream Tacos.

Common Mistakes to Avoid

  • Overfilling the shells can lead to a messy eating experience. Aim for a modest scoop of ice cream to avoid overflow.
  • Not allowing the shells to cool before filling; they must be fully cooled to maintain their shape and prevent wilting.
  • Using low-quality chocolate can lead to poor melting and aesthetic results, impacting the final presentation negatively.
  • Skipping the chilling step after assembly can result in melting, thus detracting from the overall enjoyment.
  • Neglecting to preheat the waffle iron can cause uneven cooking and undesirable texture in your taco shells.
  • Underestimating the hardening time for the chocolate drizzle which could lead to smudges and a less polished look.
  • Choosing ice cream that’s too soft. Opt for a firm texture to ensure a satisfying bite and prevent premature melting.
  • Forgoing parchment paper as a barrier between the tacos and refrigerator shelves can impact presentation adversely.

Essential Techniques


Making the perfect Ice Cream Tacos involves key techniques that enhance both aesthetics and taste:

Preheat your waffle iron and lightly oil its surface to ensure even cooking and prevent sticking. This creates a uniform shell crucial for the taco’s integrity and presentation.

When melting chocolate, do so gradually over a water bath or microwave on low heat. This prevents scorching and achieves a glossy finish that hardens well and clings to the shells effectively.

Ensure all assembly components like shell and melted chocolate are cooled before adding ice cream. This technique maintains structure and prevents premature melting.

Practice portion control with toppings. It’s crucial to ensure each ingredient complements without overwhelming the key flavors, balancing the final dish harmoniously.

Pro Tips for Perfect Ice Cream Tacos


Consider toasting nuts or coconut flakes for a richer flavor before using them as toppings. This enhances their natural taste while adding a crunchy element.

Allow enough time for the tacos to chill post-assembly for the best results. The cooling process ensures the dessert holds its shape and is enjoyable to eat.

Experimenting with flavored ice cream is encouraged but stay mindful of the shell’s sweetness, so the final product doesn’t become excessively sugary.

If hosting a gathering, set up an ice cream taco bar to let guests customize their desserts. This not only adds an interactive element but also accommodates varied dietary preferences.

Match the taco shells’ color to enhance visual appeal by experimenting with food coloring. Visually stunning shells add that extra wow factor to the presentation.

For an extra twist, add espresso powder or flavored extracts to the chocolate drizzle. This imparts a unique profile that can complement different ice cream flavors beautifully.

Variations and Adaptations


Try adapting the recipe seasonally by using pumpkin ice cream in fall or fresh fruit sorbets during summer. These modifications not only reflect the season but also add a refreshing change.

Dietary modifications can include using dairy-free ice cream or gluten-free waffle mix, thus catering to those with specific dietary requirements, broadening the dish’s appeal.

Experiment with flavor variations such as cinnamon-clove chocolate drizzle for a warm spice touch, bringing new dimensions to a classic formula while retaining the essence of the dish.

Texture can be altered by introducing crunchy elements like granola or crushed cereal into the topping, adding exciting contrast to the creamy, smooth base.

Presentation alternatives include serving the tacos individually in decorated cupcake wrappers, ensuring easy handling while boosting visual charm.

Serving and Presentation Guide


Plating these tacos individually on small patterned plates adds an elegant touch and elevates the visual appeal, making each serving special.

Garnish with edible flowers or mint leaves for a fresh burst of color, enhancing the dish’s vibrancy and creating a stunning visual effect.

Traditional accompaniments like a small shot of espresso or a drizzle of caramel sauce align with the dessert’s theme, enriching the gastronomic experience.

To serve modern, create a DIY taco station, allowing guests to assemble, customize, and a personal touch to their tacos, transforming dessert into a creative engagement.

Keeping their serving temperature consistent by using pre-chilled plates helps retain their refreshing texture and ensures each bite is as enticing as the first.

Ensure portion control by using smaller taco shells, allowing guests to indulge without overwhelming their palates, perfect for tasting multiple flavor combinations at a party.

Wine and Beverage Pairing


Pair these Ice Cream Tacos with a light sparkling wine such as Prosecco. Its effervescence complements the sweet and creamy elements without overpowering them.

For a non-alcoholic alternative, try a vibrant berry iced tea. The slight tartness cuts through the richness, refreshing the palate and enhancing the dessert’s flavors.

If you prefer coffee pairings, an iced coffee or cold brew with subtle chocolate notes can harmonize beautifully with the dessert, adding to the overall taste profile.

Consider the temperature of the beverages; chilled options are often preferable, replicating the refreshing feeling of the dessert itself, constructing a coordinated dining experience.

Strong black tea with a hint of vanilla could also serve as an excellent beverage suggestion, providing a comforting yet sophisticated background taste to the tacos.

Serving in elegant glassware corresponds with the visual appeal of the dessert, contributing an aesthetic charm that complements the playful presentation of Ice Cream Tacos.

Storage and Shelf Life


Store any leftover Ice Cream Tacos in an airtight container with parchment paper separating the layers to prevent sticking and maintain an appealing look.

Keep them frozen at a consistent freezing temperature, ideally at 0°F or lower, to preserve the ice cream integrity and shell crispness.

Significantly, avoid repeated thawing and refreezing, as this can compromise both texture and taste, leading to an undesirable icy flavor.

Check for signs of spoilage, such as excessive ice crystals or changes in smell, which indicate the tacos are no longer fit for consumption.

To enjoy reheated tacos, allow them to thaw slightly at room temperature for a few minutes, restoring the ice cream’s creamy texture without melting the shells.

If planning to freeze for longer durations, tightly wrap the shells separately before assembling to preserve freshness and avoid freezer burn.

Make Ahead Strategies


Ice Cream Tacos can be prepared in advance by making and assembling the shells only, storing them in the freezer until it’s time to fill them with ice cream.

Have the melted chocolate ready ahead of time by storing in a piping bag in the fridge, allowing for quick drizzling over ready-made tacos, adding a professional touch.

Preparation should follow a timeline where each step seamlessly transitions, minimizing inactive waiting periods, thereby maximizing efficiency and quality.

Between steps, proper storage of components in the freezer maintains their crispness, ensuring each element is at its best when it’s time to serve.

The assembly should be rapid to keep temperature fluctuations minimal, allowing the dessert to maintain its intended firmness and texture.

Before serving, consider adding freshly chopped seasonal fruits for an added brightness and freshness, balancing out the rich flavors with natural sweetness.

Scaling Instructions


To scale the Ice Cream Tacos recipe, carefully consider the timing and equipment adjustments required for larger batches, ensuring all shells have sufficient space in the waffle iron.

Halving the recipe requires proportionally adjusting the quantities of each ingredient, and careful attention to mixing techniques to preserve the desired results.

Doubling or tripling elevates the complexity, mandating larger equipment or multiple runs, which must not compromise the preparation steps or quality.

Adapt your temperatures and cook times slightly when scaling; this foresight helps prevent unintended texture changes, safeguarding the original charm of the dessert.

Ensure adequate storage space for scaled quantities, with organized airflow for even freezing, essential to keeping stores fresh and palatable.

Conduct a pre-scale test batch for unfamiliar recipes or significant scaling, allowing for fine-tuning before serving the final version to guests.

Nutritional Deep Dive


Understanding the nutritional profile of Ice Cream Tacos offers insights into balancing indulgence with health.

The macronutrient breakdown predominantly consists of carbohydrates from the waffle and ice cream, complemented by healthy fats, particularly from chocolate elements.

Micronutrient content can be elevated through select toppings, such as adding nuts for vitamin E and essential minerals, or berries for antioxidants.

Portion control addresses dietary considerations, ensuring reasonable serving sizes for mindful consumption without sacrificing flavor.

By customizing ice cream with lower sugar content, you can create a treat that aligns more favorably with dietary restrictions, accommodating diverse lifestyles.

Serve with nutritious sides or accompaniments like fresh fruit, enhancing both the balance and aesthetic appeal of the meal while supporting weight management goals.

Dietary Adaptations


For gluten-free adaptations, opt for certified gluten-free waffle mixes and toppings, crafting an inclusive dessert without compromising taste or integrity.

Dairy-free options are achievable by using plant-based ice cream and chocolate, maintaining the essence of the dish while accommodating lactose sensitivity.

To achieve a vegan version, select suitable substitutes across all parts of the recipe, from the waffle batter to garnishments, enjoying guilt-free Ice Cream Tacos.

Low-carb alterations involve using alternatives like almond flour for the shells and sugar-free chocolate, keeping this dessert in line with keto or diabetic lifestyles.

Paleo-friendly modifications are possible with natural sweeteners and coconut milk ice cream, reflecting this diet’s focus on unprocessed ingredients for well-being.

A low-FODMAP recipe transformation is attainable by selecting compatible ice cream options and carefully curating toppings that meet dietary guidelines.

Troubleshooting Guide


Ensure proper texture balance by keeping the ice cream firm before assembly but slightly soft enough for an easy scoop; this minimizes unnecessary melting during serving.

Balancing flavors involves a meticulous assortment of toppings that complement without overwhelming the ice cream base or chocolate drizzle, ensuring a harmonious outcome.

Manage temperature well by actively controlling freezer conditions and transport timing, maintaining optimal conditions from preparation to serving.

Overcome equipment challenges by researching ahead of time the effectiveness of waffle irons available, as well as being ready with substitutes like frying pans in a pinch.

For effective ingredient substitutions, consult reliable charts or substitution guides to ensure each backup choice preserves cumulative texture and taste.

Timing efficiencies are vital, achieved by setting up stations with all necessary components ready, reducing lag time between steps while maximizing the dessert’s overall appeal.

Recipe Success Stories


Ice Cream Tacos have been a hit at various community events, bringing smiles with their whimsical format, encouraging guests to indulge in a unique dessert experience.

Variations adapted by real-life cooks include adding a spicy kick with chili chocolate drizzle, illustrating the recipe’s versatility without altering core satisfaction.

Many readers have shared their adaptation successes by substituting traditional candies with healthier options, enjoying the tacos while aligning with personal nutrition goals.

Structured feedback from different forums highlights the accessibility of the ingredients, recommending the recipe to beginners looking to build confidence in creative desserts.

Through shared photography tips, community members have enhanced their presentations, learning from each other about how to capture the essence of Ice Cream Tacos.

Frequently Asked Questions

Q: Can the taco shells be made ahead of time?

A: Yes, you can make and freeze the taco shells ahead of time. Store them in an airtight container, interleaved with parchment paper to avoid sticking, maintaining freshness.

Q: What’s the best way to melt chocolate for the drizzle?

A: Melt chocolate gently using a double boiler method, gradually heating and stirring to prevent seizing and achieve a smooth, perfect consistency.

Q: Options for dairy-free ice cream?

A: Choose from almond, coconut, or soy-based varieties, now widely available, accommodating lactose intolerance while providing excellent flavor and texture.

Q: Any recommendations for low-sugar toppings?

A: Consider topping with nuts or small amounts of dark chocolate, known for their naturally lower sugar levels, offering healthful, delicious enhancements for the tacos.

Q: How do you prevent the shells from breaking?

A: Ensure even cooking in the waffle iron and allow complete cooling before assembly, maintaining structural integrity throughout the filling process.

Q: Alternatives if I don’t have a waffle iron?

A: Use a grill pan or even a non-stick frying pan, mimicking the texture and taste of traditional waffle-prepared shells through improvisation.

Q: What’s a good seasonal twist for fall?

A: Pumpkin spice ice cream offers an enticing autumnal spin, aligning flavors with the season’s character while offering something fresh and intriguing.

Q: Can I double the recipe effortlessly?

A: Yes, doubling is straightforward, just ensure you have adequate freezing space and preparation surfaces to accommodate the increased quantity without loss.

Q: What if my shells go soft too fast?

A: Keep them chilled rigorously during storage and avoid excess moisture exposure, thereby prolonging crispness from preparation through savouring.

Q: Any alcoholic pairing suggestions?

A: Champagne’s dry profile balances well with the dessert’s sweetness, offering sophistication and enhancing the tasting atmosphere through its crisp, refreshing flavor.

Additional Resources


Finding supplementary resources that enhance your Ice Cream Tacos experience adds another dimension to culinary exploration.

Look to related recipes like homemade waffle cones and ice cream making for a comprehensive understanding of foundational elements in this dish.

Consult technique guides on effective chocolate tempering for perfect drizzle and structural bonds.

Seek ingredient information, sourcing the best chocolate brands or waffle mixes available, optimizing both taste and texture.

For equipment advice, detailed reviews of the best waffle irons or chocolate melting tools direct new novices on a path of reliable, informed choices.

Explore seasonal variations through cooking blogs or channels focused on adapting classic recipes with trends, sustaining excitement in the kitchen year-round.

Join the Conversation


Engage with fellow ice cream taco enthusiasts on social media, sharing your creations and gathering inspiration for future endeavors. The community aspect adds collective support and idea sharing.

Experiment with photography styles, capturing the vibrant colors and inviting textures of your tacos to share visually captivating content with an eager audience.

Reviews of the recipe help bring awareness to others who may be considering embarking on crafting these sweet treats, reassuring them with honest experiences.

Engaging with a friendly cooking community allows for recipe variations, with experienced amateurs sharing tried and successful adaptations.

Join online forums for those keen on dessert innovation or niche foods, discovering motivational stories and practical advice linked to Ice Cream Tacos.

Irresistible Homemade Apple Turnovers: A Simple and Delicious Recipe

Classic Apple Turnover Recipe: A Sweet, Flaky Delight

⚖️
Difficulty
Easy

⏲️
Prep Time
20 mins

🕒
Cook Time
25 mins

⏱️
Total Time
45 mins

🍽️
Servings
4

Imagine biting into a Classic Apple Turnover, freshly baked and just warm enough to melt the buttery pastry in your mouth. As you take that first bite, the combination of sweet, spiced apple filling and perfectly golden, flaky pastry recalls the cozy embrace of fall. The apples, caramelized to perfection, offer a delightful sweetness without overpowering the nuanced notes of cinnamon and nutmeg. This baguette-perfect treat is not only the star of cozy family gatherings but also an elegant addition to any brunch table. Whether enjoyed with a steaming cup of coffee or a frothy chai latte, these delectable turnovers promise to satisfy every craving.

Quick Recipe Highlights

  • Flavor Profile: The turnovers feature sweet, tart apples infused with warm spices, making each bite a delightful contrast of flavors.
  • Texture: Light, flaky pastry envelops a luscious, juicy filling that promises a satisfying crunch followed by a melt-in-your-mouth sensation.
  • Aroma: The irresistible aroma of baked apples and cinnamon creates a warming atmosphere reminiscent of home-baked goodness.
  • Visual Appeal: These turnovers boast a golden-brown crust and an inviting, rustic look that hints at the deliciousness within.
  • Skill Level Needed: This recipe is simple enough for beginners but offers opportunities for more experienced bakers to experiment with variations.
  • Special Equipment: You’ll need a pastry brush for egg wash and a baking sheet. A sharp knife will help in creating clean pastry cuts.

Recipe Overview

  • Difficulty Level: Rated easy to make, this recipe involves basic pastry skills and an oven. With our step-by-step instructions, even novice bakers can achieve bakery-level results.
  • Category: This dessert or sweet snack is perfect for casual tea parties, children’s lunchboxes, or simply as a delightful treat any time of day.
  • Cuisine: Originating in European cuisine, the apple turnover has become a beloved treat worldwide, celebrated for its straightforward yet delicious nature.
  • Cost: With accessible pantry ingredients like apples and spices and store-bought puff pastry, this recipe is budget-friendly and makes a batch perfect for feeding a crowd.
  • Season: While apple turnovers are a fall favorite, their fresh flavor is welcoming year-round, ideal for showcasing seasonal apple varieties.
  • Occasion: Ideal for breakfast, dessert, or afternoon tea, apple turnovers fit any occasion where comfort and taste are prized.

Why You’ll Love This Recipe


The taste and texture of this Classic Apple Turnover are sure to win you over from the first bite. The buttery, flaky pastry encases a perfectly sweet and spiced apple filling, harmonizing with your taste buds to deliver a heavenly experience. The turnovers’ appeal lies in their simplicity and the comforting emotions they evoke.

These turnovers are incredibly convenient to make. With minimal preparation, and using readily available ingredients, you can create these treats in under an hour. Whether preparing for an impromptu gathering or a planned event, these turnovers fit into any schedule with ease.

In terms of nutritional benefits, apples are the star of this recipe, providing a wealth of vitamins and dietary fiber. The spices, especially cinnamon, also offer antioxidants, completing a surprisingly healthy treat.

Apple turnovers are perfect for social gatherings and entertaining. Their elegant shape and delightful aroma make them an easy conversation starter and a favorite among guests. Practical enough for sharing, they add a touch of homemade love to any event.

Finally, this recipe is cost-effective and accessible. By selecting ingredients that are already staples in your pantry or easy to find at any grocery store, you can enjoy an elegant dessert without breaking the bank. The preparation process is straightforward, ensuring you achieve spectacular results every time.

Historical Background and Cultural Significance


The origin of apple turnovers can be traced back to European pastry traditions. These delightful treats began gaining popularity in France, where the idea of wrapping fruits in pastry was embraced. Over time, this concept evolved into the apple turnover we know and love today—an easy-to-make treat with universal appeal.

Culturally, apple turnovers hold a special place in the culinary traditions of many countries. Loved by families because of their simplicity, turnovers inspire nostalgia for childhood memories filled with cozy family kitchens and baking days.

The recipe has evolved over generations, encompassing new ingredients and techniques that reflect its widespread popularity. Adopted around the world, apple turnovers take different forms: from puff pastry variations to fillings of varied sweetness.

Globally, different regions have embraced the apple turnover, adding unique twists that reflect local ingredients and tastes. German bakeries might offer a variant with a hint of marzipan, while American versions may include a touch of caramel. These regional adaptations showcase the recipe’s adaptability and timeless appeal.

Ingredient Deep Dive


Apples, the primary ingredient, are not only a cultural icon but also a versatile fruit found in cuisines worldwide. An essential in many classic desserts, apples bring sweetness, tartness, and nutritional benefits, such as vitamins and fiber, making them a beloved staple.

When selecting apples, Aim for ones that maintain their structure upon cooking, like Granny Smith or Honeycrisp. These varieties ensure a firm filling that complements the flaky pastry. Store apples in a cool, dark place to extend their fresh flavor right before baking.

Spices are also pivotal—cinnamon and nutmeg elevate the turnover’s simple premise to aromatic perfection. Choose fresh spices for the most impact, and store them in a cool, dry place for optimal preservation. A pinch of allspice is a delightful option when seeking a flavor variation.

Puff pastry serves as the canvas for this recipe. The airy, flaky layers come to life with butter and heat. For a seamless experience, let the pastry thaw in the refrigerator before use, ensuring the right balance between pliability and firmness.

Common Mistakes to Avoid

  • Avoid using overly soft apples, as they may become mushy upon baking. Choose firmer varieties for a pleasant texture.
  • Ensure the puff pastry is adequately thawed before use; too cold and it may tear, while too warm and it will become sticky.
  • Don’t overfill your turnovers—this could cause leaks during baking. Opt for a spoonful of filling per turnover.
  • Avoid baking on parchment paper without ensuring adequate space between turnovers, preventing potential sticking.
  • Employ an egg wash. This golden glaze not only encourages browning but also adds a beautiful sheen to the pastries.
  • Resist the temptation to over-bake; remove them when golden brown to ensure a tender pastry crust.
  • Let turnovers cool slightly before serving for optimal flavor and ease of handling.
  • For flavor accuracy, use freshly grated nutmeg rather than pre-ground whenever possible.

Essential Techniques


An important technique in making apple turnovers lies in handling the puff pastry. Its delicate, multi-layered nature requires care. Before rolling it out, ensure it’s properly thawed to prevent cracking and to achieve an effortless rolling action.

Achieving the perfect apple filling involves cutting fruit to a uniform size. This ensures even cooking and a consistent texture. Cook the mix on medium heat to caramelize sugars and release the apples’ natural sweetness without burning.

Sealing the turnovers is another crucial step. Use a fork to press the edges firmly, creating a tight seal that preserves the filling’s moisture and prevents spills. This technique also adds a decorative touch.

Layering flavors is a thoughtful approach in this recipe. Mix spices thoroughly into sugar before coating apples, ensuring an even distribution of flavors throughout the filling. This minor step makes a big difference in taste.

Pro Tips for Perfect Apple Turnovers


For perfectly golden turnovers, use an equal mix of egg and water for your egg wash. This combination enhances browning and avoids shadows from uneven washes.

Score the top of each turnover gently with a sharp knife. This step not only releases steam during baking, preventing sogginess, but also creates an inviting, artisanal pattern.

Cool the turnovers fully on a wire rack post-baking. This spacing allows air to circulate, maintaining the pastry’s crisp integrity rather than steaming.

If time allows, prepare the filling a day in advance. Chilling the mixture enhances the melding of flavors, creating a more cohesive taste in every bite.

Make it a fall-themed indulgence by grating a bit of orange zest into the filling. This citrusy touch infuses brightness and complements the spices beautifully.

Achieve an expert-level finish by dusting the cooled pastries with powdered sugar or a drizzle of simple icing for added sweetness and presentation appeal.

Consider serving your turnovers with a side of dairy, such as a dollop of clotted cream or a scoop of rich ice cream. The cold, creamy texture accentuates the pastry’s warmth.

Variations and Adaptations


Regional variations can add both fun and flavor to this classic treat. In France, turnovers might include a sprinkle of almonds, while Middle Eastern variations may introduce a hint of cardamom, altering their cultural expression.

Seasonal adaptations bring forth freshness. In spring, consider adding finely chopped rhubarb to the filling for a tart twist. Summer’s bounty of berries can transform the traditional apple turnover into an exciting mixed fruit medley.

Dietary modifications are easily accommodated. For a vegan version, use a plant-based margarine over butter and a water and flour mixture for a wash instead of eggs.

Flavor variations can introduce warmth or zest. Add a touch of ginger for a warm spiciness, or lemon zest for brightness, personalizing taste to your liking.

Texture modifications may include leaving small apple chunks for added bite or introducing a sprinkle of oat crumble for a whimsical touch.

Presentation alternatives like forming them into bite-sized dumplings or braid tarts can appeal to creative bakers, turning traditional turnovers into stunning table centerpieces.

Serving and Presentation Guide


Elegant plating techniques can elevate your apple turnovers. Serve them on a wooden platter for rustic appeal or a white ceramic plate for a modern touch that highlights the golden hues of the pastries.

Garnishing ideas abound: think fresh mint leaves or a dusting of powdered sugar across the plate. Edible flowers like pansies can add a colorful pop and a touch of elegance.

Consider traditional accompaniments such as clotted cream or custard, enhancing the comfort dessert experience. Alternatively, offer modern pairings like a raspberry coulis for subtle tartness.

Temperature considerations dictate serving these pastries slightly warm. The butter re-melts into the dough, creating an almost ethereal pastry texture.

Portion control is expertly managed by pre-slicing the turnovers halfway for guests. This approach pleases those desiring smaller portions while maintaining a visually appealing presentation.

Wine and Beverage Pairing


Classic pairings such as a refreshing Reisling or a crisp Chardonnay beautifully complement the apple turnover’s sweetness and spice, undergoing a symphony of dessert and wine harmony.

For non-alcoholic alternatives, opt for apple cider. Its earthy flavors resonate with the turnovers’ core ingredients. Sparkling water with fruit essence can also bring a modern twist.

Coffee or tea pairings expand options—strong black coffee or a spiced chai amplify the turnover’s warm notes. Experiment with brewed mint or herbal teas for a refreshing take.

Temperature considerations suggest serving hot beverages to contrast the pastry’s warmth, highlighting its inviting taste and enhancing the overall gastronomic experience.

When serving, suggest a single turnover plated with accompanying beverage, showcasing the turnover as the star, complemented rather than overshadowed.

Storage and Shelf Life


Proper storage enhances your apple turnover’s freshness. Store baked turnovers in an airtight container at room temperature for up to two days, preserving their flavor and texture.

Refrigeration for up to five days offers extended freshness. If efficiency is priority, single-layer containers prevent stacking, negating smushed pastries.

Signs of spoilage include a softened, mushy texture or an off aroma. Always utilize these indicators to ensure quality is maintained.

Reheating instructions remind you to revive turnovers in a preheated oven at 350°F for 10 minutes or until warm, revitalizing their fresh-baked allure.

Freezing guidelines recommend pre-freezing uncooked turnovers on a baking sheet for a solid hour, before transferring them to freezer bags for future baking pleasure.

Make Ahead Strategies


Advance prep streamlines this already effortless recipe. Create and chill your filling a day prior to baking, merging flavors deeply, achieving beautifully cohesive bites.

Between steps, a humidity-controlled refrigerator preserves your pastry’s pliability, thwarting drying or sogginess while resting.

Quality impact assessments highlight the benefits of pre-chilling dough and filling, ensuring optimal structure and balanced flavors during baking.

Assembly tips, such as working with semi-cold dough, guard against over-stretching, preserving the turnovers’ artistic structure.

Reheating guidelines promise warmth with a 15-minute 350°F oven refresh, restoring crispness without sacrificing flavor.

Adding fresh elements, like a sprinkle of sugar or dusting of spices before reheating, revitalizes their inviting aromas.

Scaling Instructions


To half the recipe, proportionally decrease ingredients, simplifying kitchen management. This approach conserves both supplies and costs, boosting efficiency.

Doubling or tripling recipes requires attention to detailed dough measurements and scaling ratios. Expanded batches invite party preparations, reducing last-minute rush.

Larger recipes might necessitate equipment adjustments, ensuring all turnovers fit comfortably on baking sheets without crowding.

Timing modifications, including adjusting cook increments according to larger batches, safeguard thorough baking and perfect results.

Storage considerations help maintain freshness in larger amounts: layer turnovers single slope between parchment in airless containers.

Nutritional Deep Dive


A macro breakdown highlights these turnovers as moderate-calorie, carbohydrate-centric treats; sugars and fats contribute pleasing flavors and textures while moderate protein adds balance.

Micronutrient analysis underscores the health contributions from apples, offering vitamins C and K. Cinnamon lends antioxidants, enriching your snack.

Health benefits extend beyond vitamins. Events hosted with apple turnovers include guilt-free indulgence, given moderate serving sizes.

Dietary considerations weigh the turnover’s role within balanced diets, allowing space for lusciousness without sacrificing total wellness.

Portion analysis both quantifies consumption and maintains enjoyment without overwhelming, encouraging mindful, considerate eating.

Weight management tips advise cutting turnovers in half and savoring each morsel- enhancing the experience while aligning with dietary goals.

Dietary Adaptations


For gluten-free variations, substitute the puff pastry with gluten-free options available, ensuring the pastry retains its signature flakiness without allergens.

Dairy-free turnovers swap butter with plant-based alternatives, maintaining flavor. Coconut oil or vegan margarine creates a similar mouthfeel, preserving the richness.

Vegan adaptations, eliminating eggs with water-flour pastes, preserve the dough’s sheen, avoiding animal-based ingredients without compromising presentation.

Low-carb options focus on almond flour crust adaptations. Although differing from traditional, these versions remain true to flavor profiles.

Keto turnover options balance almond and coconut flours, reducing carbohydrates. Compensating for texture, these ingredients mimic traditional pastries.

Paleo treats blend almond meal with baked apples, free from processed ingredients, resonating primal dietary values with modern taste.

Low-FODMAP adjustments incorporate specific apple varieties like Pink Lady and Granny Smith, alongside tailored sweeteners like maple syrup.

Troubleshooting Guide


Texture issues may arise if puff pastry defrosts too quickly or unevenly. Store in the fridge until thawed uniformly for best results.

Correct flavor balance by adjusting spices to taste—incorporating zests or varying fillings ensures unique, authentic results.

Temperature problems like soggy base mean insufficient baking or overcrowding. Maintain turnover spacing and extend baking by brief intervals.

Equipment challenges, such as missing a pastry cutter, allow improvisation—using a sharp knife or pizza wheel delivers comparable results.

Ingredient substitutions enable versatility, preserving flavors by exchanging cinnamon for cardamom, or using pears instead of apples.

Timing concerns ensure consistent lengths when baking—a timer remains an invaluable ally, protecting against over or undercooked pastries.

Recipe Success Stories


Readers marveled at the apple turnover’s delightful pastry, adopting variations to suit personal tastes—boosting spices, or pairing with seasonal garnishes.

Community feedback sparks joyful experimentation, with caramel enthusiasts incorporating lightly salted drizzle atop turnovers for blissful sweet-salt encounters.

Variation successes emerged with savory adaptations like cheese and onion, changing perception of pastry possibilities, resulting in mind-opening culinary adventures.

Adaptation stories reflected well-received dietary alterations, allowing various health-conscious readers to indulge without altering nutritional compromises.

Photography tips welcomed creative mindfulness—styling with rustic plates and linen napkins, showcasing nature’s bounty, crafting drool-worthy Instagram posts.

Frequently Asked Questions

Q: Can I use fresh apple varieties I have on hand?

A: Absolutely, feel free to explore different apple types. Firmer apples like Granny Smith or Honeycrisp hold shape well during baking.

Q: Could I prepare turnovers a day in advance?

A: Yes! Turnovers freeze well or rest refrigerated ready to bake; enjoy convenience and time-saving preparation all at once.

Q: How can I ensure my turnovers stay flaky?

A: Chill turnovers before baking to maintain flour’s natural layering, sealing flavors within delightful flakiness.

Q: Are there alternatives for butter-sensitive diets?

A: Certainly, substitute dairy-free margarine or coconut oil for traditional butter while observing compatible dietary needs.

Q: Can I forgo spices if sensitive to flavor?

A: Feel free to embrace minimalism or adjust spices to gentler intensities, personalizing flavors means exploring your own culinary preferences.

Q: Is parchment necessary for baking?

A: Though not mandatory, parchment paper aids moisture control and prevents pastries sticking, enhancing enjoyable baking experiences.

Q: Can store-bought puff pastry be replaced with homemade?

A: Certainly! For ultimate freshness, preparing your own puff pastry is encouraged — it offers authentic, personalised pastry experiences.

Q: Should turnovers be frozen before or after baking?

A: While either approach is valid, fresh freezing before baking ensures delectably crisp results post-reheat without compromising base texture.

Q: What could replace cinnamon in this recipe?

A: Allspice, nutmeg, or vanilla can contribute similar warmth if cinnamon sensitivity exists—incorporate preferred flavors freely.

Q: Why might turnovers leak during baking?

A: Overfilling likely caused leakage; aim for moderate filling, sealing edges securely with egg wash, or water alternative.

Additional Resources


For further inspiration, explore related recipes like savory turnovers filled with cheese and spinach or Mediterranean-inspired lamb pastries—all promising to delight.

Technique guides online detail perfecting puff-pastry lamination, elevating the baking process to a higher level, equipping home chefs for culinary success.

Investigate ingredient information exploring spice varietals, educating on heat levels, pairings, and potential allergies, tailoring to individual palates.

Equipment recommendations included are informative sources guiding kitchen purchases, from basic utensils to specialized pastry brushes—aiding culinary creation.

Exploring seasonal variations introduces you to an incredible array of turnovers matching every time of year, celebrating available fresh produce deliciously.

Join the Conversation


Join a conversation with fellow bakers and enthusiasts alike. Share your apple turnover creations on social media using #AppleTurnoverDelight.

Experiment with photography tips—create beautiful setups and lighting to capture a warm, inviting scene perfect for sharing your apple turnover journey.

Review recipes online, contributing personal experiences that may inspire future confections, ensuring every bite is met with joy and indulgence.

Engage with the community through forums, swaps, and online meet-ups, gaining insights and sharing techniques while celebrating collective apple turnover achievements.

Explore endless recipe variations, appreciating how creativity and innovation in methods reflect individual tastes and heritage, weaving a rich, flavorful tapestry.

The Recipe

Classic Apple Turnovers

Serves: 4

Prep Time: 20 mins

Cook Time: 25 mins

Total Time: 45 mins

Kitchen Equipment Needed

  • Baking sheet
  • Parchment paper
  • Rolling pin
  • Sharp knife
  • Pastry brush

Ingredients

  • 1 puff pastry sheet, thawed
  • 2 medium tart apples, peeled and diced
  • 1/4 cup sugar
  • 1 tsp cinnamon
  • 1/2 tsp nutmeg
  • 1 tbsp lemon juice
  • 1 egg, beaten

Directions

  1. Preheat oven to 400°F (200°C) and line a baking sheet with parchment paper.
  2. In a medium bowl, combine diced apples with sugar, cinnamon, nutmeg, and lemon juice. Stir well and set aside.
  3. Roll out puff pastry on a lightly floured surface. Cut into 4 equal squares.
  4. Place a spoonful of apple mixture in the center of each square.
  5. Fold each square diagonally to form a triangle, pressing the edges with a fork to seal.
  6. Transfer turnovers to the prepared baking sheet. Brush the tops with beaten egg for glazing.
  7. Bake for 20-25 minutes, or until the turnovers are puffed and golden brown.
  8. Allow to cool slightly on a wire rack before serving.

Recipe Notes

  • Use firm apple varieties for the best texture.
  • The turnovers freeze well for up to 3 months—simply reheat before serving.
  • To customize, try adding raisins or chopped nuts to the filling.

Irresistibly Easy Jello Meringue Cookies Recipe for Sweet Delight

Easy Jello Meringue Cookies: A Sweet and Simple Treat

⚖️
Difficulty
Easy

⏲️
Prep Time
15 mins

🕒
Cook Time
90 mins

⏱️
Total Time
105 mins

🍽️
Servings
24 cookies

Imagine biting into a light, airy cloud of sweetness with a delightful touch of fruity flavor. That’s what you get with these Easy Jello Meringue Cookies. Perfectly crisp on the outside but soft and chewy inside, these cookies promise a burst of joy for your taste buds. These meringue treats are a simple yet captivating confection, just right for those moments you crave a little bit of magic.

These cookies shine with their playful colors and vibrant flavors, making them not just a tasty treat but also a feast for the eyes. The hint of Jello adds a unique twist to classic meringue, infusing it with subtle notes of fruitiness that will make your cookie experience truly memorable. Whether you’re baking for a party or a casual get-together, these whimsical cookies are sure to be a hit.

Quick Recipe Highlights

  • Flavor Profile: These cookies offer a delightful blend of sweetness and subtle fruitiness, thanks to the Jello mix, making each bite a perfectly balanced experience.
  • Texture: Expect a crisp exterior that gives way to a soft, airy interior, creating a melt-in-the-mouth sensation that’s hard to resist.
  • Aroma: A gentle, sweet aroma with fruity hints that beckons anyone nearby to have a taste.
  • Visual Appeal: Vibrant, colorful cookies that catch the eye, making them an excellent choice for kid-friendly parties or festive gatherings.
  • Skill Level Needed: Suitable for beginners, these cookies are easy to make with clear, straightforward steps requiring no advanced baking skills.
  • Special Equipment: A stand or hand mixer is essential for achieving the perfect meringue consistency, while a piping bag helps shape the cookies.

Recipe Overview

  • Difficulty Level: Rated easy, this recipe is designed for bakers of all levels. The technique involves simple steps, mostly requiring patience as the meringues bake slowly to perfection.
  • Category: These tasty treats fall under the category of desserts and are an excellent addition to cookie platters or sweet snack selections.
  • Cuisine: Rooted in classic European techniques, these cookies embody the versatile and creative spirit of contemporary home baking.
  • Cost: With minimal ingredients, these cookies are budget-friendly, relying on pantry staples with just a few speciality items.
  • Season: Perfect for any season, but they bring a splash of color and flavor to spring and summer gatherings.
  • Occasion: Ideal for parties, picnics, or satisfying a sudden sweet tooth craving at home.

Why You’ll Love This Recipe

One of the greatest charms of Easy Jello Meringue Cookies lies in their taste and texture. The contrast between the crisp outer layer and the tender, chewy center makes each bite a celebration of textures. The fruity undertones from the Jello add a delightful twist to traditional meringues, elevating them to new flavor heights.

The preparation process is simple and convenient, making these cookies an excellent choice for quick baking projects. With a straightforward ingredient list and basic techniques, even novice bakers can achieve professional-looking and tasting meringue cookies without much fuss.

These cookies aren’t just delicious; they’re also light and airy, making them a guilt-free treat. Each cookie is low in calories and contains simple ingredients, making them a sweet treat you can enjoy without derailing your diet.

Socially, these cookies are showstoppers. Their vivid colors and fun shapes make them a talking point at events, ensuring they’re the first to disappear from the dessert table. Serve them at a child’s birthday party, or bring them to a potluck and watch them become an instant hit.

From a cost perspective, making these cookies is incredibly affordable. The recipe uses common pantry items, requiring only a small investment in a packet of Jello to bring excitement to a batch of classic meringues. This makes them not only fun and tasty but also an economical choice for dessert.

Historical Background and Cultural Significance

Meringue cookies have a storied past, tracing back to the intricate European dessert traditions of the 17th century. Believed to originate from the Swiss town of Meiringen, these cookies have been a favorite in European patisserie for centuries and have evolved significantly over time.

The cultural significance of meringue spans many countries, each putting its own spin on this airy confection. This recipe adapts the traditional technique with the unique addition of Jello, showcasing the evolving nature of desserts and how they cross cultural borders.

As these cookies spread across the globe, they evolved with local ingredients and flavors. The introduction of Jello, a quintessential American invention, is a perfect example of how regional ingredients can blend with traditional techniques to produce delightful new versions of timeless treats.

Today’s variations of meringue reflect the diverse culinary influences from around the world. From the simple versions found in European bakeries to the colorful and flavored adaptations in America, these cookies continue to charm food lovers with their versatile appeal.

Ingredient Deep Dive

Egg whites are the star of this recipe, offering the foundational fluff and stability. Historically, eggs have symbolized new beginnings and were extensively used in ancient cooking practices. They provide the necessary structure and lift to meringues when beaten to perfection.

In terms of nutrition, egg whites are low in calories and high in protein, making them a heart-healthy choice. When selecting eggs, opt for fresh ones for more stable whites. Store them in the fridge to maintain freshness and ensure proper separation of the whites from the yolks.

Sugar plays a pivotal role in meringues, not only sweetening but also helping stabilize the whipped egg whites. Fine granulated sugar is ideal as it dissolves more easily, ensuring a smooth meringue mixture.

For best results, measure sugar accurately. Store it in a dry, cool place to prevent clumping. If you prefer, consider using a fine caster sugar for even smoother results, or try a lower-sugar version with alternatives, keeping in mind adjustments in ratios and cooking times.

Common Mistakes to Avoid

  • Not using a clean bowl: Ensure your mixing bowl is clean and dry, free from any grease, to avoid deflating the egg whites.
  • Overbeating egg whites: Beat until stiff peaks form. Overbeating can break down the egg structure, resulting in flat cookies.
  • Using old eggs: Fresh eggs whip better. Avoid using old or room-temperature eggs for optimal results.
  • Incorrect sugar incorporation: Add sugar gradually, ensuring it’s fully dissolved before proceeding to avoid a gritty texture.
  • Baking at high temperature: Low and slow is key to perfect meringues, ensuring they dry out rather than bake through.
  • Opening the oven too soon: Resist the temptation to open the oven during baking to prevent cracks from sudden temperature changes.
  • Poor storage conditions: Store baked cookies in an airtight container to prevent them from absorbing moisture and becoming sticky.
  • Skipping preheating: Preheat the oven thoroughly to ensure even cooking and proper cookie texture.

Essential Techniques

For flawless meringues, mastering the technique of beating egg whites is crucial. Begin with clean, dry equipment and always ensure no traces of yolk mix with whites. Begin at a medium speed, gradually increasing to high to achieve stiff peaks.

Piping the meringue mixture gives the cookies their defined, uniform shape. Use a strong piping bag and a star tip for best results. Practice even pressure while squeezing to create consistent-sized cookies, and remember, patience is key.

The meringues must be baked at a low temperature. This gradual process allows the cookies to dry out and set without browning. Monitor the baking process, and if a slight color develops, reduce the temperature slightly.

Visual cues are essential for meringues. Look for meringues that are firm and crisp to the touch with no tacky or wet spots. If unsure, allow them to sit in the oven with the door ajar to finish drying out after baking.

Pro Tips for Perfect Easy Jello Meringue Cookies

Add a pinch of cream of tartar while beating the egg whites. This helps stabilize them, ensuring you achieve the perfect fluffy texture without fear of deflating.

Ensure your sugar is finely granulated to dissolve easily and fully integrate into the egg whites. Consider processing granulated sugar in a food processor if necessary for a finer texture.

When it’s rainy or humid, consider delaying your baking project. Humidity can affect the way meringues dry, leading to chewy instead of crisp cookies.

Allow baked meringues to cool completely in the oven with the door slightly ajar. This gradual cooling helps prevent cracks that can form when there is a drastic temperature change.

Opt for a fresh Jello mix to ensure maximum flavor payoff. Experiment with different flavors of Jello to customize the taste according to your preference or event theme.

Keep your workspace cool. Excessive heat can cause meringue mixture to lose volume and stability, compromising your final cookie texture.

Use parchment paper rather than grease on your baking sheet. This ensures easy removal of cookies without extra fat affecting your batter.

Store meringues in a low-humidity environment. Airtight containers with a silica gel packet can help maintain the desired crispy texture longer.

Variations and Adaptations

Incorporate regional flavors by adding a hint of citrus zest to the meringue mixture or topping with a sprinkle of coconut flakes for a tropical twist.

Switch up the seasonal flavors by trying different Jello mixes, such as lime for a spring batch or cherry for a festive winter angle.

Dietary modifications can easily be implemented by using sugar substitutes, ensuring your treats remain light and delightful for those watching their sugar intake.

Alter the flavor profile with extracts instead of Jello. A taste of vanilla, almond, or even a hint of peppermint can enhance overall flavor and create endless possibilities for these versatile treats.

Enhance texture by folding in finely chopped nuts or dried fruit. This can provide a new dimension that contrasts beautifully with the soft meringue.

For a modern presentation, consider sandwiching two cookies together with a layer of fruit preserve or chocolate ganache for an indulgent bite.

Serving and Presentation Guide

These cookies stand out best on a beautiful platter or a tiered dessert stand, creating an eye-catching centerpiece at any gathering. For added elegance, consider arranging them by color or size.

Garnish with a light dusting of powdered sugar or a drizzle of melted chocolate to enhance their visual appeal. For a pop of freshness, top with a sliver of fresh fruit that corresponds to the Jello flavor.

Traditionally, these cookies can be served with a side of tea or coffee. The lightness and subtle flavor of these cookies pair perfectly with both, offering a refreshing and balanced conclusion to a meal.

To keep the presentation modern, consider serving alongside fresh berries or a dollop of whipped cream. These additions enhance both flavor and visual appeal, making them even more irresistible.

Consider room temperature for best serving condition, ensuring that the cookies maintain their texture and flavor. If serving outside, opt for shaded areas to avoid melting or becoming sticky.

When planning portions, estimate 2-3 meringue cookies per guest. They are light and airy, meaning guests may easily indulge in multiple servings without feeling overindulged.

Wine and Beverage Pairing

For wine pairings, a Moscato or a sweet Riesling can beautifully complement the fruity notes in these cookies. Their gentle sweetness and subtle effervescence highlight the meringue’s light texture.

For non-alcoholic options, consider serving these cookies with a sparkling water infused with citrus or berry flavors. The effervescence and delicate flavors enhance the cookie’s natural sweetness.

These cookies also pair excellently with tea, such as a light Earl Grey or chamomile tea, which balance their sweetness without overpowering the delicate flavors.

Maintain an appropriate temperature for serving beverages, keeping sparkling wines and non-alcoholic drinks chilled and offering tea slightly warmer to ensure a balanced flavor experience.

Serve chilled wine in slender glasses to preserve its chill and avoid warming from hands. For tea, ceramic cups maintain the temperature while enhancing the aromatic experience.

Storage and Shelf Life

To store these cookies, use a clean, dry airtight container to protect them from moisture. This preserves their desirable crisp texture over an extended period.

Avoid storing in the fridge as the humidity can contribute to sogginess. Keep them in a cool, dry area instead, ensuring they’re shielded from direct sunlight or excessive heat.

Consider using silica gel packets inside the storage container to help absorb any ambient moisture, keeping your cookies at their best for up to a week.

Signs of spoilage include loss of crispness, a sticky surface, or any off smells that indicate your cookies are past their prime.

If you need to reheat them to regain some crispness, pop them in a preheated oven at low temperature for a few minutes. Monitor closely to avoid browning or burning.

Freezing is not recommended as it can impact the cookies’ texture. If you must, wrap them tightly and consume shortly after thawing to prevent deterioration.

Make Ahead Strategies

These cookies can be prepared a day in advance, allowing you to focus on other preparations. Simply store according to recommendations to maintain freshness.

Consider separating your tasks. Prepare and bake the meringues in advance, then decorate or assemble them closer to your event if needed.

While not typically required, if planning to add toppings like chocolate or fruit, applying them before serving ensures they’re fresh and vibrant.

Reheating is generally unnecessary if storage conditions are optimal, but for a refresher, a low-temperature oven can restore crunchiness.

If adding fresh elements such as zest or garnishing shortly before serving, it enhances the overall freshness and appeal, ensuring each cookie is at its most delicious.

Scaling Instructions

When halving the recipe, use a small mixer to maintain adequate air incorporation. Adjust baking trays to smaller sizes if needed to fit your reduced batch.

Doubling the recipe requires additional baking sheets and potential staggered baking times. Ensure adequate time is accounted for extended baking sessions.

Adjust oven racks to allow for uniform heat distribution if baking multiple trays at once, and rotate them for even cooking.

Timing modifications may be necessary based on batch size. Larger volumes may slightly increase mixing times to achieve desired peaks.

Storage becomes more crucial with larger batches. Ensure ample airtight containers are available to store extras properly and maintain quality over time.

Nutritional Deep Dive

These meringue cookies boast a lean macro profile, focusing primarily on proteins and low calories, making them suitable for balanced indulgence.

Rich in protein from eggs and low in fats, these treats offer a guilt-free experience. Incorporate them into a varied diet while keeping overall sugar intake in mind for best results.

While low in micronutrients, these cookies offer a delightful treat that fits within the context of a balanced diet when consumed wisely.

Their simple ingredient list ensures a manageable dietary consideration, making them suitable for most, with moderation in serving sizes as a general guideline.

Portion analysis reveals that enjoying these cookies in moderation, typically 2-3 at a time, aligns well with dietary goals while offering a satisfying sweet fix.

For those focusing on weight management, these cookies provide a light option. Pair them with fruit or yogurt for a more balanced snack experience, providing satisfaction without excess calories.

Dietary Adaptations

For gluten-free adaptations, these cookies naturally fit the bill as they contain no gluten-based ingredients, making them a welcome choice for those with sensitivities.

Achieving a dairy-free version requires no modification, as the base recipe contains dairy-free ingredients, offering a naturally adaptable option.

To cater to vegan diets, consider using aquafaba instead of egg whites, maintaining a similar texture while accommodating plant-based preferences.

Low-carb needs can be met by substituting sugar with a preferred sugar alternative, like erythritol or stevia, while adjusting sweetness to taste.

While not inherently a keto-friendly treat, sugar substitutes and careful portion control can align these cookies more closely with ketogenic dietary principles.

Those following a paleo diet may find these meringues difficult due to sugar. Explore natural sweeteners that fit within paleo guidelines as potential alternatives.

For low-FODMAP diets, these treats are generally suitable with careful ingredient choices. Verify compatible Jello flavoring options to maintain compliance.

Troubleshooting Guide

Texture issues often arise from over or under-beating egg whites. Aim for stiff peaks without going beyond, ensuring expected consistency.

Flavor imbalances can occur with improper Jello amount or sugar incorporation. Adjust to taste and ensure ingredients fully dissolve for optimal integration.

Temperature problems, such as an over-browned crust, are typically linked to high oven settings. Lower your bake temperature for a longer, gentler cook.

Handling equipment challenges means ensuring clean, dry tools are used, as grease can inhibit egg white aeration. Regular equipment checks can prevent unexpected issues.

Substitute ingredients carefully, noting that altering sugar affects longevity and flavor. Explore natural options meticulously to maintain the final product’s excellence.

Timing concerns, such as spreading or collapse during baking, can be avoided by considering environmental factors and precise oven timings.

Recipe Success Stories

Our baking community has embraced these Easy Jello Meringue Cookies with enthusiasm. Many readers rave about using them as a colorful, sweet party favorite.

Incorporating variations, from different Jello flavors to additional zest, community feedback shows innovation and creativity with each batch prepared.

Adaptation stories showcase creativity, with some readers pairing them with unique dipping sauces or using them as creative toppings for desserts.

Reader suggestions frequently highlight the recipe’s flexibility, noting how basic elements lend themselves to endless culinary creativity.

Photography tips submitted by readers frequently emphasize lighting and colorful backgrounds to best capture the vibrant nature of the cookies.

Frequently Asked Questions

Can I use any flavor of Jello? Yes, you can choose any flavor to match your personal taste preferences or event themes.

What if I don’t have a piping bag? You can use a zip-top plastic bag with a corner snipped off to pipe the meringues onto your baking sheet.

How to store leftover meringue cookies? Store them in an airtight container in a cool, dry place to maintain crispness, ideally with a small silica packet inside.

Can I freeze the cookies? It’s not recommended, as freezing can impact texture, but if necessary, ensure they’re tightly wrapped and consume soon after thawing.

Is it possible to make them vegan? Yes, substitute aquafaba for egg whites to create a vegan-friendly version of these meringue cookies.

My cookies became sticky, what happened? This often results from high humidity or improper storage. Use airtight conditions and consider desiccant packs to help prevent stickiness.

Can I reduce the sugar in this recipe? You can try reducing it slightly or using substitutes, keeping in mind it may affect flavor and texture.

Do I have to use cream of tartar? It’s helpful for stabilizing the egg whites, but you can make meringues without it, being extra cautious during whipping.

What does “stiff peaks” mean? It refers to egg whites beaten until they hold a firm, pointed shape without drooping when the whisk is lifted.

Can I use liquid egg whites? Fresh egg whites are recommended for optimal texture and volume, but liquid pasteurized whites may work with extra focus on whipping.

Why did my meringues crack? Cracks may result from rapid temperature changes. Allow gradual cooling by leaving the oven door slightly ajar after baking.

How do I know when the meringues are done? Look for a dry, firm exterior that’s not tacky. If uncertain, continue at low heat for a few more minutes.

Additional Resources

Dive deeper into meringue techniques with expert guidebooks, which cover various meringue-based recipes beyond cookies, like pies and pastries.

Explore related recipes such as meringue-topped cupcakes or pavlovas that build on the skills acquired with Easy Jello Meringue Cookies.

Gain insights into diverse flavor pairings and ingredient interactions from reliable food science resources to enhance your baking knowledge.

Consider investing in a high-quality stand mixer and baking tools that can streamline your baking process, ensuring perfect results with each attempt.

Explore seasonal variations, adapting these cookie techniques to complement seasonal fruit and flavor trends for year-round creativity.

Join the Conversation

Join our community on social media to share your own Easy Jello Meringue Cookie creations and exchange ideas with fellow home bakers.

Learn photography tips to capture your baking masterpieces, focusing on light, composition, and vibrant colors to enhance your presentation skills.

Encourage other bakers by sharing reviews and tips in the comments, helping fellow baking enthusiasts master their own meringue adventures.

Broaden your recipe repertoire by trying and adapting suggestions from our engaged community, enriching your culinary explorations.

Exchange stories and variations with fellow bakers, experiencing a shared love for baking and the versatility of Easy Jello Meringue Cookies.

The Recipe

Easy Jello Meringue Cookies

Serves: 24 cookies

Prep Time: 15 mins

Cook Time: 90 mins

Total Time: 105 mins

Kitchen Equipment Needed

  • Stand or hand mixer
  • Large mixing bowl
  • Spatula
  • Piping bag with star tip
  • Baking sheet
  • Parchment paper

Ingredients

  • 4 egg whites
  • 1 cup granulated sugar
  • 1 package (3 oz) Jello mix, any flavor
  • 1/2 tsp cream of tartar
  • Pinch of salt

Directions

  1. Preheat your oven to 200°F (93°C). Line two baking sheets with parchment paper.
  2. In a clean, dry bowl, beat the egg whites with a pinch of salt until they start to form soft peaks.
  3. Gradually add sugar, one tablespoon at a time, beating well after each addition until the mixture is glossy with stiff peaks.
  4. Fold in the cream of tartar and Jello mix gently until well incorporated, being careful not to deflate the meringue.
  5. Transfer the mixture to a piping bag fitted with a star tip. Pipe small mounds onto the prepared baking sheets.
  6. Bake for 90 minutes, until the cookies are crisp and easily peel off the parchment.
  7. Turn off the oven, crack the oven door, and let cookies cool completely inside the oven to prevent cracking.

Recipe Notes

  • For added flavor, sprinkle some lemon zest over piped cookies before baking.
  • Ensure egg whites are at room temperature before starting to ensure maximum volume when beating.
  • Different Jello flavors can be used for varied taste profiles; be adventurous with combinations.