Copycat Chick-fil-a Frosted Lemonade Recipe

“`html

Copycat Chick-fil-A Frosted Lemonade Recipe

Craving That Chick-fil-A Magic?

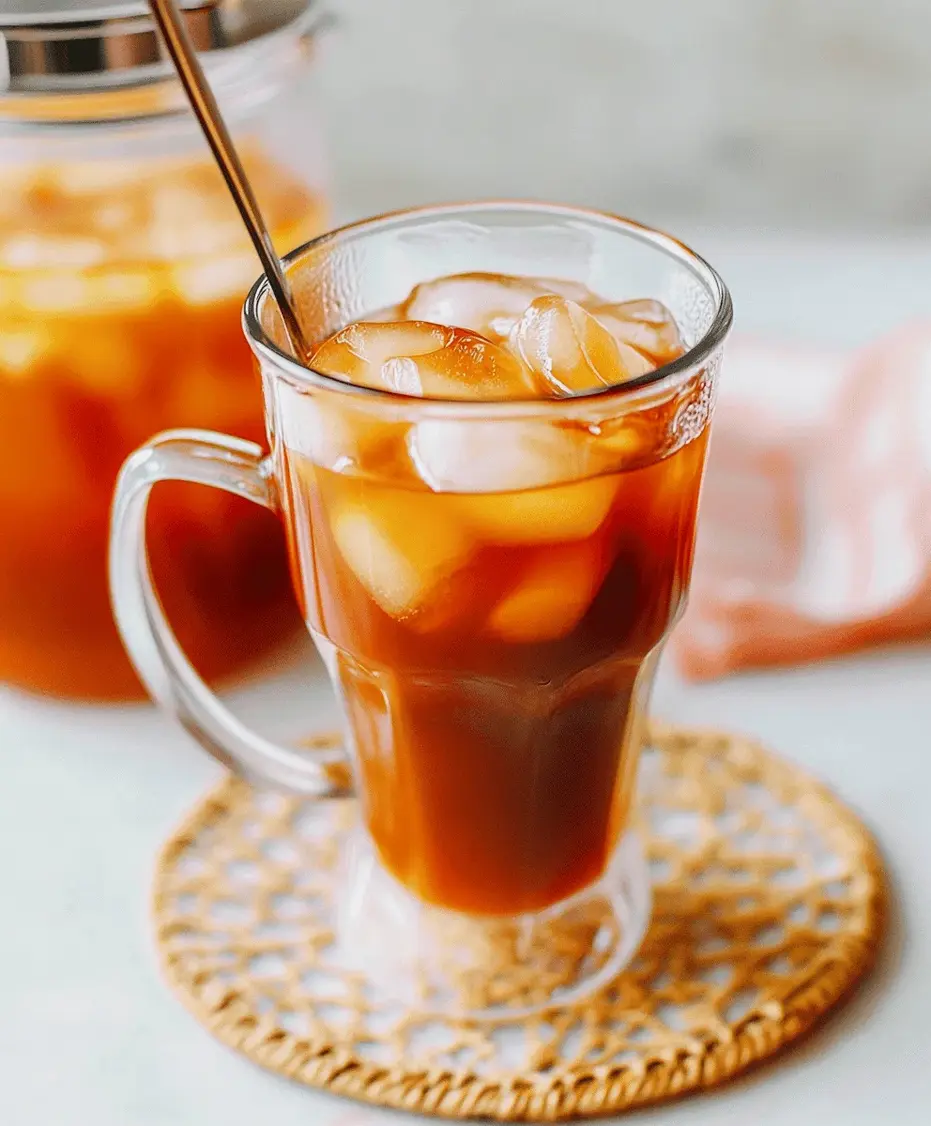
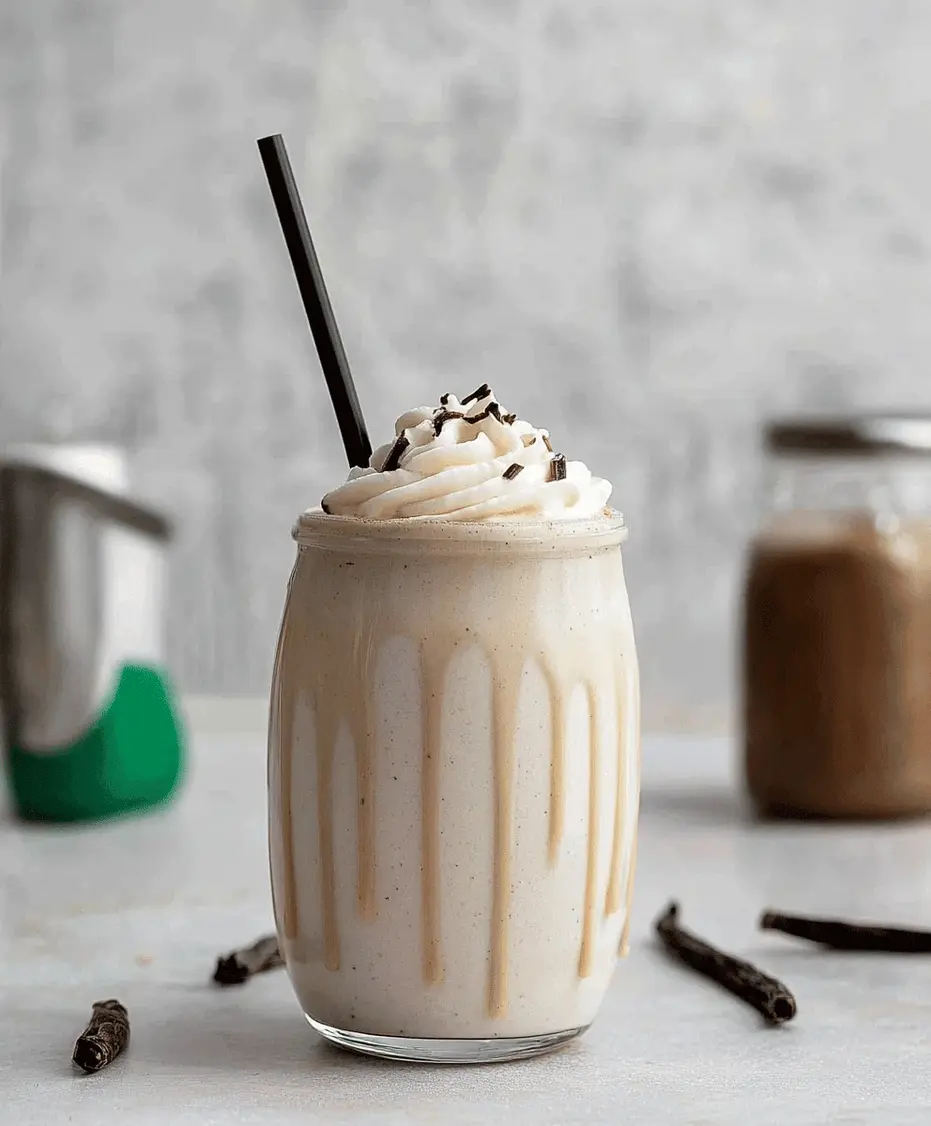
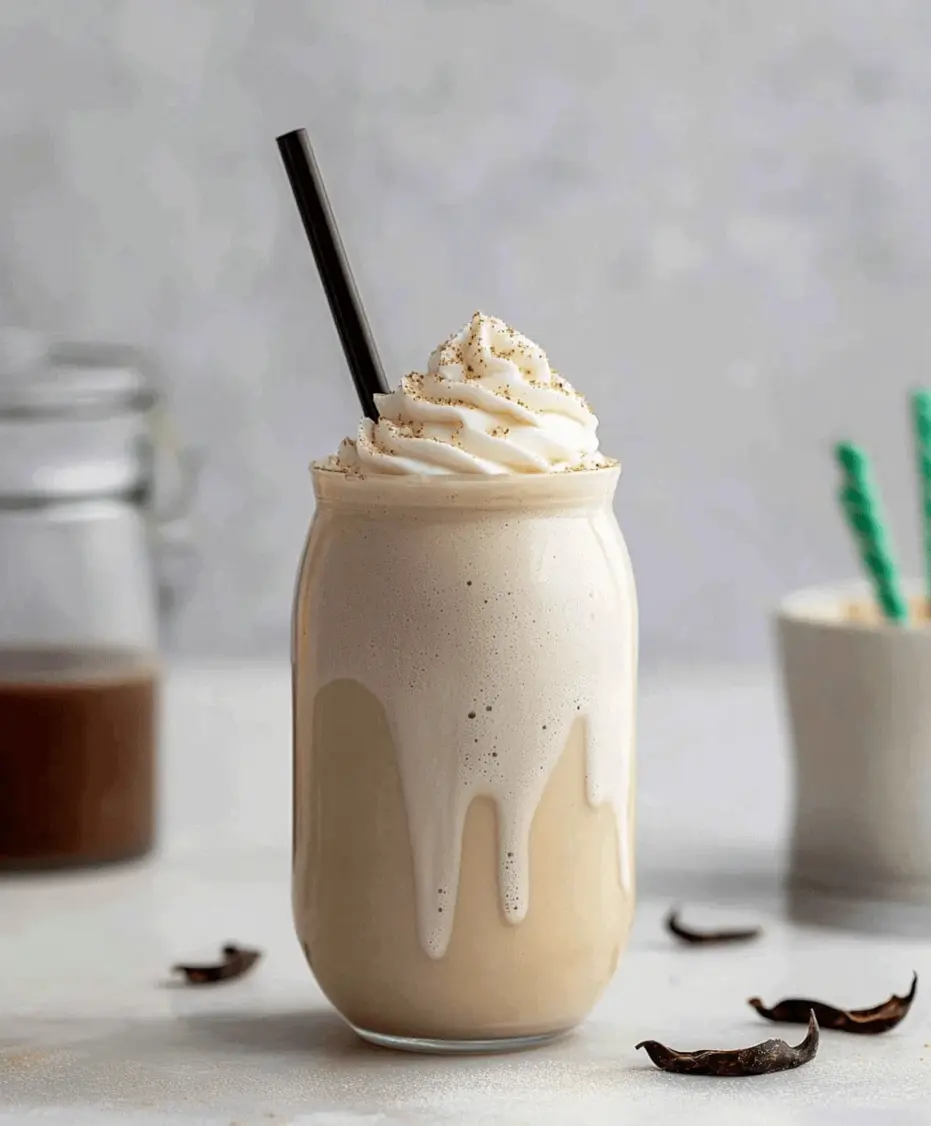
Did you know that the average person consumes around 10 gallons of lemonade annually? If you’re a fan of that iconic, creamy, and tangy delight from Chick-fil-A, you’re in for a treat! This Copycat Chick-fil-A Frosted Lemonade recipe brings that beloved fast-food beverage right into your kitchen. Mastered with simple ingredients, it delivers a perfect frosty balance of sweet and citrus that’s ideal for beating the heat on a summer day, sprucing up a party, or simply indulging in a delightful afternoon treat. Forget the drive-thru line; this homemade version uses real lemons, creamy vanilla ice cream, and potent lemonade concentrate for a frosty favorite you’ll be craving again and again.

Ingredients You’ll Need

Gathering your ingredients is the first step to recreating this iconic beverage. The beauty of this copycat recipe lies in its simplicity and the readily available nature of its components. You’ll be amazed at how these few, fresh ingredients come together to create that signature Chick-fil-A taste.

  • Lemonade Concentrate: 1 (12-ounce) can. This is the backbone of your lemonade flavor. Use a good quality frozen lemonade concentrate for the best tangy punch.
  • Vanilla Ice Cream: 4 cups, softened slightly. This is key to achieving that creamy, milkshake-like texture. Opt for a good quality vanilla bean ice cream for a richer flavor.
  • Cold Water: 1 cup. You might need a little more or less depending on your desired consistency.
  • Optional: Fresh Lemon Juice: 1-2 tablespoons, for an extra zesty kick.
  • Optional: Sweetener (e.g., simple syrup, sugar): To taste, if you prefer it sweeter.

Substitutions & Notes:

  • For a less sweet version: Use a sugar-free lemonade concentrate or reduce the amount of ice cream slightly.
  • For a dairy-free option: Experiment with dairy-free vanilla ice cream and a vegan lemonade concentrate. The texture might vary slightly.
  • Fresh Lemons: If you have time, juicing fresh lemons (about 3-4 large lemons) and adding a touch more sweetener can offer an even brighter, fresher flavor, though it will alter the exact “concentrate” profile.

Perfectly Timed Refreshment

One of the best things about this Copycat Chick-fil-A Frosted Lemonade is how incredibly fast it is to make. No long waiting periods or complicated cooking processes here!

Prep Time:
5 minutes
Cook Time:
0 minutes
Total Time:
5 minutes

Compared to the average dessert or beverage recipe that might involve baking or extensive chilling, this frosted lemonade is a speed demon. It’s perfect for those spontaneous cravings or when you need a quick treat for guests.

A tall glass filled with creamy Frosted Lemonade, garnished with a lemon slice and a straw.

Step-by-Step Instructions

Creating this delightful drink is as easy as blending a few ingredients. Follow these simple steps to achieve Chick-fil-A’s signature frosted lemonade perfection in minutes.

Step 1: Gather Your Ingredients

Before you begin blending, make sure you have all your ingredients measured out and ready to go. Having your frozen lemonade concentrate, slightly softened vanilla ice cream, and cold water within easy reach will make the process even smoother.

Step 2: Blend to Perfection

Add the contents of the frozen lemonade concentrate can directly into your blender. Next, scoop in the softened vanilla ice cream. Pour in the cold water. If you’re using any optional ingredients like fresh lemon juice or sweetener, add them now.

Secure the lid on your blender and start blending on a low speed, gradually increasing to a medium-high speed. Blend until the mixture is smooth and creamy, with no large ice chunks or streaks of ice cream remaining. You’re looking for a thick, milkshake-like consistency.

Step 3: Taste and Adjust

Once blended, pause your blender and carefully taste the frosted lemonade. This is your chance to customize it to your exact liking. If it’s not tangy enough for you, add a splash more lemonade concentrate or a squeeze of fresh lemon juice. If it’s too thick, add a little more cold water, a tablespoon at a time, until you reach your desired consistency. If it’s not sweet enough, add your preferred sweetener and blend briefly again.

Step 4: Serve and Enjoy

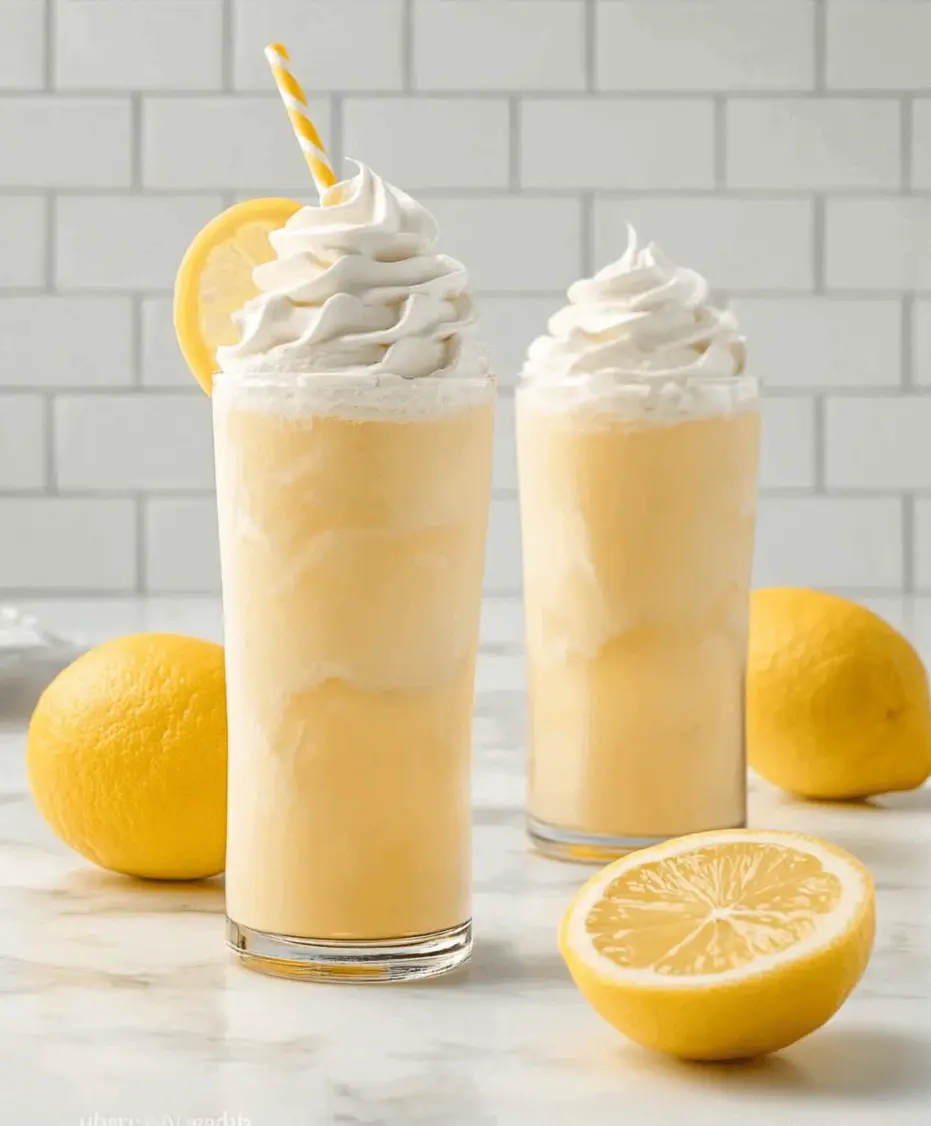
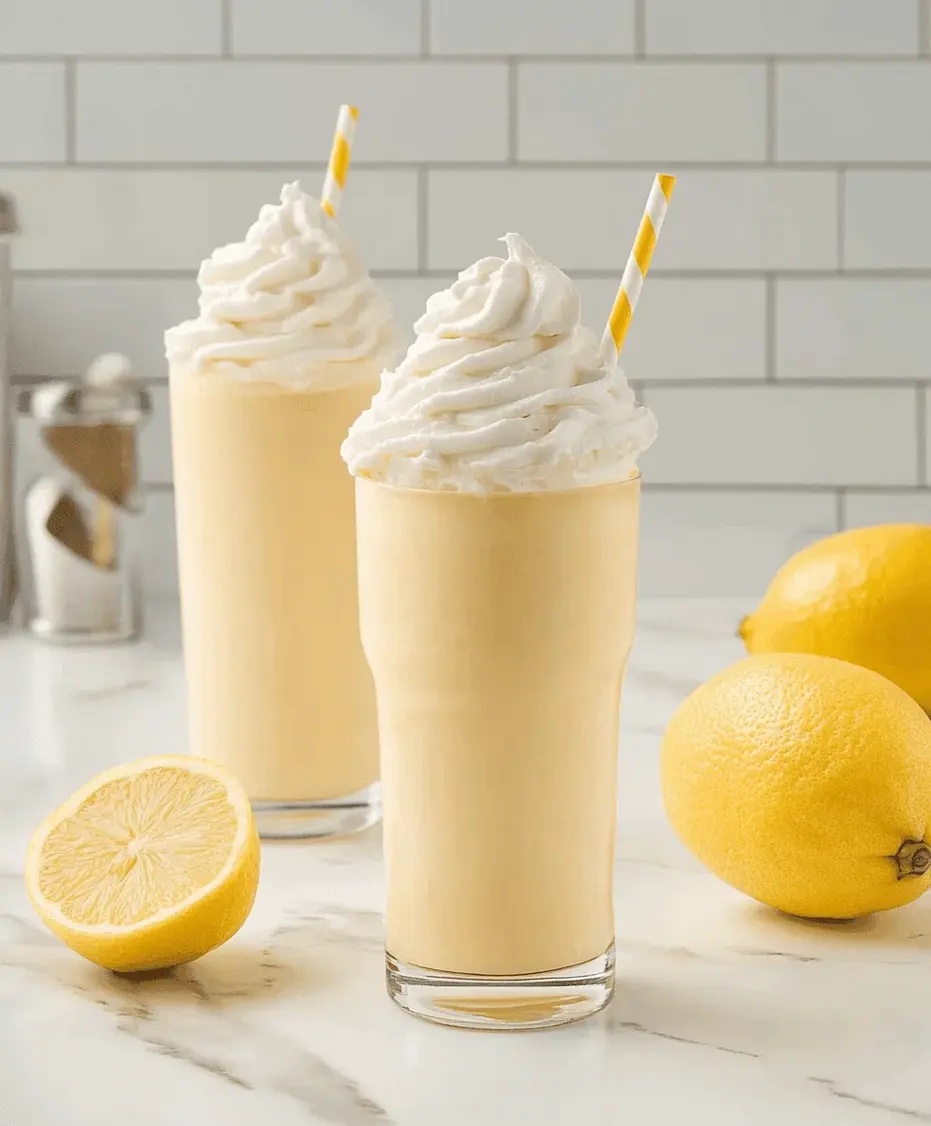
Pour your freshly blended Copycat Chick-fil-A Frosted Lemonade into chilled glasses. For an extra touch of flair and refreshment, garnish with a fresh lemon slice on the rim of the glass or a sprig of mint. Serve immediately with a straw and enjoy this delightful, frosty treat!

Nutritional Snapshot

While specific nutritional values can vary based on the brands of ice cream and lemonade concentrate used, here’s a general estimate per serving (assuming 2 servings per recipe) for our Copycat Chick-fil-A Frosted Lemonade:

  • Calories: Approximately 400-550 kcal
  • Protein: 6-10g
  • Fat: 20-35g (mostly from ice cream)
  • Carbohydrates: 50-70g (including sugars from concentrate and ice cream)
  • Sugar: 40-60g

Please note: This is an approximate value. For precise information, calculate using the specific brands and quantities you use.

Healthier Swaps for a Lighter Treat

While the original is a decadent treat, you can lighten it up without sacrificing too much flavor. Here are some suggestions:

  • Use a Low-Calorie Sweetener: If you need extra sweetness, opt for stevia or erythritol instead of sugar or simple syrup.
  • Frozen Yogurt: Swap some or all of the ice cream for a good quality vanilla frozen yogurt. This can reduce fat and sugar content significantly.
  • Sugar-Free Lemonade Concentrate: Available in many grocery stores, this is a straightforward way to cut down on sugar.
  • Add Extra Lemon: Rely more on the tang of real lemon juice and less on the sweetness of the concentrate and ice cream.
  • Reduce Ice Cream Quantity: Use 3 cups of ice cream instead of 4, and adjust water for consistency.

Serving Suggestions

This Copycat Chick-fil-A Frosted Lemonade is a standalone star, but it also pairs beautifully with:

  • Light Snacks: Think fruit salad, a small handful of almonds, or light pastries.
  • Picnics: It’s the perfect refreshing drink for an outdoor get-together.
  • Dessert Accompaniment: Serve a smaller portion alongside lighter desserts like angel food cake or fruit tarts.
  • Summer Parties: A crowd-pleaser that’s always a hit.

Common Mistakes to Avoid

To ensure you get the perfectly creamy and tangy result every time, watch out for these common pitfalls:

  • Using Hard Ice Cream: If your ice cream is too frozen, the blender might struggle, leading to an icy texture rather than creamy. Let it soften slightly.
  • Over-Blending: Blending for too long can melt the ice cream and make the drink too thin and watery. Blend just until smooth.
  • Not Tasting and Adjusting: Lemonade concentrate sweetness and tartness can vary. Always taste and adjust for your personal preference before serving.
  • Using Too Much Water: Start with the recommended amount of water and add more only if absolutely necessary to achieve the desired consistency. Too much water will make it too thin.

Storing Your Frosted Lemonade

Frosted lemonade is best enjoyed immediately after preparation for optimal texture and flavor. However, if you have leftovers:

  • Transfer any remaining frosted lemonade to an airtight container or a freezer-safe jar.
  • Store in the freezer.
  • When ready to serve again, you might need to let it thaw for a few minutes until it reaches a scoopable or re-blendable consistency. For the best results, you may want to re-blend it with a splash of water or milk to restore its creamy texture.
Close-up of a creamy Chick-fil-A Frosted Lemonade with condensation on the glass.

Frequently Asked Questions

What makes this recipe a “copycat” recipe?

It’s a copycat because it aims to replicate the exact taste and texture of the popular Frosted Lemonade sold at Chick-fil-A, using readily available ingredients so you can make it at home.

Can I make this vegan or dairy-free?

Yes, you can achieve a similar result by using dairy-free vanilla ice cream (like coconut milk or almond milk based) and ensuring your lemonade concentrate is also vegan. The flavor profile might be slightly different but still delicious!

How do I make it thicker or thinner?

For a thicker consistency, add more softened vanilla ice cream or freeze it for a bit longer. For a thinner consistency, add cold water or a little more lemonade, a tablespoon at a time, until your desired texture is reached.

Can I use fresh lemon juice instead of concentrate?

You can, but it will change the flavor profile. You would need to juice several lemons and likely adjust the sweetener to balance the tartness. For the authentic “copycat” flavor, the concentrate is recommended.

Can I prepare this ahead of time?

While best enjoyed fresh, you can store leftovers in the freezer and re-blend or let thaw slightly before serving. It’s not ideal for long-term storage as the texture can degrade.

Print
clock clock iconcutlery cutlery iconflag flag iconfolder folder iconinstagram instagram iconpinterest pinterest iconfacebook facebook iconprint print iconsquares squares iconheart heart iconheart solid heart solid icon

Copycat Chick-fil-a Frosted Lemonade Recipe


  • Author: Chef Emy

Description

Enjoy a refreshing, creamy, and tangyCopycat Chick-fil-a Frosted Lemonademade with simple ingredients. This quick and easy recipe brings the beloved fast-food drink to your home with a perfect balance of sweet and citrus. Ideal for summer days, parties, or a delightful afternoon treat. Made with real lemons, vanilla ice cream, and lemonade concentrate, it’s a frosty favorite you’ll crave.


Ingredients

Scale
  • 1 cupfreshly squeezed lemon juice (about4–6lemons)
  • ½ cupgranulated sugar (adjust to taste)
  • 1 cupcold water
  • 2 cupsvanilla ice cream
  • Ice (optional, for extra thickness)
  • Lemon slices (for garnish, optional)

Instructions

    Notes

    You can use store-bought lemonade if in a hurry.
    For a dairy-free version, substitute vanilla ice cream with non-dairy ice cream.
    Adjust sweetness depending on your preference.
    Make it ahead by prepping the lemonade base and freezing it in cubes.

    Nutrition

    • Calories: 280
    • Sugar: 40g

    “`

    Easy Thai Iced Tea Recipe

    “`html

    Easy Thai Iced Tea Recipe

    Indulge in the authentic taste of Thai cuisine with this Easy Thai Iced Tea recipe—a sweet and creamy drink perfect for any occasion. Made with strong brewed Thai tea, sweetened condensed milk, and crushed ice, this refreshing beverage is a staple in Thai restaurants and can be easily made at home.

    What is Thai Iced Tea?

    Did you know that the vibrant orange hue and distinctively sweet, spiced flavor of Thai iced tea make it one of the most recognizable beverages globally? It’s a delightful journey for your taste buds, transporting you straight to the bustling street food stalls of Thailand. While authentic Thai iced tea is synonymous with its rich, creamy, and sweet profile, many wonder if they can recreate that same magic at home. The good news is, you absolutely can! This “Easy Thai Iced Tea Recipe” is designed to bring that exotic taste directly to your kitchen, using readily available ingredients and straightforward steps. Forget about complicated infusions or hard-to-find spices; this recipe focuses on delivering that comforting, familiar flavor that has made Thai iced tea a beloved classic worldwide. It’s more than just a drink; it’s an experience – a sweet, creamy, and cool escape that’s perfect for a hot afternoon or as a delightful accompaniment to your favorite Thai dishes.

    Authentic Thai Iced Tea Ingredients

    The magic of Thai iced tea lies in its simple yet impactful combination of flavors and textures. Let’s break down what makes this drink so special:

    The Tea Base

    • Thai Tea Mix (or Black Tea): The heart and soul of this drink. Look for “Thai tea mix” in Asian grocery stores or online. These mixes are typically a blend of Ceylon tea and other spices like star anise, cardamom, and vanilla, giving it that characteristic orange color and unique aroma. If you can’t find a specific Thai tea mix, a strong-brewed black tea (like Assam or Ceylon) can serve as a base, though it won’t have the exact same spiced notes or vibrant color. The key is to brew it *very* strong.

    Sweeteners & Creaminess

    • Sweetened Condensed Milk: This is non-negotiable for achieving that signature creamy texture and rich sweetness. It’s a thick, syrupy milk that provides both sweetness and body to the tea, creating a luxurious mouthfeel. Choose a good quality brand for the best flavor.
    • Evaporated Milk (Optional, for serving): While sweetened condensed milk does the heavy lifting, a drizzle of evaporated milk on top adds a final layer of creaminess and visual appeal, creating beautiful swirls. Be sure to use unsweetened evaporated milk.

    The Ice

    • Crushed Ice: This is crucial for serving. Crushed ice melts faster than cubes, quickly chilling the tea and slightly diluting it to the perfect sipping consistency, while also providing a delightful texture.

    Making Thai Iced Tea: A Quick Guide

    Prep time: 5 minutes
    Steep time: 10 minutes
    Total time: 15 minutes (+ chilling time if desired)

    A glass of bright orange Thai iced tea with ice and a swirl of cream

    Step-by-Step: Crafting Your Perfect Thai Iced Tea

    Step 1: Brew the Strong Tea Base

    Begin by brewing your Thai tea mix. For the most intense flavor, use approximately 4-5 tablespoons of Thai tea mix per 4 cups of boiling water. If using bagged Thai tea, follow the package instructions, but aim for a robust brew. Let the tea steep for about 5-10 minutes. The longer it steeps, the stronger the flavor. Strain the tea through a fine-mesh sieve or cheesecloth to remove any tea leaves or spices. You want a dark, concentrated liquid.

    Step 2: Sweeten the Tea

    While the tea is still warm, it’s time to add the sweetness. Stir in about 1/4 to 1/2 cup of sweetened condensed milk into the hot tea. The amount will depend on your preference for sweetness. Whisk until it’s fully dissolved and the tea has a slightly opaque, creamy appearance. If you’re making a larger batch, you can adjust the condensed milk accordingly. Taste and add more if needed, but remember, we’ll be adding more liquid and ice later.

    Step 3: Prepare for Serving

    Fill your serving glasses generously with crushed ice. The crushed ice is key to achieving that authentic, quick-chilling effect. If you prefer your tea very cold, you can chill the brewed and sweetened tea in the refrigerator for at least 30 minutes before serving.

    Step 4: Assemble the Drink

    Pour the sweetened Thai tea mixture over the crushed ice, filling the glass about two-thirds of the way. This concentrated tea will quickly chill and slightly dilute as it sits on the ice. For an extra touch of decadence and visual appeal, top with a splash of evaporated milk. Let it gently cascade down the sides for those iconic swirls. Stir before sipping to combine everything.

    Nutritional Snapshot

    Thai iced tea is a treat, and its nutritional profile reflects that. While exact figures can vary based on the brand of tea mix and the amount of condensed milk used, a typical serving (around 16 oz) can contain:

    • Calories: Around 200-300 kcal
    • Sugar: 30-50g (primarily from sweetened condensed milk)
    • Fat: 5-10g (from milk products)
    • Protein: 2-5g

    It’s important to note that this is a dessert-like beverage and is not typically considered a health drink due to its high sugar content.

    Healthier Twists on Thai Iced Tea

    Love the flavor but not the sugar rush? You can enjoy a lighter version of Thai iced tea with a few smart swaps:

    • Reduced Condensed Milk: Use less sweetened condensed milk and supplement with unsweetened almond milk, coconut milk, or a sugar-free creamer for creaminess.
    • Natural Sweeteners: Instead of condensed milk, try sweetening with a simple syrup made from dates, monk fruit sweetener, or a touch of pure maple syrup. Adjust to taste, as these will offer different flavor profiles.
    • Unsweetened Black Tea Base: If your Thai tea mix contains added sugar, opt for a strong brew of pure Ceylon or Assam tea and control the sweetness entirely with your chosen sweetener.
    • Lighter Milk: Use skim evaporated milk or an unsweetened non-dairy milk (like oat milk or soy milk) for a lighter, creamy finish, adjusting sweeteners as needed.

    Serving Your Thai Iced Tea

    Thai iced tea is a fantastic standalone beverage, but it truly shines when paired with spicy or savory Thai dishes like Pad Thai, Green Curry, or Spring Rolls. The sweetness cuts through the heat and richness of the food beautifully. Serve it immediately after assembly over plenty of crushed ice for the best experience. For a cafe-style presentation, use tall glasses. For a more casual setting, mason jars work wonderfully.

    Common Thai Iced Tea Pitfalls to Avoid

    • Weak Brew: Not using enough tea leaves or steeping for too short a time will result in a watery, bland drink. Always aim for a strong, concentrated base.
    • Not Sweet Enough (or Too Sweet): Taste and adjust the condensed milk gradually. Remember, the ice will dilute the drink, so a slightly sweeter base is often better.
    • Using Ice Cubes Instead of Crushed Ice: Cubes melt slower, leading to a less-chilled and less-diluted drink. Crushed ice is essential for that classic texture and rapid cooling.
    • Adding Milk Too Early: Adding evaporated milk too soon can result in a less appealing, uniform milky color rather than the desired swirls. Add it just before serving.

    Storing Your Thai Iced Tea Components

    While it’s best enjoyed fresh, you can store components for convenience:

    • Brewed Tea Base: The concentrated, sweetened tea can be stored in an airtight container in the refrigerator for up to 3 days. It might thicken slightly; you can add a splash of water or milk to loosen it before serving.
    • Sweetened Condensed Milk & Evaporated Milk: Keep unopened cans at room temperature. Once opened, transfer any unused portions to an airtight container and refrigerate.
    • Crushed Ice: It’s best to crush ice just before serving for optimal texture.
    Ingredients for Thai iced tea laid out: Thai tea mix, condensed milk, evaporated milk, and ice

    Frequently Asked Questions

    What makes Thai iced tea orange?

    The vibrant orange color typically comes from the ingredients in the Thai tea mix, which often includes annatto or other natural food colorings, along with spices like star anise and cardamom.

    Can I make Thai iced tea without sweetened condensed milk?

    Yes, you can! While it won’t be truly authentic, you can achieve a delicious alternative by using a sugar-free simple syrup or a natural sweetener (like maple syrup or agave) and adding a creamer like unsweetened coconut milk or almond milk for richness.

    Where can I buy Thai tea mix?

    Thai tea mix is widely available at most Asian grocery stores. You can also find it online through major e-commerce retailers.

    How strong should the tea base be?

    It should be brewed very strong, almost like an espresso in its concentration. This ensures the flavor isn’t lost when it’s diluted by the milk and ice.

    Can I add other flavors to my Thai iced tea?

    While the classic recipe is delicious as is, you can experiment! Some people add a splash of half-and-half for extra creaminess or a hint of vanilla extract. However, the traditional spices in the tea mix are usually enough.

    Enjoy Your Homemade Thai Iced Tea!

    There you have it – a simple yet incredibly rewarding way to bring the authentic flavors of Thailand into your home with this Easy Thai Iced Tea Recipe. This delightful beverage is a perfect balance of sweet, creamy, and aromatic, making it a crowd-pleaser for any occasion. So, gather your ingredients, brew up a batch, and get ready to savor a taste of paradise. Don’t hesitate to adjust the sweetness to your liking and experiment with the healthier alternatives if you’re looking for a lighter indulgence. Happy brewing!

    Print
    clock clock iconcutlery cutlery iconflag flag iconfolder folder iconinstagram instagram iconpinterest pinterest iconfacebook facebook iconprint print iconsquares squares iconheart heart iconheart solid heart solid icon

    Easy Thai Iced Tea Recipe


    • Author: Chef Emy

    Description

    Indulge in the authentic taste of Thai cuisine with thisEasy Thai Iced Tea recipe—a sweet and creamy drink perfect for any occasion. Made with strong brewed Thai tea, sweetened condensed milk, and crushed ice, this refreshing beverage is a staple in Thai restaurants and can be easily made at home.


    Ingredients

    Scale
    • 2 cupswater
    • 2Thai tea bags or2 tbspThai tea leaves
    • 2 tbspsugar
    • 2 tbspsweetened condensed milk
    • 2 tbspevaporated milk or whole milk
    • Ice cubes or crushed ice

    Instructions

      Notes

      For a dairy-free version, use coconut milk or almond milk.
      Use Thai tea mix (like Pantai or ChaTraMue) for authentic color and flavor.
      Adjust sweetness to your taste by modifying sugar or condensed milk quantity.

      Nutrition

      • Calories: 180
      • Sugar: 22g

      “`

      Strawberry Lemonade Popsicles Recipe

      “`html

      Strawberry Lemonade Popsicles Recipe

      Why This Recipe is a Summer Must-Have

      Summer days are synonymous with sunshine, warmth, and of course, refreshing treats. While ice cream and sugary drinks are classic choices, they often come with a hidden cost of excessive sugar and artificial additives. This Strawberry Lemonade Popsicles Recipe offers a delightful solution. It’s incredibly simple to prepare, allowing you to enjoy a guilt-free, all-natural frozen dessert that tastes
      as good as it looks. The combination of sweet, ripe strawberries and tangy lemon juice creates a perfectly balanced flavor profile that is both invigorating and satisfying. Imagine biting into a popsicle that’s packed with the vibrant essence of fresh fruit – that’s exactly what this recipe delivers. It’s a fantastic way to use up seasonal strawberries and a fun activity to involve the whole family in. Plus, the beautiful pink hue makes them visually appealing, a surefire hit at any summer gathering or a simple treat to enjoy on a quiet afternoon.

      Ingredients for Strawberry Lemonade Popsicles

      The beauty of this recipe lies in its simplicity and the use of fresh, wholesome ingredients. Here’s what you’ll need:

      • Fresh Strawberries: 2 cups, hulled and quartered. Choose ripe, fragrant strawberries for the best natural sweetness and intense flavor. They’ll provide a glorious ruby-red color and a juicy, slightly sweet-tart base. If fresh strawberries are out of season, about 1.5 cups of frozen strawberries (thawed slightly) can be substituted.
      • Fresh Lemon Juice: ½ cup, freshly squeezed. The zesty kick of lemon is crucial for balancing the sweetness of the strawberries and giving these popsicles that classic lemonade tang. Aim for at least 2-3 large lemons. Bottled lemon juice can be used in a pinch, but fresh is always superior for brightness and flavor.
      • Water: 1 cup. This helps to create the right consistency and dilutes the flavors to a perfectly refreshing level. Filtered water is recommended for the cleanest taste.
      • Sweetener: ¼ to ½ cup, to taste. Options include granulated sugar, honey, maple syrup, or agave nectar. The amount will depend on the sweetness of your strawberries and your personal preference. Start with ¼ cup and adjust as needed. Honey and maple syrup will add subtle underlying flavors.
      • Optional: Lemon Zest: 1 teaspoon. For an extra burst of citrus aroma and flavor, finely grated zest from one lemon can be added.
      • Popsicle Molds and Sticks: Ensure you have enough molds and corresponding sticks for your batch.

      Timing is Everything

      Prep Time: 15 Minutes
      Freeze Time: 4-6 Hours
      Total Time: 4-6 Hours 15 Minutes

      Compared to traditional baking recipes that might take hours, these popsicles are incredibly quick to prepare. The majority of the time is hands-off freezing, making it an ideal recipe for busy households or those looking for an easy summer treat. This is significantly faster than the average time spent preparing elaborate desserts.

      Fresh strawberries being blended with lemon juice for popsicles

      Step-by-Step Instructions for Perfect Popsicles

      Step 1: Prepare the Strawberries

      Begin by washing your strawberries thoroughly under cool running water. Remove the green leafy tops (hull them) and then quarter the berries. This helps them blend more easily.

      Step 2: Create the Lemonade Base

      In a small saucepan, combine the water and your chosen sweetener (sugar, honey, or maple syrup). Heat gently over medium heat, stirring constantly, until the sweetener is completely dissolved. Do not boil. If using lemon zest, add it to this mixture now and let it steep for a few minutes to infuse the flavor. Remove from heat and let it cool slightly.

      Step 3: Blend and Sweeten

      Add the hulled strawberries and freshly squeezed lemon juice to a blender. Pour in the slightly cooled sweetened water mixture. If you’re using lemon zest, ensure it has been strained out of the water before adding it to the blender. Blend on high speed until the mixture is smooth and well combined. Taste the mixture and adjust the sweetness or tartness as needed. If it’s too tart, add a touch more sweetener. If it’s too sweet, add a bit more lemon juice or a splash of water. Aim for a flavor that is slightly more intense than you would want to drink, as freezing tends to mute flavors.

      Step 4: Fill and Freeze

      Carefully pour the strawberry lemonade mixture into your popsicle molds. Leave a small amount of space at the top of each mold, as liquids expand when frozen. Insert the popsicle sticks into the molds according to their design (some molds have built-in holders, while others require you to freeze for about an hour before adding sticks to prevent them from sinking). Place the filled molds onto a flat surface in your freezer. Allow them to freeze completely, which typically takes 4-6 hours, or until solid.

      Step 5: Enjoy Your Homemade Treats!

      Once frozen, carefully remove the popsicles from their molds. If they are difficult to release, you can briefly run the outside of the mold under warm water for a few seconds. Serve immediately and savor the refreshing taste of homemade strawberry lemonade!

      Nutritional Information for Strawberry Lemonade Popsicles

      Nutritional information can vary based on the type and amount of sweetener used. The following is an estimated breakdown per popsicle (assuming 8 servings from a standard mold):

      • Calories: 40-80 kcal
      • Carbohydrates: 10-20g
      • Sugar: 8-18g (primarily from fruit and added sweetener)
      • Fiber: 1-2g
      • Vitamin C: Excellent source (from strawberries and lemon)

      Healthier Alternatives and Flavor Variations

      Looking to customize or make these even healthier? Try these swaps:

      • Reduced Sugar: For a less sweet version, use only ¼ cup of sweetener or rely solely on the natural sweetness of the strawberries. You could also use a natural zero-calorie sweetener like stevia or erythritol, adjusting quantities according to package directions.
      • Dairy-Free Creaminess: For a creamier texture, blend in ¼ cup of full-fat coconut milk or a dollop of plain Greek yogurt (use dairy-free yogurt for a vegan option) before freezing.
      • Add-ins: Incorporate fresh mint leaves, a splash of lime juice, or even a few raspberries or blueberries into the blend for added flavor complexity. A pinch of ginger can also add a delightful zing.
      • Herbal Infusions: Steep a chamomile or peppermint tea bag in the hot water before sweetening for subtle, calming flavors.

      Serving Suggestions

      These Strawberry Lemonade Popsicles are perfect on their own as a refreshing snack or dessert. They are also a delightful addition to:

      • Summer Picnics and BBQs: A crowd-pleasing treat that everyone will love.
      • Kids’ Parties: A healthier alternative to sugary store-bought ice pops, and fun to make together.
      • Afternoon Pick-Me-Up: When you need a cool, sweet escape from the heat.

      Common Mistakes to Avoid

      While this recipe is quite forgiving, here are a few common pitfalls to watch out for:

      • Over-sweetening: Always taste and adjust sweetness before freezing, as cold temperatures can dull flavors. It’s better to be slightly under-sweetened and add more later if needed.
      • Not using enough lemon: The lemon is key to cutting through the sweetness and providing that classic lemonade flavor. Don’t skimp on it!
      • Filling molds too full: Remember that liquids expand when frozen. Leaving a small gap at the top will prevent overflow and cracked molds.
      • Difficulty removing popsicles: If they’re stuck, a quick dip in warm water should do the trick. Forcing them can break the popsicle.

      Storing Your Homemade Popsicles

      Once frozen solid, you can remove the popsicles from their molds. To store them long-term, wrap each individually in plastic wrap or place them in a freezer-safe bag or container. This prevents freezer burn and keeps them fresh. They will last for several weeks in the freezer.

      Strawberry Lemonade Popsicles in molds and ready to be enjoyed

      Frequently Asked Questions About Strawberry Lemonade Popsicles

      ***Can I use frozen strawberries instead of fresh?***
      Absolutely! If fresh strawberries are not in season or readily available, frozen strawberries work just as well. Thaw them slightly before blending to ensure they process smoothly.

      ***How do I prevent my popsicles from tasting bland?***
      Freezing can dull flavors. It’s important to taste your mixture before freezing and make sure it’s slightly more intense in flavor (sweeter and tarter) than you’d want for a drink. This ensures they’ll taste just right once frozen.

      ***My popsicles are really hard to get out of the mold. What should I do?***
      A quick way to release them is to run the outside of the mold under warm water for about 10-15 seconds. This slightly melts the outer layer of the popsicle, making it easier to slide out. Be careful not to use too hot water, or it will melt the pop too much.

      ***Can I add other fruits to this recipe?***
      Yes, definitely! You can add other berries like raspberries or blueberries, or even a small amount of other fruits like watermelon or peach. Adjust the liquid and sweetener as needed based on the added fruits.

      ***How long do these popsicles last in the freezer?***
      Properly stored (wrapped individually or in an airtight container), these popsicles can last for up to 4-6 weeks in the freezer. However, their best flavor is usually within the first 2-3 weeks.

      Conclusion

      There you have it – a delightful and refreshing Strawberry Lemonade Popsicles Recipe that’s perfect for any occasion. Not only are these homemade popsicles incredibly delicious, but they are also a healthier and more natural alternative to store-bought frozen treats. With minimal effort and a few simple ingredients, you can create a vibrant, flavorful dessert that will be cherished by all ages. So, gather your strawberries and lemons, and dive into the ultimate summer refreshment. Share these with your loved ones and spread the joy of homemade goodness!

      Print
      clock clock iconcutlery cutlery iconflag flag iconfolder folder iconinstagram instagram iconpinterest pinterest iconfacebook facebook iconprint print iconsquares squares iconheart heart iconheart solid heart solid icon

      Strawberry Lemonade Popsicles Recipe


      • Author: Chef Emy

      Description

      Cool off with this vibrantStrawberry Lemonade Popsicles Recipe, a sweet and tart treat bursting with fresh strawberries and zesty lemon juice. Easy to make and perfect for kids and adults alike, these popsicles are a healthy alternative to store-bought treats, with no artificial ingredients. A must-try summer dessert!


      Ingredients

      Scale
      • 2 cupsfresh strawberries, hulled
      • ½ cupfreshly squeezed lemon juice (about2–3lemons)
      • ¼tocup honey or maple syrup (to taste)
      • ½ cupwater

      Instructions

        Notes

        You can strain the blended mixture through a fine mesh sieve for a smoother texture.
        Add small chunks of strawberries before freezing for texture.
        For a more citrusy kick, include lemon zest in the blend.

        Nutrition

        • Calories: 50
        • Sugar: 9g

        “`

        Honey Lime Basil Peach Fruit Salad Recipe

        “`html

        Honey Lime Basil Peach Fruit Salad Recipe

        Introduction: Why You’ll Love This Salad

        Are you searching for a light, healthy, and incredibly flavorful way to celebrate summer’s bounty? This vibrant Honey Lime Basil Peach Fruit Salad is the answer! Imagine sinking your teeth into juicy, sun-ripened peaches, complemented by the sweet pop of berries, uplifted by the aromatic whisper of fresh basil, all brought together by a zesty, invigorating honey-lime dressing. This isn’t just any fruit salad; it’s a symphony of flavors and textures designed to refresh your palate and nourish your body. Perfect for those balmy evenings, al fresco dining, summer barbecues, or as a delightful light dessert, this healthy and easy fruit salad is brimming with fresh, seasonal ingredients that are not only delicious but also packed with beneficial antioxidants. Let’s dive into creating this quintessential summer treat!

        Ingredients: Freshness in Every Bite

        The magic of this fruit salad lies in the quality and freshness of its components. We aim for a balance of sweet, tart, and aromatic. Don’t be afraid to use what’s in season and looks best at your local market!

        Prep time
        15 minutes
        Cook time
        0 minutes
        Total time
        15 minutes
        Servings
        6-8

        For the Fruit Salad:

        • 4 ripe but firm peaches, pitted and diced (about 3 cups). Look for peaches that yield slightly to gentle pressure, with a fragrant aroma.
          Substitution: Nectarines or plums work beautifully if peaches are out of season.
        • 1 pint (about 2 cups) mixed berries, such as strawberries (hulled and halved), blueberries, raspberries, and blackberries. Choose plump, unblemished berries for optimal sweetness.
          Substitution: Cherries, halved and pitted, or chopped melon like cantaloupe or honeydew.
        • 1/4 cup fresh basil leaves, thinly sliced (chiffonade). Select vibrant green leaves with a strong, sweet scent.
          Substitution: Fresh mint or lemon balm can offer a different, yet equally refreshing, herbal note.
        • Optional: 1/4 cup toasted slivered almonds or chopped pistachios for added crunch.
          Substitution: Toasted sunflower seeds or pumpkin seeds for a nut-free option.

        For the Honey-Lime Dressing:

        • 3 tablespoons fresh lime juice (from about 1-2 limes). Freshly squeezed is key for that bright, zesty flavor.
          Substitution: Lemon juice can be used, though lime offers a more distinct tropical note.
        • 2 tablespoons honey. Use a good quality honey for the best sweetness and floral notes.
          Substitution: Maple syrup or agave nectar for a vegan option. Adjust sweetness to taste.
        • 1 tablespoon olive oil (optional, for a slightly richer mouthfeel).
          Substitution: Skip this if you prefer a lighter, purely fruit-juice based dressing.
        • Pinch of salt. Enhances all the other flavors.
        • Zest of 1/2 lime (optional, for intensified citrus aroma).

        Timing: Quick Prep, Major Flavor

        This recipe is designed for speed and ease, making it perfect for spontaneous gatherings or when you’re craving something fresh without a lot of fuss. With just 15 minutes of active prep time, it’s significantly faster than the average fruit salad recipe that might involve more complex preparations or cooking. The total time, including a brief chilling period, is also minimal, ensuring you can enjoy this delightful dish with little waiting.

        A vibrant bowl of honey lime basil peach fruit salad with fresh berries and basil.

        Step-by-Step Instructions

        Follow these simple steps to create your perfect Honey Lime Basil Peach Fruit Salad:

        Step 1: Prep Your Peaches

        Start by washing your peaches thoroughly. Halve them and twist to separate the halves, then remove the pit. Dice the peaches into bite-sized pieces, roughly 1-inch cubes. If your peaches are very ripe and the skin is thin, you can leave it on for added color and nutrients, or peel them if you prefer a smoother texture.

        Step 2: Combine the Fruits

        In a medium to large mixing bowl, gently combine the diced peaches with your chosen assortment of fresh berries. Be careful not to mash the more delicate berries like raspberries. If you’re using strawberries, halve or quarter them depending on their size.

        Step 3: Make the Dressing

        In a small bowl or a jar with a lid, whisk together the fresh lime juice, honey, optional olive oil, pinch of salt, and optional lime zest. Whisk until the honey is fully incorporated and the dressing is emulsified. Taste and adjust sweetness or tanginess as needed. If you opted for the lime zest, add it now for an extra burst of citrus aroma.

        Step 4: Assemble and Chill

        Pour about half of the honey-lime dressing over the fruit mixture. Gently toss to coat everything evenly. Add the thinly sliced fresh basil leaves and toss again. For the best flavor, it’s ideal to let the salad sit for at least 15-20 minutes at room temperature, or chill it in the refrigerator for about 30 minutes. This allows the flavors to meld beautifully. Just before serving, you can add the remaining dressing if you like a more pronounced dressing flavor, or reserve it for drizzling.

        Step 5: Garnish and Serve

        Spoon the fruit salad into individual serving bowls or a large serving platter. If using, sprinkle the toasted slivered almonds or chopped pistachios over the top for a delightful crunch. You can also add a few extra fresh basil leaves for a beautiful garnish. Serve chilled and enjoy!

        Nutritional Information: A Burst of Goodness

        While exact nutritional values can vary based on the specific fruits used and portion sizes, this Honey Lime Basil Peach Fruit Salad is generally a low-calorie, nutrient-dense dish. It’s rich in:

        • Vitamins: Especially Vitamin C (from peaches, berries, and lime) and Vitamin A (from peaches).
        • Fiber: Aids digestion and promotes satiety.
        • Antioxidants: From the colorful array of fruits and basil, helping to combat free radicals.
        • Natural Sugars: Providing energy without the processed sugar load.

        *Disclaimer: Nutritional information is an estimate and can vary based on ingredients and quantities.

        Healthier Alternatives: Making It Your Own

        This recipe is already quite healthy, but here are a few ways to customize it further while keeping the delicious flavors intact:

        • Sweetener: If you’re watching your sugar intake, use a sugar substitute like stevia or erythritol in the dressing, adjusting to your preferred sweetness. You can also reduce the amount of honey.
        • Citrus: For less acidity, use a mix of lime and orange juice.
        • Herbs: Experiment with other fresh herbs like mint, tarragon, or even a tiny bit of rosemary for a unique twist.
        • Fruit Variety: Incorporate seasonal fruits like kiwi, mango, or thinly sliced apples.

        Serving Suggestions: Versatility at its Finest

        This Honey Lime Basil Peach Fruit Salad is incredibly versatile:

        • Serve as a refreshing side dish to grilled meats, chicken, or fish.
        • A light and healthy dessert, especially on warm evenings.
        • As a vibrant addition to brunch spreads or potlucks.
        • Pair with yogurt or cottage cheese for a more substantial breakfast or snack.
        • Enjoy it on its own as a healthy and satisfying snack.

        Common Mistakes to Avoid

        To ensure your fruit salad is perfect every time:

        • Overmixing: Be gentle when combining fruits, especially with delicate berries, to prevent them from becoming mushy.
        • Using Underripe Fruit: Ensure your peaches are ripe but still firm for the best texture and sweetness.
        • Making Dresssing Too Early: The lime juice can start to break down some fruits if added too far in advance without chilling.
        • Not Tasting and Adjusting: Always taste your dressing and the final salad. Adjust sweetness, acidity, or salt to your preference.

        Storing Tips: Keeping It Fresh

        Store any leftover fruit salad in an airtight container in the refrigerator for up to 2-3 days. It’s best to store it undressed if you plan on keeping it for longer, and then dress it just before serving to maintain the best texture of the fruits. The basil may lose some of its vibrant green color over time, but the flavor will still be present.

        Close-up of honey lime basil peach fruit salad in a serving bowl, garnished with basil.

        Frequently Asked Questions

        ***Can I make this fruit salad ahead of time?***

        Yes, you can prepare the fruit and dressing separately a few hours in advance. Combine them and add the basil about 30 minutes to an hour before serving for best results. This allows the flavors to meld without the fruit becoming too soft.

        ***What if I don’t have fresh basil?***

        You can omit the basil, or substitute it with fresh mint. Mint offers a similar refreshing quality and pairs well with fruit.

        ***Can I use frozen fruit?***

        It’s best to use fresh fruit for this recipe to maintain the best texture. If you must use frozen, thaw it completely and drain well. Be aware that the texture might be softer.

        ***How can I make this salad more substantial?***

        You can add a scoop of Greek yogurt or cottage cheese, or serve it alongside granola or a slice of pound cake for a more filling meal.

        ***Can I add other fruits?***

        Absolutely! This recipe is very flexible. Other great additions include mango, kiwi, cantaloupe, honeydew, or even thinly sliced apples or pears.

        Print
        clock clock iconcutlery cutlery iconflag flag iconfolder folder iconinstagram instagram iconpinterest pinterest iconfacebook facebook iconprint print iconsquares squares iconheart heart iconheart solid heart solid icon

        Honey Lime Basil Peach Fruit Salad Recipe


        • Author: Chef Emy

        Description

        This vibrant Honey Lime Basil Peach Fruit Salad is a refreshing summer dish that combines juicy peaches, sweet berries, fragrant basil, and a zesty honey-lime dressing. Perfect for barbecues, picnics, or light desserts, this healthy and easy fruit salad is bursting with fresh flavors and antioxidants.


        Ingredients

        Scale
        • 4ripe peaches, sliced
        • 1 cupstrawberries, hulled and halved
        • 1 cupblueberries
        • 1 tablespoonfresh basil, chopped
        • 2 tablespoonshoney
        • 1 tablespoonfresh lime juice
        • 1 teaspoonlime zest

        Instructions

          Notes

          Use ripe but firm peaches for best texture.
          Substitute mint for basil if preferred.
          Can be made up to 4 hours ahead—store in the fridge.
          Add mango or kiwi for extra tropical flair.

          Nutrition

          • Calories: 120
          • Sugar: 18g

          “`

          Jello Creamsicle Pie Recipe

          “`html

          A slice of Jello Creamsicle Pie on a plate

          Introduction: The Dreamy Creamsicle Pie

          Are you searching for that perfect, no-fuss dessert that screams summer and nostalgia? Many home bakers are looking for recipes that deliver maximum flavor with minimal effort, especially as the warmer months approach. If the thought of re-creating those beloved orange and vanilla swirls from your childhood brings a smile to your face, then you’re in for a treat! This Jello Creamsicle Pie recipe is your ticket to a delightful and refreshing summer dessert. Imagine a velvety, creamy orange filling nestled within a buttery graham cracker crust, all brought together with the iconic flavor of creamsicles. It’s a no-bake wonder that’s incredibly easy to prepare, making it an ideal candidate for your next backyard barbecue, family gathering, or simply a sweet escape to beat the heat. Get ready to impress your taste buds and your guests with this wonderfully nostalgic and utterly delicious creation!

          Ingredients: What You’ll Need

          Putting together this Jello Creamsicle Pie is a breeze, thanks to its straightforward ingredient list. The magic lies in combining simple, accessible items to create that unforgettable creamsicle flavor.

          For the Graham Cracker Crust:

          • 2 cups graham cracker crumbs: These form the crispy, buttery foundation of our pie. (About 14-16 full graham cracker sheets). For a finer crumb, pulse them in a food processor.
          • 1/4 cup granulated sugar: A touch of sweetness to complement the graham crackers.
          • 1/2 cup unsalted butter, melted: This binds the crumbs together, creating a firm crust. Use unsalted to control the saltiness.

          For the Creamsicle Filling:

          • 1 (3 oz) package orange gelatin (like Jell-O): The star ingredient that brings the vibrant color and classic orange flavor. Ensure it’s not sugar-free if you want the traditional taste.
          • 1 cup boiling water: Essential for dissolving the gelatin completely.
          • 1 cup cold water: This helps the gelatin set properly and cool down before adding dairy.
          • 1 (8 oz) container whipped topping, thawed (like Cool Whip): This provides the airy, creamy texture and light vanilla notes that define the creamsicle. Don’t substitute with fresh whipped cream immediately; let it thaw to room temperature for best results.
          • 8 oz cream cheese, softened: For a rich, tangy, and lusciously smooth filling. Ensure it’s truly softened (at room temperature for at least an hour) to avoid lumps.
          • 1/2 cup powdered sugar: To sweeten the cream cheese layer and ensure a smooth texture.
          • 1 teaspoon vanilla extract: Enhances the sweet, creamy flavors and complements the orange.

          Optional Garnish:

          • Additional whipped topping: For beautiful swirls on top.
          • Orange zest or thin orange slices: To amp up the visual appeal and hint at the flavors within.

          Timing: How Long It Takes

          This no-bake pie is designed for speed and ease, making it a perfect last-minute dessert. Let’s break down the time commitment:

          Prep time: 20 minutes
          Chill time: 4 hours
          Total time: 4 hours 20 minutes (mostly inactive chilling)

          Compared to many traditional pies that require baking the crust, chilling the filling, and then baking again, this Jello Creamsicle Pie is significantly quicker in terms of active preparation. The majority of the time is spent chilling, which means you can make it ahead of time and forget about it until serving!

          Step-by-Step Instructions: Making Creamsicle Magic

          Let’s turn these simple ingredients into a show-stopping dessert. Follow these easy steps for a perfectly creamy and refreshing Jello Creamsicle Pie.

          Step 1: Prepare the Graham Cracker Crust

          In a medium bowl, combine the graham cracker crumbs and granulated sugar. Pour in the melted butter and stir until all the crumbs are evenly moistened. It should resemble wet sand. Press this mixture firmly and evenly into the bottom and up the sides of a 9-inch pie plate. You can use the bottom of a glass or measuring cup to help compact it. Place the crust in the refrigerator to firm up while you prepare the filling.

          Step 2: Create the Creamy Orange Layer

          In a heatproof bowl, pour the boiling water over the orange gelatin. Stir vigorously for about 2 minutes until the gelatin is completely dissolved. Stir in the cold water. Let this mixture cool to room temperature (this is crucial to prevent melting the whipped topping and softening the cream cheese). In a separate large bowl, beat the softened cream cheese with powdered sugar until smooth and creamy. Stir in the vanilla extract. Gently fold in the thawed whipped topping until just combined. Finally, pour the cooled gelatin mixture into the cream cheese and whipped topping mixture. Whisk gently until everything is smoothly incorporated. You want a smooth, homogenous orange filling.

          Step 3: Assemble the Pie

          Retrieve the chilled graham cracker crust from the refrigerator. Pour the prepared creamsicle filling into the crust, spreading it evenly with a spatula. Ensure the filling reaches all the edges.

          Step 4: Chill and Serve

          Cover the pie loosely with plastic wrap or foil. Refrigerate for at least 4 hours, or until the filling is completely set and firm. Before serving, you can garnish with additional whipped topping, a sprinkle of orange zest, or a thin orange slice for an extra flourish.

          A whole Jello Creamsicle Pie ready to be sliced

          Nutritional Information: A Sweet Overview

          While this Jello Creamsicle Pie is a delightful treat, it’s good to have an idea of its nutritional breakdown. Please note that these are approximate values and can vary based on the specific brands and quantities of ingredients used.

          • Calories: Approximately 300-350 per slice (assuming 8 slices per pie).
          • Fat: Around 15-20g (largely from butter, cream cheese, and whipped topping).
          • Saturated Fat: Roughly 8-10g.
          • Carbohydrates: Approximately 35-40g (from graham crackers, sugar, and gelatin).
          • Sugar: Around 25-30g (added sugars from the recipe).
          • Protein: About 3-5g.
          • Sodium: Varies, but typically around 150-200mg if using standard ingredients.

          Healthier Alternatives: Indulge Wisely

          Looking to lighten up this classic? Here are some swaps that maintain that beloved creamsicle flavor while reducing sugar and fat:

          • Crust: Use whole wheat graham crackers or even a nut-based crust (like almond or walnut) for added fiber and healthy fats. Reduce sugar in the crust by half or omit entirely if your nuts are naturally sweet. A crust made from crushed pretzels, reduced sugar, and coconut oil can offer a unique flavor profile.
          • Sweetener: Opt for sugar-free orange gelatin. For the cream cheese filling, you can use a sugar substitute like erythritol or stevia to replace the powdered sugar, adjusting to taste.
          • Whipped Topping: Use a light or fat-free whipped topping. You can also make your own whipped topping from coconut cream (chilled full-fat coconut milk, skimmed off and whipped with a touch of sweetener) for a dairy-free, healthier option.
          • Cream Cheese: Consider using reduced-fat cream cheese or even a blend of neufchâtel cheese and Greek yogurt for a tangy, lighter base. Ensure your Greek yogurt is thick and unsweetened.

          Serving Suggestions: Elevate Your Slice

          This pie is delicious on its own, but these suggestions can make it even more special:

          • Classic Garnish: A dollop of extra whipped topping and a sprinkle of orange zest are simple yet elegant.
          • Fresh Fruit: Serve with fresh orange segments or berries for a burst of freshness and color.
          • Chocolate Drizzle: A light drizzle of melted dark chocolate can add a sophisticated touch and a flavor contrast.
          • Ice Cream Pairing: A small scoop of vanilla bean ice cream alongside a slice of this pie is pure bliss.

          Common Mistakes to Avoid

          To ensure your Jello Creamsicle Pie turns out perfectly every time, keep these common pitfalls in mind:

          • Not letting gelatin cool: Adding hot or warm gelatin to the cream cheese/whipped topping mixture can cause it to melt, curdle, or become less stable, resulting in a runny pie.
          • Not softening cream cheese enough: Lumps in your filling! Ensure the cream cheese is at true room temperature to achieve a smooth, creamy texture.
          • Overmixing the filling: Especially after adding whipped topping, overmixing can deflate the airy texture. Fold gently.
          • Not chilling long enough: Patience is key! The pie needs ample time to set firmly in the refrigerator.
          • Using sugar-free gelatin without adjustment: While a healthier option, sugar-free gelatin can sometimes have a different texture and require minor adjustments to sweetness or setting agents if you’re aiming for an exact replica.

          Storing Tips: Keeping It Fresh

          Proper storage ensures your Jello Creamsicle Pie stays delicious:

          • Refrigeration is Key: Always store the pie covered tightly with plastic wrap or foil in the refrigerator.
          • Duration: It’s best enjoyed within 3-4 days. The crust may soften over time, especially if stored with the filling for too long.
          • Freezing: This pie is generally not recommended for freezing, as the texture of the whipped topping and cream cheese can change significantly upon thawing, leading to a watery or grainy consistency.

          Frequently Asked Questions About Creamsicle Pie

          ***What is the best way to make graham cracker crumbs?***

          You can place graham crackers in a zip-top bag and crush them with a rolling pin until fine crumbs form, or use a food processor for a quick and consistent result.

          ***Can I use a different type of gelatin?***

          Yes, you can experiment with other fruit-flavored gelatins like lemon or even strawberry for a different twist, but orange is key for the classic creamsicle flavor.

          ***My filling is too runny. What went wrong?***

          This usually happens if the gelatin mixture was too warm when added to the other ingredients, or if the pie was not chilled for a sufficient amount of time.

          ***Can I make this pie dairy-free?***

          It requires significant substitutions. You would need lactose-free or dairy-free cream cheese alternatives, dairy-free whipped topping (like coconut cream), and ensure your graham crackers are dairy-free.

          ***How do I ensure a smooth filling?***

          Make sure your cream cheese is fully softened to room temperature and beat it well with the powdered sugar until completely smooth before incorporating other ingredients.

          Print

          clock clock iconcutlery cutlery iconflag flag iconfolder folder iconinstagram instagram iconpinterest pinterest iconfacebook facebook iconprint print iconsquares squares iconheart heart iconheart solid heart solid icon

          Jello Creamsicle Pie Recipe


          • Author: Chef Emy

          Description

          ThisJello Creamsicle Pie recipeis a refreshing, no-bake summer dessert featuring orange Jello, whipped topping, and a creamy filling in a buttery graham cracker crust. Perfect for gatherings, BBQs, or a light sweet treat, this pie offers nostalgic flavors in every bite. Easy to prepare and absolutely delicious, this creamsicle pie is a guaranteed crowd-pleaser!


          Ingredients

          Scale
          • 1package (3 oz) orange Jello
          • cupboiling water
          • ½ cupcold water
          • ½ cuporange juice
          • 1tub (8 oz) whipped topping (like Cool Whip), thawed
          • ½ cupvanilla yogurt or sour cream
          • 1pre-made graham cracker crust (9-inch)

          Instructions

            Notes

            You can substitute orange juice with mandarin orange juice for a twist.
            For a stronger citrus flavor, add a bit of orange zest to the mixture.
            Store pie covered in the refrigerator for up to 3 days.

            Nutrition

            • Calories: 220
            • Sugar: 19g

            “`

            Lemon Posset Recipe

            “`html

            Lemon Posset Recipe

            Introduction: What is Lemon Posset?

            Are you looking for a dessert that’s deceptively simple yet undeniably elegant, requiring minimal effort for maximum impact? If you’re yearning for a taste of classic British comfort that’s both refreshing and rich, then the creamy Lemon Posset is your answer. This delightful dessert, often hailed as a testament to the magic of a few quality ingredients, is famously made with just three core components: heavy cream, sugar, and lemon. Its appeal lies in its incredibly smooth texture, perfectly balanced tanginess, and the fact that it sets beautifully in the refrigerator, making it an ideal make-ahead treat for any occasion.

            The art of Lemon Posset is in its simplicity. Unlike more complex pastries or mousses, it relies on a chemical reaction between the lemon’s acid and the heated cream to achieve its signature set. This makes it a liberating option for home bakers of all skill levels. Whether you’re hosting a dinner party and need a show-stopping yet effortless finale, or you simply crave a sophisticated treat on a warm afternoon, a lemon posset delivers. Its bright citrus notes cut through the richness of the cream, creating a harmonious flavor profile that is both comforting and invigorating. We’ll dive deep into what makes this British dessert so beloved, how to achieve that perfect creamy texture, and provide tips to ensure your lemon posset is a resounding success every time. Get ready to discover your new favorite easy lemon recipe!

            Ingredients for the Perfect Lemon Posset

            The beauty of Lemon Posset lies in its minimalist ingredient list. You don’t need a pantry full of exotic items to create something truly special. The quality of each ingredient plays a crucial role in the final outcome, so opt for the best you can find.

            Heavy Cream

            This is the luxurious base of our posset. You’ll need heavy cream, also known as double cream in the UK, with a high fat content (typically 30-40%). This fat content is essential for the setting process. Lower fat creams may result in a softer or unset posset. The cream provides an unparalleled richness and silky smooth texture that is the hallmark of a great posset.

            Substitution: If heavy cream is unavailable, you can try a mixture of evaporated milk and butter, but the results may vary. For a slightly less rich option, a good quality whipping cream (at least 30% fat) can sometimes work, but heavy cream is always recommended for the best set and flavor.

            Granulated Sugar

            Granulated sugar not only sweetens the posset but also plays a vital role in its structure. It dissolves into the cream, and when cooked, contributes to the final set. Use standard white granulated sugar for a clean flavor and desired texture. The sweetness should be balanced by the tang of the lemon.

            Substitution: Caster sugar (superfine sugar) will dissolve more quickly and can be used. Avoid brown sugars, as their molasses content will affect the color and flavor. Agave nectar or honey are not suitable replacements as they don’t provide the same structural support and alter the flavor profile significantly.

            Fresh Lemon Juice and Zest

            This is where the magic happens! Fresh lemon juice provides the essential acidity to coagulate the cream and create the set. It also lends a bright, tangy flavor that cuts through the richness of the cream. Using freshly squeezed juice is non-negotiable; bottled juice often lacks the vibrant flavor and can have a metallic aftertaste. The zest adds an extra layer of fragrant lemon aroma and flavor without introducing more liquid.

            Substitution: While lemon is classic, you could experiment with lime juice and zest for a different citrus twist. The principle remains the same: you need the acid from citrus to set the cream.

            Optional Garnish

            While the posset is delicious on its own, garnishes can elevate its presentation and add textural contrast. Fresh berries, a sprig of mint, a small curl of lemon zest, or even a delicate shortbread biscuit are wonderful choices.

            Timing Your Lemon Posset

            Prep time:
            15 minutes
            Cook time:
            10 minutes
            Chill time:
            4 hours (minimum)
            Total time:
            4 hours 25 minutes

            Compared to many desserts, the active preparation and cooking time for Lemon Posset is incredibly short, typically around 25 minutes. However, it requires a significant chilling period to set properly. This make-ahead nature is one of its biggest advantages, positioning it as a stress-free dessert for busy cooks. Most average desserts might take an hour or more of active work, but the real magic of posset happens passively in the fridge.

            Creamy Lemon Posset in delicate serving glasses

            Step-by-Step Instructions for Making Lemon Posset

            Crafting a perfect Lemon Posset is straightforward. Follow these simple steps for a consistently delightful creamy dessert.

            Step 1: Heat the Cream and Sugar

            In a medium saucepan, combine the heavy cream and granulated sugar. Stir gently to combine. Place the saucepan over medium heat.

            Step 2: Simmer Gently

            Bring the cream and sugar mixture to a gentle simmer. Do not let it come to a rolling boil. Stir occasionally to ensure the sugar dissolves completely and that no cream sticks to the bottom of the pan. Allow it to simmer gently for about 3-5 minutes. This simmering process is crucial for allowing the cream to thicken slightly and for the sugar to fully dissolve. The mixture should just be beginning to bubble around the edges.

            Step 3: Add the Lemon

            Remove the saucepan from the heat. Stir in the fresh lemon juice and lemon zest. Whisk gently until everything is well combined. The mixture might look a little curdled at this stage due to the lemon’s acidity, which is normal.

            Step 4: Strain and Pour

            To ensure a perfectly smooth texture, pour the mixture through a fine-mesh sieve into a clean bowl or jug. This will catch any small bits of zest or potential curdling. Discard any solids left in the sieve. Once strained, carefully ladle or pour the liquid into your chosen serving dishes (ramekins, small glasses, or teacups). Aim for equal amounts in each dish.

            Step 5: Chill to Perfection

            Place the filled serving dishes onto a tray, which makes them easier to move into the refrigerator. Chill in the refrigerator for at least 4 hours, or preferably overnight, until the possets are set. They should have a firm, yet wobbly consistency, similar to a very soft panna cotta or a rich custard.

            Nutritional Information

            This section provides an approximate nutritional breakdown per serving, assuming 4 servings from the recipe. Actual values may vary based on specific ingredients used.

            • Calories: Approx. 400-500 kcal
            • Fat: Approx. 40-50g (mostly from heavy cream)
            • Saturated Fat: Approx. 25-30g
            • Carbohydrates: Approx. 25-30g (from sugar)
            • Sugar: Approx. 25-30g
            • Protein: Approx. 3-5g
            • Sodium: Minimal

            Healthier Alternatives for Lemon Posset

            While the indulgent nature of Lemon Posset is part of its charm, you can make lighter adaptations without sacrificing too much flavor or texture. The key is maintaining the acid-cream interaction.

            • Reduced Fat Cream: Substitute half of the heavy cream with a good quality single cream or whipping cream (ensure it has at least 30% fat). While this will reduce richness, it can still set if not over-simmered.
            • Greek Yogurt Base: For a significantly lighter version, try a base of full-fat Greek yogurt. Mix the yogurt with a smaller amount of heated cream and sugar, and then add lemon juice. This will result in a tangier, yogurt-like consistency rather than the ultra-smooth creaminess of traditional posset.
            • Sweetener Adjustment: While sugar plays a structural role, you can slightly reduce the amount of sugar and rely more on the natural sweetness of fresh fruit garnishes to compensate. Avoid artificial sweeteners as they may not behave the same way when heated and can affect the set.

            Remember, these alternatives will alter the final texture and richness, but they can offer a more “everyday-friendly” version of this delightful dessert.

            Serving Suggestions

            Lemon Posset is a versatile dessert. It’s elegant enough for special occasions but simple enough for a weeknight treat. Here are some ideas:

            • Classic Presentation: Serve chilled in small ramekins, teacups, or elegant glasses. Garnish with a few fresh raspberries, blueberries, or a sprig of mint.
            • Citrus Twist: Top with a thin, candied lemon slice or a delicate twist of lemon zest.
            • With Baked Goods: Accompany with a crisp shortbread cookie or a delicate almond biscotti for added texture.
            • As a Base: Use it as a creamy base for a fruit tart or as a filling for mini pastry shells.

            Common Mistakes to Avoid

            Even with its simplicity, a few common pitfalls can lead to a less-than-perfect posset:

            • Using Low-Fat Cream: As mentioned, high-fat content is crucial for the setting process.
            • Boiling Vigorously: Over-boiling the cream can cause it to break or become greasy. A gentle simmer is all that’s needed.
            • Not Heating Enough: If the cream isn’t heated sufficiently, the sugar won’t dissolve properly, and the posset might not set well.
            • Using Bottled Lemon Juice: The flavor and setting power of fresh juice are superior.
            • Not Straining: Skipping the straining step can lead to a less smooth texture due to zest fragments or minor curdling.
            • Insufficient Chilling Time: Patience is key! Ensure the posset is fully set before attempting to serve.

            Storing Your Lemon Posset

            Lemon Posset should be prepared ahead of time and stored in the refrigerator. Once set in their individual serving dishes, they can be covered tightly with plastic wrap to prevent any odors from the fridge from affecting their delicate flavor. Stored this way, lemon possets are best enjoyed within 2-3 days of preparation. They are not suitable for freezing, as the texture will change significantly upon thawing.

            Close-up of Lemon Posset with berries

            Frequently Asked Questions (FAQs)

            ***What is the science behind Lemon Posset setting?***

            The magic of Lemon Posset lies in acid coagulation. When the acid from the lemon juice is introduced to the heated cream, it causes the proteins in the cream to denature and unwind. These proteins then tangle and bond with each other, creating a gel-like network that traps the liquid and fats, resulting in a smooth, set dessert.

            ***Can I make Lemon Posset ahead of time?***

            Absolutely! In fact, it’s highly recommended. Lemon Posset needs at least 4 hours to set properly, so making it the day before your event is ideal. This makes it a perfect dessert for entertaining as it requires no last-minute fuss.

            ***My posset didn’t set. What went wrong?***

            Several factors could be the cause: using a cream with insufficient fat content, not simmering the cream long enough for it to slightly thicken, or not using enough lemon juice. Ensure you’re using heavy cream (at least 30% fat) and that the cream simmers for the specified time before adding the lemon. Also, double-check that your lemon juice is fresh and a sufficient quantity.

            ***Can I flavor my Lemon Posset with other things?***

            Yes, you can! While lemon is classic, you can infuse the cream with other flavors before adding the lemon juice. Consider adding a vanilla bean pod to the cream as it heats, or a sprig of rosemary or lavender for a subtle herbal note. You could also add a liqueur like limoncello or elderflower liqueur along with the lemon juice for an extra layer of flavor.

            ***How much sugar should I use?***

            The amount of sugar is crucial for both sweetness and structure. The recipe calls for a specific ratio that has been tested for optimal results. While you can slightly reduce it, drastically altering the sugar content can compromise the posset’s ability to set correctly.

            Conclusion

            The Lemon Posset is a testament to the fact that simplicity can often be the most elegant and delicious approach in the kitchen. With just a few high-quality ingredients and a little bit of patience for chilling, you can create a dessert that is incredibly creamy, wonderfully tangy, and utterly satisfying. It’s a British classic that is easy enough for beginners yet sophisticated enough to impress any guest. Whether you’re seeking an easy lemon recipe for a summer gathering or a comforting yet refreshing dessert any time of year, the Lemon Posset is sure to become a beloved staple in your recipe repertoire. Give it a try and experience the delightful magic of this creamy, dreamy treat!

            Print
            clock clock iconcutlery cutlery iconflag flag iconfolder folder iconinstagram instagram iconpinterest pinterest iconfacebook facebook iconprint print iconsquares squares iconheart heart iconheart solid heart solid icon

            Lemon Posset Recipe


            • Author: Chef Emy

            Description

            Creamy Lemon Posset is a classic British dessert made with just cream, sugar, and lemon. It’s tangy, smooth, and incredibly easy to prepare. This simple yet elegant treat sets beautifully in the fridge and is perfect for entertaining guests or a refreshing summer indulgence. Keywords: lemon posset, British dessert, creamy lemon dessert, easy lemon recipe, summer treat.


            Ingredients

            Scale
            • 2 cups(480ml) heavy cream
            • ¾ cup(150 g) granulated sugar
            • ⅓ cup(80ml) fresh lemon juice (about2lemons)
            • 1 tbsplemon zest (optional for extra zing)

            Instructions

              Notes

              Do not overboil the cream to avoid curdling.
              Can be made a day ahead for convenience.
              Use fresh lemon juice for best flavor and texture.
              Garnish with fresh raspberries or candied lemon peel for presentation.

              Nutrition

              • Calories: 410
              • Sugar: 24g

              “`

              Banana Bread Bliss Recipe

              “`html

              Banana Bread Bliss Recipe

              Why You’ll Love This Banana Bread Bliss Recipe

              Did you know that nearly 80% of people find baking to be a stress-relieving activity? And what better way to de-stress than with a slice of warm, fragrant Banana Bread Bliss? This isn’t just any banana bread; it’s a classic, moist masterpiece designed for ultimate comfort and flavor. We’re talking about using those perfectly overripe bananas, the ones whose skins are speckled with brown, to unlock their maximum sweetness and aroma. Combined with the gentle warmth of cinnamon and the subtle sweetness of vanilla, this easy-to-make recipe is your new go-to for a delicious breakfast, a satisfying snack, or even a decadent dessert. You’ll be amazed at how a simple combination of pantry staples can create something so utterly delightful, all baked to golden perfection in under an hour. Get ready to experience pure homemade comfort, loaded with unmistakable banana flavor!

              The Secret to Perfectly Moist Banana Bread

              The magic of this banana bread lies in the quality of its ingredients and their perfect ratio. Using overripe bananas is non-negotiable; they provide moisture, sweetness, and that quintessential banana flavor that screams comfort. Here’s what you’ll need to create your batch of Banana Bread Bliss:

              Wet Ingredients

              • 3 large, very ripe bananas: The riper, the better! Look for dark spots and a soft texture for maximum sweetness and moisture. Mashed, they should yield about 1.5 cups. (~300-350g)
              • 1/3 cup (75g) unsalted butter, melted: Butter provides richness and a tender crumb.
                Substitution: Use coconut oil or a neutral-flavored vegetable oil for a dairy-free option.
              • 1 large egg: Binds the ingredients and adds structure. At room temperature, it incorporates more easily.
                Substitution: For an egg-free version, use a flax egg (1 tbsp flaxseed meal + 3 tbsp water, let sit for 5 minutes).
              • 1 teaspoon vanilla extract: Enhances all the other flavors and adds a lovely aroma. Use pure vanilla extract for the best taste.
              • 1/2 cup (100g) granulated sugar: Balances the banana flavor and aids in browning.
                Substitution: You can reduce this to 1/4 cup (50g) if your bananas are extremely ripe and sweet, or use brown sugar for a deeper, caramelly note.

              Dry Ingredients

              • 1.5 cups (190g) all-purpose flour: The base of our bread. Spooned and leveled for accuracy.
                Substitution: For a whole wheat version, use half all-purpose and half whole wheat flour. For gluten-free, use a 1:1 gluten-free baking blend.
              • 1 teaspoon baking soda: The leavening agent that helps the bread rise and achieve a tender texture. Ensure it’s fresh!
              • 1/2 teaspoon ground cinnamon: Adds that classic warm spice that pairs perfectly with banana.
                Substitution: A pinch of nutmeg or a mix of cinnamon and allspice works beautifully too.
              • 1/4 teaspoon salt: Balances sweetness and enhances all the flavors.

              Optional Add-ins

              • 1/2 cup (85g) chopped walnuts or pecans: For a delightful crunch and nutty flavor. Toast them lightly for enhanced taste.
              • 1/2 cup (100g) chocolate chips: Dark, milk, or semi-sweet – choose your favorite for pockets of melted chocolatey goodness.

              Baking Time: From Prep to Perfection

              Prep time: 15 minutes
              Cook time: 50-60 minutes
              Total time: 1 hour 5 minutes – 1 hour 15 minutes

              Compared to many other quick bread recipes that can take over an hour just for prep and baking, this Banana Bread Bliss recipe is remarkably efficient. The total time is well within the average for banana bread, making it ideal for a weeknight bake or a weekend brunch project. The active prep is kept to a minimum, allowing you to achieve delicious results without a huge time commitment.

              Close-up of ripe bananas ready to be mashed for banana bread

              Crafting Your Banana Bread Bliss: Step-by-Step

              Step 1: Preheat Your Oven & Prep Your Pan

              Begin by preheating your oven to 350°F (175°C). Grease and flour a standard 9×5 inch loaf pan, or line it with parchment paper for easy removal. This ensures your beautiful banana bread won’t stick.

              Step 2: Mash Those Overripe Bananas

              In a medium bowl, mash the 3 very ripe bananas with a fork or potato masher until mostly smooth. A few small lumps are perfectly fine and add character!

              Step 3: Combine Wet Ingredients

              To the mashed bananas, add the melted butter, egg, granulated sugar, and vanilla extract. Whisk everything together until well combined and the mixture is smooth.

              Step 4: Whisk Dry Ingredients

              In a separate large bowl, whisk together the all-purpose flour, baking soda, ground cinnamon, and salt. This ensures your leavening agent and spices are evenly distributed throughout the batter.

              Step 5: Gently Combine Wet and Dry

              Pour the wet ingredient mixture into the bowl with the dry ingredients. Using a spatula or a wooden spoon, gently fold the ingredients together until *just* combined. Be careful not to overmix! Overmixing develops the gluten in the flour, leading to a tough, dense bread.

              Step 6: Fold in Your Add-ins (If Using)

              If you’re adding nuts or chocolate chips, gently fold them into the batter now.

              Step 7: Bake to Golden Perfection

              Pour the batter evenly into the prepared loaf pan. Bake for 50-60 minutes, or until a wooden skewer or toothpick inserted into the center comes out clean or with a few moist crumbs attached (no wet batter!). If the top is browning too quickly, you can tent it loosely with aluminum foil during the last 15-20 minutes of baking.

              Step 8: Cool and Enjoy

              Once baked, let the banana bread cool in the pan for about 10-15 minutes before carefully inverting it onto a wire rack to cool completely. This is crucial for the structure to set and prevents it from becoming gummy.

              Nutritional Snapshot of Banana Bread Bliss

              While exact nutritional values can vary depending on the brands of ingredients used and any additions, a typical slice of this Banana Bread Bliss (assuming 12 slices per loaf, without add-ins) contains approximately:

              • Calories: ~200-250 kcal
              • Carbohydrates: ~30-35g
              • Fat: ~8-10g
              • Protein: ~3-4g
              • Sugar: ~15-20g (largely from ripe bananas)

              Please note: This is an estimation. For precise nutritional information, it’s recommended to use a nutritional calculator with your specific ingredients.

              Healthier Twists on Banana Bread Bliss

              Looking to make your Banana Bread Bliss even healthier without sacrificing flavor? Try these swaps:

              • Reduce Sugar: As mentioned in the ingredients, decrease granulated sugar to 1/4 cup or rely solely on the natural sweetness of very ripe bananas.
              • Whole Wheat Flour: Substitute half of the all-purpose flour with whole wheat flour for added fiber and nutrients.
              • Greek Yogurt or Applesauce: Replace some of the butter or oil with an equal amount of unsweetened applesauce or plain Greek yogurt. This reduces fat and adds moisture.
              • Boost Fiber: Fold in a tablespoon or two of chia seeds or flaxseeds into the dry ingredients.

              Elevate Your Banana Bread Experience: Serving Ideas

              While delicious on its own, Banana Bread Bliss can be elevated with these serving suggestions:

              • Warm and Buttery: A classic for a reason – toast a slice and spread with a generous layer of butter.
              • Cream Cheese Delight: A fan favorite, a thick layer of cream cheese adds a tangy contrast.
              • Nutty Crunch: Top with a dollop of almond butter or peanut butter and a sprinkle of chopped nuts.
              • Fruity Pairing: Serve alongside fresh berries or a dollop of plain yogurt for a balanced treat.

              Avoiding Banana Bread Pitfalls: Common Mistakes

              Prevent common banana bread issues with these tips:

              • Overmixing the Batter: This is the number one culprit for tough, dense banana bread. Mix until ingredients are just combined.
              • Using Underripe Bananas: They lack sweetness and moisture, resulting in a bland, dry loaf.
              • Opening the Oven Door Too Soon: Resist peeking! The fluctuating temperature can cause the bread to collapse.
              • Underbaking: A gummy center is no fun. Always test for doneness with a skewer.

              Keeping Your Banana Bread Bliss Fresh

              To maintain the deliciousness of your Banana Bread Bliss:

              • Room Temperature: Store at room temperature, tightly wrapped in plastic wrap or in an airtight container, for up to 3 days.
              • Refrigeration: For longer storage (up to a week), refrigerate the wrapped bread. It may become slightly firmer, so let it come to room temperature before serving or gently warm a slice.
              • Freezing: Wrap the cooled loaf tightly in plastic wrap, then a layer of aluminum foil, or place in a freezer-safe bag. It will keep well for up to 3 months. Thaw overnight at room temperature. You can also freeze individual slices.
              A slice of moist banana bread with chocolate chips

              Frequently Asked Questions About Banana Bread Bliss

              Why is my banana bread dry?

              This can happen if you’ve overbaked it, used underripe bananas, or overmixed the batter. Ensure you’re using very ripe bananas, mixing just until combined, and baking until a tester comes out with moist crumbs.

              Can I use frozen bananas?

              Absolutely! Frozen bananas work perfectly. Thaw them completely and drain off any excess liquid before mashing and using them in the recipe.

              How do I get a perfectly golden-brown crust?

              Baking at the correct temperature (350°F/175°C) and ensuring your sugar content is adequate helps with browning. If it’s browning too quickly, tent the loaf with foil during the last part of baking.

              Can I make muffins with this recipe?

              Yes! This recipe can easily be adapted into muffins. Fill muffin liners about two-thirds full and bake at 350°F (175°C) for 20-25 minutes, or until a toothpick inserted into the center comes out clean.

              Why does my banana bread sink in the middle?

              This typically occurs from overmixing the batter, using too much leavening, or opening the oven door too early. Ensure you follow the mixing instructions carefully and resist the urge to peek until the bread is nearly done.

              The Sweetest Ending to Your Baking Day

              There you have it – the recipe for absolute Banana Bread Bliss! This recipe is a testament to how simple ingredients can create something truly wonderful. Its moist texture, comforting aroma, and delightful flavor make it a crowd-pleaser for any occasion. Whether you’re a seasoned baker or just starting out, this easy banana bread is sure to become a staple in your kitchen.

              Print
              clock clock iconcutlery cutlery iconflag flag iconfolder folder iconinstagram instagram iconpinterest pinterest iconfacebook facebook iconprint print iconsquares squares iconheart heart iconheart solid heart solid icon

              Banana Bread Bliss Recipe


              • Author: Chef Emy

              Description

              Banana Bread Bliss is a classic, moist banana bread recipe made with overripe bananas, warm cinnamon, and a hint of vanilla. This easy-to-make recipe is perfect for breakfast, a snack, or even dessert. Enjoy a delicious slice of homemade comfort that’s loaded with flavor and easy to bake in just under an hour.


              Ingredients

              Scale
              • 3ripe bananas, mashed
              • ½ cupunsalted butter, melted
              • ¾ cupgranulated sugar
              • 1large egg
              • 1 tspvanilla extract
              • 1 ½ cupsall-purpose flour
              • 1 tspbaking soda
              • ¼ tspsalt
              • ½ tspground cinnamon (optional)
              • ½ cupchopped walnuts or chocolate chips (optional)

              Instructions

                Notes

                Overripe bananas (brown spots) work best.
                Add a streusel topping or swirl with Nutella for variation.
                Stores well wrapped at room temp for 3 days or refrigerated for up to a week.

                Nutrition

                • Calories: 210
                • Sugar: 14g

                “`

                Vanilla Bean Frappuccino Recipe

                “`html

                Vanilla Bean Frappuccino Recipe

                Ever wondered if you can recreate that creamy, dreamy Starbucks Vanilla Bean Frappuccino at home without the coffee? Did you know that a coffee-free version is enjoyed by millions globally, especially as a sweet treat for all ages? This Vanilla Bean Frappuccino recipe is your golden ticket to achieving that beloved taste and texture right in your own kitchen. Forget the lines and the expense; this homemade delight uses simple ingredients like milk, actual vanilla bean (or extract), and ice to deliver pure, unadulterated vanilla bliss. It’s a refreshingly sweet escape perfect for a warm afternoon, a special brunch, or anytime you crave a delightful, non-caffeinated indulgence.

                Ingredients

                Crafting this delightful frappuccino is surprisingly simple. The key is to use quality ingredients that pack a flavorful punch. Here’s what you’ll need:

                • Milk: 1 cup (240ml). Whole milk will give you the creamiest result, but 2% or even skim milk works. For a dairy-free option, almond, soy, or oat milk are excellent substitutes.
                • Vanilla Bean: 1/2 vanilla bean, scraped (or 1-2 teaspoons pure vanilla extract). Using a real vanilla bean provides those beautiful flecks and an intensely rich, complex vanilla flavor that extract can’t quite match. If using extract, opt for a good quality one.
                • Granulated Sugar: 2-3 tablespoons, or to taste. This adds sweetness and body. You can adjust this based on your preference and the sweetness of your vanilla source.
                • Xanthan Gum: 1/2 teaspoon (optional, but highly recommended). This is the secret ingredient that gives frappuccinos their signature smooth, thick, and non-icy texture.
                • Ice Cubes: 1 ½ cups. Use standard ice cubes. The amount may vary slightly depending on your blender and desired thickness.
                • Whipped Cream: For topping (optional). A dollop of fluffy whipped cream takes this treat to the next level.
                • Vanilla Bean Specks: From the scraped vanilla bean, for garnish (optional).

                Substitutions & Notes:

                • Vanilla Flavor: If you don’t have a vanilla bean, use 1.5 to 2 teaspoons of high-quality pure vanilla extract. You might also consider doubling the sugar slightly if using extract, as beans can sometimes have a more concentrated flavor profile.
                • Sweetener: Agave nectar or maple syrup can be used instead of sugar, though they will impart their own subtle flavors. Start with a similar quantity and adjust to taste.
                • Creaminess Boost: For an even richer texture, you can add 1-2 tablespoons of heavy cream or half-and-half.
                • Xanthan Gum Alternative: While xanthan gum is best, a tiny pinch of guar gum can also work. Without it, your frappuccino might become icier and separate faster.

                Timing

                Prep time: 5 minutes
                Cook time: 0 minutes
                Total time: 5 minutes

                Compared to the average complex dessert recipe that can take hours, this Vanilla Bean Frappuccino is a remarkable timesaver. While traditional baking might demand significant time for preparation, cooling, and assembly, this blended beverage is ready in mere minutes. The prep mainly involves gathering your ingredients and perhaps scraping a vanilla bean – a task that takes less than a minute. This makes it an ideal choice for an impromptu craving or when you need a delightful treat without a long wait.

                Vanilla Bean Frappuccino ingredients on a counter

                Step-by-Step Instructions

                Step 1: Prepare Your Ingredients

                First things first, let’s get everything ready. If you’re using a vanilla bean, carefully slice it lengthwise with a sharp knife and use the back of the knife to scrape out all those beautiful, fragrant seeds. If you’re opting for vanilla extract, measure it out with your sugar. If using whole milk, ensure it’s at room temperature or slightly chilled. Having all your ingredients measured and ready to go ensures a smooth blending process.

                Step 2: Blend It All Up

                In the carafe of a powerful blender, combine the milk, scraped vanilla bean seeds (or vanilla extract), sugar, and xanthan gum (if using). Add the ice cubes. Now, secure the lid tightly. Begin blending on a low speed, gradually increasing to high. Blend until the mixture is completely smooth and has a thick, slushy consistency. This usually takes about 30-60 seconds, depending on your blender’s power. You’re looking for a uniform texture with no large ice chunks remaining. If it seems too thick, add a splash more milk; if too thin, add a few more ice cubes.

                Step 3: Pour and Enjoy

                Once your Vanilla Bean Frappuccino has reached the perfect consistency, carefully pour it into a tall glass. For the ultimate indulgence, top with a generous swirl of whipped cream. If you used a real vanilla bean, you can sprinkle a few of the scraped specks over the whipped cream for an extra touch of elegance and flavor. Serve immediately with a straw and savor every sip of this homemade delight!

                Nutritional Information

                While exact nutritional values can vary based on specific ingredient brands and quantities used (especially sugar and milk fat content), here’s an estimated breakdown for one serving of this Vanilla Bean Frappuccino (without whipped cream topping and using whole milk and 2 tbsp sugar):

                • Calories: Approximately 250-300 kcal
                • Protein: 8-10g
                • Fat: 10-15g (higher if using whole milk or cream)
                • Carbohydrates: 30-40g (largely from sugar)
                • Sugar: 25-35g

                Please note: This is a general estimate. Using skim milk, sugar substitutes, or omitting sugar will significantly alter these values.

                Healthier Alternatives

                Looking to make this treat a bit lighter without sacrificing flavor? Here are some swaps:

                • Milk: Opt for unsweetened almond milk or skim milk to reduce calories and fat.
                • Sweetener: Replace granulated sugar with a sugar substitute like stevia, erythritol, or monk fruit sweetener. You can also use a small amount of pure maple syrup or agave nectar, though these still contain sugars. Start with less and adjust to your taste.
                • Xanthan Gum: While it provides texture, if you’re looking to avoid it, the frappuccino will be icier but still enjoyable. For a smoother, less icy texture without xanthan gum, ensure your ice is finely crushed.
                • Toppings: Skip the whipped cream or opt for a sugar-free version. A dusting of cinnamon or a drizzle of sugar-free caramel sauce can add flavor without many calories.

                Serving Suggestions

                This Vanilla Bean Frappuccino is fantastic on its own, but it also pairs wonderfully with:

                • Freshly baked cookies or muffins.
                • A light fruit salad.
                • As a sweet end to a light lunch or brunch.
                • Especially perfect for kids’ parties or a midday treat on a hot day.

                Common Mistakes to Avoid

                To ensure your homemade Frappuccino is perfect every time:

                • Over-blending: Blending for too long can melt the ice and result in a watery drink. Aim for just long enough to achieve a smooth consistency.
                • Not enough ice: Insufficient ice will lead to a thin, more milky consistency rather than a thick, icy frappé.
                • Skipping the xanthan gum: While optional, it makes a significant difference in achieving that classic smooth, non-icy texture. If you omit it, your drink might separate or become noticeably icy.
                • Using warm ingredients: Ensure your milk and any other liquid additions are chilled for the best texture.

                Storing Tips

                Frappuccinos are best enjoyed immediately after preparation. The texture is optimal when freshly blended. If you have any leftovers, they will likely separate and become icy over time. You can try re-blending them for a few seconds, but the texture won’t be quite the same. If you must store it, transfer it to an airtight container and keep it in the freezer. It will essentially become an ice cream base, and you’ll need to let it soften slightly before attempting to consume it.

                A close-up of a Vanilla Bean Frappuccino with whipped cream and vanilla specks

                Frequently Asked Questions

                _***Can I make this frappuccino without a blender?_***

                While a blender is ideal for achieving the smooth, icy texture, you could try vigorously shaking all ingredients (except ice) in a cocktail shaker with ice, then pouring over fresh ice. However, the texture will be significantly different and more like a heavily sweetened, flavored iced milk.

                _***How do I get the vanilla bean specks if I only have vanilla extract?_***

                If you solely use vanilla extract, you won’t have actual vanilla bean specks. For a similar visual effect, you could consider adding a tiny pinch of edible black glitter or finely chopped dark chocolate shavings as a garnish, though these will alter the flavor profile.

                _***Can I make this recipe ahead of time?_***

                It’s best prepared fresh. Pre-making it will result in a separated and icy drink. The beauty of this recipe is its speed; it only takes 5 minutes!

                _***What kind of milk is best for this recipe?_***

                Whole milk provides the richest, creamiest texture. However, 2%, skim, or plant-based milks like almond, soy, or oat milk will also work well, though the creaminess might vary.

                Conclusion

                There you have it – your ultimate guide to creating a delicious, no-coffee Vanilla Bean Frappuccino right at home! This recipe is a testament to how simple ingredients can transform into a delightful treat that rivals your favorite coffee shop versions. It’s versatile, easy to customize, and perfect for any occasion. So grab your blender, gather your ingredients, and whip up a batch of pure vanilla bliss. You and your taste buds will be so glad you did!

                Print

                clock clock iconcutlery cutlery iconflag flag iconfolder folder iconinstagram instagram iconpinterest pinterest iconfacebook facebook iconprint print iconsquares squares iconheart heart iconheart solid heart solid icon

                Vanilla Bean Frappuccino Recipe


                • Author: Chef Emy

                Description

                This Vanilla Bean Frappuccino recipe is a creamy, sweet, and refreshing homemade version of the classic Starbucks favorite. Made with simple ingredients like milk, vanilla bean, and ice, this no-coffee drink is perfect for all ages. Enjoy the rich vanilla flavor in every sip with this easy-to-make treat!


                Ingredients

                Scale
                • 1 cupwhole milk (or milk of choice)
                • 1 ½ cupsice
                • 3scoops vanilla bean ice cream
                • 1 tspvanilla bean paste or extract
                • Whipped cream (for topping)

                Instructions

                  Notes

                  For a dairy-free version, use plant-based milk and ice cream.
                  Adjust sweetness by adding a bit of sugar or syrup if desired.
                  You can freeze leftover portions in ice cube trays and blend later.

                  Nutrition

                  • Calories: 280
                  • Sugar: 28g

                  “`

                  Vanilla Bean Frappuccino Recipe

                  “`html

                  Vanilla Bean Frappuccino Recipe

                  Dreaming of a Creamy Vanilla Treat?

                  Are you looking for a delightful way to quench your thirst and satisfy your sweet cravings without a trip to the coffee shop? If the thought of a rich, creamy, and perfectly sweet vanilla bean beverage sounds like paradise, you’re in the right place! This homemade Vanilla Bean Frappuccino recipe is your ticket to replicating that beloved coffee shop experience right in your own kitchen. Many people search for “Starbucks copycat recipes” or “easy no-coffee drinks,” and this recipe directly addresses that desire, offering a pure vanilla indulgence that’s both refreshing and wonderfully satisfying. Unlike its caffeinated counterparts, this version is perfect for any time of day and for all ages, proving that you don’t need coffee to enjoy a fantastic blended beverage. Get ready to impress yourself and your loved ones with this simple yet spectacular treat!

                  Gather Your Sweet Symphony: Ingredients

                  The magic of this Vanilla Bean Frappuccino lies in its simplicity. You likely have most of these ingredients in your pantry already! We’re focusing on pure, unadulterated vanilla flavor here.

                  The Creamy Foundation: Milk

                  1 cup (240ml) Whole Milk: For the richest, creamiest texture, whole milk is your best friend. Its fat content helps create that luxurious mouthfeel we all adore in a good frappuccino.

                  Substitutions:

                  • 2% Milk: A slightly less rich but still creamy option.
                  • Almond Milk (Unsweetened): For a dairy-free, lighter version. It won’t be as creamy but offers a neutral base.
                  • Oat Milk: Excellent for creaminess and a slightly sweet, neutral flavor.
                  • Soy Milk: A good vegan alternative, though it might impart a slight soy flavor.

                  Sweetness & Depth: Vanilla Bean Paste

                  2-3 tablespoons Vanilla Bean Paste (or 1 vanilla bean, scraped): This is the star ingredient, delivering that authentic, speckled, rich vanilla bean flavor that separates this from a simple vanilla syrup frappuccino. The paste offers intense flavor and those beautiful vanilla bean flecks.

                  Substitutions:

                  • High-Quality Vanilla Extract: Use 1.5 to 2 teaspoons. While good, it won’t have the same depth or visual appeal as paste or a fresh bean.
                  • Seeds from 1 Vanilla Bean: The absolute purest flavor, but can be pricier.

                  The Cool Crucial Component: Ice

                  2 cups (about 200g) Ice Cubes: This is what gives your frappuccino its signature icy, blended texture. The amount can be adjusted based on how thick you like your drinks.

                  Extra Sweetness (Optional)

                  1-2 tablespoons Granulated Sugar or Simple Syrup (Optional): Depending on your sweet tooth and the sweetness of your milk/vanilla bean paste, you might want a little extra sweetness. Simple syrup blends easier into cold drinks.

                  Substitutions:

                  • Honey or Maple Syrup (will alter flavor slightly).
                  • Agave Nectar.

                  For That Velvety Texture: Xanthan Gum (Optional)

                  1/8 teaspoon Xanthan Gum: This is a common ingredient in commercial blended drinks to prevent ice crystals from forming and create a smoother, more stable, velvety texture. It’s optional but highly recommended for that authentic coffee shop consistency. You can find it in most grocery stores or online.

                  Your Delicious Timeline

                  Prep time:
                  5 minutes
                  Cook time:
                  0 minutes
                  Total time:
                  5 minutes

                  Compared to the average blended drink recipe which might involve simmering syrups or complex preparations, this Vanilla Bean Frappuccino is exceptionally quick. With most recipes hovering around 5-10 minutes total, this one truly stands out for its speed and simplicity, making it ideal for a spontaneous treat.

                  A refreshing Vanilla Bean Frappuccino in a glass, topped with whipped cream and vanilla bean specks.

                  Crafting Your Vanilla Bean Dream

                  Now for the fun part! Let’s blend up this deliciousness. The key is a good blender and the right proportions.

                  Step 1: Prepare Your Blender

                  Ensure your blender is clean and ready to go. If you’re adding xanthan gum, have it measured out. The less time you spend fumbling, the colder your ingredients will stay, leading to a better blend.

                  Step 2: Combine the Creamy Goodness

                  Pour your chosen milk into the blender. Add the vanilla bean paste (or scraped vanilla bean seeds). If you’re using it, add the xanthan gum and any optional sweetener (sugar or simple syrup) at this stage. Adding liquids first helps the blender blades get moving smoothly.

                  Step 3: Blend to Perfection

                  Add the ice cubes to the blender. Secure the lid tightly and start blending on a low speed, gradually increasing to high. Blend until the mixture is completely smooth and has a thick, frosty consistency. You’re looking for no large ice chunks—just a creamy, uniform texture. This usually takes about 30-60 seconds, depending on your blender’s power. If it’s too thick, add a splash more milk; if too thin, add a few more ice cubes and blend again briefly.

                  Step 4: Serve and Savor

                  Pour your freshly blended Vanilla Bean Frappuccino into a tall glass. For the ultimate treat, top generously with whipped cream and a sprinkle of extra vanilla bean specks or a drizzle of vanilla syrup. Serve immediately with a straw and enjoy the pure vanilla bliss!

                  Nutritional Snapshot

                  Nutritional information can vary based on the type of milk and sweetener used. Here’s an approximate breakdown for a standard recipe using whole milk and 2 tablespoons of vanilla bean paste (no added sugar):

                  • Calories: Approx. 250-300 kcal
                  • Fat: Approx. 10-15g
                  • Carbohydrates: Approx. 30-40g
                  • Protein: Approx. 8-10g

                  Note: Adding sugar or using sweetened milk alternatives will increase carbohydrate and calorie counts.

                  Healthier Twists on a Classic

                  You can easily tailor this recipe to be lighter or cater to specific dietary needs without sacrificing flavor:

                  • Dairy-Free/Vegan: Use unsweetened almond milk or oat milk. Ensure your whipped cream topping is also vegan.
                  • Lower Sugar: Omit the added sugar entirely and rely on the natural sweetness of the vanilla bean paste and milk. You can also use sugar-free vanilla syrup if you prefer.
                  • Higher Protein: Use a protein-fortified milk alternative or add a scoop of unflavored or vanilla protein powder (adjust liquid as needed).
                  • Reduced Fat: Opt for 2% or skim milk, or lighter plant-based milks.

                  Serving Suggestions

                  The classic presentation is always a winner! Serve in a chilled tall glass.

                  • Toppings: A generous swirl of whipped cream is almost mandatory. Garnish with a few vanilla bean specks, a dusting of cinnamon, or even a drizzle of caramel or chocolate sauce for an extra decadent touch.
                  • Add-ins: For variety, consider adding a tablespoon of cocoa powder for a chocolate-vanilla swirl, or a small handful of berries.
                  • Pairings: This refreshing drink pairs wonderfully with pastries, cookies, or even as a sweet end to a light meal.

                  Avoiding Common Pitfalls

                  • Too Icy/Watery: This often happens if you use too much ice or not enough liquid/creamy base. Start with the recommended ice amount and adjust. Ensure you’re using a powerful blender that can pulverize the ice effectively.
                  • Not Sweet Enough (or Too Sweet): Taste and adjust! It’s easier to add more sweetener than to take it away. Start with less and add more if needed. Remember, vanilla bean paste and certain milk alternatives have their own sweetness levels.
                  • Lack of Vanilla Flavor: Don’t skimp on the vanilla bean paste! Using low-quality extract won’t give you the same rich, authentic flavor.
                  • Texture Issues: If you’re not getting that smooth, velvety texture, try adding a tiny pinch of xanthan gum. It truly makes a difference!

                  Storing Your Creation

                  Blended drinks like frappuccinos are best enjoyed immediately after preparation. The ice will start to melt, and the texture will change, becoming more watery and less frothy. If you absolutely must save some, transfer it to an airtight container and store it in the freezer. Be aware that you’ll likely need to re-blend it briefly or stir it vigorously before serving to achieve a palatable consistency. It’s always recommended to make only what you plan to drink right away.

                  Close-up of a Vanilla Bean Frappuccino with whipped cream and vanilla specks.

                  Frequently Asked Questions

                  What is vanilla bean paste, and why use it?

                  Vanilla bean paste is made from vanilla beans, sugar, and a thickener. It contains real vanilla bean seeds (specks), offering a more intense, complex flavor and a beautiful visual appeal compared to vanilla extract. It’s the key to that authentic, gourmet vanilla taste.

                  Can I make this without a blender?

                  It would be very difficult to achieve the signature frappuccino texture without a blender. You’d end up with a very watery, icy vanilla drink. A strong blender is essential for pulverizing the ice correctly.

                  Is this recipe vegan?

                  The base recipe is not vegan because it uses dairy milk. However, you can easily make it vegan by substituting dairy milk with unsweetened almond milk, oat milk, or soy milk, and by using dairy-free whipped cream for topping.

                  How do I make it thicker or thinner?

                  To make it thicker, add more ice cubes and blend again. For a thinner consistency, add a splash more milk until it reaches your desired texture.

                  Can I add coffee to this?

                  Absolutely! While this recipe is designed as a no-coffee version, you can easily add a shot or two of chilled espresso or strong brewed coffee for a caffeinated kick. Adjust sweetness as needed.

                  The Takeaway

                  There you have it – your guide to creating the most delightful homemade Vanilla Bean Frappuccino! This recipe is proof that you don’t need fancy ingredients or complex steps to achieve a coffee shop-worthy treat. The pure vanilla flavor, creamy texture, and refreshing chill make it an irresistible indulgence for any occasion. Say goodbye to expensive store-bought drinks and hello to your new favorite homemade beverage!

                  Print
                  clock clock iconcutlery cutlery iconflag flag iconfolder folder iconinstagram instagram iconpinterest pinterest iconfacebook facebook iconprint print iconsquares squares iconheart heart iconheart solid heart solid icon

                  Vanilla Bean Frappuccino Recipe


                  • Author: Chef Emy

                  Description

                  This Vanilla Bean Frappuccino recipe is a creamy, sweet, and refreshing homemade version of the classic Starbucks favorite. Made with simple ingredients like milk, vanilla bean, and ice, this no-coffee drink is perfect for all ages. Enjoy the rich vanilla flavor in every sip with this easy-to-make treat!


                  Ingredients

                  Scale
                  • 1 cupwhole milk (or milk of choice)
                  • 1 ½ cupsice
                  • 3scoops vanilla bean ice cream
                  • 1 tspvanilla bean paste or extract
                  • Whipped cream (for topping)

                  Instructions

                    Notes

                    For a dairy-free version, use plant-based milk and ice cream.
                    Adjust sweetness by adding a bit of sugar or syrup if desired.
                    You can freeze leftover portions in ice cube trays and blend later.

                    Nutrition

                    • Calories: 280
                    • Sugar: 28g

                    “`

                    Dubai Chocolate Strawberry Cup Recipe

                    “`html

                    Dubai Chocolate Strawberry Cup Recipe

                    Indulge in Luxury: The Dubai Chocolate Strawberry Cup

                    Are you searching for a dessert that embodies elegance and decadence, captivating both the eyes and the palate? In a world where sweet treats often promise more than they deliver, the Dubai Chocolate Strawberry Cup stands out as a beacon of luxurious flavor. This exquisite dessert, featuring the deep, rich embrace of premium chocolate intertwined with the vibrant freshness of ripe strawberries, is more than just a dessert; it’s an experience. Imagine the smooth, velvety chocolate melting on your tongue, perfectly complemented by the juicy burst of a sweet strawberry. It’s a pairing that has delighted for generations, but this modern rendition, inspired by the opulence of Dubai, elevates it to new heights. Perfect for impressing guests, celebrating a special occasion, or simply treating yourself to a moment of pure bliss, the Dubai Chocolate Strawberry Cup is a guaranteed showstopper.

                    Ingredients: A Symphony of Flavors

                    The magic of the Dubai Chocolate Strawberry Cup lies in its high-quality, complementary ingredients. Here’s what you’ll need to create this masterpiece:

                    • For the Chocolate Layer:
                      • 200g high-quality dark chocolate (70% cocoa solids or higher), finely chopped. We recommend a good quality Belgian or Swiss chocolate for its smooth, intense flavor.
                      • 150ml heavy whipping cream. This provides a luscious, creamy base that counteracts the richness of the chocolate. Ensure it’s cold for optimal whipping.
                      • 1 tablespoon unsalted butter, softened. Adds a glossy finish and a subtle richness.
                      • 1 teaspoon vanilla extract. Enhances the chocolate flavor without overpowering it.
                      • A pinch of sea salt. Crucial for balancing sweetness and deepening the chocolate notes.
                    • For the Strawberry Layer:
                      • 250g fresh strawberries, hulled and sliced. Choose ripe, fragrant strawberries for the best natural sweetness and vibrant color. For a more intense, jammy flavor, you can use slightly overripe ones.
                      • 2 tablespoons granulated sugar (or to taste). Adjust based on the sweetness of your strawberries.
                      • 1 teaspoon fresh lemon juice. Brightens the strawberry flavor and adds a subtle tang.
                      • Optional: 1 tablespoon Grand Marnier or Cointreau. For an adult twist, this liqueur adds a sophisticated citrus note that pairs beautifully with both strawberry and chocolate.
                    • For Garnish (Optional but recommended for that Dubai flair):
                      • Fresh mint leaves.
                      • Whole fresh strawberries.
                      • Edible gold leaf or gold dust.
                      • A dusting of cocoa powder.

                    Timing is Everything

                    Crafting these luxurious cups is a rewarding process. While the active preparation is minimal, allowing for chilling is key to achieving the perfect texture.

                    Prep Time:
                    20 minutes
                    Cook Time:
                    10 minutes (for strawberry compote)
                    Total Time:
                    30 minutes + chilling time
                    Average Recipe Time:
                    Typically, similar layered desserts require around 45-60 minutes of active prep and significant chilling, making this recipe efficient.

                    Dubai Chocolate Strawberry Cup assembled in a clear glass

                    Step-by-Step Instructions: Crafting Your Chocolate Masterpiece

                    Follow these steps to create your own Dubai Chocolate Strawberry Cups. Precision and a little love will ensure a truly exceptional result.

                    Step 1: Prep the Chocolate Base

                    Begin by creating the luxurious chocolate ganache. Place the finely chopped dark chocolate in a heatproof bowl. In a small saucepan, heat the heavy whipping cream over medium heat until it just begins to simmer around the edges. Do not let it boil. Pour the hot cream over the chopped chocolate. Let it sit undisturbed for 2-3 minutes to allow the chocolate to melt. Then, gently whisk the mixture starting from the center and working your way outwards until it is smooth, glossy, and fully emulsified. Whisk in the softened butter until melted, followed by the vanilla extract and a pinch of sea salt. The consistency should be like thick, pourable pudding. If it seems too thick, you can add another tablespoon of cream. If it’s too thin, let it sit for a few more minutes to thicken.

                    Step 2: Prepare the Strawberry Layer

                    While the chocolate ganache is cooling slightly, prepare the strawberry compote. In a medium saucepan, combine the sliced strawberries, granulated sugar, and lemon juice. If using, add the Grand Marnier or Cointreau. Cook over medium heat, stirring occasionally, until the strawberries soften and release their juices, and the mixture thickens slightly into a syrupy consistency. This should take about 8-10 minutes. Avoid overcooking, as you want some strawberry pieces to remain slightly intact. Remove from heat and let it cool completely. As it cools, it will thicken further.

                    Step 3: Assemble the Cups

                    This is where your dessert starts to take shape! Choose your serving vessels – elegant glass cups, small bowls, or even martini glasses work beautifully to showcase the layers. Spoon a layer of the cooled strawberry mixture into the bottom of each glass. Then, carefully pour or spoon the slightly cooled chocolate ganache over the strawberry layer, creating a distinct second layer. Ensure you don’t mix them too much; a clean separation is visually appealing.

                    Step 4: Chill and Decorate

                    Once assembled, cover the cups loosely with plastic wrap and refrigerate for at least 2-3 hours, or until the chocolate layer is firm and set. This chilling time is crucial for the flavors to meld and the textures to develop. Before serving, remove the cups from the refrigerator. Now comes the fun part – the garnish! Decorate each cup with a fresh mint leaf, a perfectly halved fresh strawberry, and for that ultimate Dubai touch, a delicate piece of edible gold leaf or a sprinkle of edible gold dust. A final light dusting of cocoa powder can also add a sophisticated finish.

                    Nutritional Information

                    While this is a decadent dessert, here’s an approximate breakdown per serving (assuming 6 servings):

                    • Calories: ~350-400 kcal
                    • Protein: ~4-6g
                    • Fat: ~25-30g (primarily from chocolate and cream)
                    • Carbohydrates: ~30-35g (from sugar and chocolate)
                    • Fiber: ~4-6g (from strawberries and dark chocolate)

                    Please note: These are estimates and can vary based on specific ingredients used.

                    Healthier Alternatives for a Lighter Indulgence

                    Looking to make this treat a bit lighter without sacrificing flavor? Here are some swaps:

                    • Chocolate Layer: Use a good quality bittersweet chocolate (60-70% cocoa) and consider using half heavy cream and half milk, or even a plant-based cream like coconut cream (full-fat for richness). You can also reduce the butter slightly.
                    • Sweetener: For the strawberries, try using a natural sweetener like maple syrup or agave nectar, adjusting to taste, or simply rely on the natural sweetness of ripe berries.
                    • Portion Control: Serve in smaller glasses for smaller, more satisfying portions.

                    Serving Suggestions

                    Serve these exquisite cups chilled. They are perfect as a standalone dessert after a rich meal, a delightful addition to a dessert buffet, or a romantic treat for two. Pair with a small glass of dessert wine or a cup of strong coffee.

                    Common Mistakes to Avoid

                    To ensure perfection:

                    • Overheating Chocolate: Ensure cream is not boiling when poured over chocolate, as this can cause it to seize.
                    • Under-Chilling: Don’t rush the chilling process; it’s vital for the ganache to set properly.
                    • Using Low-Quality Chocolate: The flavor of your chocolate is paramount. Invest in good quality chocolate for the best results.
                    • Overworking the Ganache: Gentle whisking is key. Over-whisking can incorporate too much air or break the emulsion.

                    Storing Tips

                    These cups are best enjoyed within 2-3 days of making. Store them covered tightly in the refrigerator. The strawberries might release a bit more juice over time, which is perfectly fine and can even enhance the flavor.

                    Close-up of Dubai Chocolate Strawberry Cup with gold leaf garnish

                    Frequently Asked Questions

                    *** ***Is it necessary to use dark chocolate?*** ***

                    While dark chocolate (70% or higher) offers the richest flavor and best texture for this recipe, you can use good quality milk chocolate if you prefer a sweeter taste. Just be mindful that milk chocolate has more sugar and less cocoa, which will alter the final flavor and potentially the set of the ganache. You might need to adjust the sweetness of the strawberry layer accordingly.

                    *** ***Can I use frozen strawberries?*** ***

                    Yes, you can use frozen strawberries for the compote. Thaw them first and drain any excess liquid before cooking with sugar and lemon juice. Keep in mind that thawed frozen strawberries might be softer and release more liquid, so you may need to cook the compote a little longer to achieve the desired thickness.

                    *** ***How can I make the chocolate layer dairy-free?*** ***

                    To make this recipe dairy-free, use dairy-free dark chocolate chips or a dairy-free chocolate bar. For the cream, substitute with full-fat canned coconut milk (the solid cream part) or a good quality dairy-free whipping cream alternative. Ensure your butter is also replaced with a dairy-free butter substitute.

                    *** ***Can I prepare these cups ahead of time?*** ***

                    Absolutely! These cups are ideal for preparing a day in advance. Assemble them and chill them thoroughly. Garnish just before serving to keep the decorations fresh and pristine.

                    Print
                    clock clock iconcutlery cutlery iconflag flag iconfolder folder iconinstagram instagram iconpinterest pinterest iconfacebook facebook iconprint print iconsquares squares iconheart heart iconheart solid heart solid icon

                    Dubai Chocolate Strawberry Cup Recipe


                    • Author: Chef Emy

                    Description

                    Indulge in the Dubai Chocolate Strawberry Cup, a luxurious dessert featuring rich chocolate and fresh strawberries, perfect for any special occasion.


                    Ingredients

                    Scale
                    • 1 cupdark chocolate chips
                    • ½ cupheavy cream
                    • 1 tspvanilla extract
                    • 1 tbsphoney (optional)
                    • 1 cupfresh strawberries, hulled and sliced
                    • Whipped cream or edible gold flakes for garnish (optional)

                    Instructions

                      Notes

                      Use high-quality dark chocolate for a richer taste. Add chopped nuts or crushed biscuits for extra texture.

                      Nutrition

                      • Calories: 310
                      • Sugar: 20g

                      “`