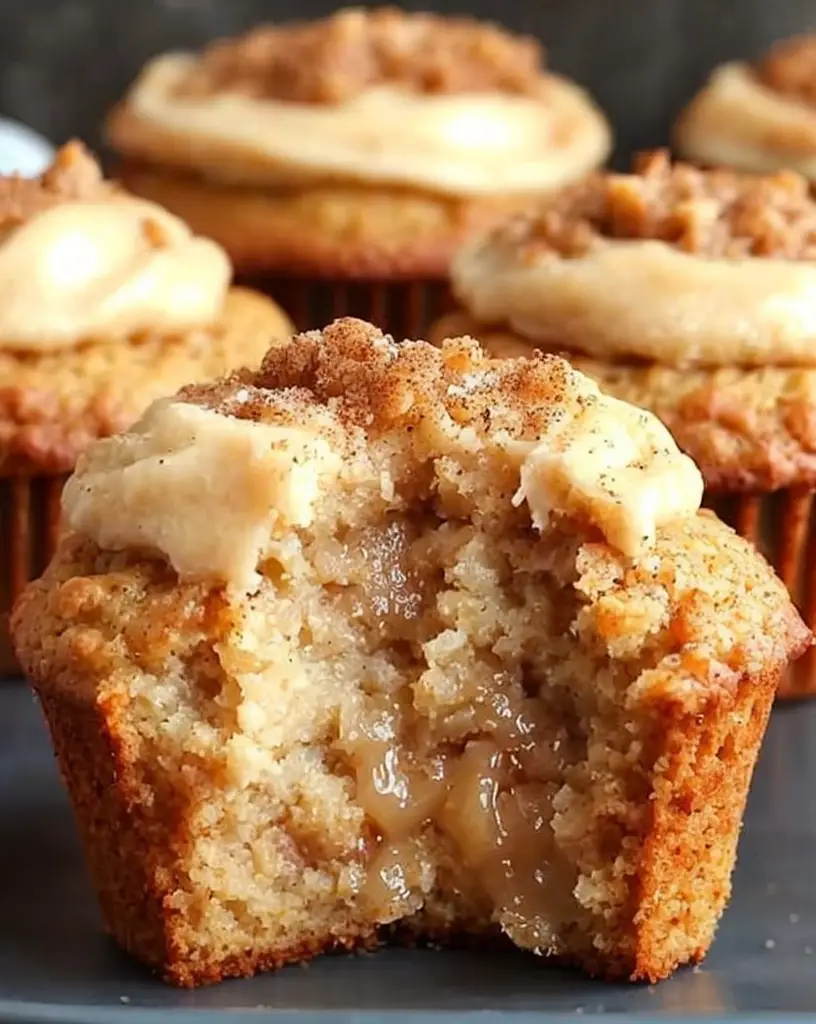
Deliciously Easy Recipe for Juicy Pineapple Cake at Home

Juicy Pineapple Cake: A Tropical Delight for Any Occasion

⚖️
Difficulty
Medium

⏲️
Prep Time
20 mins

🕒
Cook Time
30 mins

⏱️
Total Time
50 mins

🍽️
Servings
8 slices

If you’re looking for a dessert that transports you straight to a tropical paradise, look no further than this Juicy Pineapple Cake. Bursting with sweet, succulent pineapple flavors, this delightful cake is certain to become a family favorite. Perfect for summer picnics or cozy family gatherings, this cake features light and fluffy layers infused with the bright taste of pineapple, making every bite a refreshing treat.

This Juicy Pineapple Cake is more than just a pretty dessert; it’s a delicious way to celebrate the vibrant flavors of summer. With the perfect balance of sweetness and tang, this cake is beautifully complemented by a rich cream cheese frosting that adds a silky smooth texture. Ideal for birthdays, barbecues, or any festive occasion, it’s an easy-to-make cake that will leave your guests asking for seconds!

Quick Recipe Highlights

  • Flavor Profile: A delightful mix of sweet and tangy pineapple that brightens your palate.
  • Texture: The cake is light and fluffy, complemented by a creamy, smooth frosting.
  • Aroma: The aroma of caramelized pineapple wafts through the kitchen, enhancing the anticipation.
  • Visual Appeal: With its golden hue and fluffy frosting, this cake is a feast for the eyes and a star at any dessert table.
  • Skill Level Needed: Suitable for home bakers of all levels, making it accessible and fun.
  • Special Equipment: Just basic baking tools are required, making it easy to whip up.

Recipe Overview

  • Difficulty Level: This Juicy Pineapple Cake is classified as medium difficulty, allowing even beginners to get it right with a little practice.
  • Category: This dessert belongs to the cake category, specifically fruity cakes, making it perfect for summer gatherings.
  • Cuisine: This recipe draws on tropical influences, celebrating the beloved pineapple that is popular across many cuisines.
  • Cost: The ingredients are budget-friendly, typically costing under $20 for a finished cake.
  • Season: Best enjoyed during summer when pineapples are in season, although canned pineapples can be used year-round.
  • Occasion: Perfect for birthdays, summer parties, or as an uplifting dessert after a family meal.

Why You’ll Love This Recipe

The taste of the Juicy Pineapple Cake is simply divine, combining the sweetness of ripe pineapples with a tender cake that melts in your mouth. Each slice is a burst of tropical flavor, making it perfect for those hot summer days when you crave something refreshing. The frosting, while rich, balances the cake’s sweetness, ensuring you savor every bite without feeling overwhelmed.

Convenience is another reason to love this Juicy Pineapple Cake. It comes together quickly with simple ingredients, and can be made ahead of time, freeing you up on the day of your gathering. You can bake it, frost it, and store it until you’re ready to impress your guests!

Nutritionally, pineapple is not just tasty; it’s also packed with vitamins and minerals, including vitamin C and manganese. This cake provides a delicious way to enjoy a fruit that offers significant health benefits while still satisfying your sweet tooth.

This cake serves as a great centerpiece for any gathering. Whether it’s a family reunion or a birthday party, it can elevate any occasion. The visually appealing slices will encourage guests to mingle and share their experiences, bringing people together over delicious food.

Lastly, this Juicy Pineapple Cake is cost-effective. Made with simple pantry staples and fresh fruit, you don’t need to break the bank to create a stunning dessert that gets rave reviews. It’s accessible for anyone looking to impress without overextending their grocery budget.

Historical Background and Cultural Significance

The origin of pineapple cake can be traced back to various regions, particularly within tropical climates where the fruit is abundant. Initially, this cake was a way to utilize surplus pineapples, combining the fruit with sweet batter to create a delectable treat that has stood the test of time.

Culturally, pineapple is often regarded as a symbol of hospitality and warmth, making pineapple desserts popular in gatherings and celebrations. In many cultures, the act of serving pineapple cake symbolizes welcoming guests with kindness.

As culinary trends evolved, variations of pineapple cake began to surface, featuring diverse cultural influences that incorporate local ingredients. From traditional cream cheese icing to vegan adaptations, this dessert has adapted to changing palates while retaining its fruity essence.

Regionally, pineapple cake has unique twists that reflect local tastes. For example, in certain parts of Asia, recipes may include coconut for a tropical twist, while Latin recipes often incorporate cinnamon for added warmth and depth. These variations show how the basic recipe can evolve based on cultural contexts.

Ingredient Deep Dive

Pineapple

Pineapples have a rich cultural significance in many tropical countries, where they are often a symbol of welcome. Nutritionally, pineapples contain bromelain, an enzyme that aids digestion and has anti-inflammatory properties. When selecting pineapples, look for those that are firm with a sweet aroma. Store fresh pineapples in the refrigerator to prolong their freshness, or opt for canned ones for year-round baking. As for substitutions, if fresh pineapple isn’t available, crushed canned pineapple works well.

Flour

Flour is a staple ingredient in baking, providing the structure for cakes. Whole wheat flour can offer more fiber, making it a healthier option. When selecting flour, choose all-purpose flour for versatility and consistency. Store it in a cool, dry place to prevent clumping. If gluten-free flour is needed, look for a blend that contains xanthan gum to mimic the texture of wheat flour.

Sugar

Sugar not only sweetens but also helps with the browning and moisture of the cake. Granulated sugar is typically used, but brown sugar can add a deeper flavor. Store sugar in an airtight container to prevent moisture absorption. If looking for substitutes, options like honey or agave syrup can be used, though adjustments in measurements may be necessary.

Eggs

Eggs contribute moisture and richness while helping the cake rise. Fresh eggs are preferable for their binding properties. Store them in the fridge and check for freshness by placing them in water. For egg alternatives, unsweetened applesauce or flax eggs can be good choices, providing moisture without compromising texture.

Butter

Butter adds flavor and contributes to the cake’s moist texture. Use unsalted butter for better control of salt levels. Store butter in the fridge or freezer for longevity. If vegan options are needed, alternatives like coconut oil or vegan butter can be easily substituted.

Common Mistakes to Avoid

  • Overmixing the Batter: Overmixing can lead to a dense cake; mix just until ingredients are combined.
  • Using Cold Ingredients: Cold eggs or butter can affect the batter texture; ensure they are at room temperature.
  • Wrong Oven Temperature: An incorrect oven temperature can lead to uneven baking; always preheat your oven.
  • Not Greasing the Pan: Skipping this step can cause the cake to stick; ensure pans are well-greased and floured.
  • Overbaking: Keeping the cake in too long can dry it out; check for doneness with a toothpick.
  • Ignoring Ingredient Quality: Using subpar ingredients can affect the end flavor; always choose the best quality available.
  • Not Letting the Cake Cool: Eating the cake while hot can result in a crumbly texture; let it cool completely.
  • Skipping the Frosting: While the cake is delicious on its own, the frosting is what completes the flavor profile—don’t overlook it!

Essential Techniques

Mixing Ingredients

Proper mixing is crucial for cake texture. Use gentle folding to incorporate ingredients without deflating the batter. A well-mixed batter results in a lighter cake, while overmixing can yield a tough texture. Visually, the batter should be smooth and homogeneous without lumps.

Baking

Understanding your oven’s baking characteristics can greatly impact your cake. Ensure your oven is adequately preheated and the cake is centered in the oven to allow for even heat distribution. A properly baked cake will spring back when lightly touched and pull away from the sides of the pan.

Frosting Application

Applying frosting correctly enhances visual appeal and flavor. Start by cooling the cake completely, then use an offset spatula to apply a thin layer of frosting on top before adding a thicker final layer. This technique prevents crumbs from mixing into the frosting, resulting in a cleaner finish.

Cake Storage

Knowing how to store cake effectively can keep it fresh longer. Store it in an airtight container at room temperature for up to 3 days. For longer storage, freeze slices individually wrapped in plastic. This technique preserves flavor and moisture, so it’s ready for serving later.

Pro Tips for Perfect Juicy Pineapple Cake

1. Use fresh pineapple for better flavor and moisture—fresh fruit makes a noticeable difference!

2. Sift your flour and sugar to create a lighter batter—this helps to incorporate air and achieve fluffiness.

3. Warm your eggs slightly in a bowl of warm water before using them—they blend more easily with other ingredients.

4. Watch the baking time closely; every oven varies, and it’s best to start checking a few minutes early.

5. For an enhanced flavor, add a splash of rum or coconut extract to the batter.

6. Let the cake cool in the pan for about 10 minutes before transferring to a wire rack; this helps prevent crumbling.

7. If using buttercream frosting, consider adding a bit of crushed pineapple for a unique twist to the icing.

8. Decorate with toasted coconut flakes for added texture and a beautiful presentation.

Variations and Adaptations

For a tropical twist, consider adding shredded coconut or macadamia nuts to the batter. These ingredients pair wonderfully with pineapple and enhance the cake’s tropical flavor profile. Seasonal adaptations can include substituting different fruits, like mango or peach, based on availability.

For dietary modifications, this cake can easily be adapted to be gluten-free by using a gluten-free flour blend. Additionally, swapping refined sugar for coconut sugar will appeal to those seeking a more natural sweetening option.

In terms of texture modifications, incorporating crushed pineapple directly into the batter gives a chunky and moist texture. Alternatively, baking the pineapple slices directly in the cake ensures each piece releases its juices into the batter.

Presentation alternatives could involve layering the cake with additional fresh fruit between the layers or using edible flowers as a garnish for a stunning visual appeal that’s sure to impress.

Serving and Presentation Guide

For plating techniques, consider using a cake stand to elevate your Juicy Pineapple Cake, offering an impressive display. A simple dusting of powdered sugar over the top enhances visual appeal without overwhelming flavors.

For garnishing, use fresh mint leaves, edible flowers, or thinly sliced fresh fruit to create an eye-catching presentation. Modern serves can include individual slices plated with a scoop of ice cream or whipped cream on the side.

Temperature considerations are essential; serving the cake chilled enhances its refreshing nature, especially in warmer months. However, for an optimal taste experience, ensure it is not too cold, allowing the flavors to shine upon serving.

Lastly, portion control is important when serving this indulgent cake—slices should be generous yet manageable, allowing guests to enjoy without overindulgence.

Wine and Beverage Pairing

For wine pairings, a light Moscato or Riesling complements the sweetness of the Juicy Pineapple Cake beautifully. These wines enhance the fruit flavors and offer refreshing contrasts. Alternatively, a crisp Prosecco adds a celebratory feel to any occasion.

Non-alcoholic alternatives can include iced pineapple or passionfruit tea, which echo the cake’s tropical notes. Homemade lemonade offers another refreshing pairing, balancing sweetness with a light tartness.

If coffee or tea is preferred, opt for a lightly brewed green tea that pairs nicely with the cake’s sweetness or a mellow coffee to enjoy alongside.

When serving beverages, consider temperature; wines should be chilled, while teas can be served either hot or cold, depending on preference.

Storage and Shelf Life

For storing Juicy Pineapple Cake, keep it in an airtight container at room temperature for up to 3 days, or refrigerate it for up to a week. Make sure to separate layers with parchment paper to prevent sticking.

Signs of spoilage include off-smells or a significant change in texture; if the cake looks dry or has developed a crust, it’s best to discard it. Reheating instructions should also involve low heat in the oven to preserve moisture rather than using a microwave.

If planning to freeze the cake, wrap individual slices in plastic wrap and store in an airtight container for up to three months. Thaw at room temperature for the best texture upon serving.

Make Ahead Strategies

To prepare ahead of time, bake and cool the cakes a day in advance and wrap them tightly in plastic wrap before placing them in the fridge. This improves moisture retention and allows the flavors to meld.

For storage between steps, it’s effective to frost the cake on the day of serving to maintain the visual quality and avoid sogginess. However, you can also prepare the frosting a day in advance and refrigerate it—just re-whip before applying.

Assessing the quality impact is crucial; while cakes can be frozen or made in advance, freshness contributes to flavor, so aim to serve within a few days for best results.

When assembling, ensure all components are at room temperature before doing so, to allow better adhesion of frosting to the cake layers. Fresh elements, like fruit garnishes, should be added just before serving for vibrant results.

Scaling Instructions

To halve the recipe, simply divide each ingredient measurement by two, but ensure to adjust baking time as the smaller cake may bake faster.

For doubling or tripling the recipe, use larger pans and consider the oven’s capacity—baking in batches may be necessary to prevent overcrowding that could lead to uneven baking.

Equipment adjustments may include using larger mixing bowls or additional utensils to handle increased quantities. Timing modifications should account for varying bake times and should include periodic checks for doneness.

When storing larger quantities, ensure all layers are correctly sealed to prevent drying out and maintain freshness for longer periods.

Nutritional Deep Dive

The Juicy Pineapple Cake offers a fun way to enjoy dessert while still being mindful of nutritional intake. Each slice provides carbohydrates primarily from sugar and flour, essential for energy, with some dietary fiber from the pineapple.

In terms of micronutrients, the cake contributes vitamins from pineapple, particularly vitamin C. Each serving contains a good balance of proteins from eggs and fats from butter, integral for a balanced diet.

Health benefits can include improved digestive health from pineapple’s bromelain, while portion control allows you to indulge without excessive calorie intake. Pairing with nutritious sides, like yogurt or fruit, can enhance health benefits significantly.

When considering dietary needs, remember that moderation is key; creating smaller servings can allow for enjoyment without impacting overall dietary goals.

Dietary Adaptations

For gluten-free options, substitute all-purpose flour with a blend of gluten-free flours, ensuring to include ingredients like xanthan gum for structure.

Dairy-free variations may involve replacing butter with coconut oil and using plant-based milk and cream cheese for the frosting.

For a vegan version, you can substitute eggs with flaxseed meal or applesauce, and use a non-dairy butter alternative, ensuring the cake remains moist and flavorful.

Low-carb or keto enthusiasts can easily adapt the recipe using almond or coconut flour and sugar alternatives like erythritol.

Paleo adaptations can eliminate refined sugars entirely, using natural sweeteners like honey or maple syrup and ensuring all ingredients align with paleo guidelines.

Troubleshooting Guide

If your cake isn’t rising, check your baking powder for freshness; expired leavening agents can lead to flat cakes. Additionally, ensure you didn’t overmix, which can cause deflation.

Flavor balance issues often arise from not incorporating enough sweetness; adjusting sugar levels in the batter or frosting can help. Always taste as you go to find the right harmony.

Temperature problems can be identified through over-browning or undercooking; use an oven thermometer to check accuracy and ensure your cake is perfectly baked.

If you encounter equipment challenges, such as a malfunctioning mixer, hand mix the batter carefully, or use a whisk for small batches until repairs are made.

For ingredient substitutions causing texture changes, adapt by using similar ingredients; for example, if butter is replaced with oil, decrease liquid in the recipe to keep consistency intact.

Recipe Success Stories

Reader feedback highlights various success stories, with many praising the cake for its moistness and flavor profile. Adjustments suggested by readers, like adding shredded coconut, have found their way into many kitchens!

Variation successes have also been shared, with bakers experimenting with different fruits, leading to personalized creations that resonate with their taste preferences.

Many readers have submitted stunning photographs of their Juicy Pineapple Cake creations, showcasing delicious icing swirls and garnished presentations that inspire the community.

Feedback on cooking times and techniques continuously aligns with the successes shared, reinforcing best practices for baking this beloved dessert.

Frequently Asked Questions

1. Can I use canned pineapple for this recipe?

Yes, canned pineapple works wonderfully if fresh is unavailable. Ensure to drain it thoroughly to prevent excess moisture.

2. How do I prevent the cake from sticking to the pan?

Greasing the pan with butter and dusting it lightly with flour creates a non-stick surface, ensuring easy removal.

3. Can I freeze this cake?

Yes! Wrap it tightly in plastic wrap and store in an airtight container for up to 3 months for best quality.

4. How can I make this cake vegan?

Simply replace the eggs with flaxseed meal or applesauce and use plant-based butter and cream cheese for the frosting.

5. What is the best way to store leftovers?

Store leftover slices in an airtight container at room temperature for a few days, or refrigerate for longer freshness.

6. Can I add nuts to the recipe?

Definitely! Chopped walnuts or pecans add a lovely crunch and can be incorporated into the batter or as a topping.

7. How can I make this cake less sweet?

Reduce the sugar in the cake and frosting, and enhance flavor by adding a splash of lemon juice or zest.

8. Is this cake suitable for children?

Absolutely! The Juicy Pineapple Cake can be a fun treat for kids, especially when served at parties or celebrations.

9. What types of frosting pair well with this cake?

While cream cheese frosting is traditional, whipped cream or a light coconut frosting also complement the flavors beautifully.

10. Can I double this recipe?

Yes! Just be sure to adjust baking times and use larger pans to accommodate the increased batter.

11. What can I use instead of cream cheese frosting?

For buttercream frosting, you can use coconut cream mixed with powdered sugar for a tropical twist.

12. Can I add additional flavors to the cake batter?

Yes! Consider adding vanilla extract or citrus zest for an extra layer of flavor that complements the pineapple.

Additional Resources

For a delicious journey through similar flavors, check out our recipes for tropical fruit salads, coconut cupcakes, and more fruity cakes. Each recipe celebrates the beauty of fresh ingredients while offering unique pairings and serving ideas.

Explore our technique guides that delve deeper into baking fundamentals, providing skill-building insights for beginners and experienced bakers alike.

Seasonal variations are also available, encouraging readers to incorporate fresh, locally-sourced produce for enhanced flavors in all their baking endeavors.

Lastly, equipment recommendations help identify the must-have tools to create your perfect cakes, ensuring each baking experience is a success.

Join the Conversation

We love to hear about your baking adventures! Share your Juicy Pineapple Cake experiences on social media and tag us to showcase your creations. Join the community by posting reviews and sharing your adaptations of the recipe.

Photography tips can help you capture incredible images of your baking results; remember to shoot in natural light and experiment with angles to showcase details.

Engage with other bakers by sharing tips and favorite variations, creating a supportive network that fuels creativity in baking!

The Recipe

Juicy Pineapple Cake

Serves: 8 slices

Prep Time: 20 mins

Cook Time: 30 mins

Total Time: 50 mins

Kitchen Equipment Needed

  • Mixing bowls
  • Whisk or electric mixer
  • Measuring cups and spoons
  • 9-inch round cake pans
  • Offset spatula for frosting
  • Cooling rack

Ingredients

  • 2 cups all-purpose flour
  • 1 cup granulated sugar
  • 1/2 cup butter, softened
  • 3 eggs
  • 1 cup crushed pineapple, drained
  • 1/2 cup buttermilk
  • 2 teaspoons baking powder
  • 1 teaspoon vanilla extract

Indulge in Decadent Crème Brûlée Cake: A Luxurious Dessert

Crème Brûlée Cake – A Decadent Custard & Caramel Dessert

⚖️
Difficulty
Medium

⏲️
Prep Time
30 mins

🕒
Cook Time
50 mins

⏱️
Total Time
80 mins

🍽️
Servings
8

Indulge in the luxurious flavors of our Crème Brûlée Cake, a divine confection that marries the classic elements of crème brûlée with the comforting richness of cake. This exquisite dessert features layers of velvety custard, a golden caramel topping, and a tender cake base—all harmonizing to create an unforgettable experience for your taste buds. Each slice offers a delightful contrast between the creamy custard and a crisp, sugar-crusted exterior, inviting you to savor every bite.

The preparation of Crème Brûlée Cake is a celebration of culinary art, balancing technique and creativity. The process begins with crafting a smooth custard base, which is then poured over a buttery cake layer, resulting in a dessert that is both impressive and indulgent. With its charming presentation and rich flavors, this cake is perfect for special occasions or a sophisticated treat after dinner, ensuring that it will be a hit among friends and family alike.

Quick Recipe Highlights

  • Flavor Profile: Expect a delightful blend of vanilla, cream, and caramel notes, elevating your taste experience.
  • Texture: The cake is moist and supple, while the caramel topping provides a satisfying crunch.
  • Aroma: The enticing scent of baked vanilla and caramel wafts through the air, promising a heavenly taste.
  • Visual Appeal: Its golden-brown crust atop a creamy base creates an elegant visual, perfect for any dessert table.
  • Skill Level Needed: This recipe requires medium-level baking skills, ideal for those looking to enhance their culinary repertoire.
  • Special Equipment: A kitchen torch is essential for achieving the signature crunchy crème brûlée topping.

Recipe Overview

  • Difficulty Level: While crafting this Crème Brûlée Cake may seem daunting, the steps are straightforward, making it accessible to intermediate bakers willing to invest time.
  • Category: This dessert fits perfectly into sweet indulgences or as a show-stopping centerpiece for evening gatherings.
  • Cuisine: This cake draws inspiration from French culinary traditions, renowned for their rich pastries and desserts.
  • Cost: The ingredients are relatively affordable, with most pantry items and a few specialty items like vanilla beans forming the base.
  • Season: Ideal for all seasons, this cake shines particularly during festive gatherings where indulgence is welcomed.
  • Occasion: Perfect for anniversaries, birthdays, or dinner parties, it adds a touch of elegance to any occasion.

Why You’ll Love This Recipe

The Crème Brûlée Cake is a culinary delight that offers a rich taste and an enchanting texture. The creamy custard layer, complemented by a novel cake base, creates an interplay of indulgent flavors that will leave you craving for more. The contrast of a crisp caramelized top layer adds intrigue, ensuring your palate is treated with a variety of mouthfeel elements.

One of the most alluring aspects of this recipe is its manageable preparation. The relatively simple steps empower you to create an impressive dessert without excessive worry, making it an ideal choice for those who want to impress guests with minimal fuss. The combination of a classic recipe and a contemporary twist offers a rewarding baking experience without compromising flavor.

Beyond its magnificent flavor, this cake can provide advantages for those looking to enjoy a rich dessert without excessive portions. It encourages moderation—one slice will satisfy your sweet tooth and provide that luxurious crème brûlée experience without overwhelming your senses, making it a more mindful indulgence.

This Crème Brûlée Cake also serves as an excellent centerpiece for social gatherings. The moment you bring it to the dessert table, it becomes the talk of the evening, encouraging conversation and admiration. The shared experience of lightly caramelizing the sugar top adds excitement to dinner parties, making the preparation an interactive affair.

Lastly, the ingredients are versatile and accessible, ensuring that you can recreate this delightful dessert without breaking the bank. Many of the components can be found in your pantry, and with just a few fresh items, you can transform them into something truly extraordinary, making it a cost-effective choice for both everyday celebrations and special occasions.

Historical Background and Cultural Significance

Crème Brûlée has a fascinating history that traces back to the late 17th century in France, where it was first referenced in culinary texts. The term itself translates to “burnt cream,” aptly describing the dessert’s iconic crust and creamy base. Initially served as a simple dish among the wealthy upper classes, its allure began to spread across Europe, becoming a staple of patisserie.

Culturally, Crème Brûlée represents opulence and celebration. It was often featured in French banquets, symbolizing culinary excellence and sophistication. This cake adaptation adds a modern twist while preserving the traditional flavors that have elevated it through the ages, making the dessert both timeless and innovative.

The evolution of Crème Brûlée has inspired countless versions and adaptations, including the Crème Brûlée Cake. As bakers experiment and reinterpret classic recipes, they take influences from various global cuisines, leading to an exciting culinary evolution that blends tradition with creativity.

Regionally, you can find variants of Crème Brûlée across various cultures, each bringing unique spices and flavors to the basic recipe. From the creamy textures of classic French crème brûlée to adaptations that incorporate local ingredients, these variations showcase the versatility of this beloved dessert in different culinary landscapes.

Ingredient Deep Dive

– **Heavy Cream**: Heavy cream is essential for creating that rich custard base. Its high-fat content contributes to a smooth and luscious texture, making it a crucial ingredient in the Crème Brûlée Cake. Nutritionally, cream provides a good source of calcium, essential for bone health. When selecting cream, opt for pasteurized varieties, and store it in the refrigerator. If you need to substitute, half-and-half can work in a pinch but may not provide the same creaminess.

– **Egg Yolks**: Egg yolks play a pivotal role in crafting the custard. They add richness and the characteristic yellow pigmentation that brings warmth to the dish. When sourcing eggs, opt for organic or free-range when possible for better flavor and nutritional benefits. Store them in the refrigerator to maintain freshness. If you’re looking for substitutes, custard powder or silken tofu can work in specific recipes, although the texture will differ.

– **Granulated Sugar**: This key ingredient sweetens the custard and is essential for creating the crisp caramel topping. Besides adding sweetness, granulated sugar aids in the texture of the cake, making it light and fluffy. For optimal results, choose a high-quality sugar for your recipes. To keep granulated sugar fresh, store it in an airtight container. Brown sugar can be used as a substitute, giving the cake a richer flavor profile, though it may alter the color.

– **Vanilla Beans**: The use of vanilla beans elevates the flavor profile to luxurious levels. Beans contain tiny seeds, which provide bold, aromatic characteristics that are essential for a dessert like Crème Brûlée. When selecting vanilla beans, look for plump and shiny ones, indicating freshness and flavor. Store them in a cool, dark place to preserve their potency. Vanilla extract can be a substitute; however, the flavor will not be as intense and aromatic.

Common Mistakes to Avoid

  • Not tempering the egg yolks: Failing to temper the yolks when adding hot cream can result in scrambled eggs instead of a smooth custard.
  • Overmixing the batter: Liquid ingredients should be just combined; overmixing may lead to a dense cake, deviating from the desired light texture.
  • Using cold ingredients: Ensure that eggs and cream are at room temperature to achieve a better emulsion and consistency in your batter.
  • Ignoring oven temperature: An oven that is too hot can cause the custard to set improperly, while one that is too cool may not cook the cake through.
  • Burning the sugar: When caramelizing the sugar topping, keep a close watch; the sugar can quickly go from perfectly caramelized to burnt if left unattended.
  • Not using the right baking dish: The type of pan can affect how heat distributes, potentially leading to uneven cooking.
  • Skipping the cooling phase: Allowing the cake to cool completely is crucial; cutting it warm can lead to a messy presentation.
  • Using too much sugar for the topping: A thick layer of sugar can lead to difficulty in obtaining the desired caramelization.

Essential Techniques

– **Tempering the Eggs**: This technique is vital for creating a smooth custard. By gradually introducing hot cream to the egg yolks, you prevent the yolks from cooking too quickly. To master this technique, whisk the yolks continuously while slowly pouring in the cream. Look for a silky, even texture—if the mixture is grainy, it’s an indicator of overcooked yolks.

– **Caramelizing Sugar**: Achieving a perfectly caramelized crust requires patience and attention. Use a kitchen torch for even caramelization, moving in circular motions to avoid burning any one spot. The final texture should be crisp to the touch yet not too thick. Practice will help hone your technique, and visual cues include a bright amber color before it reaches the point of caramelization.

Pro Tips for Perfect Crème Brûlée Cake

– Always sift your flour before incorporation to remove clumps and ensure a lighter, fluffier cake.
– Experiment with different flavored sugars for the caramel topping, such as cinnamon or cocoa, for a unique twist.
– Use a high-quality vanilla extract if vanilla beans are unavailable, but note the flavor may differ.
– Set up the kitchen torch ahead of time and practice before caramelizing the cake to feel confident in achieving the desired result.
– Blend the custard mixture thoroughly but avoid incorporating too much air, which can cause bubbles in the final texture.
– Invest in an oven thermometer to ensure accurate temperature readings and consistent baking results.
– Allow the cake to chill completely before topping with sugar for a better surface for caramelization.
– Consider chilling the cake overnight; it enhances the flavors and promotes a smoother custard.

Variations and Adaptations

– **Regional variations**: Explore flavors from various cultures by adding lavender or coconut, inspired by French or tropical desserts.
– **Seasonal adaptations**: Substitute seasonal fruits like raspberries or mangoes in the cake batter for a fresh twist.
– **Dietary modifications**: Create gluten-free versions by substituting regular flour with almond or coconut flour, achieving a nutty flavor.
– **Flavor variations**: Experiment with chocolate, matcha, or espresso powder in the batter to infuse unique flavors.
– **Texture modifications**: Consider chilling the custard longer for a firmer consistency, perfect for those who enjoy a more set dessert.
– **Presentation alternatives**: Serve in individual ramekins for a personal touch, garnished with fresh berries or mint leaves for added allure.

Serving and Presentation Guide

To create an eye-catching presentation, consider plating techniques that highlight the Crème Brûlée Cake’s elegant design. Start by carefully slicing the cake with a serrated knife, ensuring a clean edge. Arrange each slice on a stylish dessert plate, allowing the glossy top layer to shine.

For garnishing, consider topping with lightly whipped cream or a scoop of vanilla ice cream for an indulgent touch. Fresh seasonal fruits, such as berries or citrus slices, can add color and enhance flavor, while sprigs of mint can provide a vibrant contrast. For a more modern approach, serve with a drizzle of chocolate or caramel sauce along the plate, adding depth to the presentation.

Temperature is crucial; this cake shines when served slightly chilled, allowing the flavors to develop while ensuring the custard remains creamy. Keep portion control in mind; this dessert is rich, and a smaller slice can be just as satisfying, especially when served with accompanying flavors that complement its richness.

Wine and Beverage Pairing

The right pairing can elevate your Crème Brûlée Cake experience. A sweet dessert wine such as a Sauternes or Moscato complements the cake’s rich vanilla and caramel flavors beautifully. The sweetness in these wines aligns with the dessert, creating a harmonious taste sensation.

For non-alcoholic alternatives, consider serving sparkling water infused with citrus or herbal notes, which can cleanse the palate between bites. A well-brewed cup of coffee can also enhance the experience, particularly if it features slight bitterness to balance the cake’s sweetness.

Temperature considerations are vital in pairing; serve dessert wines chilled, while coffee should be hot for optimal flavor release. Offering a variety of drink options ensures that your guests find the perfect compliment to their slice of heaven.

Storage and Shelf Life

When it comes to storage, keep your Crème Brûlée Cake in the refrigerator, where it can last for up to 4 days. Place it in an airtight container or cover it tightly with plastic wrap to prevent it from absorbing other flavors.

Monitor the cake for signs of spoilage, such as an off smell or changes in texture—both can indicate it’s time to discard the dessert. Reheating the cake is not recommended, as it can alter the desired creamy texture of the custard.

If you wish to freeze the cake, wrap each slice in plastic wrap followed by aluminum foil for an extended shelf life of about 3 months. When ready to enjoy, allow it to thaw in the refrigerator overnight for optimal taste and texture.

Make Ahead Strategies

If you’re planning for a special occasion, preparing the Crème Brûlée Cake a day ahead is an excellent strategy. You can bake the cake and prepare the custard, then chill them together to allow the flavors to meld beautifully.

Between steps, make sure to store the layers covered to prevent drying out. Assess the quality impact; chilling overnight enhances the flavors, making it even more indulgent. When it’s time to serve, quickly sprinkle and caramelize the sugar top right before plating to maintain the crunchiness.

Consider adding garnishes, such as whipped cream or fresh fruits, just prior to serving to maintain their freshness and visual appeal.

Scaling Instructions

Scaling the Crème Brûlée Cake recipe can be easily adapted to suit the number of servings you need. If halving the recipe, use smaller baking pans to ensure an even bake. Keep in mind that cooking times may vary, so it’s crucial to monitor doneness closely.

Conversely, if you are doubling or tripling the recipe, ensure you have sufficient mixing bowls and baking pans on hand. Adjusting cooking times might be necessary if you are using larger pans, so always conduct the toothpick test to check for doneness.

Consider storage space when scaling; a larger batch may require more refrigerator space for proper storage, especially if you plan to chill the cake or need to store unrefrigerated items separately.

Nutritional Deep Dive

Analyzing the macro breakdown reveals that the Crème Brûlée Cake is largely carbohydrate-based due to the sugar content, along with a significant amount of fats from the cream and butter. Protein primarily comes from the eggs, offering a slight balance to the overall dessert.

With regards to micronutrient analysis, the cake provides calcium and vitamins A and D from the essence of heavy cream and eggs, contributing to overall health benefits. Moderation is key, as the richness of the cake makes it a treat rather than a staple.

For those mindful of dietary considerations, breaking down the serving size is essential. Enjoying a small slice provides enjoyment without excessive calorie intake. Weight management becomes manageable when treats like this are savored, rather than consumed in heavy portions.

Dietary Adaptations

For gluten-free enthusiasts, substitute conventional flour with almond flour or a gluten-free blend in the cake batter. These alternatives maintain the cake’s fluffiness while accommodating dietary needs.

Dairy-free options can be created using coconut cream combined with almond or oat milk for a unique flavor that aligns with the essence of crème brûlée. Substitute vegan butter for a comparable richness while still keeping it plant-based.

Those following a low-carb or keto diet can use erythritol or stevia as sugar substitutes, ensuring you maintain that sweet indulgence without the carbohydrates. In contrast, paleo followers would appreciate a recipe swap emphasizing nut flours and natural sweeteners.

If you need to accommodate other specific diets, such as low-FODMAP, consider checking ingredient compatibility thoroughly to ensure everyone can join in the feast without concern.

Troubleshooting Guide

– **Texture issues**: If your cake is too dense or gummy, consider revisiting your mixing technique; overmixing should be avoided to maintain tenderness.
– **Flavor balance**: Should your cake taste overly sweet, balance it with a pinch of salt or by serving it with tart fruits to counteract the sweetness.
– **Temperature problems**: Make sure your oven isn’t running hot or cold by utilizing an oven thermometer; an inaccurate oven can lead to undesirable baking results.
– **Equipment challenges**: If your kitchen torch fails when caramelizing sugar, utilize the broiler option, but keep a close eye to prevent burning.
– **Ingredient substitutions**: When replacing custard staples, always consider the moisture content and adjust other ingredients as needed to maintain integrity.
– **Timing concerns**: If you notice your custard isn’t setting up, it may need additional baking time or a slight oven adjustment; monitor closely for best results.

Recipe Success Stories

Our readers have shared numerous success stories following the Crème Brûlée Cake recipe, sharing how they wowed their friends and family with this indulgence. Many have enjoyed customizing the flavors, such as adding espresso powder for a coffee-infused twist.

Photography enthusiasts have embraced showcasing their creations, often capturing the perfect caramelized surface, leading to inspiring new entries on social media platforms. Feedback comes filled with creativity, suggesting variations with vibrant fruits or seasonal herbs for added flair.

The community engagement surrounding this recipe highlights the joy of baking and sharing; readers have come forward with suggestions that have enriched the recipe refinement process. Each success story adds a rich layer to the Crème Brûlée Cake legacy.

Frequently Asked Questions

Can I make the Crème Brûlée Cake ahead of time?
Yes, this cake can be made a day in advance. Just ensure that it is kept in the refrigerator until ready to serve to maintain freshness.

What is the best way to store leftover cake?
Store any leftover cake in an airtight container in the refrigerator for up to 4 days.

How do I achieve the perfect caramelization on top?
Use a kitchen torch for the best results, moving in circular motions until you achieve a crisp, golden layer. If you don’t have a torch, you can carefully use the broiler.

Can I freeze the Crème Brûlée Cake?
Yes, but it’s best to freeze it sliced. Wrap individual portions tightly in plastic then foil to prevent freezer burn.

What can I use instead of egg yolks?
For a vegan alternative, silken tofu can be blended until smooth to mimic the custard consistency, although it won’t have an exact flavor match.

Why is my custard lumpy?
This usually occurs if the egg yolks were cooked too rapidly. Always temper the yolks gradually with the hot cream to avoid this issue.

What are common flavor variations for this cake?
Popular flavor variations include chocolate, orange zest, and coffee, all of which pair beautifully with the custard base.

How can I reduce the sugar content in the recipe?
You can experiment with sugar alternatives like monk fruit sweetener or stevia to match your preferred sweetness without the excess calories.

What is the key to prevent the custard from cracking?
Bake the cake in a water bath to keep the temperature even and help maintain moisture while cooking.

Can I substitute heavy cream with another dairy?
Yes, half-and-half or light cream can substitute heavy cream, although the richness may be reduced slightly.

Additional Resources

Looking to explore more? Discover related recipes that will complement your newfound baking skills, such as classic French tarts or rich cheesecakes. Enhance your culinary toolkit with technique guides ranging from basic baking methods to advanced pastry techniques, offering various ways to elevate your dessert game.

Learn about ingredients to understand the nuances and best practices for ensuring high-quality components in your recipes. With the right equipment recommendations at your fingertips, you can confidently navigate your way through various culinary endeavors.

Lastly, keep an eye out for seasonal variations, as these can inspire fresh takes on classic recipes, breathing new life into your baking repertoire.

Join the Conversation

Your culinary journey is just beginning! Join us on social media to share your own Crème Brûlée Cake creations—use the hashtag #CrèmeBrûléeCakeSuccess to connect with other baking enthusiasts. Photography tips abound, allowing you to capture the beauty of your baked goods while sharing with the world.

Engage in recipe reviews as you refine your baking skills, and be sure to contribute your unique twists on this classic dessert. Community engagement is what makes baking a joyful endeavor, allowing everyone to partake in the delicious experiences that great food can offer.

The Recipe

Crème Brûlée Cake

Serves: 8

Prep Time: 30 mins

Cook Time: 50 mins

Total Time: 80 mins

Kitchen Equipment Needed

  • Mixing bowls
  • Whisk
  • Kitchen torch
  • Baking dish
  • Oven thermometer
  • Rubber spatula

Ingredients

  • 2 cups heavy cream
  • 4 large egg yolks
  • 3/4 cup granulated sugar, divided
  • 1 vanilla bean, split and seeded
  • 1/2 cup all-purpose flour
  • 1/2 cup unsalted butter, softened
  • 1/4 teaspoon salt

Directions

  1. Preheat oven to 325°F (163°C) and prepare a baking dish for a water bath with hot water.
  2. In a saucepan, heat cream and vanilla bean over medium heat until simmering. Remove from the heat and let steep.
  3. In a bowl, whisk egg yolks and 1/2 cup sugar until pale and thick.
  4. Gradually whisk in the hot cream, tempering the yolks. Strain the mixture to remove lumps.
  5. In another bowl, combine flour, butter, remaining sugar, and salt until smooth. Combine with custard mixture.
  6. Pour into prepared dish and place in the water bath. Bake for 50 minutes or until set.
  7. Cool at room temperature before chilling in the fridge for at least 4 hours.
  8. Before serving, sprinkle a thin layer of sugar on top and use a kitchen torch to caramelize until golden.

Recipe Notes

  • For added flavor, consider adding a pinch of espresso powder to the cake mixture.
  • Ensure that the cream does not boil, as it can affect the custard’s texture.
  • Individual ramekins can be used instead of one large dish for personal servings.

Decadent Chocolate Swirl Cheesecake Slice Recipe You’ll Love

Chocolate Swirl Cheesecake Slice: Decadent Dessert Delight

⚖️
Difficulty
Medium

⏲️
Prep Time
20 mins

🕒
Cook Time
50 mins

⏱️
Total Time
70 mins

🍽️
Servings
12 slices

Indulging in a slice of Chocolate Swirl Cheesecake is an experience that tantalizes the senses. The rich, velvety cream cheese filling laced with a decadent chocolate swirl offers a perfect balance of flavors and textures. This delightful dessert is not just a feast for your palate; it’s a visual masterpiece with its marbled chocolate presentation. Whether you’re hosting a dinner party or simply treating yourself to a sweet escape, this cheesecake slice is bound to impress.

Every bite of this Chocolate Swirl Cheesecake Slice is a celebration of sweet and creamy goodness. The luscious chocolate counterbalances the tangy flavor of the cheese, making it a delightful combination. The crust, with its buttery crunch, provides the perfect foundation for the creamy filling. As the cheesecake bakes, the aroma fills the kitchen, teasing everyone nearby and increasing anticipation for that first heavenly slice.

Quick Recipe Highlights

  • Flavor Profile: Rich chocolate paired with a creamy, tangy filling creates an irresistible combination.
  • Texture: Smooth cheesecake with a velvety body and a crunchy graham cracker crust.
  • Aroma: A heavenly blend of chocolate and baked cream cheese that wafts throughout your kitchen.
  • Visual Appeal: Beautifully marbleized slices that showcase the chocolate and cream cheese swirls.
  • Skill Level Needed: Medium difficulty; requires some baking experience but is accessible to all.
  • Special Equipment: A springform pan is recommended for perfect baking and presentation.

Recipe Overview

  • Difficulty Level: This recipe is classified as medium. While it doesn’t require specialized skills, attention to detail in the mixing and baking processes is essential for achieving that perfect swirl.
  • Category: Dessert – perfect for any sweet occasion, ranging from family gatherings to elegant dinners.
  • Cuisine: Combining classic ingredients from traditional cheesecake recipes with contemporary flair, this dessert transcends cultural boundaries with its universal appeal.
  • Cost: Approximately $15 for 12 servings, making it both an economical and delightful way to satisfy your sweet tooth.
  • Season: Great for any season, but especially delightful during celebratory occasions such as holidays and birthdays.
  • Occasion: Ideal for birthday parties, holiday feasts, or even a cozy night in to pamper yourself with a sweet treat.

Why You’ll Love This Recipe

Each bite of this Chocolate Swirl Cheesecake Slice offers a blissful medley of flavors that dance on your taste buds. The combination of chocolate’s sweetness with the creaminess of the cheese creates a dessert that’s totally irresistible. The rich velvety texture complements the slight crunch of the crust, giving you a proper mouthfeel that enhances the overall experience.

This cheesecake not only captivates the palate but is also convenient to prepare. With simple steps and straightforward ingredients, it allows both novice and experienced bakers to create a show-stopping dessert without excessive effort. Once you master this recipe, you’re left with a foundational idea that you can adapt and experiment with.

Nutritionally, cheesecake can offer certain benefits depending on ingredient selections. Using lower-fat cream cheese can reduce the calorie count while still providing a rich and satisfying dessert. Additionally, you can enhance its nutritional value by incorporating yogurt for added probiotics.

Gathering friends or family around a beautiful cheesecake creates an inviting atmosphere perfect for socializing and sharing. The process of serving and enjoying cheesecake together can make any occasion feel special, turning an ordinary get-together into a memorable celebration.

Lastly, this Chocolate Swirl Cheesecake Slice is cost-effective while impressing guests with its gourmet feel. With a few staple ingredients, you can create a restaurant-quality dessert right at home, proving that delightful indulgence doesn’t always have to break the bank.

Historical Background and Cultural Significance

The origins of cheesecake can be traced back to ancient Greece, where it was served to athletes during the first Olympic games. This early version utilized simple ingredients like cheese and honey, showcasing the culinary simplicity of the time. As recipes evolved, the delightful dessert took new shapes depending on regional preferences, with variations flourishing across different cultures.

In the United States, cheesecake gained popularity in the 19th century, particularly with the introduction of cream cheese as a key ingredient. This shift allowed for the creation of what we now think of as the traditional New York-style cheesecake, which paved the way for innovative variations like our Chocolate Swirl Cheesecake.

Cheesecake’s cultural significance extends beyond its delicious taste; it often symbolizes celebration and togetherness. From weddings to festivals, cheesecake has found its place in heartfelt gatherings, representing happiness and indulgence.

Modern adaptations of cheesecake recipes evolve yet remain rooted in tradition. Chefs around the world experiment with flavors and styles, incorporating local ingredients to craft unique versions that appeal to a wider audience, such as this rich chocolate variation.

Ingredient Deep Dive

Chocolate serves as the star ingredient for this cheesecake, adding richness and depth. This beloved treat has ancient roots, with cacao being cultivated by the Mesoamerican civilizations as early as 1500 BC. The modern chocolate we use today is loaded with antioxidants and has been linked to numerous health benefits, including improved heart health and mood enhancement. When selecting chocolate for this recipe, opt for high-quality dark chocolate for deeper flavor and richness, and remember to store it in a cool, dark place to maintain freshness.

Graham cracker crumbs create the crust, providing a satisfying crunch and a subtle sweetness. Originating from the invention of Graham flour by Sylvester Graham in the 19th century, graham crackers became a pantry staple for many desserts. Nutritionally, they offer fiber while delivering those beloved crisp textures. When storing leftover crumbs, keep them in an airtight container to maintain freshness, and feel free to substitute with digestive biscuits for a twist.

Lastly, cream cheese is crucial for the filling. With origins linked to early American civilizations, this creamy cheese has revolutionized dessert practices around the globe. Cream cheese is rich in calcium and can be found in reduced-fat versions, making it a versatile addition to desserts. Choosing a high-fat version yields a richer flavor, while lower-fat options can help cut calories. Keep it refrigerated and use it by the expiration date for optimal flavor.

Common Mistakes to Avoid

  • Not letting the cream cheese soften: Starting with cold cream cheese can lead to a lumpy filling. Always allow it to come to room temperature first.
  • Overmixing the batter: Overmixing can incorporate too much air, leading to cracks in the cheesecake. Mix until just combined.
  • Skipping the water bath: A water bath helps stabilize the cheesecake during baking. If omitted, uneven baking or cracking may occur.
  • Not allowing the cheesecake to cool properly: Rapid temperature changes can cause cracks. Allow it to cool gradually before refrigerating.
  • Cutting too soon: Slicing the cheesecake before it has fully set can result in a messy presentation. Give it at least 4 hours in the fridge before cutting.
  • Forgetting to line the pan: Always line the bottom and sides of your pan with parchment paper for easy removal.
  • Using the incorrect pan size: Stick to the specified pan size in the recipe to ensure proper cooking times and proportions.
  • Not measuring ingredients correctly: Baking is a science, so precise measurements are crucial for your cheesecake’s success.
  • Neglecting decorations: A well-presented cheesecake enhances its appeal. Always consider how you want to garnish your cheesecake before serving.

Essential Techniques

Understanding the art of making a cheesecake requires mastering the technique of mixing ingredients. Incorporating everything at room temperature, followed by careful mixing, ensures a smooth batter. Avoiding overmixing will prevent undesirable air pockets, leading to a cheesecake that remains level as it bakes, without unsightly cracks.

The water bath technique is paramount in creating the perfect cheesecake. It helps maintain an even temperature and moisture level during baking, promoting even cooking. Learn to wrap the springform pan securely in foil to prevent water from entering while providing a gentle environment that enhances texture.

Pro Tips for Perfect Chocolate Swirl Cheesecake Slice

For guaranteed success, always use high-quality chocolate for the best flavor. Melt and let it cool before swirling into the cheesecake mixture for effortless mixing.

When preparing your crust, use finely crushed crumbs and mix with melted butter until even. This ensures a firm base that holds together upon slicing.

To create beautiful swirls, drop spoonfuls of chocolate on top of your cheesecake batter, then use a knife or skewer to swirl gently. Too much mixing will destroy the visual effect.

Equip yourself with a cake tester or toothpick to check for doneness; the cheesecake should be set but still slightly jiggly in the center.

Once the cheesecake is fully cooked, let it cool in the oven with the door ajar for at least an hour. This helps prevent cracking due to sudden temperature changes.

Always refrigerate your cheesecake overnight, as this helps improve flavor and allows it to set properly, making it easier to slice.

Enjoy serving with a dollop of whipped cream and fresh berries for added flair that complements the rich chocolate.

When cutting, use a hot knife for clean slices, dipping it in hot water and wiping it dry between cuts.

Variations and Adaptations

Consider experimenting with seasonal adaptations, such as adding pumpkin spice for a fall-inspired dessert or incorporating fresh berries in the summer to balance flavors beautifully. These can add a refreshing twist while maintaining the core structure of your cheesecake.

For those watching their carb intake, a low-carb sweetener can easily substitute for regular sugar in the filling. This yields a dessert that doesn’t compromise on taste while accommodating dietary preferences.

Certain variations focus on flavor combinations, like espresso for a mocha cheesecake or salted caramel for an added layer of sweetness and savory depth. Don’t shy away from mixing flavors before pouring them into the crust.

Texture modifications can include adding a layer of chocolate ganache on top for a luscious finish or sprinkling sea salt for a balanced flavor punch. Presentation enhancements, such as chocolate shavings or edible flowers make for stunning visual options.

Serving and Presentation Guide

For a delightful presentation, plate your cheesecakes with artistry. Consider using a dessert plate for each slice to create a pleasing visual appeal. Garnish with fresh whipped cream, chocolate shavings, or berries to enhance its appearance and flavor profiles.

Use a warm knife to slice through your cheesecake smoothly, ensuring clean edges and enhancing the aesthetic for your guests. A drizzle of chocolate sauce or caramel around the edges of the plate can elevate the overall presentation.

Serving temperature matters—cheesecakes are best served slightly chilled, allowing the flavors to bloom without being too cold. Aim to remove them from the refrigerator about 30 minutes before serving for optimal texture.

When considering portion control, keep slices reasonable to maintain balance with sweetness. Each slice should be satisfying but leave room for more flavors, as portioning can create a more enjoyable eating experience.

Wine and Beverage Pairing

Pair your Chocolate Swirl Cheesecake with a dessert wine like a port or a rich ruby merlot, enhancing the chocolate’s sweetness. Their deep flavors complement the richness of the cheesecake and provide a luxurious taste experience.

If you are looking for non-alcoholic options, a rich hot chocolate or coffee can beautifully complement the dessert, enhancing the rich chocolate notes.

For tea lovers, consider pairing with a strong chai or an Earl Grey, where the aromatic spices can contrast delightfully with the creamy cheesecake.

Ensure beverages are served at ideal temperatures; chilled wines enhance the sweetness while hot beverages can negate strong flavors when paired.

Storage and Shelf Life

To preserve the integrity of your Chocolate Swirl Cheesecake Slice, store it in an airtight container in the refrigerator. Proper cooling can extend longevity up to a week while maintaining its delicious flavors.

If you anticipate leftovers, consider freezing individual slices; wrapping them in plastic wrap followed by foil ensures both moisture retention and flavor preservation. Thaw each slice overnight in the fridge before enjoying once more.

Watch for signs of spoilage, including off-odors, undesirable changes in texture, or unusual discoloration. If any signs appear, it’s best to err on the side of caution and discard.

Reheating is straightforward—allowing the cheesecake to come to room temperature before serving will restore its original creaminess and enhance flavors, avoiding the need for heating.

Make Ahead Strategies

For those hosting events, consider creating your cheesecake the day before. This allows overnight chilling, which improves flavors through marination. It also offers convenience, reducing stress on the event day.

Storage between steps is straightforward; the crust can be made and stored in the refrigerator or freezer while mixing the filling can be done separately until ready to bake.

Assessing quality impacts means understanding that some flavors intensify overnight, while ensuring a proper seal during refrigeration keeps moisture locked in, maintaining the texture.

Assembly tips include assembling your cheesecake on the serving plate to avoid damage during transfer. This prevents breaking and maintains a perfect slice.

Fresh elements, like whipped cream or fruit toppings, should be added right before serving to keep them at optimal freshness.

Scaling Instructions

Scaling this recipe up or down is simple. Halving the recipe translates into smaller parties, whereas doubling for a big gathering ensures everyone enjoys a slice.

Equipment adjustments are crucial when scaling; be mindful of baking times and sizes, ensuring you follow through with suitable pan changes to fit any new quantity.

If you’re doubling or tripling the recipe, keep an eye on cooking times to accommodate extra batter. Adjustments accordingly in your oven may be required, particularly when needing to increase overall baking time.

When it comes to storage considerations, remember to allow for more space in your fridge or freezer for larger batches. Properly label each container to identify servings and dates.

Nutritional Deep Dive

This cheesecake offers a delightful macro breakdown with protein from cheese, fat from cream, and carbohydrates from sugar and crust. Each slice provides a satisfying balance that contributes to dietary needs in moderation.

Micronutrient analysis reveals essential vitamins such as calcium from cream cheese, promoting bone health while monitoring sugar intake promotes better energy levels when indulging responsibly.

Nutritional advantages arise from considering ingredient modifications; using yogurt increases protein without excessive calories, while darker chocolate enhances antioxidants.

Be mindful of portion analysis. Control your servings by considering the richness of the cheesecake; a small slice can suffice for a sweet craving.

Weight management tips suggest enjoying this dessert occasionally helps balance strict diets with indulgent treats, emphasizing moderation over restriction.

Dietary Adaptations

If you aim for gluten-free options, you can substitute regular graham crackers with gluten-free versions to maintain that delightful crust. Many stores offer gluten-free alternatives that work perfectly in this recipe.

For those seeking dairy-free options, using plant-based cream cheese available on the market can make this cheesecake accessible while keeping the flavor profile intact.

Vegan enthusiasts can replace the eggs with a mixture of silken tofu or a commercially available egg substitute, ensuring that you can enjoy this dessert without animal products.

Low-carb dieters can explore recipes using almond flour for the crust and erythritol for sweetening to align with their nutritional goals.

If you follow a keto or paleo diet, this recipe can be adapted to eliminate excess sugars and utilize natural sweeteners that meet those strict dietary frameworks.

For those on low-FODMAP diets, using lactose-free cream cheese is a simple yet effective way to adapt this recipe to fit dietary restrictions without sacrificing flavor.

Troubleshooting Guide

If you encounter texture issues, like a dense consistency, double-check your mixing methods; excessively beating introduces too much air. Keep it gentle for a silky smooth batter.

Flavor balance problems often arise from adjusting sugar levels; carefully taste as you add sweeteners, striving for the right balance without overpowering the cheesecake’s creamy finesse.

Temperature problems can arise if the oven is miscalibrated or opened during baking. Consider investing in an oven thermometer for accurate cooking results as well as allowing the cheesecake to rest once removed from heat.

If you run into equipment challenges, ensure that your tools are to the specifications required in the recipe; using a mixer that isn’t powerful enough could lead to undesirable textures and blends.

Ingredient substitutions may lead to disparities; understanding that not all ingredients perform the same can impact final results. Stick close to the recipe as much as possible to navigate these changes successfully.

Timing concerns can throw off your baking; utilizing timers while multi-tasking helps ensure that your cheesecake doesn’t over or under-cook, protecting its rich features.

Recipe Success Stories

The community feedback surrounding this Chocolate Swirl Cheesecake Slice is incredibly encouraging. Many have raved about the perfect combination of flavors, highlighting it as a standout dessert for various occasions.

Variation successes often arise from folks adapting the recipe to include their favorite flavors, with stories of delicious berry swirls and festive peppermint additions garnering wide applause.

Reader suggestions seen in online communities have led to fresh fruit toppings or adding zest layers that enhance traditional flavors, making the dessert even more vibrant.

Photography tips shared among readers include showcasing the marbled patterns well, with many encouraging a dark background to highlight the rich colors of the cheesecake.

Frequently Asked Questions

Q: Can I make this cheesecake in advance?
A: Yes! In fact, making it a day before helps develop flavor and ensures that it sets perfectly. Store it covered in the fridge until you’re ready to serve.

Q: What size pan should I use?
A: A 9-inch springform pan is recommended for this recipe. This size allows for the cheesecake to bake evenly and helps with easy removal.

Q: How do I prevent cracks in my cheesecake?
A: Cracks are often caused by rapid temperature changes. Bake your cheesecake in a water bath and avoid sudden peaks in heat for even baking.

Q: What’s the best way to store leftovers?
A: Keep any leftover cheesecake covered in an airtight container in the refrigerator for up to a week. It’s great for quick snacking!

Q: Can I freeze this cheesecake?
A: Absolutely! Wrap individual slices tightly in plastic wrap and place them in a freezer bag. They can last up to three months.

Q: What happens if I overbake the cheesecake?
A: Overbaking can lead to a dry and crumbly texture. Bake until the edges are set and the center is just slightly jiggly to prevent this.

Q: How can I add flavor variations to the cheesecake?
A: You can incorporate different flavorings like vanilla extract, espresso, or citrus zest for a unique twist on the classic cheesecake flavor.

Q: Is this cheesecake suitable for vegans?
A: Yes, you can modify the recipe to be vegan-friendly by using plant-based cream cheese and substitutes for eggs.

Q: Why is my cheesecake too dense?
A: This could result from overmixing the batter. Always mix gently to keep air pockets in check for a light and fluffy cheesecake.

Q: Can I use a different type of crust?
A: Yes! Feel free to try an Oreo crust or any other favorite cookie to change things up while still getting a delicious base!

Additional Resources

For more delightful treats, explore related recipes such as strawberry shortcake cupcakes or pumpkin spice tartlets that are sure to impress. Each offers unique flavors and presentations that can complement this cheesecake.

If you’re interested in mastering more techniques, our baking guides cover everything from perfecting crusts to glazing your desserts for visual appeal. Discover how to elevate your baking game today!

Ingredient information provides insights into seasonal or locally sourced alternatives for various ingredients, helping you maintain freshness while embracing adventurous cooking.

Equipment recommendations are available to assist with choosing the right tools for baking fantastic desserts at home, including mixers, pans, and quality baking sheets.

Don’t miss out on seasonal variations that highlight seasonal fruits or spices, allowing you to adapt your recipes based on what’s fresh and abundant.

Join the Conversation

Share your experiences with this recipe on social media, we love seeing how your versions turn out! Tag us using your photos of the beautiful Chocolate Swirl Cheesecake Slices you’ve made.

Photography tips shared by our community can offer insight into capturing the perfect angles to show off your finished product. A little attention to detail can make a big difference!

Be a part of the community by reviewing the recipe and sharing your ideas for possible adaptations or suggestions. This collaborative approach enriches the cooking experience for everyone involved.

Engagement with fellow bakers helps foster inspiration, whether through seeking advice or offering your unique variations that may inspire others!

The Recipe

Chocolate Swirl Cheesecake Slice

Serves: 12 slices

Prep Time: 20 mins

Cook Time: 50 mins

Total Time: 70 mins

Kitchen Equipment Needed

  • 9-inch springform pan
  • Mixing bowls
  • Electric mixer
  • Rubber spatula
  • Oven
  • Water bath setup (baking dish)

Ingredients

  • 1 1/2 cups graham cracker crumbs
  • 1/2 cup unsalted butter, melted
  • 4 (8-ounce) packages cream cheese, softened
  • 1 cup granulated sugar
  • 4 large eggs
  • 2 teaspoons vanilla extract
  • 1 cup sour cream
  • 1 cup dark chocolate, melted

Directions

  1. Preheat the oven to 325°F (160°C). Prepare the springform pan by lightly greasing it or lining with parchment paper.
  2. In a mixing bowl, combine graham cracker crumbs and melted butter until evenly moistened. Press the mixture into the bottom of the pan to form the crust.
  3. In a large mixing bowl, use an electric mixer to beat the cream cheese until smooth. Gradually add the sugar, continuing to mix until well fused.
  4. Add the eggs one at a time, ensuring each is fully combined before adding the next one. Mix in the vanilla extract and sour cream until smooth and creamy.
  5. Pour half of the cheesecake mixture into the prepared crust. Swirl in half of the melted chocolate, and then pour in the remaining cream cheese mixture.
  6. Add the remaining melted chocolate on top and use a knife to create the beautiful swirls in the batter. Do this gently to avoid mixing too much.
  7. Place the springform pan into a larger baking dish filled with hot water to create a water bath, then carefully place it in the oven.
  8. Bake for 50 minutes or until the edges are set and the center slightly jiggles. Turn off the oven and let the cheesecake cool in the oven with the door shut for one hour.
  9. Remove from the oven and let it cool completely before transferring to the refrigerator to chill for at least 4 hours or overnight for the best results.
  10. Once chilled, carefully remove the sides of the springform pan. Slice and serve with whipped cream and chocolate shavings if desired.

Recipe Notes

  • Feel free to experiment with flavored extracts like almond or orange.
  • If you wish, you can decorate the cheesecake with fresh berries or mint leaves for garnish.
  • Store leftovers covered in the refrigerator for up to a week or freeze for up to three months.
  • This recipe is easily adjustable; consider swapping out ingredients to suit your taste or dietary needs.

Indulge in Irresistible Mini Chocolate Peanut Butter Pies Today

Irresistible Mini Chocolate Peanut Butter Pies: A Decadent Delight

⚖️
Difficulty
Easy

⏲️
Prep Time
20 mins

🕒
Cook Time
10 mins

⏱️
Total Time
30 mins

🍽️
Servings
12 mini pies

Imagine sinking your teeth into a rich, creamy mini chocolate peanut butter pie that perfectly balances sweetness and saltiness. With each bite, the decadent layers of chocolate and velvety peanut butter dance on your palate, leaving you craving more. These mini indulgences are not only delicious but also incredibly easy to prepare, making them the perfect treat for any occasion. Whether you’re celebrating a birthday, hosting a holiday gathering, or simply satisfying your sweet tooth, these irresistible mini chocolate peanut butter pies are sure to impress.

These delightful miniature pies are made with a buttery graham cracker crust that crumbles deliciously, complementing the smooth, rich filling. Each mini pie is topped with a luscious chocolate ganache, providing an elegant finish that will have your guests coming back for seconds. The delightful combination of flavors and textures creates an unforgettable dessert experience that is both satisfying and indulgent.

Quick Recipe Highlights

  • Flavor Profile: The pleasing contrast of rich chocolate and nutty peanut butter creates a sensational flavor experience.
  • Texture: Enjoy the crunch of the crust paired with the smoothness of the filling and the glossy finish of the ganache.
  • Aroma: The warm scent of baked cookies mixed with the sweet aroma of chocolate and peanut butter fills your kitchen.
  • Visual Appeal: Cute and dainty, these mini pies boast a gorgeous chocolate glaze that catches the eye.
  • Skill Level Needed: This simple recipe requires minimal skills, perfect for both novice and experienced bakers alike.
  • Special Equipment: You only need a muffin tin, mixing bowls, and a whisk for successful preparation.

Recipe Overview

  • Difficulty Level: These mini chocolate peanut butter pies are labeled easy due to their straightforward steps and minimal cooking time.
  • Category: This recipe falls under desserts, specifically no-bake treats that are creamy and sweet.
  • Cuisine: While these pies have American roots, their combination of chocolate and peanut butter resonates with various culinary influences.
  • Cost: The approximate cost is budget-friendly, making use of common pantry staples like graham crackers, chocolate, and peanut butter.
  • Season: These mini pies are perfect for any season but shine during summer gatherings and holiday parties.
  • Occasion: Whether it’s a picnic, potluck, or birthday bash, these bite-sized desserts fit beautifully into any celebration.

Why You’ll Love This Recipe

These mini chocolate peanut butter pies will capture your heart with their delightful taste and texture. The rich, chocolatey filling pairs perfectly with the creamy peanut butter, creating a balanced and satisfying dessert. Their small size allows for guilt-free indulgence, making it easy for everyone to enjoy this treat without feeling overwhelmed.

The convenience of this recipe sets it apart. It requires no baking time, making it simple to prepare ahead of time. You can whip them up quickly and refrigerate until ready to serve, ensuring you can enjoy your guests without fussing over the dessert at the last minute.

Nutritionally, the inclusion of peanut butter provides protein, while the rich chocolate satisfies your sweet cravings. The balance of flavors also ensures you don’t overindulge, making these pies a sweet treat you can feel good about.

Social gatherings will become even more special with these mini pies making an appearance. Their eye-catching presentation and delightful taste will undoubtedly earn you compliments and requests for the recipe, making them a signature dish for dessert tables.

Lastly, this recipe is cost-effective. Using simple ingredients that are often already in your pantry, you can create an impressive dessert that won’t break the bank. It’s an accessible option for anyone seeking to make a delicious homemade treat without high costs.

Historical Background and Cultural Significance

The origin of chocolate and peanut butter desserts dates back to the early 20th century when chocolate became widely available to American households. Peanut butter, initially a health food served in elite circles, soon found its way into everyday cooking and baking. The merging of these two beloved ingredients has created a dessert staple that has won over dessert enthusiasts for generations.

Culturally, these mini chocolate peanut butter pies resonate with the American love for comfort food and sweet indulgences. They reflect a trend in modern American cuisine that embraces the combination of flavors and textures, ultimately satisfying a wide range of palates. The mini version of traditional pies allows everyone to partake in the delicious experience without the commitment of a larger pie.

As the recipe has evolved, variations have emerged, leading to unlimited possibilities for flavors, crusts, and toppings. Classic recipes have found modern twists, including vegan substitutes or gluten-free options, allowing more people to enjoy this treat.

Regional variations highlight local ingredients and preferences, showcasing the versatility of the chocolate and peanut butter combination. In the South, for instance, chocolate and peanut butter desserts often integrate Southern pecans or local favorites, adding a unique layer of flavor and culture to each recipe.

Ingredient Deep Dive

Chocolate: Chocolate holds significant cultural importance, especially in the United States, where it has transformed from a luxury item into a beloved everyday ingredient. Nutritionally, dark chocolate provides antioxidants and can improve heart health. When selecting chocolate, look for high-quality options with minimal additives, and store it in a cool, dry place. You can substitute chocolate chips with cacao powder if desired, but adjustments to sugar content will be necessary.

Peanut Butter: Peanut butter has its roots in the Americas, where it has been a staple for many decades, particularly during the rise of health foods in the early 20th century. Nutritionally, it is rich in protein and essential fats, making it a popular choice for energy. Look for brands with minimal added sugars and oils. Peanut butter should be stored in a cool location and can be substituted with almond butter for a different flavor profile.

Common Mistakes to Avoid

  • Overmixing the filling can lead to a dense texture instead of the desired creamy consistency.
  • Using sweetened peanut butter can make the pies overly sweet; opt for natural varieties for better balance.
  • Failing to cool the ganache properly can result in it being too runny when attempting to top the pies.
  • Using the wrong size muffin tin can affect cooking time; always check that you’re using standard mini sizes.
  • Not chilling the pies long enough before serving can lead to a messy presentation.
  • Ignoring the crust’s baking time can result in a burnt or bland flavor, so keep an eye on it.
  • Using low-quality chocolate can diminish the flavor; always choose good quality for the best results.
  • Rushing the cooling process can affect both the flavors developed and the overall texture.
  • Forgetting to account for the filling spreading when adding the ganache can lead to overflow.
  • Using non-stick spray instead of butter can affect the texture of the crust negatively.

Essential Techniques

Making the Graham Cracker Crust: This step is crucial as it provides the foundational flavor and texture. Begin by finely crushing the graham crackers to ensure an even texture. Mixing with melted butter helps bind the crumbs together, creating a crumbly but cohesive crust. A common pitfall is under- or over-pressing the crust; you want it dense enough to hold together but not packed so tightly that it becomes hard.

Preparing the Chocolate Ganache: Mastering ganache is key to achieving a glossy finish. The cream should be heated until almost boiling before pouring it over the chopped chocolate, allowing for a smooth melt. A common mistake is not letting it sit long enough, leading to a grainy texture. You want it to meld beautifully, and visual cues include a silky sheen and the absence of unmelted chocolate pieces.

Pro Tips for Perfect Irresistible Mini Chocolate Peanut Butter Pies

1. Use high-quality ingredients for the best flavor; rich chocolate and natural peanut butter make a significant difference.
2. Make sure to chill the filling properly before topping with ganache for clean, defined layers.
3. Experiment with various flavor combinations, such as adding a pinch of sea salt on top for a sweet-salty experience.
4. Consider making a gluten-free crust using almond flour or gluten-free cookies for those with dietary restrictions.
5. Always taste your filling and adjust sweetness accordingly before pouring it into the crust.
6. If making ahead, keep ganache and filling separate until ready to serve for the freshest results.
7. Use silicone muffin pans for easy removal and cleaner presentation.
8. Allow your pies to sit at room temperature for a few minutes before serving to enhance flavors.

Variations and Adaptations

If you’re looking to mix things up, consider regional variations such as using different types of nut butter instead of peanut butter, such as almond or cashew for a new twist. For seasonal adaptations, you could add a hint of peppermint during the holidays or pumpkin spice in the fall to align with seasonal flavors.

Dietary modifications can easily be made with this recipe. For a vegan version, you can substitute the butter and chocolate with dairy-free alternatives. If you’re looking for lower-carbohydrate options, consider using a sugar substitute in the filling and opting for a nut-based crust.

Texture modifications are unlimited as well; consider tossing in a handful of crushed nuts or a layer of whipped cream for added depth. Presentation alternatives include serving them in elegant dessert cups or on a beautiful platter to enhance visual appeal at gatherings.

Serving and Presentation Guide

These mini chocolate peanut butter pies should be plated with care. When serving, consider using paper liners to enhance their look and make serving easier. Garnishing with a dollop of whipped cream, a sprinkle of crushed peanuts, or a drizzle of chocolate sauce will elevate the presentation significantly.

When it comes to traditional accompaniments, a fresh fruit salad can provide a light counterbalance to the richness of the pies. For modern servings, consider pairing them with coffee or espresso to enhance the chocolate flavors.

Be conscious of temperature considerations; serving the pies chilled allows for the best flavor and texture. For portion control, offer them on small plates, allowing guests to indulge without overwhelming their appetites.

Wine and Beverage Pairing

To complement the rich flavors of the mini chocolate peanut butter pies, consider pairing them with a sweet dessert wine like port or a rich red wine such as Cabernet Sauvignon. These wines can enhance the dessert’s chocolate notes while balancing its sweetness.

For non-alcoholic alternatives, a creamy hot chocolate or a classic milkshake would be a delicious pairing. Additionally, a cup of freshly brewed coffee or strong tea provides a lovely contrast, cutting through the richness.

Remember temperature considerations; serving wines chilled and hot drinks steaming enhances both experience and enjoyment.

Storage and Shelf Life

These mini chocolate peanut butter pies can be stored in the refrigerator, covered with plastic wrap or in an airtight container to keep them fresh. The ideal storage temperature is below 40°F. They can typically last up to a week, but for the best flavor, enjoy them within three days.

Signs of spoilage include an off smell, changes in texture, or the development of mold. If the chocolate ganache becomes dull or grainy, that can also indicate spoilage. Reheating isn’t necessary, but if you prefer a softer pie, let them sit at room temperature for a few minutes before enjoying.

For freezing, these pies can last up to three months. Ensure they are properly wrapped to prevent freezer burn. When ready to serve, let them defrost in the refrigerator overnight for best results.

Make Ahead Strategies

To save time, prep the filling and crust ahead and store them separately in the fridge. Make the crust up to two days in advance; it will hold up nicely, which makes assembly a breeze when you’re ready to create the pies.

When planning an event, assemble the mini pies the day before, topping them with ganache, and store in the refrigerator until you’re ready to serve. Keeping the layers separate until serving time helps maintain optimal texture and freshness.

Avoid compromising on quality by waiting to add any fresh toppings, such as whipped cream or nuts, until just before serving. This will keep them light and delightful.

Scaling Instructions

When scaling the recipe, halving it is straightforward; simply divide each ingredient by two for a smaller batch. For doubling or tripling, adjust your kitchen tools and advise how larger muffin tins may be necessary to accommodate.

Timing modifications may be required; larger quantities may need slightly longer chilling times. Ensure to taste the filling and adjust sweetness as needed when increasing the volume.

For storage considerations, ensure each scaled-up batch is stored separately in airtight containers to maintain freshness, particularly since mini pies can be cold dense.

Nutritional Deep Dive

Analyzing the macros of these mini chocolate peanut butter pies reveals a balanced mix of fats, carbohydrates, and protein. While they are considered a treat, moderation is necessary due to the sugar content from chocolate and crust.

Micronutrient analysis shows that peanut butter brings essential vitamins and minerals, such as Vitamin E and magnesium, contributing to overall nutritional value.

Health benefits include the potential heart benefits of dark chocolate and the energy-boosting properties of peanut butter, making it a satisfying treat when enjoyed in moderation.

Dietary considerations can vary; for those observing sugar intake or dietary restrictions, consider adjusting the recipe with natural sweeteners or low-carb options.

For portion analysis, stick to one pie as a serving in moderation to keep within calorie guidelines if weight management is a concern.

Dietary Adaptations

These mini chocolate peanut butter pies can easily be adapted for various dietary needs. To make them gluten-free, opt for gluten-free graham crackers or ground nuts for the crust base.

For dairy-free options, select a dairy-free chocolate for the ganache and use a plant-based butter substitute in the crust. Vegans can indulge with these mini pies by using coconut cream in lieu of traditional dairy products.

Low-carb and keto modifications may involve substituting peanut butter with almond or another low-carb nut spread while also adjusting the sweetener.

For a paleo-friendly version, replace traditional ingredients with those allowed on the paleo diet, ensuring to avoid processed sugars and use only natural sweeteners.

Low-FODMAP adaptations can include using suitable alternatives like coconut cream with caution around peanut butter if sensitive to certain legumes.

Troubleshooting Guide

If you’re experiencing texture issues, ensure your filling achieves a smooth consistency by mixing fully; a grainy texture usually indicates under-mixing or poor-quality chocolate.

Flavor balance can be adjusted by tasting before adding all ingredients; sometimes, an extra pinch of salt may enhance the overall flavor profile.

If temperature problems arise during creating the ganache, remember to let the cream almost boil before adding — this ensures a proper melt that won’t separate.

Equipment challenges are often solved by ensuring proper non-stick sprays are used and muffin pans are greased adequately to prevent sticking during removal.

Ingredient substitutions should be approached with caution, as significant differences in flavor and texture can occur. Be prepared to experiment with quantities and flavors if considering alternative ingredients.

Timing concerns can affect the final product, so always keep an eye on the chilling time of the layers before moving on to the next step; patience can significantly improve results.

Recipe Success Stories

Community feedback on these indulgent mini chocolate peanut butter pies has been overwhelmingly positive. Many find themselves amazed by how an easy recipe can yield restaurant-quality desserts right at home.

Variation successes abound, from those who have added chili to a chocolate topping for a surprising kick to those who had successfully made them gluten-free without compromising texture or flavor. Each unique attempt emphasizes the recipe’s flexibility and adaptability.

Reader suggestions about topping ideas have often included crushed pretzels or caramel drizzle, showcasing a fun way to add personalization to this classic dessert. Many have shared that these modifications have been a hit at gatherings.

Photography tips from the community highlight the beautiful contrast of colors these mini pies offer; a recommendation includes using natural light for the best shots, emphasizing textures and layers with simplicity.

Ultimately, this recipe serves as a platform for culinary creativity, fostering community bonds through shared experiences in the kitchen.

Frequently Asked Questions

1. Can I use a different type of nut butter?
Yes! Almond butter or cashew butter can be excellent substitutes for peanut butter. Just keep in mind that each nut butter has its own flavor profile, so it will slightly alter the overall taste of the pies.

2. How can I store leftover pies?
Store your mini chocolate peanut butter pies in an airtight container in the refrigerator. They should last for about a week. It’s best to enjoy them within 3–4 days for optimal flavor and freshness.

3. Can I freeze these mini pies?
Yes, you can freeze them for up to 3 months! Just be sure they are well-wrapped or in a freezer-safe container to prevent freezer burn. Thaw them in the refrigerator overnight before serving.

4. What if I want to make these pies vegan?
To make these pies vegan, simply use dairy-free chocolate and coconut cream instead of heavy cream for the ganache. Ensure your peanut butter is also free from additives.

5. How can I make the crust gluten-free?
You can make a gluten-free crust by substituting regular graham crackers with gluten-free alternatives or ground nuts. Just ensure all ingredients used are certified gluten-free.

6. Can I add more chocolate to the filling?
Absolutely! Adding more melted chocolate to the filling will intensify the chocolate flavor. Just be careful not to overtighten the filling to avoid it becoming too firm.

7. What’s the difference between using chocolate chips and chocolate bars?
Chocolate bars often have a higher cocoa content and can have a richer flavor than chocolate chips. Chocolate chips may contain stabilizers meant to prevent them from melting, making them less flavorful when used in recipes.

8. Can I customize the flavor of the ganache?
Yes! Add a splash of vanilla extract or flavored extracts like hazelnut or peppermint to the ganache to infuse additional flavor.

9. How do I know when the pies are done chilling?
The pies are ready when the filling has fully set and is firm to the touch. It’s typically best to chill them for at least 2 hours or until completely cooled.

10. What can I replace if I don’t have graham crackers?
You can use crumbled cookies, digestive biscuits, or a nut-based crust made with ground nuts and coconut oil as an alternative for a gluten-free version.

Additional Resources

If you enjoyed the mini chocolate peanut butter pies, you might also be interested in similar recipes like no-bake cheesecake bites or chocolate mousse cups. Exploring technique guides can help refine your baking skills and expand your dessert repertoire.

For more ingredient information, understanding the differences between various chocolate types can further enhance your selections, providing richer culinary experiences. Ensure you have the right kitchen tools for successful baking by investing in high-quality equipment, especially for dessert preparation.

When seeking seasonal variations, consider utilizing fresh seasonal fruits like strawberries or peaches to complement your dessert spread. Seasonal adaptations can really elevate your gatherings!

Join the Conversation

We would love to see your take on these Irresistible Mini Chocolate Peanut Butter Pies! Share your creations on social media with us. If you’ve made variations or added toppings, please share your tips and photos to inspire others.

Recipe reviews help foster community engagement and provide valuable feedback for recipe developers. If you have suggestions for future recipes or techniques you’d like to learn, let us know!

Engaging with our community through recipe variations promotes creativity, ensuring everyone can enhance their culinary skills and enjoy their favorites in new ways.

The Recipe

Irresistible Mini Chocolate Peanut Butter Pies

Serves: 12 mini pies

Prep Time: 20 mins

Cook Time: 10 mins

Total Time: 30 mins

Kitchen Equipment Needed

  • Muffin tin (mini size)
  • Mixing bowls
  • Whisk
  • Double boiler or microwave-safe bowl
  • Measuring cups and spoons

Ingredients

  • 1 ½ cups graham cracker crumbs
  • ½ cup melted butter
  • 1 cup creamy peanut butter
  • ½ cup powdered sugar
  • ½ cup heavy cream
  • 1 cup semi-sweet chocolate chips
  • Pinch of salt

Directions

  1. Preheat the oven to 350°F (175°C). In a bowl, combine graham cracker crumbs and melted butter. Stir until evenly combined.
  2. Press the mixture into the mini muffin tin to create a crust, about 1/4 inch thick. Bake for 10 minutes and let cool.
  3. In a bowl, mix peanut butter, powdered sugar, and a pinch of salt until smooth. Spoon evenly into each cooled crust.
  4. For the ganache, heat heavy cream in a double boiler until just about to boil. Pour over chocolate chips and let sit for a minute, then stir until smooth.
  5. Pour the ganache over each pie, ensuring an even layer. Refrigerate for at least 2 hours until set.

Recipe Notes

  • For extra flavor, add a splash of vanilla extract to the peanut butter filling.
  • Feel free to substitute other nut butters if desired.
  • If you want to make these gluten-free, use gluten-free graham cracker crumbs or almond flour for the crust.

Indulge in a Quick Cinnamon Roll Mug Cake Delight

Cinnamon Roll Mug Cake: A Quick and Delightful Treat

⚖️
Difficulty
Easy

⏲️
Prep Time
5 mins

🕒
Cook Time
1-2 mins

⏱️
Total Time
6-7 mins

🍽️
Servings
1

Indulge in the warm, gooey delight of a Cinnamon Roll Mug Cake! This quick and easy dessert is perfect for satisfying your sweet tooth in a matter of minutes. Imagine the comforting flavors of cinnamon and sugar mingling with soft, fluffy cake. It’s like having a mini cinnamon roll ready to enjoy right in your own mug.

Perfect for those late-night cravings or a sweet treat during your busy day, this mug cake recipe requires minimal ingredients and just a few minutes of your time. Fluffy and warm, each bite is a melt-in-your-mouth experience that not only delights the palate but also warms the heart. With its rich aroma filling your kitchen, this delightful dessert is sure to impress anyone lucky enough to enjoy a spoonful.

Quick Recipe Highlights

  • Flavor Profile: This mug cake combines the sweet warmth of cinnamon and sugar with a hint of vanilla, creating a delicious balance of flavors that evokes the classic cinnamon roll experience.
  • Texture: Enjoy a light, fluffy, and moist cake that pulls apart like a freshly baked cinnamon roll, offering a delightful mouthfeel with every bite.
  • Aroma: The aroma of cinnamon and sugar wafting through the air as it cooks is truly irresistible, making it hard to wait for your delicious treat!
  • Visual Appeal: Served in a cute mug, this cake showcases a beautiful golden-brown top, speckled with cream cheese frosting swirls or a sprinkle of powder sugar, highlighting its mouthwatering nature.
  • Skill Level Needed: This recipe is ideal for novice bakers as it requires simple methods and commonly available ingredients.
  • Special Equipment: All you need is a microwave-safe mug and a spoon, making this recipe extremely accessible.

Recipe Overview

  • Difficulty Level: With its easy-to-follow steps, this recipe is perfect for beginners or anyone looking for a last-minute dessert option.
  • Category: This mug cake fits perfectly into the dessert category, making a sweet ending to any meal.
  • Cuisine: Though inspired by traditional cinnamon rolls, this quick dessert embodies a modern twist suited for today’s fast-paced lifestyle.
  • Cost: The ingredients are budget-friendly, keeping costs low without compromising on flavor or enjoyment.
  • Season: Ideal for all seasons, this mug cake is especially comforting during colder months when you desire something warm and sweet.
  • Occasion: Perfect for any occasion—from a satisfying weeknight indulgence to a special treat during family gatherings.

Why You’ll Love This Recipe

One of the standout features of this Cinnamon Roll Mug Cake is its fantastic taste and texture. The combination of sweet cinnamon and a moist, fluffy cake creates a delightful experience that feels indulgent yet is ready in just minutes. You won’t have to wait for the oven to preheat or worry about complicated baking techniques—it’s almost instant gratification in dessert form.

The convenience factor is another reason to love this recipe. Need a quick dessert after a long day? This mug cake is as easy as mixing a few ingredients, microwaving for a couple of minutes, and voila—you have a delicious dessert. The minimal prep and cook time make it an excellent choice for busy weekdays or spontaneous celebrations.

Nutritionally, it offers a sweet treat without the guilt often associated with larger, richer desserts. Moreover, the ability to enjoy this cake single-serve helps you maintain portion control, allowing you to indulge without overdoing it.

Socially, this recipe has great entertaining value, too. Imagine having friends over for a movie night and catching them off guard by serving them a warm, comforting mug cake in minutes. It’s a fantastic conversation starter and offers a rustic, homemade touch to your gatherings.

Finally, cost-effectiveness is key here. With common pantry ingredients like flour, sugar, and cinnamon, you won’t break the bank making this delightful dessert. It’s accessible to anyone, which means you can enjoy delicious flavors without a hefty price tag.

Historical Background and Cultural Significance

The origins of cinnamon rolls date back centuries, with historical records suggesting they may have started in ancient Greece, where they flavored bread with various spices, including cinnamon. Over time, as the popularity of spices grew, so did the evolution into the sweet, sticky treat we know today as the cinnamon roll.

Culturally, cinnamon rolls hold a special place in various traditions around the world. In Scandinavia, for instance, they are a beloved pastry served during coffee breaks known as “fika.” The communal aspect of enjoying cinnamon rolls highlights their significance in bringing people together, making them more than just a baked good.

The recipe for cinnamon rolls has evolved dramatically, with numerous adaptations reflecting regional preferences and ingredient availability. With recipes varying from sticky buns to the more traditional roll format, each culture has contributed to this delightful pastry’s development, showcasing its universal appeal.

Today, you can find countless variations of cinnamon rolls, from classic recipes to modern adaptations like this quick mug cake, showcasing the versatility of this beloved treat in contemporary dessert culture.

Ingredient Deep Dive

Flour: Flour is the foundation of this recipe; it provides structure and stability to the cake. Whole wheat or gluten-free alternatives can add nutrition or cater to dietary preferences. Storing flour in an airtight container in a cool, dry place extends its shelf life.

Sugar: The sweetness of sugar elevates the flavors of the cake. Brown sugar is often preferred for its rich caramel notes, enhancing depth. Proper storage in a sealed container helps prevent it from hardening.

Cinnamon: This spice is the star of the show, infusing the cake with warming, aromatic flavors. Cinnamon also packs health benefits, including anti-inflammatory properties. Always look for fresh, high-quality cinnamon to get the best flavor.

Milk: Milk adds moisture, contributing to the mug cake’s tender crumb. You can use alternatives like almond or oat milk to cater to dietary restrictions. It’s essential to store milk properly to maintain freshness and prevent spoilage.

Butter: The addition of melted butter in the cake enhances richness and flavor. Using unsalted butter allows for better control over the overall saltiness of the cake. Properly store butter in the fridge for optimal freshness.

Vanilla extract: This ingredient brightens the flavors in the cake, providing a lovely aroma. Using a pure vanilla extract is highly recommended for the best results. Keep it in a cool, dark place to maintain its quality.

Common Mistakes to Avoid

  • Overmixing the batter: This can result in a dense and chewy texture rather than a soft, fluffy cake. Mix just until combined.
  • Using the wrong mug: Ensure your mug is microwave-safe; metal or plastic can be hazardous in the microwave.
  • Microwaving for too long: Overcooking can dry out the cake, so start with short bursts of cooking time and check frequently.
  • Not greasing the mug: Skipping this step may lead to difficulties in removing the cake and visually unappealing results.
  • Skipping the resting time: Letting the cake sit for a minute after cooking helps enhance the flavors and makes it easier to eat.
  • Not adjusting for different microwaves: Microwave wattage varies, so you may need to adjust the cooking time to achieve the best texture.
  • Using cold ingredients: Room temperature ingredients help the cake mix better, contributing to a more uniformly cooked texture.
  • Incorrect ingredient measurements: Always measure ingredients accurately to maintain the recipe’s balance and achieve consistent results.
  • Omitting toppings: Adding a swirl of frosting or a sprinkle of sugar elevates the mug cake from good to great.
  • Ignoring storage instructions: If you have leftovers, store them properly to maintain freshness and avoid spoilage.

Essential Techniques

Mixing Techniques: Proper mixing is crucial for a fluffy cake texture. Combine dry and wet ingredients gently and avoid overmixing, which can lead to a tough texture. Watch for a smooth mixture with no dry pockets.

Microwave Cooking: Getting to know your microwave is essential for successful mug cakes. Start with shorter cooking increments and adjust based on your microwave’s wattage. This ensures that the cake cooks evenly without becoming dry.

Ingredient Preparation: Use ingredients at room temperature for better integration. Cold ingredients can affect the final texture. Let eggs and milk reach room temperature before mixing to ensure better emulsification.

Frosting Application: Adding frosting (if desired) while the cake is still warm allows it to melt slightly, creating a deliciously gooey finish. Use a butter knife to spread frosting evenly on top for a beautiful presentation.

Garnishing Techniques: Experiment with toppings such as chopped nuts or fresh berries for extra texture and flavor. A dusting of powdered sugar adds a finishing touch, elevating the mug cake’s visual appeal.

Pro Tips for Perfect Cinnamon Roll Mug Cake

1. Always use a mug that’s larger than you think you need; the cake rises as it cooks.
2. Try adding a scoop of ice cream or whipped cream on top once it’s cooled for an extra indulgent dessert.
3. Swirl in some cream cheese frosting before microwaving for a deliciously rich center.
4. Don’t forget to adjust cooking times based on the wattage of your microwave; lower wattage will need a bit more time.
5. To enhance flavor, you can add a touch of nutmeg to the sugar and cinnamon mixture.
6. Make sure all your ingredients are fresh—this will ensure the best taste and texture.
7. If you want to double the recipe, it’s best to make two separate mug cakes rather than doubling in one mug.
8. Experiment with toppings such as crushed pecans or sprinkles for additional flavor and color.

Variations and Adaptations

For a regional variation, try a pumpkin spice version by adding pumpkin puree and spices, perfectly suited for autumn. Seasonal adaptations can also include utilizing eggnog in place of milk during the holiday season, enhancing the cake’s flavor profile.

Dietary modifications are simple, too; replace dairy ingredients with vegan alternatives for a plant-based version. Additionally, try a gluten-free flour blend to cater to those with gluten sensitivities, ensuring everyone can enjoy this delicious mug cake.

Flavor variations like adding chocolate chips or fruit can take this dessert to new heights. Consider incorporating ingredients such as blueberries or white chocolate for bursts of flavor, enhancing the cake’s sweetness.

Lastly, presentation alternatives can include serving in fancy cups or adding fresh herbs like mint for color contrast, making it visually appealing for guests.

Serving and Presentation Guide

Plating techniques for a mug cake can be as simple or elaborate as you wish. Serve directly in the mug or transfer to a small plate for an elegant touch. Traditional accompaniments like a scoop of ice cream or dollop of whipped cream create an inviting dessert.

For garnishing ideas, sprinkle powdered sugar, drizzle chocolate sauce, or place fresh berries on top. Modern serving suggestions include pairing the mug cake with a warm beverage for a cozy experience, especially during cold months.

Temperature considerations are key; serving immediately while warm enhances the flavor and texture. Portion control tips suggest enjoying a one-mug serving to avoid consuming too much at once, keeping the dessert indulgent yet manageable.

Wine and Beverage Pairing

With a rich and sweet dessert like a Cinnamon Roll Mug Cake, a glass of dessert wine, such as a late harvest Riesling or a light sparkling wine, pairs wonderfully to complement the spice flavors.

For non-alcoholic alternatives, consider pairing it with a spiced apple cider or a creamy vanilla milkshake to match the comforting elements of the cake.

If you’re a coffee enthusiast, serving with a small cup of freshly brewed coffee or a spiced latte enhances the dessert experience, particularly in the morning or during brunch.

When pairing beverages, consider temperature—serve your drink choices warm to complement the warm cake for an overall delightful experience.

Storage and Shelf Life

For the best storage methods, keep leftovers in an airtight container to maintain freshness. Ideally, consume within 1-2 days as the mug cake tastes best when freshly made.

Reheating the mug cake can be done in the microwave at low power for short intervals to avoid drying it out. Monitor closely to maintain that soft and moist texture.

Freezing is not recommended for this dessert due to its texture, but if necessary, allow it to cool completely before wrapping tightly in plastic wrap and freezing for up to a month. When ready to eat, let it thaw in the refrigerator before reheating.

Make Ahead Strategies

To make this dessert more convenient, you can prepare the dry ingredients ahead of time and store them in a sealed bag. When you’re ready to enjoy the cake, simply add the wet ingredients, mix, and microwave.

Create a prep timeline by measuring and combining ingredients during any downtime you have in the kitchen, streamlining the process when dessert time rolls around.

While this recipe is best enjoyed fresh, you can assemble the ingredients the night before, making it quick and easy to whip it up in the morning or after a long day.

Incorporate fresh elements like fruits or whipped cream just before serving for added flavor and visual appeal.

Scaling Instructions

When halving the recipe, use a smaller mug and adjust the cooking time accordingly. This ensures even cooking without losing the delicious flavors.

For doubling or tripling, it’s best to prepare multiple mugs, as cooking all at once in a single mug may cause uneven cooking.

Equipment adjustments may include larger or additional microwaves to accommodate more servings.

Timing modifications are essential; monitor closely during the testing phase to find the perfect cooking time for a larger yield without losing quality.

Nutritional Deep Dive

The macro breakdown for a serving of this mug cake largely consists of carbohydrates from the sugar and flour, along with fats and proteins from the butter and milk. This balance creates a satisfying treat that can fit into a variety of dietary lifestyles.

A micronutrient analysis shows that while this dessert is primarily indulgent, the use of whole ingredients like cinnamon adds antioxidants and health benefits, counteracting some of the sugar content.

For those keeping an eye on their health, enjoying this treat in moderation can help satisfy cravings without completely derailing larger nutritional goals.

Portion analysis is critical; this single-serving dessert provides a guilt-free way to indulge without the risk of overindulgence that larger cakes present.

Weight management tips suggest being mindful of toppings and additional ingredients to keep the treat enjoyable without excessive calories.

Dietary Adaptations

For gluten-free adaptations, consider using almond flour or a gluten-free flour blend, ensuring that everyone can enjoy this delicious treat without dietary restrictions.

Dairy-free options can be easily achieved by swapping butter and milk for plant-based alternatives, broadening the cake’s accessibility to those with lactose sensitivities or preferences.

Creating a vegan version requires substituting dairy with alternatives like coconut oil and plant-based milk, while also ensuring any frosting used is dairy-free as well.

Low-carb variations can be crafted by using almond flour and sugar substitutes to create a satisfying dessert that fits into a keto diet lifestyle.

Continuing with paleo or low-FODMAP modifications can involve adjusting ingredients to align with specific dietary goals without losing the essence of a delicious mug cake.

Troubleshooting Guide

For texture issues, if the mug cake turns out too dense, ensure that flour measures are accurate, and avoid overmixing the batter.

If flavor balance seems off, consider adjusting sugar or spice levels next time based on personal preferences to achieve the ideal taste.

Temperature problems arise when the mug cake is either undercooked or overcooked; monitor microwave time closely to find that sweet spot based on your microwave’s wattage.

If an ingredient substitution results in unexpected outcomes, take note of how different ingredients interact to improve future attempts at the recipe.

When timing concerns arise, pre-preparing ingredients and using a timer can significantly influence the cooking success.

Recipe Success Stories

Community feedback often lauds this quick dessert for its convenience and taste. Many enjoy adapting the recipe, sharing their variations, and discovering new flavor combinations that work for them.

These variations highlight how versatile the base recipe is, proving successful modifications for dietary restrictions and personal tastes.

Adaptation stories frequently emerge from families, where everyone adds their twist, making it a fun activity that transforms a simple dessert into a cherished tradition.

Readers often share photography tips when showcasing their creations on social media, igniting creativity as others replicate their beautiful presentations.

Frequently Asked Questions

Can I make this mug cake dairy-free?
Absolutely! Use plant-based milk and dairy-free butter alternatives for a delicious dairy-free option that maintains flavor and texture.

How do I know when my mug cake is done?
The mug cake should be firm to the touch and slightly springy. If it’s still wet in the center, give it another 10-20 seconds in the microwave.

Can I make this in advance?
While it’s best enjoyed immediately, you can prepare the dry ingredients in advance. When you’re ready, just mix with the wet ingredients and cook.

What type of mug should I use?
Use a microwave-safe ceramic or glass mug to ensure even cooking without risking meltdowns. Avoid using metal mugs altogether.

Can I freeze the mug cake?
Freezing is not recommended as it may affect the texture. However, you can store it in the fridge for up to two days.

Is this recipe suitable for kids to make?
Yes! This recipe is straightforward and fun for kids. Just supervise them around the microwave for safety.

What kind of toppings work best?
Toppings like whipped cream, frosting, or a drizzle of caramel enhance the flavor and presentation. Feel free to experiment with your favorites!

Can I customize flavors?
Definitely! Add chocolate chips, nuts, or fresh fruits to create a personalized version that suits your taste.

Does the cooking time vary for different microwaves?
Yes, microwave wattage varies, so adjust the cooking time according to your appliance for optimal results.

How many servings does this recipe yield?
This recipe is a single serving, perfect for a quick treat when you’re craving something sweet without making a full-sized cake.

Can this recipe be doubled?
It’s best to make two separate mugs instead of doubling the batter in one mug to ensure proper cooking.

Additional Resources

If you’re looking for related recipes, be sure to check out other quick mug cakes or simple dessert options for those moments when you crave something sweet.

For technique guides, refer to resources on microwave cooking basics, which can help you achieve perfect results with any mug recipe you try.

Ingredient information on baking basics can deepen your understanding of how each component contributes to your dessert, enhancing your baking skills.

Should you be in need of equipment recommendations, there are plenty of affordable microwave-safe mugs with various styles, perfect for your kitchen.

Seasonal variations of this mug cake can inspire your baking with new flavors and ingredients, embracing what each season has to offer.

Join the Conversation

Feel free to share your own cinnamon roll mug cake photos and modifications on social media to inspire others. Engaging with fellow bakers creates a sense of community around this simple treat.

Don’t hesitate to leave a review below, comment on what worked for you, or suggest additional variations for others to try! Your ingredient suggestions and feedback can offer valuable insights to your fellow foodie friends.

With such a versatile recipe, documenting your adventures with this mug cake provides encouragement for others to jump in and try their hand at baking, enhancing their dessert experiences.

The Recipe

Cinnamon Roll Mug Cake

Serves: 1

Prep Time: 5 mins

Cook Time: 1-2 mins

Total Time: 6-7 mins

Kitchen Equipment Needed

  • Microwave-safe mug
  • Mixing spoon
  • Measuring cups and spoons

Ingredients

  • 4 tablespoons all-purpose flour
  • 2 tablespoons granulated sugar
  • 1/2 teaspoon baking powder
  • 1/4 teaspoon cinnamon
  • 1/8 teaspoon salt
  • 3 tablespoons milk
  • 2 tablespoons melted butter
  • 1/4 teaspoon vanilla extract
  • Optional: frosting for topping

Directions

  1. In a microwave-safe mug, combine flour, sugar, baking powder, cinnamon, and salt, and mix until combined.
  2. Add milk, melted butter, and vanilla extract into the mug and stir until the mixture is smooth and lump-free.
  3. Microwave on high for 1 minute. Check if the cake is set; if not, microwave in increments of 10-15 seconds until done.
  4. Let the mug cake cool for a minute before adding your favorite frosting or toppings.

Recipe Notes

  • For best results, use room temperature ingredients.
  • Feel free to add chocolate chips or nuts for an extra twist.
  • Store any leftovers in an airtight container for up to 2 days.

Indulge in Delicious German Chocolate Pecan Pound Cake Recipe

Mouthwatering German Chocolate Pecan Pound Cake: A Decadent Delight

⚖️
Difficulty
Moderate

⏲️
Prep Time
25 mins

🕒
Cook Time
50 mins

⏱️
Total Time
75 mins

🍽️
Servings
12 slices

Indulge your sweet tooth with this Mouthwatering German Chocolate Pecan Pound Cake! This remarkable dessert beautifully intertwines the rich flavors of chocolate, nutty pecans, and a hint of coconut, making it a delightful treat for any occasion. This pound cake exceeds the ordinary, presenting layers of moist, tender cake and a divine frosting that crowns it perfectly. Every bite invites you into a world where classic chocolate cake meets a Southern pecan pie charm, leaving you wanting more.

Perfect as an after-dinner delight or as the star of your next celebration, this cake showcases not only extraordinary flavor but also stunning visual appeal. Its beautifully textured layers, adorned with toasted pecans and swirls of chocolate, serve as a feast for the eyes, while the luscious aroma wafting from the oven gets everyone excited for a slice. It’s time to gather your ingredients and bring a touch of gourmet baking into your kitchen with this irresistible German Chocolate Pecan Pound Cake!

Quick Recipe Highlights

  • Flavor Profile: Sweet, chocolatey, with nutty undertones from pecans and a hint of tropical coconut.
  • Texture: A rich, moist cake with a crumbly exterior, complemented by crunchy toasted nuts and a creamy frosting.
  • Aroma: Inviting notes of chocolate mixed with the warm scent of baked nuts and vanilla.
  • Visual Appeal: A gorgeous dark chocolate hue contrasted by a white coconut frosting, adorned with shiny pecan halves.
  • Skill Level Needed: Requires basic baking skills with some hands-on frosting techniques.
  • Special Equipment: A quality bundt pan, stand mixer, and cooling rack for optimal results.

Recipe Overview

  • Difficulty Level: Moderate; this recipe involves multiple steps, including baking and frosting, but can be handled by any home baker with some experience.
  • Category: Perfect for dessert, this German Chocolate Pecan Pound Cake excels at any celebration, from birthdays to holidays.
  • Cuisine: Rooted in German traditions, this cake showcases the distinct flavor of German chocolate, enriched by American pecan pie influences.
  • Cost: Ingredients like chocolate and pecans may yield a moderately priced cake, typically around $15 to $20 depending on local prices.
  • Season: Ideal year-round, though the warm flavors resonate especially well during the fall and holiday seasons.
  • Occasion: A perfect offering for gatherings, holiday dinners, or even as a comforting treat for weekday indulgence.

Why You’ll Love This Recipe

Delighting your senses with both taste and texture, this German Chocolate Pecan Pound Cake is a celebration in itself. The rich, melt-in-your-mouth chocolate paired with the crunchy bite of pecans creates a delectable contrast that is simply irresistible. Whether served warm out of the oven or chilled, each slice promises satisfaction, making it a go-to for both dessert enthusiasts and casual eaters alike.

The convenience of this recipe also shines through, as it is relatively straightforward to prepare, utilizing common baking techniques that can enhance your culinary confidence. The cake’s preparation can be segmented into manageable parts, allowing for flexibility in your baking schedule, perfect for busy bakers looking to impress without extensive time commitments.

In terms of nutrition, pecans provide a wealth of healthy fats and antioxidants, while the chocolate brings energy. Indulging in this cake allows you to enjoy a treat that offers not only pleasure but also some nutritional benefits.

This cake also excels in social settings, providing a rich centerpiece for any gathering. Imagine the compliments and conversations sparked as friends and family relish every mouthful. Sharing this cake elevates the experience, making celebrations even more memorable.

From a financial perspective, this versatile recipe demonstrates cost-effectiveness. With just a handful of ingredients, you can create an opulent cake that rivals bakery offerings, providing excellent value for your effort.

Historical Background and Cultural Significance

The origins of German Chocolate Cake can be traced back to an American named Samuel German, who developed a dark-baking chocolate for Baker’s Chocolate Company in 1852. This unique chocolate was later named after him, and over time, it became the hero ingredient of this delectable cake. While it carries a German name, the cake’s recipe evolved in the United States, leading to the creation of numerous variations.

German Chocolate Pecan Pound Cake showcases its cultural importance through celebratory gatherings where it is frequently served. It embodies comfort and indulgence, often linked to family traditions and holiday festivities. This cake transcends its simple ingredients, representing warmth and connection between loved ones.

As time went on, recipes began to evolve, reflecting regional preferences and available ingredients. The addition of pecans and coconut frosting is reminiscent of Southern baking traditions, where these ingredients are prevalent. This adaptation highlights the integration of culinary influences that make the cake uniquely American.

Regional variations abound; in some areas, the cake may be layered with cream cheese, while others might incorporate fruits or different nuts. These adaptations not only signify regional tastes but also showcase the creativity that can be found in the kitchen, reinforcing the bond between food and culture.

Ingredient Deep Dive

German Chocolate: This specific type of chocolate brings a distinct sweetness and depth that sets German Chocolate Pound Cake apart from others. Made with less cocoa than traditional chocolate, it has a rich, earthy flavor. For those looking to substitute, semisweet chocolate can work, although the taste profile will be slightly altered.

Pecans: Native to North America, these nuts add crunch and a buttery flavor to the cake. In addition to their deliciousness, pecans are a great source of healthy fats, proteins, and various vitamins. When selecting pecans, opt for those with a fresh aroma and avoid any that smell rancid. Store them in an airtight container in the refrigerator to prolong their freshness.

Coconut: Coconut in the frosting lends a tropical sweetness that balances the rich chocolate. Shredded coconut possesses fiber and offers a low-calorie option for adding texture to baked goods. When selecting coconut, shredded pieces that are unsweetened can provide a more balanced flavor profile, and they can be stored in a cool, dry place to maintain their freshness.

Common Mistakes to Avoid

  • Overmixing the batter can lead to a dense cake. Mix just until the ingredients are combined.
  • Not letting butter and eggs come to room temperature may prevent the cake from rising properly.
  • Skipping the greasing of the pan can cause the cake to stick, resulting in broken pieces.
  • Using cold ingredients can lead to a heavy texture; always use room-temperature eggs and butter.
  • Underbaking the cake can create a gooey center, while overbaking can dry it out; use a toothpick to test doneness.
  • Neglecting to cool the cake before frosting can cause the frosting to melt off the cake.
  • Piling frosting too thickly on one side can make it drip; use an offset spatula for even distribution.
  • Not properly measuring ingredients can alter flavor and texture; always use accurate measurements.
  • Skipping the cooling step after baking can affect the cake’s overall structure.
  • Assuming all ovens bake the same leads to inconsistencies; adjust baking times based on your oven’s calibration.

Essential Techniques

Mixing: Proper mixing techniques ensure the ingredients are well incorporated without developing gluten. Start with creaming the butter and sugar until light and fluffy, which creates air pockets that help the cake rise. Be careful not to overmix; stop as soon as you see the flour integrated.

Baking: Understanding the science of baking powder’s activation can greatly improve your results. Ensure you properly measure and add the leavening agent to make your cake rise correctly. A common pitfall is not preheating the oven; doing so allows for the perfect temperature for baking.

Pro Tips for Perfect Mouthwatering German Chocolate Pecan Pound Cake

– Use high-quality German chocolate for a profound flavor experience; choosing gourmet chocolate can elevate your cake.
– Toast the pecans before adding them to the batter; this intensifies their flavor and adds crunch.
– Consider adding a pinch of sea salt to the frosting; it enhances sweetness and adds depth.
– Substitute half of the all-purpose flour with cake flour for a lighter, more tender crumb.
– Allow the cake to cool in the pan for about 10 minutes before transferring to a wire rack for complete cooling.
– Don’t rush the frosting; allow the cake to cool fully before frosting to prevent melting.
– For added flair, drizzle a chocolate ganache over the frosted cake before garnishing with extra pecans.
– Experiment with adding coconut extract to enhance the flavor profile.

Variations and Adaptations

If you’re feeling adventurous, try incorporating different nuts like walnuts for a unique twist, or utilize almond extract in place of vanilla for a different flavor dimension. Seasonal adaptations can include adding pumpkin spice during the fall for a festive touch.

For those requiring dietary modifications, consider using gluten-free flour blends to adapt the recipe for gluten-free diets. Vegan alternatives, such as applesauce as an egg substitute or almond milk instead of dairy products, can also offer delicious results.

Enhancing flavor can be achieved by infusing the cake with coffee or espresso for a mocha variation. If you prefer a richer texture, replace some of the flour with ground almonds; this results in a denser, butnutty cake.

Presentation is key; consider making mini versions of the pound cake for an elegant touch at gatherings or layering slices with whipped cream and fresh berries for a stunning dessert display.

Serving and Presentation Guide

To plate the German Chocolate Pecan Pound Cake elegantly, slice it carefully while ensuring even portions. Garnish with a dusting of powdered sugar, or drizzle chocolate ganache over the top for visual appeal.

Consider serving with fresh berries or a scoop of vanilla ice cream for a delightful contrast in flavor and temperature. Seasonal fruits such as raspberries or strawberries can complement the richness of the cake beautifully.

When it comes to temperature, serving the cake at room temperature allows all flavors to shine. If the cake has been refrigerated, allow it to sit out for a bit before serving to restore its natural moisture and flavor.

Portion control is important; consider providing smaller slices if serving to a larger group to encourage tasting multiple dishes and maintain lower calorie intake per serving.

Wine and Beverage Pairing

When it comes to pairing wines with your German Chocolate Pecan Pound Cake, look for a sweet dessert wine like Riesling, which balances the cake’s sweetness. A port wine can also offer deep flavor notes that complement the chocolate beautifully.

For non-alcoholic alternatives, consider serving the cake with freshly brewed coffee or a rich, dark hot chocolate to enhance the chocolate flavors.

If tea is your beverage of choice, a robust black tea or an aromatic chai can provide a wonderful warming contrast to the cake’s richness.

Temperature matters; serve your beverages at their ideal temperatures to ensure a delightful dining experience.

Storage and Shelf Life

To store your German Chocolate Pecan Pound Cake properly, cover it with plastic wrap and keep it in an airtight container at room temperature for up to three days. For longer storage, wrap the cake in aluminum foil and place it in the refrigerator, where it will last up to a week.

If you’d like to freeze your cake, make sure it’s thoroughly cooled, and wrap it securely in plastic wrap and then in aluminum foil. It can be frozen for up to three months for optimal freshness.

Always look for signs of spoilage before consumption; if the cake develops an off smell, discoloration, or strange texture, it’s best to discard it.

Reheating slices can be done in the microwave for about 10-15 seconds or in the oven at 350°F for a few minutes to enjoy the cake warm.

Make Ahead Strategies

For efficient meal preparation, consider making the cake one or two days in advance. This allows the flavors to mature and meld together, enhancing the overall taste.

To store between steps, bake and cool the cake, then wrap it tightly and refrigerate until the day of serving. Frosting can be prepared a day ahead, stored in an airtight container in the refrigerator, and brought to room temperature before using.

Assess the quality after storage; cakes may become denser when chilled, so try to keep the frosting at room temperature if possible to avoid texture issues.

Assembly should happen shortly before serving to maintain freshness; however, you can frost the cake a few hours in advance, setting it covered in a cool spot.

Adding fresh elements, such as fruit or whipped cream, can be done right before serving for a touch of freshness and color.

Scaling Instructions

To halve the recipe, simply cut all ingredient measurements in half and retain the same steps. Baking time may slightly reduce; start checking on the cake a few minutes earlier than suggested.

If you wish to double or triple the ingredients, consider the capacity of your mixing equipment and divide the batches accordingly to ensure thorough mixing.

Keep in mind that baking times will vary; larger batches might require longer baking times, so it’s essential to perform doneness testing with a toothpick or cake tester.

Storage can be adjusted, as larger cakes may require more space; ensure you have the appropriate containers available.

Adjustments may be needed for frosting and decorating; you’ll likely need proportionally more frosting for larger cakes to cover properly.

Nutritional Deep Dive

In understanding the nutritional aspects of Mouthwatering German Chocolate Pecan Pound Cake, let’s analyze the macro breakdown. Each slice typically contains a healthy portion of carbohydrates, balanced by protein from eggs and fats from butter and pecans, contributing to its rich texture.

Micronutrient analysis reveals healthy amounts of Vitamin E and B vitamins, primarily derived from nuts, providing essential nutrients beneficial for metabolism.

Notably, pecans bring a host of health benefits, including antioxidants and healthy monounsaturated fats, supporting heart health and weight management when consumed in moderation.

Dietary considerations are crucial; for those watching their intake, incorporating smaller portion sizes is key. The richness of the cake allows for a satisfying experience even with reduced servings.

When it comes to weight management tips, consider pairing a slice of the cake with a fruit or low-calorie side to balance indulgence and nutrition, making your dessert experience complete.

Dietary Adaptations

For gluten-free adaptations, substitute regular flour with gluten-free flour blends to ensure that everyone can enjoy this delightful cake.

If dairy is a concern, replace butter with coconut or almond butter; dairy-free alternatives for icing can also provide similar creaminess.

Vegans can easily adapt by using flax eggs (1 tablespoon flaxseed meal mixed with 3 tablespoons water = 1 egg) and substituting almond milk for buttermilk, yielding impressive results.

For low-carb or keto adaptations, consider using almond flour instead of all-purpose flour, alongside a sugar substitute to reduce carb content while maintaining flavor.

Paleo modifications may involve swapping refined sugar for natural sweeteners like honey or maple syrup, avoiding processed ingredients for a more health-conscious option.

If following a low-FODMAP diet, keep servings moderate and opt for lactose-free alternatives in your frosting.

Troubleshooting Guide

If your cake has texture issues, it may be due to overmixing; next time, mix only until combined.

For flavor balance, if the cake turns out too sweet, consider reducing the sugar in the frosting or adding a hint of salt to balance it out.

In case of temperature problems, always ensure the oven is preheated before placing your cake, as it affects the rise and texture significantly.

If your equipment presents challenges, ensure your baking pan fully fits the portion you’re making to avoid uneven cooking.

Ingredient substitutions can lead to challenges; always research or test small batches when trying new ingredients to ensure they yield the desired results.

Timing concerns are common; accurately note the baking time and check at the lower suggested time to avoid overbaking.

Recipe Success Stories

Community feedback on this delightful recipe has been overwhelmingly positive, with numerous adaptations and personal stories shared. Many readers have reported excellent results, praising both the simplicity of the preparation and the rich flavors achieved.

Variation successes have been highlighted, especially with those opting to try different nuts like macadamia or walnuts, enhancing the unique taste profile of the cake.

Several bakers have adapted this recipe to sugar-free versions and reported similar textures and flavors, showcasing the cake’s versatility.

Photography tips from the community suggest natural lighting to showcase the beautiful layers and highlighting frosting details; these visual cues often entice others to recreate the recipe.

Readers universally appreciate the cake’s aesthetic appeal, with some even transforming it into a tiered cake for special occasions.

Frequently Asked Questions

Can I use other types of chocolate in this pound cake? Absolutely! While German chocolate gives a specific flavor, you can substitute it with semisweet or dark chocolate for a different profile, though it will change the overall taste.

How do I know when the cake is done? A simple test is to insert a toothpick into the center; if it comes out clean or with just a few crumbs, the cake is done.

Can I freeze this cake? Yes! Wrap it tightly in plastic wrap and foil and place it in the freezer for up to three months. Be sure to defrost in the refrigerator for best results.

What’s the best way to store leftovers? Store leftovers in an airtight container at room temperature for up to three days, or in the refrigerator for up to a week.

Can I use coconut in the batter instead of the frosting? Yes! You can add shredded coconut to the batter for an anytime flavor enhancement or adjust the amount in the frosting for a textured effect.

How does the cake improve over time? The flavors meld and develop over time; making it a day in advance can help enhance the taste.

Is it necessary to frost the cake? Not at all! This pound cake is delightful on its own, or you can simply dust it with powdered sugar for a simpler presentation.

What other nuts can I use in the recipe? You can substitute pecans with walnuts, almonds, or even hazelnuts for a different twist while still retaining the cake’s core flavors.

Can I make this cake gluten-free? Yes, use a gluten-free flour blend to substitute for all-purpose flour, ensuring that your baking powder is gluten-free as well.

What can I do if the cake is too dry? If your cake turns out dry, ensure you’re measuring the flour correctly and not overbaking it. Adding a layer of simple syrup during frosting can also help retain moisture.

Additional Resources

Looking for more delicious recipes? Explore our collection of baking recipes perfect for both amateurs and seasoned bakers, from chocolate chip cookies to delectable cheesecakes.

For technique guides, learn about the essential methods that can elevate your baking skills, such as mastering the art of whipping and folding to create airy textures.

Understanding ingredients can also enhance your baking; familiarize yourself with substitutions and find out how different flours and sweeteners interrupt your recipes.

Equipment recommendations can also help streamline your baking experience; invest in quality pans, mixers, and tools that can make all the difference in your results.

Seasonal variations guide allows you to adapt the recipe to incorporate available fruits and flavors throughout the year, giving a twist to classic desserts.

Join the Conversation

We invite you to share your experience with Mouthwatering German Chocolate Pecan Pound Cake! Engage with us on social media and share your baking accomplishments, photos, and unique adaptations.

Join our community discussions to exchange tips or suggestions on baking techniques and flavor enhancements, enriching everyone’s culinary journey.

Your feedback on this recipe is essential; let us know how it turned out for you, and feel free to leave comments about your variations and preferences!

We also encourage photography tips; capturing the beauty of your baked goods can inspire others to try their hand at this delightful cake.

Let’s create a rich tapestry of shared culinary experiences, celebrating the joys of baking together!

The Recipe

Mouthwatering German Chocolate Pecan Pound Cake

Serves: 12 slices

Prep Time: 25 mins

Cook Time: 50 mins

Total Time: 75 mins

Kitchen Equipment Needed

  • Bundt pan
  • Stand mixer or hand mixer
  • Cooling rack
  • Mixing bowls
  • Measuring cups and spoons
  • Spatula

Ingredients

  • 1 cup unsalted butter, softened
  • 2 cups granulated sugar
  • 4 large eggs
  • 1 teaspoon vanilla extract
  • 2 cups all-purpose flour
  • 1 teaspoon baking powder
  • 1/2 teaspoon salt
  • 1 cup German chocolate, melted
  • 1 cup chopped pecans, toasted
  • 1 cup shredded coconut
  • 1 cup powdered sugar (for frosting)
  • 1/4 cup heavy cream (for frosting)
  • 1/2 teaspoon vanilla extract (for frosting)

Directions

  1. Preheat the oven to 350°F (175°C) and grease the bundt pan.
  2. In a large mixing bowl, cream together the butter and sugar until light and fluffy.
  3. Add the eggs one at a time, mixing well after each addition. Stir in vanilla extract.
  4. In another bowl, mix the flour, baking powder, and salt together.
  5. Gradually add the flour mixture to the butter mixture, alternating with the melted chocolate.
  6. Fold in the toasted pecans and shredded coconut until just combined.
  7. Pour the batter into the prepared bundt pan and smooth the top.
  8. Bake for 45-50 minutes, or until a toothpick inserted in the center comes out clean.
  9. Allow the cake to cool in the pan for 10 minutes before transferring to a cooling rack to cool completely.
  10. For the frosting, whip the heavy cream, powdered sugar, and vanilla extract until soft peaks form; spread over the cooled cake.
  11. Garnish with additional pecans and shredded coconut if desired.

Recipe Notes

  • For a richer frosting, add more cream for a silky texture.
  • Adjust sugar in the frosting based on sweetness preference.
  • This cake can be stored at room temperature or refrigerated for longer freshness.

Delicious Soft Levain Bakery NYC Cookies: A Must-Try Recipe

Soft Levain Bakery NYC Cookies: The Ultimate Cookie Experience

⚖️
Difficulty
Intermediate

⏲️
Prep Time
20 mins

🕒
Cook Time
15 mins

⏱️
Total Time
35 mins

🍽️
Servings
12 cookies

Soft Levain Bakery NYC Cookies are a delight for any cookie lover. Imagine biting into a warm, gooey chocolate chip cookie that has crisp edges and a chewy center. These cookies balance sweet and salty perfectly, evoking a feeling of comfort and nostalgia. As you pull them from the oven, the chocolate melts slightly, creating an irresistible aroma that fills your kitchen and leaves you counting the minutes until they’re cooled enough to enjoy.

The secret of these Soft Levain Bakery NYC Cookies lies not only in the incredible flavor but also in their decadent texture. The dough is thicker than your average cookie, which contributes to the delightfully soft center. Each cookie is a perfect balance of rich chocolate and buttery goodness, ensuring that every bite provides a heavenly experience. Get ready for an unforgettable treat that will become a staple in your baking repertoire.

Quick Recipe Highlights

  • Flavor Profile: These cookies boast a decadent chocolate flavor balanced with a hint of vanilla, enhanced by a light sprinkle of sea salt.
  • Texture: Expect a delightful contrast between the crispy edges and the soft, gooey center that melts in your mouth.
  • Aroma: The rich scent of butter and chocolate wafting through your home will have everyone rushing to the kitchen.
  • Visual Appeal: The cookies have a perfectly browned exterior, and the melted chocolate creates a stunning look that tempts at first glance.
  • Skill Level Needed: With just a few intermediate techniques, anyone can master these cookies and impress friends and family.
  • Special Equipment: A large mixing bowl, baking sheet, and parchment paper are all you need to create these delectable cookies.

Recipe Overview

  • Difficulty Level: This recipe is classified as intermediate due to the handling of the dough and the baking process, which requires precision.
  • Category: These cookies make a fantastic dessert or snack that can also serve as a sweet treat for gatherings.
  • Cuisine: Drawing inspiration from classic American bakeries, these cookies represent the modern cookie trend that values texture and flavor.
  • Cost: The ingredients are relatively affordable, making it a budget-friendly choice for cookie lovers.
  • Season: Perfect for any season, these cookies are particularly enjoyed in the winter months, providing warmth on chilly days.
  • Occasion: Ideal for birthday parties, holiday gatherings, or simply as a treat for a casual afternoon, they are versatile to fit any occasion.

Why You’ll Love This Recipe

The taste and texture of Soft Levain Bakery NYC Cookies are undeniably delightful. Each bite gives a satisfying crunch followed by a soft, chewy interior filled with rich chocolate chips. The combination of flavors will tantalize your taste buds, making these cookies a standout in the world of baking.

Convenience is also a significant benefit of this cookie recipe. With simple ingredients and straightforward steps, you can have freshly baked cookies ready in under an hour. This allows for quick cravings to be satisfied without a lengthy process, making baking feel achievable and enjoyable.

In terms of nutrition, while cookies are a treat, using quality ingredients such as dark chocolate can provide some antioxidant benefits. By making these cookies at home, you have control over the ingredients, allowing you to make healthier choices to some extent.

During social gatherings, Soft Levain Bakery NYC Cookies serve as a fantastic conversation starter. Sharing home-baked cookies creates an inviting atmosphere, encouraging guests to relax and mingle, while enjoying the fruits of your culinary labor.

Moreover, these cookies are cost-effective. Most of the ingredients are pantry staples, and the quantities used yield a generous batch, allowing you to share and delight others without breaking the bank.

Historical Background and Cultural Significance

Soft Levain Bakery NYC Cookies have become iconic in the world of American baking. Their origins can be traced back to the Levain Bakery established in New York City, known for its thick, indulgent cookies that have created a loyal following. Fans of the bakery often describe its cookies as the epitome of gooey deliciousness, and they have influenced many home bakers across the nation.

Culturally, the rise of artisan baking, particularly in urban areas, has brought attention to quality and experience in food. The soft, artisanal cookie represents a shift in consumer preferences toward homemade, high-quality treats over mass-produced options. This cookie has sparked a baking revolution that emphasizes the importance of quality ingredients and craftsmanship.

Over the years, the recipe has evolved from its original form into various adaptations across bakeries and homes nationwide. Many bakers experiment with ingredients and flavors, adding spices or different types of chocolate, creating personal versions of the classic cookie.

Regional variations have also surfaced, as local bakers offer their unique spins on the classic recipe. Some incorporate local flavors or ingredients, resulting in a diverse array of cookie styles within the same base recipe.

Ingredient Deep Dive

Flour: Flour is the backbone of every cookie, providing the structure that holds it together. All-purpose flour is typically used for cookies, offering a great balance of gluten for chewiness, yet light enough for a tender crumb. Nutritionally, it’s a source of carbohydrates and provides energy. When selecting flour, look for a brand that is freshly milled for optimal flavor. Store flour in a cool, dry place to maintain its quality, and use an airtight container for longer shelf life. If you need a substitute, consider almond flour for a gluten-free option.

Butter: Butter adds richness and moisture to cookies, contributing to a tender and flavorful result. It also aids in achieving that lovely golden-brown color when baked. Culturally, butter is a symbol of indulgence in many baking traditions, from French pastries to American cookies. Nutritionally, butter is high in calories but offers fat-soluble vitamins like A and D. Always choose high-quality unsalted butter for baking. Store it in the fridge and keep any unused portions wrapped. For a lighter substitute, consider using applesauce or coconut oil, but this will alter the taste and texture.

Common Mistakes to Avoid

  • Not measuring ingredients accurately: This can lead to too dry or too wet dough, which affects the final cookie texture.
  • Using cold butter: Cold butter can prevent proper mixing, resulting in dense cookies instead of light and fluffy ones.
  • Overmixing the dough: Overmixing can develop gluten too much, leading to tough cookies instead of the desired softness.
  • Not chilling the dough: Skipping this step can result in cookies spreading too much during baking.
  • Using expired ingredients: Old baking soda or flour can affect the rise and taste of the cookies.
  • Baking at the wrong temperature: An oven that is too hot or too cold can be the difference between perfect and burnt cookies.
  • Not allowing cookies to cool: Removing cookies from the baking sheet too soon can lead to them falling apart.
  • Using the wrong type of chocolate: Chocolate is a key ingredient; using low-quality chocolate can diminish the overall flavor.
  • Skipping the salt: Salt enhances the flavors in your cookies, and without it, they can taste flat.
  • Neglecting to read through the recipe: Not reading the entire recipe can lead to missing steps or misunderstandings about ingredient order.

Essential Techniques

Measuring Ingredients: Proper measuring is crucial for baking success. Use precise tools like dry measuring cups for flour and liquid measuring cups for liquids. Make sure to level off dry ingredients with a knife for consistent results. Common pitfalls include scooping flour directly from the bag, leading to packed flour and inaccurate quantities. The visual cue for success is having a well-formed dough that isn’t too wet or dry.

Creaming Butter and Sugar: This technique helps create a fluffy texture and incorporates air for leavening. Start with room temperature butter and sugar, beating until light and fluffy, which usually takes about 2-3 minutes. Pitfalls include not using softened butter, which can lead to clumps instead of a smooth mixture. A good visual cue is the mixture turning pale and airy in texture.

Pro Tips for Perfect Soft Levain Bakery NYC Cookies

1. Always use high-quality chocolate chips; they make a noticeable difference in flavor and texture.
2. Chill your dough for at least 30 minutes before baking to help prevent excessive spreading.
3. Try to use room-temperature ingredients, which allows for better mixing and texture.
4. Experiment with different types of chocolate combinations for a more complex flavor profile.
5. For added depth, incorporate nuts or spices like cinnamon into the dough.
6. Bake on parchment paper for easier cleanup and to prevent sticking.
7. Don’t overbake! Aim for a golden color around the edges and slightly underbaked centers for the best results.
8. Let cookies cool on the baking sheet for a few minutes before transferring to a wire rack to finish cooling.

Variations and Adaptations

For regional variations, consider adding local flavors such as cinnamon for a twist on the classic cookie or incorporating seasonal ingredients like pumpkin for autumn.

For seasonal adaptations, switch up mix-ins based on availability; try dried cranberries during the winter holidays or coconut shavings in the summertime.

For dietary modifications, you can make these cookies gluten-free by substituting with almond flour and using dairy-free chocolate chips for a delicious vegan option.

Flavor variations could include adding orange zest or a dash of espresso powder to enhance the chocolate flavor subtly.

Texture modifications can be achieved by using different sugars, like brown sugar for a chewier cookie compared to granulated sugar for a crispier outcome.

Presentation alternatives include drizzling melted chocolate over the cookies or garnishing them with sea salt for an added touch of flair.

Serving and Presentation Guide

For plating techniques, arrange cookies on a rustic wooden board to showcase their homemade charm. Use a few decorative elements, such as sprigs of mint or edible flowers, to enhance visual appeal.

Garnishing ideas could include a light dusting of powdered sugar or chocolate shavings for a touch of elegance.

Traditional accompaniments like a cold glass of milk or a cup of coffee complement the cookies while contrasting flavors create an engaging experience.

In modern serving suggestions, consider serving them warm with scoops of ice cream for an indulgent dessert.

Be mindful of temperature considerations; enjoy cookies at room temperature for optimal softness.

For portion control, one cookie per serving is perfect for satisfying a sweet craving without overindulging, especially in social settings.

Wine and Beverage Pairing

A red wine like a merlot or Cabernet Sauvignon pairs exceptionally well with chocolate chip cookies, enhancing the rich flavors and offering a contrasting taste experience.

For non-alcoholic alternatives, consider pairing with hot chocolate or milk to balance the sweetness of the cookies.

Ketogenic dieters may enjoy a cup of herbal tea that complements the chocolate without overwhelming it.

Ensure beverages are served at the right temperature; hot drinks can amplify the delightful experience of enjoying warm cookies.

Presentation suggestions include serving beverages in fun, colorful mugs alongside a plate of the warm cookies for a cozy and inviting look.

Storage and Shelf Life

To store cookies, place them in an airtight container at room temperature to keep them fresh for up to one week, depending on moisture levels.

For long-term storage, consider freezing cookies in an airtight container or sealed freezer bag, which can extend their lifespan to about three months.

Be cautious of signs of spoilage; cookies will become hard and dry or might develop mold if left too long.

Reheating instructions are simple—pop them in the microwave for a few seconds for a warm delight, or place them back in a preheated oven briefly.

Also, avoid thawing frozen cookies at room temperature; instead, reheat from frozen for the best texture.

Make Ahead Strategies

To simplify baking, prepare your cookie dough ahead of time and store it in the refrigerator. This allows you to bake fresh cookies whenever a craving hits.

Consider freezing cookie dough scoops so you can take out only what you need, leaving the rest ready to bake at a later time.

Assess the quality impact of this method; freshly baked cookies are unbeatable, but pre-made dough can save time and minimize mess.

When assembling, ensure to shape the cookies before freezing, as the dough may require more time to bake from frozen.

Add fresh elements like sea salt or chocolate drizzle right before serving to enhance your cookies’ appeal without requiring additional time during preparation.

Scaling Instructions

For halving the recipe, use smaller amounts of each ingredient while keeping ratios the same for successful results.

Doubling or tripling the recipe is feasible; use larger mixing bowls and baking sheets to accommodate the increased volume.

Adjust your equipment based on the quantity; smaller batches may need to bake in separate rounds to ensure even cooking.

Timing modifications can vary; larger cookies may need additional minutes in the oven, while smaller ones may cook faster.

Lastly, remember that storing larger quantities requires appropriate container sizes to avoid spoilage.

Nutritional Deep Dive

Each cookie offers a delicious balance of macros, featuring carbohydrates from sugar and flour, a source of protein from eggs, and healthy fats from butter.

In terms of micronutrients, ingredients like eggs provide essential vitamins while chocolate contributes minerals like magnesium and iron.

Considering health benefits, dark chocolate offers antioxidants, making these cookies a slightly more nutritious treat when enjoyed in moderation.

Dietary considerations include the high sugar levels; adjusting portion sizes can help with weight management.

For those keeping calorie counts, enjoying smaller portions or sharing with friends can make indulgence feel less hefty.

Dietary Adaptations

To make these cookies gluten-free, utilize almond flour or a gluten-free baking blend while maintaining the same ratios for success.

For a dairy-free version, substitute regular butter with coconut oil or a vegan butter alternative that works well in baking.

A vegan twist is possible by replacing eggs with flaxseed or applesauce, ensuring the cookie’s structure remains intact.

Low-carb options can incorporate almond flour and erythritol or another sugar substitute for those following a keto diet.

Other specific diets, such as paleo, can also adapt this recipe using coconut sugar in place of refined sugars without losing the cookie essence.

Troubleshooting Guide

Common texture issues may arise from ingredient ratios being off; ensure accurate measuring for consistent results.

Flavor balance problems can often be resolved with a simple add of salt; it magnifies sweetness while reducing flat tastes.

Temperature problems, like cookies spreading too much or not cooking through, often relate to oven calibration or ingredient temperatures, so ensure room temperature items.

If using substitute ingredients, keep in mind they can alter the final cookie significantly; be cautious with swaps for best results.

Timing concerns during baking can be alleviated with regular checks on cookies, shortening every couple of minutes if they are baking unevenly.

Recipe Success Stories

The community’s enthusiasm for these Soft Levain Bakery NYC Cookies is palpable, with readers sharing feedback on their delightful experiences and love for the flavor.

Variation successes abound, as bakers post photos and ideas on how they have adjusted the recipe to include nuts or enjoy them gluten-free.

Adaptation stories often highlight unique ingredients that readers have experimented with, showcasing the flexible nature of the cookies to fit various tastes.

Many readers provide insightful photography tips, emphasizing the importance of presentation and light to showcase the beautifully baked cookies.

These success stories create a vibrant community around the iconic cookie recipe, fostering a sense of camaraderie among bakers.

Frequently Asked Questions

Can I freeze the cookie dough?

Yes, you can freeze cookie dough! Simply scoop dough into balls and place them in a freezer bag. They can be baked directly from frozen, adding a minute or two to the bake time.

How long do these cookies stay fresh?

These cookies generally stay fresh for up to one week at room temperature when stored in an airtight container. They can also be frozen for longer storage.

What can I use instead of chocolate chips?

Feel free to substitute with chopped chocolate bars, white chocolate chips, or even dried fruits like cranberries for a different twist!

What should I do if my cookies are too flat?

If your cookies turn out flat, often it’s due to using melted butter or not enough flour. Ensure butter is at room temperature and measure carefully next time.

Can I make these cookies vegan?

Yes! To make the cookies vegan, substitute butter with coconut oil and eggs with flaxseed meal mixed with water or applesauce for binding.

Is it necessary to chill the dough?

Chilling the dough helps prevent spreading and enhances the flavor. It’s quite recommended for the best texture.

Can I add nuts to the dough?

Absolutely! Chopped nuts like walnuts or pecans add a nice crunch and flavor to the cookies. Just combine them with the chocolate chips.

How do I know when they are done baking?

The cookies should be golden brown around the edges and slightly underbaked in the center. They will continue to cook on the baking sheet after removing them from the oven.

Which kind of flour is best for cookies?

All-purpose flour works great for cookies, providing the perfect balance of structure and texture. For gluten-free options, consider almond or oat flour.

Do I need any special tools for baking these cookies?

No special tools are required, but a quality baking sheet, mixing bowls, and good measuring tools will greatly enhance your baking experience.

Additional Resources

For those interested in baking, check out other cookie recipes that focus on various themes and flavors. Look for technique guides that delve deeper into baking science and principles behind each technique.

Explore ingredient guides for in-depth information about different types of flours and chocolates to elevate your baking skills.

For anyone new to baking, consider investing in reliable, top-quality equipment recommendations based on particular needs.

Finally, seek out seasonal variations to keep your baking fresh and relevant throughout the year, adding exciting twists to perennial favorites.

Join the Conversation

We encourage readers to share their recreations of Soft Levain Bakery NYC Cookies on social media to build a community filled with creative bakers.

Photography tips can help showcase your cookie masterpieces, encouraging engagement with fellow baking enthusiasts.

Don’t forget to leave reviews on your baking experience with this recipe to assist and inspire others.

Join the conversation about variations and experiments readers might have embarked upon, adding your unique twist to this beloved recipe.

Together, we can cultivate a community that celebrates every delicious byte of this amazing cookie experience!

The Recipe

Soft Levain Bakery NYC Cookies

Serves: 12 cookies

Prep Time: 20 mins

Cook Time: 15 mins

Total Time: 35 mins

Kitchen Equipment Needed

  • Mixing bowl
  • Baking sheet
  • Parchment paper
  • Measuring cups and spoons
  • Electric mixer
  • Cooling rack

Ingredients

  • 2 cups all-purpose flour
  • 1 cup unsalted butter, softened
  • 1 cup brown sugar
  • ½ cup granulated sugar
  • 2 large eggs
  • 2 teaspoons vanilla extract
  • 1 teaspoon baking soda
  • ½ teaspoon salt
  • 2 cups chocolate chips

Directions

  1. Preheat your oven to 350°F (175°C) and line a baking sheet with parchment paper.
  2. In a large mixing bowl, cream softened butter, brown sugar, and granulated sugar until fluffy.
  3. Add the eggs, one at a time, and vanilla, mixing until fully incorporated.
  4. In another bowl, whisk together flour, baking soda, and salt.
  5. Gradually add the dry ingredients to the wet mixture, mixing until just combined.
  6. Fold in chocolate chips, ensuring even distribution throughout the dough.
  7. Using a cookie scoop, portion out the dough onto the prepared baking sheet, leaving space between each cookie.
  8. Bake for 12-15 minutes until golden brown on the edges. Let cool on the baking sheet for 5 minutes, then transfer to a wire rack to cool completely.

Recipe Notes

  • Chill the dough for extra thickness if preferred.
  • Feel free to mix in nuts for added crunch.
  • Adjust bake times based on your oven’s accuracy.
  • Experiment with different types of chocolate for varied flavor.

Indulge in Delicious Raspberry Rose Chocolate Truffles Recipe

Elegant Raspberry Rose Chocolate Truffles Recipe: Delightful Indulgence for Your Sweet Tooth

⚖️
Difficulty
Medium

⏲️
Prep Time
30 mins

🕒
Cook Time
10 mins

⏱️
Total Time
40 mins

🍽️
Servings
24 truffles

Indulge in the luxurious flavors of our Elegant Raspberry Rose Chocolate Truffles Recipe. Perfect for any occasion, these delectable truffles combine rich chocolate with the delicate taste of raspberries and floral notes of rose, creating a symphony of flavors that will delight your senses. Whether you’re celebrating a special event or simply treating yourself to something extraordinary, these truffles will elevate your dessert experience.

With each bite, you’ll be captivated by the velvety richness of the chocolate ganache contrasted by the bright and tangy raspberries. The essence of rose adds a sophisticated touch, making these truffles not just a treat but a true masterpiece. The dip into cocoa powder or crushed nuts further enhances their visual appeal, making them a feast for both the eyes and the palate.

Quick Recipe Highlights

  • Flavor Profile: Revel in the sweet and tart combination of fresh raspberries blended with smooth chocolate and fragrant rose.
  • Texture: Experience the luxurious creaminess of chocolate contrasted with the delicate crunch of cocoa or nut coatings.
  • Aroma: The delightful aroma of fresh raspberries mingles perfectly with hints of floral rose, creating an enticing scent.
  • Visual Appeal: Wonderfully rich and decadent, these truffles boast a beautiful deep color, inviting you to indulge.
  • Skill Level Needed: This recipe is accessible for both novice and experienced cooks, requiring basic melting and rolling techniques.
  • Special Equipment: A thermometer for precise temperature control and a double boiler or microwave for melting chocolate are recommended.

Recipe Overview

  • Difficulty Level: With a medium difficulty rating, this Elegant Raspberry Rose Chocolate Truffles Recipe requires careful handling of chocolate but is straightforward enough for anyone willing to try.
  • Category: Perfect for dessert or as a sweet gift, these truffles make an excellent choice for a luxurious finish to any meal.
  • Cuisine: This recipe draws inspiration from European confectionery traditions, highlighting the art of chocolate-making.
  • Cost: With ingredients like chocolate and raspberries, this recipe can be made at a low to moderate cost, making it accessible for home bakers.
  • Season: These truffles are particularly delightful in the spring and summer when raspberries are at their peak ripeness.
  • Occasion: Ideal for weddings, anniversaries, or even as a delightful surprise for a loved one, these truffles are sure to impress.

Why You’ll Love This Recipe

The taste and texture of these truffles are undeniably appealing. Each bite offers a luscious, creamy chocolate experience that gently envelops the bold flavors of raspberry, creating a harmonious balance. The slight crunch from the coating adds to the overall satisfying mouthfeel, making each truffle a mini celebration in itself.

In addition to the irresistible flavor, the convenience of preparing these truffles makes them a standout choice. With minimal cooking time and straightforward steps, you can whip up a batch in less than an hour. Prepare them ahead of time and allow them to chill, making them perfect for last-minute gatherings or relaxing evenings at home.

From a nutritional standpoint, dark chocolate, when used in moderation, holds numerous health benefits, including antioxidants and heart health properties. Coupled with fresh raspberries, you’ll also gain fiber and vitamins, making these truffles somewhat of a guilt-free indulgence.

The social aspect of sharing these truffles cannot be overlooked. Perfect for entertaining, they are conversation starters at parties and make delightful gifts for friends and family. Bringing a box of these elegant treats will surely spread joy and appreciation.

Lastly, considering the cost of ingredients, these truffles are quite economical compared to purchasing gourmet chocolates. With just a few high-quality ingredients, you can create an elite dessert without breaking the bank, proving that luxury can be both delicious and affordable.

Historical Background and Cultural Significance

The invention of chocolate truffles is believed to date back to the late 19th century in Europe. Named for their resemblance to the prized underground fungi, these confections have evolved into a symbol of luxury and indulgence. The combination of chocolate and fruit, such as raspberries, has always been popular due to its balancing elements, accentuating the sweetness while providing a refreshing counterpart.

Culturally, chocolate has been revered since ancient civilizations. The rich, decadent flavor is often associated with celebrations and special occasions. Rose, commonly used in Middle Eastern desserts, brings a unique twist, making these truffles a bridge between different culinary traditions.

Over the decades, the basic truffle recipe has seen countless adaptations. Today, you can find variations infused with spices, liqueurs, or alternative flavors, showing how versatile this treat can be. Our Elegant Raspberry Rose Chocolate Truffles add an innovative spin, merging the classic with the contemporary.

Regionally, variations exist as different countries use local fruits or flavorings. For instance, the Italian “tartufo” often showcases nuts, while French versions may incorporate liquors. Our recipe pays homage to these influences while crafting a unique experience with raspberries and rose.

Ingredient Deep Dive

Dark Chocolate: Rich in antioxidants, dark chocolate has been celebrated for its potential health benefits, such as improving heart health and lowering cholesterol levels. To select the best quality, look for chocolate with a cocoa content of at least 70%. Store it in a cool place away from direct sunlight to maintain its quality. For those who prefer a sweeter truffle, you can substitute semi-sweet chocolate, but keep in mind this will affect the overall taste.

Raspberries: Raspberries are loaded with vitamins, minerals, and antioxidants, making them a nutritious choice for your recipes. When selecting, opt for plump, firm berries with a vibrant color. Store them in the refrigerator and consume them within a few days for peak freshness. If fresh raspberries are unavailable, you can use frozen ones but ensure they are thawed and drained before incorporating them into the recipe.

Rose Water: A quintessential ingredient in many Middle Eastern cuisines, rose water has gained popularity for adding an elegant floral note to desserts. It’s important to look for high-quality rose water to ensure you get the best flavor. Typically stored in a cool, dark place, rose water has a long shelf-life. In case you can’t find rose water, consider using a few drops of vanilla extract as an alternative, although it will change the profile slightly.

Cocoa Powder/Nuts Coating: Cocoa powder adds an extra chocolatey element to the truffles, while crushed nuts can provide a delightful crunch. For a richer taste, opt for unsweetened cocoa powder. Nut coatings should be finely chopped to best adhere to the truffles. Both options can be stored in airtight containers and are widely available, enhancing the truffles’ overall aesthetic and flavor.

Common Mistakes to Avoid

  • Using Low-Quality Chocolate: Always choose high-quality chocolate, as it directly influences the flavor and texture of your truffles.
  • Overheating the Chocolate: When melting chocolate, do so gradually to avoid scorching. Use a double boiler or microwave at low increments with frequent stirring.
  • Skipping Tempering: If you plan to coat the truffles in chocolate, ensure it’s tempered for a glossy finish and snapping texture.
  • Not Chilling Enough: Insufficient refrigeration can lead to crumbly truffles. Always allow them to set completely before rolling.
  • Ignoring Measurements: Be precise with ingredient measurements, especially when it involves flavoring agents like rose water.
  • Forgetting to Sift: When using dry ingredients like cocoa or powdered sugar, sift them to avoid lumps.
  • Overmixing: When combining chocolate and cream or fruit, mix just until blended to maintain a smooth consistency.
  • Neglecting Coatings: Don’t forget to roll your truffles in cocoa or nuts to enhance both flavor and visual appeal.

Essential Techniques

Melting Chocolate: This technique involves gently heating chocolate until smooth. It’s vital to ensure it melts evenly, preventing scorching. Use a double boiler or microwave method, stirring frequently. Visual cues for success include a shiny, lump-free texture.

Chilling the Truffles: After forming the truffles, chilling them helps to set the ganache, making it easier to roll and coat. If they are too soft, they will melt and lose shape during coating. A good rule of thumb is to refrigerate for at least 30 minutes.

Coating Techniques: Rolling truffles requires practice for consistency. You can use your hands or a fork. Visual cues for success involve an even and consistent coating; no bare spots should be visible. Ensure coatings are dry before placing them in an airtight container.

Flavor Infusing: Incorporating flavor like rose water requires precision. Too much can overpower the truffle, while too little might not yield the desired taste. Start with small measurements and adjust according to your preference.

Pro Tips for Perfect Elegant Raspberry Rose Chocolate Truffles

1. Use a silicone spatula when stirring to prevent the ganache from sticking, ensuring a smooth texture.
2. For a contrasting flavor, consider adding a pinch of sea salt to the chocolate mixture.
3. Experiment with different coatings such as shredded coconut or colored sprinkles to enhance visual appeal.
4. Ensure your hands are cool while rolling to prevent melting the ganache.
5. Chill the truffles for longer to firm up if you plan to work in a warm kitchen.
6. For a burst of flavor, add chopped candied ginger to the raspberry mixture.
7. Use a digital thermometer to gauge the chocolate melting temperature accurately.
8. Plan ahead by preparing the truffles the night before serving for a hassle-free dessert option.

Variations and Adaptations

Regional variations of chocolate truffles often include local ingredients, such as incorporating orange zest for a zesty twist or lavender for a more aromatic flavor. Seasonal adaptations could involve using seasonal fruits like strawberries or cherries when they’re at their best.

For dietary modifications, consider creating vegan versions by substituting dairy with coconut cream and ensuring the chocolate is dairy-free. Low-carb adaptations can include using sugar-free chocolate and reducing fruit content for a guilt-free indulgence.

Experimenting with flavors such as espresso or chili pepper can create unique versions that offer a spice or stronger taste profile. Presentation alternatives can vary from using decorative boxes to arrange truffles on a beautiful platter, making them suitable for gifting or serving.

Serving and Presentation Guide

When serving, consider plating the truffles on a beautiful cake stand or decorative platter to elevate their visual appeal. Garnishing them with fresh mint leaves or crushed raspberries can add a vibrant touch to the presentation.

Traditional accompaniments might include a side of whipped cream or a drizzle of raspberry sauce to enhance the dessert experience. For modern touches, consider pairing the truffles with a scoop of artisan ice cream or a dollop of gelato.

Temperature is key; serving them slightly chilled accentuates their flavor while maintaining their shape. When considering portion control, offering an assorted platter with other sweets allows guests to enjoy a variety without overeating.

Wine and Beverage Pairing

Pair these elegant truffles with a rich, full-bodied red wine like a Cabernet Sauvignon or a light rosé to complement the chocolate and raspberry flavor profiles. Alternatively, consider sparkling wines, such as Prosecco, which can enhance the dessert’s sweetness.

For non-alcoholic options, try pairing with a berry-infused iced tea or a refreshing raspberry lemonade to mirror the truffle’s flavor. When serving coffee or tea, a dark roast coffee can harmonize well with the chocolate, offering a delightful contrast.

Temperature considerations are essential; serve wines chilled to balance the sweetness. Detail how to prepare drinks that are garnished with raspberry or rose petals to make the experience more luxurious.

Storage and Shelf Life

Store your Elegant Raspberry Rose Chocolate Truffles in an airtight container in the refrigerator to maintain freshness. Ideally, they should be consumed within one week, but they can last up to two weeks under proper storage conditions.

To prevent spoilage, keep them away from sunlight and sources of moisture. If you notice any changes in texture or if they develop an off smell, it’s best to discard them.

Reheating is unnecessary since they are best served chilled; however, taking them out of refrigeration a few minutes before serving can enhance flavor. For longer storage, consider freezing the truffles in a single layer, then transferring them into a freezer-safe container. They can keep for up to three months in the freezer.

Make Ahead Strategies

You can prepare your Elegant Raspberry Rose Chocolate Truffles in advance, making them an excellent choice for busy hosts. Begin by making the ganache the day before and refrigerating it overnight.

For the best flavor and texture, assemble the truffles the day of serving. If time allows, let them sit at room temperature for about 15 minutes before serving to enhance softness.

Consider dividing your truffle mixture into sections so you can roll and coat them on different days, maintaining freshness. For an extra pop of flavor, add fresh garnish like mint or additional raspberry just before serving.

Scaling Instructions

When halving the Elegant Raspberry Rose Chocolate Truffles Recipe, maintain the same ratios by using half the amount of each ingredient. This is simple and ensures no loss in flavor or texture.

If doubling or tripling the recipe, consider the size of your mixing bowl. Use larger bowls or mix in batches, as the ganache may be challenging to blend evenly in tight spaces. Timing adjustments are essential; ensure chilling times are sufficient for larger batches.

When storing excess truffles, ensure ample space in the container to prevent them from sticking together, presenting a neat appearance when served.

Nutritional Deep Dive

This Elegant Raspberry Rose Chocolate Truffles Recipe is rich in nutrients thanks to dark chocolate and raspberries. The macro breakdown reveals a focus on healthy fats from chocolate while providing wholesome carbohydrates from the fruit.

Micronutrient analysis shows an abundance of vitamins C and K from raspberries, while dark chocolate provides minerals like iron and magnesium. The health benefits of consuming dark chocolate include improved heart health and reduced stress levels, adding a wholesome element to these indulgent treats.

Consider dietary guidelines for portion control. Each truffle provides a sweet treat without excessive calories, making them suitable for those mindful of their intake but still wishing to indulge occasionally.

Dietary Adaptations

Creating gluten-free Elegant Raspberry Rose Chocolate Truffles is easily achieved since the primary ingredients do not contain gluten. Ensure that any added ingredients, like coatings, are also gluten-free.

For vegan adaptations, use coconut cream instead of heavy cream and select dairy-free chocolate. Low-carb variations can be crafted using sugar substitutes and minimal fruit content for diabetic-friendly indulgence.

Keto and paleo-friendly options are also available by ensuring all ingredients align with those meal plans, such as opting for dark chocolate with low sugar content. For those following a low-FODMAP diet, be cautious with the amount of raspberry used.

Troubleshooting Guide

If you encounter texture issues with your truffles, it could be due to over or under-chilling. Adjust the chilling time accordingly to achieve the desired consistency.

For flavor balance, if the truffles taste too sweet, consider adding a hint of sea salt in the ganache preparation to elevate the overall flavor profile.

Temperature problems may arise if the kitchen is too warm, causing the ganache to melt too quickly when rolling. Ensure your working environment is cool, or chill the mixture longer before handling.

Should you face equipment challenges, ensure your tools, like the thermometer, are functioning correctly. For ingredient substitutions, always consult alternatives that complement the original flavor profile without overpowering it.

Recipe Success Stories

Community feedback for the Elegant Raspberry Rose Chocolate Truffles has been overwhelmingly positive. Many have enjoyed the refreshing taste and sophisticated flavor combination, especially during festive gatherings.

Variations shared by readers demonstrate creativity, with others adding different flavored extracts or opting for various coatings, proving that this recipe can adapt to personal preferences beautifully.

Adaptation stories highlight how simple it is to modify the recipe for dietary needs while maintaining the luxurious essence of the truffles.

Photography tips have encouraged aspiring cooks to capture the beauty of their creations, showcasing their truffles in various settings, which in turn inspires others to try their hand at making these elegant treats.

Frequently Asked Questions

Can I use fresh raspberries instead of puree?

Absolutely! You can incorporate fresh raspberries directly into the chocolate ganache. However, ensure to mash them to release their juices for better flavor integration.

How long will these truffles keep?

Properly stored in the refrigerator, they should last up to two weeks. Ensure they’re in an airtight container to maintain moisture and freshness.

What if my ganache is too runny?

If your ganache is too runny, allow it to chill longer or gradually add more melted chocolate to thicken it up before rolling.

Can I make these truffles vegan?

Yes! Substitute the heavy cream with coconut cream and ensure your chocolate is dairy-free to enjoy vegan truffles.

What kind of chocolate should I use?

Use high-quality dark chocolate with a cocoa content of at least 70% for the best flavors and health benefits. Semi-sweet chocolate also works well if you prefer a sweeter taste.

Can I freeze the truffles?

Yes, these truffles freeze well. Place them in a single layer, wrap carefully, and store in a freezer-safe container. Enjoy them within three months for the best quality.

Is it okay to use a different fruit?

Yes, you can experiment with different fruits! Strawberries, cherries, or even mango can provide delightful variations, but be mindful of balancing sweetness and acidity.

Is rose water necessary?

While rose water adds a distinct flavor, it’s not strictly necessary. You can substitute it with vanilla extract if preferred.

Can I use other kinds of nuts for coating?

Yes! Feel free to use any nuts you enjoy, such as pistachios, almonds, or hazelnuts, to coat your truffles for a unique texture and flavor.

How do I know when my chocolate is melted perfectly?

Perfectly melted chocolate should be smooth and glossy without any lumps. A digital thermometer should read between 110°F and 115°F for ideal results.

Additional Resources

If you enjoyed this Elegant Raspberry Rose Chocolate Truffles Recipe, check out related recipes such as chocolate ganache tarts and raspberry pavlova. These desserts share similar flavor profiles and can impress guests during any gathering.

Also, explore technique guides for advanced chocolate-making processes or ingredient information about making the most out of different chocolates. Recommendations for equipment can help improve your dessert-making experience, ensuring you have the right tools at hand for epic indulgences.

Seasonal variations can introduce delightful options that showcase fresh ingredients, turning your dessert table into a seasonal celebration.

Join the Conversation

We invite you to share your thoughts on this Elegant Raspberry Rose Chocolate Truffles Recipe! Feel free to share your pictures and experiences through social media.

Photography tips can enhance your presentation, so don’t hesitate to engage with fellow bakers and share your creative variations. Share reviews if you’ve tried this recipe, as community feedback encourages new bakers to give these elegant truffles a try!

Be part of our growing community, and let’s inspire each other with culinary creations!

The Recipe

Elegant Raspberry Rose Chocolate Truffles

Serves: 24 truffles

Prep Time: 30 mins

Cook Time: 10 mins

Total Time: 40 mins

Kitchen Equipment Needed

  • Double boiler or microwave-safe bowl
  • Mixing bowls
  • Spatula
  • Airtight container for storage
  • Digital thermometer (optional)

Ingredients

  • 8 oz (225g) dark chocolate, chopped
  • ½ cup (120ml) heavy cream
  • ¾ cup (100g) fresh raspberries, pureed
  • 1 tsp rose water
  • Cocoa powder or crushed nuts for rolling

Directions

  1. In a double boiler or microwave, gently melt the chocolate until smooth.
  2. Heat the heavy cream separately until just boiling, then pour it over the melted chocolate.
  3. Stir gently with a spatula until fully combined, then mix in the raspberry puree and rose water.
  4. Cover the bowl with plastic wrap and refrigerate for about 2 hours, or until firm.
  5. Once firm, use a melon baller or spoon to scoop out portions of the ganache and roll them into balls.
  6. Roll the truffles in cocoa powder or crushed nuts until evenly coated.
  7. Place the coated truffles on a baking sheet lined with parchment paper and refrigerate for another 30 minutes.
  8. Serve chilled or at room temperature and enjoy!

Recipe Notes

  • Feel free to adjust the rose water to suit your taste.
  • These truffles can be frozen; just ensure they are tightly packed in an airtight container.
  • Experiment with different types of chocolate for varied flavors.

Easy Salted Caramel Banana Bread Recipe for Delicious Indulgence

Easy Salted Caramel Banana Bread Recipe: A Deliciously Sweet Twist

⚖️
Difficulty
Easy

⏲️
Prep Time
15 mins

🕒
Cook Time
50 mins

⏱️
Total Time
65 mins

🍽️
Servings
10 slices

When you think of comforting baked goods, nothing quite compares to the delightful flavor of banana bread—except when you elevate it with a luscious salted caramel swirled through the batter! This Easy Salted Caramel Banana Bread Recipe combines the natural sweetness of ripe bananas with the rich, buttery goodness of salted caramel, creating a loaf that is as indulgent as it is satisfying. It’s perfect for breakfast, brunch, or even a sweet afternoon treat with a cup of coffee.

The beauty of this banana bread lies in its simplicity. With just a few basic ingredients and minimal prep time, you can craft a delectable dessert that your family and friends will rave about. Each slice is moist and fluffy, complete with delightful caramel pockets that melt in your mouth, making it hard to resist grabbing a second piece. Whether you’re using up overripe bananas or celebrating a special occasion, this recipe will be a go-to favorite.

Quick Recipe Highlights

  • Flavor Profile: The combination of sweet bananas and savory salted caramel creates a harmonious balance that is absolutely irresistible.
  • Texture: This banana bread is incredibly moist with a tender crumb, while the caramel adds a sticky sweetness that enhances each bite.
  • Aroma: The smell of baked bananas mingled with warm caramel wafts through your kitchen, inviting everyone to come and enjoy.
  • Visual Appeal: A golden-brown crust with flecks of caramel running through the loaf makes this banana bread a true standout.
  • Skill Level Needed: Perfect for bakers of all levels, this recipe requires no special techniques or equipment.
  • Special Equipment: All you need is a mixing bowl, a whisk, a loaf pan, and an oven to create this masterpiece!

Recipe Overview

  • Difficulty Level: This Easy Salted Caramel Banana Bread is designed for anyone to master. With straightforward steps and common ingredients, even novice bakers can create a delicious treat.
  • Category: Banana bread is a cherished breakfast item but also doubles as a wonderful dessert or snack option for any time of day.
  • Cuisine: Inspired by classic American baking traditions, this recipe adds a twist with a touch of gourmet salted caramel.
  • Cost: With affordable ingredients, you can whip up this banana bread without breaking the bank—it’s a budget-friendly option for deliciousness!
  • Season: While this banana bread can be enjoyed year-round, its comforting flavors make it especially appealing in the fall and winter months.
  • Occasion: Ideal for brunch gatherings, holiday celebrations, or simply a cozy evening at home, this loaf caters to various occasions.

Why You’ll Love This Recipe

The taste of this easy salted caramel banana bread is what makes it truly special. The sweetness of the bananas pairs perfectly with the salty notes of the caramel, creating a flavor explosion that dances on your palate. Every bite is a tantalizing blend of moist banana goodness and a caramel drizzle that leaves you craving more. You won’t have to worry about bland or dry banana bread; this one delivers on taste and texture in every slice!

Convenience also plays a huge role in why this recipe is so loved. The prep time is minimal, allowing you to mix everything in one bowl with simple measuring and stirring. There’s no need for complicated techniques, making it perfect for busy bakers or those who simply want to enjoy a quick treat at home. You can have fresh banana bread in under an hour, which is unbeatable for a baking recipe.

Additionally, this recipe offers nutritional advantages as bananas are high in potassium and provide natural sweetness. They are a great source of fiber, which is beneficial for digestion. When combined with minimal added sugar from salted caramel, this bread strikes a balance between indulgence and health, making it a better choice than many store-bought treats.

Social gatherings are the perfect backdrop for this Easy Salted Caramel Banana Bread. It serves as a heartwarming gift to friends or a delightful dish to bring to gatherings, showcasing your baking prowess without the overwhelm. It encourages sharing and brings a sense of comfort to any occasion, making it an instant hit with guests.

Cost-effectiveness is another standout feature of this recipe. Most ingredients are simple pantry staples that are generally inexpensive, plus you can use overripe bananas that you might otherwise discard. Instead of splurging on gourmet treats from the bakery, you can create a delicious homemade version that captures all the flavor and charm.

Historical Background and Cultural Significance

The origins of banana bread are deeply rooted in American baking history. During the Great Depression, creative bakers sought to make the most of their ingredients, leading to the invention of banana bread as a delicious waste-not dish. Using overripe bananas that might have otherwise been thrown away, bakers created a moist loaf that could last for days. Its simplicity and sustainability became deeply embedded in American culture.

As banana bread gained popularity, it evolved into numerous variations worldwide, with different cultures adding their own flair. From adding nuts in the United States to the use of coconut in South American recipes, banana bread became a blank canvas for flavor experimentation. This evolution reflects a broader trend in baking, where home cooks adapt recipes based on regional tastes and available ingredients.

The cultural importance of banana bread continues today, as it is often made during family gatherings, potlucks, and celebrations. It signifies hospitality and warmth, often shared among friends and loved ones. In many homes, it has become a rite of passage for new bakers to learn the craft by mastering this beloved recipe.

Variations of banana bread, such as adding chocolate chips or spices, have also gained popularity over the years. The influx of dietary modifications—think gluten-free or vegan banana bread—shows how adaptable this recipe remains in modern kitchens, bridging tradition and contemporary baking needs.

Ingredient Deep Dive

  • Bananas: The star ingredient of our recipe, bananas provide natural sweetness and moisture. They are a great source of potassium, which is critical for heart health and muscle function. When selecting bananas, look for ones that are ripe but not overly brown, as they would be too mushy for bread. For storage, keep them at room temperature until ripe and then refrigerate to extend their shelf life.
  • All-Purpose Flour: A versatile staple in baking, all-purpose flour is responsible for the structure of the banana bread. It’s often enriched with nutrients, providing essential vitamins and minerals. When measuring flour, spoon it into the cup rather than scooping to avoid packing it down. Store it in a cool, dry place and consider refrigeration for longer shelf life.
  • Salted Caramel: This ingredient not only adds decadence to the banana bread but also complements the sweetness of the bananas. The combination of sugar and butter creates a rich, smooth sauce that elevates the dish. Homemade salted caramel is easy to make, but pre-packaged versions can also serve in a pinch. Keep any leftover caramel for drizzling over other desserts!
  • Sugar: Sugar plays a pivotal role in enhancing flavor, providing sweetness while also contributing to the browning effect during baking. Brown sugar is commonly used in banana bread for added moisture and depth of flavor. To store sugar, keep it in an airtight container to prevent clumping due to moisture.
  • Eggs: Essential for binding the ingredients and providing structure, eggs also add moisture and richness to banana bread. When choosing eggs, consider organic or free-range options for better flavor and nutritional value. Store them in the refrigerator for maximum freshness and use them within a few weeks.

Common Mistakes to Avoid

  • Overmixing the batter can lead to a tough texture. Mix just until the ingredients are combined for a tender loaf.
  • Not using ripe enough bananas will result in less sweetness. Aim for bananas that are at least spotted with brown for maximum flavor.
  • Forgetting to preheat the oven can lead to uneven baking. Ensure your oven is at the right temperature before putting in your loaf.
  • Using too much flour can make the bread dense and dry. Measure flour correctly to maintain the right balance in your batter.
  • Not allowing the banana bread to cool before slicing can result in a gummy texture. Let it rest for at least 15 minutes before cutting.
  • Underbaking the loaf can lead to a wet center. Always check for doneness with a toothpick in the center before removing it from the oven.
  • Using cold eggs can affect the mixing process. Let eggs come to room temperature for better incorporation into the batter.
  • Skipping the caramel drizzle can minimize flavor—the caramel adds a beautiful finish and delicious sweetness.
  • Storing baked banana bread improperly can lead to spoilage. Keep it wrapped in plastic wrap to maintain moisture and freshness.
  • Not experimenting with add-ins may lead to missed flavor opportunities. Consider walnuts, chocolate chips, or spices for an added twist.

Essential Techniques

The creaming method is crucial for this banana bread. This technique involves beating sugar and butter until smooth and fluffy, which helps to incorporate air into the batter, resulting in a lighter texture. Mastering this method requires patience; always start with room temperature butter and mix at medium speed to avoid over-creaming.

Proper measuring techniques are essential for consistent baking results. Using the spoon and level method for flour prevents packing, which can yield dense bread. Invest in a kitchen scale for more precise measurements, especially for dry ingredients, and always measure wet ingredients in clear measuring cups to ensure accuracy.

Pro Tips for Perfect Easy Salted Caramel Banana Bread

1. Use overripe bananas for maximum sweetness—don’t toss those brown ones!
2. Adjust the salt level in the caramel sauce to balance the sweetness; a bit more salt can enhance flavors significantly.
3. Experiment with spices like cinnamon or nutmeg for an extra warming flavor profile.
4. Add chopped nuts for added texture; walnuts or pecans work beautifully.
5. For a richer caramel flavor, you can use brown sugar in the caramel recipe.
6. If using frozen bananas, ensure they are thawed and drained before incorporating into the batter.
7. Let the banana bread sit for a few hours before slicing for the best texture.
8. Cover the loaf in plastic wrap while cooling to retain moisture and keep it from drying out.

Variations and Adaptations

For those looking to switch it up, there are numerous ways to modify this Easy Salted Caramel Banana Bread. Regional variations might include adding coconut for a tropical twist, while chocolate chip banana bread introduces a decadence that pairs wonderfully with caramel. Seasonal adaptations may include adding pumpkin spice in the fall to embrace autumn flavors.

For dietary modifications, gluten-free flours or almond flour can replace regular flour without losing moistness. If you’re aiming for vegan options, you can substitute eggs with flaxseed meal or applesauce, ensuring that the banana bread remains deliciously moist and flavorful.

When it comes to texture modifications, consider adding oats for a hearty bite or substituting some of the flour with almond flour to introduce a nuttier flavor. Presentation alternatives, such as serving with a dollop of whipped cream or icing drizzles, can elevate your banana bread for special occasions.

Serving and Presentation Guide

Plating techniques for banana bread can transform it into a stunning centerpiece. Serve slices on a rustic wooden board with fresh fruit or edible flowers for a spring-inspired aesthetic. Garnishing with chopped nuts or a drizzle of salted caramel sauce heightens visual appeal.

Traditional accompaniments often include butter or cream cheese spread, adding flavor and richness. For modern suggestions, pair your banana bread slices with Greek yogurt to introduce a tangy element, enhancing the overall taste.

Temperature considerations play an important role; serving banana bread slightly warm enhances its aroma and encourages enjoyment. Portion control can be managed with resealable bags for storage, ensuring you can savored over several days without losing freshness.

Wine and Beverage Pairing

For a delightful pairing, consider serving your Easy Salted Caramel Banana Bread with a sweet dessert wine such as Moscato, which complements the flavors beautifully. A rich coffee, like a dark roast or espresso, also works wonderfully, enhancing the natural sweetness of the bread.

Non-alcoholic alternatives might include a spicy chai tea, adding warmth and depth. If opting for a fruity accompaniment, a sparkling apple cider can elevate your dining experience, adding a refreshing contrast to the sweetness of the banana bread.

Temperature considerations are essential for your drink pairings; ensure that coffee is served hot, while chilled beverages like sparkling cider offer a crisp refreshment that enhances the bread’s moisture.

Storage and Shelf Life

Proper storage methods for your banana bread will greatly affect its shelf life. Wrap the loaf tightly in plastic wrap to avoid drying out and store it at room temperature for up to three days. For longer storage, consider placing it in the refrigerator, where it can last up to a week.

Temperature requirements for optimal freshness dictate keeping the banana bread away from direct sunlight or heat sources. Use an airtight container for best results.

Signs of spoilage include an off smell or visible mold. If you plan to freeze, slice the bread first and wrap individual pieces in plastic wrap for easy access later. Reheating can be done in the microwave for a few seconds or a toaster oven for a warm snack.

Make Ahead Strategies

Planning is key for make-ahead strategies with your Easy Salted Caramel Banana Bread. You can prepare the batter a day in advance and store it in the refrigerator. This minimizes last-minute prep while enhancing flavors as the mixture marinates.

For storage between steps, ensure that your prepared ingredients are measured and organized ahead of time to streamline the baking process. Assess the quality impact of making ahead; flavors may deepen overnight, enhancing the final product.

Assembly tips include preparing the caramel sauce one day ahead, as it can easily be reheated for a fluid drizzle. Add nuts just before baking to maintain their crunch.

Scaling Instructions

If you’re looking to feed a larger crowd, you can double or triple this Easy Salted Caramel Banana Bread recipe quite easily. However, remember to adjust your loaf pan size accordingly and increase baking time, checking for doneness with a toothpick.

Halving the recipe can also work if you’re looking for a smaller portion. Use smaller loaf pans or muffin tins to create indulgent banana bread muffins for individual servings.

Equipment adjustments may include using multiple mixers or larger bowls when scaling up. Always keep timing modifications in mind; larger loaves will need more time than the original recipe suggests.

Nutritional Deep Dive

A nutritional breakdown of the Easy Salted Caramel Banana Bread demonstrates its balance of macros. With carbohydrates primarily from bananas and flour, it provides a quick energy boost. The fats from butter or oil contribute to satiety, making it a satisfying choice for breakfast or snacks.

Micronutrient analysis reveals that bananas bring important vitamins such as Vitamin B6 and C, as well as potassium. While sugar adds sweetness, moderation is key; the salted caramel sauce should be enjoyed mindfully as part of an overall balanced diet.

Dietary considerations for this banana bread may highlight the use of whole-grain flour for added fiber and nutrient density, making it a heartier choice. Portion analysis showcases that enjoying a slice can provide energy without excessive calories, a perfect fit for weight management.

Dietary Adaptations

For those looking for gluten-free options, substitute all-purpose flour with a gluten-free blend specifically formulated for baking. This ensures similar texture and flavor, allowing everyone to enjoy this delightful treat.

Dairy-free adaptations can be achieved through the use of almond milk or coconut oil instead of butter. Additionally, using flax eggs can effectively replace eggs for a vegan-friendly option without compromising taste.

The low-carb approach can incorporate almond flour and erythritol as sugar substitutes. These modifications allow for delicious indulgence even for those following strict dietary restrictions.

For a paleo-friendly version, all-purpose flour can be replaced with almond or coconut flour, while sweetener options such as honey or maple syrup can replace refined sugar, aligning with paleo principles.

Troubleshooting Guide

Common texture issues may arise if the batter is overmixed, resulting in a dense loaf. Always mix just until combined for the best outcome. If you find the banana bread too dry, consider adding more mashed bananas or checking your oven temperature for accuracy.

Flavor balance can be adjusted by modifying the saltiness of the caramel, ensuring the sweet and salty notes enhance your banana bread experience. If your caramel sauce is too thin, return it to heat to cook down further.

Temperature problems may occur if you take the loaf out of the oven too soon; always perform the toothpick test to confirm doneness. Equipment challenges could arise from the type of baking dish used; metal pans conduct heat more efficiently than glass, potentially affecting baking time.

Ingredient substitutions like using fruit puree instead of bananas can lead to texture issues; always stick to the core ingredients for best results. Timing concerns may emerge when scaling the recipe; keep an eye on larger loaves for adequate baking time.

Recipe Success Stories

Community feedback around the Easy Salted Caramel Banana Bread has been overwhelmingly positive, with many praising its delightful taste and moist texture. Readers have shared their variations, such as adding chocolate chips or experimenting with different nuts, creating a sense of camaraderie among bakers.

Variation successes have come from those who’ve utilized seasonal ingredients, like pumpkin in the fall, making the recipe versatile and appealing for every season. The adaptability of this recipe means it continues evolving, reflecting the tastes and preferences of those who try it.

Photography tips shared by readers emphasize capturing the caramel drizzle in a way that showcases its rich texture. Many recommend using natural light to highlight the bread’s golden-brown crust and inviting aroma, turning every loaf into an Instagram-worthy moment.

Not only does the Easy Salted Caramel Banana Bread satisfy taste buds, but it also becomes a canvas for expression, with users finding their unique ways of decorating and sharing their endeavors.

Frequently Asked Questions

Can I use frozen bananas?

Absolutely! Frozen bananas work great for banana bread. Just make sure to thaw them and drain any excess moisture before using.

How do I know when my banana bread is done?

A toothpick inserted into the center of the loaf should come out clean or with a few moist crumbs. If it comes out wet, it requires more baking time.

Can I make this recipe vegan?

Yes, you can replace the eggs with flaxseed meal mixed with water or use unsweetened applesauce for a perfect vegan alternative.

How long can I store banana bread?

In a sealed container at room temperature, banana bread can last about three days. For longer storage, refrigerate it for up to a week.

Is there a gluten-free option?

Yes! Substitute all-purpose flour with a gluten-free flour blend to enjoy this recipe gluten-free.

What’s the best way to reheat banana bread?

The microwave works best for individual slices, while a toaster oven can warm the entire loaf without drying it out.

Can I add nuts to the recipe?

Definitely! Adding walnuts or pecans can provide a nice crunch and may enhance the flavor significantly.

Do I need to use salted caramel?

While salted caramel is recommended for flavor contrast, you can use regular caramel if preferred. Just keep in mind the balance of sweetness.

Can I double the recipe?

Yes, you can double the recipe! Just make sure to adjust your baking time accordingly and use larger loaf pans if necessary.

What’s the difference between light and dark brown sugar?

Light brown sugar contains less molasses, resulting in a milder flavor. Dark brown sugar has a richer, deeper flavor due to more molasses. Both can be used in this recipe.

Additional Resources

If you enjoyed making Easy Salted Caramel Banana Bread, check out related recipes like pumpkin bread or zucchini bread for inspiration. Technique guides on mastering banana bread recipes provide even more options, ensuring you can vary flavors and textures.

For ingredient information, it’s essential to understand the benefits of using fresh produce versus dried or canned. Equipment recommendations can help enhance your baking experience—consider investing in quality bakeware for better outcomes.

Seasonal variations for celebrating each part of the year with unique banana bread flavors can broaden your horizon in baking, from adding cranberries around the holidays to infusing spices in the fall.

Join the Conversation

Engage with us on social media by sharing your Easy Salted Caramel Banana Bread creations! Use the hashtag #SaltedCaramelBananaBread to connect with others and showcase your baking achievements.

Photography tips can help capture your delicious results; consider focusing on close-ups of the caramel drizzle. Recipe reviews are always appreciated—let us know what you loved about the process and the final product.

Join the community by sharing your own variations or suggestions. We love seeing what creative twists fellow bakers can come up with, ensuring that the tradition of this recipe continues to grow!

The Recipe

Easy Salted Caramel Banana Bread

Serves: 10 slices

Prep Time: 15 mins

Cook Time: 50 mins

Total Time: 65 mins

Kitchen Equipment Needed

  • Mixing bowl
  • Whisk
  • Loaf pan
  • Rubber spatula
  • Measuring cups and spoons

Ingredients

  • 3 ripe bananas, mashed
  • 1/3 cup melted butter
  • 1/2 cup sugar
  • 1/4 cup brown sugar
  • 1 large egg
  • 1 teaspoon vanilla extract
  • 1 teaspoon baking soda
  • 1/4 teaspoon salt
  • 1 cup all-purpose flour
  • 1 cup homemade or store-bought salted caramel

Directions

  1. Preheat your oven to 350°F (175°C) and grease a loaf pan.
  2. In a large mixing bowl, mix the melted butter with the mashed bananas until well combined.
  3. Add the sugars and mix until incorporated. Stir in the egg and vanilla extract.
  4. Sprinkle baking soda and salt over the mixture, then mix until combined.
  5. Gently fold in the flour until just combined; be careful not to overmix.
  6. Pour half of the banana batter into the prepared loaf pan and drizzle half of the salted caramel over it.
  7. Pour the remaining batter on top, followed by another drizzle of salted caramel.
  8. Bake in preheated oven for 50-60 minutes, or until a toothpick comes out clean.
  9. Let the bread cool in the pan for about 15 minutes before transferring to a wire rack to cool completely.

Recipe Notes

  • Make sure your bananas are fully ripe for maximum flavor and sweetness.
  • This recipe works well with freeze-dried fruit or nut add-ins, creating your personalized flavor.
  • Store leftover banana bread tightly wrapped to keep it moist and fresh.

Indulge in Gooey Butterfinger Caramel Crunch Cookies Today!

Butterfinger Caramel Crunch Cookies – Delicious & Gooey!

⚖️
Difficulty
Easy

⏲️
Prep Time
15 mins

🕒
Cook Time
12 mins

⏱️
Total Time
27 mins

🍽️
Servings
24 cookies

If you are searching for a cookie recipe that combines the rich flavors of chocolate, peanut butter, and caramel, look no further than these Butterfinger Caramel Crunch Cookies. These cookies are an absolute delight, guaranteed to satisfy your sweet tooth! With each bite, you will experience the perfect mix of soft, chewy cookie, and crunchy Butterfinger bits, creating a texture and flavor explosion that is nothing short of heavenly.

The best part about these Butterfinger Caramel Crunch Cookies is their gooey centers filled with melted caramel, providing a warm and indulgent experience. Whether you’re baking these cookies for a holiday gathering, a birthday celebration, or simply as a delightful treat for yourself, they are sure to impress everyone who gets a taste. They’re perfect for sharing—or keeping all to yourself!

Quick Recipe Highlights

  • Flavor Profile: Sweet, nutty, and decadent with a chocolatey taste from the Butterfingers and the rich flavor of caramel.
  • Texture: Soft on the inside with a satisfying crunch from the Butterfinger pieces and a gooey caramel surprise.
  • Aroma: Warm, inviting aromas of baking cookies with hints of chocolate and caramel waft through your kitchen.
  • Visual Appeal: Golden brown cookies speckled with pieces of Butterfinger and a glossy caramel drizzle make for an enticing presentation.
  • Skill Level Needed: Perfect for beginners and expert bakers alike, there are simple steps to follow for stunning results.
  • Special Equipment: No fancy tools required—just basic baking utensils like mixing bowls and a baking sheet!

Recipe Overview

  • Difficulty Level: This is an easy recipe suitable for bakers of all skill levels. The process is straightforward, making it a fun baking project for all.
  • Category: These cookies fall under desserts and are ideal for parties, after-school snacks, or cozy evenings at home.
  • Cuisine: This recipe is an American classic, inspired by the beloved Butterfinger candy bar that many enjoy.
  • Cost: The cost for ingredients is relatively low, making this a budget-friendly treat that everyone can enjoy.
  • Season: These cookies are perfect for any season, but especially delightful during the winter holidays when comfort foods are in high demand.
  • Occasion: Ideal for gatherings, birthday parties, bake sales, and as a sweet surprise to cheer up your friends!

Why You’ll Love This Recipe

The combination of taste and texture is unmatched with these Butterfinger Caramel Crunch Cookies. The sweetness of the buttery cookie dough pairs beautifully with the saltiness of the peanut butter in the Butterfinger pieces, creating a perfect balance that will have your taste buds tingling. Each cookie offers a delightful contrast of soft chewiness and crunchy bits, with bursts of caramel enhancing every mouthful.

Convenience is another reason to love this recipe. Preparation is quick, with minimal clean-up required. Just mix, bake, and enjoy! The ease of making these cookies means you can whip them up unexpectedly for a friend dropping by or for a last-minute get-together, making them a go-to recipe for those sweet moments.

Nutritionally, while these cookies are certainly a treat, they also contain straightforward ingredients that are easy to recognize. While enjoying them in moderation, you can savor the flavors without worrying about overly processed additives, as they’re made with simple pantry staples!

When entertaining, these cookies bring a delicious touch to any gathering. They are perfect for sharing, and the gooey caramel in each one is sure to spark joy and conversation. Whether placed on a dessert platter or wrapped in a charming box for a gift, these cookies are bound to impress.

Lastly, the accessibility and cost-effectiveness of this recipe truly make it a winner. With ingredients that are commonly found or easily obtainable, you can indulge in baking without stretching your budget. Plus, with only a handful of ingredients, you’ll find that this cookie recipe can work within various dietary preferences as well!

Historical Background and Cultural Significance

The Butterfinger candy bar has a rich history that dates back to 1923. Originally introduced by the Curtiss Candy Company, it has grown to become a favorite with its unique combination of flavors and crispy peanut butter core. The recipe for these cookies pays homage to this classic treat, harnessing the sweet nostalgia of childhood snacks and desserts.

In many American households, cookies are a staple of comfort food. They often bring back memories of family gatherings, celebrations, and simple moments shared over a homemade treat. The integration of Butterfinger into cookies not only showcases a beloved candy bar but also highlights the creativity in American baking traditions.

As this recipe has evolved, various adaptations have appeared, showcasing regional differences in baking styles and ingredient availability. Many bakers experiment by adding new elements, like different chocolates, or swapping out the caramel for other fillings. This constant evolution keeps the recipe exciting and allows individuals to tailor it to their taste.

Regional variations can also lead to unique ingredients being used, reflecting local culinary preferences. For instance, some may incorporate spices or different types of nuts that are favored in their area, creating an entirely new flavor profile while maintaining the beloved Butterfinger essence.

Ingredient Deep Dive

Butterfinger Candy Bars: These are the stars of the recipe, providing a unique flavor and texture that make the cookies special. Made of crunchy peanut butter and coated with chocolate, Butterfingers deliver both nostalgia and sweetness. A major strength of Butterfingers is their shelf stability, allowing you to stock up and use them as needed. Look for store-bought options, or you can even make homemade versions if you’re feeling adventurous!

Caramel: Gooey, sweet, and rich, caramel takes these cookies to a whole new level. It is traditionally crafted from sugar, butter, and cream, resulting in a decadent ingredient loved across various desserts. For baking, choose soft caramels for melting and drizzling, ensuring they integrate smoothly into the cookies. It is vital to store caramel in cool, airtight containers to maintain its consistency and flavor.

All-Purpose Flour: The foundation of cookie recipes, all-purpose flour provides structure and stability. By balancing texture while allowing the other ingredients to shine, it is essential in cookie baking. When selecting flour, opt for brands that are unbleached for a more natural flavor, ensuring freshness by storing it in cool, dry places.

Brown Sugar: This adds moisture and a slight chewiness to the cookies, enhancing the caramel flavor profile. Brown sugar is a mixture of granulated sugar and molasses, yielding a richer taste compared to white sugar. For optimal results, consider using light brown sugar for subtle sweetness or dark brown sugar for deeper flavors, storing it in airtight containers to prevent hardening.

Butter: The richness of butter is crucial for creating cookies that are crisp on the edges yet chewy in the middle. While unsalted butter is typically recommended for recipes, using salted butter can add an additional layer of flavor complexity. Always ensure butter is at room temperature for even mixing, and keep it stored correctly in the refrigerator or freezer based on your short-term usage needs.

Common Mistakes to Avoid

  • Skipping the chilling step: If you rush the chilling process, the cookies may spread too much, resulting in flat cookies instead of the desired thicker texture.
  • Overmixing the dough: Mixing too much can lead to tough cookies. Keep the mixing to a minimum once you add the flour to retain a tender texture.
  • Not measuring ingredients correctly: Using too much flour or sugar can drastically alter the outcome. Always measure accurately, ideally by weight for precision.
  • Using cold eggs or butter: Starting with room temperature ingredients allows for proper creaming, which helps create a light texture. Always let your butter and eggs warm up before mixing.
  • Baking on a cold tray: Ensure that your baking tray is heated before placing the dough. A cold tray could lead to uneven baking.
  • Ignoring the oven temperature: An uncalibrated oven can lead to baking times that are too short or too long. Use an oven thermometer for accuracy.
  • Not letting cookies cool on the tray: Removing cookies too early can cause them to fall apart. Let them cool on the tray for a few minutes before transferring them to a wire rack.
  • Choosing stale ingredients: Always check for freshness, especially with baking soda and baking powder, as this can affect how well your cookies rise and taste.
  • Forgetting to line the baking sheet: Not using parchment paper can result in cookies sticking, losing their shape, and making clean-up more difficult.
  • Using too cold butter: Cold butter won’t cream properly, and will lead to dense cookies. Be sure to let butter soften to room temperature before mixing.

Essential Techniques

Creaming Butter and Sugar: This essential technique allows air to mix into the dough, which contributes to a lighter texture in the final product. To master this technique, using room temperature butter is critical. Mix until the mixture is light and fluffy, usually around 3 minutes. Watch for a pale color change and texture transformation for the best results.

Chilling the Dough: Chilling your cookie dough before baking is crucial as it prevents the cookies from spreading too much. It helps solidify the fat in the dough, resulting in thicker cookies. Aim for at least 30 minutes in the refrigerator for optimal texture. Pay attention to your dough; if it’s too soft, give it extra time in the fridge.

Pro Tips for Perfect Butterfinger Caramel Crunch Cookies

1. Use high-quality chocolate and Butterfinger bars for the richest flavor. Splurging a little on good ingredients can elevate your cookie game significantly.
2. Play with the baking time to achieve your desired cookie texture. For a softer center, take them out slightly earlier than suggested.
3. Experiment with additional add-ins like nuts, chips, or even a sprinkle of sea salt to enhance both flavor and aesthetics.
4. Consider using a cookie scoop for uniform size, which helps in achieving even baking and a consistent look.
5. Always preheat your oven to ensure evenly baked cookies from the first batch to the last.
6. If you live in a humid climate, be prepared to adjust the moisture content by adding a little more flour if necessary.
7. Allow cookies to cool completely before storing; this prevents them from becoming soggy.
8. Store cookies in an airtight container at room temperature to maintain their freshness for longer periods.

Variations and Adaptations

If you’re looking to switch things up, try incorporating seasonal flavors by adding pumpkin spice or cinnamon during the fall. These flavors blend beautifully with the sweetness of caramel and Butterfinger, creating a cozy vibe.

For those who enjoy different textures, consider swirling in peanut butter into the cookie dough for an extra creamy, nutty element. Alternatively, adding crushed pretzels or nuts can introduce a lovely saltiness that balances the sweetness.

Dietary modifications are possible too. With a few adjustments, you can create gluten-free or dairy-free versions of these cookies, using almond or coconut flour and dairy-free chocolate to make them more inclusive for varying diets.

Changing the presentation can also be fun! Try using cookie cutters to shape your cookies into different forms for special occasions or for kids’ parties. Decorate them with colorful icing or additional candy toppings to make them visually appealing.

Lastly, for a richer flavor, consider browning the butter before mixing it into the dough; this adds a nutty depth that pairs splendidly with the chocolate and caramel.

Serving and Presentation Guide

When it comes to serving, aim for a rustic yet elegant presentation. Place a stack of cookies on a decorative plate or cake stand to impress your guests. Drizzling some extra melted caramel or chocolate over the cookies before serving adds a touch of indulgence and makes for stunning visuals.

For garnishing, a sprinkle of flaky sea salt can elevate the flavors while enhancing the overall appearance. Pairing your cookies with a scoop of vanilla ice cream transforms them into an exquisite dessert that everyone will love.

Consider offering these cookies alongside a warm beverage such as coffee, hot chocolate, or a spiced chai. The warmth of these drinks complements the gooeyness of the cookies, creating a cozy and inviting experience.

Remember, temperature matters. Serve cookies slightly warm for the best gooey texture, and ensure they are at room temperature before storing to ensure they retain their chewy goodness.

Finally, cut each cookie into halves or quarters if serving as part of a larger dessert spread. This allows everyone to sample and indulge without overwhelming portions.

Wine and Beverage Pairing

When considering wine pairings, look for a dessert wine with sweetness to match these cookies, such as a late-harvest Riesling or a fruity Moscato. These will complement the caramel and chocolate flavors beautifully, enhancing the overall experience.

For those avoiding alcohol, consider pairing these cookies with a glass of milk or a rich nut milk, such as almond or cashew, which can bridge flavors and provide a comforting accompaniment.

If you’re a coffee lover, opt for an espresso to cut through the sweetness while accentuating the chocolate notes in the cookies. Alternatively, a mocha or a fresh brew of dark roast coffee can be fitting companions.

When serving hot beverages, ensure they are at optimal temperature and prepared in advance to create a seamless and luxurious tasting experience.

Storage and Shelf Life

To store your Butterfinger Caramel Crunch Cookies, place them in an airtight container at room temperature, where they will maintain their texture for up to a week. Ensure that they are fully cooled before storing to prevent moisture buildup.

For longer storage, you can freeze the cookies by placing them in freezer-safe bags or containers, separating layers with parchment paper. They can last up to three months in the freezer. When you’re ready to enjoy, thaw them at room temperature or briefly warm them in the oven for a freshly baked taste.

Keep an eye out for signs of spoilage, like an off-smell or noticeable texture changes, to ensure you’re enjoying them at their best.

For reheating, pop them in the microwave for about 10-15 seconds, or use the oven at a low temperature to maintain their freshly baked quality.

Make Ahead Strategies

If you plan to bake these cookies ahead of time, consider preparing the dough a day in advance. Chill the dough in the refrigerator to enhance the flavors and make it easier to work with when you’re ready to bake.

Pre-scooping the dough and freezing individual cookie portions lets you enjoy freshly baked cookies at a moment’s notice. Just place the frozen dough directly onto your baking sheet without thawing when baking; however, add a couple of minutes to the baking time.

Assembly can be a breeze by prepping extra ingredients, such as chopped Butterfinger and caramel, ahead of time, enabling a quick baking session when the craving hits.

When planning for quality, it’s vital to freeze and store correctly to preserve the cookies’ flavor and texture. Just be aware that the longer you store them, the more they may lose their softness.

Lastly, consider adding fresh elements, like flaked sea salt or chocolate drizzle, right before serving. This way, they will have a fresh appearance and enhanced flavor just when you need them.

Scaling Instructions

When scaling this Butterfinger Caramel Crunch Cookies recipe, halving or doubling the quantities is a straightforward process. To halve, simply divide all measurements in the ingredient list by two.

For doubling or tripling, be aware that mixing time and baking times may vary. A larger batch often requires a bit more time in the oven, so be sure to keep an eye on them while they bake.

Equipment adjustments may be necessary if you’re creating a large batch. Ensure your mixing bowls and baking sheets can accommodate the quantities without overflowing.

Always allow extra time for mixing and chilling if you increase the batch size, as larger amounts will take longer to chill adequately.

If you have leftover dough, consider storing it in the refrigerator for up to three days or freezing for up to three months, allowing you to bake in smaller portions whenever desired.

Nutritional Deep Dive

Each cookie has a unique nutritional profile, delivering a balance of macros with carbohydrates from sugar and flour, fats from butter and peanut butter, and proteins from eggs and Butterfinger. Understanding these elements aids in fathoming their role in a balanced diet.

While these cookies are delicious, they should ideally be consumed in moderation due to their higher sugar content. Understanding portion sizes can help integrate these treats into a balanced diet without exceeding daily sugar recommendations.

The ingredients in these cookies also provide some micronutrients. For example, brown sugar offers trace minerals, and the nutty flavors of peanuts deliver healthy fats and proteins.

If you’re focused on dietary considerations, be mindful of alternative ingredients to enhance nutritional value, such as replacing regular flour with whole wheat or almond flour for added fiber and nutrients.

Understanding serving sizes and how they contribute to total daily intake is essential for anyone looking to enjoy this cookie recipe within a balanced lifestyle.

Dietary Adaptations

There are several ways to adapt these cookies to fit particular dietary needs. For a gluten-free version, substitute the all-purpose flour with a suitable gluten-free flour blend, ensuring the texture remains consistent.

For those needing a dairy-free cookie, swaps such as coconut oil or dairy-free margarine can replace the butter, and use vegan chocolates to maintain the delicious flavor without the milk.

A low-carb or keto adaptation can be achieved by using almond flour combined with sugar replacements such as erythritol or monk fruit, allowing you to enjoy a guilt-free treat.

If you’re following a paleo diet, opt for almond flour as a base and natural sweeteners like honey or maple syrup instead of the refined sugars.

Exploring these adaptations not only accommodates various dietary preferences but also encourages creativity in the kitchen, allowing everyone to enjoy these flavorful Butterfinger Caramel Crunch Cookies.

Troubleshooting Guide

For texture issues, like cookies being too dry, check your flour measurement and make sure you’re using the right type. Likewise, if they’re too gooey, it may require a few more minutes in the oven for better structure.

Balancing flavors might also cause concern. If your cookies taste overly sweet, consider adding a sprinkle of salt during baking to counteract the sweetness.

When an oven runs too hot or too cold, it can affect baking times significantly. Investing in an oven thermometer will help ensure correct temperatures leading to evenly baked cookies.

If you encounter equipment challenges, verify that your mixing tools are in working order. A malfunctioning mixer can disrupt your dough consistency, leading to unexpected results.

When substituting ingredients, be aware that texture and flavor can vary significantly, so conduct small-scale tests prior to larger batches to find a balance that works.

Timing concerns can be remedied by keeping a close eye on dough while it chills and then adjusting your baking time according to the size of your cookie dough balls.

Recipe Success Stories

Community feedback has highlighted these Butterfinger Caramel Crunch Cookies as a go-to favorite among bakers of all skill levels. Delightful stories recount successful attempts to share them during family gatherings and parties, often resulting in requests for the recipe!

Many have experimented with variations, such as adding mini chocolate chips or swapping in different candy bars, allowing these cookies to shine even more. Their ability to adapt while remaining delicious has made them popular across various culinary circles.

Readers have suggested baking tips and tricks, like using different nut types or incorporating spices, showing the community’s creativity and engagement with the recipe. These adaptations have become part of the evolving story of the cookies, showcasing their versatility.

Photography tips are frequently shared among bakers as they capture the beauty of these cookies for social media. The blend of colors and textures makes for eye-catching food photography, often leading to additional recipe interests from onlookers.

Encouragement from the baking community adds to the recipe’s success, emphasizing the joy that comes from sharing creations and connecting through food. Whether enjoyed in solitude or among friends, these cookies leave a lasting impression.

Frequently Asked Questions

Can I freeze the dough? Yes! You can freeze the dough for up to three months. Just scoop the dough into balls and store in an airtight container or freezer bag. Bake them directly from frozen, adding a couple of extra minutes to the baking time.

What can I use instead of Butterfinger? You can substitute any candy of your choice, such as Reese’s Pieces, Snickers, or Milky Way, providing a unique taste to the cookies.

Can I make these cookies gluten-free? Absolutely! Use a gluten-free flour blend, which will work well in this recipe without altering the sweet flavor profile.

How do you store leftover cookies? Keep them in an airtight container at room temperature for up to a week. You can also refrigerate them to extend their shelf life.

Are these cookies safe to eat raw? While the ingredients are relatively safe, we recommend baking the dough for food safety, especially as it contains raw eggs.

Can I add nuts to the cookies? Yes! Chopped nuts, such as pecans or walnuts, give these cookies an additional crunch and deeper flavor.

What should I do if my cookies turn out dry? Overbaking can cause dryness. Ensure you check your cookies a couple of minutes before the suggested baking time.

Can I use a vegan substitute for butter? Yes! Options like coconut oil or vegan butter will work nicely, allowing you to maintain the flavors without dairy.

How long do these cookies keep? Properly stored in an airtight container, they can last up to a week. You can also freeze them for longer storage.

What drinks pair well with these cookies? They pair beautifully with milk, coffee, or even dessert wines like Moscato for a lovely culinary experience.

Additional Resources

Looking for more delicious recipes? Check out our collection of cookie recipes, including classics like chocolate chip and oatmeal raisin. We also provide technique guides on creating the perfect cookie texture and understanding essential baking terms.

For insight on ingredient information, we cover the benefits of various sugars and flours used in desserts. Our equipment recommendations section focuses on must-have tools for your kitchen to elevate your baking experience.

Seasonal variations are also available, offering dessert inspiration tailored to each time of year, ensuring you’re always able to create something delightful no matter the season.

Join the Conversation

We encourage our readers to share baking pictures, successes, and variations of their Butterfinger Caramel Crunch Cookies! Join us on social media to show off your culinary creations and engage with fellow bakers.

Recipe reviews and tips from the community are essential, and we love seeing how our readers adapt and play with recipes. Share your experience, and let us know what worked well for you!

Don’t forget to leave feedback on this recipe if you’ve tried it! Your insights help others navigate their baking journey and inspire new recipes. Celebrate your creative baking endeavors with us and inspire others to whip up these delicious cookies as well!

The Recipe

Butterfinger Caramel Crunch Cookies

Serves: 24 cookies

Prep Time: 15 mins

Cook Time: 12 mins

Total Time: 27 mins

Kitchen Equipment Needed

  • Mixing bowls
  • Baking sheets
  • Parchment paper (optional)
  • Cookie scoop
  • Whisk
  • Spatula

Ingredients

  • 1 cup unsalted butter, softened
  • 1 cup brown sugar, packed
  • 1/2 cup granulated sugar
  • 2 large eggs
  • 2 teaspoons vanilla extract
  • 3 cups all-purpose flour
  • 1 teaspoon baking soda
  • 1/2 teaspoon salt
  • 2 cups crushed Butterfinger candy bars
  • 1 cup caramel bits, melted

Directions

  1. Preheat your oven to 350°F (175°C) and line baking sheets with parchment paper.
  2. In a large mixing bowl, cream together the softened butter, brown sugar, and granulated sugar until light and fluffy.
  3. Add eggs one at a time, mixing well after each addition before stirring in the vanilla extract.
  4. In another bowl, whisk together the flour, baking soda, and salt.
  5. Gradually add the dry mixture to the butter mixture, blending well until fully combined.
  6. Stir in the crushed Butterfinger pieces, distributing them evenly throughout the dough.
  7. Using a cookie scoop, place balls of dough onto the prepared baking sheets, leaving space between each cookie.
  8. Bake in the preheated oven for 10-12 minutes, or until the edges are golden brown. Do not overbake!
  9. Once baked, allow cookies to cool on the tray for a few minutes before transferring them to a wire rack to cool completely.
  10. Drizzle melted caramel over the cookies for an attractive finish before serving.

Recipe Notes

  • For a richer flavor, consider browning the butter before mixing it in.
  • You can substitute semisweet chocolate chips for a different chocolate flavor.
  • Store baked cookies in an airtight container to keep them fresh for up to a week.
  • Feel free to play around with different types of candy in place of Butterfinger, depending on your flavor preferences.