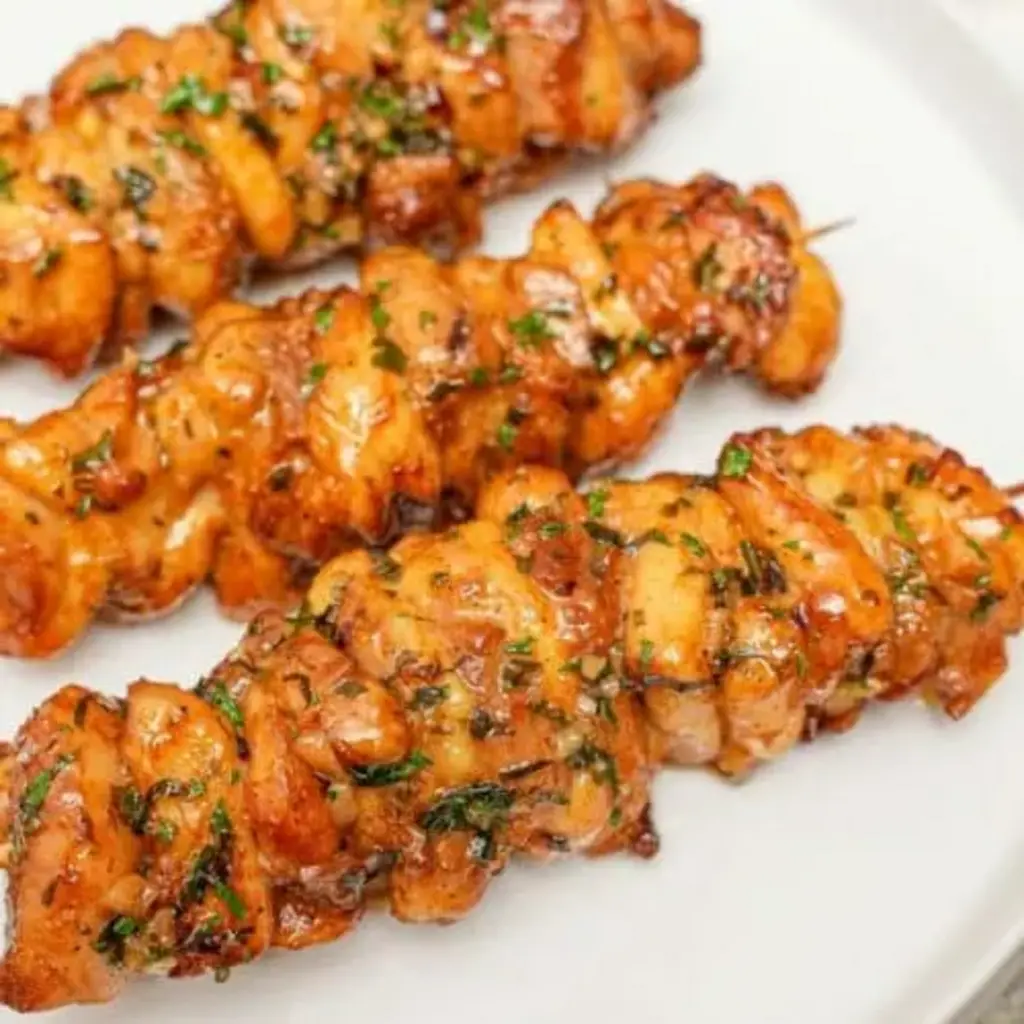
Panda Express Orange Chicken Recipe

The Ultimate Panda Express Orange Chicken Recipe: Crispy, Tangy & Better Than Takeout

Prep Time Cook Time Total Time Servings Difficulty
20 minutes 25 minutes 45 minutes 4-6 people Medium

Introduction: Why This Recipe Beats Takeout

Craving that iconic, sweet, tangy, and crispy Panda Express Orange Chicken but want to skip the drive-thru and control exactly what goes into your meal? You’ve landed in the right place. This meticulously tested Panda Express Orange Chicken recipe delivers that perfect balance of crispy fried chicken coated in a glossy, addictive orange sauce that will have your family thinking you’ve mastered Chinese-American cuisine. The secret isn’t a mystery ingredient—it’s a combination of technique and balancing sweet, sour, salty, and umami flavors in the homemade sauce.

For years, The Kitchen Team has been deconstructing popular restaurant dishes to make them accessible for home cooks. This recipe is the result of that mission. We’re not just replicating a flavor; we’re elevating it. By making it at home, you avoid unnecessary additives, adjust the spice level to your liking, and achieve a crispiness that often gets soggy in a takeout container. Plus, the satisfaction of creating this beloved dish from scratch is unbeatable. Let’s transform your kitchen into your favorite Panda Express, one crispy bite at a time.

Why This Is The Best Homemade Orange Chicken Recipe

Not all copycat recipes are created equal. Many fall short on the sauce’s depth or the chicken’s crunch. This recipe stands out for several key reasons that guarantee restaurant-quality results every single time.

First, we use a double-coating method with cornstarch and flour. Cornstarch is the ultimate secret for ultra-crispy, light fried chicken that stays crunchy even after being tossed in sauce. The flour adds structure and helps the coating adhere. Second, our sauce is built from pantry staples but achieves a complex flavor profile. We use orange juice concentrate for an intense citrus punch without adding too much liquid, which would thin the sauce. The combination of vinegar, soy sauce, and a hint of ginger and garlic creates that signature tangy-savory base.

Finally, we emphasize technique. Frying at the correct temperature (350°F) is non-negotiable for preventing greasy chicken. We also toss the crispy chicken in the sauce just before serving, not during cooking, which preserves that coveted crunch. This attention to detail is what makes this the definitive Panda Express Orange Chicken recipe for your home kitchen.

💡 The Kitchen Team’s Pro Tip: For the absolute crispiest chicken, let the coated chicken pieces sit on a wire rack for 10 minutes before frying. This allows the coating to hydrate and adhere better, preventing it from sliding off in the oil.

Ingredients & Substitutions

Here’s everything you’ll need to create this iconic dish. We’ve also included a comprehensive substitution guide to ensure you can make this recipe no matter what’s in your pantry.

Ingredient Quantity Purpose & Best Substitutes
Boneless Chicken Breasts or Thighs 2 lbs Breasts are classic for lean bites; thighs offer more flavor and juiciness. Can use tenderloins for even quicker cooking.
Egg 1 large Binder for the coating. For an egg-free version, use 3 Tbsp milk or buttermilk.
Neutral Oil (Sunflower, Canola, Vegetable) 1 Tbsp (for marinade) + 6 cups (for frying) Adds moisture to the marinade. For frying, use any high-smoke point oil. Peanut oil adds great flavor.
Cornstarch 3/4 cup (for coating) + 1 Tbsp (for sauce) The KEY to crispiness. Can substitute with potato starch for a similar result.
All-Purpose Flour 1/3 cup (heaping) Works with cornstarch for the perfect coating. For gluten-free, use a 1:1 GF flour blend.
White Distilled Vinegar 1/2 cup Provides the essential tang. Rice vinegar or apple cider vinegar can be used.
Cane Sugar 1/2 cup Balances the vinegar’s acidity. White granulated sugar works perfectly.
Soy Sauce (or Coconut Aminos) 1/4 cup Adds saltiness and umami. Use low-sodium soy sauce to control salt, or tamari for gluten-free.
Orange Juice Concentrate 1 Tbsp Concentrated orange flavor. Substitute with 3 Tbsp fresh orange juice + 1/2 tsp orange zest.
Fresh Garlic & Ginger 2 cloves, 1/2 tsp zest Fresh is best! In a pinch, use 1/2 tsp each of garlic powder and ground ginger.
Sesame Oil & Rice Wine 1 tsp each Finishing flavors. For rice wine, substitute dry sherry or apple cider vinegar.

Step-by-Step Instructions for Perfect Orange Chicken

Follow these detailed steps for foolproof, crispy, and saucy orange chicken. We recommend reading through all instructions once before you begin.

Step 1: Prepare the Chicken

Pat the chicken breasts or thighs completely dry with paper towels. This is crucial—any surface moisture will steam the coating instead of letting it fry crisp. Cut into uniform 1-inch bite-sized pieces. Uniformity ensures even cooking.

Step 2: Create the Coating Station

In a medium bowl, whisk together 1 egg, 1 Tbsp of neutral oil, 1 1/2 tsp salt, and 1 tsp black pepper until smooth. In a separate shallow bowl or plate, combine the 3/4 cup cornstarch and 1/3 cup (heaping) all-purpose flour. Mix with a fork to distribute evenly.

Step 3: Coat the Chicken

Working in batches of 6-8 pieces, add chicken to the egg mixture, tossing to coat thoroughly. Let excess drip off, then transfer to the cornstarch-flour mixture. Dredge aggressively, pressing the coating onto all sides of the chicken to form a shaggy, dry layer. Place coated pieces on a clean plate or wire rack.

💡 The Kitchen Team’s Pro Tip: Use one hand for the wet mixture and the other for the dry mixture. This keeps your fingers from becoming a clumpy, coated mess and makes the process much faster.

Step 4: Fry to Golden Perfection

In a large, heavy-bottomed pot, Dutch oven, or wok, heat about 2 inches of neutral oil to 350°F. Use a deep-fry or candy thermometer for accuracy. If you don’t have one, test the oil by dropping in a small piece of coating—it should sizzle vigorously and float to the top within 2 seconds.

Carefully add chicken pieces in a single layer, not crowding the pot. Fry in batches for 3-4 minutes, turning occasionally, until deeply golden brown and the internal temperature reaches 165°F. Transfer to a wire rack set over a baking sheet (this keeps them crispier than paper towels). Repeat with remaining chicken.

Step 5: Craft the Signature Orange Sauce

While the chicken fries (or beforehand), make the sauce. In a medium saucepan, combine 1/2 cup vinegar, 1/2 cup sugar, 1/4 cup water, 1/4 cup soy sauce, crushed red pepper flakes, minced garlic, and grated ginger. Whisk over medium heat until the sugar dissolves and the mixture comes to a simmer.

In a small separate bowl, create a slurry by mixing 1 Tbsp cornstarch with 2 Tbsp cold water until completely smooth. While whisking the simmering sauce, slowly stream in the cornstarch slurry. Continue to whisk for 1-2 minutes as the sauce thickens to a glossy, syrupy consistency. Remove from heat and stir in the orange juice concentrate, 1 tsp sesame oil, and 1 tsp rice wine.

Step 6: The Grand Finale – Toss and Serve

In a large bowl, combine the crispy fried chicken and the prepared orange sauce. Gently toss until every piece is evenly and generously coated. Serve immediately while hot and crispy.

Serving Suggestions: Build Your Takeout Feast

This Panda Express Orange Chicken is the star, but the right sides turn it into a feast. Here are our favorite pairings:

  • Classic Fried Rice: A must-have. The mild flavors of egg and vegetable fried rice perfectly balance the bold orange chicken.
  • Steamed Jasmine or White Rice: Simple and effective for soaking up every last drop of that incredible sauce.
  • Lo Mein Noodles: Toss cooked lo mein or chow mein noodles with a little of the orange sauce for a citrusy twist.
  • Quick Veggie Side: Steamed broccoli, sautéed snap peas, or a simple Asian cucumber salad add freshness and color to your plate.
  • Garnish: A sprinkle of sesame seeds and thinly sliced green onions adds the perfect finishing touch.

Storage & Reheating Instructions

Storage: Store leftover orange chicken in an airtight container in the refrigerator for up to 3 days. Store any extra sauce separately if possible to help preserve the chicken’s crispness.

Reheating for Best Results: The oven or air fryer is your best friend for reviving crispiness. Avoid the microwave, which will make the coating soggy.

  • Oven/Air Fryer: Preheat to 375°F. Spread chicken in a single layer on a baking sheet (or air fryer basket). Reheat for 8-12 minutes (5-8 in air fryer), until hot and crispy. If the chicken seems dry, toss it with a splash of the reserved sauce or a tiny bit of water before heating.
  • Stovetop: For a small batch, reheat in a non-stick skillet over medium heat with a teaspoon of oil, turning frequently until hot.

Delicious Variations to Try

Once you’ve mastered the classic, get creative with these tasty twists on the Panda Express Orange Chicken recipe:

  • Spicy Orange Chicken: Double the crushed red pepper flakes or add 1-2 teaspoons of Sriracha or chili-garlic sauce to the simmering sauce.
  • Baked “Healthier” Orange Chicken: For a lighter version, place coated chicken on a parchment-lined baking sheet. Spray generously with cooking spray and bake at 425°F for 18-22 minutes, flipping halfway, until cooked through and crispy. Toss with sauce.
  • Orange Cauliflower (Vegan): Replace chicken with bite-sized cauliflower florets. Follow the same coating and frying (or baking) process for a fantastic plant-based alternative.
  • Pineapple Orange Chicken: Add 1/2 cup of small pineapple chunks to the sauce during the last minute of simmering for a sweet tropical flavor.

Frequently Asked Questions (FAQ)

Can I make Panda Express Orange Chicken ahead of time?

You can prep components ahead. Coat the chicken and keep it refrigerated on a rack for up to 4 hours before frying. The sauce can be made 2-3 days in advance and stored in the fridge. Reheat the sauce gently before tossing with freshly fried chicken for the best texture.

Why is my orange chicken sauce not thickening?

Ensure your cornstarch slurry is smooth with no lumps. Also, the sauce must be at a simmer when you add the slurry, and you need to whisk constantly for 1-2 full minutes to activate the starch’s thickening power. If it’s still thin, mix another 1 tsp cornstarch with 1 Tbsp water and repeat the process.

Can I use bottled orange juice instead of concentrate?

Yes, but for the best flavor, use 3 tablespoons of fresh orange juice and add 1/2 teaspoon of finely grated orange zest. Bottled juice often lacks the bright, concentrated citrus punch the recipe needs.

Is there a way to make this recipe less sweet?

Absolutely. Reduce the sugar to 1/3 cup. You can also increase the vinegar by 1 tablespoon to balance the reduced sweetness with more tang.

Can I use an air fryer for the chicken?

Yes! For air fryer orange chicken, spray the coated chicken generously with oil. Air fry at 400°F for 10-12 minutes, shaking the basket halfway through, until crispy and cooked to 165°F. The texture will be slightly different from deep-frying but still delicious.

What’s the difference between orange chicken and General Tso’s chicken?

While both are crispy fried chicken in a sauce, General Tso’s sauce is typically spicier, less sweet, and more savory, featuring soy, garlic, ginger, and dried chiles. Orange Chicken is defined by its distinct sweet-tangy citrus flavor.

My chicken coating fell off in the oil. What went wrong?

This usually happens if the oil temperature is too low, causing the coating to absorb oil and slip off before it sets. Always ensure your oil is at a steady 350°F before adding chicken. Also, make sure to shake off excess egg mixture before dredging in the dry coating.

Can I freeze homemade orange chicken?

We don’t recommend freezing it after it’s been sauced, as the texture will suffer. You can freeze the fried (unsauced) chicken pieces. Spread them on a baking sheet to freeze solid, then transfer to a freezer bag for up to 2 months. Reheat from frozen in a 375°F oven until hot and crispy, then toss with fresh sauce.

We hope you love this ultimate homemade take on a fast-food favorite! If you make this Panda Express Orange Chicken recipe, please share your creation with us. Tag @cookingwithemy on social media!

Love This Recipe? Save It For Later!

Pin the image below to your Dinner Ideas or Copycat Recipes board on Pinterest to always have this recipe handy.

Follow us on Pinterest @cookingwithemy for more delicious inspiration!

[PINTEREST-READY IMAGE: A high-quality photo of glossy, crispy orange chicken in a bowl, with steamed rice and broccoli on the side, garnished with green onions and sesame seeds.]

clock clock iconcutlery cutlery iconflag flag iconfolder folder iconinstagram instagram iconpinterest pinterest iconfacebook facebook iconprint print iconsquares squares iconheart heart iconheart solid heart solid icon

Panda Express Orange Chicken


  • Author:
    Chef Emy

Description

Crispy homemade Orange Chicken, just like Panda Express! Pieces of boneless chicken breast are deep-fried and then cooked in a sweet, tangy orange sauce made from scratch. Panda Express Orange Chicken is not too spicy and so easy to make!


Ingredients


Scale
  • 2 lbs boneless chicken breasts ((or chicken thighs))
  • 1 egg
  • 1 Tbsp sunflower oil ((or any neutral flavored oil) )
  • 1 1/2 tsp salt
  • 1 tsp pepper
  • 3/4 cup cornstarch
  • 1/3 cup all-purpose flour ((heaping))
  • 1/2 cup white distilled vinegar
  • 1/2 cup cane sugar
  • 1/4 cup water
  • 1/4 cup soy sauce ((or coconut liquid aminos) )
  • 1/2 tsp crushed red pepper flakes
  • 2 cloves garlic ((crushed))
  • 1/2 tsp zested ginger root ((peeled))
  • 1 Tbsp orange juice concentrate ((or 3 Tbsp orange juice))
  • 1 Tbsp cornstarch
  • 1 tsp sesame oil
  • 1 tsp rice wine ((or apple cider vinegar))

Instructions

  1. Cut the chicken into bite-sized pieces (about 1 inch thick). Then, preheat 2 inches of oil in a large pot or deep skillet.
  2. Whisk together the egg, oil, salt, and pepper in a small bowl.
  3. In a separate bowl, mix together the flour and cornstarch.
  4. Dredge the chicken in the beaten egg mixture and then into the flour mixture. Shake off any excess flour.
  5. Deep fry the chicken in batches in 350°F oil until crispy, and the internal temperature reaches 165°F. Transfer to a large plate lined with paper towels.
  6. To make the orange chicken sauce, Combine all the sauce ingredients in a saucepan or large pot. Bring to a boil and simmer to desired thickness (1-2 minutes).
  7. Add the fried chicken pieces to the sauce and toss to coat. Transfer to a serving dish and enjoy!


Sizzling Chinese Pepper Steak with Onions – CookTune


Sizzling Chinese Pepper Steak with Onions: The 20-Minute Takeout Fakeout

Prep Time: 15 minutes
Cook Time: 10 minutes
Total Time: 25 minutes
Servings: 4
Difficulty: Easy

Why This Recipe is a Weeknight Game-Changer

Craving the bold, savory flavors of your favorite Chinese restaurant but short on time? Look no further. This Sizzling Chinese Pepper Steak with Onions is your ultimate solution for a quick, satisfying, and incredibly flavorful dinner that comes together in just about 20 minutes. Forget waiting for delivery or dealing with soggy takeout containers. This recipe delivers tender, juicy strips of beef, caramelized sweet onions, and a glossy, umami-rich sauce that clings perfectly to every bite.

At Cooking With Emy, we believe that great food doesn’t have to be complicated. This dish is a cornerstone of that philosophy. It’s a stir-fry that masters the essential techniques of high-heat cooking, simple marination, and sauce balancing, all while using ingredients you can find at any mainstream grocery store. The result? A restaurant-quality meal that will have your family asking for seconds and doubting you didn’t just have it delivered. The sizzle as the steak hits the hot pan, the aromatic punch of ginger and garlic, and the final glossy sheen of the sauce are all part of the thrilling, simple cooking experience we love.

What Makes This The Best Chinese Pepper Steak?

You might find many pepper steak recipes online, but this one from The Kitchen Team is meticulously crafted for maximum flavor with minimal fuss. The secret lies in a few key details. First, we use a dual-purpose marinade that not only tenderizes the beef but also forms the flavor base for the entire dish. Second, we cook the onions separately to achieve perfect caramelization without steaming them alongside the beef. Finally, our sauce is the perfect balance of salty, sweet, and tangy, using a combination of soy, hoisin, and rice vinegar that thickens into a luxurious glaze.

This recipe is forgiving for beginners yet impressive enough for seasoned cooks. It teaches fundamental stir-fry principles: mise en place (having everything prepped and ready), managing pan heat, and building layers of flavor. Whether you’re cooking for a busy Tuesday or a casual Friday night feast, this pepper steak is reliably delicious.

💡 The Kitchen Team’s Pro Tip: The key to authentic stir-fry texture is velveting the beef. For an even more tender result, add 1 tablespoon of baking soda to the beef strips, toss, and let sit for 15 minutes before rinsing thoroughly and patting dry. Then proceed with the marinade. This restaurant trick breaks down proteins for incredibly silky meat.

Gathering Your Ingredients

Quality ingredients are the foundation of any great dish. Here’s what you’ll need to create this sizzling masterpiece. We’ve broken it down into the marinade, sauce, and main components for clarity.

Ingredient Quantity Notes
Beef (Sirloin or Ribeye) 1 lb Slice against the grain into ¼-inch strips for tenderness.
Vegetable Oil 3 tbsp total Divided for onions, beef, and sauce. Use a high-smoke point oil.
Large Yellow Onion 1 Sliced into ½-inch strips for even cooking.
Garlic, minced 2 cloves Fresh is best for the most aromatic flavor.
Fresh Ginger, grated 1 tbsp The zingy backbone of the marinade.
Soy Sauce (low-sodium) 3 tbsp total Divided between marinade and sauce. Low-sodium helps control salt level.
Oyster Sauce 1 tbsp (optional) Adds deep, savory umami. Substitute with more soy sauce if needed.
Hoisin Sauce 2 tbsp Provides a sweet, complex base for the sauce.
Rice Vinegar 2 tbsp Adds necessary brightness and tang.
Cornstarch 1 tbsp The essential thickener for a glossy, restaurant-style sauce.
Sesame Oil 1 tsp Use toasted sesame oil for finishing aroma. Do not use for high-heat cooking.
Salt & Black Pepper To taste Freshly cracked black pepper is ideal.

Step-by-Step Cooking Instructions

Follow these steps carefully for a flawless stir-fry. The process is fast, so have all your ingredients measured, chopped, and within arm’s reach before you turn on the stove.

Step 1: Marinate the Beef

In a medium bowl, whisk together 1 tablespoon of soy sauce, 1 tablespoon of oyster sauce (if using), the grated ginger, minced garlic, and 1 teaspoon of sesame oil. Add the beef strips and toss thoroughly until every piece is coated. Let it marinate at room temperature for 15 minutes. This brief marination infuses flavor without making the beef mushy.

Step 2: Caramelize the Onions

While the beef marinates, heat 1 tablespoon of vegetable oil in a large skillet or wok over medium heat. Add the sliced onions and a pinch of salt. Cook, stirring occasionally, for 6-8 minutes until they are soft, golden brown, and sweet. Do not rush this step—the caramelized onions are a key flavor component. Once done, transfer them to a plate and set aside.

Step 3: Sear the Beef to Perfection

Increase the heat to high and add 1 more tablespoon of oil to the now-empty pan. Let it get very hot, almost smoking. Add the marinated beef strips in a single layer, working in batches if necessary to avoid overcrowding. Let them sear undisturbed for 1 minute to develop a crust, then stir-fry for another 1-2 minutes until just browned but still slightly pink inside. Overcooking will make the beef tough. Remove the beef to the plate with the onions.

💡 The Kitchen Team’s Pro Tip: Never add cold meat to a hot pan in a big clump. Pat your beef strips very dry with paper towels after marinating. Excess moisture will steam the beef instead of searing it. For the best crust, ensure the beef is as dry as possible before it hits the oil.

Step 4: Create the Signature Sauce

In a small bowl or measuring cup, whisk together the remaining 2 tablespoons of soy sauce, 2 tablespoons of hoisin sauce, 2 tablespoons of rice vinegar, and 1 tablespoon of cornstarch until smooth. This is your slurry.

Step 5: Bring It All Together

Reduce the pan heat to medium. Give the sauce slurry another quick whisk (cornstarch settles) and pour it into the pan. It will start to thicken immediately. Let it bubble for 30 seconds to cook out the raw cornstarch taste. Add the cooked beef and onions back into the pan. Toss everything vigorously for 1-2 minutes until the sauce thickens into a glossy glaze that completely coats the beef and onions. Taste and adjust seasoning with a final crack of black pepper.

Serving Suggestions & Pairings

This sizzling pepper steak is a versatile centerpiece. For a classic presentation, serve it over a generous bed of steamed jasmine or white rice to soak up every drop of the delicious sauce. For a lighter option, try it with cauliflower rice. It also pairs wonderfully with lo mein noodles or even tucked inside soft lettuce cups for a low-carb meal.

To round out your feast, consider simple side dishes that won’t compete with the main event. A quick steamed broccoli or sautéed bok choy with garlic makes a perfect vegetable companion. For a starter, a light egg drop soup or hot and sour soup sets the tone beautifully.

Storage & Reheating Instructions

Storage: Allow any leftovers to cool completely before transferring them to an airtight container. They will keep in the refrigerator for up to 3 days.

Reheating: The best way to reheat stir-fry is on the stovetop. Add a small splash of water or broth to a skillet over medium heat, add the pepper steak, and cover. Heat gently, stirring occasionally, until warmed through. This method helps rehydrate the sauce without overcooking the beef. Microwaving is possible but may slightly toughen the beef.

Freezing: We do not recommend freezing this dish, as the texture of the onions and beef can become mushy upon thawing.

Creative Recipe Variations

One of the joys of this recipe is its adaptability. Here are a few ways to make it your own:

  • Add More Veggies: Transform it into a fuller meal by adding sliced bell peppers (any color), mushrooms, or snap peas. Add harder veggies like peppers with the onions, and quicker-cooking veggies like snap peas in the last minute with the beef.
  • Spice It Up: For a kick, add 1-2 teaspoons of chili-garlic sauce (sambal oelek) or a few dried red chilies to the oil before adding the beef.
  • Protein Swap: This sauce is fantastic with chicken breast or thigh strips, thinly sliced pork, or even extra-firm tofu. Adjust cooking times accordingly.
  • Gluten-Free Version: Use tamari or a certified gluten-free soy sauce, and ensure your hoisin and oyster sauces are gluten-free brands.

Your Pepper Steak Questions Answered (FAQ)

What is the best cut of beef for Chinese pepper steak?

For the perfect balance of flavor, tenderness, and value, sirloin or flank steak are our top choices. Ribeye is more luxurious and flavorful but also more expensive. Always remember to slice the beef thinly against the grain to ensure tenderness.

Can I make this dish ahead of time?

You can prep all components ahead: slice the beef and onions, make the marinade and sauce slurry, and store them separately in the fridge for up to 24 hours. The actual stir-frying should be done just before serving for the best texture.

My sauce didn’t thicken. What went wrong?

The most common issue is that the cornstarch wasn’t fully dissolved in the cold liquids before adding to the pan, or the heat wasn’t high enough to activate the thickening. Always whisk your cornstarch slurry vigorously until completely smooth. If your sauce is still thin, mix another teaspoon of cornstarch with a tablespoon of cold water and stir it in, letting it simmer for a minute.

Is oyster sauce necessary?

While it adds a deep, savory, umami-rich flavor that is characteristic of many Chinese dishes, it is optional. If you omit it, you may want to add an extra half tablespoon of soy sauce and a pinch of sugar to the sauce to balance the flavors.

Can I use frozen beef strips?

We highly recommend using fresh beef for the best sear and texture. Frozen beef releases too much water when cooking, which will steam the meat and prevent proper browning. If you must use frozen, thaw it completely in the refrigerator and pat it extremely dry before marinating.

What’s the difference between this and Mongolian beef?

While both are beef stir-fries, Mongolian beef typically features a sweeter, stickier sauce made with brown sugar and is often finished with green onions. Our Chinese Pepper Steak has a more savory, well-rounded profile with a focus on the caramelized onions and a balanced sauce from hoisin and vinegar.

How can I make this recipe less salty?

Use low-sodium soy sauce as recommended. You can also reduce the soy sauce in the sauce by 1 tablespoon and replace it with 1 tablespoon of water or beef broth. Taste and adjust at the end.

What type of pan is best?

A large, heavy-bottomed skillet or a traditional carbon steel wok is ideal. The key is a pan that can hold and distribute high heat evenly to get a good sear on the beef without burning the sauce.

If you loved this Sizzling Chinese Pepper Steak with Onions recipe, please share it with friends and family! Find more amazing recipes and cooking tips on our Pinterest @cookingwithemy.

Sizzling Chinese Pepper Steak with Onions in a black skillet, served over white rice
Pin this image to save our Sizzling Chinese Pepper Steak recipe for later!


clock clock iconcutlery cutlery iconflag flag iconfolder folder iconinstagram instagram iconpinterest pinterest iconfacebook facebook iconprint print iconsquares squares iconheart heart iconheart solid heart solid icon

Sizzling Chinese Pepper Steak with Onions


  • Author:
    Chef Emy

Description

This Chinese Pepper Steak with Onions is a quick and flavorful dinner featuring tender beef strips, crisp onions, and a savory sauce thats perfect for a weeknight meal. Cooked to perfection in a sizzling stir-fry, this dish brings the bold flavors of Chinese cuisine straight to your table. Serve it over steamed rice or noodles for a satisfying, restaurant-quality meal at home.


Ingredients


Scale
  • 1 lb (450g) beef strips (sirloin or ribeye)
  • 2 tbsp (30g) vegetable oil
  • 2 cloves garlic, minced
  • 1 tbsp (15g) grated fresh ginger
  • 1 tbsp (15g) soy sauce
  • 1 tbsp (15g) oyster sauce (optional)
  • 1 tsp sesame oil
  • Salt and pepper to taste
  • 2 tbsp (30g) soy sauce
  • 2 tbsp (30g) oyster sauce (optional)
  • 2 tbsp (30g) hoisin sauce
  • 2 tbsp (30g) rice vinegar
  • 1 tbsp (15g) cornstarch
  • 2 tbsp (30g) vegetable oil
  • 1 large onion, sliced
  • 1 tbsp (15g) vegetable oil
  • Salt and pepper to taste

Instructions

  1. Prepare the Steak: In a bowl, whisk together soy sauce, oyster sauce, ginger, garlic, and sesame oil.
  2. Toss the beef strips in the marinade and let sit for 10-15 minutes.
  3. Cook the Onions: Heat 1 tbsp vegetable oil in a skillet over medium heat.
  4. Add sliced onions and sauté until soft and slightly caramelized.
  5. Season with salt and pepper, then remove from the pan and set aside.
  6. Sear the Beef: In the same pan, heat 2 tbsp vegetable oil over high heat.
  7. Add the marinated beef strips and stir-fry for 2-3 minutes until browned.
  8. Make the Sauce: In a small bowl, whisk together soy sauce, hoisin sauce, rice vinegar, and cornstarch.
  9. Pour the sauce over the beef and let simmer until it thickens.
  10. Combine & Serve: Add the sautéed onions back into the pan, stirring to combine.
  11. Serve hot over steamed rice or noodles.


Sticky Chicken Rice Bowls Recipe | Cheff Recipes

Prep Time: 15 minutes
Cook Time: 20 minutes
Total Time: 35 minutes
Servings: 4 people
Difficulty: Easy

The Ultimate Guide to Sticky Chicken Rice Bowls: Your New Weeknight Hero

If you’re searching for a meal that perfectly balances sweet, savory, spicy, and satisfying, your quest ends here. These Sticky Chicken Rice Bowls are more than just a recipe; they’re a complete flavor experience that comes together in about 30 minutes. Imagine tender, juicy chicken pieces coated in a glossy, finger-licking-good glaze, piled high over a bed of fluffy rice with crisp-tender broccoli, all finished with a creamy, spicy mayo drizzle and a sprinkle of sesame seeds. This dish is the epitome of what a great weeknight dinner should be: fast, flavorful, and foolproof. At Cooking With Emy, we believe in recipes that deliver maximum taste with minimal fuss, and this sticky chicken rice bowls recipe is a shining example. Let’s transform your dinner routine.

Why This Sticky Chicken Rice Bowls Recipe is the Best

You might be wondering what sets this particular sticky chicken rice bowls recipe apart from the countless others online. The answer lies in the harmony of its components and the clever techniques we use. First, the chicken is seasoned with a robust blend of spices—smoked paprika, chili powder, oregano—before being air-fried to achieve a beautifully caramelized exterior without deep frying. This step locks in the juices and creates the perfect texture to cling to our signature sauce.

The sauce itself is a masterclass in balance. We use equal parts soy sauce and honey, creating that foundational sweet-and-salty profile. Rice vinegar adds a necessary bright acidity, while sriracha and garlic provide a gentle heat and aromatic depth. The secret weapon? A touch of sesame oil and ground ginger, which elevate the sauce from simply “good” to authentically complex and restaurant-quality.

Finally, the assembly is intentional. By keeping the components separate until serving, we ensure the rice stays fluffy, the broccoli retains a slight crunch, and the chicken’s sticky coating remains perfectly intact. The spicy mayo drizzle isn’t an afterthought; it’s a crucial counterpoint that adds a cool, creamy richness to cut through the intensity of the glaze. This recipe has been meticulously tested to ensure every bite is a perfect bite.

Ingredients for Sticky Chicken Rice Bowls

Gathering high-quality ingredients is the first step to culinary success. Here’s everything you’ll need to create these irresistible bowls. We’ve broken it down into components for clarity.

ComponentIngredientQuantity & Notes
Base & VegUncooked Long-Grain White Rice (Jasmine or Basmati)2 cups
Broccoli2 small heads, chopped into florets
Olive Oil (for broccoli)1 tbsp (for steaming/sautéing)
Chicken & Spice RubBoneless, Skinless Chicken Breasts3 large (about 1.5 – 2 lbs total)
Olive Oil2 tbsp
Kosher Salt1 tsp
Black Pepper1/2 tsp, freshly ground
Chili Powder1 tsp
Smoked Paprika1 tsp
Onion Powder1 tsp
Dried Oregano1 tsp
Sticky SauceLow-Sodium Soy Sauce1/2 cup
Honey1/2 cup
Unseasoned Rice Vinegar1/4 cup
Garlic3 cloves, finely minced
Sriracha2 tbsp (adjust to taste)
Toasted Sesame Oil2 tsp
Ground Ginger1 tsp
Arrowroot Powder or Cornstarch2 tsp
Cold Water (for slurry)2 tbsp
Spicy Mayo & ToppingsMayonnaise (full-fat recommended)1/2 cup
Sriracha1 tbsp
Water (to thin)2-3 tbsp
GarnishToasted Sesame SeedsFor serving
OptionalSliced Green Onions, Red Pepper FlakesFor garnish

Ingredient Notes & Substitutions:

  • Rice: Jasmine rice is our top choice for its fragrant, slightly sticky quality that holds the sauce well. Brown rice can be used but will increase cook time.
  • Chicken: Chicken thighs are an excellent substitute for breasts. They are more forgiving and stay incredibly juicy. Use about 2 lbs, trimmed and cut into bite-sized pieces.
  • Soy Sauce: Using low-sodium allows you to control the salt level. For a gluten-free version, substitute tamari or coconut aminos.
  • Sweetener: Honey can be replaced with maple syrup or agave nectar for a vegan alternative.
  • Thickener: Arrowroot powder creates a beautifully clear, glossy sauce. Cornstarch works perfectly as a 1:1 substitute.

How to Make Sticky Chicken Rice Bowls: Step-by-Step

Follow these detailed instructions for flawless results every single time.

Step 1: Prepare the Rice and Broccoli

Begin by cooking your rice according to the package directions. For the fluffiest rice, use the absorption method: rinse 2 cups of rice until the water runs clear, then combine with 2.5 cups of water in a pot. Bring to a boil, reduce heat to low, cover, and simmer for 18 minutes. Remove from heat and let it steam, covered, for 10 minutes. Fluff with a fork.

While the rice cooks, prepare the broccoli. You can steam it using your preferred method:

  • Stovetop Steaming: Place florets in a steamer basket over 1 inch of boiling water. Cover and steam for 4-5 minutes until bright green and fork-tender.
  • Microwave: Place florets in a microwave-safe bowl with 2 tablespoons of water. Cover with a damp paper towel and microwave on high for 3-4 minutes.
  • Air Fryer (for extra crispness): Toss florets with 1 tbsp olive oil, salt, and pepper. Air fry at 375°F for 8-10 minutes, shaking halfway.

💡 The Kitchen Team’s Pro Tip: For the best texture and to avoid soggy broccoli, shock it in an ice bath after steaming. Simply transfer the hot broccoli to a bowl of ice water for 60 seconds, then drain thoroughly. This stops the cooking process instantly, locking in the vibrant color and a perfect crisp-tender bite.

Step 2: Season and Cook the Chicken

Pat the chicken breasts completely dry with paper towels—this is crucial for browning. Cut them into uniform, bite-sized pieces (about 1-inch cubes). In a medium bowl, toss the chicken pieces with 2 tablespoons of olive oil until lightly coated. Add the salt, pepper, chili powder, smoked paprika, onion powder, and oregano. Toss vigorously until every piece is evenly coated with the spice rub.

Air Fryer Method (Recommended): Preheat your air fryer to 400°F. Arrange the chicken pieces in a single layer in the basket, ensuring they are not touching for optimal air circulation. Cook for 10-12 minutes, shaking the basket halfway through, until the chicken is golden brown and has reached an internal temperature of 165°F.

Stovetop Method: Heat a large skillet or wok over medium-high heat with 1 tablespoon of oil. Add the chicken in a single layer (cook in batches if necessary) and cook for 5-7 minutes per side until browned and cooked through.

Step 3: Create the Legendary Sticky Sauce

While the chicken cooks, combine the soy sauce, honey, rice vinegar, minced garlic, sriracha, sesame oil, and ground ginger in a small saucepan. Whisk well to combine. Bring the mixture to a boil over medium heat.

In a separate small bowl, make your slurry by whisking the arrowroot powder (or cornstarch) with 2 tablespoons of COLD water until completely smooth and lump-free.

Once the sauce is boiling, reduce heat to a simmer. While whisking constantly, slowly drizzle in the slurry. Continue to simmer, whisking frequently, for 4-5 minutes. The sauce will transform from thin and watery to a luxurious, glossy, coating consistency. It should thickly coat the back of a spoon. Remove from heat.

Step 4: Assemble Your Bowls

In a large bowl, combine the hot, cooked chicken with the prepared sticky sauce. Toss until every piece is generously and evenly glazed.

Prepare the spicy mayo by whisking together the mayonnaise, 1 tablespoon of sriracha, and 2-3 tablespoons of water until you achieve a drizzle-able consistency. Add water one tablespoon at a time.

To assemble, divide the fluffy rice among four bowls. Top each with a portion of the steamed broccoli and a generous scoop of the saucy sticky chicken. Drizzle artistically with the spicy mayo, and finish with a hearty sprinkle of toasted sesame seeds (and green onions if using). Serve immediately.

Serving Suggestions

While these bowls are a complete meal, here are some ideas to customize your experience:

  • Add More Veggies: Swap or add sautéed bell peppers, snap peas, shredded carrots, or bok choy.
  • Change the Base: Try cauliflower rice for a low-carb option, quinoa for extra protein, or soba noodles for a different texture.
  • Boost the Protein: Add a fried or soft-boiled egg on top for a decadent touch. Edamame beans also make a great plant-based addition.
  • Adjust the Heat: Serve with extra sriracha on the side for heat lovers, or omit it from the sauce and mayo for a mild version perfect for kids.

Storage and Reheating Instructions

Storage: Store components separately in airtight containers in the refrigerator for best results. The rice, broccoli, sauced chicken, and spicy mayo will keep for 3-4 days.

Reheating: Reheat the chicken and rice separately to maintain texture. The microwave works fine (1-2 minutes on high, stirring halfway). For best results, reheat the chicken in a skillet over medium heat with a splash of water to loosen the sauce. Reheat the rice with a sprinkle of water, covered, in the microwave or in a steamer basket. Assemble fresh bowls with cold broccoli and a fresh drizzle of spicy mayo.

💡 The Kitchen Team’s Pro Tip: The sticky sauce can be made in advance and stored in the fridge for up to a week. It thickens when cold, so simply reheat it gently in a saucepan, adding a teaspoon or two of water to bring it back to a pourable consistency.

Delicious Variations to Try

This recipe is incredibly adaptable. Don’t be afraid to make it your own!

  • Korean-Inspired: Add 1 tbsp of Gochujang (Korean chili paste) to the sticky sauce and garnish with kimchi.
  • Teriyaki Twist: Replace the ground ginger with 1 tbsp of freshly grated ginger and add a splash of mirin to the sauce.
  • Pineapple Sweet & Sour: Add 1 cup of fresh pineapple chunks to the sauce as it simmers.
  • Spicy Peanut: Whisk 2-3 tablespoons of creamy peanut butter into the sticky sauce and use a lime wedge garnish.

Frequently Asked Questions (FAQ)

1. Can I make this sticky chicken rice bowls recipe in the oven instead of an air fryer?
Absolutely! Preheat your oven to 425°F. Place the seasoned chicken pieces on a parchment-lined baking sheet and bake for 15-20 minutes, flipping halfway, until cooked through. You can then toss it with the sauce in a bowl or add the sauce to the baking sheet and broil for 1-2 minutes for extra caramelization.

2. How can I make this recipe gluten-free?
It’s easy! Simply ensure you use gluten-free tamari or coconut aminos instead of soy sauce. Also, double-check that your sriracha brand is gluten-free (most are, but some may contain traces).

3. My sauce didn’t thicken. What went wrong?
The most common issue is not bringing the sauce to a full boil after adding the slurry. The starch needs to reach a high temperature to activate and thicken. Ensure you simmer it for the full 4-5 minutes, whisking frequently. If it’s still thin, mix another 1 tsp of cornstarch with 1 tbsp cold water and whisk it in, then simmer for another 2-3 minutes.

4. Can I use frozen broccoli?
Yes, frozen broccoli florets work well in a pinch. There’s no need to thaw—cook them directly according to the package directions for steaming, but be careful not to overcook them, as they can become mushy more quickly than fresh.

5. Is there a way to make this dish less sweet?
Certainly. Reduce the honey to 1/3 cup. You can also balance the sweetness by increasing the rice vinegar by an extra tablespoon or adding a squeeze of fresh lime juice at the end.

6. Can I prep these bowls ahead of time for meal prep?
This is a fantastic meal prep recipe! Store the rice, broccoli, sauced chicken, and spicy mayo in separate compartments of a meal prep container. When ready to eat, reheat the rice and chicken (see reheating instructions above) and assemble. Keep the spicy mayo cold until serving.

7. What’s the best substitute for sriracha if I don’t have any?
You can use another hot sauce like Frank’s RedHot, but note the flavor will be different (more vinegar-forward). For a similar garlic-chili flavor, mix 1 tbsp of chili garlic sauce (like Sambal Oelek) with 1/2 tsp of garlic powder. For no heat at all, simply omit it.

8. Why is my chicken rubbery or dry?
This is almost always due to overcooking. Chicken breasts cook quickly. Use an instant-read thermometer and pull the chicken from the heat as soon as it reaches 160-165°F—it will continue to cook slightly with residual heat. Cutting the pieces uniformly also ensures even cooking.

We hope this ultimate guide empowers you to create the most delicious Sticky Chicken Rice Bowls of your life. This recipe is a testament to how simple ingredients, when combined with care, can create something truly extraordinary. It’s a dish that promises and delivers comfort, flavor, and satisfaction in every single bite.

If you make this recipe (and we know you will!), please share your creation with us. Tag @cookingwithemy on social media—we love seeing your kitchen triumphs!

Happy Cooking,
The Kitchen Team

Love this recipe? Save it for later!

Pin the image below to your Dinner Ideas or Meal Prep board on Pinterest to always have this easy, flavorful Sticky Chicken Rice Bowls recipe handy.

Follow us on Pinterest for more delicious inspiration: @cookingwithemy

[Image: A beautifully styled photo of the finished Sticky Chicken Rice Bowl in a white bowl, with chopsticks, garnished with sesame seeds and green onions.]

clock clock iconcutlery cutlery iconflag flag iconfolder folder iconinstagram instagram iconpinterest pinterest iconfacebook facebook iconprint print iconsquares squares iconheart heart iconheart solid heart solid icon

Sticky Chicken Rice Bowls Recipe


  • Author: Chef Emy

Description

Sticky Chicken Rice Bowls are a delicious and easy-to-make meal that combines tender chicken with a savory-sweet glaze, served over a bed of fluffy rice. Perfect for a weeknight dinner or a quick lunch, this dish is sure to become a family favorite. Lets dive into the details of creating this mouthwatering meal.


Ingredients

Scale
  • 2 cup uncooked rice
  • 2 small heads broccoli, chopped
  • 3 large chicken breasts
  • 2 tbsp olive oil
  • 1 tsp salt
  • 1/2 tsp pepper
  • 1 tsp chili powder
  • 1 tsp smoked paprika
  • 1 tsp onion powder
  • 1 tsp oregano
  • Sticky Sauce
  • 1/2 cup soy sauce
  • 1/2 cup honey
  • 1/4 cup rice vinegar
  • 3 cloves garlic, minced
  • 2 tbsp sriracha
  • 2 tsp sesame oil
  • 1 tsp ground ginger
  • 2 tsp arrowroot powder mixed with 2 tbsp water to make a slurry (sub cornstarch)
  • Spicy mayo
  • 1/2 cup mayo
  • 1 tbsp sriracha
  • 23 tbsp water
  • sesame seeds for topping

Instructions

  1. Cook rice according to package.
  2. Steam broccoli in microwave or on stove top until fork tender. Set aside.
  3. Cut chicken up into small bitesized pieces.
  4. Toss chicken with oil and all spices. Lay flat in air fryer and cook in preheated air fryer at 400F to 12 minutes or until chicken is 160F internally.
  5. While chicken is cooking, add soy sauce, honey, rice vinegar, garlic, sriracha, sesame oil, and ground ginger to a sauce pot. Bring to a boil. Once boiling, add arrowroot slurry. Let boil 4-5 minutes or until sauce has thickened greatly.
  6. Prepare bowls by layering rice, broccoli, chicken, and covering in sauce. Mix together spicy mayo ingredients and drizzle on top. Top with sesame seeds.

Panda Express Orange Chicken Recipe

The Ultimate Panda Express Orange Chicken Recipe: Crispy, Tangy & Better Than Takeout

Prep Time 20 minutes
Cook Time 25 minutes
Total Time 45 minutes
Servings 4 people
Difficulty Medium

Introduction: Skip the Takeout Line

Craving that iconic, sweet, tangy, and slightly spicy flavor of Panda Express Orange Chicken but want to enjoy it in the comfort of your own kitchen? You’ve come to the right place. This meticulously tested Panda Express Orange Chicken recipe delivers that perfect combination of crispy, golden-brown fried chicken pieces coated in a glossy, addictive orange glaze that clings to every nook and cranny. Forget the drive-thru—this homemade version is fresher, more flavorful, and incredibly satisfying to make.

At CookingWithEmy.com, we believe the best meals are the ones you create yourself. This recipe breaks down the seemingly complex takeout favorite into simple, foolproof steps. Whether it’s a busy weeknight dinner or a fun weekend cooking project, this dish is sure to become a family favorite. The secret lies in the double-cooking technique: first achieving that signature crunch, then tossing the chicken in a vibrant, homemade sauce that’s the perfect balance of sweet, sour, and savory.

Let’s dive in and create a meal that will have everyone asking for seconds and forgetting all about the takeout menu.

Why This Is The Best Homemade Orange Chicken Recipe

What sets this Panda Express Orange Chicken recipe apart from the rest? It’s all about authenticity balanced with practical home cooking. We’ve studied the flavor profile, texture, and cooking method to create a replica that doesn’t just mimic but in many ways improves upon the original.

Perfect Texture: The combination of cornstarch and flour in our dredge, along with the egg wash, creates an ultra-crispy, craggy exterior that stands up to the sauce without getting soggy. Frying at the precise temperature of 350°F ensures a golden-brown finish without greasiness.

Complex, Balanced Sauce: Our sauce isn’t just orange juice and sugar. We use a blend of vinegar for tang, soy sauce for umami depth, fresh garlic and ginger for aromatic punch, a hint of red pepper for warmth, and the secret weapon—orange juice concentrate—for an intense, true orange flavor that permeates every bite.

💡 The Kitchen Team’s Pro Tip: For the most authentic “Panda” flavor, do not substitute the orange juice concentrate if you can help it. The concentrate provides a deeper, more caramelized orange taste that regular juice can’t match. Find it in the frozen juice aisle.

Total Control: Making it at home means you control the quality of ingredients, the oil you fry in, the amount of sugar, and the sodium level. You can adjust the spice, the sweetness, and the tang to suit your personal taste perfectly.

Ingredients & Substitutions

Gathering your mise en place (everything in its place) before you start cooking is key for a smooth stir-fry experience. Here’s what you’ll need for this Panda Express Orange Chicken recipe.

Ingredient Quantity Notes & Substitutions
Boneless, Skinless Chicken Breasts (or Thighs) 2 lbs Thighs are more forgiving and stay juicier. Breasts are leaner. Cut into uniform 1-inch pieces.
Large Egg 1 Acts as the binder for the crispy coating.
Neutral Oil (Sunflower, Canola, Vegetable) 1 Tbsp + 4-6 cups for frying 1 Tbsp for the egg wash. Use a high-smoke-point oil for deep frying.
Salt & Black Pepper 1 1/2 tsp salt, 1 tsp pepper Seasoning the chicken and coating is crucial.
Cornstarch 3/4 cup + 1 Tbsp The main ingredient for the crispy coating (3/4 cup) and for thickening the sauce (1 Tbsp).
All-Purpose Flour 1/3 cup (heaping) Combined with cornstarch for the perfect crunch.
White Distilled Vinegar 1/2 cup Provides the essential tang. Rice vinegar can also be used.
Cane Sugar (or White Granulated Sugar) 1/2 cup Creates the sweet base of the sauce.
Water 1/4 cup Adjusts sauce consistency.
Soy Sauce (or Coconut Aminos) 1/4 cup For saltiness and umami. Use low-sodium if preferred.
Crushed Red Pepper Flakes 1/2 tsp For a subtle heat. Adjust to taste.
Fresh Garlic Cloves, crushed 2 Fresh is non-negotiable for best flavor.
Fresh Ginger Root, peeled and zested/minced 1/2 tsp The zesty counterpart to the garlic.
Orange Juice Concentrate (or 3 Tbsp fresh OJ) 1 Tbsp The flavor powerhouse. Highly recommend the concentrate.
Sesame Oil 1 tsp Added at the end for a nutty, aromatic finish.
Rice Wine (or Apple Cider Vinegar) 1 tsp A touch of acidity and complexity.

Step-by-Step Instructions

Follow these steps carefully for foolproof, restaurant-quality Panda Express Orange Chicken at home.

Step 1: Prepare the Chicken

Pat the chicken pieces completely dry with paper towels. This is critical for the coating to adhere properly. Cut into uniform 1-inch bite-sized pieces. In a small bowl, whisk together the egg, 1 tablespoon of neutral oil, salt, and pepper. In a separate shallow bowl or plate, mix the 3/4 cup cornstarch and heaping 1/3 cup flour together.

Step 2: Dredge and Coat

Working in batches, place chicken pieces into the egg mixture, ensuring they are fully coated. Let the excess drip off, then transfer them to the cornstarch-flour mixture. Toss and press the coating onto the chicken until each piece is thoroughly and evenly covered. Shake off any loose powder and place the coated chicken on a clean plate or wire rack. Let it sit for 5-10 minutes. This helps the coating set and adhere better during frying.

💡 The Kitchen Team’s Pro Tip: Use one hand for the wet egg mixture and the other hand for the dry coating. This prevents your fingers from becoming a clumpy, breaded mess and keeps the process clean and efficient.

Step 3: Fry to Crispy Perfection

In a large, heavy-bottomed pot, Dutch oven, or deep skillet, heat about 2 inches of neutral oil to 350°F. Use a cooking thermometer for accuracy. If the oil is too cool, the chicken will be greasy; too hot, and it will burn before cooking through. Carefully add the chicken in batches, ensuring not to overcrowd the pot. Fry for 4-6 minutes, turning occasionally, until deeply golden brown and the internal temperature reaches 165°F. Transfer to a plate lined with paper towels or a wire rack set over a baking sheet to drain. Repeat with remaining chicken.

Step 4: Create the Signature Orange Sauce

While the chicken fries (or beforehand), make the sauce. In a medium saucepan, combine the vinegar, sugar, water, soy sauce, crushed red pepper, garlic, ginger, and orange juice concentrate. Bring to a simmer over medium heat, stirring until the sugar dissolves. In a small separate bowl, make a slurry by mixing the 1 tablespoon of cornstarch with 1-2 tablespoons of cold water until smooth. While whisking the simmering sauce, slowly stream in the cornstarch slurry. Continue to cook, whisking constantly, for 1-2 minutes until the sauce thickens to a glossy, syrupy consistency that will coat the back of a spoon. Remove from heat and stir in the sesame oil and rice wine.

Step 5: The Grand Finale – Toss and Glaze

Ensure your fried chicken is still hot and crispy. You can briefly refry it for 30 seconds if it has cooled down to re-crisp. Place the chicken in a large mixing bowl. Pour the warm orange sauce over the top. Using a large spoon or spatula, gently but quickly toss the chicken until every piece is evenly and generously coated with the glossy sauce. Be swift to maintain maximum crispiness.

💡 The Kitchen Team’s Pro Tip: For an extra professional touch, garnish with thinly sliced green onions and a sprinkle of toasted sesame seeds just before serving. The color contrast and added texture elevate the dish instantly.

Serving Suggestions

This Panda Express Orange Chicken is the star of the show, but the right sides turn it into a complete feast.

  • Classic Takeout Duo: Serve over a bed of fluffy white or brown rice or with a side of homemade fried rice or chow mein noodles.
  • For a Lighter Meal: Pair it with steamed broccoli, sautéed snap peas, or a simple Asian-inspired cucumber salad to balance the richness.
  • Family-Style Spread: Make it part of a larger homemade Chinese food night! Offer it alongside egg rolls, potstickers, and wonton soup.

Storage & Reheating

Storage: Store leftover orange chicken in an airtight container in the refrigerator for up to 3 days. Store any extra sauce separately if possible.

Reheating for Best Results: To revive the crispiness, avoid the microwave. Reheat in an air fryer at 375°F for 3-5 minutes or on a baking sheet in a 400°F oven for 8-10 minutes until hot and crispy again. You can also quickly re-crisp in a skillet with a tiny bit of oil over medium heat.

Delicious Recipe Variations

Once you’ve mastered the classic, try these tasty twists on the Panda Express Orange Chicken recipe:

  • Spicy Orange Chicken: Double the crushed red pepper flakes or add a teaspoon of sriracha or chili-garlic sauce to the glaze.
  • Baked “Healthier” Orange Chicken: For a less oily version, place the coated chicken on a wire rack over a baking sheet. Spray generously with cooking spray and bake at 425°F for 18-22 minutes, flipping halfway, until crispy. Toss with sauce as directed.
  • Orange Cauliflower (Vegetarian): Replace the chicken with bite-sized cauliflower florets. Blanch them first, then coat and fry (or bake) as directed. A fantastic meat-free alternative!
  • Extra Citrusy: Add 1/2 teaspoon of fresh orange zest to the sauce along with the orange juice concentrate for an even brighter flavor.

Frequently Asked Questions (FAQ)

Can I make Panda Express Orange Chicken ahead of time?

You can prep the components ahead. Coat the chicken and keep it covered on a plate in the fridge for up to 4 hours before frying. The sauce can be made 2-3 days in advance and stored in the fridge; gently reheat it before using. For best results, fry and toss the chicken just before serving.

What’s the best oil for deep frying the chicken?

Use a neutral oil with a high smoke point, such as vegetable, canola, peanut, or sunflower oil. They won’t impart any unwanted flavor and can handle the 350°F temperature safely.

My sauce didn’t thicken. What went wrong?

Ensure your cornstarch slurry is made with cold water. Also, the sauce needs to be at a simmer when you add the slurry, and you must whisk constantly for a full 1-2 minutes to activate the starch’s thickening power. If it’s still thin, make another small slurry and repeat the process.

Can I use chicken thighs instead of breasts?

Absolutely! Boneless, skinless chicken thighs are an excellent choice. They are more flavorful and forgiving, staying juicy even if slightly overcooked. The cooking time remains the same.

How do I get my chicken extra crispy?

The keys are: 1) Pat the chicken VERY dry before coating. 2) Use the cornstarch/flour blend. 3) Maintain your oil at a steady 350°F. 4) Don’t overcrowd the pot while frying. 5) Let the coated chicken rest before frying so the coating sets.

Is this recipe gluten-free?

It can be easily adapted. Use a certified gluten-free all-purpose flour blend in place of regular flour, and ensure your soy sauce is a gluten-free tamari or use coconut aminos. Double-check that your cornstarch is gluten-free (it almost always is).

Why is my orange chicken soggy?

Sogginess usually happens if the fried chicken cools completely before saucing, if the sauce is too thin/watery, or if it’s tossed too far in advance. Always toss hot crispy chicken with a properly thickened sauce immediately before serving.

Can I freeze homemade orange chicken?

We don’t recommend freezing the fully assembled dish, as the crispy coating will become soggy upon thawing and reheating. You can freeze the uncooked, coated chicken pieces on a sheet pan, then transfer to a freezer bag for up to 2 months. Fry from frozen, adding a couple extra minutes to the cook time. The sauce can be frozen separately.

📌 Love This Recipe? Save It For Later!

Did this Panda Express Orange Chicken recipe hit the spot? Pin the image below to your Dinner Ideas or Takeout Fakeout board on Pinterest to save it for your next craving! Follow us on Pinterest @cookingwithemy for more delicious, restaurant-worthy recipes you can make at home.

Tag us in your creations using #CookingWithEmy – we love to see your masterpieces!

Recipe Name: The Ultimate Panda Express Orange Chicken Recipe
Author: The Kitchen Team for CookingWithEmy.com
Description: Crispy fried chicken coated in a sweet, tangy, and addictive homemade orange glaze. This copycat recipe tastes better than takeout!
Course: Main Course
Cuisine: Chinese-American
Keyword: panda express orange chicken recipe, orange chicken, chinese takeout, crispy chicken

clock clock iconcutlery cutlery iconflag flag iconfolder folder iconinstagram instagram iconpinterest pinterest iconfacebook facebook iconprint print iconsquares squares iconheart heart iconheart solid heart solid icon

Panda Express Orange Chicken


  • Author:
    Chef Emy

Description

Crispy homemade Orange Chicken, just like Panda Express! Pieces of boneless chicken breast are deep-fried and then cooked in a sweet, tangy orange sauce made from scratch. Panda Express Orange Chicken is not too spicy and so easy to make!


Ingredients


Scale
  • 2 lbs boneless chicken breasts ((or chicken thighs))
  • 1 egg
  • 1 Tbsp sunflower oil ((or any neutral flavored oil) )
  • 1 1/2 tsp salt
  • 1 tsp pepper
  • 3/4 cup cornstarch
  • 1/3 cup all-purpose flour ((heaping))
  • 1/2 cup white distilled vinegar
  • 1/2 cup cane sugar
  • 1/4 cup water
  • 1/4 cup soy sauce ((or coconut liquid aminos) )
  • 1/2 tsp crushed red pepper flakes
  • 2 cloves garlic ((crushed))
  • 1/2 tsp zested ginger root ((peeled))
  • 1 Tbsp orange juice concentrate ((or 3 Tbsp orange juice))
  • 1 Tbsp cornstarch
  • 1 tsp sesame oil
  • 1 tsp rice wine ((or apple cider vinegar))

Instructions

  1. Cut the chicken into bite-sized pieces (about 1 inch thick). Then, preheat 2 inches of oil in a large pot or deep skillet.
  2. Whisk together the egg, oil, salt, and pepper in a small bowl.
  3. In a separate bowl, mix together the flour and cornstarch.
  4. Dredge the chicken in the beaten egg mixture and then into the flour mixture. Shake off any excess flour.
  5. Deep fry the chicken in batches in 350°F oil until crispy, and the internal temperature reaches 165°F. Transfer to a large plate lined with paper towels.
  6. To make the orange chicken sauce, Combine all the sauce ingredients in a saucepan or large pot. Bring to a boil and simmer to desired thickness (1-2 minutes).
  7. Add the fried chicken pieces to the sauce and toss to coat. Transfer to a serving dish and enjoy!


Sizzling Chinese Pepper Steak with Onions – CookTune

Sizzling Chinese Pepper Steak with Onions: Your 20-Minute Ticket to Takeout Bliss

Craving the bold, savory flavors of your favorite Chinese restaurant but short on time? This Sizzling Chinese Pepper Steak with Onions recipe is your ultimate weeknight savior. Imagine tender strips of beef, caramelized onions, and a glossy, umami-rich sauce coming together in a single pan in under 30 minutes. At Cooking With Emy, we believe gourmet flavors belong in your home kitchen, and this dish is proof. It’s faster than delivery, healthier, and infinitely more satisfying to create yourself. Let’s turn up the heat and get sizzling!

CategoryDetails
Prep Time15 minutes
Cook Time10 minutes
Total Time25 minutes
Servings4 people
DifficultyEasy

The Secret to a Truly Sizzling Pepper Steak

The magic of a great pepper steak lies in the contrast of textures and the depth of flavor. It’s not just about cooking beef and onions; it’s about achieving the perfect wok hei—the coveted “breath of the wok” that gives Chinese stir-fries their signature smoky essence. While a professional jet-powered wok is hard to replicate at home, a very hot cast-iron skillet or heavy-bottomed pan is your best friend. The key is to cook in batches. Overcrowding the pan steams the meat instead of searing it, leading to grey, tough beef. We want high heat, quick cooking, and that irresistible sizzle from the moment the beef hits the pan until you pour it over a bed of fluffy rice.

This recipe also balances the five fundamental tastes of Chinese cuisine: salty (soy sauce), sweet (hoisin and caramelized onions), sour (rice vinegar), bitter (from the black pepper and sear), and umami (oyster sauce, beef, soy). It’s a symphony in a skillet, and you’re the conductor.

💡 The Kitchen Team’s Pro Tip: For the most authentic texture, partially freeze your beef steak for 30-45 minutes before slicing. This firms it up and allows you to cut paper-thin strips against the grain with ease, guaranteeing melt-in-your-mouth tenderness.

Why This Is The Best Chinese Pepper Steak Recipe

You’ll find countless pepper steak recipes online, so what makes this one from Cooking With Emy stand out? First, it’s built for realistic weeknight cooking. The marinade time is a quick 10-15 minutes—just enough to infuse flavor without requiring advanced planning. Second, we use a dual-purpose sauce technique. Part of the seasoning acts as a marinade, and the rest is thickened into a glossy, restaurant-style sauce that clings to every piece of beef and onion. No watery, flavorless sauces here.

Third, we emphasize proper technique over obscure ingredients. While we include optional oyster sauce for depth, the recipe is fantastic without it. We guide you through getting your pan hot enough, slicing your onions correctly, and building layers of flavor. This isn’t just a list of steps; it’s a masterclass in creating a perfect stir-fry at home. The result is a dish that’s consistently juicy, flavorful, and impressive enough for guests.

Ingredients for Authentic Flavor

Gathering the right ingredients is the first step to stir-fry success. Here’s what you’ll need, with explanations for why each component matters.

IngredientQuantityNotes & Purpose
Beef (sirloin or ribeye)1 lb (450g)Cut into thin strips against the grain. Sirloin is lean and flavorful; ribeye is more decadent and tender.
Vegetable Oil3 tbsp total (divided)High smoke point for searing. Used for onions, beef, and sauce.
Garlic, minced2 clovesAdds aromatic foundation. Don’t burn it!
Fresh Ginger, grated1 tbsp (15g)The zingy, warm soul of the dish. Fresh is non-negotiable.
Soy Sauce3 tbsp total (divided)Provides salty, umami base. Use low-sodium if preferred.
Oyster Sauce (optional)1 tbsp (15g) + 2 tbsp (30g)Deepens umami and adds a silky richness. A vegetarian oyster sauce works too.
Sesame Oil1 tspUsed in marinade for nutty fragrance. Always add at the end of cooking or in marinades—high heat destroys its flavor.
Hoisin Sauce2 tbsp (30g)Adds sweet, tangy, and slightly spicy notes. The “barbecue sauce” of Chinese cuisine.
Rice Vinegar2 tbsp (30g)Brightens the sauce and balances the richness.
Cornstarch1 tbsp (15g)The key to a glossy, thickened sauce that coats perfectly.
Large Onion, sliced1Yellow or white onion, sliced into ½-inch strips for sweet caramelization.
Salt & Black PepperTo tasteFreshly cracked black pepper is essential for the “pepper” in pepper steak!

Step-by-Step Cooking Instructions

Follow these steps carefully for a flawless result. Have all your ingredients prepped and within arm’s reach (this is called mise en place) before you turn on the stove. Stir-frying is a fast-paced dance!

Step 1: Marinate the Beef

In a medium bowl, whisk together 1 tablespoon of soy sauce, 1 tablespoon of oyster sauce (if using), the grated ginger, minced garlic, and 1 teaspoon of sesame oil. Add the thinly sliced beef strips and toss thoroughly to coat every piece. Let it marinate at room temperature for 10-15 minutes. This brief marination infuses flavor without breaking down the meat’s texture.

Step 2: Caramelize the Onions

While the beef marinates, heat 1 tablespoon of vegetable oil in a large skillet, wok, or cast-iron pan over medium heat. Add the sliced onions and a pinch of salt. Sauté, stirring occasionally, for 5-7 minutes until they are soft, translucent, and have golden-brown edges. This sweetness is crucial. Remove the onions from the pan and set them aside on a plate.

💡 The Kitchen Team’s Pro Tip: Don’t rush the onions! Letting them cook slowly over medium heat develops their natural sugars. That sweetness is the perfect counterpoint to the savory beef and salty sauce.

Step 3: Sear the Beef to Perfection

Increase the heat to high. Add the remaining 2 tablespoons of vegetable oil to the now-empty pan. Once the oil is shimmering and very hot (a drop of water should sizzle and evaporate instantly), add the marinated beef strips in a single layer. You may need to do this in two batches to avoid overcrowding. Let the beef sear undisturbed for about 1 minute to develop a crust, then stir-fry for another 1-2 minutes until just browned on all sides but still slightly pink inside. It will continue cooking in the sauce. Remove the beef and set it aside with the onions.

Step 4: Create the Glossy Sauce

Reduce the heat to medium. In the same pan, you’ll have delicious browned bits (fond) left from the beef and onions. This is flavor gold! In a small bowl, quickly whisk together the remaining 2 tablespoons of soy sauce, 2 tablespoons of hoisin sauce, 2 tablespoons of rice vinegar, 2 tablespoons of oyster sauce (if using), and the 1 tablespoon of cornstarch until smooth.

Pour this mixture into the pan. It will bubble and thicken almost immediately, scraping up the fond. Cook for 30-60 seconds until the sauce is glossy and thick enough to coat the back of a spoon.

Step 5: Combine and Finish

Return the cooked beef and onions to the pan with the thickened sauce. Toss everything together over medium heat for 1-2 minutes until heated through and evenly coated. Taste and adjust seasoning with a final crack of black pepper or a tiny splash of soy sauce if needed.

Serving Suggestions & Pairings

This sizzling pepper steak is the star, but the supporting cast makes it a meal. Here are our favorite ways to serve it:

  • Over Steamed Jasmine Rice: The classic choice. The fluffy rice soaks up the extra sauce beautifully.
  • With Fried Rice or Lo Mein Noodles: For a more substantial, restaurant-style plate.
  • Alongside Simple Veggies: Steamed broccoli, bok choy, or snap peas add color and freshness.
  • As a Lettuce Wrap Filling: For a low-carb option, spoon the mixture into crisp butter lettuce cups.
  • Garnish Galore: A final sprinkle of sliced green onions, toasted sesame seeds, or a drizzle of chili oil adds visual appeal and extra flavor layers.

Storage & Reheating Instructions

Storage: Allow leftovers to cool completely. Store in an airtight container in the refrigerator for up to 3-4 days.

Reheating (Best Methods):

  • Stovetop: Reheat gently in a skillet over medium-low heat with a splash of water or broth to loosen the sauce. This preserves texture best.
  • Microwave: Place in a microwave-safe dish, cover loosely, and heat in 30-second intervals, stirring in between, until hot. Add a teaspoon of water to prevent drying.

Freezing: We don’t recommend freezing this dish, as the onions and beef can become mushy upon thawing, and the sauce may separate.

Creative Variations to Try

Once you’ve mastered the classic, make it your own!

  • Spicy Pepper Steak: Add 1-2 sliced fresh Thai chilies or a teaspoon of chili-garlic sauce (sambal) to the marinade or sauce.
  • Vegetable-Packed: Stir-fry bell peppers (any color), mushrooms, or carrots with the onions.
  • Chicken or Pork Pepper “Steak”: Substitute thinly sliced chicken breast or pork tenderloin for the beef. Adjust cooking time slightly as needed.
  • Gluten-Free Version: Use tamari or a certified gluten-free soy sauce, and ensure your hoisin and oyster sauces are gluten-free brands.
  • Extra Umami Boost: Add a teaspoon of dark soy sauce for color and depth, or a dash of fish sauce to the final sauce.

Frequently Asked Questions (FAQ)

What’s the best cut of beef for Chinese pepper steak?

Flank steak, sirloin (top sirloin), or ribeye are excellent. They are flavorful, relatively tender, and slice well against the grain. Avoid stew meats or chuck roast, which require long, slow cooking.

Can I make this ahead of time?

You can prep the ingredients (slice beef, onions, make sauce mixture) 1 day ahead and store separately in the fridge. The actual stir-frying is best done just before serving for optimal texture.

My sauce didn’t thicken. What went wrong?

The cornstarch must be thoroughly whisked with the cold liquids before adding to the hot pan. If it’s lumpy, it won’t activate. Also, ensure the sauce comes to a simmer; cornstarch needs heat to thicken. If still thin, mix another 1 tsp cornstarch with 1 tbsp cold water and stir it in.

Is oyster sauce necessary?

No, but it’s highly recommended for its unique savory-sweet depth. If omitting, add an extra ½ tablespoon of soy sauce and a pinch of sugar to the sauce mixture.

Can I use ground black pepper instead of cracking it fresh?

Freshly cracked pepper has a brighter, more aromatic flavor. Pre-ground pepper works in a pinch but will be less potent. We recommend cracking it fresh for the best taste.

How do I prevent the beef from being tough?

Three rules: 1) Slice against the grain to shorten muscle fibers. 2) Don’t over-marinate (15 mins is plenty). 3) Cook over very high heat for a very short time. Overcooking is the #1 cause of tough stir-fry beef.

What can I substitute for hoisin sauce?

Mix 1.5 tbsp soy sauce, 1 tbsp peanut butter or black bean paste, 1 tsp honey, and a dash of five-spice powder as a rough substitute. The flavor won’t be identical, but it will be delicious.

Is this recipe authentic Chinese food?

This is a Chinese-American restaurant classic, designed for home cooks using accessible ingredients. It captures the essential flavors and techniques of stir-frying that are central to Chinese cuisine.

We hope you love this Sizzling Chinese Pepper Steak with Onions as much as we do. It’s a testament to how simple ingredients, when treated with care and proper technique, can create something extraordinary. Happy cooking from all of us at The Kitchen Team!

Don’t forget to share your creation with us! Tag @cookingwithemy on Instagram so we can see your masterpiece.

📌 Love This Recipe? Save It for Later!

Pin this image to your “Quick Dinner Ideas” or “Chinese Takeout at Home” board on Pinterest to always have this recipe handy! Follow Cooking With Emy on Pinterest for more delicious inspiration every day.

(Image suggestion: A vibrant, overhead shot of the sizzling pepper steak in a black cast-iron skillet, steam rising, next to a bowl of fluffy white rice, garnished with green onions.)

clock clock iconcutlery cutlery iconflag flag iconfolder folder iconinstagram instagram iconpinterest pinterest iconfacebook facebook iconprint print iconsquares squares iconheart heart iconheart solid heart solid icon

Sizzling Chinese Pepper Steak with Onions


  • Author: Chef Emy

Description

This Chinese Pepper Steak with Onions is a quick and flavorful dinner featuring tender beef strips, crisp onions, and a savory sauce thats perfect for a weeknight meal. Cooked to perfection in a sizzling stir-fry, this dish brings the bold flavors of Chinese cuisine straight to your table. Serve it over steamed rice or noodles for a satisfying, restaurant-quality meal at home.


Ingredients

Scale
  • 1 lb (450g) beef strips (sirloin or ribeye)
  • 2 tbsp (30g) vegetable oil
  • 2 cloves garlic, minced
  • 1 tbsp (15g) grated fresh ginger
  • 1 tbsp (15g) soy sauce
  • 1 tbsp (15g) oyster sauce (optional)
  • 1 tsp sesame oil
  • Salt and pepper to taste
  • 2 tbsp (30g) soy sauce
  • 2 tbsp (30g) oyster sauce (optional)
  • 2 tbsp (30g) hoisin sauce
  • 2 tbsp (30g) rice vinegar
  • 1 tbsp (15g) cornstarch
  • 2 tbsp (30g) vegetable oil
  • 1 large onion, sliced
  • 1 tbsp (15g) vegetable oil
  • Salt and pepper to taste

Instructions

  1. Prepare the Steak: In a bowl, whisk together soy sauce, oyster sauce, ginger, garlic, and sesame oil.
  2. Toss the beef strips in the marinade and let sit for 10-15 minutes.
  3. Cook the Onions: Heat 1 tbsp vegetable oil in a skillet over medium heat.
  4. Add sliced onions and sauté until soft and slightly caramelized.
  5. Season with salt and pepper, then remove from the pan and set aside.
  6. Sear the Beef: In the same pan, heat 2 tbsp vegetable oil over high heat.
  7. Add the marinated beef strips and stir-fry for 2-3 minutes until browned.
  8. Make the Sauce: In a small bowl, whisk together soy sauce, hoisin sauce, rice vinegar, and cornstarch.
  9. Pour the sauce over the beef and let simmer until it thickens.
  10. Combine & Serve: Add the sautéed onions back into the pan, stirring to combine.
  11. Serve hot over steamed rice or noodles.

Sizzling Chinese Pepper Steak with Onions – CookTune

Sizzling Chinese Pepper Steak with Onions: The 20-Minute Takeout Fakeout

This Sizzling Chinese Pepper Steak with Onions delivers tender, marinated beef strips, caramelized onions, and a glossy, savory sauce that rivals your favorite restaurant. Ready in under 30 minutes, it’s the ultimate quick, flavorful, and satisfying weeknight dinner.

Prep Time
15 minutes
Cook Time
10 minutes
Total Time
25 minutes
Servings
4 people
Difficulty
Easy

Why This Sizzling Pepper Steak is Your New Weeknight Hero

Imagine the sound of beef hitting a scorching hot wok—that iconic sizzle that promises deep flavor and perfect sear. That’s the experience you get with this Sizzling Chinese Pepper Steak with Onions. More than just another stir-fry, this dish is a masterclass in balancing umami, sweetness, and savory depth in one pan. Born from traditional Chinese cooking techniques but streamlined for the home cook, this recipe captures the essence of takeout without the wait, cost, or mystery ingredients.

At CookingWithEmy.com, we believe a great weeknight meal should be fast, flavorful, and foolproof. This pepper steak checks every box. The marinade tenderizes the beef while infusing it with garlic and ginger, the onions caramelize into sweet, soft ribbons, and the sauce—oh, the sauce—clings to every piece, creating a glossy, restaurant-worthy finish. Whether you’re new to stir-frying or a seasoned pro, this recipe will become a repeat player in your dinner rotation.

Why This is the Best Chinese Pepper Steak Recipe You’ll Find

Not all pepper steak recipes are created equal. Many suffer from chewy beef, watery sauce, or bland vegetables. Ours stands out for three key reasons:

1. The Double-Marinate Method: We first coat the beef in a quick, flavor-packed marinade with soy sauce, ginger, and sesame oil. This not only seasons the meat but also starts the tenderizing process, ensuring every bite is succulent.

2. The Layered Cooking Technique: By cooking the onions separately, we achieve perfect caramelization without steaming them. The beef then gets a blazing-hot sear for maximum browning (the Maillard reaction, for you science lovers), locking in juices.

3. The Perfect Sauce Consistency: A combination of cornstarch and balanced liquids creates a sauce that thickens beautifully in the pan, coating each ingredient instead of pooling at the bottom.

💡 The Kitchen Team’s Pro Tip: For an authentic “wok hei” (breath of the wok) flavor at home, make sure your pan is smoking hot before adding the beef. Don’t overcrowd the pan—cook in batches if needed—to ensure a proper sear instead of steaming.

Ingredients & What You’ll Need

This recipe uses a combination of pantry staples and fresh ingredients to build complex flavor quickly. Here’s everything you need, along with notes on key players.

Ingredient Quantity Notes & Substitutions
Beef strips (sirloin or ribeye) 1 lb (450g) Slice against the grain for tenderness. Flank steak also works well.
Vegetable oil 3 tbsp total For high-heat cooking. Canola or peanut oil are great alternatives.
Garlic, minced 2 cloves Fresh is best. Jarred minced garlic can be used in a pinch.
Fresh ginger, grated 1 tbsp (15g) Adds a warm, aromatic zing. Do not substitute dried powder.
Soy sauce (for marinade) 1 tbsp (15g) Use low-sodium if preferred. Tamari for gluten-free.
Oyster sauce (for marinade, optional) 1 tbsp (15g) Adds deep umami. Vegetarian oyster sauce or hoisin can substitute.
Sesame oil 1 tsp Use toasted sesame oil for maximum flavor. Add at the end of cooking.
Large onion, sliced 1 Yellow or white onions work best for caramelizing.
Soy sauce (for sauce) 2 tbsp (30g) Combined with hoisin for the base.
Hoisin sauce 2 tbsp (30g) Adds sweetness and thickness. Look for it in the Asian aisle.
Rice vinegar 2 tbsp (30g) Brightens the sauce. Apple cider vinegar can substitute.
Cornstarch 1 tbsp (15g) Essential for thickening. Arrowroot powder is a good GF alternative.
Salt and black pepper To taste Freshly cracked pepper is ideal.
💡 The Kitchen Team’s Pro Tip: Freeze your beef for 20-30 minutes before slicing. This firms it up, making it much easier to cut into thin, uniform strips against the grain, which is the secret to tender stir-fry beef.

Step-by-Step Cooking Instructions

Follow these steps for a flawless stir-fry every time. We’ve broken it down into clear stages, so you can move with confidence.

Step 1: Marinate the Beef

In a medium bowl, whisk together 1 tbsp soy sauce, 1 tbsp oyster sauce (if using), the grated ginger, minced garlic, and 1 tsp sesame oil. Add the beef strips and toss thoroughly until every piece is coated. Let it marinate at room temperature for 10-15 minutes. This short marination is enough to impart flavor and begin tenderizing.

Step 2: Caramelize the Onions

While the beef marinates, heat 1 tbsp of vegetable oil in a large skillet, wok, or cast-iron pan over medium heat. Add the sliced onions and cook, stirring occasionally, for about 6-8 minutes, until they are soft, golden, and slightly caramelized. Season with a pinch of salt and pepper. Transfer the onions to a plate and set aside.

Step 3: Sear the Beef to Perfection

Increase the heat to high and add 2 tbsp of vegetable oil to the same pan. Once the oil is shimmering and just beginning to smoke, add the marinated beef strips in a single layer. Let them sear undisturbed for 1 minute to develop a crust, then stir-fry for an additional 1-2 minutes until the beef is just browned on the outside but still slightly pink inside. It will continue to cook in the sauce. Remove the beef and set aside with the onions.

Step 4: Create the Glossy Sauce

In a small bowl or measuring cup, whisk together the remaining 2 tbsp soy sauce, 2 tbsp hoisin sauce, 2 tbsp rice vinegar, and 1 tbsp cornstarch until the cornstarch is fully dissolved and no lumps remain.

Step 5: Bring It All Together

Reduce the heat to medium. Pour the sauce mixture into the hot pan. It will begin to bubble and thicken almost immediately. Cook for 30 seconds to 1 minute, stirring constantly, until the sauce becomes glossy and thick enough to coat the back of a spoon.

Step 6: Final Combine and Serve

Return the cooked beef and onions to the pan. Toss everything together for 1-2 minutes until heated through and evenly coated in the luxurious sauce. Taste and adjust seasoning with an extra crack of black pepper if desired. Serve immediately while sizzling hot.

Serving Suggestions & Perfect Pairings

This Sizzling Chinese Pepper Steak is incredibly versatile. Here are our favorite ways to serve it:

Classic Base: Serve over a bed of steamed jasmine or white rice to soak up every drop of the savory sauce. For a healthier twist, cauliflower rice works surprisingly well.

Noodle Lover’s Dream: Toss with cooked lo mein noodles, udon, or even spaghetti for a hearty noodle bowl. Add a handful of snap peas or shredded carrots when you return the beef to the pan for extra veggies.

Low-Carb/Veggie Forward: Spoon it over roasted broccoli, sautéed bok choy, or a mix of stir-fried bell peppers and zucchini.

Complete Meal Ideas: Pair with a simple side of egg drop soup or a cucumber salad tossed with rice vinegar and a touch of sugar for a refreshing contrast.

Storage & Reheating Instructions

To Store: Allow leftovers to cool completely. Transfer to an airtight container and refrigerate for up to 3-4 days.

To Freeze: Freeze in a freezer-safe container for up to 2-3 months. Thaw overnight in the refrigerator before reheating. Note: The texture of the onions may become softer after freezing.

To Reheat: The best method is on the stovetop. Add a splash of water or beef broth to a skillet over medium heat, add the pepper steak, and stir until heated through. This prevents the sauce from becoming too thick or the beef from overcooking. Microwave reheating is possible (use a covered dish and stir halfway through) but can make the beef slightly tougher.

Creative Variations & Easy Swaps

Make this recipe your own with these simple twists:

Spicy Pepper Steak: Add 1-2 sliced fresh Thai chilies or 1 tsp of chili-garlic sauce (sambal oelek) to the sauce mixture.

More Veggies: Add 1 sliced bell pepper (any color) and a handful of sliced mushrooms when you cook the onions.

Pineapple Pepper Steak: Stir in ½ cup of fresh or canned pineapple chunks (drained) with the sauce for a sweet and tangy Hawaiian-inspired version.

Protein Swap: Use thinly sliced chicken breast, pork tenderloin, or even firm tofu (pressed and cubed) in place of beef. Adjust cooking time accordingly.

Gluten-Free: Use tamari instead of soy sauce and ensure your hoisin and oyster sauces are certified gluten-free.

Your Sizzling Chinese Pepper Steak Questions Answered

What is the best cut of beef for pepper steak?

Sirloin or ribeye are our top choices for their balance of flavor and tenderness, and they slice beautifully. Flank steak or skirt steak are excellent, more economical alternatives—just be sure to slice them very thinly against the grain.

Can I make this recipe ahead of time?

You can prep the components ahead: slice the beef and onions, and make the sauce mixture (store separately). However, for the best texture, we recommend stir-frying just before serving, as it takes less than 10 minutes to cook.

My sauce didn’t thicken. What went wrong?

The cornstarch needs to be fully dissolved in the cold liquids before hitting the heat. Also, ensure the sauce comes to a simmer after adding it to the pan; the heat is necessary to activate the cornstarch’s thickening power.

Is oyster sauce necessary?

It’s listed as optional but highly recommended. Oyster sauce adds a deep, savory, umami-rich base that is characteristic of the dish. For a vegetarian version, use mushroom stir-fry sauce or extra hoisin.

How do I prevent my beef from getting tough?

Three keys: 1) Slice against the grain. 2) Don’t over-marinate (15-30 mins is plenty). 3) Cook over very high heat for a short time—just until browned. Overcooking is the main cause of toughness.

Can I use frozen sliced beef?

Yes, but thaw it completely in the refrigerator first and pat it very dry with paper towels. Excess moisture will steam the beef instead of searing it.

What can I use instead of hoisin sauce?

Combine 1.5 tbsp soy sauce with 1.5 tbsp of a sweet element like honey or brown sugar, plus a tiny bit of five-spice powder if you have it.

How can I make this dish less salty?

Use low-sodium soy sauce across the board and omit the optional salt when cooking the onions. You can always add a pinch at the end if needed.

Loved this recipe? Save it for later and share the sizzle!


📌 Save on Pinterest

Follow us on Pinterest for more quick & delicious dinner ideas!

Approximate Nutrition Information (Per Serving)

Nutrient Amount
Calories ~320 kcal
Total Fat 18g
Saturated Fat 4g
Cholesterol 70mg
Sodium ~950mg
Total Carbohydrates 12g
Dietary Fiber 1g
Sugars 6g
Protein 28g

Disclaimer: Nutrition information is an estimate calculated using an online tool and will vary based on specific ingredients and portion sizes used.

clock clock iconcutlery cutlery iconflag flag iconfolder folder iconinstagram instagram iconpinterest pinterest iconfacebook facebook iconprint print iconsquares squares iconheart heart iconheart solid heart solid icon

Sizzling Chinese Pepper Steak with Onions


  • Author:
    Chef Emy

Description

This Chinese Pepper Steak with Onions is a quick and flavorful dinner featuring tender beef strips, crisp onions, and a savory sauce thats perfect for a weeknight meal. Cooked to perfection in a sizzling stir-fry, this dish brings the bold flavors of Chinese cuisine straight to your table. Serve it over steamed rice or noodles for a satisfying, restaurant-quality meal at home.


Ingredients


Scale
  • 1 lb (450g) beef strips (sirloin or ribeye)
  • 2 tbsp (30g) vegetable oil
  • 2 cloves garlic, minced
  • 1 tbsp (15g) grated fresh ginger
  • 1 tbsp (15g) soy sauce
  • 1 tbsp (15g) oyster sauce (optional)
  • 1 tsp sesame oil
  • Salt and pepper to taste
  • 2 tbsp (30g) soy sauce
  • 2 tbsp (30g) oyster sauce (optional)
  • 2 tbsp (30g) hoisin sauce
  • 2 tbsp (30g) rice vinegar
  • 1 tbsp (15g) cornstarch
  • 2 tbsp (30g) vegetable oil
  • 1 large onion, sliced
  • 1 tbsp (15g) vegetable oil
  • Salt and pepper to taste

Instructions

  1. Prepare the Steak: In a bowl, whisk together soy sauce, oyster sauce, ginger, garlic, and sesame oil.
  2. Toss the beef strips in the marinade and let sit for 10-15 minutes.
  3. Cook the Onions: Heat 1 tbsp vegetable oil in a skillet over medium heat.
  4. Add sliced onions and sauté until soft and slightly caramelized.
  5. Season with salt and pepper, then remove from the pan and set aside.
  6. Sear the Beef: In the same pan, heat 2 tbsp vegetable oil over high heat.
  7. Add the marinated beef strips and stir-fry for 2-3 minutes until browned.
  8. Make the Sauce: In a small bowl, whisk together soy sauce, hoisin sauce, rice vinegar, and cornstarch.
  9. Pour the sauce over the beef and let simmer until it thickens.
  10. Combine & Serve: Add the sautéed onions back into the pan, stirring to combine.
  11. Serve hot over steamed rice or noodles.


10-Minute Pan Fried Noodles

The Ultimate 10-Minute Pan Fried Noodles: Your New Weeknight Hero

Prep Time: 5 minutes
Cook Time: 5 minutes
Total Time: 10 minutes
Servings: 2 people
Difficulty: Easy

We’ve all been there. It’s 6 PM, your stomach is growling, and the thought of spending an hour in the kitchen feels impossible. Enter your new culinary superhero: these 10-Minute Pan Fried Noodles. This isn’t just another stir-fry recipe; it’s a masterclass in efficiency and flavor, designed for real life. Using just one pan and a handful of pantry staples, you can create a restaurant-quality noodle dish that’s savory, satisfying, and endlessly customizable. At Cooking With Emy, we believe that incredible food shouldn’t be complicated, and this recipe is the perfect proof. Let’s turn those hectic weeknights into delicious victories.

Why This Is The Best Pan Fried Noodles Recipe You’ll Find

What sets this recipe apart isn’t just its speed—it’s the technique. Many quick noodle recipes end up soggy or bland. Our method focuses on high-heat cooking to achieve that coveted caramelization on the noodles, locking in the savory sauce and creating a perfect texture that’s slightly crispy in spots. The sauce balance is key: the combination of regular and dark soy sauce provides depth and color, while a touch of sugar creates a beautiful glaze. It’s a foolproof formula that delivers maximum flavor with minimal effort.

💡 The Kitchen Team’s Pro Tip: The secret to true “wok hei” (the breath of the wok) at home is to ensure your pan is screaming hot before adding the noodles. Don’t crowd the pan—this allows steam to escape and promotes frying instead of steaming.

Ingredients for 10-Minute Pan Fried Noodles

Simplicity is the soul of this dish. Here’s everything you need, along with notes for swaps and upgrades.

Ingredient Quantity Notes & Substitutions
Fresh Egg Noodles (or Ramen, Yakisoba) 10.5 oz (300 g) Key: Use pre-cooked or par-cooked noodles. Dried noodles work but require boiling first.
Neutral Oil (avocado, vegetable) 2 tbsp High smoke point is essential for proper frying.
Garlic, minced 2 cloves Fresh is best! Jarred minced garlic can be used in a pinch.
Green Onions 2 stalks Separate white/light green parts for cooking, dark green for garnish.
Bean Sprouts 1 cup Swap for shredded cabbage, bell peppers, or carrots.
Soy Sauce (regular) 2 tbsp For saltiness and base flavor. Use tamari for gluten-free.
Dark Soy Sauce 1/2 tbsp For color and rich, molasses-like flavor. Do not omit for best results.
Granulated Sugar 1/2 tbsp Balances saltiness and aids caramelization.
White Pepper (or black) 1/8 tsp White pepper is more authentic, but black works fine.
Water 1 tbsp Helps distribute the sauce evenly.
Sesame Oil (toasted) 1 tsp ADD AT THE END. This is a finishing oil for aroma.

Step-by-Step Instructions for Perfect Pan Fried Noodles

Follow these steps closely for noodles that are perfectly sauced, caramelized, and never mushy.

Step 1: Prep is Everything (2 Minutes)

In a small bowl, whisk together the regular soy sauce, dark soy sauce, sugar, white pepper, and 1 tbsp of water until the sugar dissolves. This is your flavor powerhouse. Prepare your noodles according to package directions—usually, this means a quick 1-2 minute blanch in boiling water for fresh noodles. Immediately rinse under cold water to stop the cooking, drain thoroughly, and toss with a tiny bit of oil to prevent sticking. Mince your garlic and chop your green onions, separating the white/light green parts from the dark green tops.

💡 The Kitchen Team’s Pro Tip: Rinsing the cooked noodles in cold water is non-negotiable. It washes away excess starch that would otherwise make your final dish gummy and clumpy.

Step 2: The High-Heat Stir-Fry (5 Minutes)

Place your largest skillet, wok, or non-stick pan over medium-high heat and let it get hot for a full minute. Add the neutral oil and swirl to coat. Add the minced garlic and the white/light green parts of the green onion. Stir-fry for just 30-60 seconds until incredibly fragrant—do not let the garlic brown.

Immediately add your well-drained noodles. Use tongs or two spatulas to toss and combine them with the garlic and oil. Let them sit undisturbed for 45-60 seconds to develop a slight sear. Give them another good toss.

Step 3: Saucing & Finishing (3 Minutes)

Pour your pre-mixed sauce evenly over the noodles. Toss and stir constantly for 2-3 minutes. You’ll see the sauce reduce and start to coat and glaze the noodles, creating a beautiful caramelized color. Now, add your bean sprouts (or other quick-cooking veggies) and the reserved dark green parts of the green onions. Toss for one final minute just to wilt the vegetables slightly.

Remove the pan from the heat. Now, and only now, drizzle the toasted sesame oil over the top and give one final gentle toss. The residual heat will bloom the sesame oil’s aroma without burning it.

Step 4: Serve Immediately!

Transfer to bowls or plates and enjoy right away while the texture is at its peak—crispy-edged, chewy, and gloriously saucy.

How to Serve Your Pan Fried Noodles

While these noodles are a complete meal on their own, here’s how to build a fantastic dinner around them:

  • Protein Power: Serve alongside or top with a crispy fried egg, shredded rotisserie chicken, quick-seared shrimp, or thinly sliced pan-fried tofu.
  • Crunch Factor: Garnish with extra sliced green onions, toasted sesame seeds, or crushed peanuts for added texture.
  • Heat Lover’s Touch: Add a drizzle of chili crisp or sriracha on the side.
  • Perfect Pairings: For a larger spread, pair with a simple cucumber salad, steamed dumplings, or a light miso soup.

Storage & Reheating Instructions

Storage: Let leftovers cool completely, then store in an airtight container in the refrigerator for up to 3 days. The noodles will soften but are still delicious.

Reheating (The Right Way): The microwave will make them soggy. For best results, reheat in a non-stick skillet over medium heat with a tiny splash of water. Cover for a minute to steam, then uncover and stir-fry for another minute to re-crisp the edges.

Creative Variations to Keep It Exciting

This recipe is a perfect canvas. Here are some of our favorite twists:

  • Spicy Garlic: Add 1-2 teaspoons of gochujang (Korean chili paste) or sambal oelek to the sauce mixture.
  • Teriyaki Twist: Replace the soy sauce mixture with 3 tbsp of your favorite teriyaki sauce.
  • Thai-Inspired: Swap soy sauce for fish sauce, add a squeeze of lime juice at the end, and garnish with cilantro and crushed peanuts.
  • Protein-Packed: Stir-fry 1/2 lb of ground pork, chicken, or crumbled tofu with the garlic at the beginning, then proceed with the recipe.
  • Garden Veggie: Load it up with broccoli florets, snap peas, shredded carrots, and mushrooms. Add harder veggies right after the garlic to soften slightly before adding noodles.

Frequently Asked Questions (FAQ)

1. Can I use dried noodles instead of fresh?

Absolutely. Cook the dried noodles according to package directions until al dente, then rinse, drain, and proceed with the recipe. Spaghetti or linguine can even work in a pinch!

2. What’s the best pan to use if I don’t have a wok?

A large, heavy-bottomed skillet or non-stick pan is your next best bet. The key is having a large surface area so the noodles aren’t piled on top of each other, which steams them.

3. Can I make this gluten-free?

Yes! Use 100% buckwheat soba noodles or rice noodles, and substitute the soy sauces with tamari (for regular) and a gluten-free dark soy sauce or coconut aminos with a pinch of molasses.

4. My noodles turned out sticky. What went wrong?

This usually means the noodles were too starchy when added to the pan. Ensure you rinse them thoroughly under cold water after boiling and drain them very well. Also, make sure your pan is hot enough.

5. Can I make the sauce ahead of time?

Definitely. You can mix the sauce (minus the water) and store it in the fridge for up to a week. Add the fresh water when you’re ready to cook to ensure proper consistency.

6. Is dark soy sauce necessary? I can’t find it.

It provides unique color and flavor, but in a pinch, you can use 2.5 tbsp regular soy sauce + 1/2 tsp molasses or brown sugar for a similar effect.

7. Can I add frozen vegetables?

Yes, but thaw and drain them very well first, or add them directly from frozen right after the garlic to give them extra time to cook off their moisture before adding the noodles.

8. How can I make this dish more filling?

Add protein! Thinly sliced beef, chicken, shrimp, or tofu can be quickly stir-fried in the first step before setting aside and then added back with the bean sprouts.

Loved This Recipe? Share the Love!

If this 10-Minute Pan Fried Noodles recipe saved your weeknight, please share it with friends and family! Tag us on social media @cookingwithemy—we love seeing your creations.

📌 Save This Recipe for Later!

Don’t lose this easy dinner idea! Pin the image below to your Quick Dinners or Asian Recipes board on Pinterest so you always have it handy.

👉 Follow Us on Pinterest for More Easy Recipes!

clock clock iconcutlery cutlery iconflag flag iconfolder folder iconinstagram instagram iconpinterest pinterest iconfacebook facebook iconprint print iconsquares squares iconheart heart iconheart solid heart solid icon

10-Minute Pan Fried Noodles


  • Author:
    Chef Emy

Description

These quick & easy pan fried noodles are made with a handful of ingredients in a single pan, making it the perfect meal to add to your dinner rotation. Tossed in a savory sauce and aromatic vegetables, these stir-fried noodles are packed with flavor and can easily be customized to your liking.


Ingredients


Scale
  • 300 g fresh noodles (see notes below)
  • 2 tbsp neutral oil
  • 2 cloves garlic (minced)
  • 2 green onions (cut lengthwise in 2″ pieces)
  • 1 cup bean sprouts (or other vegetables)
  • 1 tsp sesame oil (to finish)
  • 2 tbsp soy sauce
  • 1/2 tbsp dark soy sauce
  • 1/2 tbsp sugar
  • 1/8 tsp white pepper (or black pepper)
  • 1 tbsp water

Instructions

  1. Combine the sauce ingredients in a bowl and prepare the noodles as per package instructions. Rinse the noodles under cold water, drain, and set aside.
  2. Heat oil in a wok or a large pan over medium heat. Add garlic and white parts of green onion and cook until fragrant. Add noodles and mix to combine.
  3. Pour in the sauce and cook for about 2-3 minutes until the noodles are caramelized. Add bean sprouts, reserved green onion, and sesame oil to finish. Enjoy!


10-Minute Pan Fried Noodles

Prep Time Cook Time Total Time Servings Difficulty
5 minutes 5 minutes 10 minutes 2 people Easy

Table of Contents

The Ultimate 10-Minute Pan Fried Noodles: Your New Weeknight Savior

We’ve all been there. It’s 6 PM, hunger is mounting, and the thought of spending an hour in the kitchen feels impossible. Enter these 10-Minute Pan Fried Noodles. This isn’t just another quick recipe; it’s a culinary lifeline. Born from the need for speed without sacrificing an ounce of flavor, this dish transforms a handful of pantry staples into a restaurant-worthy meal in the time it takes to boil water. At Cooking With Emy, we believe that great food shouldn’t be complicated, and this recipe is the perfect proof. With a savory, caramelized sauce clinging to every strand of noodle and the satisfying crunch of fresh vegetables, it’s a complete, customizable dinner that will earn a permanent spot in your weekly rotation.

Why This Is The Best 10-Minute Pan Fried Noodles Recipe

You might be wondering what sets this recipe apart from other quick noodle stir-fries. The secret lies in the methodology and balance. First, we use fresh noodles, which cook in mere minutes and have the perfect texture for pan-frying—chewy, not mushy. Second, our two-part sauce (soy sauce for saltiness, dark soy for color and depth, and a touch of sugar for balance) is designed to caramelize in the hot pan, creating those coveted crispy, flavorful bits. Third, we employ high-heat cooking in a specific order to ensure nothing gets soggy. The garlic and whites of the green onion are fried just until fragrant to build a flavor base, then the noodles are added to soak up that aroma before the sauce hits the pan. Finally, delicate ingredients like bean sprouts and the green parts of the onion are added at the very end to preserve their fresh crunch and vibrant color. It’s a masterclass in efficiency and flavor layering.

Ingredients & Substitutions

One of the greatest strengths of this recipe is its flexibility. Here’s exactly what you need and how you can adapt it based on what’s in your fridge.

Ingredient Quantity Purpose & Best Substitutions
Fresh Noodles (Hong Kong Style, Lo Mein, or Ramen) 10.5 oz (300g) The star. Provides the ideal chewy texture. Substitute: 8 oz dried noodles (cooked al dente) or even instant ramen bricks (discard the seasoning packet).
Neutral Oil (Avocado, Canola, Vegetable) 2 tbsp For high-heat frying. Substitute: Any high-smoke point oil.
Garlic, minced 2 cloves Aromatic base. Substitute: 1/2 tsp garlic powder added with the sauce.
Green Onions 2 stalks Adds freshness and a mild onion flavor. Separate white/light green parts from dark green tops.
Bean Sprouts 1 cup Adds crunch and freshness. Substitute: Shredded cabbage, snap peas, matchstick carrots, or bell peppers.
Soy Sauce 2 tbsp Primary salty, umami flavor. Use low-sodium if preferred.
Dark Soy Sauce 1/2 tbsp Provides rich color and a deeper, less salty umami. Substitute: Add an extra 1/2 tbsp regular soy sauce + 1/4 tsp molasses or brown sugar.
Granulated Sugar 1/2 tbsp Balances the saltiness and aids caramelization.
White Pepper 1/8 tsp Adds a distinct, earthy heat. Substitute: Freshly ground black pepper.
Water 1 tbsp Helps distribute the sauce evenly.
Sesame Oil (toasted) 1 tsp Finishing oil for a nutty aroma. Do not cook with it—add at the end.
💡 The Kitchen Team’s Pro Tip: Always have your ingredients prepped and within arm’s reach before you turn on the heat. Stir-frying is a fast process, and there’s no time to mince garlic or measure sauce once you start cooking. This “mise en place” is the true key to a successful 10-minute meal.

Step-by-Step Instructions

Follow these simple steps for perfect pan fried noodles every single time.

Step 1: Prep the Noodles & Make the Sauce

Cook your fresh noodles according to the package directions. This usually takes just 2-3 minutes in boiling water. The goal is to have them just shy of al dente, as they will finish cooking in the pan. Immediately drain and rinse under cold water to stop the cooking process. This also removes excess starch, preventing them from sticking together. Let them drain thoroughly in a colander. While the noodles cook, combine the soy sauce, dark soy sauce, sugar, white pepper, and 1 tbsp of water in a small bowl. Whisk until the sugar is dissolved. Prep your vegetables: mince the garlic, cut the green onions into 2-inch pieces (separating whites from greens), and rinse your bean sprouts.

Step 2: Build the Flavor Base

Place a large wok or heavy-bottomed skillet (non-stick or carbon steel works great) over medium-high heat. Let it get hot for about 30 seconds. Add the 2 tablespoons of neutral oil and swirl to coat the pan. Add the minced garlic and the white/light green parts of the green onions. Stir-fry for just 30-60 seconds until incredibly fragrant. Be careful not to let the garlic burn, as it will turn bitter.

Step 3: Fry the Noodles

Add the well-drained noodles to the wok. Using a pair of tongs or two spatulas, toss and stir the noodles, ensuring they get coated in the fragrant oil and mix with the garlic and onion. Let the noodles sit for about 30 seconds at a time to get a slight sear on the bottom before tossing again. This builds texture.

Step 4: Add the Sauce & Caramelize

Give your sauce mixture one final stir and then pour it evenly over the noodles. Immediately start tossing and stirring vigorously. The sauce will sizzle and begin to reduce and caramelize on the noodles and the hot surface of the pan. Continue cooking for 2-3 minutes until the noodles are uniformly coated in a beautiful, dark, glossy sauce and you see some crispy, caramelized bits forming.

Step 5: Finish with Veggies & Aroma

Add the bean sprouts and the reserved dark green parts of the green onions to the wok. Toss everything together for just 30-60 seconds—you want the bean sprouts to warm through but remain crisp. Turn off the heat. Drizzle the toasted sesame oil over the top and give one final toss. The residual heat will warm the oil, releasing its incredible nutty fragrance throughout the dish.

Step 6: Serve Immediately

Transfer the noodles to a serving platter or directly into bowls. Pan fried noodles are best enjoyed hot and fresh, right out of the wok, when the textures are at their peak.

Serving Suggestions

While these noodles are a complete meal on their own, they pair beautifully with a variety of sides. For a simple protein boost, top with a soft-boiled or fried egg with a runny yolk. The yolk acts as a rich, additional sauce. For a more substantial meal, serve alongside Quick Garlic Soy Chicken or 5-Spice Pan-Seared Tofu. A light, acidic side like a cucumber salad dressed with rice vinegar and a pinch of sugar provides a refreshing contrast to the savory noodles. For a restaurant-style touch, offer small bowls of chili crisp, extra soy sauce, and chopped peanuts or sesame seeds at the table for custom garnishing.

Storage & Reheating

Storage: Allow leftovers to cool completely before transferring to an airtight container. They will keep in the refrigerator for up to 3 days. Note that the noodles will soften, and the bean sprouts will lose their crunch.

Reheating: The best method is to re-fry them! Heat a teaspoon of oil in a skillet over medium heat. Add the cold noodles and spread them out. Let them heat through, stirring occasionally, for 4-5 minutes. A splash of water or a tiny bit of extra soy sauce can help loosen them up and refresh the flavor. Microwaving is possible but will result in softer, soggier noodles.

💡 The Kitchen Team’s Pro Tip: For meal prep, you can cook the noodles and make the sauce up to 2 days in advance. Store them separately in the fridge. When ready to eat, the actual stir-fry process will take only 5 minutes, giving you that “fresh-cooked” texture.

Delicious Variations to Try

The basic framework of this recipe is a canvas for your creativity. Here are some of our favorite twists:

  • Spicy Sichuan: Add 1-2 teaspoons of Sichuan chili bean paste (doubanjiang) to the garlic when building the base, and finish with a sprinkle of Sichuan peppercorn powder.
  • Protein Power: Add 1 cup of cooked, shredded chicken, thinly sliced beef, shrimp, or crumbled firm tofu when you add the noodles.
  • Thai-Inspired: Swap the soy sauces for 2 tbsp of fish sauce and add 1 tbsp of lime juice and a handful of fresh basil or cilantro at the end.
  • Teriyaki Twist: Replace the sauce with 3 tbsp of your favorite teriyaki sauce and add 1 cup of broccoli florets with the bean sprouts.
  • Extra Veggie: Bulk it up with a colorful mix of bell peppers, shredded carrots, mushrooms, and baby corn.

Frequently Asked Questions

Can I really make this in 10 minutes?
Absolutely! The timing is precise: 5 minutes for prep (measuring sauce, chopping aromatics) and 5 minutes of active cooking time. Having everything ready before you start cooking is non-negotiable.

What’s the best type of pan to use?
A wok is ideal because its shape allows for easy tossing and high-heat cooking. However, a large (12-inch), heavy-bottomed skillet or cast-iron pan works perfectly well.

My noodles always stick together. How do I prevent this?
Rinsing the cooked noodles thoroughly under cold water is crucial. It washes away the sticky surface starch. Also, ensure your wok is properly heated before adding oil, and don’t be shy with the initial tossing when you add the noodles to the oil.

Can I make this gluten-free?
Yes! Use gluten-free noodles (like rice noodles or gluten-free ramen) and substitute the soy sauces with tamari or a certified gluten-free soy sauce alternative.

Is dark soy sauce necessary?
While you can substitute it (see ingredient table), dark soy sauce is highly recommended. It gives the noodles their classic, rich brown color and a deeper, more complex flavor that regular soy sauce alone can’t achieve.

Can I use frozen vegetables?
You can, but add them earlier. Add frozen stir-fry vegetable mixes right after you add the noodles, so they have time to thaw and cook through. Fresh vegetables added at the end provide better texture.

How can I make this dish less salty?
Use low-sodium soy sauce and reduce the amount slightly. You can also balance it with an extra 1/2 tsp of sugar or a squeeze of fresh lime juice at the end.

What’s the difference between pan-fried and stir-fried noodles?
It’s often semantics, but “pan-frying” implies letting the noodles sit and crisp up slightly in the pan, while “stir-frying” involves constant motion. This recipe uses a combination: we toss, then let sit briefly to develop caramelization.

Love This Recipe? Share It!

If this 10-Minute Pan Fried Noodles recipe saved your weeknight, we’d be thrilled if you shared it with friends and family! Pin the image below to your Pinterest boards, or share it on Facebook and Instagram. Don’t forget to tag @cookingwithemy so we can celebrate your cooking win!

📌 Save This Recipe for Later!

Pin the image below to your ‘Quick Dinner Ideas’ board on Pinterest so you always have it handy!

Follow us on Pinterest for more easy, flavorful recipes: @cookingwithemy

(Image of sizzling pan fried noodles in a wok, garnished with green onions and sesame seeds)

clock clock iconcutlery cutlery iconflag flag iconfolder folder iconinstagram instagram iconpinterest pinterest iconfacebook facebook iconprint print iconsquares squares iconheart heart iconheart solid heart solid icon

10-Minute Pan Fried Noodles


  • Author: Chef Emy

Description

These quick & easy pan fried noodles are made with a handful of ingredients in a single pan, making it the perfect meal to add to your dinner rotation. Tossed in a savory sauce and aromatic vegetables, these stir-fried noodles are packed with flavor and can easily be customized to your liking.


Ingredients

Scale
  • 300 g fresh noodles (see notes below)
  • 2 tbsp neutral oil
  • 2 cloves garlic (minced)
  • 2 green onions (cut lengthwise in 2″ pieces)
  • 1 cup bean sprouts (or other vegetables)
  • 1 tsp sesame oil (to finish)
  • 2 tbsp soy sauce
  • 1/2 tbsp dark soy sauce
  • 1/2 tbsp sugar
  • 1/8 tsp white pepper (or black pepper)
  • 1 tbsp water

Instructions

  1. Combine the sauce ingredients in a bowl and prepare the noodles as per package instructions. Rinse the noodles under cold water, drain, and set aside.
  2. Heat oil in a wok or a large pan over medium heat. Add garlic and white parts of green onion and cook until fragrant. Add noodles and mix to combine.
  3. Pour in the sauce and cook for about 2-3 minutes until the noodles are caramelized. Add bean sprouts, reserved green onion, and sesame oil to finish. Enjoy!

10-Minute Pan Fried Noodles

These quick & easy pan fried noodles are made with a handful of ingredients in a single pan, making it the perfect meal to add to your dinner rotation. Tossed in a savory sauce and aromatic vegetables, these stir-fried noodles are packed with flavor and can easily be customized to your liking.

Print

clock clock iconcutlery cutlery iconflag flag iconfolder folder iconinstagram instagram iconpinterest pinterest iconfacebook facebook iconprint print iconsquares squares iconheart heart iconheart solid heart solid icon

10-Minute Pan Fried Noodles


  • Author: Chef Emy

Description

These quick & easy pan fried noodles are made with a handful of ingredients in a single pan, making it the perfect meal to add to your dinner rotation. Tossed in a savory sauce and aromatic vegetables, these stir-fried noodles are packed with flavor and can easily be customized to your liking.


Ingredients

Scale
  • 300 g fresh noodles (see notes below)
  • 2 tbsp neutral oil
  • 2 cloves garlic (minced)
  • 2 green onions (cut lengthwise in 2" pieces)
  • 1 cup bean sprouts (or other vegetables)
  • 1 tsp sesame oil (to finish)
  • 2 tbsp soy sauce
  • 1/2 tbsp dark soy sauce
  • 1/2 tbsp sugar
  • 1/8 tsp white pepper (or black pepper)
  • 1 tbsp water

Instructions

  1. Combine the sauce ingredients in a bowl and prepare the noodles as per package instructions. Rinse the noodles under cold water, drain, and set aside.
  2. Heat oil in a wok or a large pan over medium heat. Add garlic and white parts of green onion and cook until fragrant. Add noodles and mix to combine.
  3. Pour in the sauce and cook for about 2-3 minutes until the noodles are caramelized. Add bean sprouts, reserved green onion, and sesame oil to finish. Enjoy!

Japanese Katsu Bowls with Tonkatsu Sauce

Print

clock clock iconcutlery cutlery iconflag flag iconfolder folder iconinstagram instagram iconpinterest pinterest iconfacebook facebook iconprint print iconsquares squares iconheart heart iconheart solid heart solid icon

Japanese Katsu Bowls with Tonkatsu Sauce


  • Author: Chef Emy

Description

Japanese Katsu Bowls with Tonkatsu Sauce are the ultimate comfort food, combining crispy, golden cutlets with fluffy rice and a savory-sweet sauce. This simple yet flavorful recipe is perfect for a quick weeknight dinner or an indulgent treat that feels like dining out.


Ingredients

Scale
  • 2 boneless chicken breasts or pork loin cutlets (pounded to ½-inch thickness)
  • 1 cup panko breadcrumbs
  • ½ cup all-purpose flour
  • 2 large eggs (beaten)
  • 3 cups cooked white rice (sushi rice preferred)
  • ½ cup tonkatsu sauce (store-bought or homemade*)
  • Oil for frying (vegetable or canola)
  • Fresh parsley or green onion for garnish (optional)
  • 3 tbsp ketchup
  • 2 tbsp Worcestershire sauce
  • 1 tbsp soy sauce
  • 1 tsp sugar

Instructions

  1. Pound chicken to ½-inch thickness and season with salt and pepper.
  2. Set up a breading station with three bowls: one for flour, one for beaten eggs, and one for panko breadcrumbs.
  3. Coat each cutlet in flour, then dip in egg, and finally coat with panko breadcrumbs, pressing gently to adhere.
  4. Heat oil in a large frying pan over medium-high heat to about 350°F (175°C).
  5. Fry the cutlets for 3-4 minutes per side (for chicken) or 2-3 minutes per side (for pork) until golden and cooked through. Transfer to a paper towel-lined plate.
  6. If making homemade tonkatsu sauce, mix ketchup, Worcestershire sauce, soy sauce, and sugar in a small bowl. Adjust sweetness to taste.
  7. Assemble bowls by adding cooked rice, sliced cutlets, and a generous drizzle of tonkatsu sauce. Garnish with parsley or green onions, if desired. Serve immediately.