“`html
Table of Contents
- Unleash Flavor: Delicious Asian Chicken Wings
- The Secret to Irresistible Asian Chicken Wings
- Timing is Everything for Perfect Wings
- Crafting Your Masterpiece: Step-by-Step Instructions
- Nutritional Snapshot: Guilt-Free Indulgence
- Healthier Twists on Delicious Asian Chicken Wings
- Beyond Appetizers: Serving Suggestions
- Avoid These Common Wing-Woe Mistakes
- Storing Your Sticky Delights
- Frequently Asked Questions
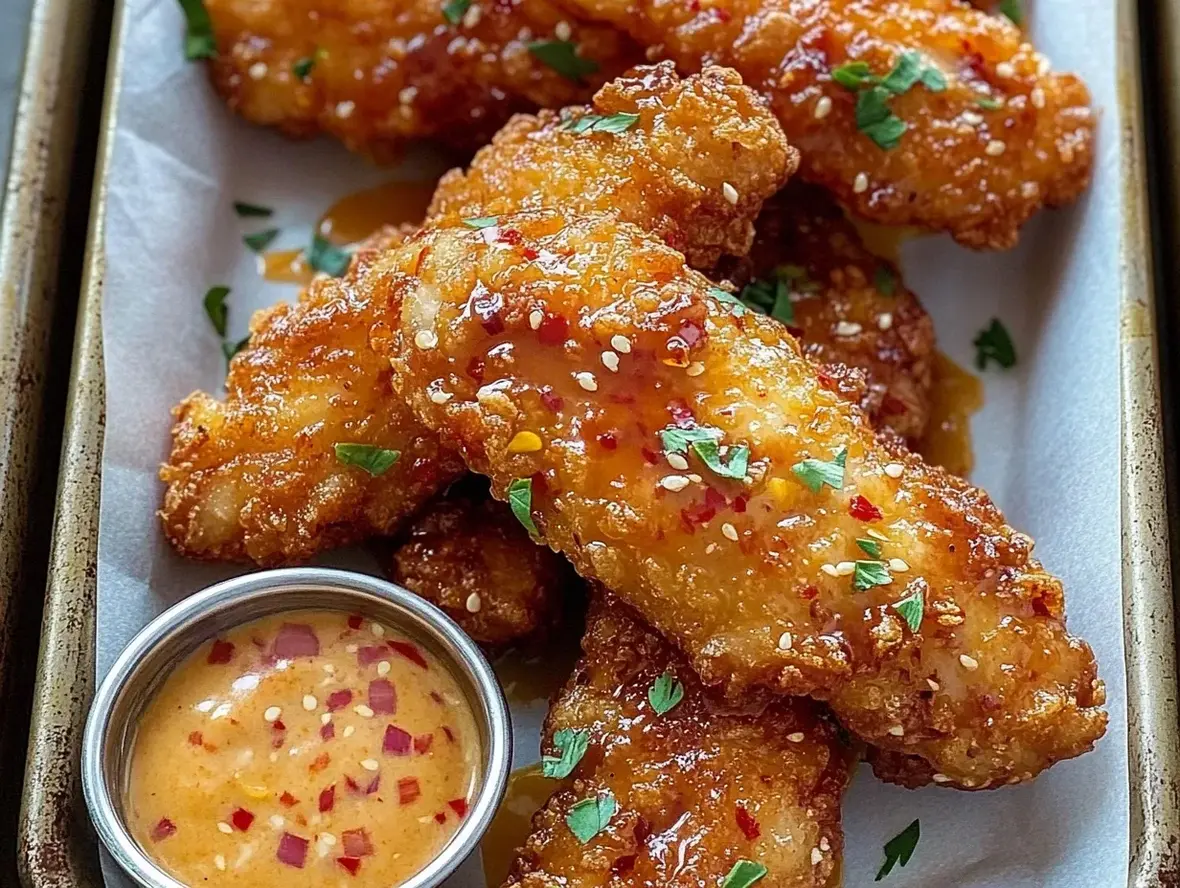
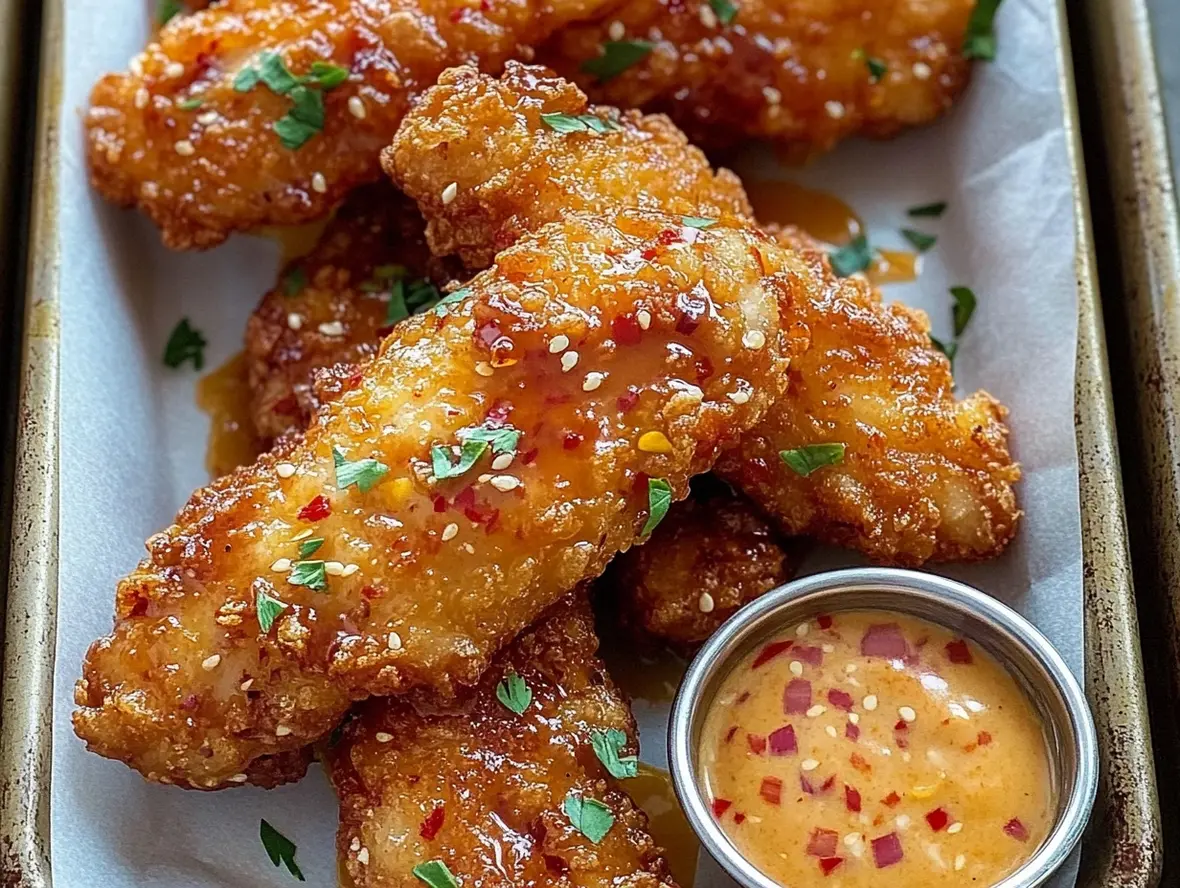
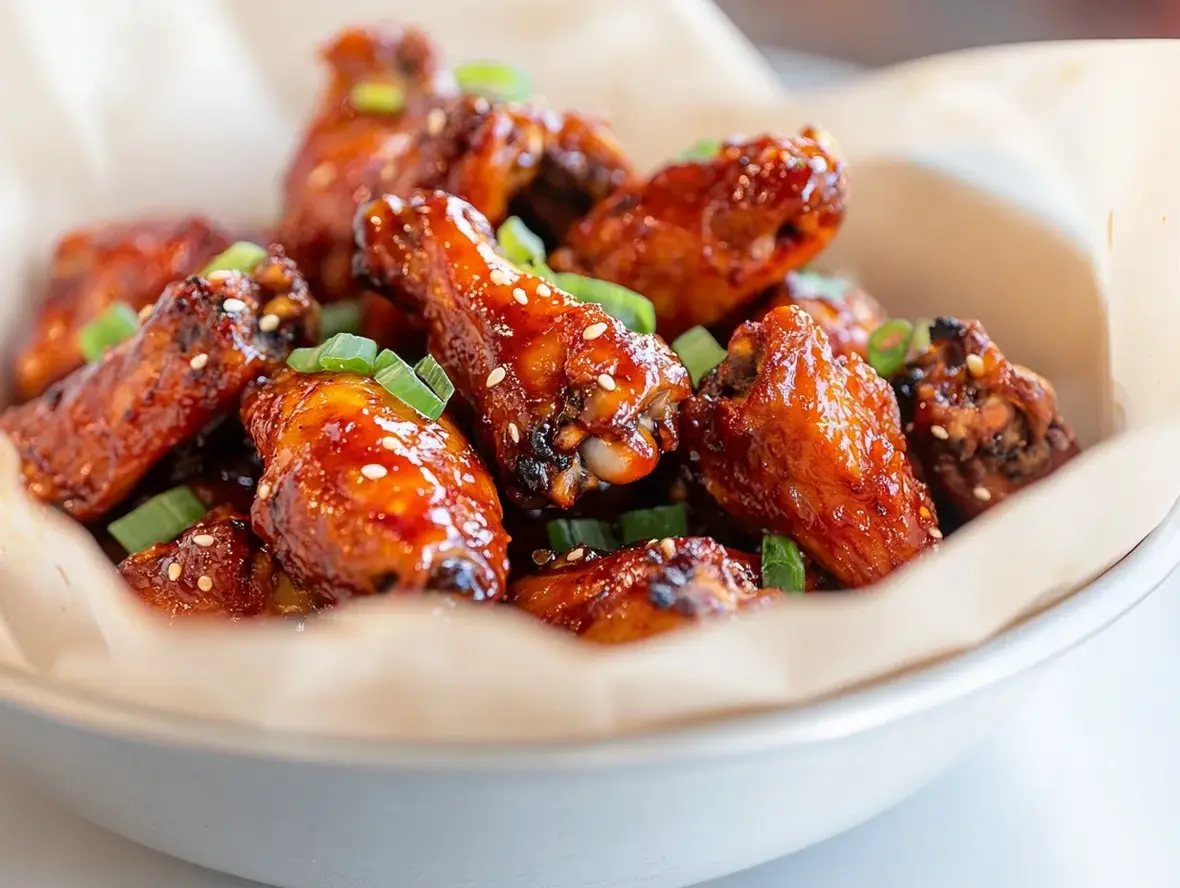
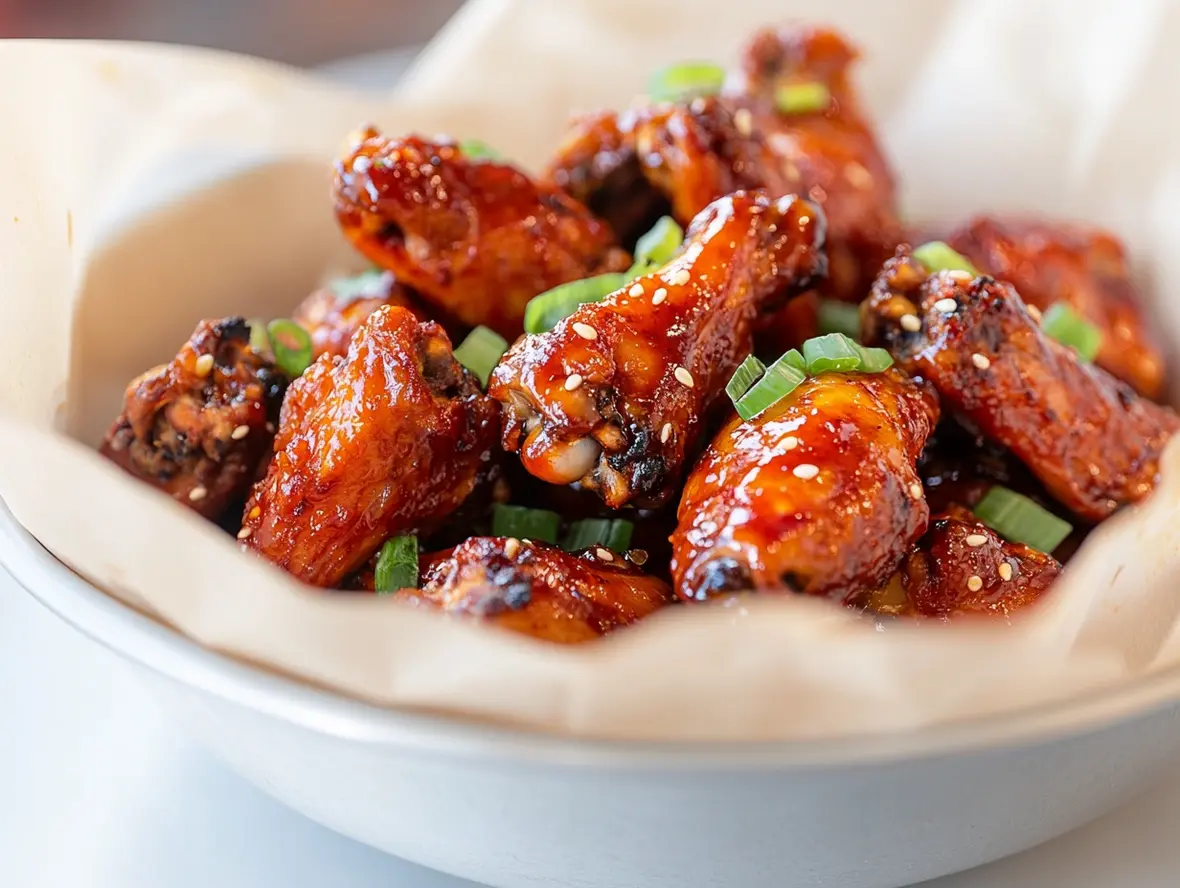
Delicious Asian Chicken Wings Recipe You’ll Love
Unleash Flavor: Delicious Asian Chicken Wings
Did you know that perfectly crispy chicken wings, coated in a savory-sweet glaze, are one of the most searched-for appetizer recipes globally, with millions of people looking for that ultimate sticky, finger-licking experience every month? If you’re nodding along, you’re in the right place! Get ready to discover a truly delicious Asian chicken wings recipe that will become your new go-to. We’re talking about wings that are unbelievably crispy on the outside, tender and juicy on the inside, all coated in a glaze that caramelizes to a glossy, irresistible sheen. Forget bland, boring wings; this recipe is about to elevate your appetizer game, party spread, or even a satisfying solo snack to an unparalleled level of deliciousness.
The Secret to Irresistible Asian Chicken Wings
The magic of these Asian chicken wings lies in a simple yet powerful combination of ingredients. We’re aiming for a balance of savory, sweet, spicy, and umami, with a texture that is both crispy and delightfully sticky.
For the Wings:
- 2 lbs Chicken Wings: Look for plump, fresh wings. You can use whole wings, or the more manageable flats and drumettes. If using whole wings, separate them at the joints (discard the wing tips or save them for stock – they’re too bony for eating!).
- 1 tablespoon Baking Powder (Aluminum-Free): This is the secret weapon for ultra-crispy skin! It raises the pH of the skin, helping it to dry out and crisp up beautifully in the oven or air fryer. Do NOT use baking soda, as it has a metallic taste.
- 1 teaspoon Salt: Enhances all the flavors. Fine sea salt or kosher salt works best.
- ½ teaspoon Black Pepper, freshly ground: For a subtle kick and aromatic warmth.
- Optional: 1 teaspoon Garlic Powder & 1 teaspoon Onion Powder: For an extra layer of savory depth directly on the wings before coating.
For The Sticky Asian Glaze:
- ½ cup Soy Sauce (or Tamari for Gluten-Free): The salty, umami backbone of the glaze.
- ⅓ cup Honey (or Maple Syrup for a vegan-friendly option): For that essential sweetness and glorious caramelization. Honey provides a richer flavor and gloss.
- 2 tablespoons Rice Vinegar: Adds a crucial tangy note to cut through the sweetness and richness.
- 1 tablespoon Sesame Oil: Toasted sesame oil is preferred for its nutty aroma and flavor.
- 2-3 cloves Garlic, minced: Freshly minced garlic imparts a pungent, aromatic sweetness when cooked.
- 1 teaspoon Ginger, freshly grated: Ginger adds a warm, spicy zest that is characteristic of Asian cuisine.
- Optional: 1-2 teaspoons Sriracha or Gochujang: For a touch of heat. Adjust to your spice preference!
- Optional: 1 tablespoon Cornstarch slurry (1 tbsp cornstarch mixed with 2 tbsp cold water): To thicken the glaze to a syrupy consistency, ensuring it coats the wings beautifully.
Timing is Everything for Perfect Wings
These times are comparable to many baked chicken wing recipes, but the focus on achieving that perfect crispiness and sticky glaze will make this recipe stand out. The prep is minimal, making it an excellent weeknight meal or party starter!
Crafting Your Masterpiece: Step-by-Step Instructions
Step 1: Prep the Wings for Perfection
First things first, let’s get our wings ready. Pat your chicken wings thoroughly dry with paper towels. This is a crucial step for achieving crispy skin! Moisture is the enemy of crispiness. Place the dried wings in a large bowl.
Step 2: The Magic Marinade (Optional but Recommended!)
In a small bowl, whisk together the baking powder, salt, pepper, and optional garlic and onion powders. Sprinkle this mixture evenly over the dried chicken wings. Toss gently to ensure each wing is lightly but completely coated. The baking powder works its magic to draw out moisture and promote browning.
Step 3: Achieve Ultimate Crispiness
Preheat your oven to 400°F (200°C). Arrange the seasoned wings in a single layer on a wire rack set over a baking sheet. This allows air to circulate around the wings, ensuring even crisping and preventing them from getting soggy. Bake for 20-25 minutes. Flip the wings and bake for another 20-25 minutes, or until they are golden brown and delightfully crispy. If you own an air fryer, you can air fry them at 390°F (195°C) for about 20-25 minutes, flipping halfway through, for even faster results!
Step 4: Craft the Irresistible Glaze
While the wings are baking, let’s make that luscious glaze. In a medium saucepan, combine the soy sauce, honey (or maple syrup), rice vinegar, sesame oil, minced garlic, grated ginger, and optional sriracha or gochujang.
Heat the mixture over medium heat, stirring occasionally, until it comes to a gentle simmer. Let it simmer for about 5-7 minutes, allowing the flavors to meld and the garlic and ginger to soften. If you prefer a thicker, more syrupy glaze, whisk in the cornstarch slurry and continue to simmer for another 1-2 minutes until it thickens to your desired consistency. Remove from heat and set aside.
Step 5: Toss and Caramelize to Sticky Perfection
Once the wings are perfectly crispy, carefully remove them from the oven (or air fryer). Transfer the hot wings to a large bowl. Pour the warm glaze over the wings. Gently toss until every wing is generously coated in the glossy, sticky sauce. The residual heat from the wings will help the glaze adhere beautifully.
For an extra layer of caramelization, you can briefly return the glazed wings to the oven (or air fryer) for a few minutes at a higher temperature (around 425°F/220°C) or under the broiler, watching very carefully to prevent burning. This step is optional but highly recommended for that restaurant-quality finish.
Step 6: Garnish and Serve Your Masterpiece
Arrange your stunning, sticky Asian chicken wings on a serving platter. Garnish generously with toasted sesame seeds and thinly sliced green onions for a pop of color and fresh flavor. Serve immediately while they’re hot, crispy, and irresistibly saucy!
Nutritional Snapshot: Guilt-Free Indulgence
While individual calorie counts can vary based on exact ingredient quantities and cooking methods, a serving of these Delicious Asian Chicken Wings generally falls within nutritional parameters that can be enjoyed as part of a balanced diet. Key nutrients include protein from the chicken, and carbohydrates from the sweeteners in the glaze.
- Approximate Calories: 300-400 per serving (depending on glaze and wing size)
- Protein: High
- Fat: Moderate (healthy fats from sesame oil)
- Carbohydrates: Moderate (from honey/maple syrup)
Enjoying these in moderation, focusing on fresh ingredients, and balancing them with vegetables will make them a guilt-free pleasure.
Healthier Twists on Delicious Asian Chicken Wings
Looking to make these even healthier without sacrificing flavor? Here are some smart swaps:
- Reduce Sweetener: Cut the honey or maple syrup by a tablespoon or two. The glaze will still be delicious, just less sweet.
- Opt for Leaner Protein: While this recipe is for wings, you could adapt the glaze for chicken breast tenders or even tofu for a vegetarian option.
- Use Lower-Sodium Soy Sauce: Significantly reduces sodium intake.
- Air Fryer Method: This method uses little to no added oil compared to deep frying, making it a healthier cooking technique.
- Spice it Up with Fresh Chili: Instead of sriracha, finely mince a fresh red chili for heat and add extra nutrients.
Beyond Appetizers: Serving Suggestions
These versatile Asian chicken wings are more than just a party starter! Try serving them:
- As a main course: Pair with steamed rice, a crisp Asian slaw, or stir-fried vegetables for a complete meal.
- In bowls: Serve over a bed of quinoa or brown rice with your favorite steamed or roasted veggies.
- Sandwich filling: Shred the meat and toss with a little extra glaze for a flavorful sandwich or wrap.
Avoid These Common Wing-Woe Mistakes
Don’t let your wings fall flat! Watch out for these common pitfalls:
- Not Drying the Wings: Soggy skin is a disaster. Pat them *very* dry.
- Overcrowding the Pan/Rack: Wings need space to get crispy. Cook in batches if necessary.
- Using Baking Soda Instead of Powder: They are not interchangeable! Baking powder is essential for crispiness.
- Burning the Glaze: Sugar burns easily. Keep a close eye when caramelizing or broiling.
- Glazing Too Early: Wait until the wings are almost done cooking to toss them in glaze to prevent burning during the initial bake.
Storing Your Sticky Delights
These wings are best enjoyed fresh for maximum crispiness. However, if you have leftovers:
- Allow the wings to cool completely before storing.
- Store in an airtight container in the refrigerator for up to 2-3 days.
- To reheat, baking is the best option to revive crispiness. Spread them on a baking sheet and reheat in a preheated oven at 375°F (190°C) for about 10-15 minutes, or until heated through and slightly re-crisped. Air frying can also work well. Microwaving will result in soft, chewy wings.
Frequently Asked Questions
***Can I make this recipe without baking powder?***
While baking powder is key for achieving ultimate crispiness, you can try omitting it. However, your wings might not be as crispy. Ensure you pat them very dry and bake them at a higher temperature for longer.
***Can I prepare the glaze ahead of time?***
Yes, you can make the glaze a day or two in advance and store it in the refrigerator. Gently reheat it on the stovetop, adding a splash of water or soy sauce if it’s too thick, before tossing with the wings.
***What is the best way to make the wings crispy?***
The combination of patting the wings dry, using baking powder, and cooking them on a wire rack over a baking sheet is the surefire way to get them crispy. Air frying is also an excellent method for crispiness.
***Can I use different types of soy sauce?***
Absolutely! If you have low-sodium soy sauce, it’s a great option to reduce salt. For gluten-free needs, tamari is an excellent substitute. The flavor profile might slightly differ, but will still be delicious.
Taste the Perfection!
There you have it – a truly delicious Asian chicken wings recipe that’s bound to impress! The perfect balance of sweet, savory, and tangy, with a crispy texture that’s utterly addictive. Whether you’re hosting a game day party, looking for a show-stopping appetizer, or just craving a flavorful snack, these wings deliver. Don’t wait – gather your ingredients and get ready to create your new favorite wings!
Ready to make these amazing wings? Let us know in the comments below how yours turn out, or if you have any creative twists to add!

Sticky Asian Wings
Description
Crispy chicken wingscoated in a sweet and tangy glaze that caramelizes beautifully for the ultimate sticky, finger-licking experience. Perfect for appetizers, parties, or a delicious snack!
Ingredients
- For the Wings:16split chicken wings (drummettes and wingettes)1 tbspgarlic powder1 tspsalt1 tsppepperAvocado oil sprayFor the Sticky Glaze:¼ cupsweet Thai chili sauce¼ cupketchup
- For the Sticky Glaze:¼ cupsweet Thai chili sauce¼ cupketchup
Instructions
- 1️⃣Prepare the Wings:Pat the chicken wings dry with a paper towel to ensure they crisp up during cooking.Season evenly with garlic powder, salt, and pepper.Lightly spray the wings with avocado oil for added crispiness.2️⃣Cooking Options:Baking Method:Preheat the oven to425°F (218°C).Line a baking sheet with parchment paper and place a cooling rack on top. Arrange the wings in a single layer on the rack.Bake for25 minutes, flipping halfway through. Continue baking until desired crispiness is achieved, ensuring the internal temperature reaches165°F (74°C).Air Fryer Method:Preheat the air fryer to400°F (204°C).Place the wings in the air fryer basket in a single layer.Air fry for20 minutes, flipping halfway, until crispy and golden brown.3️⃣Make the Sticky Glaze:In a large skillet over medium heat, combine the sweet Thai chili sauce and ketchup.Sauté for about2 minutes, stirring until the glaze becomes bubbly and starts to caramelize.4️⃣Coat the Wings:Add the cooked wings to the skillet and toss until they are evenly coated in the sticky glaze.Let the wings cook in the sauce for an additional1–2 minutesto allow the glaze to caramelize fully.5️⃣Serve:Transfer the wings to a serving plate and enjoy them while they’re hot, sticky, and irresistibly delicious!
- Pat the chicken wings dry with a paper towel to ensure they crisp up during cooking.
- Season evenly with garlic powder, salt, and pepper.Lightly spray the wings with avocado oil for added crispiness.2️⃣Cooking Options:Baking Method:Preheat the oven to425°F (218°C).Line a baking sheet with parchment paper and place a cooling rack on top. Arrange the wings in a single layer on the rack.Bake for25 minutes, flipping halfway through. Continue baking until desired crispiness is achieved, ensuring the internal temperature reaches165°F (74°C).Air Fryer Method:Preheat the air fryer to400°F (204°C).Place the wings in the air fryer basket in a single layer.Air fry for20 minutes, flipping halfway, until crispy and golden brown.3️⃣Make the Sticky Glaze:In a large skillet over medium heat, combine the sweet Thai chili sauce and ketchup.Sauté for about2 minutes, stirring until the glaze becomes bubbly and starts to caramelize.4️⃣Coat the Wings:Add the cooked wings to the skillet and toss until they are evenly coated in the sticky glaze.Let the wings cook in the sauce for an additional1–2 minutesto allow the glaze to caramelize fully.5️⃣Serve:Transfer the wings to a serving plate and enjoy them while they’re hot, sticky, and irresistibly delicious!
- Lightly spray the wings with avocado oil for added crispiness.2️⃣Cooking Options:Baking Method:Preheat the oven to425°F (218°C).Line a baking sheet with parchment paper and place a cooling rack on top. Arrange the wings in a single layer on the rack.Bake for25 minutes, flipping halfway through. Continue baking until desired crispiness is achieved, ensuring the internal temperature reaches165°F (74°C).Air Fryer Method:Preheat the air fryer to400°F (204°C).Place the wings in the air fryer basket in a single layer.Air fry for20 minutes, flipping halfway, until crispy and golden brown.3️⃣Make the Sticky Glaze:In a large skillet over medium heat, combine the sweet Thai chili sauce and ketchup.Sauté for about2 minutes, stirring until the glaze becomes bubbly and starts to caramelize.4️⃣Coat the Wings:Add the cooked wings to the skillet and toss until they are evenly coated in the sticky glaze.Let the wings cook in the sauce for an additional1–2 minutesto allow the glaze to caramelize fully.5️⃣Serve:Transfer the wings to a serving plate and enjoy them while they’re hot, sticky, and irresistibly delicious!
- 2️⃣Cooking Options:
- Preheat the oven to425°F (218°C).Line a baking sheet with parchment paper and place a cooling rack on top. Arrange the wings in a single layer on the rack.Bake for25 minutes, flipping halfway through. Continue baking until desired crispiness is achieved, ensuring the internal temperature reaches165°F (74°C).Air Fryer Method:Preheat the air fryer to400°F (204°C).Place the wings in the air fryer basket in a single layer.Air fry for20 minutes, flipping halfway, until crispy and golden brown.3️⃣Make the Sticky Glaze:In a large skillet over medium heat, combine the sweet Thai chili sauce and ketchup.Sauté for about2 minutes, stirring until the glaze becomes bubbly and starts to caramelize.4️⃣Coat the Wings:Add the cooked wings to the skillet and toss until they are evenly coated in the sticky glaze.Let the wings cook in the sauce for an additional1–2 minutesto allow the glaze to caramelize fully.5️⃣Serve:Transfer the wings to a serving plate and enjoy them while they’re hot, sticky, and irresistibly delicious!
- Line a baking sheet with parchment paper and place a cooling rack on top. Arrange the wings in a single layer on the rack.
- Bake for25 minutes, flipping halfway through. Continue baking until desired crispiness is achieved, ensuring the internal temperature reaches165°F (74°C).Air Fryer Method:Preheat the air fryer to400°F (204°C).Place the wings in the air fryer basket in a single layer.Air fry for20 minutes, flipping halfway, until crispy and golden brown.3️⃣Make the Sticky Glaze:In a large skillet over medium heat, combine the sweet Thai chili sauce and ketchup.Sauté for about2 minutes, stirring until the glaze becomes bubbly and starts to caramelize.4️⃣Coat the Wings:Add the cooked wings to the skillet and toss until they are evenly coated in the sticky glaze.Let the wings cook in the sauce for an additional1–2 minutesto allow the glaze to caramelize fully.5️⃣Serve:Transfer the wings to a serving plate and enjoy them while they’re hot, sticky, and irresistibly delicious!
- Preheat the air fryer to400°F (204°C).
- Place the wings in the air fryer basket in a single layer.Air fry for20 minutes, flipping halfway, until crispy and golden brown.3️⃣Make the Sticky Glaze:In a large skillet over medium heat, combine the sweet Thai chili sauce and ketchup.Sauté for about2 minutes, stirring until the glaze becomes bubbly and starts to caramelize.4️⃣Coat the Wings:Add the cooked wings to the skillet and toss until they are evenly coated in the sticky glaze.Let the wings cook in the sauce for an additional1–2 minutesto allow the glaze to caramelize fully.5️⃣Serve:Transfer the wings to a serving plate and enjoy them while they’re hot, sticky, and irresistibly delicious!
- Air fry for20 minutes, flipping halfway, until crispy and golden brown.3️⃣Make the Sticky Glaze:In a large skillet over medium heat, combine the sweet Thai chili sauce and ketchup.Sauté for about2 minutes, stirring until the glaze becomes bubbly and starts to caramelize.4️⃣Coat the Wings:Add the cooked wings to the skillet and toss until they are evenly coated in the sticky glaze.Let the wings cook in the sauce for an additional1–2 minutesto allow the glaze to caramelize fully.5️⃣Serve:Transfer the wings to a serving plate and enjoy them while they’re hot, sticky, and irresistibly delicious!
- 3️⃣Make the Sticky Glaze:
- In a large skillet over medium heat, combine the sweet Thai chili sauce and ketchup.Sauté for about2 minutes, stirring until the glaze becomes bubbly and starts to caramelize.4️⃣Coat the Wings:Add the cooked wings to the skillet and toss until they are evenly coated in the sticky glaze.Let the wings cook in the sauce for an additional1–2 minutesto allow the glaze to caramelize fully.5️⃣Serve:Transfer the wings to a serving plate and enjoy them while they’re hot, sticky, and irresistibly delicious!
- Sauté for about2 minutes, stirring until the glaze becomes bubbly and starts to caramelize.4️⃣Coat the Wings:Add the cooked wings to the skillet and toss until they are evenly coated in the sticky glaze.Let the wings cook in the sauce for an additional1–2 minutesto allow the glaze to caramelize fully.5️⃣Serve:Transfer the wings to a serving plate and enjoy them while they’re hot, sticky, and irresistibly delicious!
- 4️⃣Coat the Wings:
- Add the cooked wings to the skillet and toss until they are evenly coated in the sticky glaze.Let the wings cook in the sauce for an additional1–2 minutesto allow the glaze to caramelize fully.5️⃣Serve:Transfer the wings to a serving plate and enjoy them while they’re hot, sticky, and irresistibly delicious!
- Let the wings cook in the sauce for an additional1–2 minutesto allow the glaze to caramelize fully.5️⃣Serve:Transfer the wings to a serving plate and enjoy them while they’re hot, sticky, and irresistibly delicious!
- 5️⃣Serve:
- Transfer the wings to a serving plate and enjoy them while they’re hot, sticky, and irresistibly delicious!
Notes
For extra flavor, garnish with sesame seeds and chopped green onions.If you like a bit more spice, add a teaspoon of Sriracha or red chili flakes to the glaze.Use parchment paper to make cleanup easy when baking.Serve with a side of ranch or blue cheese dressing for dipping.
If you like a bit more spice, add a teaspoon of Sriracha or red chili flakes to the glaze.Use parchment paper to make cleanup easy when baking.Serve with a side of ranch or blue cheese dressing for dipping.
Use parchment paper to make cleanup easy when baking.Serve with a side of ranch or blue cheese dressing for dipping.
Serve with a side of ranch or blue cheese dressing for dipping.
“`