Crispy Cheddar Chicken A Delicious Dinner Must-Try

“`html

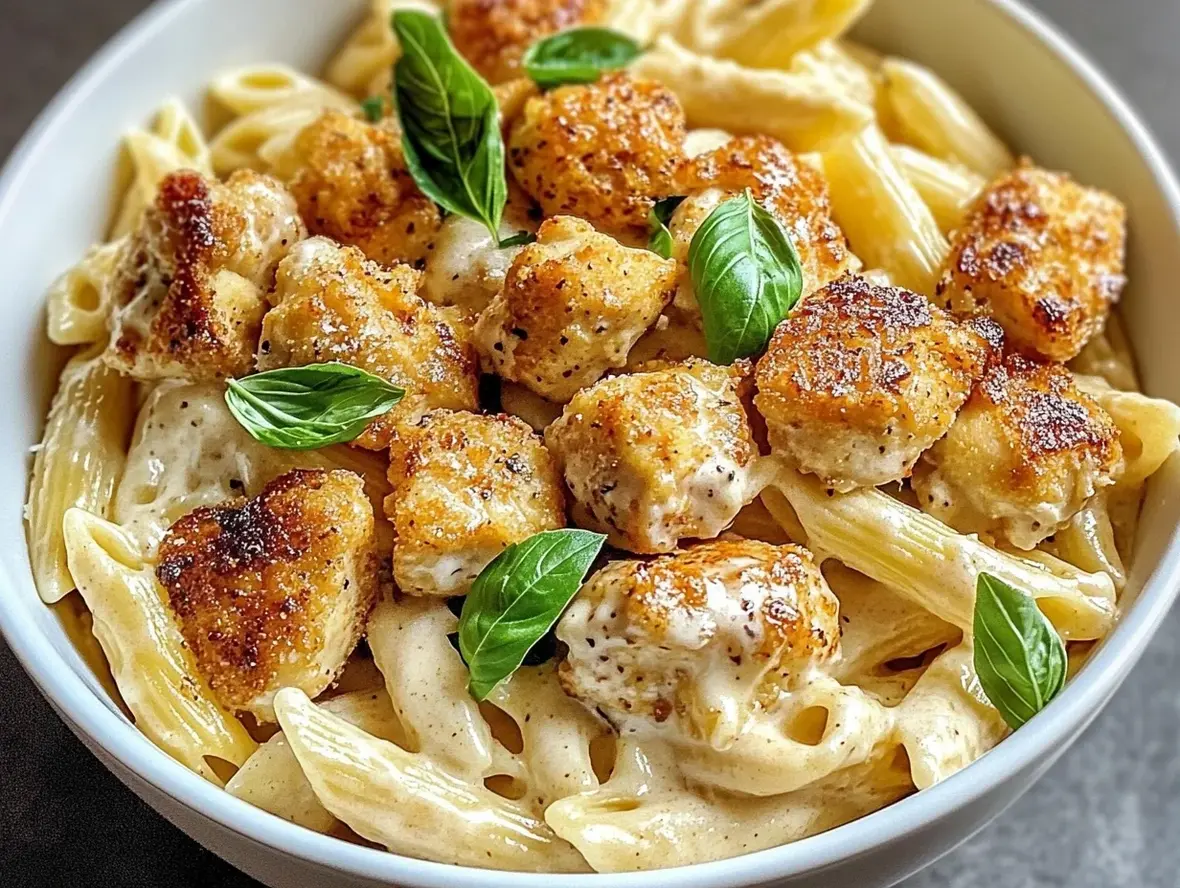
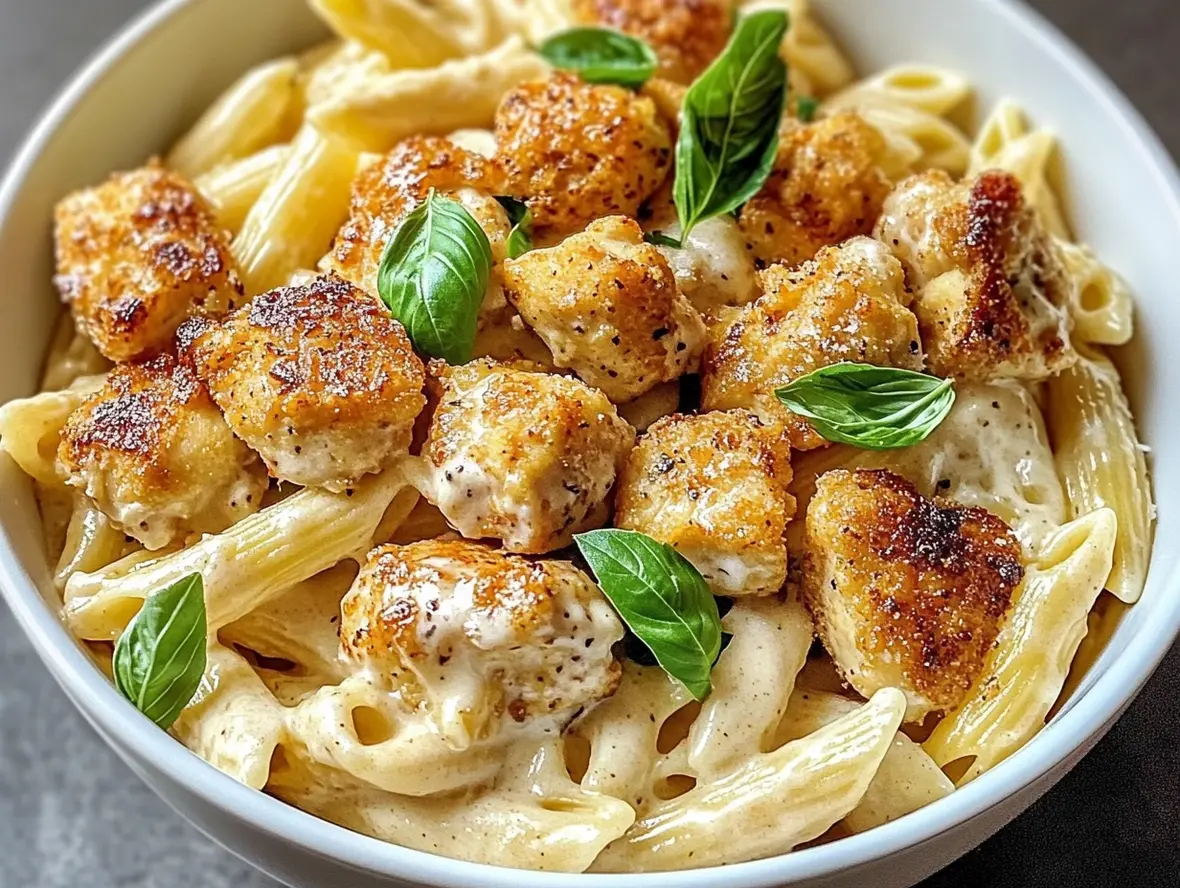
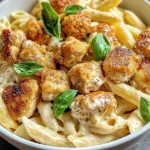
Crispy Cheddar Chicken: A Delicious Dinner Must-Try

Introduction: Craving Crispy Cheddar Chicken?

Are you looking for a weeknight dinner that’s both incredibly satisfying and surprisingly easy to make? If your answer is a resounding yes, then you’ve landed on the right page! We all know the allure of crispy, golden-brown food, and when you combine that with the melty, savory goodness of cheddar cheese, you’ve got a winner. This Crispy Cheddar Chicken recipe isn’t just a meal; it’s an experience. It’s perfect for busy families, eager home cooks, and anyone who appreciates a comforting, flavorful dish that feels both rustic and sophisticated. Get ready to discover the secret to achieving that perfectly crisp coating and irresistibly cheesy topping that will have everyone asking for seconds. Let’s dive into a recipe that promises a delicious dinner must-try!

Gather Your Cheesy Arsenal: Ingredients

The magic of Crispy Cheddar Chicken lies in its simple, yet impactful ingredients. Each component plays a crucial role in building those layers of flavor and texture we all adore.

  • Chicken: 4 boneless, skinless chicken breasts (about 6-8 oz each). Look for chicken breasts that are relatively uniform in thickness to ensure even cooking. You can also use thighs for a richer flavor, though cooking times may vary.
  • For the Crispiness:
    • 1 cup Panko breadcrumbs: These Japanese breadcrumbs are coarser and airier, delivering unparalleled crispiness. Regular breadcrumbs can be used, but Panko is highly recommended for that signature crunch.
    • 1/2 cup grated Parmesan cheese: Adds a salty, nutty depth that complements the cheddar beautifully.
    • 1/2 teaspoon garlic powder: A foundational aromatic that enhances the savory notes.
    • 1/4 teaspoon smoked paprika: For a hint of smoky warmth and a lovely reddish hue.
    • Salt and freshly ground black pepper: To taste, essential for bringing out all the flavors.
  • For Binding & Moisture:
    • 1/2 cup all-purpose flour: Helps the wet ingredients adhere to the chicken and gives the coating something to cling to.
    • 2 large eggs: Whisked, these act as the crucial binder for our crispy coating.
    • 1/4 cup milk (any kind): Helps to thin the eggs slightly, creating a better coating consistency.
  • The Star: Cheddar Cheese! 1.5 cups shredded sharp cheddar cheese: Use good quality sharp cheddar for the best flavor. Pre-shredded cheese often contains anti-caking agents that can affect meltability, so shredding your own is preferable if time allows.
  • For Sautéing: 2-3 tablespoons olive oil or unsalted butter: For that initial golden sear that locks in juices and adds richness.

Timing is Everything: Prep & Cook Times

Prep time: 20 minutes
Cook time: 25-30 minutes
Total time: 45-50 minutes

Compared to many chicken dishes requiring marinades or extensive prep, this recipe is a breeze! The average chicken breast recipe often takes upwards of an hour, but our Crispy Cheddar Chicken is designed for efficiency without sacrificing flavor. You’ll be enjoying this delicious meal in under an hour, making it a fantastic option for busy weeknights.

Crispy Cheddar Chicken on a baking sheet, ready to bake.

Let’s Get Cooking: Step-by-Step Mastery

Step 1: Preheat and Prep the Chicken

First things first, let’s get our oven ready. Preheat it to 400°F (200°C). While the oven is heating up, prepare your chicken breasts. If they are thick, you can either butterfly them or pound them gently to an even thickness of about 3/4 inch. This ensures they cook through uniformly. Pat them completely dry with paper towels – this is key for getting a truly crispy coating!

Step 2: The Flavor Base

In a shallow dish or on a plate, combine the flour with a generous pinch of salt and pepper. In a second shallow dish, whisk together the eggs and milk until well combined. This creates your wet mixture for the binding process. In a third shallow dish, mix together the Panko breadcrumbs, grated Parmesan cheese, garlic powder, smoked paprika, and another pinch of salt and pepper. Give it a good stir to ensure all those lovely spices are evenly distributed.

Step 3: Coating Creation

Now, let’s get our chicken coated. Dredge each chicken breast first in the seasoned flour, shaking off any excess. Then, dip it into the egg-and-milk mixture, allowing any excess to drip off. Finally, press the chicken firmly into the Panko and Parmesan mixture, ensuring it’s completely coated on all sides. You want a thick, even layer of that crispy goodness!

Step 4: Crispy Perfection

Heat the olive oil or butter in an oven-safe skillet (cast iron works wonderfully here) over medium-high heat. Once hot, carefully place the coated chicken breasts into the skillet. Sear them for about 2-3 minutes per side, until they are beautifully golden brown. This step is crucial for achieving maximum crispiness and locking in those delicious juices.

Step 5: Melted Cheesy Bliss

Once seared, sprinkle the shredded cheddar cheese generously over the top of each chicken breast. Don’t be shy – this is where the magic happens!

Step 6: Final Bake and Serve

Transfer the skillet (or chicken to a baking sheet if your skillet isn’t oven-safe) into the preheated oven. Bake for 15-20 minutes, or until the chicken is cooked through (internal temperature reaches 165°F or 74°C) and the cheese is melted, bubbly, and slightly golden. Let it rest for a few minutes before serving. This allows the juices to redistribute, resulting in a more tender chicken.

Nutritional Snapshot

While specific nutritional values can vary based on exact ingredient quantities and brands used, a typical serving of Crispy Cheddar Chicken (per breast, approximately) is:

  • Calories: 400-500 kcal
  • Protein: 40-50g
  • Fat: 20-30g
  • Carbohydrates: 10-15g

This is an estimate and will depend on your portion sizes and specific ingredients.

Healthier Twists on Cheesy Goodness

Looking to lighten up this delicious dish without sacrificing flavor? Try these simple swaps:

  • Whole Wheat Panko: Opt for whole wheat Panko breadcrumbs for added fiber.
  • Reduced-Fat Cheese: Use a reduced-fat sharp cheddar. While it might not melt quite as luxuriously, it still provides plenty of flavor.
  • Oven-Baked Fries: Serve with oven-baked sweet potato fries instead of traditional fried sides.
  • Greek Yogurt Dip: Serve with a cool, creamy dip made from Greek yogurt, herbs, and lemon zest instead of heavier sauces.

Serving Suggestions for a Complete Meal

This Crispy Cheddar Chicken is incredibly versatile! Here are some ideas to round out your meal:

  • Fresh Greens: A crisp Caesar salad or a simple mixed greens salad with vinaigrette provides a refreshing contrast.
  • Steamed or Roasted Vegetables: Broccoli, asparagus, green beans, or a medley of roasted root vegetables are excellent pairings.
  • Creamy Mashed Potatoes: A classic comfort food pairing that never disappoints.
  • Quinoa or Rice: For a lighter but still satisfying carbohydrate option.

Common Pitfalls to Avoid

To ensure your Crispy Cheddar Chicken turns out perfectly every time, be mindful of these common mistakes:

  • Wet Chicken: Not patting the chicken dry before coating is a recipe for soggy breading. Moisture is the enemy of crispiness!
  • Overcrowding the Pan: If you sear the chicken in batches, you’ll get a better crust. Overcrowding lowers the pan temperature and steams the chicken.
  • Uneven Thickness: Chicken breasts of varying thicknesses won’t cook at the same rate. Pound or butterfly them for consistency.
  • Not Enough Cheese: While cheese is personal, don’t skimp too much on the cheddar; it’s a star ingredient!

Storing Your Delicious Creation

Leftovers are a good problem to have! Once cooled, store any leftover Crispy Cheddar Chicken in an airtight container in the refrigerator for up to 3 days. Reheating is best done in an oven or toaster oven at around 350°F (175°C) to revive some of the crispiness. Microwaving will likely result in a softer texture.

Close up of melted cheese on Crispy Cheddar Chicken.

Frequently Asked Questions

Can I make this with chicken thighs?

Absolutely! Boneless, skinless chicken thighs are a fantastic alternative. They tend to be more forgiving and stay moister. You may need to adjust the baking time slightly, so always check for an internal temperature of 165°F (74°C).

What if I don’t have Panko breadcrumbs?

Regular breadcrumbs will work in a pinch, though the crispiness won’t be quite as pronounced. For an even crispier coating with regular breadcrumbs, try toasting them lightly before using.

How can I ensure the cheese doesn’t burn?

The recipe calls for finishing the chicken in the oven until the cheese is melted and slightly golden. If you find your cheese browns too quickly, you can loosely tent the chicken with foil for the last few minutes of baking.

Can I make this ahead of time?

You can prepare the chicken by coating it and refrigerating it for up to a few hours before baking. For best results, sear and bake just before serving.

Conclusion

There you have it – the ultimate guide to making Crispy Cheddar Chicken! This dish is a testament to how simple ingredients can create extraordinary flavors and textures. With its golden, crunchy exterior and gooey, cheesy interior, it’s sure to become a family favorite. Don’t just read about it; try it for yourself and experience the delicious dinner must-try! We’d love to hear how your Crispy Cheddar Chicken turned out, so share your thoughts and photos in the comments below!

Print
clock clock iconcutlery cutlery iconflag flag iconfolder folder iconinstagram instagram iconpinterest pinterest iconfacebook facebook iconprint print iconsquares squares iconheart heart iconheart solid heart solid icon

Crispy Cheddar Chicken


  • Author: Chef Emy

Description

Golden and crunchy on the outside, juicy and flavorful on the inside—thisCrispy Cheddar Chickenis a family favorite! Perfectly seasoned and coated with a cheesy breadcrumb crust, it’s as simple to make as it is delicious.


Ingredients

Scale
  • 4boneless, skinless chicken breasts2 cupscheddar cheese, shredded1 cupmilk1 cuppanko breadcrumbs1 teaspoongarlic powder1 teaspoonpaprika1/2 teaspoonsalt1/2 teaspoonblack pepper2 tablespoonsfresh parsley, chopped (for garnish)
  • 2 cupscheddar cheese, shredded1 cupmilk1 cuppanko breadcrumbs1 teaspoongarlic powder1 teaspoonpaprika1/2 teaspoonsalt1/2 teaspoonblack pepper2 tablespoonsfresh parsley, chopped (for garnish)
  • 1 cupmilk1 cuppanko breadcrumbs1 teaspoongarlic powder1 teaspoonpaprika1/2 teaspoonsalt1/2 teaspoonblack pepper2 tablespoonsfresh parsley, chopped (for garnish)
  • 1 cuppanko breadcrumbs1 teaspoongarlic powder1 teaspoonpaprika1/2 teaspoonsalt1/2 teaspoonblack pepper2 tablespoonsfresh parsley, chopped (for garnish)
  • 1 teaspoongarlic powder1 teaspoonpaprika1/2 teaspoonsalt1/2 teaspoonblack pepper2 tablespoonsfresh parsley, chopped (for garnish)
  • 1 teaspoonpaprika1/2 teaspoonsalt1/2 teaspoonblack pepper2 tablespoonsfresh parsley, chopped (for garnish)
  • 1/2 teaspoonsalt1/2 teaspoonblack pepper2 tablespoonsfresh parsley, chopped (for garnish)
  • 1/2 teaspoonblack pepper2 tablespoonsfresh parsley, chopped (for garnish)
  • 2 tablespoonsfresh parsley, chopped (for garnish)

Instructions

  1. 1️⃣Preheat the Oven:Preheat your oven to 375°F (190°C) and lightly grease a baking sheet or line it with parchment paper.
  2. 2️⃣Prepare the Coating:In a shallow bowl, combine the shredded cheddar cheese, panko breadcrumbs, garlic powder, paprika, salt, and black pepper. Mix well.3️⃣Dip and Coat the Chicken:Pour the milk into another shallow bowl. Dip each chicken breast into the milk to moisten, then dredge it in the breadcrumb and cheese mixture. Press the coating firmly onto the chicken to ensure it sticks well.4️⃣Arrange for Baking:Place the coated chicken breasts onto the prepared baking sheet, spacing them evenly to allow for even cooking.5️⃣Bake to Perfection:Bake the chicken for 35-40 minutes, or until the internal temperature of the chicken reaches 165°F (74°C) and the coating is golden and crispy.6️⃣Garnish and Serve:Remove the chicken from the oven and sprinkle with chopped parsley. Serve hot with your favorite sides, such as roasted vegetables, mashed potatoes, or a crisp salad.
  3. 3️⃣Dip and Coat the Chicken:Pour the milk into another shallow bowl. Dip each chicken breast into the milk to moisten, then dredge it in the breadcrumb and cheese mixture. Press the coating firmly onto the chicken to ensure it sticks well.4️⃣Arrange for Baking:Place the coated chicken breasts onto the prepared baking sheet, spacing them evenly to allow for even cooking.5️⃣Bake to Perfection:Bake the chicken for 35-40 minutes, or until the internal temperature of the chicken reaches 165°F (74°C) and the coating is golden and crispy.6️⃣Garnish and Serve:Remove the chicken from the oven and sprinkle with chopped parsley. Serve hot with your favorite sides, such as roasted vegetables, mashed potatoes, or a crisp salad.
  4. 4️⃣Arrange for Baking:Place the coated chicken breasts onto the prepared baking sheet, spacing them evenly to allow for even cooking.
  5. 5️⃣Bake to Perfection:Bake the chicken for 35-40 minutes, or until the internal temperature of the chicken reaches 165°F (74°C) and the coating is golden and crispy.6️⃣Garnish and Serve:Remove the chicken from the oven and sprinkle with chopped parsley. Serve hot with your favorite sides, such as roasted vegetables, mashed potatoes, or a crisp salad.
  6. 6️⃣Garnish and Serve:Remove the chicken from the oven and sprinkle with chopped parsley. Serve hot with your favorite sides, such as roasted vegetables, mashed potatoes, or a crisp salad.

Notes

Make It Your Own:Add a pinch of cayenne pepper for a spicy kick or substitute Parmesan cheese for a sharper flavor.Air Fryer Option:Cook the coated chicken in an air fryer at 375°F (190°C) for 15-18 minutes, flipping halfway, for a crispier crust.Storage Tip:Leftovers can be stored in an airtight container in the fridge for up to 3 days. Reheat in the oven or air fryer to maintain crispiness.
Air Fryer Option:Cook the coated chicken in an air fryer at 375°F (190°C) for 15-18 minutes, flipping halfway, for a crispier crust.Storage Tip:Leftovers can be stored in an airtight container in the fridge for up to 3 days. Reheat in the oven or air fryer to maintain crispiness.
Storage Tip:Leftovers can be stored in an airtight container in the fridge for up to 3 days. Reheat in the oven or air fryer to maintain crispiness.

“`

Authentic German Meatballs Recipe – Easy & Delicious

“`html

Authentic German Meatballs Recipe – Easy & Delicious

Are you looking for a simple yet incredibly flavorful meatball recipe that transports you straight to Germany? With an estimated 1.8 million searches for “German meatballs” annually, it’s clear that this hearty dish is a beloved classic that deserves a spot on your dinner table. This authentic German meatballs recipe is designed to be easy to follow, delivering tender, juicy, and deliciously seasoned meatballs that are perfect for a comforting family meal or to impress your guests. Forget dry, bland meatballs; these are packed with traditional German flavors!

Why You’ll Love This Recipe

Authentic Flavors

This recipe stays true to traditional German cooking, using simple ingredients that create a depth of flavor. The combination of ground meats, onions, breadcrumbs, and classic seasonings results in a taste that is both comforting and distinctively German. It’s a recipe passed down through generations for a reason!

Simple Steps

We’ve broken down the process into straightforward steps, making it accessible even for novice cooks. From mixing the ingredients to simmering them in a rich sauce, each stage is explained clearly. You don’t need to be a Michelin-star chef to master these meatballs!

Versatile Dish

Serve these German meatballs with your favorite sides like mashed potatoes, sauerkraut, or a simple green salad. They are equally delicious as a hearty main course or even as an appetizer. The rich sauce they cook in is perfect for sopping up with crusty bread.

Ingredients for Easy German Meatballs

The beauty of this authentic German meatballs recipe lies in its use of readily available ingredients. For the best flavor and texture, we recommend using a combination of ground beef and pork, but feel free to adjust based on your preference.

  • For the Meatballs:
    • 1 lb ground beef (80/20 blend recommended for juiciness)
    • 1 lb ground pork (adds richness and moisture)
      Substitution: You can use all beef or all pork, but the blend provides optimal flavor.
    • 1 cup fresh breadcrumbs (from slightly stale white bread)
      Substitution: Panko breadcrumbs can be used, but fresh offers a softer texture.
    • 1/2 cup finely chopped yellow onion (about 1 small onion)
      Sensory Description: This adds a subtle sweetness and aromatic depth.
    • 2 large eggs, lightly beaten (binds everything together)
    • 1/4 cup milk (helps moisten the mixture)
      Substitution: Water can be used, but milk adds a touch more richness.
    • 2 cloves garlic, minced
      Sensory Description: Pungent and aromatic, it complements the meats beautifully.
    • 1 teaspoon salt
    • 1/2 teaspoon black pepper
    • 1/4 teaspoon ground nutmeg (a classic German spice!)
      Sensory Description: Warm, slightly sweet, and nutty notes.
    • 2 tablespoons unsalted butter or vegetable oil (for searing)
  • For the Sauce:
    • 2 tablespoons unsalted butter
    • 1 large yellow onion, thinly sliced
      Sensory Description: Caramelizes to a sweet, savory base for the sauce.
    • 2 tablespoons all-purpose flour (for thickening)
      Substitution: Cornstarch slurry (2 tbsp cornstarch + 4 tbsp cold water) can be used as a gluten-free alternative.
    • 2 cups beef broth (low sodium preferred)
      Sensory Description: Rich and savory, forms the backbone of the sauce flavor.
    • 1/2 cup sour cream or heavy cream (for creaminess)
      Sensory Description: Adds a luxurious, velvety texture and subtle tang.
    • 1 tablespoon Dijon mustard (for a little zing)
      Sensory Description: Pungent and slightly spicy, balances the richness.
    • Salt and pepper to taste
    • Fresh parsley, chopped (for garnish)
      Sensory Description: Bright, herbaceous, and adds a fresh finish.

Timing is Everything

Prep time: 25 minutes
Cook time: 30-35 minutes
Total time: 55-60 minutes

Compared to many complex German dishes, this authentic German meatballs recipe is remarkably quick. The average meatball recipe often takes around an hour or more from start to finish, and this recipe fits right into that timeframe, offering a rewarding culinary experience without a lengthy commitment.

Deliciously formed German meatballs ready to be cooked

How to Make Authentic German Meatballs Step-by-Step

Step 1: Prepare the Meat Mixture

In a large mixing bowl, combine the ground beef and ground pork. Add the fresh breadcrumbs, finely chopped onion, lightly beaten eggs, milk, minced garlic, salt, pepper, and nutmeg. Gently mix everything together with your hands until just combined. Be careful not to overmix, as this can result in tough meatballs. We want tender, succulent results!

Step 2: Form the Meatballs

Lightly dampen your hands with water to prevent sticking. Roll the meat mixture into uniform balls, about 1.5 to 2 inches in diameter. Aim for about 16-20 meatballs. Placing them on a baking sheet as you form them can help keep your workspace organized.

Step 3: Cook the Meatballs

In a large, oven-safe skillet or Dutch oven, melt the butter or heat the vegetable oil over medium-high heat. Carefully add the meatballs in batches, ensuring not to overcrowd the pan. Sear them for about 2-3 minutes on each side until browned. This step is crucial for developing a beautiful crust and locking in moisture. Remove the seared meatballs from the skillet and set aside.

Step 4: Prepare the Sauce

In the same skillet (don’t wipe it clean – those browned bits are flavor!), add the 2 tablespoons of butter over medium heat. Add the thinly sliced onion and sauté until softened and lightly caramelized, about 5-7 minutes. Sprinkle the flour over the onions and cook for 1 minute, stirring constantly, to create a roux. Gradually whisk in the beef broth until smooth, then bring to a simmer, stirring until thickened.

Step 5: Combine and Simmer

Reduce the heat to low. Stir in the sour cream (or heavy cream) and Dijon mustard. Season with salt and pepper to taste. Gently return the seared meatballs to the skillet. Cover and let them simmer gently in the sauce for 15-20 minutes, or until cooked through. The meatballs should be heated through and the sauce should be rich and creamy. Avoid boiling vigorously, as this can cause the sauce to separate.

Nutritional Information

While individual variations may occur, a typical serving (approximately 3-4 meatballs with sauce) of these authentic German meatballs contains:

  • Calories: 350-450 kcal
  • Protein: 25-30g
  • Fat: 20-25g
  • Carbohydrates: 10-15g

This is an estimate and can vary based on the type of meat used and exact portion sizes.

Healthier Alternatives

Looking to lighten up this classic? Here are a few swaps that maintain flavor:

  • Leaner Meats: Use 90% lean ground beef and reduce the pork or use leaner pork cuts.
  • Whole Wheat Breadcrumbs: Opt for whole wheat breadcrumbs for added fiber.
  • Reduced Fat Sour Cream: Use reduced-fat sour cream or Greek yogurt for a protein boost and less fat.
  • Skip the Sear: While searing adds flavor and texture, you can bake the meatballs initially to reduce added fat, then add them to the sauce to finish cooking.

Serving Suggestions

These authentic German meatballs are incredibly versatile! Here are some of our favorite ways to serve them:

  • Classic German: Serve with creamy mashed potatoes (Kartoffelpüree) and a generous side of tangy sauerkraut.
  • Hearty Meal: Pair with spaetzle (German egg noodles) or egg noodles and a side of steamed green beans or roasted Brussels sprouts.
  • Bread Lover’s Dream: Serve with crusty bread to soak up every last drop of the delicious sauce.
  • Appetizer: Serve in a smaller portion with toothpicks for an impressive party snack.

Common Mistakes to Avoid

To ensure your authentic German meatballs are a success, steer clear of these common pitfalls:

  • Overmixing the Meat: This is the number one culprit for tough meatballs. Mix just until combined.
  • Dry Ingredients: Ensure your breadcrumbs aren’t too dry, and that you’ve included the egg and milk for moisture and binding.
  • Overcrowding the Pan: Searing in batches ensures a beautiful brown crust, not steaming the meatballs.
  • Boiling the Sauce: If you boil the sauce after adding sour cream, it can curdle. Keep it at a gentle simmer.

Storing Your Delicious Meatballs

Leftovers are a good thing! Properly stored, these meatballs will last:

  • In the Refrigerator: Store cooled meatballs and sauce in an airtight container for up to 3-4 days.
  • In the Freezer: Freeze leftover meatballs (with or without sauce) in freezer-safe containers or bags for up to 2-3 months. Thaw in the refrigerator overnight before reheating.

Reheat gently on the stovetop or in the microwave until heated through. They are just as delicious the second time around!

Close-up of creamy German meatballs in a rich sauce with fresh parsley garnish

Frequently Asked Questions (FAQs)

***What is the best type of meat for German meatballs?***

Traditionally, a mix of ground beef and ground pork is used. The beef provides a robust flavor, while the pork adds moisture and richness. Using an 80/20 blend for beef and regular ground pork is ideal for tenderness.

***Can I make this recipe with just ground beef or just ground pork?***

Yes, you absolutely can! If you use only ground beef, consider adding a tablespoon or two of extra liquid (like milk or water) to ensure moisture. If using only ground pork, you might find it very rich and might want to balance it with a bit more seasoning or a touch of acidity in the sauce.

***How do I prevent my meatballs from falling apart?***

The keys to preventing meatballs from falling apart are proper binding and not overmixing. Ensure you use eggs and breadcrumbs as directed, and mix the meat mixture gently until just combined. Avoid overworking the meat, which can break down its protein structure.

***Can I make the meatballs ahead of time?***

Yes! You can form the raw meatballs and store them in the refrigerator for up to 24 hours before cooking. You can also cook them entirely, cool them, and store them in the refrigerator or freezer, then reheat them in the sauce.

***What is ‘Königsberger Klopse’ and how does it differ?***

Königsberger Klopse is a specific type of German meatball originating from Königsberg (now Kaliningrad). They are typically made with finely ground veal or mixed meats, and are characterized by their distinctive sauce made with capers and sometimes anchovies. This recipe is a more general, rustic German meatball, often served in a creamy sauce.

Conclusion

Whipping up authentic German meatballs has never been easier or more delicious! This recipe combines traditional flavors with a straightforward process, ensuring you can enjoy a truly satisfying, homemade German meal in your own kitchen. Don’t hesitate to try this hearty, comforting dish – it’s a testament to the simple yet profound joys of German cuisine. Gather your ingredients and get ready to create a new family favorite!

Print
clock clock iconcutlery cutlery iconflag flag iconfolder folder iconinstagram instagram iconpinterest pinterest iconfacebook facebook iconprint print iconsquares squares iconheart heart iconheart solid heart solid icon

Authentic German Frikadellen


  • Author: Chef Emy

Description

Frikadellen, Germany’s beloved meat patties, are juicy, flavorful, and easy to make. Whether served with potato salad, mashed potatoes, or a hearty bread, they’re a satisfying comfort food with rich tradition.


Ingredients

Scale
  • 1lb (450 g) ground beef (or a mix of ground beef and pork)1small onion, finely chopped1clove garlic, minced1large egg1slice stale white bread (or1/2 cupbreadcrumbs)1/4 cupmilk1 tspmustard (Dijon or yellow)1 tspsalt1/2 tspblack pepper1/2 tsppaprika1/2 tspground marjoram (optional)1 tbspparsley, chopped2 tbspoil or butter (for frying)
  • 1small onion, finely chopped1clove garlic, minced1large egg1slice stale white bread (or1/2 cupbreadcrumbs)1/4 cupmilk1 tspmustard (Dijon or yellow)1 tspsalt1/2 tspblack pepper1/2 tsppaprika1/2 tspground marjoram (optional)1 tbspparsley, chopped2 tbspoil or butter (for frying)
  • 1clove garlic, minced1large egg1slice stale white bread (or1/2 cupbreadcrumbs)1/4 cupmilk1 tspmustard (Dijon or yellow)1 tspsalt1/2 tspblack pepper1/2 tsppaprika1/2 tspground marjoram (optional)1 tbspparsley, chopped2 tbspoil or butter (for frying)
  • 1large egg1slice stale white bread (or1/2 cupbreadcrumbs)1/4 cupmilk1 tspmustard (Dijon or yellow)1 tspsalt1/2 tspblack pepper1/2 tsppaprika1/2 tspground marjoram (optional)1 tbspparsley, chopped2 tbspoil or butter (for frying)
  • 1slice stale white bread (or1/2 cupbreadcrumbs)1/4 cupmilk1 tspmustard (Dijon or yellow)1 tspsalt1/2 tspblack pepper1/2 tsppaprika1/2 tspground marjoram (optional)1 tbspparsley, chopped2 tbspoil or butter (for frying)
  • 1/4 cupmilk1 tspmustard (Dijon or yellow)1 tspsalt1/2 tspblack pepper1/2 tsppaprika1/2 tspground marjoram (optional)1 tbspparsley, chopped2 tbspoil or butter (for frying)
  • 1 tspmustard (Dijon or yellow)1 tspsalt1/2 tspblack pepper1/2 tsppaprika1/2 tspground marjoram (optional)1 tbspparsley, chopped2 tbspoil or butter (for frying)
  • 1 tspsalt1/2 tspblack pepper1/2 tsppaprika1/2 tspground marjoram (optional)1 tbspparsley, chopped2 tbspoil or butter (for frying)
  • 1/2 tspblack pepper1/2 tsppaprika1/2 tspground marjoram (optional)1 tbspparsley, chopped2 tbspoil or butter (for frying)
  • 1/2 tsppaprika1/2 tspground marjoram (optional)1 tbspparsley, chopped2 tbspoil or butter (for frying)
  • 1/2 tspground marjoram (optional)1 tbspparsley, chopped2 tbspoil or butter (for frying)
  • 1 tbspparsley, chopped2 tbspoil or butter (for frying)
  • 2 tbspoil or butter (for frying)

Instructions

  1. 1️⃣Prepare the Bread Mixture:
  2. Soak the slice of stale bread in milk for about 5 minutes, then squeeze out the excess milk and crumble the bread into small pieces. Set aside.2️⃣Combine the Ingredients:In a large mixing bowl, add the ground meat, soaked bread, onion, garlic, egg, mustard, salt, pepper, paprika, marjoram (if using), and parsley.Mix until just combined. Avoid overmixing to ensure the patties remain tender.3️⃣Shape the Frikadellen:Divide the meat mixture into 4-6 equal portions.Shape each portion into a flat, oval-shaped patty about 1/2-inch thick.4️⃣Cook the Frikadellen:Heat oil or butter in a large skillet over medium heat.Place the patties in the skillet and fry for 4-5 minutes per side, or until golden brown and fully cooked (internal temperature should reach 160°F/71°C).5️⃣Serve:Serve the Frikadellen warm with sides such as potato salad, mashed potatoes, sauerkraut, or crusty bread.
  3. 2️⃣Combine the Ingredients:In a large mixing bowl, add the ground meat, soaked bread, onion, garlic, egg, mustard, salt, pepper, paprika, marjoram (if using), and parsley.Mix until just combined. Avoid overmixing to ensure the patties remain tender.3️⃣Shape the Frikadellen:Divide the meat mixture into 4-6 equal portions.Shape each portion into a flat, oval-shaped patty about 1/2-inch thick.4️⃣Cook the Frikadellen:Heat oil or butter in a large skillet over medium heat.Place the patties in the skillet and fry for 4-5 minutes per side, or until golden brown and fully cooked (internal temperature should reach 160°F/71°C).5️⃣Serve:Serve the Frikadellen warm with sides such as potato salad, mashed potatoes, sauerkraut, or crusty bread.
  4. In a large mixing bowl, add the ground meat, soaked bread, onion, garlic, egg, mustard, salt, pepper, paprika, marjoram (if using), and parsley.
  5. Mix until just combined. Avoid overmixing to ensure the patties remain tender.3️⃣Shape the Frikadellen:Divide the meat mixture into 4-6 equal portions.Shape each portion into a flat, oval-shaped patty about 1/2-inch thick.4️⃣Cook the Frikadellen:Heat oil or butter in a large skillet over medium heat.Place the patties in the skillet and fry for 4-5 minutes per side, or until golden brown and fully cooked (internal temperature should reach 160°F/71°C).5️⃣Serve:Serve the Frikadellen warm with sides such as potato salad, mashed potatoes, sauerkraut, or crusty bread.
  6. 3️⃣Shape the Frikadellen:Divide the meat mixture into 4-6 equal portions.Shape each portion into a flat, oval-shaped patty about 1/2-inch thick.4️⃣Cook the Frikadellen:Heat oil or butter in a large skillet over medium heat.Place the patties in the skillet and fry for 4-5 minutes per side, or until golden brown and fully cooked (internal temperature should reach 160°F/71°C).5️⃣Serve:Serve the Frikadellen warm with sides such as potato salad, mashed potatoes, sauerkraut, or crusty bread.
  7. Divide the meat mixture into 4-6 equal portions.
  8. Shape each portion into a flat, oval-shaped patty about 1/2-inch thick.4️⃣Cook the Frikadellen:Heat oil or butter in a large skillet over medium heat.Place the patties in the skillet and fry for 4-5 minutes per side, or until golden brown and fully cooked (internal temperature should reach 160°F/71°C).5️⃣Serve:Serve the Frikadellen warm with sides such as potato salad, mashed potatoes, sauerkraut, or crusty bread.
  9. 4️⃣Cook the Frikadellen:Heat oil or butter in a large skillet over medium heat.Place the patties in the skillet and fry for 4-5 minutes per side, or until golden brown and fully cooked (internal temperature should reach 160°F/71°C).5️⃣Serve:Serve the Frikadellen warm with sides such as potato salad, mashed potatoes, sauerkraut, or crusty bread.
  10. Heat oil or butter in a large skillet over medium heat.
  11. Place the patties in the skillet and fry for 4-5 minutes per side, or until golden brown and fully cooked (internal temperature should reach 160°F/71°C).5️⃣Serve:Serve the Frikadellen warm with sides such as potato salad, mashed potatoes, sauerkraut, or crusty bread.
  12. 5️⃣Serve:Serve the Frikadellen warm with sides such as potato salad, mashed potatoes, sauerkraut, or crusty bread.
  13. Serve the Frikadellen warm with sides such as potato salad, mashed potatoes, sauerkraut, or crusty bread.

Notes

Bread Substitute:If using breadcrumbs, skip the milk step and add them directly to the meat mixture.Flavor Boost:For an authentic touch, add a pinch of nutmeg to the mixture.Make-Ahead:Shape the patties ahead of time and store them in the fridge for up to 24 hours before cooking.
Flavor Boost:For an authentic touch, add a pinch of nutmeg to the mixture.Make-Ahead:Shape the patties ahead of time and store them in the fridge for up to 24 hours before cooking.
Make-Ahead:Shape the patties ahead of time and store them in the fridge for up to 24 hours before cooking.

“`

Cheeseburger Pasta: A Comfort Food Favorite

“`html

Cheeseburger Pasta: A Comfort Food Favorite

Indulge in the Ultimate Comfort Food

Are you craving a meal that’s both incredibly satisfying and ridiculously easy to whip up? In a world where weeknight dinners often feel like a culinary race against time, wouldn’t it be amazing to have a go-to recipe that delivers maximum comfort with minimal fuss? Enter Cheeseburger Pasta, the dish that takes all the beloved flavors of your favorite burger and transforms them into a hearty, cheesy, and utterly delicious pasta casserole. It’s the kind of meal that warms you from the inside out, perfect for busy families, relaxed weekends, or whenever that savory, cheesy craving strikes. Forget the delivery apps and long wait times; this recipe brings the burger joint straight to your dining table!

Ingredients and Sensory Delights

The magic of Cheeseburger Pasta lies in its simple yet classic flavor profile. We’re aiming for that perfect harmonious blend of savory beef, tangy ketchup and mustard, rich cheese, and tender pasta. Here’s what you’ll need to create this masterpiece:

  • 1 pound lean ground beef: The savory foundation of our dish. Look for 85-90% lean for a good balance of flavor and moisture. You can also use ground turkey or a plant-based crumble for a lighter or vegetarian option.
  • 1 tablespoon olive oil: To help sauté our aromatics and prevent sticking. Extra virgin olive oil will add a subtle fruity note.
  • 1 medium onion, finely chopped: Provides a sweet, pungent base that softens beautifully as it cooks. Yellow or white onions are excellent choices.
  • 2 cloves garlic, minced: The aromatic essential that awakens the palate. Use fresh garlic for the most vibrant flavor.
  • 1 (15 ounce) can diced tomatoes, undrained: Adds a touch of acidity and moisture, creating a delightful sauce base. Fire-roasted tomatoes can offer a deeper, smokier flavor.
  • 1/2 cup ketchup: The quintessential burger condiment, bringing sweetness and tang. Choose your favorite brand; they all offer a slightly different nuanced flavor.
  • 1/4 cup mustard (yellow or Dijon): For that signature zesty kick. Yellow mustard offers a classic tang, while Dijon adds a more complex, slightly spicy note.
  • 1 teaspoon Worcestershire sauce: A secret weapon for umami depth, adding a complex savory and slightly salty flavor.
  • 1/2 teaspoon salt, or to taste: Enhances all the other flavors.
  • 1/4 teaspoon black pepper, or to taste: Provides a gentle warmth and spice.
  • 8 ounces pasta (elbow macaroni, rotini, or penne): The perfect vehicle for our rich sauce. Choose a shape that holds sauce well. Cooked al dente to avoid mushiness.
  • 2 cups shredded cheddar cheese (sharp or mild): The star of the “cheese” in cheeseburger pasta! Sharp cheddar offers a more pronounced tang, while mild is creamier. You can also mix in Monterey Jack or Colby for meltiness.
  • Optional toppings: Pickles, lettuce, diced tomatoes, extra cheese, a drizzle of sriracha.

Timing is Everything

This recipe is designed for weeknight ease, making it a quicker option than many other pasta bakes or casseroles. Here’s how the timing breaks down:

Prep time: 15 minutes
Cook time: 25 minutes
Total time: 40 minutes

Compared to many homemade pasta dishes that can take over an hour, this Cheeseburger Pasta is a speedy delight, perfect for when hunger pangs are urgent!

Cheeseburger pasta in a pan, ready to serve

Step-by-Step Creation

Let’s get cooking! Follow these simple steps to create your own bowl of cheesy, beefy bliss.

Step 1: Brown the Beef

Heat the olive oil in a large skillet or Dutch oven over medium-high heat. Add the ground beef and break it apart with a spoon. Cook, stirring occasionally, until the beef is browned and no pink remains. Drain off any excess grease and set the beef aside. If you’re using a recipe that calls for browning the beef and then adding other ingredients to the same pan, feel free to keep the beef in the skillet and drain excess grease before proceeding.

Step 2: Sauté the Aromatics

In the same skillet (or a clean one if you removed the beef), add the chopped onion. Sauté until softened and translucent, about 5-7 minutes. Add the minced garlic and cook for another minute until fragrant, being careful not to burn it. The aroma at this stage is already promising!

Step 3: Build the Sauce

Return the browned beef to the skillet with the onions and garlic. Stir in the diced tomatoes (with their juice), ketchup, mustard, and Worcestershire sauce. Season with salt and black pepper. Bring the mixture to a simmer, then reduce the heat to low, cover, and let it simmer for at least 10 minutes to allow the flavors to meld beautifully. This slow simmer is where the magic really happens, transforming simple ingredients into a rich, savory sauce.

Step 4: Cook the Pasta

While the sauce is simmering, cook your pasta according to package directions in a separate pot of salted boiling water until it’s al dente (tender but still firm to the bite). You don’t want mushy pasta! Drain the pasta thoroughly. Reserve about 1/2 cup of the pasta water before draining, as it can be used to loosen the sauce if needed.

Step 5: Combine and Melt

Add the drained pasta directly into the skillet with the beef and sauce mixture. Stir gently to coat all the pasta in the delicious sauce. Sprinkle the shredded cheddar cheese evenly over the top of the pasta. Cover the skillet and let it sit for a few minutes, or until the cheese is completely melted and gooey. For an extra bubbly, cheesy top, you can place the skillet under a broiler for 1-2 minutes, watching carefully to prevent burning.

Step 6: Serve and Savor

Once the cheese is perfectly melted, give everything one final gentle stir. Serve hot, garnished with your favorite cheeseburger toppings like thinly sliced pickles, fresh lettuce, or a drizzle of sriracha for a spicy kick. Each bite is a symphony of familiar burger flavors in a comforting pasta form.

Nutritional Highlights

Cheeseburger Pasta is a hearty dish, offering a good balance of protein, carbohydrates, and fats. A typical serving (without added toppings) is approximately:

  • Calories: 450-600 (depending on beef leanness and cheese amount)
  • Protein: 25-35g
  • Carbohydrates: 30-40g
  • Fat: 20-30g

(Note: Nutritional values are estimates and can vary based on specific ingredients used.)

Healthier Alternatives (Without Sacrificing Flavor)

Looking to lighten up this classic comfort dish? You don’t have to sacrifice flavor! Try these simple swaps:

  • Leaner Protein: Opt for 90-93% lean ground beef, or try ground turkey, chicken, or even a plant-based crumble for reduced fat.
  • Whole Wheat Pasta: Substitute regular pasta with whole wheat varieties for added fiber and nutrients.
  • Reduced-Fat Cheese: Use reduced-fat cheddar or a blend of cheeses with less fat content. Alternatively, use a smaller amount of full-fat cheese for maximum flavor intensity.
  • Veggies Galore: Bulk up the sauce with extra finely chopped vegetables like bell peppers, zucchini, or mushrooms. They add bulk, nutrients, and tender texture without altering the core taste.
  • Lighter Condiments: If concerned about sugar content, look for lower-sugar ketchup options or make your own.

Serving Suggestions to Elevate Your Meal

Make your Cheeseburger Pasta meal complete with these delicious serving ideas:

  • Crisp Salad: A simple green salad with a light vinaigrette offers a refreshing contrast to the rich pasta.
  • Steamed Veggies: Broccoli, green beans, or asparagus make for a healthy and colorful side.
  • Corn on the Cob: Especially during summer, grilled or boiled corn on the cob is a perfectly complementary side.
  • Pickle Spears: The classic burger pairing, offering a tangy crunch.
  • A dollop of Sour Cream or Greek Yogurt: For an extra creamy, cooling element.

Common Mistakes to Avoid

Steer clear of these pitfalls for Cheeseburger Pasta perfection:

  • Overcooking the Pasta: Soggy pasta will ruin the texture. Cook it precisely al dente.
  • Not Draining Grease: Excess grease can make the dish heavy and unappetizing.
  • Under-Seasoning: Be generous with salt and pepper; they bring out the core flavors. Taste and adjust as needed.
  • Burning the Garlic: Burnt garlic turns bitter. Add it towards the end of sautéing aromatics.
  • Using Too Much Liquid: Ensure the sauce is thick enough to coat the pasta; if it’s too thin, let it simmer uncovered for a few extra minutes.

Storing Tips for Lasting Deliciousness

Leftovers are a delicious bonus! To store:

  • Allow the pasta to cool completely before storing.
  • Transfer to an airtight container and refrigerate for up to 3-4 days.
  • To reheat, gently warm on the stovetop over low heat, adding a splash of water or milk if it seems dry. Alternatively, microwave in short bursts until heated through.
Close-up of a cheesy cheeseburger pasta bowl, garnished with pickles

Frequently Asked Questions about Cheeseburger Pasta

***Can I make this recipe vegetarian?***

Absolutely! Replace the ground beef with your favorite plant-based grounds or a hearty lentil mixture. Ensure your Worcestershire sauce is vegetarian or vegan if needed.

***What kind of cheese is best?***

Cheddar is classic for its sharp flavor and good melting properties. Monterey Jack, Colby, or a blend of these with mozzarella will also work beautifully, offering extra creaminess.

***Can I freeze cheeseburger pasta?***

While it’s best enjoyed fresh, you can freeze it. Store in an airtight container for up to 2 months. Reheat thoroughly on the stovetop or in the oven for best results, as freezing can sometimes affect the texture of the pasta and cheese.

***My sauce is too thin, what should I do?***

If your sauce is too liquidy, remove the lid and let it simmer for a few extra minutes to reduce and thicken. You can also whisk together a tablespoon of cornstarch with a couple of tablespoons of cold water to create a slurry, then stir it into the simmering sauce until thickened.

***How can I make it more “burger-like”?***

Add toppings like chopped dill pickles, shredded lettuce, or even a drizzle of special sauce (mayo and ketchup mix) right before serving. A sprinkle of sesame seeds can also evoke that burger bun feel.

Print
clock clock iconcutlery cutlery iconflag flag iconfolder folder iconinstagram instagram iconpinterest pinterest iconfacebook facebook iconprint print iconsquares squares iconheart heart iconheart solid heart solid icon

Cheesy Sloppy Cheeseburger Pasta Delight


  • Author: Chef Emy

Description

This creamy, cheesy pasta dish combines the flavors of a classic cheeseburger with the comforting texture of baked pasta. It’s a family-friendly favorite that’s simple to make and packed with flavor. Perfect for weeknight dinners or casual gatherings!


Ingredients

Scale
  • 12 ozpasta (penne or macaroni works best)1lb ground beef1onion, diced2cloves garlic, minced1 cupketchup1 cupmustard1 cupshredded cheddar cheese1 cupshredded mozzarella cheese1/2 cupheavy creamSalt and pepper to taste1 tbspolive oilOptional:chopped pickles, turkey bacon bits, additional cheese for topping
  • 1lb ground beef1onion, diced2cloves garlic, minced1 cupketchup1 cupmustard1 cupshredded cheddar cheese1 cupshredded mozzarella cheese1/2 cupheavy creamSalt and pepper to taste1 tbspolive oilOptional:chopped pickles, turkey bacon bits, additional cheese for topping
  • 1onion, diced2cloves garlic, minced1 cupketchup1 cupmustard1 cupshredded cheddar cheese1 cupshredded mozzarella cheese1/2 cupheavy creamSalt and pepper to taste1 tbspolive oilOptional:chopped pickles, turkey bacon bits, additional cheese for topping
  • 2cloves garlic, minced1 cupketchup1 cupmustard1 cupshredded cheddar cheese1 cupshredded mozzarella cheese1/2 cupheavy creamSalt and pepper to taste1 tbspolive oilOptional:chopped pickles, turkey bacon bits, additional cheese for topping
  • 1 cupketchup1 cupmustard1 cupshredded cheddar cheese1 cupshredded mozzarella cheese1/2 cupheavy creamSalt and pepper to taste1 tbspolive oilOptional:chopped pickles, turkey bacon bits, additional cheese for topping
  • 1 cupmustard1 cupshredded cheddar cheese1 cupshredded mozzarella cheese1/2 cupheavy creamSalt and pepper to taste1 tbspolive oilOptional:chopped pickles, turkey bacon bits, additional cheese for topping
  • 1 cupshredded cheddar cheese1 cupshredded mozzarella cheese1/2 cupheavy creamSalt and pepper to taste1 tbspolive oilOptional:chopped pickles, turkey bacon bits, additional cheese for topping
  • 1 cupshredded mozzarella cheese1/2 cupheavy creamSalt and pepper to taste1 tbspolive oilOptional:chopped pickles, turkey bacon bits, additional cheese for topping
  • 1/2 cupheavy creamSalt and pepper to taste1 tbspolive oilOptional:chopped pickles, turkey bacon bits, additional cheese for topping
  • Salt and pepper to taste1 tbspolive oilOptional:chopped pickles, turkey bacon bits, additional cheese for topping
  • 1 tbspolive oilOptional:chopped pickles, turkey bacon bits, additional cheese for topping
  • Optional:chopped pickles, turkey bacon bits, additional cheese for topping

Instructions

  1. 1️⃣Cook the Pasta:Bring a large pot of salted water to a boil. Add the pasta and cook according to package instructions until al dente.Drain the pasta and set it aside.2️⃣Prepare the Beef Mixture:Heat olive oil in a large skillet over medium heat.Add the diced onion and sauté until translucent, about 3-4 minutes.Add minced garlic and cook for an additional minute until fragrant.Add the ground beef and cook until browned, breaking it into small pieces as it cooks. Drain any excess fat and season with salt and pepper to taste.3️⃣Make the Cheese Sauce:In a medium saucepan, heat the heavy cream over medium heat.Gradually whisk in the cheddar and mozzarella cheese until melted and smooth. Season with salt and pepper if needed.4️⃣Preheat the Oven:Preheat your oven to 375°F (190°C). Grease a large baking dish with cooking spray or a little olive oil.5️⃣Combine Ingredients:In a large mixing bowl, combine the cooked pasta, beef mixture, ketchup, mustard, and cheese sauce. Mix well to ensure everything is evenly coated.6️⃣Assemble and Bake:Transfer the pasta mixture into the greased baking dish.Sprinkle additional cheese, turkey bacon bits, or chopped pickles on top if desired.Bake in the preheated oven for 20 minutes, or until the cheese is bubbly and golden.7️⃣Serve:Remove from the oven and let the dish cool for a few minutes before serving. Enjoy your cheesy, savory delight!
  2. Bring a large pot of salted water to a boil. Add the pasta and cook according to package instructions until al dente.Drain the pasta and set it aside.2️⃣Prepare the Beef Mixture:Heat olive oil in a large skillet over medium heat.Add the diced onion and sauté until translucent, about 3-4 minutes.Add minced garlic and cook for an additional minute until fragrant.Add the ground beef and cook until browned, breaking it into small pieces as it cooks. Drain any excess fat and season with salt and pepper to taste.3️⃣Make the Cheese Sauce:In a medium saucepan, heat the heavy cream over medium heat.Gradually whisk in the cheddar and mozzarella cheese until melted and smooth. Season with salt and pepper if needed.4️⃣Preheat the Oven:Preheat your oven to 375°F (190°C). Grease a large baking dish with cooking spray or a little olive oil.5️⃣Combine Ingredients:In a large mixing bowl, combine the cooked pasta, beef mixture, ketchup, mustard, and cheese sauce. Mix well to ensure everything is evenly coated.6️⃣Assemble and Bake:Transfer the pasta mixture into the greased baking dish.Sprinkle additional cheese, turkey bacon bits, or chopped pickles on top if desired.Bake in the preheated oven for 20 minutes, or until the cheese is bubbly and golden.7️⃣Serve:Remove from the oven and let the dish cool for a few minutes before serving. Enjoy your cheesy, savory delight!
  3. Drain the pasta and set it aside.
  4. 2️⃣Prepare the Beef Mixture:Heat olive oil in a large skillet over medium heat.Add the diced onion and sauté until translucent, about 3-4 minutes.Add minced garlic and cook for an additional minute until fragrant.Add the ground beef and cook until browned, breaking it into small pieces as it cooks. Drain any excess fat and season with salt and pepper to taste.3️⃣Make the Cheese Sauce:In a medium saucepan, heat the heavy cream over medium heat.Gradually whisk in the cheddar and mozzarella cheese until melted and smooth. Season with salt and pepper if needed.4️⃣Preheat the Oven:Preheat your oven to 375°F (190°C). Grease a large baking dish with cooking spray or a little olive oil.5️⃣Combine Ingredients:In a large mixing bowl, combine the cooked pasta, beef mixture, ketchup, mustard, and cheese sauce. Mix well to ensure everything is evenly coated.6️⃣Assemble and Bake:Transfer the pasta mixture into the greased baking dish.Sprinkle additional cheese, turkey bacon bits, or chopped pickles on top if desired.Bake in the preheated oven for 20 minutes, or until the cheese is bubbly and golden.7️⃣Serve:Remove from the oven and let the dish cool for a few minutes before serving. Enjoy your cheesy, savory delight!
  5. Heat olive oil in a large skillet over medium heat.Add the diced onion and sauté until translucent, about 3-4 minutes.Add minced garlic and cook for an additional minute until fragrant.Add the ground beef and cook until browned, breaking it into small pieces as it cooks. Drain any excess fat and season with salt and pepper to taste.3️⃣Make the Cheese Sauce:In a medium saucepan, heat the heavy cream over medium heat.Gradually whisk in the cheddar and mozzarella cheese until melted and smooth. Season with salt and pepper if needed.4️⃣Preheat the Oven:Preheat your oven to 375°F (190°C). Grease a large baking dish with cooking spray or a little olive oil.5️⃣Combine Ingredients:In a large mixing bowl, combine the cooked pasta, beef mixture, ketchup, mustard, and cheese sauce. Mix well to ensure everything is evenly coated.6️⃣Assemble and Bake:Transfer the pasta mixture into the greased baking dish.Sprinkle additional cheese, turkey bacon bits, or chopped pickles on top if desired.Bake in the preheated oven for 20 minutes, or until the cheese is bubbly and golden.7️⃣Serve:Remove from the oven and let the dish cool for a few minutes before serving. Enjoy your cheesy, savory delight!
  6. Add the diced onion and sauté until translucent, about 3-4 minutes.
  7. Add minced garlic and cook for an additional minute until fragrant.Add the ground beef and cook until browned, breaking it into small pieces as it cooks. Drain any excess fat and season with salt and pepper to taste.3️⃣Make the Cheese Sauce:In a medium saucepan, heat the heavy cream over medium heat.Gradually whisk in the cheddar and mozzarella cheese until melted and smooth. Season with salt and pepper if needed.4️⃣Preheat the Oven:Preheat your oven to 375°F (190°C). Grease a large baking dish with cooking spray or a little olive oil.5️⃣Combine Ingredients:In a large mixing bowl, combine the cooked pasta, beef mixture, ketchup, mustard, and cheese sauce. Mix well to ensure everything is evenly coated.6️⃣Assemble and Bake:Transfer the pasta mixture into the greased baking dish.Sprinkle additional cheese, turkey bacon bits, or chopped pickles on top if desired.Bake in the preheated oven for 20 minutes, or until the cheese is bubbly and golden.7️⃣Serve:Remove from the oven and let the dish cool for a few minutes before serving. Enjoy your cheesy, savory delight!
  8. Add the ground beef and cook until browned, breaking it into small pieces as it cooks. Drain any excess fat and season with salt and pepper to taste.3️⃣Make the Cheese Sauce:In a medium saucepan, heat the heavy cream over medium heat.Gradually whisk in the cheddar and mozzarella cheese until melted and smooth. Season with salt and pepper if needed.4️⃣Preheat the Oven:Preheat your oven to 375°F (190°C). Grease a large baking dish with cooking spray or a little olive oil.5️⃣Combine Ingredients:In a large mixing bowl, combine the cooked pasta, beef mixture, ketchup, mustard, and cheese sauce. Mix well to ensure everything is evenly coated.6️⃣Assemble and Bake:Transfer the pasta mixture into the greased baking dish.Sprinkle additional cheese, turkey bacon bits, or chopped pickles on top if desired.Bake in the preheated oven for 20 minutes, or until the cheese is bubbly and golden.7️⃣Serve:Remove from the oven and let the dish cool for a few minutes before serving. Enjoy your cheesy, savory delight!
  9. 3️⃣Make the Cheese Sauce:
  10. In a medium saucepan, heat the heavy cream over medium heat.Gradually whisk in the cheddar and mozzarella cheese until melted and smooth. Season with salt and pepper if needed.4️⃣Preheat the Oven:Preheat your oven to 375°F (190°C). Grease a large baking dish with cooking spray or a little olive oil.5️⃣Combine Ingredients:In a large mixing bowl, combine the cooked pasta, beef mixture, ketchup, mustard, and cheese sauce. Mix well to ensure everything is evenly coated.6️⃣Assemble and Bake:Transfer the pasta mixture into the greased baking dish.Sprinkle additional cheese, turkey bacon bits, or chopped pickles on top if desired.Bake in the preheated oven for 20 minutes, or until the cheese is bubbly and golden.7️⃣Serve:Remove from the oven and let the dish cool for a few minutes before serving. Enjoy your cheesy, savory delight!
  11. Gradually whisk in the cheddar and mozzarella cheese until melted and smooth. Season with salt and pepper if needed.4️⃣Preheat the Oven:Preheat your oven to 375°F (190°C). Grease a large baking dish with cooking spray or a little olive oil.5️⃣Combine Ingredients:In a large mixing bowl, combine the cooked pasta, beef mixture, ketchup, mustard, and cheese sauce. Mix well to ensure everything is evenly coated.6️⃣Assemble and Bake:Transfer the pasta mixture into the greased baking dish.Sprinkle additional cheese, turkey bacon bits, or chopped pickles on top if desired.Bake in the preheated oven for 20 minutes, or until the cheese is bubbly and golden.7️⃣Serve:Remove from the oven and let the dish cool for a few minutes before serving. Enjoy your cheesy, savory delight!
  12. 4️⃣Preheat the Oven:
  13. Preheat your oven to 375°F (190°C). Grease a large baking dish with cooking spray or a little olive oil.5️⃣Combine Ingredients:In a large mixing bowl, combine the cooked pasta, beef mixture, ketchup, mustard, and cheese sauce. Mix well to ensure everything is evenly coated.6️⃣Assemble and Bake:Transfer the pasta mixture into the greased baking dish.Sprinkle additional cheese, turkey bacon bits, or chopped pickles on top if desired.Bake in the preheated oven for 20 minutes, or until the cheese is bubbly and golden.7️⃣Serve:Remove from the oven and let the dish cool for a few minutes before serving. Enjoy your cheesy, savory delight!
  14. 5️⃣Combine Ingredients:In a large mixing bowl, combine the cooked pasta, beef mixture, ketchup, mustard, and cheese sauce. Mix well to ensure everything is evenly coated.6️⃣Assemble and Bake:Transfer the pasta mixture into the greased baking dish.Sprinkle additional cheese, turkey bacon bits, or chopped pickles on top if desired.Bake in the preheated oven for 20 minutes, or until the cheese is bubbly and golden.7️⃣Serve:Remove from the oven and let the dish cool for a few minutes before serving. Enjoy your cheesy, savory delight!
  15. In a large mixing bowl, combine the cooked pasta, beef mixture, ketchup, mustard, and cheese sauce. Mix well to ensure everything is evenly coated.
  16. 6️⃣Assemble and Bake:Transfer the pasta mixture into the greased baking dish.Sprinkle additional cheese, turkey bacon bits, or chopped pickles on top if desired.Bake in the preheated oven for 20 minutes, or until the cheese is bubbly and golden.7️⃣Serve:Remove from the oven and let the dish cool for a few minutes before serving. Enjoy your cheesy, savory delight!
  17. Transfer the pasta mixture into the greased baking dish.Sprinkle additional cheese, turkey bacon bits, or chopped pickles on top if desired.Bake in the preheated oven for 20 minutes, or until the cheese is bubbly and golden.7️⃣Serve:Remove from the oven and let the dish cool for a few minutes before serving. Enjoy your cheesy, savory delight!
  18. Sprinkle additional cheese, turkey bacon bits, or chopped pickles on top if desired.
  19. Bake in the preheated oven for 20 minutes, or until the cheese is bubbly and golden.7️⃣Serve:Remove from the oven and let the dish cool for a few minutes before serving. Enjoy your cheesy, savory delight!
  20. 7️⃣Serve:Remove from the oven and let the dish cool for a few minutes before serving. Enjoy your cheesy, savory delight!
  21. Remove from the oven and let the dish cool for a few minutes before serving. Enjoy your cheesy, savory delight!

Notes

Add a layer of breadcrumbs on top for extra crunch before baking.For a spicy twist, mix in a tablespoon of hot sauce or chopped jalapeños.Leftovers can be stored in the refrigerator for up to 3 days and reheated in the oven or microwave.
For a spicy twist, mix in a tablespoon of hot sauce or chopped jalapeños.Leftovers can be stored in the refrigerator for up to 3 days and reheated in the oven or microwave.
Leftovers can be stored in the refrigerator for up to 3 days and reheated in the oven or microwave.

“`

Easy Mediterranean Salmon with Herbs

“`html

Easy Mediterranean Salmon with Herbs

Why You’ll Love This Recipe

The Mediterranean diet is renowned for its health benefits, and this salmon dish is a perfect embodiment of its principles. It’s a symphony of fresh, wholesome ingredients – tender salmon, bright lemon, aromatic garlic, and a medley of colorful Mediterranean toppings. This recipe is incredibly forgiving, making it ideal for both novice cooks and seasoned chefs. In under 30 minutes, you can have a restaurant-quality meal on your table that will impress your family and friends, all while nourishing your body with lean protein and healthy fats. Get ready to elevate your weeknight dinners!

Ingredients You’ll Need

Gathering these simple yet impactful ingredients is the first step to culinary success. You’ll find most of these staples in your pantry or easily available at your local market.

For the Salmon and Marinade:

  • Salmon Fillets: 2 (6-ounce) skin-on or skinless salmon fillets (about 1-inch thick). Look for vibrant, firm flesh. Substitution: Cod or halibut can be used, though cooking times may vary.
  • Olive Oil: 3 tablespoons extra virgin olive oil, for that distinct fruity richness. Substitution: Avocado oil for a higher smoke point, or a light olive oil.
  • Garlic: 3 cloves, minced. Fresh garlic offers a pungent, aromatic kick. Substitution: 1 teaspoon garlic powder if fresh isn’t available.
  • Lemon Juice: 2 tablespoons fresh lemon juice, for a zesty, bright flavor. Substitution: Lime juice for a slightly different citrus note.
  • Fresh Herbs: 2 tablespoons chopped fresh herbs. A mix of parsley and dill is classic, but feel free to experiment! Substitution: 2 teaspoons dried Italian seasoning or mixed dried herbs.
  • Salt: 1/2 teaspoon sea salt, to enhance all the flavors.
  • Black Pepper: 1/4 teaspoon freshly ground black pepper, for a hint of spice.

For the Toppings:

  • Cherry Tomatoes: 1 cup, halved. These burst with sweetness when cooked. Substitution: Grape tomatoes or diced regular tomatoes.
  • Kalamata Olives: 1/2 cup, pitted and halved. Their briny, robust flavor is quintessential Mediterranean. Substitution: Other brine-cured black olives.
  • Feta Cheese: 1/4 cup crumbled feta, for a salty, creamy finish. Substitution: Goat cheese or a sharp white cheddar in a pinch.
  • Red Onion: 1/4 cup thinly sliced red onion (optional, for a little bite).

Timings

Prep time:
10 minutes
Cook time:
12-15 minutes
Total time:
25 minutes

This recipe is significantly faster than the average salmon dish, which often requires longer marinating or cooking times. Perfect for when you need a wholesome meal in a flash!

Easy Mediterranean Salmon with Herbs prepared and ready to be served on a plate, garnished with fresh herbs and lemon wedges.

Step-by-Step Instructions

Step 1: Marinate the Salmon

In a shallow dish or a zip-top bag, whisk together the olive oil, minced garlic, fresh lemon juice, chopped fresh herbs, salt, and pepper. Place the salmon fillets in the marinade, ensuring they are well-coated. Let them marinate for at least 10 minutes at room temperature, or up to 30 minutes in the refrigerator. This brief marination time is enough to infuse the salmon with fantastic flavor without “cooking” the fish with the lemon juice.

Step 2: Prepare the Toppings

While the salmon marinates, prepare your vibrant toppings. Halve the cherry tomatoes, pit and halve the Kalamata olives, crumble the feta cheese, and thinly slice the red onion if you’re using it. Having everything prepped and ready ensures a smooth assembly process once the salmon is cooked.

Step 3: Cook the Salmon

Heat a large oven-safe skillet (cast iron works wonderfully!) over medium-high heat. Add a drizzle of olive oil if your skillet isn’t well-seasoned. Carefully place the marinated salmon fillets, skin-side down if using skin-on, into the hot skillet. Sear for about 3-4 minutes until the skin is crispy and golden. Flip the salmon carefully and top each fillet with the halved tomatoes, olives, and red onion slices (if using). Transfer the skillet to a preheated oven at 400°F (200°C) and bake for 8-10 minutes, or until the salmon is cooked through and flakes easily with a fork. The exact cooking time will depend on the thickness of your fillets.

Step 4: Assemble and Serve

Once the salmon is cooked, remove the skillet from the oven. Sprinkle the crumbled feta cheese over the hot salmon and topping mixture. The heat will slightly soften the feta, making it even more delicious. Let it rest for a minute or two, then serve immediately. Garnish with a little extra fresh parsley or dill if desired.

Nutritional Information

This recipe is a nutritional powerhouse! While exact values can vary based on ingredient specifics, a typical serving (per fillet, without sides) offers:

  • Calories: Approx. 350-450 kcal
  • Protein: Approx. 30-40g
  • Healthy Fats (Omega-3s): Significant amount from salmon and olive oil
  • Vitamins and Minerals: Rich in Vitamin D, B vitamins, selenium, iodine, and antioxidants from the herbs and vegetables.

Healthier Alternatives and Flavor Swaps

Looking to tweak this recipe further or adapt it for dietary needs? Here are some ideas:

  • Lower Sodium: Use low-sodium olives and reduce added salt.
  • Dairy-Free: Omit the feta cheese or use a dairy-free feta alternative.
  • Spice It Up: Add a pinch of red pepper flakes to the marinade for a subtle kick.
  • More Veggies: Toss in some thinly sliced bell peppers or zucchini slices with the tomatoes and olives before baking.
  • Herb Variations: Experiment with rosemary, thyme, or oregano for different Mediterranean profiles.

Serving Suggestions

This versatile salmon pairs beautifully with a variety of sides. Consider serving it with:

  • Quinoa or couscous for a light grain
  • A crisp Greek salad
  • Roasted asparagus or broccoli
  • A side of crusty bread to soak up any delicious pan juices

Common Mistakes to Avoid

  • Overcooking the Salmon: Keep an eye on the salmon; it cooks quickly and can become dry if overdone. Aim for flaky and moist.
  • Not Preheating the Pan: Starting with a hot pan before searing is crucial for achieving a nice crust and preventing sticking.
  • Under-Marinating: While it’s a quick marinade, don’t skip it entirely, or you’ll miss out on flavor infusion.
  • Crowding the Pan: If cooking more than 2-3 fillets at once, use a larger pan or cook in batches to ensure even searing.

Storing Your Mediterranean Salmon

Leftover cooked salmon can be stored in an airtight container in the refrigerator for up to 2-3 days. Reheat gently on the stovetop or in a low oven to prevent drying out. It’s also delicious served cold on salads.

Close-up of a cooked salmon fillet on a plate, topped with tomatoes, olives, and feta cheese, ready to be eaten.

Frequently Asked Questions

***Can I use dried herbs instead of fresh?***

Yes, you can! Use about 1 teaspoon of dried herbs for every tablespoon of fresh herbs. Dried herbs are more potent, so start with less and adjust to your taste. Mediterranean blends like Italian seasoning, oregano, or thyme work wonderfully.

***What kind of salmon is best?***

Wild-caught salmon (like sockeye or coho) is often preferred for its leaner texture and robust flavor, but farmed salmon is also excellent and readily available. Choose fillets that are firm, have a bright color, and smell fresh.

***Can I grill this salmon instead of baking it?***

Absolutely! You can grill this salmon. Preheat your grill to medium-high heat. Sear the salmon for a few minutes on each side, then add the toppings. Close the lid and cook until done, about 8-12 minutes total depending on thickness and grill temperature. Watch carefully to prevent burning.

***Is this recipe suitable for meal prep?***

Yes, it’s quite suitable! Cooked salmon and toppings can be stored separately or together in the refrigerator for up to 2-3 days. The tomatoes might soften slightly, but the overall flavor holds up well.

Enjoy Your Flavorful Mediterranean Salmon!

This Easy Mediterranean Salmon with Herbs is more than just a recipe; it’s an invitation to enjoy vibrant, healthy, and simple cooking. It proves that delicious meals don’t need to be complicated. Whether you’re a busy professional, a budding chef, or just looking for a delightful way to eat healthily, this dish is sure to become a favorite. Give it a try and taste the sunshine!

Print

clock clock iconcutlery cutlery iconflag flag iconfolder folder iconinstagram instagram iconpinterest pinterest iconfacebook facebook iconprint print iconsquares squares iconheart heart iconheart solid heart solid icon

Easy Mediterranean Salmon with Herbs


  • Author: Chef Emy

Description

“This Mediterranean Salmon features a perfect blend of fresh herbs and olive oil, creating a light and delicious meal for any time of day.”


Ingredients

Scale
  • 2 salmon fillets (6 oz each)
  • 1 tablespoon olive oil
  • 1 teaspoon dried oregano
  • 1 teaspoon dried parsley
  • 1/2 teaspoon garlic powder
  • Salt and pepper to taste
  • 1 tablespoon lemon juice
  • 1 tablespoon fresh parsley, chopped (for garnish)
  • 1 lemon, cut into wedges (for serving)
  • 1 cup cherry tomatoes, halved
  • 1/2 cucumber, sliced
  • 1/4 red onion, thinly sliced

Instructions

    Notes

    For a complete meal, serve with roasted vegetables or a side of quinoa.You can grill the salmon for an added smoky flavor.


    “`

    Easy Pull Apart Pizza Bread Recipe for a Crowd

    “`html

    Easy Pull Apart Pizza Bread Recipe for a Crowd

    It’s Pizza Night, But Better!

    Are you struggling to find a crowd-pleasing dish that’s both fun to eat and incredibly easy to prepare? Look no further than this Easy Pull Apart Pizza Bread! In a world where we’re constantly seeking convenient yet impressive meal options for gatherings or quick family dinners, this recipe stands out. It transforms the beloved flavors of pizza into an interactive, shareable experience that’s guaranteed to disappear from the plate in minutes. With its gooey cheese, savory toppings, and irresistibly soft dough, this pull-apart pizza bread is more than just a meal – it’s a communal delight that brings people together. Let’s dive into how you can create this showstopper!

    Ingredients for Pull-Apart Pizza Bread

    The beauty of this recipe lies in its simplicity and flexibility. You can customize it with your favorite pizza toppings! Here’s a foundational list to get you started:

    • Pizza Dough: 1 lb (450g) refrigerated pizza dough, or homemade if you prefer. Aim for a dough that’s slightly chilled, making it easier to handle. For a slightly richer flavor, consider a brioche or enriched dough.
    • Pizza Sauce: 1 cup (240ml) your favorite pizza sauce or marinara. A thick sauce is best to prevent sogginess. You can also use a pesto or white garlic sauce for a different flavor profile.
    • Cheese: 2 cups (about 8 oz/225g) shredded mozzarella cheese. This provides that essential gooey stretch. For added depth, mix in some sharp cheddar, provolone, or a sprinkle of Parmesan.
    • Toppings: 1 cup (about 4 oz/115g) of your desired chopped pizza toppings. Think classic pepperoni, cooked Italian sausage, sautéed mushrooms, diced bell peppers, black olives, or even caramelized onions. Ensure any raw vegetables are finely diced or pre-cooked to ensure they cook through in the oven.
    • Seasoning: 1 teaspoon dried Italian seasoning or oregano. A pinch of red pepper flakes for a touch of heat.
    • Optional: Melted butter or olive oil for brushing the top, fresh basil or parsley for garnish.

    Timing is Everything

    This recipe is designed for efficiency, making it perfect for busy weeknights or last-minute gatherings. Compared to artisanal pizza, the assembly is significantly faster. Most standard recipes of this kind require about 15-20 minutes of prep work and 20-25 minutes of baking.

    Prep Time:
    15 minutes
    Cook Time:
    25 minutes
    Total Time:
    40 minutes

    Pull apart pizza bread assembled in a baking dish, ready for the oven

    Step-by-Step Instructions

    Step 1: Prep Your Dough

    Preheat your oven to 375°F (190°C). Lightly grease a 9×13 inch baking dish. If using refrigerated dough, let it sit at room temperature for about 15-20 minutes to make it more pliable, but don’t let it get too warm or it will be difficult to work with. On a lightly floured surface, gently stretch or roll out the pizza dough into a rectangle that roughly fits your baking dish. You don’t need it to be perfect, as it will expand and fill the dish. If you’ve made your own dough, ensure it has proofed appropriately.

    Step 2: Layer on the Flavor

    Spread the pizza sauce evenly over the dough, leaving a small border around the edges. Be generous but not so much that it becomes soupy. Next, sprinkle about half of your shredded mozzarella cheese over the sauce. Now, evenly distribute your chosen toppings over the cheese. Finally, sprinkle the remaining mozzarella cheese over the toppings. Drizzle with a little olive oil or brush the edges with melted butter for an extra crisp and golden crust, and sprinkle with Italian seasoning and red pepper flakes, if using.

    Step 3: Bake to Golden Perfection

    Cover the baking dish loosely with aluminum foil to prevent the top from browning too quickly before the cheese is fully melted and bubbly. Bake for 15 minutes. After 15 minutes, carefully remove the foil and continue baking for another 10-15 minutes, or until the cheese is melted, bubbly, and the crust is golden brown and cooked through. The internal temperature should reach around 165°F (74°C).

    Step 4: The Pull-Apart Magic

    Once out of the oven, let the pizza bread rest for about 5-10 minutes. This is crucial for allowing the cheese to set slightly, making it easier to pull apart. If you desire, sprinkle with fresh chopped basil or parsley for a pop of color and freshness. Serve it directly from the dish, allowing everyone to pull out their own cheesy, delicious piece!

    Nutritional Highlights

    While nutritional values can vary significantly based on the specific ingredients and toppings used, a typical serving of this pull-apart pizza bread (approximately 1/8th of the dish) offers:

    • Calories: ~300-400 kcal
    • Protein: ~15-20g
    • Fat: ~15-25g
    • Carbohydrates: ~25-35g

    Note: These are estimations. For precise nutritional information, please use a recipe calculator with your exact ingredients.

    Healthier Alternatives (Without Sacrificing Flavor)

    You can easily lighten up this dish without compromising on taste:

    • Whole Wheat Dough: Substitute half or all of the white pizza dough with whole wheat flour for added fiber and nutrients.
    • Lean Protein: Opt for lean turkey pepperoni or grilled chicken breast instead of traditional meats.
    • Reduced-Fat Cheese: Use part-skim mozzarella or a blend with reduced-fat cheeses.
    • Veggie-Loaded: Load up on extra vegetables like spinach, broccoli florets, or mushrooms. They add bulk, nutrients, and flavor with minimal calories.
    • Sauce Swap: Consider a lighter marinara sauce or even a pureed vegetable sauce.

    Serving Suggestions to Elevate Your Pizza Bread

    This pull-apart pizza bread is a star on its own, but here are some ideas to make it even better:

    • Dipping Sauces: Serve with extra pizza sauce, ranch dressing, or garlic aioli for dipping.
    • Side Salad: A fresh, crisp green salad with a vinaigrette dressing balances the richness of the pizza bread.
    • Soup Pairing: It makes a fantastic side for a hearty tomato soup or a creamy vegetable soup.
    • Party Platter: Arrange individual pieces on a platter with toothpicks for an easy appetizer at parties.

    Common Mistakes to Avoid

    To ensure your pull-apart pizza bread turns out perfectly every time:

    • Overworking the Dough: Be gentle when stretching or rolling the dough. Overworking it can make it tough.
    • Too Much Sauce: Using too much liquidy sauce can make the bread soggy. Opt for a thicker sauce and don’t overload it.
    • Cutting into Servings Too Soon: Letting it rest after baking allows the cheese to set, making it easier to pull apart cleanly.
    • Underbaking: Ensure the center is cooked through and the cheese is fully melted. Use a thermometer if unsure.

    Storing and Reheating Tips

    Leftovers can be stored and enjoyed later. After the pizza bread has cooled completely, cover the baking dish tightly with plastic wrap or transfer pieces to an airtight container. Refrigerate for up to 3 days.

    Reheating: For best results, reheat individual portions in a toaster oven or conventional oven at 350°F (175°C) until warmed through and the cheese is melty again. Microwaving can make the crust soft and chewy.

    A close-up of gooey, melted cheese being pulled from a piece of pizza bread

    Frequently Asked Questions

    ***Can I use store-bought biscuit dough or crescent roll dough?***

    Yes, you absolutely can! Using biscuit or crescent roll dough will result in a fluffier, more pastry-like pull-apart bread. Simply press the dough into the pan, layer your toppings, and bake according to the dough package directions, adjusting time as needed for the cheese and toppings to melt and brown.

    ***Can I prepare this ahead of time?***

    You can assemble the pizza bread up to a day in advance. Cover it tightly and refrigerate. However, it’s best to bake it fresh for optimal texture and flavor. If baking from refrigerated, you might need to add a few extra minutes to the covered baking time.

    ***What are some other topping ideas?***

    Get creative! Consider: cooked crumbled bacon, pineapple chunks (if you’re brave!), jalapeños, fresh tomatoes, basil pesto, spinach, buffalo chicken, or even a dessert version with Nutella and fruit!

    ***Can this recipe be made gluten-free?***

    Yes, you can adapt this recipe for gluten-free diets. Use your favorite gluten-free pizza dough or a store-bought gluten-free pizza crust mix. Follow the package instructions for dough preparation, and then proceed with the layering and baking as outlined in the recipe.

    Print
    clock clock iconcutlery cutlery iconflag flag iconfolder folder iconinstagram instagram iconpinterest pinterest iconfacebook facebook iconprint print iconsquares squares iconheart heart iconheart solid heart solid icon

    Pull-Apart Pizza Bread with Beef Pepperoni


    • Author: Chef Emy

    Description

    A fun, cheesy, and savory appetizer perfect for parties or family gatherings. This pull-apart pizza bread is packed with gooey mozzarella, bold Italian seasoning, and flavorful beef pepperoni for a crowd-pleasing dish!


    Ingredients

    Scale
    • 1can (16 oz) refrigerated pizza dough1 1/2 cupsshredded mozzarella cheese1/2 cupgrated Parmesan cheese1/2 cupmini beef pepperoni slices (or regular beef pepperoni, quartered)2 tablespoonsolive oil1 teaspoongarlic powder1 teaspoonItalian seasoning1/4 cupmarinara sauce (for dipping)
    • 1 1/2 cupsshredded mozzarella cheese1/2 cupgrated Parmesan cheese1/2 cupmini beef pepperoni slices (or regular beef pepperoni, quartered)2 tablespoonsolive oil1 teaspoongarlic powder1 teaspoonItalian seasoning1/4 cupmarinara sauce (for dipping)
    • 1/2 cupgrated Parmesan cheese1/2 cupmini beef pepperoni slices (or regular beef pepperoni, quartered)2 tablespoonsolive oil1 teaspoongarlic powder1 teaspoonItalian seasoning1/4 cupmarinara sauce (for dipping)
    • 1/2 cupmini beef pepperoni slices (or regular beef pepperoni, quartered)2 tablespoonsolive oil1 teaspoongarlic powder1 teaspoonItalian seasoning1/4 cupmarinara sauce (for dipping)
    • 2 tablespoonsolive oil1 teaspoongarlic powder1 teaspoonItalian seasoning1/4 cupmarinara sauce (for dipping)
    • 1 teaspoongarlic powder1 teaspoonItalian seasoning1/4 cupmarinara sauce (for dipping)
    • 1 teaspoonItalian seasoning1/4 cupmarinara sauce (for dipping)
    • 1/4 cupmarinara sauce (for dipping)

    Instructions

    1. 1️⃣Preheat the oven:
    2. Preheat your oven to 375°F (190°C). Grease a Bundt pan or round baking dish with cooking spray or a thin layer of olive oil.2️⃣Prepare the dough:Roll out the pizza dough on a clean surface and cut it into small, bite-sized pieces, about 1-2 inches in size.3️⃣Mix the toppings:In a large mixing bowl, combine the dough pieces with olive oil, garlic powder, Italian seasoning, half of the mozzarella cheese, and the beef pepperoni slices. Toss well to coat the dough evenly.4️⃣Assemble the bread:Layer the seasoned dough pieces into the greased pan, sprinkling the remaining mozzarella and Parmesan cheese throughout as you go to ensure even cheesiness.5️⃣Bake:Place the pan in the preheated oven and bake for 25-30 minutes, or until the bread is golden brown and the cheese is melted and bubbly. Let it cool for 5 minutes before carefully removing it from the pan.6️⃣Serve:Transfer the pull-apart pizza bread to a serving plate. Serve warm with a side of marinara sauce for dipping. Pull apart and enjoy the cheesy, pepperoni-filled goodness!
    3. 2️⃣Prepare the dough:Roll out the pizza dough on a clean surface and cut it into small, bite-sized pieces, about 1-2 inches in size.3️⃣Mix the toppings:In a large mixing bowl, combine the dough pieces with olive oil, garlic powder, Italian seasoning, half of the mozzarella cheese, and the beef pepperoni slices. Toss well to coat the dough evenly.4️⃣Assemble the bread:Layer the seasoned dough pieces into the greased pan, sprinkling the remaining mozzarella and Parmesan cheese throughout as you go to ensure even cheesiness.5️⃣Bake:Place the pan in the preheated oven and bake for 25-30 minutes, or until the bread is golden brown and the cheese is melted and bubbly. Let it cool for 5 minutes before carefully removing it from the pan.6️⃣Serve:Transfer the pull-apart pizza bread to a serving plate. Serve warm with a side of marinara sauce for dipping. Pull apart and enjoy the cheesy, pepperoni-filled goodness!
    4. Roll out the pizza dough on a clean surface and cut it into small, bite-sized pieces, about 1-2 inches in size.
    5. 3️⃣Mix the toppings:In a large mixing bowl, combine the dough pieces with olive oil, garlic powder, Italian seasoning, half of the mozzarella cheese, and the beef pepperoni slices. Toss well to coat the dough evenly.4️⃣Assemble the bread:Layer the seasoned dough pieces into the greased pan, sprinkling the remaining mozzarella and Parmesan cheese throughout as you go to ensure even cheesiness.5️⃣Bake:Place the pan in the preheated oven and bake for 25-30 minutes, or until the bread is golden brown and the cheese is melted and bubbly. Let it cool for 5 minutes before carefully removing it from the pan.6️⃣Serve:Transfer the pull-apart pizza bread to a serving plate. Serve warm with a side of marinara sauce for dipping. Pull apart and enjoy the cheesy, pepperoni-filled goodness!
    6. In a large mixing bowl, combine the dough pieces with olive oil, garlic powder, Italian seasoning, half of the mozzarella cheese, and the beef pepperoni slices. Toss well to coat the dough evenly.4️⃣Assemble the bread:Layer the seasoned dough pieces into the greased pan, sprinkling the remaining mozzarella and Parmesan cheese throughout as you go to ensure even cheesiness.5️⃣Bake:Place the pan in the preheated oven and bake for 25-30 minutes, or until the bread is golden brown and the cheese is melted and bubbly. Let it cool for 5 minutes before carefully removing it from the pan.6️⃣Serve:Transfer the pull-apart pizza bread to a serving plate. Serve warm with a side of marinara sauce for dipping. Pull apart and enjoy the cheesy, pepperoni-filled goodness!
    7. 4️⃣Assemble the bread:
    8. Layer the seasoned dough pieces into the greased pan, sprinkling the remaining mozzarella and Parmesan cheese throughout as you go to ensure even cheesiness.5️⃣Bake:Place the pan in the preheated oven and bake for 25-30 minutes, or until the bread is golden brown and the cheese is melted and bubbly. Let it cool for 5 minutes before carefully removing it from the pan.6️⃣Serve:Transfer the pull-apart pizza bread to a serving plate. Serve warm with a side of marinara sauce for dipping. Pull apart and enjoy the cheesy, pepperoni-filled goodness!
    9. 5️⃣Bake:Place the pan in the preheated oven and bake for 25-30 minutes, or until the bread is golden brown and the cheese is melted and bubbly. Let it cool for 5 minutes before carefully removing it from the pan.6️⃣Serve:Transfer the pull-apart pizza bread to a serving plate. Serve warm with a side of marinara sauce for dipping. Pull apart and enjoy the cheesy, pepperoni-filled goodness!
    10. Place the pan in the preheated oven and bake for 25-30 minutes, or until the bread is golden brown and the cheese is melted and bubbly. Let it cool for 5 minutes before carefully removing it from the pan.
    11. 6️⃣Serve:Transfer the pull-apart pizza bread to a serving plate. Serve warm with a side of marinara sauce for dipping. Pull apart and enjoy the cheesy, pepperoni-filled goodness!
    12. Transfer the pull-apart pizza bread to a serving plate. Serve warm with a side of marinara sauce for dipping. Pull apart and enjoy the cheesy, pepperoni-filled goodness!

    Notes

    For extra flavor, add a sprinkle of crushed red pepper flakes or chopped fresh basil before baking.If you don’t have a Bundt pan, a regular round baking dish works just as well—just make sure it’s well-greased.Leftovers can be stored in an airtight container and reheated in the oven for 5-7 minutes to restore crispiness.
    If you don’t have a Bundt pan, a regular round baking dish works just as well—just make sure it’s well-greased.Leftovers can be stored in an airtight container and reheated in the oven for 5-7 minutes to restore crispiness.
    Leftovers can be stored in an airtight container and reheated in the oven for 5-7 minutes to restore crispiness.

    “`

    Easy Barbecue Meatballs with Pineapple for Any Occasion

    “`html

    Easy Barbecue Meatballs with Pineapple for Any Occasion

    Introduction

    Are you looking for a quick, crowd-pleasing appetizer or a simple weeknight dinner that doesn’t compromise on flavor? In today’s fast-paced world, finding recipes that are both delicious and time-efficient is key. This easy barbecue meatballs with pineapple recipe is precisely that! Imagine perfectly seasoned, tender meatballs coated in a sweet and tangy barbecue sauce, with bursts of juicy pineapple adding a tropical flair. It’s a combination that truly sings, offering a delightful balance of savory, sweet, and tart that makes it perfect for game days, holiday parties, potlucks, or even just a fun family meal. This recipe is designed for minimal effort and maximum enjoyment, proving that you don’t need hours in the kitchen to create something truly special.

    Ingredients List

    Gathering your ingredients is the first exciting step towards culinary success! For these delightful barbecue meatballs with pineapple, we’ve kept it straightforward, ensuring you can whip them up with items you likely have on hand or can easily find. The key to truly exceptional meatballs lies in their texture and flavor, and the sauce is where the magic truly unfolds.

    For the Meatballs:

    • 1 lb ground beef (80/20 blend recommended for moisture and flavor; you can also use a mix of beef and pork)
    • 1/2 cup breadcrumbs (Panko or regular, for binding and a tender texture)
    • 1/4 cup finely chopped onion (adds a subtle sweet and savory depth; you can substitute with onion powder if you’re in a pinch)
    • 1 large egg, lightly beaten (acts as a binder, ensuring the meatballs hold their shape beautifully)
    • 2 cloves garlic, minced (essential for that aromatic punch)
    • 1 tablespoon Worcestershire sauce (for umami richness and complexity)
    • 1/2 teaspoon salt (enhances all the other flavors)
    • 1/4 teaspoon black pepper (freshly ground for the best zest)

    For the Barbecue Sauce:

    • 1.5 cups your favorite barbecue sauce (store-bought or homemade – use one with a flavor profile you love, whether it’s smoky, sweet, or spicy)
    • 1 cup pineapple chunks, drained (fresh or canned, these add a delightful sweet and tangy contrast; reserving some juice can add extra moisture)
    • 1 tablespoon brown sugar (optional, for an extra touch of caramelized sweetness; adjust to taste based on your BBQ sauce)
    • 1 teaspoon apple cider vinegar (adds a bright, tangy note to balance the sweetness)

    Timing

    Prep time: 15 minutes
    Cook time: 30-35 minutes
    Total time: 45-50 minutes

    Compared to many homemade meatball recipes that can take upwards of an hour, this dish is remarkably quick. The prep is minimal, and the cooking is largely hands-off, making it a perfect mid-week meal solution. This is significantly faster than the average 60-minute meatball recipe, allowing you to enjoy a delicious meal without the long wait.

    Delicious barbecue meatballs with pineapple in a serving dish.

    Step-by-Step Instructions

    Let’s get cooking! Follow these simple steps for perfectly tender and flavorful barbecue meatballs with pineapple. We’re aiming for that irresistible sweet and savory glaze that coats every single bite.

    Step 1: Prepare the Meatballs

    In a large bowl, gently combine the ground beef, breadcrumbs, finely chopped onion, beaten egg, minced garlic, Worcestershire sauce, salt, and pepper. It’s important to mix these ingredients just until they are incorporated. Overmixing can lead to tough meatballs, so handle the mixture with care. Once combined, roll the mixture into uniform-sized balls, about 1 to 1.5 inches in diameter. Arranging them on a baking sheet makes them easy to manage.

    Step 2: Make the Barbecue Sauce

    In a medium saucepan, whisk together the barbecue sauce, drained pineapple chunks, brown sugar (if using), and apple cider vinegar. Heat this mixture over medium heat until it begins to simmer. Stir occasionally to ensure the flavors meld beautifully and the sauce becomes slightly thickened. The aroma at this stage is already intoxicating!

    Step 3: Combine and Cook

    Carefully add the prepared meatballs to the simmering barbecue sauce in the saucepan. Stir gently to coat each meatball thoroughly. Once all the meatballs are coated, reduce the heat to low, cover the saucepan, and let them simmer for 20-25 minutes. This low and slow cooking process allows the meatballs to cook through evenly while absorbing all the delicious flavors of the sauce. Stir occasionally to prevent sticking, and ensure they are cooking at a gentle simmer, not a rolling boil.

    Step 4: Add Pineapple

    If you prefer your pineapple slightly firmer and with more of a distinct bite, now is the time to add it. Stir in the pineapple chunks during the last 5-10 minutes of simmering. This ensures they heat through but retain some of their delightful texture and bright, juicy character, adding that perfect sweet and tangy counterpoint to the savory meatballs.

    Step 5: Finish and Serve

    Once the meatballs are cooked through and the sauce has reached your desired consistency, taste and adjust seasoning if necessary. Serve the barbecue meatballs and pineapple hot. They are fantastic on their own as an appetizer or can be served as a main dish.

    Nutritional Information

    • Calories: Approximately 250-300 per serving (will vary based on meat fat content and BBQ sauce used)
    • Protein: 15-20g
    • Fat: 12-18g
    • Carbohydrates: 15-25g (largely from BBQ sauce and pineapple)

    Note: This is an estimated nutritional breakdown. Actual values may vary greatly depending on specific ingredients used, portion sizes, and the brand of barbecue sauce.

    Healthier Alternatives

    Looking to make these barbecue meatballs with pineapple even lighter? You have several fantastic options that don’t sacrifice flavor:

    • Leaner Meat: Opt for ground turkey, chicken, or a leaner blend of beef (93/7). While they may be less moist, the sauce will compensate.
    • Reduced Sugar BBQ Sauce: Choose a barbecue sauce that is labeled “no sugar added” or “low sugar.” You might need to add a touch more vinegar to balance the flavor.
    • Fresh Pineapple Focus: Use fresh pineapple instead of canned. While both are good, fresh can offer a brighter, natural sweetness. If using canned in juice, drain them well.
    • Whole Wheat Breadcrumbs: Swap regular breadcrumbs for whole wheat for added fiber.
    • Vegetable Boost: Finely grate carrots or zucchini into the meatball mixture for added moisture and nutrients.

    Serving Suggestions

    These versatile barbecue meatballs with pineapple are a star in many scenarios:

    • Appetizer: Serve them hot straight from the saucepan or on a warming tray in a slow cooker for parties. A toothpick in each meatball makes them easy to grab.
    • Main Course: Serve over fluffy white rice, quinoa, or cauliflower rice. They also pair wonderfully with mashed potatoes or a simple green salad.
    • Sandwiches: Pile them onto slider buns for a fun and casual sandwich.
    • Skewers: Alternate meatballs with chunks of bell peppers and onions on skewers and grill or broil for a delightful meal.

    Common Mistakes to Avoid

    Prevent common pitfalls to ensure your meatballs are perfect every time:

    • Overmixing the Meat: This is the number one culprit for tough meatballs. Mix only until ingredients are just combined.
    • Too Small or Uneven Balls: Ensure your meatballs are roughly the same size for even cooking.
    • Boiling Instead of Simmering: A vigorous boil can break apart the meatballs and make them tough. A gentle simmer is key.
    • Forgetting to Taste and Adjust: Always taste your sauce before serving and adjust salt, sweetness, or tanginess as needed.

    Storing Tips

    These meatballs are great for making ahead. Store any leftover cooked meatballs in an airtight container in the refrigerator for up to 3-4 days. Reheat them gently on the stovetop or in the oven. For longer storage, they can be frozen for up to 2-3 months. Thaw overnight in the refrigerator before reheating.

    Close-up of barbecue meatballs with pineapple being served.

    Frequently Asked Questions

    ***Can I make these meatballs ahead of time?***

    Yes! You can form the meatballs and store them in the refrigerator for up to 24 hours before cooking. You can also cook the meatballs ahead of time and store them with the sauce in the refrigerator for 3-4 days.

    ***What kind of ground meat is best?***

    A blend of 80/20 ground beef and pork provides the best flavor and moisture. However, you can use all beef, all pork, or even ground turkey or chicken for a lighter option.

    ***Can I bake the meatballs instead of simmering them?***

    Absolutely! You can bake the meatballs on a baking sheet at 400°F (200°C) for about 15-20 minutes, or until browned and cooked through. Then, drain off any excess fat and toss them with the warm barbecue sauce in a saucepan or slow cooker to coat and heat through.

    ***How can I make the sauce spicier?***

    To add heat, you can incorporate a pinch of cayenne pepper, a dash of hot sauce, or some finely chopped jalapeño into the barbecue sauce while it simmers. Adjust to your spice preference!

    ***What if I don’t have breadcrumbs?***

    You can substitute the breadcrumbs with crushed crackers (like saltines or Ritz), quick oats (pulsed in a food processor), or even a small amount of flour. The goal is to act as a binder.

    Print

    clock clock iconcutlery cutlery iconflag flag iconfolder folder iconinstagram instagram iconpinterest pinterest iconfacebook facebook iconprint print iconsquares squares iconheart heart iconheart solid heart solid icon

    Slow Cooker Pineapple Barbecue Meatballs


    • Author: Chef Emy

    Description

    Juicy meatballs coated in a sweet and tangy pineapple barbecue sauce, slow-cooked to perfection. This easy dish is perfect for parties, potlucks, or a family dinner!


    Ingredients

    Scale
    • 2pounds frozen meatballs (store-bought or homemade)1 cupbarbecue sauce (hickory, honey, or spicy)1 cuppineapple juice1/2 cupbrown sugar1/4 cupsoy sauce
    • 1 cupbarbecue sauce (hickory, honey, or spicy)1 cuppineapple juice1/2 cupbrown sugar1/4 cupsoy sauce
    • 1 cuppineapple juice1/2 cupbrown sugar1/4 cupsoy sauce
    • 1/2 cupbrown sugar1/4 cupsoy sauce
    • 1/4 cupsoy sauce
    • 1 teaspoongarlic powder1 teaspoononion powder1/2 teaspoonblack pepper1/2 teaspoonred pepper flakes (optional)
    • 1 teaspoononion powder1/2 teaspoonblack pepper1/2 teaspoonred pepper flakes (optional)
    • 1/2 teaspoonblack pepper1/2 teaspoonred pepper flakes (optional)
    • 1/2 teaspoonred pepper flakes (optional)
    • 1can (20 oz) pineapple chunks, drainedFresh parsley (optional, for garnish)
    • Fresh parsley (optional, for garnish)

    Instructions

    1. 1️⃣Prepare the Sauce:In a large mixing bowl, whisk together the barbecue sauce, pineapple juice, brown sugar, soy sauce, garlic powder, onion powder, black pepper, and red pepper flakes (if using).2️⃣Assemble the Slow Cooker:Place the frozen meatballs into the slow cooker.Pour the prepared sauce over the meatballs, ensuring they are well coated.Add the drained pineapple chunks on top and gently stir to combine.3️⃣Cook the Meatballs:Cover the slow cooker and set it tolowfor 4-5 hours orhighfor 2-3 hours.Stir occasionally to ensure the meatballs are evenly coated in the sauce.4️⃣Serve:Once the meatballs are heated through and the sauce has thickened, transfer them to a serving dish.Garnish with fresh parsley, if desired, and serve warm.
    2. In a large mixing bowl, whisk together the barbecue sauce, pineapple juice, brown sugar, soy sauce, garlic powder, onion powder, black pepper, and red pepper flakes (if using).2️⃣Assemble the Slow Cooker:Place the frozen meatballs into the slow cooker.Pour the prepared sauce over the meatballs, ensuring they are well coated.Add the drained pineapple chunks on top and gently stir to combine.3️⃣Cook the Meatballs:Cover the slow cooker and set it tolowfor 4-5 hours orhighfor 2-3 hours.Stir occasionally to ensure the meatballs are evenly coated in the sauce.4️⃣Serve:Once the meatballs are heated through and the sauce has thickened, transfer them to a serving dish.Garnish with fresh parsley, if desired, and serve warm.
    3. 2️⃣Assemble the Slow Cooker:
    4. Place the frozen meatballs into the slow cooker.Pour the prepared sauce over the meatballs, ensuring they are well coated.Add the drained pineapple chunks on top and gently stir to combine.3️⃣Cook the Meatballs:Cover the slow cooker and set it tolowfor 4-5 hours orhighfor 2-3 hours.Stir occasionally to ensure the meatballs are evenly coated in the sauce.4️⃣Serve:Once the meatballs are heated through and the sauce has thickened, transfer them to a serving dish.Garnish with fresh parsley, if desired, and serve warm.
    5. Pour the prepared sauce over the meatballs, ensuring they are well coated.Add the drained pineapple chunks on top and gently stir to combine.3️⃣Cook the Meatballs:Cover the slow cooker and set it tolowfor 4-5 hours orhighfor 2-3 hours.Stir occasionally to ensure the meatballs are evenly coated in the sauce.4️⃣Serve:Once the meatballs are heated through and the sauce has thickened, transfer them to a serving dish.Garnish with fresh parsley, if desired, and serve warm.
    6. Add the drained pineapple chunks on top and gently stir to combine.
    7. 3️⃣Cook the Meatballs:Cover the slow cooker and set it tolowfor 4-5 hours orhighfor 2-3 hours.Stir occasionally to ensure the meatballs are evenly coated in the sauce.4️⃣Serve:Once the meatballs are heated through and the sauce has thickened, transfer them to a serving dish.Garnish with fresh parsley, if desired, and serve warm.
    8. Cover the slow cooker and set it tolowfor 4-5 hours orhighfor 2-3 hours.Stir occasionally to ensure the meatballs are evenly coated in the sauce.4️⃣Serve:Once the meatballs are heated through and the sauce has thickened, transfer them to a serving dish.Garnish with fresh parsley, if desired, and serve warm.
    9. Stir occasionally to ensure the meatballs are evenly coated in the sauce.
    10. 4️⃣Serve:Once the meatballs are heated through and the sauce has thickened, transfer them to a serving dish.Garnish with fresh parsley, if desired, and serve warm.
    11. Once the meatballs are heated through and the sauce has thickened, transfer them to a serving dish.Garnish with fresh parsley, if desired, and serve warm.
    12. Garnish with fresh parsley, if desired, and serve warm.

    Notes

    To make this dish a complete meal, serve the meatballs over steamed rice or with roasted vegetables.For a spicier kick, add extra red pepper flakes or a splash of hot sauce to the sauce mixture.Store leftovers in an airtight container in the refrigerator for up to 3 days. Reheat in the microwave or on the stovetop.
    For a spicier kick, add extra red pepper flakes or a splash of hot sauce to the sauce mixture.Store leftovers in an airtight container in the refrigerator for up to 3 days. Reheat in the microwave or on the stovetop.
    Store leftovers in an airtight container in the refrigerator for up to 3 days. Reheat in the microwave or on the stovetop.


    “`

    Honey Bacon Roasted Potatoes Recipe You’ll Love

    “`html

    Honey Bacon Roasted Potatoes Recipe You’ll Love

    Craving the Perfect Side Dish?

    Are you looking for a side dish that’s incredibly flavorful, satisfying, and surprisingly easy to make? If you’re like most home cooks, the answer is a resounding yes! We all want those go-to recipes that impress guests and become family favorites. Imagine a dish where hearty, crispy roasted potatoes are coated in a sweet and salty glaze, infused with the irresistible aroma of bacon. That’s exactly what this Honey Bacon Roasted Potatoes Recipe delivers. It’s a harmonious blend of textures and tastes that transforms humble potatoes into a showstopper. Forget bland, boring sides; this recipe is designed to be the star of your meal, perfect for weeknight dinners or festive gatherings. This easy-to-make dish combines crispy roasted potatoes with the sweet-savory flavors of honey and bacon for an unforgettable taste.

    The Delicious Breakdown: Ingredients You’ll Need

    The magic of this recipe lies in its simple yet impactful ingredients. Each one plays a crucial role in creating that perfect sweet and savory symphony.

    Potatoes: The Hearty Foundation

    • 2 lbs Yukon Gold or Red Potatoes: These varieties are fantastic for roasting because they hold their shape well and develop a creamy interior with a crisp exterior. Their slightly waxy texture means they won’t turn to mush. You can also use Russet potatoes, but be mindful they can be drier. Choose medium-sized potatoes so they roast evenly.

    Bacon: The Savory Sensation

    • 6-8 slices Thick-Cut Bacon: Opt for good quality, thick-cut bacon. It renders beautifully, providing crispy bits and that essential smoky, salty flavor. The rendered fat is also gold for coating the potatoes.

    Sweetener: The Sweet Kiss

    • 2-3 tablespoons Honey: The star of our glaze! Use good quality honey for the best flavor. Raw or local honey will offer a more complex taste. Adjust the amount based on your preference for sweetness.
    • Substitution: Maple syrup works beautifully as a direct substitute, offering a slightly different but equally delicious caramel-like sweetness. Agave nectar is another option for a vegan version.

    Seasoning: Elevating the Flavors

    • 1 teaspoon Smoked Paprika: Adds a subtle smoky depth and a beautiful color without overwhelming the other flavors.
    • 1/2 teaspoon Garlic Powder: Essential for that savory, umami punch.
    • Salt and Freshly Ground Black Pepper: To taste. Remember bacon is salty, so season judiciously.
    • Optional: 1/4 teaspoon Cayenne Pepper: For a hint of heat that balances the sweetness.

    Optional Additions: For Extra Flair

    • Fresh Rosemary or Thyme: A sprig or two added during roasting adds a wonderful aromatic dimension.
    • Chopped Chives or Parsley: For a fresh, vibrant garnish after roasting.

    Timing is Everything

    Prep time: 15 minutes
    Cook time: 40-50 minutes
    Total time: 55-65 minutes

    While the average roasted potato recipe might take around 45 minutes total, our Honey Bacon Roasted Potatoes have a slightly longer cook time due to the initial bacon rendering and the final glazing step. However, the active prep time is minimal, making it a worthwhile endeavor for the incredible flavor payoff.

    Honey bacon roasted potatoes arranged on a platter

    Step-by-Step to Potato Perfection

    Let’s get cooking! Follow these simple steps to create the most delicious honey bacon roasted potatoes you’ve ever tasted.

    1. Preheat and Prep Your Potatoes

    First things first, crank up your oven to 400°F (200°C). This high heat is crucial for achieving those coveted crispy edges. Now, give your potatoes a good wash. You can peel them if you prefer, but the skins add nutrients and texture. Cut the potatoes into uniform, bite-sized pieces, about 1-inch cubes. This ensures they cook evenly. For extra crispiness, you can soak the cut potatoes in cold water for about 30 minutes, then drain and pat them thoroughly dry with paper towels. This removes excess starch.

    2. Cook the Bacon

    In a large oven-safe skillet (like cast iron) or a separate pan, cook your bacon over medium heat until it’s crispy. You don’t need to add any oil, as the bacon will render its own delicious fat. Once crispy, remove the bacon from the pan and place it on a paper towel-lined plate to drain. Reserve about 2-3 tablespoons of the rendered bacon fat in the skillet, discarding the rest or saving it for another use (bacon fat is liquid gold!).

    3. Roast Potatoes with Bacon Fat

    Add your dried potato cubes to the skillet with the reserved bacon fat. Toss them well to coat every piece. Now, sprinkle the potatoes with smoked paprika, garlic powder, salt, pepper, and cayenne pepper (if using). Toss again to ensure an even distribution of the seasonings. Spread the potatoes out in a single layer in the skillet. If you’re not using an oven-safe skillet, transfer the potatoes to a baking sheet lined with parchment paper.

    Place the skillet or baking sheet into the preheated oven and roast for 20-25 minutes, or until the potatoes are starting to soften and turn golden brown.

    4. Chop Bacon and Prepare the Glaze

    While the potatoes are roasting, chop your cooked bacon into small, bite-sized pieces. In a small bowl, whisk together the honey (or maple syrup) with a pinch of salt and pepper. This simple glaze is where the magic happens.

    5. Combine, Glaze, and Final Roast

    After the initial 20-25 minutes of roasting, carefully remove the skillet from the oven. Sprinkle the chopped bacon over the partially roasted potatoes. Drizzle the honey mixture evenly over the potatoes and bacon. Gently toss everything together right in the skillet to ensure an even coating. Return the skillet to the oven and continue roasting for another 15-20 minutes. You’re looking for the potatoes to be fork-tender and beautifully caramelized, with the honey glaze sticky and slightly bubbly. The bacon should be perfectly integrated and slightly crisped again.

    For an extra touch of freshness, you can sprinkle with chopped chives or parsley just before serving.

    Nutritional Quick Glance

    While precise nutritional values can vary based on exact ingredients and portion sizes, a typical serving (approximately 1/4 of the recipe) of these Honey Bacon Roasted Potatoes contains:

    • Calories: Around 300-350 kcal
    • Protein: 8-10g
    • Fat: 15-20g (mostly from bacon and potato cooking)
    • Carbohydrates: 35-40g
    • Sugar: 5-8g (primarily from honey)

    Note: This is an estimate. For precise information, it’s recommended to use a nutritional calculator with your specific ingredients.

    Healthier Spins on This Delight

    Want to enjoy these flavors with a lighter touch? Here are some smart swaps:

    • Leaner Bacon: Use turkey bacon or a lower-fat pork bacon. You might need to add a tablespoon of olive oil to the pan to compensate for less rendered fat.
    • Reduced Honey: Use just 1-2 tablespoons of honey, or opt for a sugar-free syrup alternative.
    • Air Fryer Method: Cook potatoes in the air fryer with a light coating of olive oil and seasonings, then toss with a smaller amount of honey and bacon bits at the end. This significantly reduces the fat content.
    • Double Down on Veggies: Toss in some Brussels sprouts or broccoli florets during the last 20 minutes of roasting for added fiber and nutrients.

    What to Serve Them With

    These Honey Bacon Roasted Potatoes are incredibly versatile. They make a fantastic side for:

    • Grilled or roasted chicken and steak.
    • Pork chops or a roasted pork loin.
    • Hearty salads for a flavorful addition.
    • Burger night for a gourmet twist.
    • As part of a brunch spread alongside eggs and sausage.

    Common Mistakes to Avoid

    • Overcrowding the Pan: This leads to steamed, soggy potatoes instead of crispy ones. Ensure potatoes are in a single layer with some space between them.
    • Not Drying Potatoes Enough: Excess moisture is the enemy of crispiness. Pat them very dry after washing/cutting.
    • Uneven Cutting: Cut potatoes into similar sizes so they cook at the same rate.
    • Adding Honey Too Early: Honey can burn quickly at high temperatures. Add it during the final roasting stage to prevent scorching and achieve that perfect glaze.

    Storing Your Delicious Potatoes

    Leftovers? Lucky you! Store completely cooled potatoes in an airtight container in the refrigerator for up to 3-4 days. Reheat them in a hot oven (around 375°F/190°C) or an air fryer for best results to regain some crispiness. Microwaving will make them soft.

    Close-up of honey bacon roasted potatoes with a sticky glaze

    Don’t Wait, Bake!

    This Honey Bacon Roasted Potatoes recipe is a true game-changer. It’s proof that simple ingredients can create extraordinary flavors. The irresistible combination of crispy, tender potatoes, savory bacon, and a sweet honey glaze makes this dish a guaranteed winner for any meal. Whether you’re a seasoned cook or just starting, this recipe is foolproof and destined to become a staple in your kitchen. Go ahead, give it a try, and prepare for a symphony of flavors that will have everyone asking for seconds!

    Frequently Asked Questions

    Q: Can I use different types of potatoes?

    A: Yes, you can! While Yukon Golds and red potatoes are recommended for their texture, Russets can also work. Just be aware they might be a bit drier. Sweet potatoes are also delicious with this glaze, but will require a shorter roasting time.

    Q: How do I make the potatoes extra crispy?

    A: For maximum crispiness, ensure you pat the potatoes very dry after cutting, and don’t overcrowd the pan. Roasting them in a single layer with good air circulation is key. Soaking them in cold water beforehand also helps remove starch, contributing to crispier results.

    Q: Can I make this vegetarian or vegan?

    A: Absolutely! Omit the bacon and use about 2-3 tablespoons of olive oil or avocado oil instead of bacon fat. For the glaze, use maple syrup or agave nectar instead of honey. You can add vegetarian bacon bits or smoked paprika for extra savory flavor.

    Q: How far in advance can I prepare components?

    A: You can wash and chop the potatoes a few hours ahead of time and store them submerged in cold water in the refrigerator. Pat them dry just before roasting. The bacon can be cooked and chopped a day in advance and stored in an airtight container.

    Q: My honey glaze is burning, what should I do?

    A: Honey caramelizes and burns quickly. Ensure you are adding it only during the last 15-20 minutes of the total cooking time. If you notice it browning too fast, you can loosely tent the pan with foil or reduce the oven temperature slightly.

    Print
    clock clock iconcutlery cutlery iconflag flag iconfolder folder iconinstagram instagram iconpinterest pinterest iconfacebook facebook iconprint print iconsquares squares iconheart heart iconheart solid heart solid icon

    Honey Turkey Bacon Roasted Potatoes


    • Author: Chef Emy

    Description

    A sweet and savory side dish perfect for any meal. Crispy roasted potatoes paired with caramelized honey and smoky turkey bacon make this dish a family favorite. It’s simple to make yet packed with flavor!


    Ingredients

    Scale
    • 2pounds russet potatoes, scrubbed and cut into1-inch cubes1/2 cupchopped turkey bacon1/4 cuphoney1 tablespoonolive oil1 teaspoonsalt1/2 teaspoonblack pepper
    • 1/2 cupchopped turkey bacon1/4 cuphoney1 tablespoonolive oil1 teaspoonsalt1/2 teaspoonblack pepper
    • 1/4 cuphoney1 tablespoonolive oil1 teaspoonsalt1/2 teaspoonblack pepper
    • 1 tablespoonolive oil1 teaspoonsalt1/2 teaspoonblack pepper
    • 1 teaspoonsalt1/2 teaspoonblack pepper
    • 1/2 teaspoonblack pepper

    Instructions

    1. 1️⃣Preheat the oven:Preheat your oven to 425°F (220°C). Prepare a large baking sheet by lining it with parchment paper or lightly greasing it with olive oil.
    2. 2️⃣Prepare the potatoes:In a large bowl, combine the cubed potatoes, chopped turkey bacon, honey, olive oil, salt, and black pepper. Toss until the potatoes are evenly coated in the mixture.3️⃣Spread on baking sheet:Spread the potato mixture in a single layer on the prepared baking sheet. Ensure the potatoes are not overcrowded to allow even roasting.4️⃣Roast:Place the baking sheet in the preheated oven and roast for 20-25 minutes. Stir the potatoes halfway through cooking to ensure even browning.5️⃣Check for doneness:The potatoes are ready when they are golden brown and tender when pierced with a fork.6️⃣Serve:Remove from the oven and transfer to a serving dish. Serve hot and enjoy your sweet and smoky Honey Turkey Bacon Roasted Potatoes!
    3. 3️⃣Spread on baking sheet:Spread the potato mixture in a single layer on the prepared baking sheet. Ensure the potatoes are not overcrowded to allow even roasting.4️⃣Roast:Place the baking sheet in the preheated oven and roast for 20-25 minutes. Stir the potatoes halfway through cooking to ensure even browning.5️⃣Check for doneness:The potatoes are ready when they are golden brown and tender when pierced with a fork.6️⃣Serve:Remove from the oven and transfer to a serving dish. Serve hot and enjoy your sweet and smoky Honey Turkey Bacon Roasted Potatoes!
    4. 4️⃣Roast:Place the baking sheet in the preheated oven and roast for 20-25 minutes. Stir the potatoes halfway through cooking to ensure even browning.
    5. 5️⃣Check for doneness:The potatoes are ready when they are golden brown and tender when pierced with a fork.6️⃣Serve:Remove from the oven and transfer to a serving dish. Serve hot and enjoy your sweet and smoky Honey Turkey Bacon Roasted Potatoes!
    6. 6️⃣Serve:Remove from the oven and transfer to a serving dish. Serve hot and enjoy your sweet and smoky Honey Turkey Bacon Roasted Potatoes!

    Notes

    For extra crispiness, broil the potatoes for 2-3 minutes at the end of roasting.You can substitute turkey bacon with vegetarian bacon for a meatless option.Pair this dish with roasted chicken or a fresh salad for a complete meal.
    You can substitute turkey bacon with vegetarian bacon for a meatless option.Pair this dish with roasted chicken or a fresh salad for a complete meal.
    Pair this dish with roasted chicken or a fresh salad for a complete meal.

    “`

    Easy Stuffed Mushrooms with Crab and Cheese

    “`html

    Party-Perfect Appetizers: Easy Stuffed Mushrooms with Crab and Cheese

    When you’re planning a party or a special family dinner, the last thing you want is to be stressed out in the kitchen. You want to mingle, enjoy your guests, and present food that looks and tastes incredible without spending hours slaving away. That’s where these Easy Stuffed Mushrooms with Crab and Cheese come in. They’re the perfect blend of elegant and effortless, boasting a rich, savory filling encased in tender mushroom caps. Imagine those delightful little bites disappearing from the platter faster than you can replenish them – that’s the magic of a well-made stuffed mushroom, and this recipe guarantees that success!

    Gather Your Culinary Treasures: Ingredients

    The beauty of these stuffed mushrooms lies in their harmonious blend of textures and flavors. We’ve carefully selected ingredients that not only taste amazing together but also offer room for personal flair.

    The Heart of the Dish: Main Ingredients

    • 1 lb Cremini Mushrooms (about 20-24 medium): These mushrooms, also known as baby bellas, have a robust, earthy flavor and a firm texture that holds up beautifully when baked. Look for mushrooms that are uniformly sized and firm to the touch, with caps that are tightly closed.
    • 8 oz Lump Crab Meat (fresh or canned, drained): The star of our filling! Opt for good quality lump crab meat for the best flavor and texture. If using canned, be sure to drain it thoroughly to avoid a watery filling. The sweet, delicate taste of crab is what makes these so special.
    • 4 oz Cream Cheese (softened): This provides a creamy, luxurious base for our filling, binding all the ingredients together and adding a rich decadence. Make sure it’s softened to room temperature for easy mixing.
    • 1/4 cup Grated Parmesan Cheese (plus more for topping): This salty, nutty cheese adds a sharp counterpoint to the richness of the crab and cream cheese, and helps create a lovely golden crust.
    • 1/4 cup Panko Breadcrumbs (plus more for topping): These Japanese breadcrumbs are wonderfully light and crispy, offering a delightful textural contrast to the soft filling and mushrooms. They toast up beautifully, adding a golden crunch.

    The Symphony of Flavor: Flavor Boosters

    • 2 cloves Garlic (minced): Fresh minced garlic provides a pungent, aromatic backbone. It awakens the palate and complements the seafood and cheese perfectly.
    • 2 tablespoons Fresh Parsley (chopped): Adds a bright, fresh herbaceous note that cuts through the richness. Its vibrant green color also makes the filling visually appealing.
    • 1 teaspoon Lemon Zest: A touch of citrus zest brightens everything up, lifting the flavors of the crab and cheese and preventing the dish from feeling too heavy.
    • 1/4 teaspoon Paprika: For a hint of subtle warmth and color. Smoked paprika can be used for an added layer of smoky complexity.
    • Salt and freshly ground Black Pepper to taste: Essential for balancing and enhancing all the other flavors. Season generously, as the mushrooms themselves are quite mild.
    • 2 tablespoons Butter (melted): Adds richness to the filling and helps create a beautiful sear on the mushroom stems if you choose to include them.

    A Touch of Whimsy: Optional Additions

    • 1 tablespoon Worcestershire Sauce: Adds a complex umami depth that’s fantastic with seafood.
    • 1 tablespoon finely chopped Chives: For an extra oniony kick and a lovely green fleck in the filling.
    • A pinch of Cayenne Pepper: For those who like a subtle, lingering heat.

    Timing is Everything: Prep, Cook, and Total Time

    We know your time is precious. This recipe is designed to be efficient without compromising on deliciousness. Compared to many complex appetizer recipes, these stuffed mushrooms are remarkably quick to prepare and bake.

    Prep time:
    20 minutes
    Cook time:
    20-25 minutes
    Total time:
    40-45 minutes

    This hands-on time is significantly less than many elaborate appetizer recipes, making it ideal for busy hosts. The active preparation is straightforward, and the baking time ensures a perfectly cooked, golden-brown mushroom.

    Easy Stuffed Mushrooms with Crab and Cheese

    Crafting Perfection: Step-by-Step Instructions

    Let’s get cooking! These steps are designed to be clear and manageable, ensuring a delightful outcome every time.

    Step 1: Preheat and Prep Mushrooms

    First things first, let’s get our oven ready to work its magic. Preheat your oven to 375°F (190°C). While the oven heats up, it’s time to prepare the star vessel for our delicious filling. Gently wash your mushrooms under cool running water or wipe them clean with a damp cloth. We want to remove any dirt without them getting waterlogged, as excess moisture can make them soggy. Carefully snap off the mushroom stems. Don’t discard these! Finely chop the stems; they’ll add another layer of savory flavor to our filling. Arrange the mushroom caps in a single layer on a baking sheet. If they feel a bit wobbly, you can gently slice a tiny sliver off the bottom of each cap to create a flat base. This ensures they stand up straight and don’t tip over when filled.

    Step 2: Make the Crab Filling

    Now for the glorious filling! In a medium bowl, combine the softened cream cheese, grated Parmesan cheese, Panko breadcrumbs, minced garlic, chopped parsley, lemon zest, paprika, and the finely chopped mushroom stems. Add the drained lump crab meat. Gently fold everything together. Be careful not to overmix or break up the crab meat too much; we want to see those lovely lumps of crab! Pour in the melted butter and stir in any optional ingredients like Worcestershire sauce, chives, or cayenne pepper if you’re using them. Season generously with salt and freshly ground black pepper. Taste the mixture and adjust seasonings as needed. Remember, the crab meat is already a bit salty, so season cautiously at first.

    Step 3: Stuff the Mushrooms

    This is where the magic starts to take shape! Using a spoon or a small spatula, generously fill each mushroom cap with the crab mixture. Mound the filling slightly; it will settle a bit as it bakes. Don’t be shy with the filling – a well-stuffed mushroom is a happy mushroom! Once all the caps are filled, sprinkle a little extra Parmesan cheese and a few more Panko breadcrumbs over the top of each one. This is your chance to give them a beautiful, golden, crispy crown.

    Step 4: Bake to Perfection

    Place the filled mushrooms back onto the prepared baking sheet and slide them into the preheated oven. Bake for 20-25 minutes, or until the mushrooms are tender and slightly shrunken, and the filling is hot, bubbly, and beautifully golden brown on top. The aroma filling your kitchen at this point will be absolutely divine! Once baked, carefully remove the baking sheet from the oven. Let the stuffed mushrooms cool for just a few minutes before serving. They’ll be piping hot!

    Nutritional Snapshot: What’s Inside

    While it’s hard to give exact figures without knowing precise ingredient amounts and brands, here’s a general idea of what you can expect from a serving of these delicious stuffed mushrooms. These are approximate values per mushroom (assuming 20-24 mushrooms):

    • Calories: 70-100 kcal
    • Protein: 4-6g
    • Fat: 5-8g
    • Carbohydrates: 2-4g

    Note: This is an estimation and can vary based on the size of mushrooms, amount of cheese, and specific seafood used.

    Making it Lighter: Healthier Alternatives

    Looking to lighten up this decadent appetizer without sacrificing flavor? Here are a few swaps that can make a difference:

    • Use lighter cream cheese or Neufchatel cheese: These options can reduce the fat content while retaining creaminess.
    • Incorporate Greek yogurt: For a tangy, protein-rich creamy base, substitute half of the cream cheese with plain Greek yogurt.
    • Boost with veggies: Finely chopped spinach, finely diced celery, or finely minced bell peppers can add volume, nutrients, and fiber, allowing you to use a little less cheese and crab while still feeling satisfied. Sauté them first to remove excess moisture.
    • Opt for whole wheat breadcrumbs: If you’re a breadcrumb enthusiast, a whole wheat version offers more fiber.
    • Reduce cheese: While cheese is key, you can experiment with using a bit less Parmesan and relying more on herbs and spices for flavor.

    How to Serve Your Masterpieces

    These stuffed mushrooms are incredibly versatile! They make a show-stopping appetizer for any holiday party, Super Bowl gathering, or an elegant addition to a brunch spread. They pair beautifully with a crisp white wine like Sauvignon Blanc or Pinot Grigio. For a more substantial meal, serve them alongside a fresh green salad and a light pasta dish.

    Common Mistakes to Avoid

    To ensure your stuffed mushrooms turn out perfectly every time, here are a few pitfalls to sidestep:

    • Waterlogged Mushrooms: Over-washing or not drying mushrooms properly can lead to a soggy bottom. Wipe them clean instead of rinsing if possible, or ensure they are thoroughly dried.
    • Over-mixing the Filling: You want distinct pieces of crab meat, not a mush. Fold gently to preserve the texture.
    • Under-seasoning: Mushrooms are mild, and the crab can be delicate. Don’t be afraid to season well with salt and pepper.
    • Not Preheating the Oven: A properly preheated oven ensures even cooking and that golden-brown finish.
    • Using Stale or Soggy Breadcrumbs: Fresh Panko breadcrumbs give the best crunch.

    Keeping Them Delicious: Storing and Reheating

    To Store: If you have any leftover stuffed mushrooms, let them cool completely before storing. Place them in an airtight container in the refrigerator. They will keep for up to 2-3 days. It’s best to store them in a single layer if possible to prevent them from getting too soft.

    To Reheat: For the best results and to recapture that delightful crispiness, reheat them in a 350°F (175°C) oven for about 10-15 minutes. You can also reheat them on a baking sheet in an air fryer for a few minutes. Microwaving is an option, but it tends to make them a bit softer.

    Crab and Cheese Stuffed Mushrooms close-up

    Frequently Asked Questions (FAQs)

    ***(Can I make these stuffed mushrooms ahead of time?)***

    Yes, you absolutely can! You can prepare the filling and stuff the mushrooms a few hours ahead of baking. Cover them loosely with plastic wrap and refrigerate. You might need to add a few extra minutes to the baking time if baking them chilled.

    ***(What kind of mushrooms are best for stuffing?)***

    Cremini (baby bella) mushrooms are ideal due to their firm texture and robust flavor. White button mushrooms also work well, though they are milder. Larger portobello caps can be used, but they will require a longer baking time.

    ***(Can I use imitation crab meat?)***

    You can use imitation crab meat (surimi) if you prefer, but the flavor and texture will be different from real crab meat. If using imitation crab, ensure it’s well-drained.

    ***(How can I tell when the mushrooms are done?)***

    The mushrooms are done when they are tender, slightly shrunken, and their liquid has mostly evaporated. The filling should be hot and bubbly, and the topping should be a lovely golden brown color.

    ***(Can I freeze stuffed mushrooms?)***

    It’s generally not recommended to freeze stuffed mushrooms after baking, as the texture of the mushrooms and filling can become mushy upon thawing and reheating. If you need to prepare ahead, refrigerating is the better option.

    Your New Go-To Appetizer

    There you have it – a recipe for Easy Stuffed Mushrooms with Crab and Cheese that’s as delightful to make as it is to eat. These little flavor bombs are guaranteed to impress your guests and become a staple at all your future gatherings. Don’t just take our word for it; try them out and experience the perfect balance of savory crab, creamy cheese, and earthy mushrooms!

    Ready to impress? Give this recipe a try and let us know how it turns out in the comments below! Happy cooking!

    Print
    clock clock iconcutlery cutlery iconflag flag iconfolder folder iconinstagram instagram iconpinterest pinterest iconfacebook facebook iconprint print iconsquares squares iconheart heart iconheart solid heart solid icon

    Crab Stuffed Mushrooms


    • Author: Chef Emy

    Description

    These delectable crab-stuffed mushrooms are the perfect appetizer or party snack. Juicy mushroom caps are loaded with a creamy, savory crab filling and baked to golden perfection. Easy to make and impressive to serve!


    Ingredients

    Scale
    • 16large white mushrooms, stems removed8 ozcrab meat, drained and flaked4 ozcream cheese, softened½ cupshredded Parmesan cheese¼ cupbreadcrumbs2cloves garlic, minced2 tbspgreen onions, finely chopped2 tbspfresh parsley, chopped (plus extra for garnish)1 tbsplemon juice1 tbspolive oilSalt and pepper, to taste
    • 8 ozcrab meat, drained and flaked4 ozcream cheese, softened½ cupshredded Parmesan cheese¼ cupbreadcrumbs2cloves garlic, minced2 tbspgreen onions, finely chopped2 tbspfresh parsley, chopped (plus extra for garnish)1 tbsplemon juice1 tbspolive oilSalt and pepper, to taste
    • 4 ozcream cheese, softened½ cupshredded Parmesan cheese¼ cupbreadcrumbs2cloves garlic, minced2 tbspgreen onions, finely chopped2 tbspfresh parsley, chopped (plus extra for garnish)1 tbsplemon juice1 tbspolive oilSalt and pepper, to taste
    • ½ cupshredded Parmesan cheese¼ cupbreadcrumbs2cloves garlic, minced2 tbspgreen onions, finely chopped2 tbspfresh parsley, chopped (plus extra for garnish)1 tbsplemon juice1 tbspolive oilSalt and pepper, to taste
    • ¼ cupbreadcrumbs2cloves garlic, minced2 tbspgreen onions, finely chopped2 tbspfresh parsley, chopped (plus extra for garnish)1 tbsplemon juice1 tbspolive oilSalt and pepper, to taste
    • 2cloves garlic, minced2 tbspgreen onions, finely chopped2 tbspfresh parsley, chopped (plus extra for garnish)1 tbsplemon juice1 tbspolive oilSalt and pepper, to taste
    • 2 tbspgreen onions, finely chopped2 tbspfresh parsley, chopped (plus extra for garnish)1 tbsplemon juice1 tbspolive oilSalt and pepper, to taste
    • 2 tbspfresh parsley, chopped (plus extra for garnish)1 tbsplemon juice1 tbspolive oilSalt and pepper, to taste
    • 1 tbsplemon juice1 tbspolive oilSalt and pepper, to taste
    • 1 tbspolive oilSalt and pepper, to taste
    • Salt and pepper, to taste

    Instructions

    1. 1️⃣Preheat the Oven:Preheat your oven to 375°F (190°C).Line a baking sheet with parchment paper.2️⃣Prepare the Mushrooms:Clean the mushroom caps by wiping them with a damp cloth.Arrange them hollow-side up on the prepared baking sheet. Drizzle with olive oil and set aside.3️⃣Make the Filling:In a mixing bowl, combine the crab meat, cream cheese, Parmesan cheese, breadcrumbs, garlic, green onions, parsley, lemon juice, salt, and pepper. Mix until well combined and creamy.4️⃣Stuff the Mushrooms:Fill each mushroom cap with the crab mixture, pressing gently to pack the filling evenly.5️⃣Bake:Place the stuffed mushrooms in the preheated oven and bake for 15–20 minutes, or until the mushrooms are tender and the tops are golden brown.6️⃣Garnish and Serve:Sprinkle with extra parsley for garnish and serve warm.
    2. Preheat your oven to 375°F (190°C).Line a baking sheet with parchment paper.2️⃣Prepare the Mushrooms:Clean the mushroom caps by wiping them with a damp cloth.Arrange them hollow-side up on the prepared baking sheet. Drizzle with olive oil and set aside.3️⃣Make the Filling:In a mixing bowl, combine the crab meat, cream cheese, Parmesan cheese, breadcrumbs, garlic, green onions, parsley, lemon juice, salt, and pepper. Mix until well combined and creamy.4️⃣Stuff the Mushrooms:Fill each mushroom cap with the crab mixture, pressing gently to pack the filling evenly.5️⃣Bake:Place the stuffed mushrooms in the preheated oven and bake for 15–20 minutes, or until the mushrooms are tender and the tops are golden brown.6️⃣Garnish and Serve:Sprinkle with extra parsley for garnish and serve warm.
    3. Line a baking sheet with parchment paper.
    4. 2️⃣Prepare the Mushrooms:Clean the mushroom caps by wiping them with a damp cloth.Arrange them hollow-side up on the prepared baking sheet. Drizzle with olive oil and set aside.3️⃣Make the Filling:In a mixing bowl, combine the crab meat, cream cheese, Parmesan cheese, breadcrumbs, garlic, green onions, parsley, lemon juice, salt, and pepper. Mix until well combined and creamy.4️⃣Stuff the Mushrooms:Fill each mushroom cap with the crab mixture, pressing gently to pack the filling evenly.5️⃣Bake:Place the stuffed mushrooms in the preheated oven and bake for 15–20 minutes, or until the mushrooms are tender and the tops are golden brown.6️⃣Garnish and Serve:Sprinkle with extra parsley for garnish and serve warm.
    5. Clean the mushroom caps by wiping them with a damp cloth.Arrange them hollow-side up on the prepared baking sheet. Drizzle with olive oil and set aside.3️⃣Make the Filling:In a mixing bowl, combine the crab meat, cream cheese, Parmesan cheese, breadcrumbs, garlic, green onions, parsley, lemon juice, salt, and pepper. Mix until well combined and creamy.4️⃣Stuff the Mushrooms:Fill each mushroom cap with the crab mixture, pressing gently to pack the filling evenly.5️⃣Bake:Place the stuffed mushrooms in the preheated oven and bake for 15–20 minutes, or until the mushrooms are tender and the tops are golden brown.6️⃣Garnish and Serve:Sprinkle with extra parsley for garnish and serve warm.
    6. Arrange them hollow-side up on the prepared baking sheet. Drizzle with olive oil and set aside.
    7. 3️⃣Make the Filling:In a mixing bowl, combine the crab meat, cream cheese, Parmesan cheese, breadcrumbs, garlic, green onions, parsley, lemon juice, salt, and pepper. Mix until well combined and creamy.4️⃣Stuff the Mushrooms:Fill each mushroom cap with the crab mixture, pressing gently to pack the filling evenly.5️⃣Bake:Place the stuffed mushrooms in the preheated oven and bake for 15–20 minutes, or until the mushrooms are tender and the tops are golden brown.6️⃣Garnish and Serve:Sprinkle with extra parsley for garnish and serve warm.
    8. In a mixing bowl, combine the crab meat, cream cheese, Parmesan cheese, breadcrumbs, garlic, green onions, parsley, lemon juice, salt, and pepper. Mix until well combined and creamy.4️⃣Stuff the Mushrooms:Fill each mushroom cap with the crab mixture, pressing gently to pack the filling evenly.5️⃣Bake:Place the stuffed mushrooms in the preheated oven and bake for 15–20 minutes, or until the mushrooms are tender and the tops are golden brown.6️⃣Garnish and Serve:Sprinkle with extra parsley for garnish and serve warm.
    9. 4️⃣Stuff the Mushrooms:
    10. Fill each mushroom cap with the crab mixture, pressing gently to pack the filling evenly.5️⃣Bake:Place the stuffed mushrooms in the preheated oven and bake for 15–20 minutes, or until the mushrooms are tender and the tops are golden brown.6️⃣Garnish and Serve:Sprinkle with extra parsley for garnish and serve warm.
    11. 5️⃣Bake:Place the stuffed mushrooms in the preheated oven and bake for 15–20 minutes, or until the mushrooms are tender and the tops are golden brown.6️⃣Garnish and Serve:Sprinkle with extra parsley for garnish and serve warm.
    12. Place the stuffed mushrooms in the preheated oven and bake for 15–20 minutes, or until the mushrooms are tender and the tops are golden brown.
    13. 6️⃣Garnish and Serve:Sprinkle with extra parsley for garnish and serve warm.
    14. Sprinkle with extra parsley for garnish and serve warm.

    Notes

    For a crispier topping, switch the oven to broil for the last 2 minutes of baking.Add a splash of hot sauce or cayenne pepper to the filling for a spicy kick.Substitute panko breadcrumbs for added crunch and texture.
    Add a splash of hot sauce or cayenne pepper to the filling for a spicy kick.Substitute panko breadcrumbs for added crunch and texture.
    Substitute panko breadcrumbs for added crunch and texture.

    “`

    Creamy Parmesan Pasta with Garlic Butter Chicken Bites

    “`html

    Creamy Parmesan Pasta with Garlic Butter Chicken Bites

    Why You’ll Love This Recipe

    Are you searching for a pasta dish that’s both incredibly satisfying and surprisingly easy to make? In a typical week, how often do you crave a meal that feels like a gourmet experience but can be on your table in under an hour? This Creamy Parmesan Pasta with Garlic Butter Chicken Bites is the answer to your weeknight dinner dilemma and weekend indulgence dreams. It perfectly balances the rich, comforting embrace of a creamy parmesan sauce with the savory, tender delight of garlic butter chicken bites. This isn’t just a meal; it’s an experience designed to bring smiles to faces and create memorable moments around your dinner table. Get ready to impress yourself and your loved ones with a dish that truly delivers on flavor and ease.

    Ingredients You’ll Need

    For the Chicken:

    • 1.5 lbs boneless, skinless chicken breasts or thighs, cut into 1-inch cubes
    • 2 tablespoons olive oil
    • 3 cloves garlic, minced
    • 1 teaspoon dried Italian seasoning
    • 1/2 teaspoon salt
    • 1/4 teaspoon black pepper
    • 2 tablespoons butter

    For the Pasta:

    • 12 oz pasta of your choice (fettuccine, penne, or rotini work wonderfully)
    • 2 tablespoons butter
    • 3 cloves garlic, minced
    • 1.5 cups heavy cream
    • 1 cup grated Parmesan cheese (plus more for serving)
    • 1/2 cup reserved pasta water
    • Salt and freshly ground black pepper to taste
    • Optional: Fresh parsley, chopped, for garnish

    Substitution Note: For a lighter option, you can use half-and-half instead of heavy cream, though the sauce will be less rich. Chicken thighs offer more flavor and moisture than breasts. Feel free to experiment with your favorite pasta shape!

    Cooking Timing Breakdown

    Prep time: 15 minutes
    Cook time: 30 minutes
    Total time: 45 minutes

    Compared to an average creamy pasta recipe that can take up to an hour, this dish significantly cuts down on cooking time without sacrificing flavor, making it ideal for busy nights.

    Creamy Parmesan Pasta with Garlic Butter Chicken Bites ready to be served.

    Crafting Your Creamy Parmesan Pasta

    Step 1: Prep the Chicken

    Begin by ensuring your chicken is cut into uniform, bite-sized pieces. This helps them cook evenly and quickly. In a medium bowl, toss the chicken cubes with 2 tablespoons of olive oil, 3 minced garlic cloves (for the chicken), Italian seasoning, salt, and pepper. Make sure each piece is well-coated. This marination step infuses the chicken with flavor right from the start.

    Step 2: Cook the Chicken

    Heat a large skillet over medium-high heat. Add the seasoned chicken pieces in a single layer, working in batches if necessary to avoid overcrowding the pan. This ensures the chicken sears nicely rather than steaming. Cook for about 5-7 minutes, flipping halfway through, until golden brown and cooked through. Once cooked, transfer the chicken to a plate and set aside. In the same skillet, melt 2 tablespoons of butter over medium heat. Add the remaining 3 minced garlic cloves and sauté for about 30 seconds until fragrant. Be careful not to burn the garlic!

    Step 3: Cook the Pasta

    While the chicken is cooking, bring a large pot of salted water to a rolling boil. Add your chosen pasta and cook according to package directions until al dente. Before draining, reserve about 1 cup of the starchy pasta water – this is liquid gold for creating a luscious sauce! Drain the pasta well.

    Step 4: Craft the Creamy Parmesan Sauce

    To the skillet with the garlic butter, pour in the heavy cream. Bring it to a gentle simmer, stirring occasionally. Let it simmer for about 3-5 minutes, allowing it to thicken slightly. Gradually whisk in the grated Parmesan cheese until it’s smooth and well combined. Now, introduce about 1/2 cup of the reserved pasta water to the sauce. This helps emulsify the sauce, making it wonderfully creamy and glossy while also thinning it to the perfect consistency. Season with salt and pepper to taste.

    Step 5: Combine and Serve

    Add the cooked pasta and the cooked chicken bites back into the skillet with the creamy sauce. Toss gently until everything is coated in the rich, cheesy goodness. If the sauce seems too thick, add a little more pasta water, a tablespoon at a time, until it reaches your desired consistency. Garnish with fresh chopped parsley and an extra sprinkle of Parmesan cheese, if desired. Serve immediately and savor every delicious bite!

    Nutritional Highlights

    • Calories: Approximately 550-650 per serving (varies based on portion size and ingredients).
    • Protein: Rich in protein from the chicken.
    • Carbohydrates: Primarily from the pasta.
    • Fats: Contains healthy fats from olive oil and beneficial fats from butter and cream.

    This information is an estimate and can vary. For precise nutritional data, it’s recommended to use a nutritional calculator for your specific ingredients.

    Healthier Twists on Tradition

    • Whole Wheat Pasta: Boost fiber content by using whole wheat pasta.
    • Leaner Protein: Opt for chicken breast, or consider adding shrimp or white beans for a plant-based protein.
    • Reduced Cream: Use a blend of half-and-half and a splash of milk, or even a dairy-free milk like unsweetened almond milk thickened with a little cornstarch, for a lighter sauce.
    • Add More Veggies: Toss in steamed broccoli florets, spinach, or sautéed mushrooms for added nutrients and texture.

    Serving Suggestions

    This creamy parmesan pasta is a complete meal on its own, but it also pairs wonderfully with a crisp green salad tossed with a light vinaigrette. Consider serving it with crusty garlic bread to mop up any leftover sauce. A glass of crisp white wine, like a Sauvignon Blanc or Pinot Grigio, complements the richness of the dish beautifully.

    Common Pitfalls to Avoid

    • Overcooking the Pasta: Ensure your pasta is al dente, as it will continue to cook slightly when mixed with the sauce.
    • Burning the Garlic: Garlic burns quickly. Sauté it gently until fragrant, not brown.
    • Sauce Too Thick/Thin: Use reserved pasta water judiciously to achieve the perfect creamy consistency.
    • Overcrowding the Pan: Don’t overcrowd the skillet when cooking chicken. Cook in batches for a proper sear.

    Storing and Reheating

    Leftovers can be stored in an airtight container in the refrigerator for up to 3 days. For reheating, gently warm the pasta on the stovetop over low heat, adding a splash of milk or water to loosen the sauce. Alternatively, you can microwave it, stirring halfway through. Be aware that the sauce might separate slightly upon reheating; stirring usually resolves this.

    Close up of creamy parmesan pasta with chicken bites.

    Frequently Asked Questions

    ***_What kind of pasta is best for this dish?_***

    Any pasta shape that holds sauce well will work. Long pastas like fettuccine or linguine, or short shapes like penne, rigatoni, or fusilli are excellent choices. The sauce clings beautifully to these varieties.

    ***_Can I make this sauce dairy-free?_***

    Yes, you can adapt it! Use a dairy-free butter, a plant-based cream alternative (like cashew or oat cream), and nutritional yeast or dairy-free shredded parmesan for a cheesy flavor. You might need to adjust the seasoning.

    ***_How can I add more flavor to the chicken?_***

    Besides the garlic and Italian seasoning, consider adding a pinch of red pepper flakes for a little heat, smoked paprika for depth, or a squeeze of lemon juice over the cooked chicken for brightness.

    ***_My sauce is too thin, what should I do?_***

    Simmer the sauce for a few extra minutes without the pasta to allow it to reduce and thicken. You can also create a slurry by mixing 1 teaspoon of cornstarch with 2 teaspoons of cold water, then whisking it into the simmering sauce until thickened.

    ***_Can I use store-bought pre-cooked chicken?_***

    You can, but the flavor won’t be as intense as freshly cooked chicken. If you do, ensure it’s cut into bite-sized pieces and warmed through in the sauce at the end, perhaps sautéed briefly with garlic before adding it to the sauce.

    Print

    clock clock iconcutlery cutlery iconflag flag iconfolder folder iconinstagram instagram iconpinterest pinterest iconfacebook facebook iconprint print iconsquares squares iconheart heart iconheart solid heart solid icon

    Garlic Butter Chicken Bites with Creamy Parmesan Pasta


    • Author: Chef Emy

    Description

    This delightful dish combines tender, garlicky chicken bites with a rich and creamy Parmesan pasta for the ultimate comfort food. It’s an easy, satisfying meal that’s perfect for busy weeknights or a cozy dinner.


    Ingredients

    Scale
    • 1lb chicken breast, cubed8 ozpasta (penne or rotini)4 tbspbutter2cloves garlic, minced1 cupheavy cream1 cupgrated Parmesan cheeseSalt and pepper, to tasteFresh basil, for garnish
    • 8 ozpasta (penne or rotini)4 tbspbutter2cloves garlic, minced1 cupheavy cream1 cupgrated Parmesan cheeseSalt and pepper, to tasteFresh basil, for garnish
    • 4 tbspbutter2cloves garlic, minced1 cupheavy cream1 cupgrated Parmesan cheeseSalt and pepper, to tasteFresh basil, for garnish
    • 2cloves garlic, minced1 cupheavy cream1 cupgrated Parmesan cheeseSalt and pepper, to tasteFresh basil, for garnish
    • 1 cupheavy cream1 cupgrated Parmesan cheeseSalt and pepper, to tasteFresh basil, for garnish
    • 1 cupgrated Parmesan cheeseSalt and pepper, to tasteFresh basil, for garnish
    • Salt and pepper, to tasteFresh basil, for garnish
    • Fresh basil, for garnish

    Instructions

    1. 1️⃣Cook the Pasta:Bring a large pot of salted water to a boil.Cook the pasta according to package directions until al dente. Drain and set aside.2️⃣Cook the Chicken:Heat a large skillet over medium heat and melt the butter.Add the minced garlic and sauté for 1-2 minutes, until fragrant.Add the cubed chicken, cooking for 6-8 minutes, stirring occasionally, until golden brown and fully cooked. Season with salt and pepper.3️⃣Make the Sauce:Lower the heat and stir in the heavy cream, scraping up any browned bits from the skillet for extra flavor.Gradually add the Parmesan cheese, stirring until the sauce is smooth and creamy. Adjust seasoning with salt and pepper as needed.4️⃣Combine and Serve:Add the cooked pasta to the skillet and toss to coat it evenly in the creamy sauce.Garnish with fresh basil leaves and serve immediately.
    2. Bring a large pot of salted water to a boil.
    3. Cook the pasta according to package directions until al dente. Drain and set aside.2️⃣Cook the Chicken:Heat a large skillet over medium heat and melt the butter.Add the minced garlic and sauté for 1-2 minutes, until fragrant.Add the cubed chicken, cooking for 6-8 minutes, stirring occasionally, until golden brown and fully cooked. Season with salt and pepper.3️⃣Make the Sauce:Lower the heat and stir in the heavy cream, scraping up any browned bits from the skillet for extra flavor.Gradually add the Parmesan cheese, stirring until the sauce is smooth and creamy. Adjust seasoning with salt and pepper as needed.4️⃣Combine and Serve:Add the cooked pasta to the skillet and toss to coat it evenly in the creamy sauce.Garnish with fresh basil leaves and serve immediately.
    4. 2️⃣Cook the Chicken:Heat a large skillet over medium heat and melt the butter.Add the minced garlic and sauté for 1-2 minutes, until fragrant.Add the cubed chicken, cooking for 6-8 minutes, stirring occasionally, until golden brown and fully cooked. Season with salt and pepper.3️⃣Make the Sauce:Lower the heat and stir in the heavy cream, scraping up any browned bits from the skillet for extra flavor.Gradually add the Parmesan cheese, stirring until the sauce is smooth and creamy. Adjust seasoning with salt and pepper as needed.4️⃣Combine and Serve:Add the cooked pasta to the skillet and toss to coat it evenly in the creamy sauce.Garnish with fresh basil leaves and serve immediately.
    5. Heat a large skillet over medium heat and melt the butter.
    6. Add the minced garlic and sauté for 1-2 minutes, until fragrant.Add the cubed chicken, cooking for 6-8 minutes, stirring occasionally, until golden brown and fully cooked. Season with salt and pepper.3️⃣Make the Sauce:Lower the heat and stir in the heavy cream, scraping up any browned bits from the skillet for extra flavor.Gradually add the Parmesan cheese, stirring until the sauce is smooth and creamy. Adjust seasoning with salt and pepper as needed.4️⃣Combine and Serve:Add the cooked pasta to the skillet and toss to coat it evenly in the creamy sauce.Garnish with fresh basil leaves and serve immediately.
    7. Add the cubed chicken, cooking for 6-8 minutes, stirring occasionally, until golden brown and fully cooked. Season with salt and pepper.3️⃣Make the Sauce:Lower the heat and stir in the heavy cream, scraping up any browned bits from the skillet for extra flavor.Gradually add the Parmesan cheese, stirring until the sauce is smooth and creamy. Adjust seasoning with salt and pepper as needed.4️⃣Combine and Serve:Add the cooked pasta to the skillet and toss to coat it evenly in the creamy sauce.Garnish with fresh basil leaves and serve immediately.
    8. 3️⃣Make the Sauce:
    9. Lower the heat and stir in the heavy cream, scraping up any browned bits from the skillet for extra flavor.Gradually add the Parmesan cheese, stirring until the sauce is smooth and creamy. Adjust seasoning with salt and pepper as needed.4️⃣Combine and Serve:Add the cooked pasta to the skillet and toss to coat it evenly in the creamy sauce.Garnish with fresh basil leaves and serve immediately.
    10. Gradually add the Parmesan cheese, stirring until the sauce is smooth and creamy. Adjust seasoning with salt and pepper as needed.4️⃣Combine and Serve:Add the cooked pasta to the skillet and toss to coat it evenly in the creamy sauce.Garnish with fresh basil leaves and serve immediately.
    11. 4️⃣Combine and Serve:
    12. Add the cooked pasta to the skillet and toss to coat it evenly in the creamy sauce.Garnish with fresh basil leaves and serve immediately.
    13. Garnish with fresh basil leaves and serve immediately.

    Notes

    For a touch of heat, add a pinch of red pepper flakes to the butter while cooking the garlic.Substitute half-and-half for a lighter version of the sauce, but the texture may be less creamy.Pair with a side salad or garlic bread for a complete meal.
    Substitute half-and-half for a lighter version of the sauce, but the texture may be less creamy.Pair with a side salad or garlic bread for a complete meal.
    Pair with a side salad or garlic bread for a complete meal.


    “`

    Easy Recipes with Pinto Beans for a Delicious Meal

    “`html

    Easy Recipes with Pinto Beans for a Delicious Meal

    Why Pinto Beans for Your Next Meal?

    Are you looking for a way to add more fiber and protein to your diet without sacrificing flavor or speed? Did you know that a single cup of cooked pinto beans can provide around 15 grams of fiber and 15 grams of protein, making them a nutritional powerhouse that can help you feel full and energized for longer? Pinto beans, with their creamy texture and mild, earthy flavor, are one of the most versatile legumes you can have in your pantry. They are an absolute staple for anyone seeking healthy, hearty, and budget-friendly meals. From comforting stews to zesty salads and quick weeknight dinners, the humble pinto bean can transform ordinary ingredients into extraordinary culinary experiences. This guide is designed to unlock the full potential of pinto beans, offering easy-to-follow recipes and practical tips to make your cooking adventures both delicious and successful. Get ready to discover how simple it is to create satisfying meals that will have everyone coming back for seconds!

    Hearty Pinto Bean Ingredients

    The beauty of pinto bean recipes lies in their adaptability. While the base of pinto beans is essential, feel free to experiment with spices and additions. Here’s a general list of ingredients you might find in a delicious pinto bean dish, focusing on flavor and texture:

    • Dried Pinto Beans: The star of the show! Look for plump, uniformly colored beans. For a quicker meal, canned pinto beans are a fantastic alternative.
      • Tip: If using dried beans, a quick soak (about an hour in hot water) can reduce cooking time considerably.
    • Aromatics: These build the foundational flavor.
      • Onion: Finely chopped, yellow or white onions work best, offering a sweet and pungent base.
      • Garlic: Minced or crushed, garlic adds a pungent depth that complements the beans perfectly.
    • Broth or Water: Vegetable or chicken broth adds more depth than plain water.
      • Substitution: Water is perfectly acceptable if you’re aiming for a lighter flavor or have dietary restrictions.
    • Spices: This is where magic happens!
      • Cumin: Earthy and warm, it’s a classic pairing with beans.
      • Chili Powder: Adds a gentle warmth and complexity.
      • Smoked Paprika: For a hint of smokiness and vibrant color.
      • Oregano: Dried oregano adds a herbaceous note.
      • Salt and Black Pepper: To taste, essential for bringing out all the other flavors.
    • Optional Flavor Boosters:
      • Bay Leaf: Adds a subtle, aromatic complexity during simmering.
      • Diced Tomatoes: Canned diced tomatoes (plain or fire-roasted) add acidity and a lovely texture.
      • A touch of sweetener: A pinch of sugar or a drizzle of maple syrup can balance acidity (especially from tomatoes).
      • A splash of acid: Lime juice or vinegar at the end brightens the flavors wonderfully.

    Delicious Timing for Pinto Bean Dishes

    Prep time: 15 minutes
    Cook time: 1 hour – 1 hour 30 minutes (for dried beans) / 15-20 minutes (for canned)
    Total time: 1 hour 15 minutes – 1 hour 45 minutes

    Compared to many complex recipes, cooking with pinto beans, especially using canned varieties, is remarkably fast. Even starting with dried beans, the hands-on time is minimal, allowing the beans to simmer and develop their rich flavor. If you’re crunched for time, opt for canned beans, and you can have a delicious, hearty meal on the table in under 30 minutes!

    A bowl of delicious pinto bean stew

    Crafting Your Pinto Bean Masterpiece: Step-by-Step

    Step 1: Gather and Prepare Your Ingredients

    Begin by gathering all your ingredients. If you’re using dried pinto beans, rinse them thoroughly under cold water and pick out any small stones or debris. You’ll need to soak them to soften them for cooking. For a quick soak, place the rinsed beans in a large bowl, cover them with plenty of water (at least 2-3 inches above the beans), and let them soak for about 1 hour. Drain and rinse them. If you have more time, an overnight soak (8 hours or more) is even better. If using canned beans, simply drain and rinse them well. Finely chop your onion and mince your garlic.

    Step 2: Build the Flavor Base

    In a large pot or Dutch oven, heat a tablespoon of olive oil or your preferred cooking fat over medium heat. Add the chopped onion and sauté until softened and translucent, about 5-7 minutes. Then, add the minced garlic and cook for another minute until fragrant, being careful not to burn it. This fragrant base is crucial for a deeply flavorful dish.

    Step 3: Harmonize the Flavors (Simmer)

    Add the soaked and drained dried pinto beans (or rinsed canned beans) to the pot. If using dried beans, add enough fresh water or broth to cover them by about 2 inches. Stir in your chosen spices: cumin, chili powder, smoked paprika, oregano, salt, and pepper. If you’re using a bay leaf or diced tomatoes, add them now. Bring the mixture to a boil, then reduce the heat to low, cover, and simmer. For dried beans, this will take about 1 to 1.5 hours, or until the beans are tender. For canned beans, you’ll simmer for about 15-20 minutes to allow the flavors to meld.

    Tip: Check the liquid level periodically and add more water or broth if it gets too low, ensuring the beans remain submerged.

    Step 4: The Finishing Touches

    Once the beans are tender and the flavors have melded beautifully, remove the bay leaf if used. Taste and adjust seasonings as needed – perhaps a little more salt, pepper, or a pinch of chili powder for extra heat. If the stew is too thin, you can mash some of the beans against the side of the pot with a spoon or simmer uncovered for a few minutes to thicken. For brightness, stir in a squeeze of fresh lime juice or a splash of apple cider vinegar just before serving.

    Step 5: Serve and Savor

    Ladle the warm, comforting pinto bean dish into bowls. Garnish with your favorite toppings and serve immediately. Enjoy the rich, satisfying flavors!

    Nutritional Powerhouse: What’s Inside?

    Pinto beans are celebrated not just for their taste and versatility but also for their impressive nutritional profile. A standard serving (approximately 1 cup cooked) offers:

    • Calories: Roughly 245-255 kcal
    • Protein: Approximately 15 grams (an excellent source for plant-based diets)
    • Fiber: Around 15 grams (contributes to digestive health and satiety)
    • Carbohydrates: About 45 grams, with a good portion being complex carbohydrates.
    • Fat: Very low, typically less than 1 gram per serving.
    • Vitamins & Minerals: Rich in folate, iron, magnesium, potassium, and phosphorus.

    These nutrients make pinto beans a fantastic addition to a balanced diet, supporting everything from heart health to energy levels.

    Healthier Twists for Your Pinto Bean Recipes

    While pinto bean recipes are generally healthy, you can enhance them further with thoughtful ingredient swaps:

    • Reduce Sodium: Opt for low-sodium canned beans or cook dried beans without added salt. Flavor can be boosted with herbs, spices, lemon juice, and vinegar instead.
    • Leaner Proteins: If adding meat, choose lean turkey or chicken. For a vegetarian option, add more vegetables or plant-based proteins like lentils or quinoa.
    • Healthy Fats: Use olive oil or avocado oil for sautéing instead of butter or bacon fat. Add healthy fats through toppings like avocado slices or a sprinkle of seeds.
    • Whole Grains: Serve your pinto beans with brown rice or whole-wheat tortillas for added fiber and nutrients.
    • Load Up on Veggies: Incorporate extra vegetables like bell peppers, corn, spinach, kale, or zucchini into your bean dishes for added vitamins and fiber.

    Serving Up Perfection: How to Enjoy Your Pinto Beans

    Pinto beans are incredibly versatile. Here are some delightful ways to serve them:

    • As a Side Dish: Creamy, seasoned pinto beans are a classic accompaniment to Mexican-inspired dishes, barbecue, or any hearty meal.
    • In Soups and Stews: They add substance and a creamy texture to chili, hearty vegetable soups, or Irish stew.
    • Burrito Filling: Mashed or whole, they make a fantastic, filling component for burritos and tacos.
    • Bean Dip: Blend with spices, garlic, and a little lime juice for a flavorful and healthy dip.
    • Over Rice: Serve simply over a bed of fluffy rice for a quick and satisfying vegetarian meal.
    • Toppings: Don’t forget the garnishes! Fresh cilantro, chopped red onion, a dollop of sour cream or Greek yogurt, salsa, avocado, or shredded cheese all elevate the dish.

    Avoiding Pitfalls: Common Pinto Bean Mistakes

    Ensure your pinto bean dishes are always a success by avoiding these common missteps:

    • Not Soaking Dried Beans: If not soaked (or quick-soaked), dried beans will take significantly longer to cook and may not become fully tender.
    • Under-Seasoning: Beans absorb a lot of flavor. Don’t be shy with salt, pepper, and your chosen spices. Taste and adjust throughout the cooking process.
    • Burning Garlic: Garlic can go from fragrant to bitter very quickly. Add it towards the end of sautéing aromatics and cook gently.
    • Using Too Much Liquid Initially: Start with enough liquid to cover the beans, then add more as needed. Too much liquid can dilute the flavors.
    • Overcooking Canned Beans: Canned beans are already cooked, so their simmering time is primarily for flavor melding. Overcooking can make them mushy.

    Keeping the Goodness: Storing Pinto Beans

    Proper storage ensures your delicious pinto bean creations remain safe and tasty:

    • Refrigeration: Cooked pinto beans and dishes containing them can be stored in an airtight container in the refrigerator for up to 3-4 days.
    • Freezing: For longer storage, cooked pinto beans freeze beautifully. Portion them into freezer-safe containers or bags and freeze for up to 3 months. They are excellent for meal prep.
    • Reheating: Reheat gently on the stovetop with a splash of water or broth, or in the microwave.
    Close-up of seasoned pinto beans

    Embrace the Versatility of Pinto Beans

    Pinto beans are more than just a pantry staple; they are a gateway to countless delicious and nutritious meals. Their affordability, ease of preparation, and incredible versatility make them a perfect choice for busy home cooks and healthy eaters alike. Whether you’re whipping up a quick weeknight dinner, a comforting weekend stew, or a flavorful side dish, pinto beans are sure to impress. So, don’t hesitate to experiment with these humble legumes – your taste buds (and your wallet) will thank you! Now, go forth and cook up something amazing!

    Frequently Asked Questions about Pinto Beans

    ***Is it necessary to soak dried pinto beans?***

    Soaking dried pinto beans is highly recommended. It softens them, significantly reduces cooking time, and can help make them easier to digest for some people. A quick soak (about an hour in hot water) is a good alternative if you’re short on time.

    ***Can I use canned pinto beans instead of dried?***

    Absolutely! Canned pinto beans are a fantastic shortcut. Just make sure to drain and rinse them well to remove excess sodium and any metallic taste. They will reduce your overall cooking time to just the period needed to heat them through and meld flavors.

    ***What spices pair well with pinto beans?***

    Classic pairings include cumin, chili powder, smoked paprika, oregano, and garlic. For a bit more zest, consider a pinch of cayenne pepper, or for a deeper flavor, add a bay leaf during simmering.

    ***How do I make my pinto beans creamy?***

    To achieve a creamy texture, you can mash some of the beans against the side of the pot with a spoon or potato masher towards the end of cooking. Stirring in a little bit of sour cream, Greek yogurt, or even a touch of dairy-free cream alternative can also enhance creaminess.

    ***Are pinto beans good for weight loss?***

    Yes, pinto beans can be excellent for weight loss due to their high fiber and protein content, which promote satiety and help you feel fuller for longer. They are also naturally low in fat.

    Print

    clock clock iconcutlery cutlery iconflag flag iconfolder folder iconinstagram instagram iconpinterest pinterest iconfacebook facebook iconprint print iconsquares squares iconheart heart iconheart solid heart solid icon

    Pinto Beans, Green Chile, and Beef Soup


    • Author: Chef Emy

    Description

    This hearty, flavorful soup combines tender pinto beans, zesty green chiles, and savory ground beef for a comforting meal. Perfect for weeknights or gatherings, it’s easy to make and packed with bold, satisfying flavors.


    Ingredients

    Scale
    • 1pound ground beef1 tablespoonolive oil (optional, for lean beef)1medium onion, diced3garlic cloves, minced2 cupscooked pinto beans (or 1 can,15 oz, drained and rinsed)1can (4 oz) diced green chiles (mild or hot)1can (14.5 oz) diced tomatoes (with juices)4 cupsbeef broth (or chicken/vegetable broth)1 teaspoonground cumin1 teaspoonsmoked paprika½ teaspoonchili powder (optional, for heat)Salt and pepper, to taste1 cupfrozen corn (optional, for sweetness)Fresh cilantro, chopped (for garnish)Lime wedges (for serving)
    • 1 tablespoonolive oil (optional, for lean beef)1medium onion, diced3garlic cloves, minced2 cupscooked pinto beans (or 1 can,15 oz, drained and rinsed)1can (4 oz) diced green chiles (mild or hot)1can (14.5 oz) diced tomatoes (with juices)4 cupsbeef broth (or chicken/vegetable broth)1 teaspoonground cumin1 teaspoonsmoked paprika½ teaspoonchili powder (optional, for heat)Salt and pepper, to taste1 cupfrozen corn (optional, for sweetness)Fresh cilantro, chopped (for garnish)Lime wedges (for serving)
    • 1medium onion, diced3garlic cloves, minced2 cupscooked pinto beans (or 1 can,15 oz, drained and rinsed)1can (4 oz) diced green chiles (mild or hot)1can (14.5 oz) diced tomatoes (with juices)4 cupsbeef broth (or chicken/vegetable broth)1 teaspoonground cumin1 teaspoonsmoked paprika½ teaspoonchili powder (optional, for heat)Salt and pepper, to taste1 cupfrozen corn (optional, for sweetness)Fresh cilantro, chopped (for garnish)Lime wedges (for serving)
    • 3garlic cloves, minced2 cupscooked pinto beans (or 1 can,15 oz, drained and rinsed)1can (4 oz) diced green chiles (mild or hot)1can (14.5 oz) diced tomatoes (with juices)4 cupsbeef broth (or chicken/vegetable broth)1 teaspoonground cumin1 teaspoonsmoked paprika½ teaspoonchili powder (optional, for heat)Salt and pepper, to taste1 cupfrozen corn (optional, for sweetness)Fresh cilantro, chopped (for garnish)Lime wedges (for serving)
    • 2 cupscooked pinto beans (or 1 can,15 oz, drained and rinsed)1can (4 oz) diced green chiles (mild or hot)1can (14.5 oz) diced tomatoes (with juices)4 cupsbeef broth (or chicken/vegetable broth)1 teaspoonground cumin1 teaspoonsmoked paprika½ teaspoonchili powder (optional, for heat)Salt and pepper, to taste1 cupfrozen corn (optional, for sweetness)Fresh cilantro, chopped (for garnish)Lime wedges (for serving)
    • 1can (4 oz) diced green chiles (mild or hot)1can (14.5 oz) diced tomatoes (with juices)4 cupsbeef broth (or chicken/vegetable broth)1 teaspoonground cumin1 teaspoonsmoked paprika½ teaspoonchili powder (optional, for heat)Salt and pepper, to taste1 cupfrozen corn (optional, for sweetness)Fresh cilantro, chopped (for garnish)Lime wedges (for serving)
    • 1can (14.5 oz) diced tomatoes (with juices)4 cupsbeef broth (or chicken/vegetable broth)1 teaspoonground cumin1 teaspoonsmoked paprika½ teaspoonchili powder (optional, for heat)Salt and pepper, to taste1 cupfrozen corn (optional, for sweetness)Fresh cilantro, chopped (for garnish)Lime wedges (for serving)
    • 4 cupsbeef broth (or chicken/vegetable broth)1 teaspoonground cumin1 teaspoonsmoked paprika½ teaspoonchili powder (optional, for heat)Salt and pepper, to taste1 cupfrozen corn (optional, for sweetness)Fresh cilantro, chopped (for garnish)Lime wedges (for serving)
    • 1 teaspoonground cumin1 teaspoonsmoked paprika½ teaspoonchili powder (optional, for heat)Salt and pepper, to taste1 cupfrozen corn (optional, for sweetness)Fresh cilantro, chopped (for garnish)Lime wedges (for serving)
    • 1 teaspoonsmoked paprika½ teaspoonchili powder (optional, for heat)Salt and pepper, to taste1 cupfrozen corn (optional, for sweetness)Fresh cilantro, chopped (for garnish)Lime wedges (for serving)
    • ½ teaspoonchili powder (optional, for heat)Salt and pepper, to taste1 cupfrozen corn (optional, for sweetness)Fresh cilantro, chopped (for garnish)Lime wedges (for serving)
    • Salt and pepper, to taste1 cupfrozen corn (optional, for sweetness)Fresh cilantro, chopped (for garnish)Lime wedges (for serving)
    • 1 cupfrozen corn (optional, for sweetness)Fresh cilantro, chopped (for garnish)Lime wedges (for serving)
    • Fresh cilantro, chopped (for garnish)Lime wedges (for serving)
    • Lime wedges (for serving)

    Instructions

    1. 1️⃣Brown the Beef:Heat a large pot or Dutch oven over medium heat.Add the ground beef and cook until browned, breaking it into crumbles. If using lean beef, add olive oil to prevent sticking.Drain any excess grease.2️⃣Sauté the Aromatics:Add the diced onion to the pot and sauté for 3–5 minutes until softened.Stir in the minced garlic and cook for 1 minute, until fragrant.3️⃣Build the Soup Base:Add the green chiles, diced tomatoes (with their juices), and pinto beans to the pot.Stir in the cumin, smoked paprika, chili powder (if using), salt, and pepper.4️⃣Add the Broth:Pour in the beef broth and stir well to combine.Bring the soup to a gentle boil, then reduce the heat to low.Let the soup simmer for 15–20 minutes, allowing the flavors to meld.5️⃣Optional Additions:During the last 5 minutes of cooking, stir in the frozen corn for a touch of sweetness.6️⃣Serve:Ladle the soup into bowls and garnish with fresh cilantro.Serve with lime wedges for a tangy finish. Pair with cornbread, tortillas, or crusty bread for a complete meal.
    2. Heat a large pot or Dutch oven over medium heat.Add the ground beef and cook until browned, breaking it into crumbles. If using lean beef, add olive oil to prevent sticking.Drain any excess grease.2️⃣Sauté the Aromatics:Add the diced onion to the pot and sauté for 3–5 minutes until softened.Stir in the minced garlic and cook for 1 minute, until fragrant.3️⃣Build the Soup Base:Add the green chiles, diced tomatoes (with their juices), and pinto beans to the pot.Stir in the cumin, smoked paprika, chili powder (if using), salt, and pepper.4️⃣Add the Broth:Pour in the beef broth and stir well to combine.Bring the soup to a gentle boil, then reduce the heat to low.Let the soup simmer for 15–20 minutes, allowing the flavors to meld.5️⃣Optional Additions:During the last 5 minutes of cooking, stir in the frozen corn for a touch of sweetness.6️⃣Serve:Ladle the soup into bowls and garnish with fresh cilantro.Serve with lime wedges for a tangy finish. Pair with cornbread, tortillas, or crusty bread for a complete meal.
    3. Add the ground beef and cook until browned, breaking it into crumbles. If using lean beef, add olive oil to prevent sticking.
    4. Drain any excess grease.2️⃣Sauté the Aromatics:Add the diced onion to the pot and sauté for 3–5 minutes until softened.Stir in the minced garlic and cook for 1 minute, until fragrant.3️⃣Build the Soup Base:Add the green chiles, diced tomatoes (with their juices), and pinto beans to the pot.Stir in the cumin, smoked paprika, chili powder (if using), salt, and pepper.4️⃣Add the Broth:Pour in the beef broth and stir well to combine.Bring the soup to a gentle boil, then reduce the heat to low.Let the soup simmer for 15–20 minutes, allowing the flavors to meld.5️⃣Optional Additions:During the last 5 minutes of cooking, stir in the frozen corn for a touch of sweetness.6️⃣Serve:Ladle the soup into bowls and garnish with fresh cilantro.Serve with lime wedges for a tangy finish. Pair with cornbread, tortillas, or crusty bread for a complete meal.
    5. 2️⃣Sauté the Aromatics:Add the diced onion to the pot and sauté for 3–5 minutes until softened.Stir in the minced garlic and cook for 1 minute, until fragrant.3️⃣Build the Soup Base:Add the green chiles, diced tomatoes (with their juices), and pinto beans to the pot.Stir in the cumin, smoked paprika, chili powder (if using), salt, and pepper.4️⃣Add the Broth:Pour in the beef broth and stir well to combine.Bring the soup to a gentle boil, then reduce the heat to low.Let the soup simmer for 15–20 minutes, allowing the flavors to meld.5️⃣Optional Additions:During the last 5 minutes of cooking, stir in the frozen corn for a touch of sweetness.6️⃣Serve:Ladle the soup into bowls and garnish with fresh cilantro.Serve with lime wedges for a tangy finish. Pair with cornbread, tortillas, or crusty bread for a complete meal.
    6. Add the diced onion to the pot and sauté for 3–5 minutes until softened.
    7. Stir in the minced garlic and cook for 1 minute, until fragrant.3️⃣Build the Soup Base:Add the green chiles, diced tomatoes (with their juices), and pinto beans to the pot.Stir in the cumin, smoked paprika, chili powder (if using), salt, and pepper.4️⃣Add the Broth:Pour in the beef broth and stir well to combine.Bring the soup to a gentle boil, then reduce the heat to low.Let the soup simmer for 15–20 minutes, allowing the flavors to meld.5️⃣Optional Additions:During the last 5 minutes of cooking, stir in the frozen corn for a touch of sweetness.6️⃣Serve:Ladle the soup into bowls and garnish with fresh cilantro.Serve with lime wedges for a tangy finish. Pair with cornbread, tortillas, or crusty bread for a complete meal.
    8. 3️⃣Build the Soup Base:Add the green chiles, diced tomatoes (with their juices), and pinto beans to the pot.Stir in the cumin, smoked paprika, chili powder (if using), salt, and pepper.4️⃣Add the Broth:Pour in the beef broth and stir well to combine.Bring the soup to a gentle boil, then reduce the heat to low.Let the soup simmer for 15–20 minutes, allowing the flavors to meld.5️⃣Optional Additions:During the last 5 minutes of cooking, stir in the frozen corn for a touch of sweetness.6️⃣Serve:Ladle the soup into bowls and garnish with fresh cilantro.Serve with lime wedges for a tangy finish. Pair with cornbread, tortillas, or crusty bread for a complete meal.
    9. Add the green chiles, diced tomatoes (with their juices), and pinto beans to the pot.
    10. Stir in the cumin, smoked paprika, chili powder (if using), salt, and pepper.4️⃣Add the Broth:Pour in the beef broth and stir well to combine.Bring the soup to a gentle boil, then reduce the heat to low.Let the soup simmer for 15–20 minutes, allowing the flavors to meld.5️⃣Optional Additions:During the last 5 minutes of cooking, stir in the frozen corn for a touch of sweetness.6️⃣Serve:Ladle the soup into bowls and garnish with fresh cilantro.Serve with lime wedges for a tangy finish. Pair with cornbread, tortillas, or crusty bread for a complete meal.
    11. 4️⃣Add the Broth:Pour in the beef broth and stir well to combine.Bring the soup to a gentle boil, then reduce the heat to low.Let the soup simmer for 15–20 minutes, allowing the flavors to meld.5️⃣Optional Additions:During the last 5 minutes of cooking, stir in the frozen corn for a touch of sweetness.6️⃣Serve:Ladle the soup into bowls and garnish with fresh cilantro.Serve with lime wedges for a tangy finish. Pair with cornbread, tortillas, or crusty bread for a complete meal.
    12. Pour in the beef broth and stir well to combine.
    13. Bring the soup to a gentle boil, then reduce the heat to low.Let the soup simmer for 15–20 minutes, allowing the flavors to meld.5️⃣Optional Additions:During the last 5 minutes of cooking, stir in the frozen corn for a touch of sweetness.6️⃣Serve:Ladle the soup into bowls and garnish with fresh cilantro.Serve with lime wedges for a tangy finish. Pair with cornbread, tortillas, or crusty bread for a complete meal.
    14. Let the soup simmer for 15–20 minutes, allowing the flavors to meld.5️⃣Optional Additions:During the last 5 minutes of cooking, stir in the frozen corn for a touch of sweetness.6️⃣Serve:Ladle the soup into bowls and garnish with fresh cilantro.Serve with lime wedges for a tangy finish. Pair with cornbread, tortillas, or crusty bread for a complete meal.
    15. 5️⃣Optional Additions:
    16. During the last 5 minutes of cooking, stir in the frozen corn for a touch of sweetness.6️⃣Serve:Ladle the soup into bowls and garnish with fresh cilantro.Serve with lime wedges for a tangy finish. Pair with cornbread, tortillas, or crusty bread for a complete meal.
    17. 6️⃣Serve:Ladle the soup into bowls and garnish with fresh cilantro.Serve with lime wedges for a tangy finish. Pair with cornbread, tortillas, or crusty bread for a complete meal.
    18. Ladle the soup into bowls and garnish with fresh cilantro.
    19. Serve with lime wedges for a tangy finish. Pair with cornbread, tortillas, or crusty bread for a complete meal.

    Notes

    For a vegetarian version, omit the ground beef and use vegetable broth.Adjust spice levels by choosing mild or hot green chiles and adding more chili powder if desired.Leftovers store well in the refrigerator for up to 3 days or freeze for up to 3 months.
    Adjust spice levels by choosing mild or hot green chiles and adding more chili powder if desired.Leftovers store well in the refrigerator for up to 3 days or freeze for up to 3 months.
    Leftovers store well in the refrigerator for up to 3 days or freeze for up to 3 months.


    “`