End your day with a delicious, comforting, and satisfying dinner! Whether you’re looking for quick and easy weeknight meals, cozy comfort food, or elegant dishes for special occasions, we have the perfect recipes for you.
From hearty casseroles and one-pan wonders to savory pastas, juicy meats, and flavorful vegetarian options, our collection is designed to make dinnertime effortless and enjoyable.
Busy schedule? No problem! Try our slow cooker meals, sheet pan dinners, and 30-minute recipes to save time without sacrificing flavor. Whatever your craving, these recipes will bring warmth and joy to your table every night. 🍽️✨
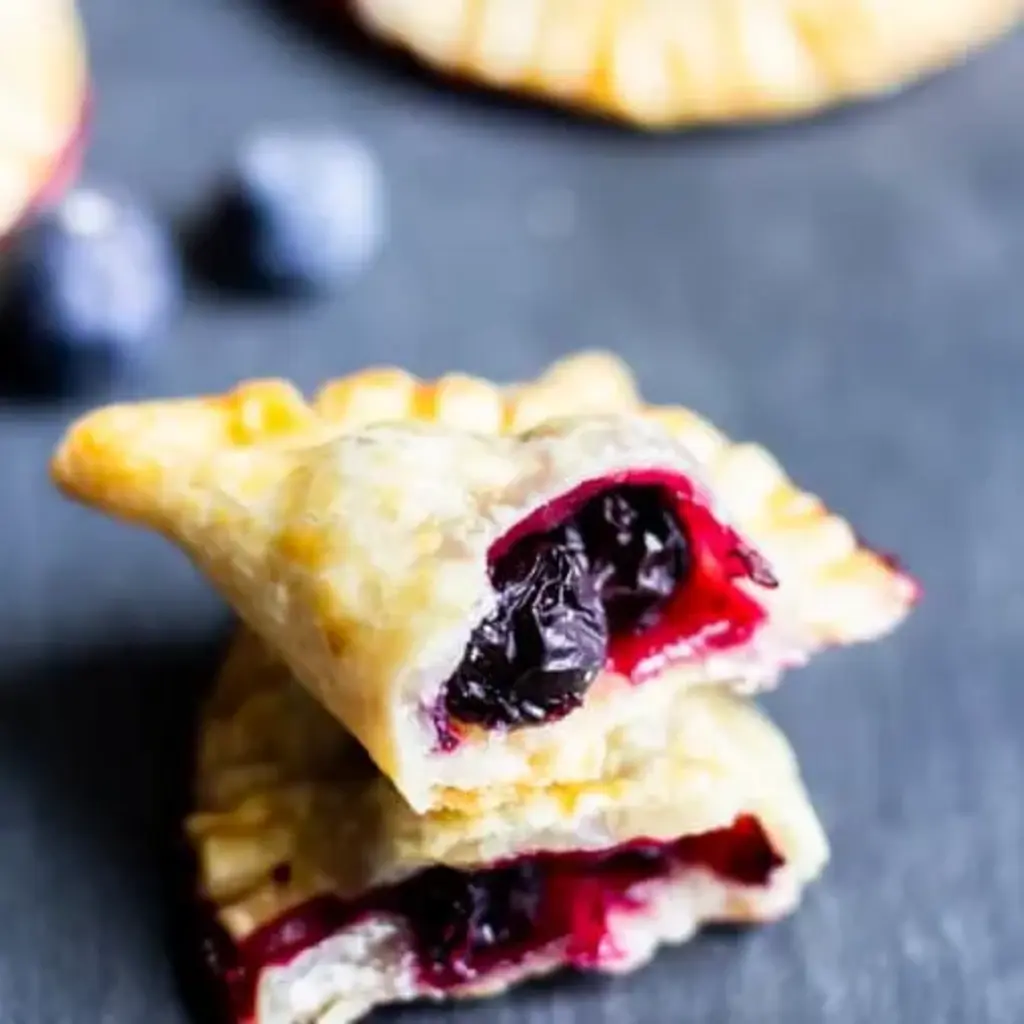
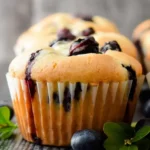
These rustic Blueberry Hand Pies are easy to make and incredibly delicious. What better way to enjoy fresh, summer blueberries than in these tasty little pie bites!
Ingredients
Scale
1 cup blueberries
1/2 cup water
1/4 cup granulated sugar
1 tablespoon cornstarch mixed with 1 tablespoon water
1/4 teaspoon vanilla extract
1 teaspoon lemon juice
Instructions
Combine all ingredients and bring to a boil over medium-high heat. Reduce heat to low and simmer until thickened, abut 3-5 minutes.
Notes
** Nutritional information is an estimate and may vary.
Nutrition
Calories:78kcal
Sugar:16g
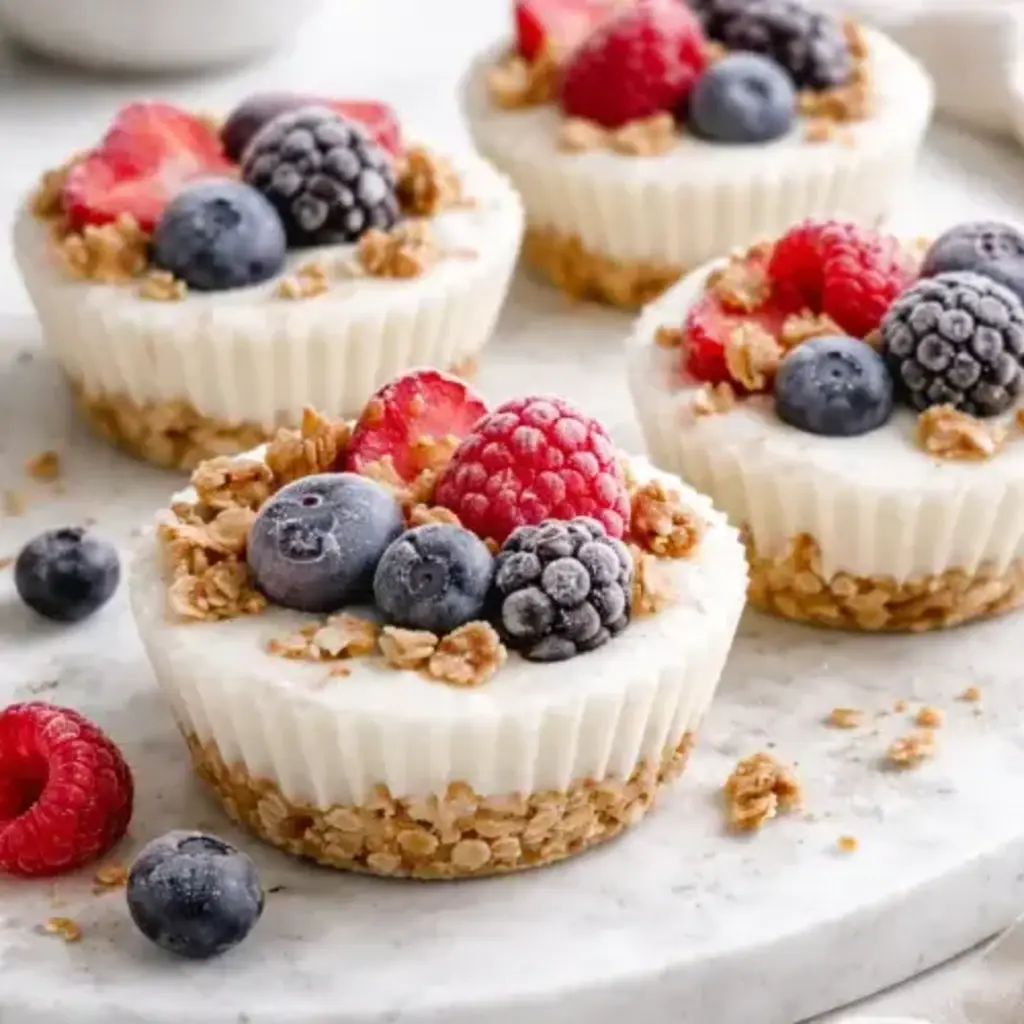
Frozen Yogurt Granola Cups with Berries
fall dessert recipes,fall dessert,dessert recipes,dessert recipes easy,dinner ideas,dinner recipes,dinner recipes for family,dinner ideas easy,lunch ideas,lunch recipes,breakfast ideas,breakfast recipes,cooking recipes,recipes for dinner,cooking ideas,healthy dinner recipes,healthy recipes,healthy lunch ideas,healthy meals,healthy fall baking,halthy eating,that girl,that girl aesthetic,that girl routine,friday blessings,friday night dinner ideas,baking ideas,autumn,christmas treats
A high-protein, fiber-rich frozen treat featuring a chewy almond-oat base and a creamy Greek yogurt center topped with antioxidant-rich berries.
Ingredients
Scale
3/4 cup Rolled oats
1/4 cup Natural almond butter
3 4 tbsp Honey or maple syrup
1 tsp Vanilla extract
1/2 tsp Ground cinnamon
1 1/2 cups Greek yogurt full-fat recommended
1 cup Mixed fresh berries strawberries, blueberries, raspberries
Instructions
Base: In a bowl, mix oats, cinnamon, almond butter, honey, and vanilla until a sticky dough forms.
Line: Place 12 liners in a muffin tin.
Press: Distribute the granola mixture evenly across the liners and press down firmly to create a solid base.
Fill: Top the granola with a generous dollop of Greek yogurt (about 2 tablespoons per cup).
Top: Press fresh berries into the yogurt and add any remaining granola crumbles.
Freeze: Freeze for a minimum of 4 hours until the yogurt is solid.
Serve: Remove from the freezer and let sit for 35 minutes before peeling off the liner.
Notes
Customization: Add a few mini dark chocolate chips to the granola base for a more dessert-like experience.
Vegan Option: Use coconut-based yogurt and maple syrup for a 100% plant-based version.
Consistency: If your almond butter is very stiff, microwave it for 10 seconds to make it easier to incorporate into the oats.
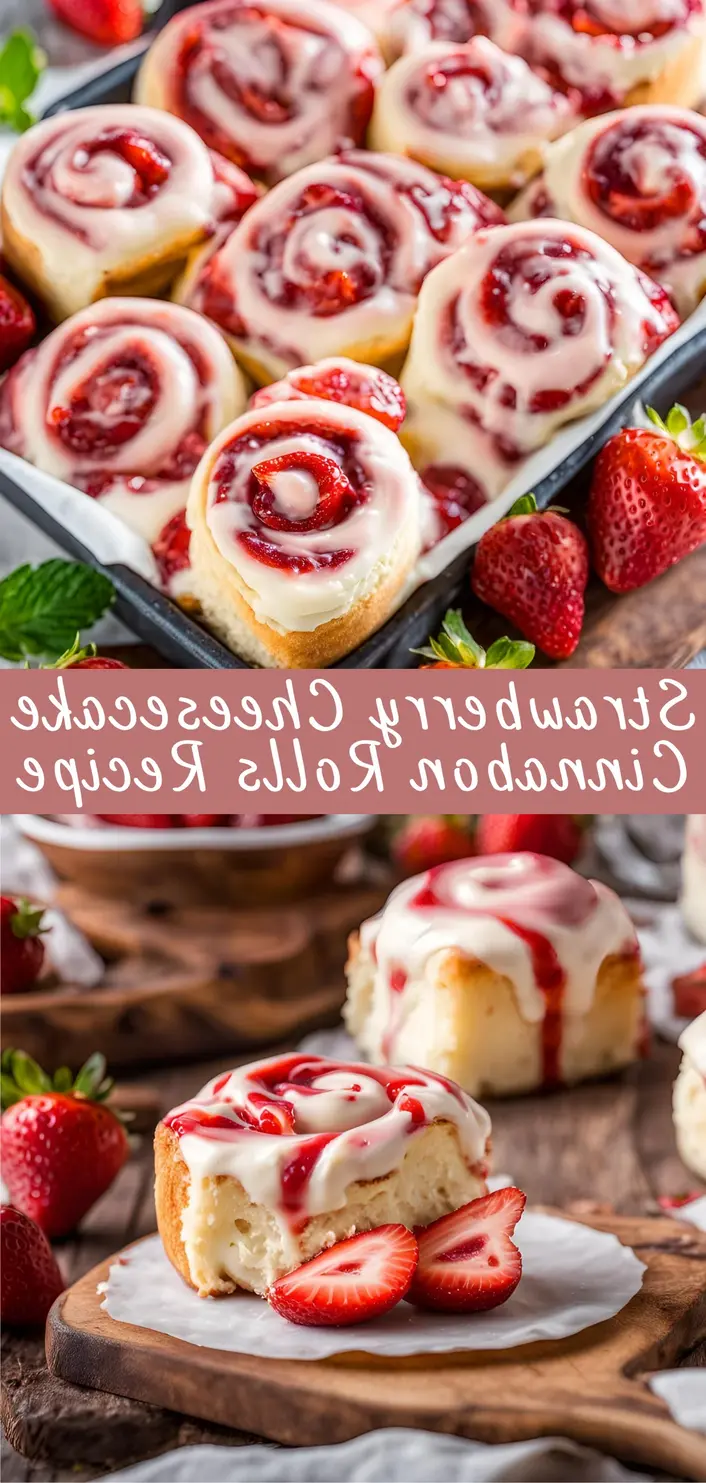
Strawberry Cheesecake Cinnabon Rolls combine several beloved treats into one deliciously indulgent dessert or breakfast. By blending the soft, buttery texture of a cinnamon roll with the rich and creamy tang of cheesecake and the freshness of strawberries, this recipe takes traditional cinnamon rolls to a whole new level.
Ingredients
Scale
For the Dough:
The dough is the base of your rolls and needs to be soft, fluffy, and slightly sweet. For this, youll need:
2 cups (240g) all-purpose flour
1/2 cup (120ml) whole milk, lukewarm
2 1/4 teaspoons (7g) active dry yeast
1/4 cup (50g) granulated sugar
1/4 cup (60g) unsalted butter, softened
1 large egg
1/2 teaspoon vanilla extract
1/2 teaspoon salt
For the Cheesecake Filling:
This will add the creamy, tangy element to your rolls, making them irresistibly indulgent:
8 oz (225g) cream cheese, softened
1/4 cup (50g) granulated sugar
1 teaspoon vanilla extract
1 tablespoon all-purpose flour
1/2 cup (120ml) sour cream or Greek yogurt
For the Cinnamon Sugar Filling:
The classic cinnamon sugar filling gives these rolls that familiar Cinnabon flavor, but well enhance it with the cheesecake filling and strawberries:
1/2 cup (100g) packed brown sugar
2 tablespoons ground cinnamon
1/4 teaspoon salt
1/4 cup (60g) unsalted butter, softened
For the Strawberry Topping:
Fresh strawberries add a burst of flavor and color to the rolls, creating a lovely contrast with the rich cheesecake filling:
1 cup (150g) fresh strawberries, hulled and sliced
1 tablespoon sugar (optional, for extra sweetness)
For the Cream Cheese Icing:
A creamy, tangy icing that complements the rich, sweet rolls:
4 oz (115g) cream cheese, softened
1/2 cup (60g) powdered sugar
1/4 teaspoon vanilla extract
1–2 tablespoons whole milk, as needed for consistency
Pinch of salt
Instructions
Step 1: Preparing the Dough: Activate the YeastIn a small bowl, combine the lukewarm milk and the yeast. Stir to dissolve, then let it sit for 5-10 minutes until it becomes frothy. This indicates that the yeast is active and ready to use.
Step 1: Preparing the Dough: Mix the DoughIn a large mixing bowl, combine the flour, sugar, and salt. Create a well in the center and add the yeast mixture, the softened butter, egg, and vanilla extract. Mix until a dough starts to form. You can use a wooden spoon or your hands at this stage.
Step 1: Preparing the Dough: Knead the DoughOnce the dough comes together, transfer it to a lightly floured surface. Knead the dough for about 8-10 minutes, until it becomes smooth and elastic. If it’s too sticky, you can add a little more flour, but be careful not to add too much as you want a soft, tender dough.
Step 1: Preparing the Dough: Let the Dough RiseForm the dough into a ball and place it in a lightly greased bowl. Cover it with a clean towel or plastic wrap and let it rise in a warm place for about 1-1.5 hours, or until it has doubled in size.
Step 2: Making the Cheesecake Filling: Blend the Cream CheeseWhile the dough is rising, prepare the cheesecake filling. In a medium-sized bowl, beat the softened cream cheese with an electric mixer on medium speed until it’s smooth and creamy.
Step 2: Making the Cheesecake Filling: Add the Other IngredientsAdd the granulated sugar, vanilla extract, flour, and sour cream (or Greek yogurt). Beat everything together until fully combined and smooth. Set aside for assembly.
Step 3: Preparing the Cinnamon Sugar Filling: Make the Cinnamon Sugar MixtureIn a small bowl, mix the brown sugar, cinnamon, and salt. Set this aside, ready for the roll assembly.
Step 3: Preparing the Cinnamon Sugar Filling: Prepare the ButterSoften the butter (you can microwave it for a few seconds or let it sit at room temperature) until it’s spreadable, but not melted.
Step 4: Assembling the Rolls: Roll Out the DoughAfter the dough has risen, punch it down gently to release any air bubbles. Turn the dough out onto a floured surface and roll it into a large rectangle, about 16 inches by 12 inches (40 cm x 30 cm).
Step 4: Assembling the Rolls: Spread the ButterUsing a pastry brush or the back of a spoon, spread the softened butter evenly over the dough, leaving a small border around the edges.
Step 4: Assembling the Rolls: Add the Cheesecake FillingSpoon the cheesecake mixture over the buttered dough, spreading it out evenly with a spatula or the back of a spoon. Be careful not to go all the way to the edges to prevent it from spilling out during baking.
Step 4: Assembling the Rolls: Sprinkle the Cinnamon SugarEvenly sprinkle the cinnamon-sugar mixture over the cheesecake layer.
Step 4: Assembling the Rolls: Roll Up the DoughStarting from the long edge, carefully roll the dough into a tight log. Once you have the full roll, pinch the seam to seal it.
Step 4: Assembling the Rolls: Cut the RollsUse a sharp knife or dental floss to cut the dough into 12 equal rolls. Place the rolls in a greased 9×13-inch baking dish or a similar-sized dish, ensuring they’re close but not touching.
Step 4: Assembling the Rolls: Let the Rolls RiseCover the rolls loosely with plastic wrap or a clean towel and let them rise for about 30-45 minutes, or until they’re puffed up and touching each other.
Step 5: Baking the Rolls: Preheat the OvenPreheat your oven to 350°F (175°C) while the rolls are rising.
Step 5: Baking the Rolls: BakeOnce the rolls have risen, bake them in the preheated oven for 25-30 minutes, or until they’re golden brown and cooked through. If they start to brown too quickly, cover them loosely with aluminum foil.
Step 5: Baking the Rolls: Cool SlightlyRemove the rolls from the oven and allow them to cool for about 10 minutes before adding the icing and strawberry topping.
Step 6: Preparing the Cream Cheese Icing: Mix the IcingIn a medium-sized bowl, beat the softened cream cheese, powdered sugar, vanilla extract, and a pinch of salt. Gradually add the milk until you reach a smooth, spreadable consistency.
Step 6: Preparing the Cream Cheese Icing: Drizzle or SpreadOnce the rolls have cooled slightly, drizzle or spread the icing over the warm rolls. The warmth of the rolls will help the icing melt slightly, creating a luscious, creamy topping.
Step 7: Preparing the Strawberry Topping: Slice the StrawberriesSlice the fresh strawberries thinly, then toss them with a tablespoon of sugar if you like them extra sweet.
Step 7: Preparing the Strawberry Topping: Top the RollsGently arrange the sliced strawberries on top of the rolls. The sweetness of the strawberries balances the richness of the cheesecake and cinnamon filling, creating a perfect flavor combination.
Notes
Dough Rising Time: The first rise for the dough typically takes about 1 to 1.5 hours, depending on the temperature of your kitchen. Make sure your dough is kept in a warm, draft-free spot to rise efficiently.
Yeast Activation: Ensure your yeast is fresh. If your yeast doesnt foam after 5-10 minutes when mixed with warm milk, it may be expired and youll need to use fresh yeast for the recipe.
Softening Ingredients: For the best results, make sure the cream cheese, butter, and sour cream are softened before mixing them into the filling or icing. Cold ingredients will lead to lumps in the filling or icing.
Freezing the Rolls: If you’d like to make these ahead of time, you can freeze the unbaked rolls after assembling them. Simply freeze them on a baking sheet until firm, then transfer them to a freezer-safe bag. When youre ready to bake, let them thaw in the refrigerator overnight and then allow for a final rise before baking.
Customization: Feel free to switch out the strawberries for other fruits like blueberries, raspberries, or peaches. You can also experiment with different flavorings, like lemon zest or cinnamon, to make the rolls uniquely yours!
Cinnamon Sugar Variation: If you want an extra kick of cinnamon flavor, you can increase the amount of cinnamon in the filling or sprinkle some on top of the rolls before baking.
Icing Consistency: If your icing is too thick, add milk a teaspoon at a time until it reaches a drizzle-able consistency. If it’s too thin, add a bit more powdered sugar to thicken it up.
Dont Skip the Second Rise: The second rise is important for the rolls to puff up and achieve that light, fluffy texture. Make sure you allow for this step, even if you’re in a rushtrust us, its worth the wait!
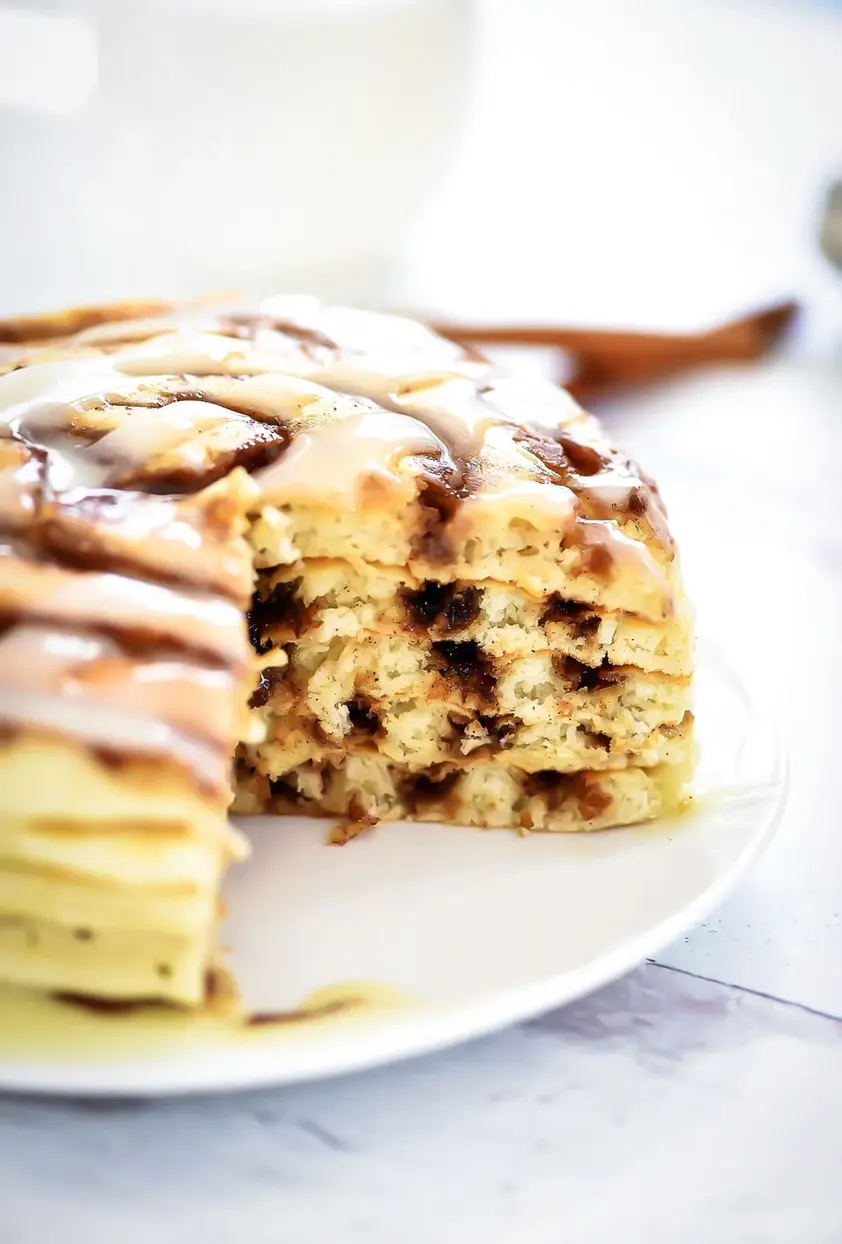
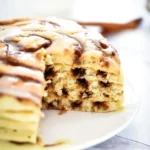
Cinnamon Roll Pancakes will be the star of the show at breakfast! Swirls of cinnamon through out and topped with cream cheese glaze!
Ingredients
Scale
1 ¼ cups all-purpose flour
2 teaspoons baking powder
1/2 teaspoon salt
1 cup milk (may need to add a little more if batter is too thick)
1 Tablespoon vegetable oil
1 large egg beaten
OR use pancake batter from a mix (we like Bisquick)
Instructions
Prepare Cinnamon Filling first:In a medium bowl, mix butter, brown sugar and cinnamon. Scoop the filling into a small zip baggie and set aside. (Set this aside and let it rest for 10 to 15 minutes. You want it just slightly thick.)
Prepare Pancake batter: In a medium bowl whisk together flour, baking powder and salt. Whisk in milk, oil and egg just until batter is moistened. (a few small lumps are fine)
OR If using a boxed mix, prepare according to package directions.
Prepare Cream Cheese glaze: In a medium glass or microwave-safe bowl, heat the butter and cream cheese until melted. Whisk together until smooth, then whisk in powdered sugar and vanilla. Set aside.
Heat a large skillet or griddle over low heat. Spray with non-stick cooking spray. Pour about 1/2 cup of pancake batter onto the skillet.Snip the corner of your cinnamon filling baggie and squeeze a spiral of the filling onto the top of the pancake.When bubbles begin to appear on the surface, flip carefully with a spatula and cook until lightly browned on the underside, 1 to 2 minutes more. Transfer pancake to a baking sheet and keep warm in the oven while you make the rest of the pancakes.
When ready to serve, spoon warmed cream cheese glaze on top of each pancake. Enjoy!
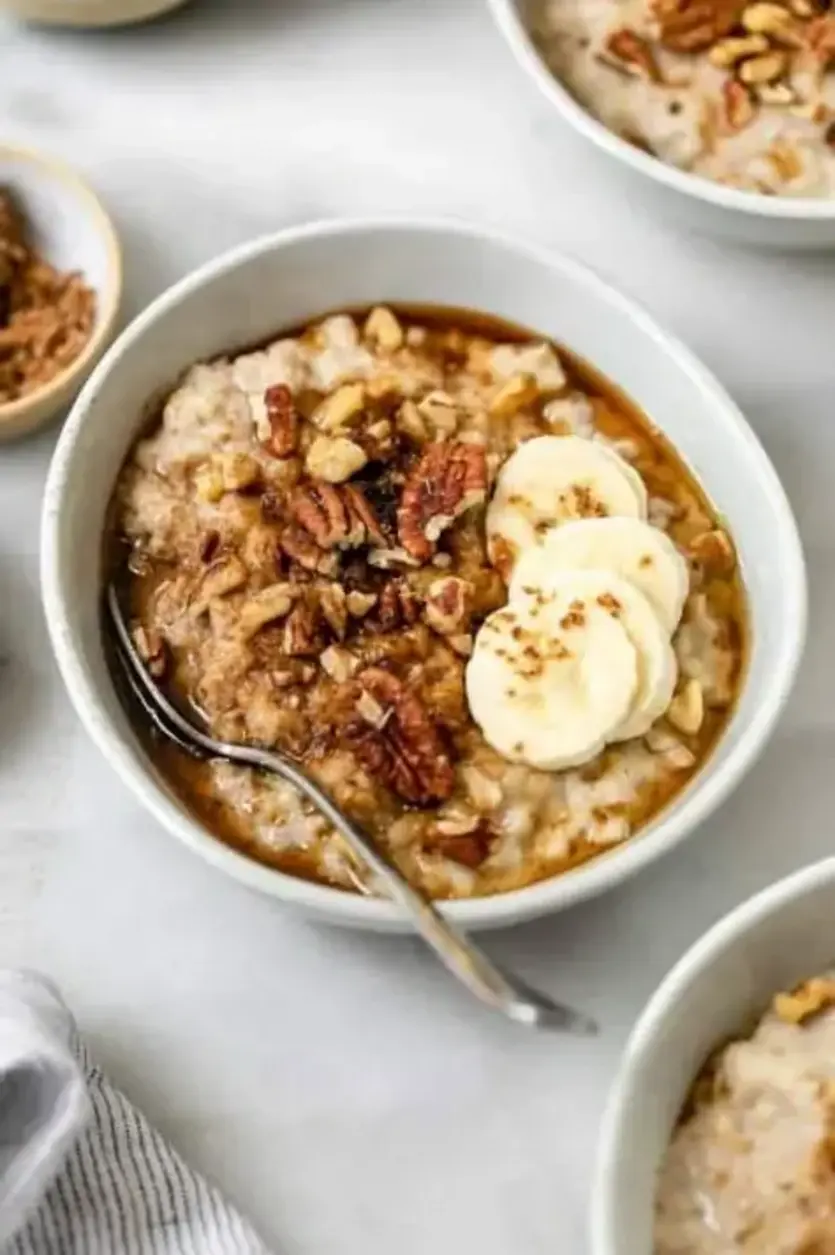
Sick of boring bowls of oatmeal? Me too! This guide on how to make oatmeal shows you step by step how to make the perfect bowl and customize it to your own needs.
Ingredients
Scale
1 cup dry old fashioned oats
1 cup water
1 cup almond milk or milk of choice
¼ teaspoon cinnamon
1 tablespoon maple syrup
Pinch of salt
Instructions
Add all ingredients to a pot and bring to a low boil.
Reduce heat to low and let simmer until thick, stirring occasionally. This will take about 5-10 minutes.
Once it has reached your desired consistency, remove from heat and add any toppings of your choice.
I like doing a maple brown sugar style oatmeal, so I add a sprinkle of brown sugar, cinnamon, chopped nuts and banana.
Notes
You may also use all water or all almond milk as your liquid, just be sure to use a total of 2 cups of liquid. I like using half and half to give a creamy consistency, but either one works!
Once prepared, this oatmeal will keep in the fridge for about 3 days. To reheat, add to a pan with a splash of non-dairy milk and let warm over medium heat.
As written, this recipe isn’t super sweet, so feel free to adjust the sweetness as desired!
These Double Chocolate Banana Muffins are so easy to make, bursting with rich chocolate flavor and loaded with chocolate chips. They are soft and perfectly moist. You’ll forget you’re eating breakfast because these muffins taste like true dessert. Don’t be surprised when they disappear in seconds!
Ingredients
Scale
1 cup all-purpose flour
1/2 cup unsweetened cocoa powder
3/4 cup semisweet mini chocolate chips
2 large bananas – very ripe (about 1 cup mashed)
1/2 cup plain Greek yogurt or sour cream
1 teaspoon baking soda
1/2 teaspoon fine salt
1/4 cup grapeseed oil, (or vegetable oil)
1/2 cup granulated sugar
1 large egg
1 teaspoon vanilla extract
Instructions
Prep. Line a 12-count standard muffin pan with cupcake liners. Preheat the oven to a 350°F.
Wet ingredients. In a large bowl, mash 2 overripe bananas with a fork or potato masher until chunky applesauce consistency. Scrape mashed bananas to one side of the bowl.
On the other side of the same bowl add 1/2 cup plain Greek yogurt and 1 tsp baking soda. Stir yogurt and baking soda and give 1-2 mins to activate the soda.
To the bowl with wet ingredients add 1/2 tsp fine salt, 1/4 cup oil, 1/2 cup granulated sugar, 1 egg and 1 tsp vanilla extract. Whisk the wet ingredients until just combined.
Dry ingredients. In a medium bowl, sift, combine and whisk 1 cup all-purpose flour, 1/2 cup cocoa powder and 3/4 cup mini chocolate chips.
Combine dry and wet ingredients and stir with a spatula just until combined. Do not overmix to avoid dense muffins.
Bake. Spoon muffin batter equally into muffin pan, filling cups 3/4 to the top. Bake at 350°F for 18-20 minutes, or until toothpick inserted into the center, comes out clean. (some melted chocolate on toothpick is okay, but not batter).
Let baked muffins cool in muffin pan for few minutes and then transfer onto a cooling rack until slightly cooled before enjoying. Muffins taste their best the first 2 days. Store at room temperature (covered) for 3 days, or refrigerate for up to 1 week.
Notes
Notes Freezing Instructions: For longer storage, cool the muffins completely, then wrap each muffin tightly in a plastic wrap, one by one. Place in a freezer bag and remove as much air as possible. They freeze well for up to 3 months. Thaw overnight in the refrigerator or unwrap and place them on the kitchen counter. They need 1-2 hours to come to room temperature. Heat up (if desired) before enjoying. Measuring Flour: To measure flour, spoon flour into a measuring cup and scrape off the top with the back of a knife. Pushing your measuring cup into the flour bin, will result in up to 25% more compacted flour. Sift Dry Ingredients: Sifted dry ingredients provide fluffy texture of the baked goods. More Banana Flavor: The chocolate flavor overpowers the banana, so don’t expect tons of banana flavor. You can add additional banana for slightly more banana flavor, but the texture will be moister and expect to have more than 12 standard muffins. Keep in mind that bananas must be very ripe and resemble applesauce consistency once mashed. Sugar: 1/2 cup of sugar produces wonderfully sweet muffins. If you’re looking for something not quite as sweet, reduce sugar to 1/3 cup or even 1/4 cup. Remember, you still get sweetness from bananas and chocolate chips.
Blueberry Banana Bread
Looking for the ultimate bake? Our Vegan Blueberry Banana Bread nails it. It’s easy, perfect for those after a gluten-free treat, and crafted with healthier swaps like maple syrup and almond flour. Dive into its moist and tender goodness, packed with juicy blueberries. A deliciously thick slice of this bread is the perfect morning boost or afternoon snack! vegan snacks | vegan desserts | fall desserts | fall recipes | fall snacks | gluten-free snacks
Looking for the ultimate bake? Our Vegan Blueberry Banana Bread nails it. It’s easy-peasy, perfect for those after a gluten-free treat, and crafted with healthier swaps like maple syrup and almond flour. Dive into its moist and tender goodness, packed with juicy blueberries. A deliciously thick slice of this bread is the morning boost or afternoon pick-me-up you’ve been dreaming of. Make the smart choice; bake fresh, eat better!
Ingredients
Scale
2 overripe mashed bananas
1 cup plain and unsweetened almond or oat milk
¼ cup melted vegan butter
¾ cup maple syrup
1 teaspoon baking powder
1 teaspoon baking soda
1 teaspoon vanilla
1 ½ cup regular or gluten-free all purpose flour
1 cup almond flour or an additional ½ cup or regular or gluten-free all purpose flour
1 cup fresh blueberries (in season) if not in season, ok to use frozen blueberries
Instructions
Begin by preheating the oven to 375. Grease your bread loaf pan with non-stick baking spray or line it with parchment paper.
In a large bowl, mash your ripe bananas with a fork. Add the milk, maple syrup, butter, baking powder, baking soda, and vanilla. Mix with the fork or a whisk. Add the regular flour and the almond flour. Mix until a thick batter is formed. Fold in the blueberries.
Pour the blueberry banana bread batter into your greased pan and bake in the oven for 50 minutes or until the loaf has completely risen and is golden brown on the top. Check the center with a toothpick for doneness. If the blueberry banana bread is becoming too dark on top but is not completely cooked through the center yet, simply cover the top with foil and continue to bake until it's done.
Remove the loaf from the pan. While it cools, option to whip up with vegan cream cheese frosting by mixing the vegan cream cheese, butter, and powdered sugar together with a hand mixer. Drizzle the icing on top of the loaf and serve .
If you're not topping your blueberry banana bread with frosting, we recommend enjoying your warm slice with a pat of vegan butter.
Nutrition
Calories:163kcal
Sugar:16g
Protein:2g
SOUTHERN PEACH BREAD
Here’s an easy summer breakfast if you’re wondering what to do with fresh peaches! It’s also a great snack idea to enjoy midday. Moist and packed with flavor, this southern peach bread recipe will become your new favorite!
This Southern Peach Bread comes together using only ingredients you may already have on hand! Packed with flavor and no yeast required, this will be a new favorite!
Ingredients
Scale
1 cup peaches, peeled/diced
½ cup vegetable oil
½ cup sugar
2 eggs
½ cup sour cream
1 teaspoon vanilla extract
1 ½ cups flour
1 teaspoon baking soda
½ teaspoon salt
Instructions
Preheat oven to 350 degrees and spray 3 mini loaf pans *or 1 large loaf pan
In a medium bowl, combine the peaches, oil, sugar, eggs, sour cream, and vanilla extract.
Stir in the flour, baking soda, and salt.mixing until just combined.
Pour batter evenly into prepared pans.
Place pans in preheated oven and bake for 25-30 minutes if mini loaves, 50-55 minutes if large loaf.
Remove from oven and allow to cool slightly before slicing and enjoying!
Nutrition
Calories:304kcal
Sugar:15g
Protein:4g
3 Ingredient Banana Oatmeal Breakfast Cookies (no egg, no flour)
Don’t throw out those spotty bananas! Make these quick and easy 3 ingredient banana oatmeal breakfast cookies instead! This versatile recipe requires no egg, no flour, is gluten-free (if using gluten-free oats) and sugar-free. Easy, healthy banana and oatmeal cookies recipe with no flour that’s vegan, plant-based. Top with chocolate, raisins, nuts, berries and more!
Don’t throw out those spotty bananas! Make these quick and easy 3 ingredient banana oat breakfast cookies instead! This simple and versatile recipe requires no added sugar, no egg and no flour.
Ingredients
Scale
2 bananas ripe and spotty, mashed, about 200g
1 cup rolled oats old fashioned or quick cooking
1 teaspoon ground cinnamon
Instructions
Preheat oven to 350 F. Peel and mash bananas in a medium bowl with a potato masher or fork. Make sure they are well-mashed, with only small chunks remaining.
Stir in rolled oats and cinnamon. Set aside for a few minutes to allow the oats to soak up the moisture. If the batter is very wet/thin still, add 1-2 tablespoons of oats.
Line a baking tray with parchment paper or a silicone baking mat. (Cookies will stick if you skip this step).
Drop spoonfuls of batter onto baking tray and then shape with your fingers. Cookies do not spread out while baking, so shape them into the width and height you want them to be. This recipe will make about eight medium, 3-inch wide cookies.
Add optional toppings, if using.
Bake cookies for 17 minutes. *See notes for adjustments for smaller or larger cookies.
Remove from oven and allow to cool slightly before enjoying.
Notes
If making small 2-in wide cookies, reduce cooking time by 3-5 minutes. If making large 4-in wide cookies, increase cooking time by 2-3 minutes.
Spices & Flavoring: Instead of cinnamon, try using 1 teaspoon of vanilla extract instead. Or, ¼ teaspoon of cardamom + ¼ teaspoon of cinnamon. 1 teaspoon of pumpkin spice seasoning is another good option.
Toppings: dark chocolate chips or shavings, walnut halves, chopped walnuts, pecan halves, chopped pecans, sunflower seeds, smear of fruit preserves, jam or jelly, berries, raisins, dried cranberries, flaxseed, coconut or wheat germ.
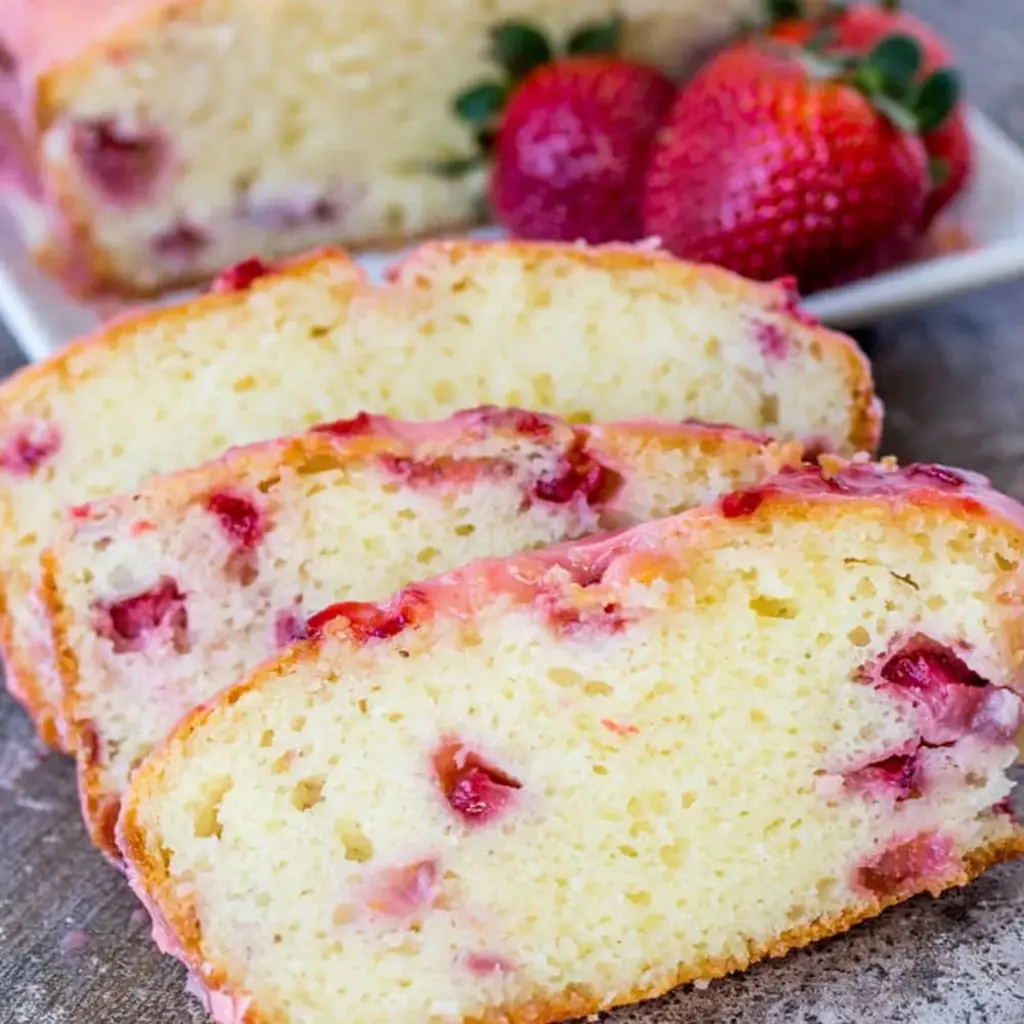
Deliciously moist and flavorful, this Strawberry Pound Cake is a one-bowl treat that has a fruity and sweet glaze and satisfies that sweet tooth! It’s a great spring and summer dessert!
Ingredients
Scale
1 1/2 cup all-purpose flour
2 teaspoons baking powder
1/2 teaspoon salt
1 cup plain greek yogurt
1 cup sugar
3 large eggs
1 1/2 teaspoon almond extract
1/2 cup vegetable oil
1 cup diced strawberries about 1 ¼ cup whole
Instructions
Preheat oven to 350 degrees F. Spray an 8 or 9-inch loaf pan with non-stick cooking spray, set aside.
In medium-sized bowl, stir together flour, baking powder and salt.
In a separate, large mixing bowl mix Greek yogurt, sugar, eggs, extract and oil. Slowly stir in the dry ingredients until just incorporated.
Fold in the strawberries and spoon batter into the prepared pan.
Bake for about 50 minutes or until center is set.
Remove from oven and let sit 10 minutes, then turn out onto cooling rack to cool completely.
While the bread is cooling, make the glaze.
In a medium-sized bowl combine smashed strawberries and powdered sugar.
Once cake is cooled pour the glaze over top, let set, cut and serve.
Nutrition
Calories:280kcal
Sugar:22g
Protein:6g
Hi I'm Emy
I’m passionate about sharing a diverse collection of sweet and savory recipes that I’ve meticulously tested and perfected in my own kitchen.