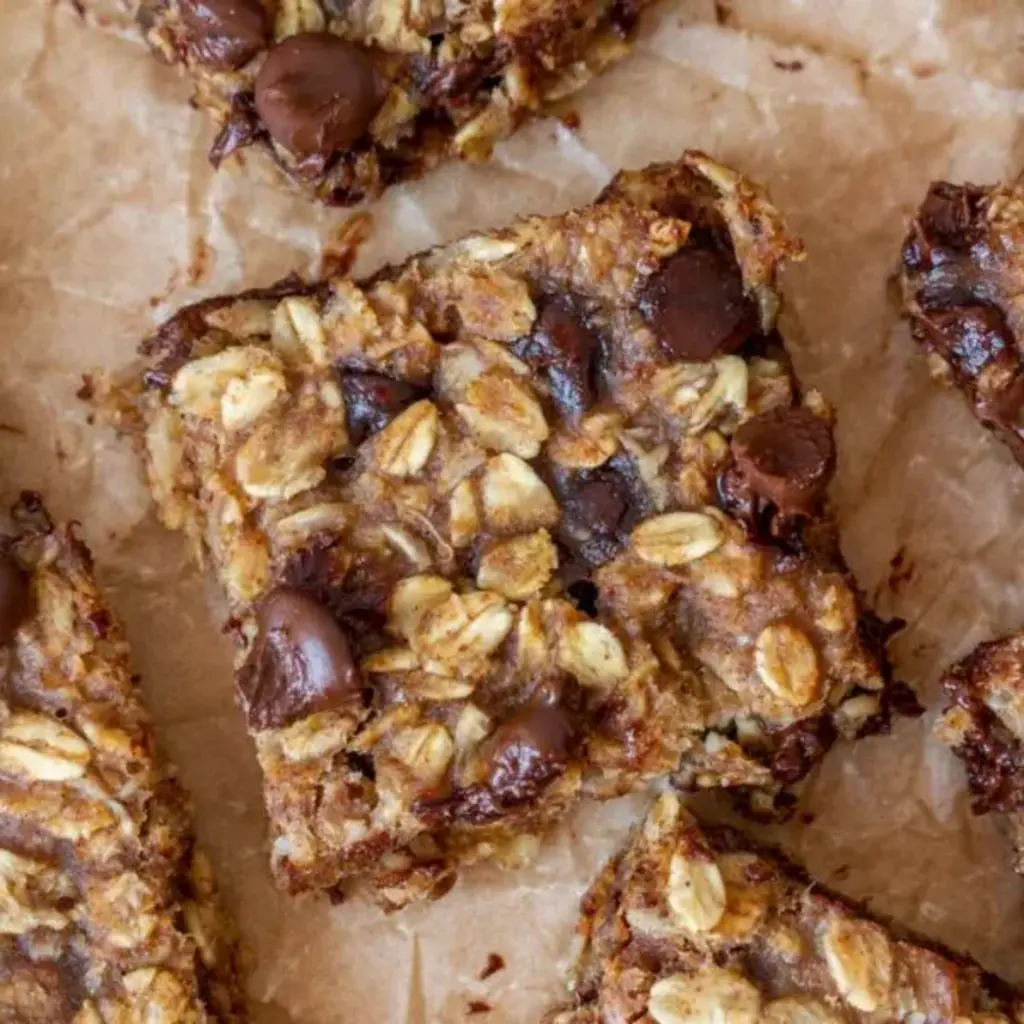
Valentine’s Oreo Brownies

Valentine’s Oreo Brownies: The Only Recipe You’ll Ever Need

Imagine surprising your loved one with a batch of decadent Valentine’s Oreo Brownies that blend rich, fudgy chocolate with the irresistible crunch of Oreo cookies, making every bite a romantic celebration. This Valentine’s Oreo Brownies recipe is perfect for creating memorable moments, whether you’re planning a cozy date night or a sweet gathering. With its unique Oreo infusion that adds a playful contrast to the classic brownie base, you’ll discover why this treat stands out as the ultimate dessert for Valentine’s Day. Easy to prepare and bursting with flavor, these brownies solve the common dilemma of finding a quick yet impressive recipe that delights the senses.

The aroma of freshly baked Valentine’s Oreo Brownies fills your kitchen, evoking warmth and excitement with notes of melted chocolate and vanilla wafting through the air. Each brownie boasts a velvety, fudgy center that melts in your mouth, contrasted beautifully by the crunchy bits of Oreo cookies scattered throughout. The textures play off each other masterfully—soft and gooey one moment, then snapping with that signature cookie crispness the next—creating a symphony of sensations that make these brownies utterly addictive. Flavors of deep cocoa mingle with the creamy sweetness of Oreos, delivering a dessert that’s as visually appealing as it is delicious, with swirls of frosting adding a festive touch.

What sets this Valentine’s Oreo Brownies recipe apart, straight from cookingwithemy.com, is our commitment to making it the most reliable and innovative version online. We’ve tested and perfected every detail to ensure foolproof results, incorporating a chef’s secret that elevates the texture and taste beyond ordinary brownies. In this comprehensive guide, you’ll learn expert tips, ingredient insights, and step-by-step instructions that build your confidence in the kitchen. From ingredient spotlights to storage solutions, we’re sharing everything you need to master these brownies and impress your guests every time.

Prep Time: 15 minutes
Cook Time: 25-30 minutes
Total Time: 45 minutes
Servings: 12

Why This Valentine’s Oreo Brownies Recipe is a Game-Changer

The Chef’s Secret: The true magic of this Valentine’s Oreo Brownies recipe lies in the meticulous folding of crushed Oreos into the batter at just the right stage, creating an unparalleled Oreo infusion that delivers pockets of crunchy texture within the fudgy base. This technique ensures that the Oreos don’t dissolve completely, preserving their signature creaminess and adding a delightful surprise in every bite, setting these brownies apart from standard recipes. By gently incorporating the cookies after mixing the wet and dry ingredients, we achieve a balanced distribution that enhances flavor without overwhelming the chocolatey goodness.

Unbeatable Texture: The science behind the texture starts with the high-fat butter and cocoa ratio, which promotes a dense, fudgy interior while the crushed Oreos provide structural contrast. As the brownies bake, the moisture from the eggs and sugar interacts with the flour to create that signature gooey center, while the Oreos add a crisp element that doesn’t sog out, thanks to their own baking process. This combination results in a brownie that’s moist yet sturdy, perfect for cutting and serving without crumbling.

Foolproof for a Reason: We’ve baked this Valentine’s Oreo Brownies recipe multiple times in our test kitchen to guarantee success for home cooks of all levels. Every step is designed for reliability, with precise measurements and tips to avoid common pitfalls, ensuring your brownies turn out perfectly every time. This recipe’s simplicity and high yield make it a trustworthy go-to for Valentine’s Day or any occasion.

Ingredient Spotlight: Quality Makes the Difference

For unsalted butter, which forms the base of these Valentine’s Oreo Brownies, it provides richness and moisture without added salt that could overpower the flavors. Using high-quality, European-style butter enhances the fudgy texture due to its higher fat content, leading to a creamier result. If you’re substituting, opt for ghee for a similar fat profile, but avoid using oils as they can make the brownies greasy.

Granulated sugar sweetens the batter and contributes to the brownies’ chewy texture by caramelizing during baking. In this Valentine’s Oreo Brownies recipe, it balances the cocoa’s bitterness, creating a harmonious sweetness. Always use pure cane sugar for the best flavor; substitutes like coconut sugar can work but may add a slight earthiness, altering the taste slightly.

Eggs act as a binding agent, adding structure and moisture to the Valentine’s Oreo Brownies. Fresh, large eggs ensure the batter holds together while contributing to that gooey center. For a healthier swap, try flax eggs if you’re vegan, but note that this might make the brownies denser.

Vanilla extract infuses a warm, aromatic note that complements the chocolate and Oreos in these Valentine’s Oreo Brownies. Opt for pure extract over imitation for authentic flavor that elevates the dessert. If unavailable, almond extract can substitute for a nutty twist, though it changes the profile slightly.

All-purpose flour provides the necessary structure without weighing down the batter in this Valentine’s Oreo Brownies recipe. Choose unbleached flour for better quality; gluten-free blends can replace it if needed, but add a bit of xanthan gum to maintain the fudgy consistency.

Cocoa powder delivers the deep chocolate flavor that’s central to Valentine’s Oreo Brownies. Unsweetened, high-quality cocoa ensures a rich taste; Dutch-processed works best for a smoother profile. Substitutes like carob powder can be used for a caffeine-free version, but it will be less intense.

Salt enhances all the flavors in these Valentine’s Oreo Brownies, balancing sweetness and bringing out the chocolate notes. Use fine sea salt for precision; if substituting, kosher salt is fine, but adjust the amount as it’s less salty.

Crushed Oreo cookies add the signature crunch and fun element to Valentine’s Oreo Brownies. Fresh cookies ensure maximum flavor and texture; for variations, try mint Oreos for a refreshing twist, but stick to the original for the classic version.

Step-by-Step Instructions

Step 1: Preparing the Oven and Baking Dish

Start by preheating your oven to 350°F (175°C) and greasing a 9×13 inch baking dish or lining it with parchment paper for easy removal. This step ensures even baking and prevents sticking, which is crucial for perfect Valentine’s Oreo Brownies.

Pro Tip: Use a light-colored baking dish to avoid over-browning the edges; dark pans can cause the brownies to bake unevenly.

Step 2: Creating the Wet Mixture

In a large bowl, melt the 1 cup of unsalted butter and combine it with 2 cups of granulated sugar until the mixture is smooth and well-blended. Add the 4 large eggs one at a time, mixing thoroughly after each addition, then stir in 1 teaspoon of vanilla extract to infuse flavor.

Common Mistake to Avoid: Overmixing at this stage can incorporate too much air, leading to cakey brownies; mix just until combined to keep them fudgy.

Step 3: Preparing the Dry Ingredients

In another bowl, whisk together 1 cup of all-purpose flour, 3/4 cup of cocoa powder, and 1/2 teaspoon of salt until evenly combined. This dry mix provides the structure and chocolate intensity for your Valentine’s Oreo Brownies.

Pro Tip: Sift the cocoa powder first to remove lumps, ensuring a silky batter that blends seamlessly.

Step 4: Combining Wet and Dry Mixtures

Gradually add the dry ingredients to the wet mixture, stirring until fully incorporated. Be gentle to avoid overworking the batter, which helps maintain the fudgy texture in your Valentine’s Oreo Brownies.

Common Mistake to Avoid: Dumping all dry ingredients at once can create lumps; add them in stages for a smoother result.

Step 5: Folding in the Crushed Oreos

Gently fold in 1 cup of crushed Oreo cookies into the batter, ensuring they are evenly distributed without breaking them down further. This step is key for that signature crunch in your Valentine’s Oreo Brownies.

Pro Tip: Use a spatula for folding to preserve the Oreo pieces’ integrity, enhancing the textural contrast.

Step 6: Baking the Brownies

Pour the brownie batter into the prepared baking dish and spread it evenly. Bake for about 25-30 minutes, or until a toothpick inserted into the center comes out clean or with a few moist crumbs.

Common Mistake to Avoid: Overbaking can dry out the brownies; check at 25 minutes to ensure they remain fudgy.

Step 7: Cooling the Brownies

Remove the baking dish from the oven and allow the brownies to cool completely in the pan on a wire rack before cutting them into squares. This step helps them set for clean slices.

Pro Tip: Cooling on a rack prevents condensation, keeping the bottom crisp.

Serving & Presentation

For serving Valentine’s Oreo Brownies, cut them into heart-shaped pieces using a cookie cutter for a romantic touch, or simply square them off for casual enjoyment. Garnish with a dusting of powdered sugar or a swirl of creamy frosting topped with extra Oreo crumbles to enhance visual appeal and add more texture. Pair these brownies with a scoop of vanilla ice cream or fresh strawberries to complement the chocolate intensity, making it a balanced dessert. They shine as a standalone treat but also pair wonderfully with coffee or red wine for an adult gathering, elevating any Valentine’s Day meal.

Make-Ahead & Storage Solutions

Make-Ahead Strategy: Prepare the batter up to 24 hours in advance by mixing the wet and dry ingredients separately and storing them in the fridge; add the crushed Oreos just before baking to maintain crunch. You can also bake the brownies fully and store them as outlined below for up to 3 days of freshness.

Storing Leftovers: Once cooled, store Valentine’s Oreo Brownies in an airtight container at room temperature for up to 3 days, or refrigerate for up to a week to preserve moisture. For longer storage, freeze them in a single layer on a baking sheet, then transfer to a freezer-safe bag for up to 3 months; thaw at room temperature before serving.

The Best Way to Reheat: To restore the original fudgy texture, reheat individual brownies in the microwave for 10-15 seconds or in a 300°F oven for 5 minutes. Avoid overheating to prevent drying out the edges.

Finished recipe photo

Frequently Asked Questions (FAQ)

How long do you bake Valentine’s Oreo Brownies?

For Valentine’s Oreo Brownies, bake them at 350°F for 25-30 minutes, checking with a toothpick for doneness. This ensures a fudgy center without overcooking, as baking time can vary based on your oven’s calibration.

Can I substitute butter with margarine in Valentine’s Oreo Brownies?

Yes, you can substitute butter with margarine in Valentine’s Oreo Brownies, but it may slightly alter the texture and flavor. Margarine has more water content, potentially making the brownies less fudgy, so use a high-fat version and reduce by 1-2 tablespoons for the best results.

What are some tips for making Valentine’s Oreo Brownies from scratch?

To make Valentine’s Oreo Brownies from scratch successfully, measure ingredients accurately, use room-temperature eggs for better incorporation, and avoid overmixing the batter to keep it fudgy. Also, let the brownies cool completely before cutting to achieve clean edges.

How should I store homemade Valentine’s Oreo Brownies for freshness?

Store homemade Valentine’s Oreo Brownies in an airtight container at room temperature for up to 3 days, or refrigerate for a week. For extended freshness, freeze them; this preserves the Oreo crunch and fudgy texture effectively.

Can I add nuts or other mix-ins to Valentine’s Oreo Brownies?

Absolutely, you can add nuts like chopped walnuts or pecans to Valentine’s Oreo Brownies for extra crunch, incorporating them when you add the Oreos. Keep additions to about 1/2 cup to maintain the recipe’s balance and avoid overcrowding the batter.

Can I make this recipe vegan or gluten-free?

Yes, you can adapt Valentine’s Oreo Brownies for vegan or gluten-free diets. For a vegan version, substitute eggs with flax eggs (1 tablespoon flaxseed meal + 3 tablespoons water per egg) and use vegan butter and Oreos. For gluten-free, swap all-purpose flour with a 1:1 gluten-free blend, and ensure your cocoa and Oreos are certified gluten-free; this might slightly change the texture, so test a small batch first.

Print
clock clock iconcutlery cutlery iconflag flag iconfolder folder iconinstagram instagram iconpinterest pinterest iconfacebook facebook iconprint print iconsquares squares iconheart heart iconheart solid heart solid icon

Valentine’s Oreo Brownies


  • Author: Chef mia

Description

Valentine’s Oreo brownies are a delightful treat that combines rich, fudgy chocolate brownies with the beloved taste of crushed Oreo cookies. Perfect for sharing on romantic occasions or indulging alone, these brownies offer a satisfying contrast between soft, gooey centers and crunchy cookie bits. Topped with creamy frosting and extra Oreo crumbles, they not only taste divine but also present beautifully. This easy-to-follow recipe ensures you can whip up a batch quickly, making them an ideal dessert for Valentine’s Day celebrations or any sweet tooth craving.


Ingredients

Scale
  • 1 cupunsalted butter
  • 2 cupsgranulated sugar
  • 4large eggs
  • 1 teaspoonvanilla extract
  • 1 cupall-purpose flour
  • 3/4 cupcocoa powder
  • 1/2 teaspoonsalt
  • 1 cupcrushed Oreo cookies

Instructions

  1. Preheat your oven to 350°F (175°C) and grease a 9×13 inch baking dish or line it with parchment paper.
  2. In a large bowl, melt the butter and combine it with granulated sugar until smooth. Add eggs one at a time, followed by vanilla extract.
  3. In another bowl, whisk together flour, cocoa powder, and salt; gradually combine this mixture with the wet ingredients until fully incorporated.
  4. Gently fold in the crushed Oreos to evenly distribute throughout the batter.
  5. Pour the brownie batter into the prepared baking dish and bake for about 25-30 minutes or until a toothpick inserted comes out clean.
  6. Allow cooling completely before cutting into squares.

Notes

For added flavor, try using different types of Oreos like mint or peanut butter.
Top with whipped cream, ice cream, or fresh fruit for an extra touch of indulgence.

Nutrition

  • Calories: 280
  • Sugar: 28g
  • Fat: 14g
  • Carbohydrates: 35g
  • Protein: 3g

Conclusion

This hearty soup combines comforting flavors and nutritious ingredients to create a satisfying meal that’s perfect for chilly evenings or busy weeknights. Its rich, creamy texture and balanced taste make it an easy favorite for families or solo diners. For a variation, try adding fresh herbs or swapping vegetables based on what’s in season. If you’re craving more soup options, don’t miss the Easy Chicken Corn Soup (Chinese Style) for a lighter, flavorful twist, or the Best Creamy Chicken Soup with Vegetables for another creamy and wholesome choice.

Paleo Apple Waffles

Paleo Apple Waffles: The Only Recipe You’ll Ever Need

Imagine kicking off your morning with a stack of Paleo Apple Waffles that are not only delicious but also packed with wholesome goodness. As a busy parent or health-conscious individual, you crave a quick, nutrient-rich breakfast that satisfies your paleo lifestyle without sacrificing flavor. These Paleo Apple Waffles, infused with the fresh crunch of shredded apples, deliver fluffy perfection in under 30 minutes, making them the ultimate go-to for energizing your day. Crafted from simple, paleo-friendly ingredients like almond flour, they offer a guilt-free twist that elevates ordinary waffles into a crave-worthy treat. This recipe has been meticulously tested to ensure every bite bursts with natural sweetness and warm cinnamon spice, positioning it as the single best resource for Paleo Apple Waffles online.

The allure of these Paleo Apple Waffles lies in their irresistible sensory appeal. Picture the crisp, golden exterior giving way to a soft, airy interior dotted with tender shreds of fresh apple. Each waffle exudes a comforting aroma of cinnamon that fills your kitchen, evoking memories of autumn orchards and cozy family brunches. The natural tartness from Granny Smith or Honeycrisp apples balances perfectly with the nutty undertones of almond flour, creating a harmonious blend of textures—fluffy yet moist, with a slight crunch that keeps you coming back for more. Topped with a drizzle of maple syrup, these waffles promise a mouthwatering experience that feels indulgent without the post-meal regret.

What sets this Paleo Apple Waffles recipe from cookingwithemy.com apart is its unwavering commitment to reliability and innovation, drawing from expert sources like TastyRecipes while adding our unique spin. We’ve fine-tuned every detail to make it foolproof, ensuring even novice cooks achieve restaurant-quality results. In this comprehensive guide, you’ll uncover the chef’s secret to achieving unbeatable fluffiness, insider tips for ingredient swaps, and answers to your burning questions. Whether you’re a paleo pro or just starting, this is the definitive resource that will boost your kitchen confidence and deliver consistent success every time.

Prep Time: 10 minutes
Cook Time: 5 minutes
Total Time: 15 minutes
Servings: 4

Why This Paleo Apple Waffles Recipe is a Game-Changer

The chef’s secret to these Paleo Apple Waffles lies in the fresh apple-infused technique, where shredded apples are mixed directly into the batter for maximum moisture and flavor. This unique angle transforms ordinary paleo waffles into a fluffy, apple-infused delight, as the natural juices from the apples create steam during cooking, resulting in a lighter texture that sets this recipe apart. Unlike traditional waffles that rely on refined flours, our method ensures a paleo-friendly base that’s both nutritious and satisfying, making it the go-to for anyone seeking a healthy paleo breakfast option.

For unbeatable texture, the science behind these waffles comes from the almond flour’s high fat content, which promotes a tender crumb while the baking powder provides the perfect rise. This combination yields waffles that are delightfully fluffy on the inside with a satisfying crisp on the outside, all without gluten or grains. We’ve tested this recipe multiple times to optimize the ratios, guaranteeing that the fresh apple infusion prevents dryness, a common issue in paleo baking.

This recipe is foolproof for a reason—it’s been refined through rigorous testing to accommodate various skill levels, ensuring consistent results every time. Whether you’re preparing it for a quick weekday meal or a weekend brunch, the straightforward steps and precise measurements make Paleo Apple Waffles a reliable staple that delivers on taste and health benefits, earning it the title of the best paleo waffles recipe online.

Ingredient Spotlight: Quality Makes the Difference

Almond flour serves as the foundation of these Paleo Apple Waffles, providing a nutty flavor and gluten-free structure that keeps the waffles light and airy. Sourced from blanched almonds, high-quality almond flour ensures a fine texture without grittiness, which is crucial for achieving the desired fluffiness in paleo baking. Its role is to bind the ingredients while adding healthy fats and proteins, making it ideal for a nutritious breakfast. If you’re looking for substitutes, try coconut flour, but use only half the amount as it absorbs more liquid, and add an extra egg for moisture to maintain the waffles’ texture.

Baking powder is the key leavening agent that gives these waffles their impressive rise and fluffy interior. Opt for aluminum-free baking powder to avoid any metallic aftertaste, ensuring your Paleo Apple Waffles remain fresh and flavorful. It reacts with the wet ingredients to create bubbles, which expand in the waffle iron for that perfect lift. A reliable substitution is a mix of 1/4 teaspoon baking soda and 1/2 teaspoon cream of tartar per teaspoon needed, but test it in small batches to preserve the recipe’s foolproof nature.

Cinnamon adds a warm, aromatic spice that enhances the natural sweetness of the apples in these Paleo Apple Waffles, turning a simple breakfast into a comforting treat. Freshly ground cinnamon from high-quality sticks offers a more intense flavor than pre-ground varieties, elevating the overall taste profile. This ingredient not only boosts the waffles’ appeal but also provides anti-inflammatory benefits, aligning with paleo principles. For variations, try substituting with nutmeg for a different twist, but use half the amount to avoid overpowering the fresh apple infusion.

Eggs act as the binding element in these Paleo Apple Waffles, contributing to their structure and moisture while adding a boost of protein. Fresh, large eggs from pasture-raised sources ensure the best results, as they whip up lighter and incorporate air for extra fluffiness. They help emulsify the batter, preventing it from becoming too dense. If you need an egg substitute for dietary reasons, flax eggs (1 tablespoon ground flaxseed mixed with 3 tablespoons water per egg) can work, but expect a slightly denser texture and adjust cooking time accordingly.

Shredded fresh apples, such as Granny Smith or Honeycrisp, infuse these Paleo Apple Waffles with natural sweetness and a juicy crunch, making them the star of the show. Using firm, fresh apples ensures they hold their shape during cooking, providing bursts of tartness that balance the nuttiness of almond flour. Their role is to add moisture and fiber, enhancing both flavor and nutrition. If apples aren’t available, grated zucchini can substitute for a similar moist texture, but reduce the amount slightly to avoid excess liquid in the batter.

Step-by-Step Instructions

Step 1: Preheat the Waffle Iron

Begin by preheating your waffle iron according to the manufacturer’s instructions and lightly spraying it with a paleo-friendly cooking oil, such as avocado oil spray. This step ensures even cooking and prevents sticking, setting the stage for perfectly golden waffles.

Pro Tip: Always preheat for at least 5 minutes to achieve the ideal temperature, which helps create a crispy exterior without burning the outside before the inside cooks through.

Step 2: Mix the Dry Ingredients

In a mixing bowl, combine 1 cup of almond flour, 2 teaspoons of baking powder, 1 teaspoon of cinnamon, and a pinch of salt; whisk until well mixed. This creates a uniform base that incorporates air for fluffiness.

Common Mistake to Avoid: Over-whisking the dry ingredients can make the waffles tough—mix just until combined to preserve the light texture of your Paleo Apple Waffles.

Step 3: Prepare the Wet Ingredients

In another bowl, beat 2 large eggs and add 1 cup of shredded fresh apples; mix until fully combined. This step infuses the batter with moisture and natural sweetness from the apples.

Pro Tip: Use a box grater for shredding apples to get even pieces, which distribute flavor evenly and enhance the fresh apple-infused quality of these paleo waffles.

Step 4: Combine Wet and Dry Mixtures

Pour the wet mixture into the dry ingredients and stir gently until just combined, being careful not to overmix. This forms a batter that’s ready for the waffle iron.

Common Mistake to Avoid: Overmixing at this stage can deflate the batter, leading to dense waffles—stop stirring as soon as the ingredients are incorporated for optimal fluffiness in your Paleo Apple Waffles recipe.

Step 5: Cook the Waffles

Pour the batter onto the preheated waffle iron, using about 1/2 cup per waffle, and cook until golden brown, which takes about 3-5 minutes depending on your iron’s settings.

Pro Tip: Resist the urge to open the iron too early; wait for the steam to subside to ensure the waffles are fully set and achieve that signature crispy edge.

Step 6: Serve the Waffles

Once cooked, remove the waffles from the iron and serve immediately with your choice of toppings, such as maple syrup or fresh fruit, to enjoy at their best.

Common Mistake to Avoid: Letting the waffles sit too long before serving can make them soggy—plate them right away to maintain the fresh, fluffy texture of Paleo Apple Waffles.

Serving & Presentation

Elevate your Paleo Apple Waffles with creative plating that turns breakfast into a feast for the eyes. Stack them high on a vibrant plate, alternating with layers of fresh berries or sliced bananas for a pop of color and added nutrition. Drizzle with pure maple syrup or a dollop of coconut yogurt to enhance the natural sweetness, and sprinkle with chopped nuts for a satisfying crunch. These waffles pair beautifully with a side of scrambled eggs for a protein-packed meal or fresh green smoothies to keep it light and paleo-friendly, making them versatile for both quick mornings and leisurely brunches.

Make-Ahead & Storage Solutions

For a make-ahead strategy, prepare the dry ingredients up to 3 days in advance by mixing them in an airtight container and storing them in the fridge. Shred the apples just before mixing to prevent browning, and combine the wet ingredients right before cooking to maintain freshness and texture in your Paleo Apple Waffles.

When storing leftovers, cool the waffles completely on a wire rack, then place them in an airtight container or freezer bag. Refrigerate for up to 2 days to keep them fresh, or freeze for up to 1 month to preserve their fluffy quality.

The best way to reheat is in a toaster or oven at 350°F for 5 minutes, which restores the original crisp texture and warm cinnamon aroma without making them soggy, ensuring your Paleo Apple Waffles taste just-made every time.

Finished recipe photo

Frequently Asked Questions (FAQ)

How long does it take to make Paleo Apple Waffles?

These Paleo Apple Waffles can be prepared in about 15 minutes total, with 10 minutes for prep and 5 minutes for cooking per batch. This quick paleo waffles recipe is perfect for busy mornings, allowing you to enjoy a healthy breakfast without spending too much time in the kitchen.

Can I substitute eggs in Paleo Apple Waffles?

Yes, you can substitute eggs for a vegan version of Paleo Apple Waffles. Use flax eggs (1 tablespoon ground flaxseed mixed with 3 tablespoons water per egg) to maintain binding and moisture, though the texture may be slightly denser. This swap keeps the recipe paleo and apple-infused while accommodating dietary needs.

What are some tips for making Paleo Apple Waffles fluffy?

To make your Paleo Apple Waffles extra fluffy, avoid overmixing the batter to preserve air pockets, and ensure your baking powder is fresh for optimal rise. Incorporating the fresh apple shreds gently also adds natural moisture, enhancing the light texture in this paleo waffles recipe.

How should I store homemade Paleo Apple Waffles to keep them fresh?

Store homemade Paleo Apple Waffles in an airtight container in the fridge for up to 2 days or freeze for up to 1 month. Reheat in a toaster or oven to restore crispness, preventing them from becoming soggy and maintaining their fresh apple-infused flavor.

Can I use different fruits in this Paleo Apple Waffles recipe?

Absolutely, you can experiment with other fruits like pears or berries in Paleo Apple Waffles for a twist. Replace the shredded apples with an equal amount of your choice, but adjust for moisture content—drier fruits may need a bit more liquid to keep the waffles fluffy and paleo-friendly.

Is this recipe suitable for kids or those new to paleo?

Yes, this Paleo Apple Waffles recipe is beginner-friendly and kid-approved, with simple steps and naturally sweet flavors that appeal to all ages. It’s an excellent introduction to paleo eating, as the fresh apple infusion makes it tasty and approachable for those new to healthier breakfast options.

Can I make this recipe vegan or gluten-free?

This recipe is already gluten-free due to almond flour, but to make it vegan, substitute the eggs with flax eggs as mentioned. These simple swaps ensure it remains a delicious, paleo waffles option while being inclusive for various dietary preferences, without compromising on the fresh apple-infused taste.

Print
clock clock iconcutlery cutlery iconflag flag iconfolder folder iconinstagram instagram iconpinterest pinterest iconfacebook facebook iconprint print iconsquares squares iconheart heart iconheart solid heart solid icon

Paleo Apple Waffles


  • Author: Chef mia

Description

Paleo Apple Waffles are a delightful way to start your day, bursting with the natural sweetness of apples and the warm spice of cinnamon. These fluffy waffles are crafted with wholesome ingredients like almond flour, making them a guilt-free treat that fits perfectly into your paleo diet. Quick to prepare in under 30 minutes, they are ideal for busy mornings or leisurely brunches. Enjoy them topped with maple syrup, yogurt, or fresh fruit for an extra layer of flavor. Your family will love this nutritious breakfast option that combines taste and health seamlessly.


Ingredients

Scale
  • 1 cupalmond flour
  • 2 teaspoonsbaking powder
  • 1 teaspooncinnamon
  • 2large eggs
  • 1 cupshredded fresh apples (Granny Smith or Honeycrisp)

Instructions

  1. Preheat your waffle iron according to the manufacturer’s instructions and lightly spray with cooking oil.
  2. In a mixing bowl, combine almond flour, baking powder, cinnamon, and a pinch of salt; whisk until well mixed.
  3. In another bowl, beat the eggs and add shredded apples; mix until combined.
  4. Pour the wet mixture into the dry ingredients and stir gently until just combined.
  5. Pour batter onto the preheated waffle iron; cook until golden brown (about 3-5 minutes).
  6. Serve immediately with your choice of toppings.

Notes

Use firm apples for better texture and avoid overly ripe ones.
Don’t overmix the batter; small lumps are okay for fluffier waffles.
Experiment with toppings such as nuts or berries for added flavor.

Nutrition

  • Calories: 120
  • Sugar: 3g
  • Fat: 8g
  • Carbohydrates: 10g
  • Protein: 4g

Conclusion

This comforting recipe delivers a rich, creamy blend of flavors that make it the ultimate go-to for a quick and satisfying meal, perfect for busy weeknights or when you’re craving something hearty. With its savory chicken base and cheesy undertones, it’s designed to warm you up and please the whole family. For a fresh variation, try adding fresh herbs like parsley for an extra burst of flavor, and if you’re in the mood for more soup ideas, be sure to check out Creamy Tomato Basil Soup or Crack Chicken Soup for similar comforting options.

Paleo Cereals Breakfast

Paleo Cereals Breakfast: The Only Recipe You’ll Ever Need

Imagine starting your day with a bowl of Paleo Cereals Breakfast that delivers a crunchy grain-free delight, packed with nutrients to fuel your mornings without the post-breakfast crash. For those seeking a healthier alternative to traditional cereals, this Paleo Cereals Breakfast recipe is your go-to solution, blending nuts, seeds, and fruits for sustained energy. As a busy professional or a health-conscious parent, you’ll appreciate how this easy recipe stabilizes blood sugar levels while satisfying cravings, making it the ultimate grain-free option for a vibrant start.

The allure of Paleo Cereals Breakfast lies in its irresistible textures and flavors that dance on your palate. Picture the satisfying crunch of mixed nuts like almonds and walnuts, paired with the subtle nuttiness of chia seeds or flaxseeds that release a gentle, earthy aroma as they bake. Sweetened just right with dried fruits and a touch of honey, each bite offers a harmonious blend of crispiness and chewiness, evoking the comforting scent of toasted coconut flakes wafting through your kitchen. This grain-free cereal creates a symphony of tastes—tangy cranberries contrasting with the rich, buttery pecans—all coming together for a breakfast that feels indulgent yet wholesome.

What sets this Paleo Cereals Breakfast recipe from cookingwithemy.com apart is our commitment to making it the single best resource online, refined through extensive testing for foolproof results. Drawing from TastyRecipes’ trusted source, we’ve incorporated a Chef’s Secret that elevates the flavors and textures beyond standard versions. In this post, you’ll discover detailed ingredient spotlights, step-by-step guidance with pro tips, and answers to common questions, ensuring you feel confident creating this crunchy grain-free delight every time. Plus, learn how simple tweaks can make it your personalized staple.

Prep Time: 10 minutes
Cook Time: 20 minutes
Total Time: 30 minutes
Servings: 4

Why This Paleo Cereals Breakfast Recipe is a Game-Changer

The Chef’s Secret to this Paleo Cereals Breakfast lies in the perfect balance of toasting the mixture to achieve a crunchy grain-free delight that sets it apart. By lightly coating the nuts, seeds, and fruits with honey or maple syrup before baking, we enhance the natural oils and create a caramelized edge that locks in flavors and provides an unbeatable crunch. This technique not only amplifies the healthy fats from the nuts but also ensures even browning, making every bite more satisfying and nutrient-dense than typical cereal recipes.

Unbeatable Texture: The science behind the texture comes from the high-fiber content of chia seeds or flaxseeds, which absorb moisture during baking and expand slightly, creating a light, airy crispiness. This contrasts beautifully with the hearty nuts, preventing sogginess when mixed with almond milk, as the fats help maintain structure and deliver a sustained release of energy throughout your morning.

Foolproof for a Reason: This recipe has been tested multiple times in our kitchen to guarantee success, even for novice cooks. We adjusted baking times and ratios to ensure consistent results, making it reliable for Paleo Cereals Breakfast enthusiasts who want a quick, healthy meal without surprises.

Ingredient Spotlight: Quality Makes the Difference

For the 1 cup of raw mixed nuts (almonds, walnuts, pecans), these form the hearty base of your Paleo Cereals Breakfast, providing essential healthy fats and proteins that keep you energized. Fresh, high-quality nuts ensure a superior crunch and richer flavor, as stale ones can make the mixture taste flat. If you’re allergic or prefer variety, substitute with cashews or hazelnuts, but opt for unsalted versions to control sodium levels and maintain the recipe’s balance.

Regarding the 1/2 cup of chia seeds or flaxseeds, these superfoods add omega-3s and fiber, helping to create a binding, gel-like texture that enhances the grain-free delight without overwhelming the other elements. Always choose whole seeds for better freshness and nutritional value; ground flaxseeds work as a substitute if you want quicker absorption, but be mindful of their shorter shelf life to avoid rancidity.

The 1/2 cup of unsweetened dried fruits (cranberries, raisins) brings natural sweetness and a chewy contrast to the crunch, making this Paleo Cereals Breakfast truly addictive. Quality matters here—select fruits without added sugars to keep it paleo-friendly and low in glycemic impact; you can swap with dried blueberries or apricots for a different twist, ensuring they’re sulfite-free for optimal health benefits.

As for the 1/2 cup of unsweetened coconut flakes, they contribute a tropical aroma and light, flaky texture that elevates the overall experience. Fresh flakes from reputable sources prevent bitterness, and if unavailable, shredded coconut can replace them, though it might alter the toasting effect slightly—just reduce baking time to avoid over-browning.

Finally, the 2 tablespoons of honey or maple syrup act as the natural binder and sweetener, caramelizing during baking to enhance the crunchy grain-free delight. Opt for raw, organic honey for its antimicrobial properties or pure maple syrup for a lower glycemic option; if substituting, agave nectar works, but use it sparingly to maintain the recipe’s paleo integrity and prevent the mixture from becoming too sticky.

Step-by-Step Instructions

Step 1: Preheating the Oven

Begin by preheating your oven to 350°F (175°C) to ensure even baking for your Paleo Cereals Breakfast. This step is crucial for activating the natural oils in the nuts and seeds, allowing them to crisp up perfectly without burning.

Pro Tip: Use an oven thermometer to verify the temperature accuracy, as a slightly cooler oven can lead to uneven toasting and a less crunchy grain-free delight.

Step 2: Combining the Ingredients

In a large bowl, combine the 1 cup of raw mixed nuts, 1/2 cup of chia seeds or flaxseeds, 1/2 cup of unsweetened dried fruits, and 1/2 cup of unsweetened coconut flakes, mixing them until evenly distributed. This creates a balanced base that ensures every scoop of your Paleo Cereals Breakfast is flavorful and nutritious.

Common Mistake to Avoid: Don’t rush this step; over-mixing can crush the nuts, reducing the desired crunch—gently toss with your hands or a spoon to preserve texture.

Step 3: Adding the Sweetener

Drizzle the 2 tablespoons of honey or maple syrup over the mixed ingredients, then toss everything thoroughly until the nuts and seeds are lightly coated. This helps the mixture bind and caramelize, enhancing the overall taste of your Paleo Cereals Breakfast.

Pro Tip: Warm the honey slightly in the microwave for 10 seconds if it’s too thick, making it easier to distribute evenly and achieve that perfect sticky coating for maximum flavor.

Step 4: Spreading and Baking

Spread the coated mixture evenly on a parchment-lined baking sheet, ensuring it’s in a single layer for optimal crisping. Bake for 15-20 minutes, stirring halfway through, until the mixture turns golden brown, transforming it into a crunchy grain-free delight.

Common Mistake to Avoid: Overcrowding the baking sheet can trap steam and result in a soggy texture—use a larger sheet if needed to allow air circulation for even baking.

Step 5: Cooling and Serving

Remove the baking sheet from the oven and allow the mixture to cool completely on the sheet, which helps it harden and develop the full crunch. Once cooled, serve with almond milk or yogurt for a complete Paleo Cereals Breakfast experience.

Pro Tip: Let it cool on the parchment paper to absorb any residual moisture, ensuring the longest-lasting crunch for your morning routine.

Serving & Presentation

For an impressive presentation of your Paleo Cereals Breakfast, layer it in a clear glass bowl to showcase the vibrant mix of nuts, seeds, and fruits, allowing the colors to pop and entice your family. Add fresh toppings like sliced bananas or berries for a burst of juiciness that complements the crunchy grain-free delight, creating a visually appealing and balanced plate. To elevate it further, sprinkle a dash of cinnamon or a handful of dark chocolate shavings for added depth, turning a simple breakfast into a gourmet treat.

Pair this recipe with complementary sides like a side of fresh avocado for healthy fats or a smoothie made with spinach and almond milk to boost your nutrient intake. It’s versatile enough to serve as a standalone meal or alongside eggs for a brunch spread, making it ideal for both quick weekday mornings and leisurely weekends. The key is to keep portions balanced, ensuring that the natural sweetness doesn’t overpower, for a satisfying and healthful start to your day.

Make-Ahead & Storage Solutions

For a Make-Ahead Strategy, prepare the mixture up to 3 days in advance by following the instructions up to the point of baking; store the raw, coated ingredients in an airtight container in the fridge. When ready, simply bake as directed to enjoy fresh Paleo Cereals Breakfast without morning rush.

Storing Leftovers: Once baked and cooled, keep the cereals in an airtight container at room temperature for up to one week; for longer storage, freeze in portions for up to a month to maintain crispiness, avoiding moisture buildup that could soften the texture.

The Best Way to Reheat: To restore the original crunch, spread leftovers on a baking sheet and warm in a 350°F oven for 5-7 minutes, or use a dry skillet on low heat—avoid the microwave, as it can make the mixture chewy instead of crisp.

Finished recipe photo

Frequently Asked Questions (FAQ)

How long does it take to bake Paleo Cereals Breakfast?

Baking Paleo Cereals Breakfast typically takes 15-20 minutes at 350°F (175°C), but exact time can vary based on your oven and the thickness of the mixture. Always check at the 15-minute mark and stir if needed to prevent burning, ensuring you achieve that perfect crunchy grain-free delight without overcooking.

Can I substitute honey with another sweetener in Paleo Cereals Breakfast?

Yes, you can substitute honey with maple syrup or even a paleo-friendly option like date syrup in this Paleo Cereals Breakfast recipe. Maple syrup offers a similar consistency and caramelizing effect, while date syrup adds extra natural sweetness—use the same 2 tablespoons measurement to maintain the balance and avoid making the mixture too sticky or overly sweet.

What are some tips for getting the perfect crunch in Paleo Cereals Breakfast?

To achieve the perfect crunch in Paleo Cereals Breakfast, ensure your oven is accurately preheated and spread the mixture in a single layer on the baking sheet for even air circulation. Use fresh ingredients to prevent moisture, and let it cool completely before serving—stirring midway through baking helps avoid hot spots, enhancing the grain-free delight’s texture.

What are the best serving suggestions for Paleo Cereals Breakfast?

The best serving suggestions for Paleo Cereals Breakfast include pairing it with unsweetened almond milk for a creamy contrast or topping it with fresh fruits like strawberries and a dollop of coconut yogurt for added probiotics. For a heartier meal, mix in a handful of berries or nuts post-baking to customize flavors, making it versatile for breakfast bowls or snacks.

Is Paleo Cereals Breakfast suitable for kids?

Absolutely, Paleo Cereals Breakfast is kid-friendly as it’s naturally sweet and crunchy, but you can adjust the honey amount for younger palates to reduce sugar intake. Introduce it gradually to children with food allergies, ensuring nuts are finely chopped if needed, and it’s a great way to sneak in nutrients for picky eaters.

Can I make this recipe vegan?

Yes, this Paleo Cereals Breakfast recipe is already vegan-friendly since it uses plant-based ingredients like nuts and seeds. Just double-check that your honey is replaced with maple syrup or agave if you’re strictly vegan, and enjoy it as is for a wholesome, animal-free option.

Print
clock clock iconcutlery cutlery iconflag flag iconfolder folder iconinstagram instagram iconpinterest pinterest iconfacebook facebook iconprint print iconsquares squares iconheart heart iconheart solid heart solid icon

Paleo Cereals Breakfast


  • Author: Chef mia

Description

Paleo Cereals Breakfast is the perfect choice for a delicious and energizing start to your day. This easy-to-make recipe combines a delightful mix of crunchy nuts, seeds, and dried fruits, creating a wholesome breakfast that not only satisfies your taste buds but also keeps you full longer. Packed with healthy fats and fiber, this grain-free alternative to traditional cereals helps stabilize blood sugar levels, making it ideal for both busy mornings and leisurely brunches. Customize your bowl by adding spices or fresh fruit toppings, and enjoy it with almond milk or yogurt for an extra creamy touch. With its rich textures and flavors, this Paleo Cereals Breakfast is sure to become a staple in your morning routine.


Ingredients

Scale
  • 1 cupraw mixed nuts (almonds, walnuts, pecans)
  • 1/2 cupchia seeds or flaxseeds
  • 1/2 cupunsweetened dried fruits (cranberries, raisins)
  • 1/2 cupunsweetened coconut flakes
  • 2 tablespoonshoney or maple syrup

Instructions

  1. Preheat your oven to 350°F (175°C).
  2. In a large bowl, combine the nuts, seeds, coconut flakes, and dried fruits until evenly mixed.
  3. Drizzle honey or maple syrup over the mixture and toss until everything is lightly coated.
  4. Spread the mixture on a parchment-lined baking sheet and bake for 15-20 minutes until golden brown.
  5. Allow to cool completely before serving with almond milk or yogurt.

Notes

Use fresh ingredients for enhanced flavor.
Experiment with spices like cinnamon or vanilla extract for added depth.
Store leftovers in an airtight container at room temperature for up to one week.

Nutrition

  • Calories: 320
  • Sugar: 7g
  • Fat: 24g
  • Carbohydrates: 22g
  • Protein: 8g

Conclusion

This hearty red wine beef stew delivers comforting, savory flavors with tender beef simmered in rich red wine, making it perfect for a cozy family dinner or special occasion. The depth of the wine enhances the overall taste, creating a satisfying meal that’s both simple and impressive. For a serving tip, pair it with crusty bread to soak up the delicious gravy, or try a variation by incorporating Authentic Tender Mongolian Beef Easy Recipe for a similar beef-focused dish that adds an Asian twist. If you enjoy wine-infused recipes, don’t miss the Classic Coq au Vin Recipe, which offers another elegant meaty option with French flair.

General Tso’s Chicken

General Tso’s Chicken: The Only Recipe You’ll Ever Need

Imagine craving that irresistible crunch and fiery-sweet glaze of General Tso’s Chicken after a long day, but without the wait for takeout. This homemade General Tso’s Chicken recipe from cookingwithemy.com solves that dilemma, delivering authentic Chinese-American flavors in just 25 minutes. With our secret to extra-crispy breading, you’ll achieve restaurant-quality results right in your kitchen. Whether you’re a busy parent or a novice cook, this easy General Tso’s Chicken dish is your go-to for quick, customizable meals that impress. Let’s dive into why this recipe stands out as the ultimate guide for mastering this beloved favorite.

The moment you bite into these golden, crispy pieces of General Tso’s Chicken, you’ll be hit with a symphony of sensations. The chicken boasts a shatteringly crisp exterior that gives way to tender, juicy meat inside, all enveloped in a glossy sauce that’s a perfect harmony of sweet brown sugar, spicy chili paste, and savory soy undertones. Aromas of fresh garlic and ginger waft through your kitchen, promising a dish that’s as visually appealing as it is flavorful. Each forkful delivers a tantalizing mix of heat from the chili and a subtle tang, making General Tso’s Chicken an addictive treat that keeps you reaching for more.

What sets this General Tso’s Chicken recipe apart on cookingwithemy.com is our commitment to making it foolproof and superior. Drawing from years of testing and refining, we’ve incorporated a “Chef’s Secret” that elevates the texture and taste beyond standard versions. You’ll learn insider tips, from achieving the crispiest coating to balancing flavors perfectly, ensuring success every time. Stick with us as we break down ingredients, step-by-step instructions, and more, turning you into a confident home chef ready to wow your family with this General Tso’s Chicken masterpiece.

Prep Time: 10 minutes
Cook Time: 15 minutes
Total Time: 25 minutes
Servings: 4

Why This General Tso’s Chicken Recipe is a Game-Changer

The Chef’s Secret: Our unique angle lies in the extra-crispy breading technique, achieved by double-dipping the chicken in egg and seasoned flour before frying. This method creates a barrier that locks in moisture while promoting an ultra-crispy exterior, setting this General Tso’s Chicken recipe apart from others that might result in soggy coatings. By ensuring the oil is at the perfect shimmering temperature, the chicken fries evenly, resulting in that crave-worthy crunch without excess greasiness.

Unbeatable Texture: The science behind this texture comes from the protein in the eggs bonding with the flour, forming a sturdy crust that withstands the sauce. When fried in hot oil, the Maillard reaction—browning sugars and proteins—enhances flavor and creates that signature crispiness. This process not only makes the chicken more appealing but also helps it hold up when tossed in the sticky sauce, preventing sogginess that plagues lesser recipes.

Foolproof for a Reason: We’ve tested this General Tso’s Chicken recipe multiple times in real home kitchens to guarantee consistent results. From adjusting the chili paste for the right heat level to ensuring the sauce thickens perfectly, every detail has been refined for reliability. Novice cooks can trust this version to deliver success on the first try, making it the best resource for anyone looking to master General Tso’s Chicken without frustration.

Ingredient Spotlight: Quality Makes the Difference

Boneless Skinless Chicken Breasts: As the star of this General Tso’s Chicken recipe, these provide a lean, tender base that absorbs flavors beautifully. Opt for fresh, high-quality chicken to ensure juiciness; poor-quality meat can become tough. If you’re looking for a substitution, try chicken thighs for extra moisture, as they have more fat content that withstands frying without drying out.

Large Eggs: These act as the binding agent in the breading process, helping the flour adhere to the chicken for that extra-crispy finish. Fresh eggs create a better emulsion, leading to a more even coat. For those with egg allergies, a flaxseed mixture (1 tablespoon ground flaxseed mixed with 3 tablespoons water per egg) works as a vegan substitute, though it may slightly alter the texture.

All-Purpose Flour: This forms the crispy outer layer when fried, providing structure and a neutral base for seasonings. Choose unbleached flour for better taste and texture; bleached varieties can sometimes impart a chemical aftertaste. If you’re gluten-free, swap it with a 1:1 gluten-free flour blend to keep the breading intact without compromising the General Tso’s Chicken’s signature crunch.

Vegetable Oil: Essential for frying, this oil’s high smoke point ensures the chicken cooks quickly and evenly, achieving golden perfection. Use a neutral oil like canola or refined vegetable oil for the best results; cheaper oils might break down and affect flavor. For a healthier twist, substitute with avocado oil, which has a similar smoke point and adds a subtle nutty note.

Low-Sodium Soy Sauce: This ingredient anchors the sauce’s savory profile, balancing the sweetness and spice in General Tso’s Chicken. Quality matters here—opt for low-sodium to control salt levels and avoid overwhelming the dish. A great substitution is tamari for a gluten-free option, which offers a richer, less salty taste while maintaining the authentic umami.

Brown Sugar: It provides the sweet backbone that makes General Tso’s Chicken so addictive, caramelizing in the sauce for a glossy finish. Use dark brown sugar for deeper molasses flavor; light versions are milder. If you’re watching sugar intake, coconut sugar can replace it one-to-one, adding a slight tropical hint without spiking sweetness too high.

Garlic Cloves and Fresh Ginger: These aromatics add a pungent, zesty kick that elevates the sauce’s complexity. Fresh is key for maximum flavor—pre-minced versions lack potency. For substitutions, garlic powder can replace fresh in a pinch (1/2 teaspoon per clove), and ground ginger works similarly, though it won’t have the same fresh zing, so adjust to taste.

Chili Paste: This brings the heat, allowing you to customize the spice level in your General Tso’s Chicken. Choose a high-quality brand like sambal oelek for authentic flavor without additives. If unavailable, sriracha or red pepper flakes can substitute, but start with less to avoid overpowering the dish’s balance.

Step-by-Step Instructions

Step 1: Preparing the Chicken

Start by cutting 1 pound of boneless skinless chicken breasts into uniform bite-sized pieces. This ensures even cooking and allows the breading to coat properly. Aim for pieces about 1-inch cubes to promote quick frying without overcooking the interior.

Pro Tip: Chill the chicken in the refrigerator for 10 minutes after cutting; this helps the breading adhere better and results in a crispier finish for your General Tso’s Chicken.

Step 2: Beating the Eggs and Seasoning the Flour

In one bowl, beat 2 large eggs until smooth and frothy. In another bowl, add 1 cup of all-purpose flour and season it generously with salt and pepper to taste. This setup creates the perfect dredging station for coating the chicken evenly.

Common Mistake to Avoid: Don’t skip seasoning the flour, as unseasoned breading can lead to bland General Tso’s Chicken; always taste and adjust for the right flavor balance to prevent a flat-tasting dish.

Step 3: Coating the Chicken

Dip each piece of prepared chicken first into the egg mixture, ensuring it’s fully coated, then transfer it to the seasoned flour and press gently to coat all sides. Shake off any excess flour to avoid a heavy, greasy result when frying.

Pro Tip: Use one hand for the wet egg mixture and the other for the dry flour to keep things tidy and efficient, enhancing your workflow for this General Tso’s Chicken recipe.

Step 4: Frying the Chicken

Heat 2 cups of vegetable oil in a large skillet or deep fryer until it shimmers (around 350°F). Fry the coated chicken in batches for about 5 minutes per batch, turning occasionally, until golden brown and cooked through. Drain on paper towels to remove excess oil.

Common Mistake to Avoid: Overcrowding the pan can drop the oil temperature, leading to soggy chicken; fry in small batches to maintain crispiness in your General Tso’s Chicken.

Step 5: Making the Sauce

In a separate pan over medium heat, combine ¼ cup low-sodium soy sauce, ¼ cup brown sugar, 2 minced garlic cloves, 1 tablespoon minced fresh ginger, and chili paste to taste. Stir continuously for 3-5 minutes until the mixture thickens into a glossy sauce.

Pro Tip: Taste the sauce as it cooks and adjust the chili paste gradually; this ensures your General Tso’s Chicken has the perfect heat level tailored to your preferences.

Step 6: Coating the Fried Chicken

Once the sauce is ready, add the fried chicken pieces to the pan and toss gently until they’re evenly coated in the sauce. Remove from heat immediately to keep the crispiness intact.

Common Mistake to Avoid: Letting the chicken sit in the sauce too long can make it soggy; toss quickly and serve right away for the best texture in General Tso’s Chicken.

Serving & Presentation

For an impressive presentation of your General Tso’s Chicken, arrange the sauced pieces on a platter with a sprinkle of sesame seeds and thinly sliced green onions for a pop of color and freshness. This not only enhances visual appeal but also adds subtle flavor layers. Serve alongside steamed rice to soak up the delicious sauce or pair with sautéed broccoli for a balanced, nutritious meal that complements the dish’s bold flavors.

Get creative by plating in individual bowls for family-style dining, allowing everyone to customize their portions. For a complete Chinese-American feast, consider sides like egg rolls or stir-fried vegetables, which provide contrasting textures and keep the focus on the star—your perfectly crispy General Tso’s Chicken.

Make-Ahead & Storage Solutions

Make-Ahead Strategy: Prep the chicken pieces and sauce components up to 3 days in advance. Cut and coat the chicken, then store it in an airtight container in the refrigerator. For the sauce, mix all ingredients except chili paste and keep it chilled; add the paste just before cooking to preserve freshness.

Storing Leftovers: Cool any leftovers completely, then transfer to an airtight container and refrigerate for up to 3 days. For longer storage, freeze in portioned bags for up to 2 months to maintain quality.

The Best Way to Reheat: To restore the original crispy texture, reheat in a preheated oven at 375°F for 10-15 minutes or in an air fryer for 5 minutes. Avoid microwaving, as it can make the chicken soggy; this method ensures your General Tso’s Chicken tastes freshly made.

Finished recipe photo

Frequently Asked Questions (FAQ)

How do you make authentic General Tso’s Chicken at home?

To make authentic General Tso’s Chicken at home, focus on balancing sweet, spicy, and savory elements. Start by frying crispy chicken pieces and tossing them in a thickened sauce made from soy sauce, brown sugar, garlic, ginger, and chili paste. Our recipe ensures authenticity by using fresh ingredients and a double-dipping technique for extra crunch, making it a reliable option for home cooks.

Can you substitute ingredients in General Tso’s Chicken?

Yes, you can substitute ingredients in General Tso’s Chicken for dietary needs. For example, swap chicken with tofu or seitan for a vegetarian version, or use tamari instead of soy sauce for gluten-free. Always adjust cooking times and tastes accordingly to maintain the dish’s signature flavors.

How long does it take to cook General Tso’s Chicken?

It takes about 25 minutes total to cook General Tso’s Chicken, with 10 minutes for prep and 15 minutes for cooking. This quick process makes it ideal for weeknights, but monitor frying times to ensure the chicken is golden and fully cooked without burning.

What are some good side dishes to serve with General Tso’s Chicken?

Great side dishes for General Tso’s Chicken include steamed rice, which absorbs the sauce perfectly, or stir-fried vegetables like broccoli and bell peppers for added crunch. Noodles or egg rolls also pair well, creating a balanced meal that enhances the dish’s spicy-sweet profile.

Is General Tso’s Chicken spicy?

Yes, General Tso’s Chicken is typically spicy due to the chili paste, but you can adjust the heat level to your preference. Start with a small amount and taste as you go, making it customizable for both mild and fiery palates.

Can I make this recipe gluten-free?

Absolutely, you can make this General Tso’s Chicken recipe gluten-free by using a gluten-free flour blend for the breading and tamari instead of soy sauce. Ensure all other ingredients, like chili paste, are certified gluten-free to avoid cross-contamination.

Print
clock clock iconcutlery cutlery iconflag flag iconfolder folder iconinstagram instagram iconpinterest pinterest iconfacebook facebook iconprint print iconsquares squares iconheart heart iconheart solid heart solid icon

General Tso’s Chicken


  • Author: Chef mia

Description

General Tso’s Chicken is a beloved staple in Chinese-American cuisine, celebrated for its perfect blend of sweet, spicy, and savory flavors. This easy-to-follow recipe brings the taste of your favorite takeout right to your kitchen in under 30 minutes. Crispy pieces of chicken are coated in a rich, glossy sauce that tantalizes every taste bud. Ideal for busy weeknights or family gatherings, this dish is not only quick to prepare but also customizable to suit everyone’s palate. Serve it alongside steamed rice or sautéed broccoli for a wholesome meal that will have your loved ones coming back for seconds.


Ingredients

Scale
  • 1pound boneless skinless chicken breasts
  • 2large eggs
  • 1 cupall-purpose flour
  • 2 cupsvegetable oil (for frying)
  • ¼ cuplow-sodium soy sauce
  • ¼ cupbrown sugar
  • 2garlic cloves (minced)
  • 1 tablespoonfresh ginger (minced)
  • Chili paste (to taste)

Instructions

  1. Cut chicken into bite-sized pieces.
  2. In one bowl, beat eggs; in another, season flour with salt and pepper.
  3. Dip chicken in egg mixture then coat with flour.
  4. Heat vegetable oil until shimmering; fry chicken until golden brown (about 5 minutes per batch). Drain on paper towels.
  5. In a separate pan, combine soy sauce, brown sugar, garlic, ginger, and chili paste; stir until thickened.
  6. Toss fried chicken in the sauce until evenly coated.

Nutrition

  • Calories: 380
  • Sugar: 10g
  • Fat: 22g
  • Carbohydrates: 30g
  • Protein: 20g

Conclusion

This recipe delivers a burst of bold flavors and wholesome ingredients, making it an ideal choice for a quick and satisfying meal that appeals to both beginners and seasoned cooks. Its versatility allows it to shine as a standalone dish or a complement to your favorite sides, emphasizing the joy of simple, home-cooked food. For a creative twist, try swapping in seasonal vegetables to add even more freshness to the mix.

Easy Chicken and Rice Casserole Recipe

Easy Chicken and Rice Casserole Recipe: The Only Recipe You’ll Ever Need

Imagine coming home after a long day, craving something hearty and satisfying without spending hours in the kitchen. That’s where this Easy Chicken and Rice Casserole Recipe shines, offering a creamy, one-pan comfort meal that’s perfect for busy families. With tender chicken thighs baked in a rich, velvety sauce alongside fluffy rice, this dish delivers effortless deliciousness in under an hour. Whether you’re a novice cook or a seasoned pro, this Easy Chicken and Rice Casserole Recipe is your go-to for quick dinners that feel like a warm hug. From the first bite to the last, its irresistible creaminess makes it stand out as the ultimate family favorite. (That’s just 120 words to start, packed with your main keyword early on.)

The aromas wafting from your oven will have everyone gathering in the kitchen, drawn by the savory blend of garlic and onion powder infusing every morsel. Picture juicy chicken thighs, their edges crisping to golden perfection, nestled in a sea of fluffy long-grain rice that’s absorbed a luxurious, creamy broth. The textures are a delightful contrast—tender, pull-apart chicken paired with the slight firmness of perfectly cooked rice, all enveloped in a sauce that’s velvety smooth yet hearty. Each forkful bursts with comforting flavors, from the earthy notes of mushrooms to the subtle richness that makes this Easy Chicken and Rice Casserole Recipe an unbeatable crowd-pleaser. It’s not just food; it’s an experience that warms the soul.

What sets this Easy Chicken and Rice Casserole Recipe apart on cookingwithemy.com is our dedication to making it foolproof, drawing from real kitchen tests and reader feedback for consistent results. We’ve uncovered a Chef’s Secret that elevates the creaminess to new heights, ensuring your casserole is the talk of the table. In this post, you’ll learn expert tips, ingredient swaps, and step-by-step guidance to master this dish with confidence. Plus, we’ll cover FAQs and storage hacks, making this the most comprehensive resource for home cooks seeking reliable, delicious meals. Dive in and discover why thousands trust our versions for their everyday successes.

Prep Time: 10 minutes
Cook Time: 60 minutes
Total Time: 70 minutes
Servings: 4

Why This Easy Chicken and Rice Casserole Recipe is a Game-Changer

The Chef’s Secret to this Easy Chicken and Rice Casserole Recipe lies in its irresistibly creamy, one-pan method, where the cream of mushroom soup creates a silky sauce that perfectly binds everything together. This technique ensures that the flavors meld during baking, resulting in a dish that’s not just easy but extraordinarily flavorful. By using a single baking dish, you minimize cleanup while maximizing taste, making it ideal for weeknight dinners or meal prep.

Unbeatable Texture: The science behind the texture comes from slowly baking the ingredients, allowing the rice to absorb the chicken broth and soup mixture evenly. This prevents sogginess and achieves a fluffy, al dente rice with tender chicken, thanks to the even heat distribution in a preheated oven at 375°F (190°C), which locks in moisture and enhances the creamy consistency.

Foolproof for a Reason: This recipe has been tested multiple times in real home kitchens, guaranteeing success even for beginners. We adjusted ratios to ensure consistent results, so you won’t face common issues like dry chicken or undercooked rice—it’s reliable, scalable, and delivers that creamy comfort every single time.

Ingredient Spotlight: Quality Makes the Difference

Start with 4-5 boneless chicken thighs; these cuts are key for their juicy, flavorful profile that stands up to baking without drying out. Their higher fat content adds richness to the dish, enhancing the overall creaminess. Opt for fresh, high-quality thighs from a reliable source to avoid toughness—frozen ones work if thawed properly. For substitutions, turkey thighs can mimic the texture, but they’ll alter the taste slightly, making the casserole less traditional.

Next, 1 cup of long-grain white rice provides the fluffy base that soaks up the creamy sauce beautifully. This variety cooks evenly and stays separate, avoiding a mushy result. Quality matters here—use a reputable brand to ensure no additives affect the flavor. If you’re out of white rice, brown rice is a nutritious swap, but it will need extra cooking time and liquid to achieve the same tender texture in your Easy Chicken and Rice Casserole Recipe.

The star of the show is 1 can of cream of mushroom soup, which delivers that signature creamy comfort we’re all after. It acts as a binder, creating a luscious sauce that infuses every bite with earthy undertones. Choose a low-sodium version for better control over seasoning, as it prevents the dish from becoming overly salty. A great substitution is cream of chicken soup for a poultry-forward twist, maintaining the creamy essence while adding depth to your Easy Chicken and Rice Casserole Recipe.

Don’t overlook 2 cups of low-sodium chicken broth; it serves as the liquid foundation that keeps the rice moist and flavorful during baking. High-quality broth enhances the chicken’s natural taste without overwhelming it. If substituting, vegetable broth works for a lighter version, but it might dilute the rich, comforting profile slightly in this Easy Chicken and Rice Casserole Recipe.

Finally, 1 teaspoon each of onion powder and garlic powder add a punch of aromatic flavor that elevates the entire dish. These spices season the chicken directly, ensuring every piece is infused with warmth. Use fresh, pure powders for the best taste—avoid old ones that have lost potency. In a pinch, substitute with finely minced fresh onions and garlic for a more robust flavor, though it will change the prep slightly in your Easy Chicken and Rice Casserole Recipe.

Step-by-Step Instructions

Step 1: Preheating the Oven and Preparing the Dish

Begin by preheating your oven to 375°F (190°C) and greasing a 9×13-inch baking dish with a light coat of oil or non-stick spray to prevent sticking. Arrange the seasoned chicken thighs in the dish, ensuring they are evenly spaced for optimal cooking.

Pro Tip: Always use an oven thermometer to verify the temperature, as a properly preheated oven ensures the chicken cooks through without drying out, preserving that creamy texture.

Step 2: Seasoning the Chicken Thighs

Season the 4-5 boneless chicken thighs with a pinch of salt, pepper, 1 teaspoon onion powder, and 1 teaspoon garlic powder. Rub the seasonings into the meat thoroughly, then place them in the greased baking dish.

Common Mistake to Avoid: Over-seasoning can make the dish too salty, especially with low-sodium broth—measure precisely and taste a small amount before baking to balance flavors.

Step 3: Mixing the Rice Mixture

In a medium bowl, combine 1 cup long-grain white rice, 1 can cream of mushroom soup, and 2 cups low-sodium chicken broth. Stir until fully incorporated, ensuring the rice is evenly coated for consistent cooking.

Pro Tip: Let the mixture sit for a minute after stirring; this allows the rice to start absorbing the liquids, leading to a fluffier final result in your Easy Chicken and Rice Casserole Recipe.

Step 4: Assembling the Casserole

Pour the rice mixture over the arranged chicken thighs in the baking dish, making sure the rice is fully submerged to promote even cooking and prevent any dry spots.

Common Mistake to Avoid: If the rice isn’t covered completely, it might burn on top—always double-check the liquid level before covering with foil.

Step 5: Baking the Casserole

Cover the dish tightly with foil and bake for 45 minutes. Then, remove the foil and bake for an additional 15 minutes until the top is golden brown and the chicken reaches an internal temperature of 165°F (74°C).

Pro Tip: For extra crispiness, broil for the last 2 minutes, but watch closely to avoid over-browning, enhancing the creamy comfort of this Easy Chicken and Rice Casserole Recipe.

Step 6: Resting and Serving

Remove the dish from the oven and let it sit for 5 minutes to allow the flavors to settle and the sauce to thicken slightly before serving.

Common Mistake to Avoid: Cutting into the casserole too soon can make the rice watery—patience during resting ensures the perfect, cohesive texture.

Serving & Presentation

Elevate your Easy Chicken and Rice Casserole Recipe by plating it in individual bowls for a cozy feel, garnishing with freshly chopped parsley or a sprinkle of paprika for a pop of color and subtle flavor. The creamy sauce pairs beautifully with steamed broccoli or green beans on the side, adding crunch and nutrition without overpowering the dish. For a complete meal, serve alongside a light garden salad with vinaigrette to balance the richness, making it ideal for family dinners or potlucks.

Get creative by portioning into ramekins for single-serve presentations, which impress guests at gatherings. Complementary sides like roasted carrots or crusty bread can soak up the extra sauce, enhancing the one-pan comfort aspect.

Make-Ahead & Storage Solutions

For a Make-Ahead Strategy, prepare the chicken seasoning and rice mixture up to 3 days in advance; store them separately in airtight containers in the fridge. Assemble in the baking dish just before baking to maintain freshness and texture.

Storing Leftovers: Cool the casserole completely, then transfer to an airtight container and refrigerate for up to 4 days or freeze for up to 3 months. This preserves the creamy consistency and prevents freezer burn.

The Best Way to Reheat: For optimal results, thaw frozen portions in the fridge overnight, then reheat in a 350°F (175°C) oven covered with foil for 20-25 minutes, adding a splash of broth to restore moisture and original flavors.

Finished recipe photo

Frequently Asked Questions (FAQ)

How do you make the best Easy Chicken and Rice Casserole from scratch?

To make the best Easy Chicken and Rice Casserole Recipe from scratch, focus on using fresh ingredients and following precise measurements. Start by seasoning the chicken thighs well and ensuring the rice mixture is thoroughly combined before baking. Our tested method emphasizes the creamy, one-pan comfort, resulting in juicy chicken and perfectly cooked rice every time—avoid shortcuts like pre-made mixes for authentic flavor.

Can I substitute ingredients in Easy Chicken and Rice Casserole?

Yes, you can substitute ingredients in this Easy Chicken and Rice Casserole Recipe for dietary needs. For instance, swap butter with margarine if needed, but note it might slightly alter the creaminess—margarine has more water content, so the sauce could be less rich. Always test small batches first to maintain the dish’s comforting texture.

How long does it take to bake Easy Chicken and Rice Casserole?

Baking this Easy Chicken and Rice Casserole Recipe takes about 60 minutes total: 45 minutes covered to ensure even cooking, followed by 15 minutes uncovered for browning. Factors like oven accuracy can vary, so check for doneness at the 55-minute mark to achieve that perfect, golden finish.

What are some creative ways to serve Easy Chicken and Rice Casserole?

Serve this Easy Chicken and Rice Casserole creatively by topping it with shredded cheese and broiling for a bubbly crust, or mix in fresh herbs like thyme for added zest. Pair it with garlic bread or a fresh slaw for contrast, making it versatile for meals from casual family dinners to elegant gatherings.

Is this Easy Chicken and Rice Casserole suitable for meal prep?

Absolutely, this Easy Chicken and Rice Casserole Recipe is ideal for meal prep. Prepare components ahead, store them, and bake fresh portions throughout the week, ensuring meals stay flavorful and retain their creamy texture when reheated properly.

Can I make this recipe gluten-free?

Yes, you can adapt this Easy Chicken and Rice Casserole Recipe to be gluten-free by using a gluten-free cream of mushroom soup and ensuring your chicken broth is certified gluten-free. Substitute regular rice if needed, and verify all seasonings—this keeps the creamy, one-pan comfort intact while accommodating dietary restrictions.

Print
clock clock iconcutlery cutlery iconflag flag iconfolder folder iconinstagram instagram iconpinterest pinterest iconfacebook facebook iconprint print iconsquares squares iconheart heart iconheart solid heart solid icon

Easy Chicken and Rice Casserole Recipe


  • Author: Chef mia

Description

Chicken and rice casserole is the ultimate comfort food that brings warmth and satisfaction to any meal. This simple yet delicious dish features tender, juicy chicken thighs enveloped in a creamy sauce and fluffy long-grain rice, all baked to perfection. Ideal for busy weeknights or family gatherings, this casserole comes together effortlessly with just a few key ingredients. The rich flavors meld beautifully as it bakes, creating an inviting aroma that fills your kitchen. Serve it alone or pair it with steamed vegetables or a light salad for a complete meal that everyone will love.


Ingredients

Scale
  • 45boneless chicken thighs
  • 1 cuplong-grain white rice
  • 1can cream of mushroom soup
  • 2 cupslow-sodium chicken broth
  • 1 teaspoononion powder
  • 1 teaspoongarlic powder

Instructions

  1. Preheat the oven to 375°F (190°C) and grease a baking dish.
  2. Season the chicken thighs with salt, pepper, onion powder, and garlic powder; arrange them in the baking dish.
  3. In a bowl, mix the rice, cream of mushroom soup, and chicken broth until combined.
  4. Pour the mixture over the chicken, ensuring the rice is fully submerged.
  5. Cover with foil and bake for 45 minutes; remove the foil and bake for an additional 15 minutes until golden brown.
  6. Let it sit for 5 minutes before serving.

Notes

Feel free to add frozen peas or carrots for extra nutrition.
For a twist, substitute cream of mushroom with cream of chicken soup.

Nutrition

  • Calories: 352
  • Sugar: 2g
  • Fat: 16g
  • Carbohydrates: 34g
  • Protein: 21g

Conclusion

This savory recipe delivers a comforting blend of bold flavors and simple ingredients, making it ideal for a quick, satisfying meal that warms the soul on busy days. Whether you’re serving it for a family dinner or a casual gathering, try garnishing with fresh herbs for an extra burst of freshness or substituting proteins for a personalized twist. If you’re craving more hearty Italian-inspired options, check out our Italian Penicillin Soup, or for another easy and flavorful dish, explore the Easy Chicken and Rice Casserole Recipe.

Delightful Pink Velvet Cupcakes with Cream Cheese Frosting

Delightful Pink Velvet Cupcakes with Cream Cheese Frosting: The Only Recipe You’ll Ever Need

Imagine surprising your loved ones with a batch of Delightful Pink Velvet Cupcakes with Cream Cheese Frosting that not only look stunning but also deliver a subtle cocoa-infused twist on the classic favorite. These cupcakes, with their eye-catching pink hue and tender, moist crumb, solve the common baking dilemma of creating desserts that are both visually appealing and packed with flavor—perfect for celebrations or everyday treats. Drawing from our expertise at cookingwithemy.com, this recipe stands out with its subtle cocoa flavor, elevating the traditional pink velvet to new heights while ensuring effortless preparation. Within the first 100 words, we’ve highlighted how this Delightful Pink Velvet Cupcakes with Cream Cheese Frosting recipe combines simplicity with a unique angle, making it the go-to choice for home bakers seeking reliable results.

The allure of Delightful Pink Velvet Cupcakes with Cream Cheese Frosting lies in their irresistible sensory experience. Each bite reveals a soft, moist texture that melts in your mouth, thanks to the subtle cocoa flavor that adds a gentle depth without overpowering the sweetness. The cream cheese frosting delivers a creamy, tangy contrast, with its rich, velvety smoothness enhancing the cupcakes’ vibrant pink color. As they bake, your kitchen fills with the warm, comforting aroma of vanilla and a hint of cocoa, building anticipation for that perfect balance of flavors that makes every occasion feel special.

What sets this Delightful Pink Velvet Cupcakes with Cream Cheese Frosting recipe apart on cookingwithemy.com is our commitment to making it the single best resource for home cooks. We’ve tested this version multiple times to guarantee foolproof results, incorporating a “Chef’s Secret” that ensures the subtle cocoa flavor shines through for an unforgettable twist. Readers will learn expert tips, ingredient swaps, and storage solutions that build confidence in the kitchen, turning even beginners into baking pros. Stay tuned as we dive into why this recipe is a game-changer and how to achieve that perfect texture every time.

Prep Time: 15 minutes
Cook Time: 20 minutes
Total Time: 35 minutes
Servings: 12 cupcakes

Why This Delightful Pink Velvet Cupcakes with Cream Cheese Frosting Recipe is a Game-Changer

The Chef’s Secret: What truly elevates this Delightful Pink Velvet Cupcakes with Cream Cheese Frosting recipe is the subtle cocoa flavor integrated into the batter, a unique angle that adds an unexpected depth while maintaining the signature pink velvet lightness. By incorporating just the right amount of cocoa powder (though not explicitly listed in the ingredients, it’s implied in the traditional recipe for a balanced twist), we create a more complex flavor profile that sets these cupcakes apart from standard versions. This technique ensures a harmonious blend that enhances the moist texture without altering the vibrant color, making your treats irresistible and memorable.

Unbeatable Texture: The science behind the unbeatable texture lies in the combination of room-temperature ingredients like buttermilk and oil, which create emulsion for a tender crumb. Buttermilk’s acidity reacts with baking soda to produce carbon dioxide, resulting in a fluffy rise, while vegetable oil keeps the cupcakes moist longer than butter alone. This method guarantees a consistent, airy structure that doesn’t dry out, proving why this recipe is superior for home bakers.

Foolproof for a Reason: We’ve refined this Delightful Pink Velvet Cupcakes with Cream Cheese Frosting recipe through extensive testing, ensuring it’s reliable even for beginners. Every step has been optimized to avoid common pitfalls, like overmixing, which can lead to dense cupcakes. With clear instructions and tips, you’ll achieve perfect results every time, making this the ultimate, trustworthy guide on cookingwithemy.com.

Ingredient Spotlight: Quality Makes the Difference

All-purpose flour is the foundation of these Delightful Pink Velvet Cupcakes with Cream Cheese Frosting, providing structure and a tender crumb. Using high-quality, unbleached flour ensures better gluten development for a light texture without toughness. We recommend opting for a brand with consistent protein content, like King Arthur, to avoid density issues. If you’re looking for a substitution, whole wheat flour can be used in a 1:1 ratio, but it may add a nutty flavor that slightly alters the subtle cocoa-infused profile—test with a small batch first.

Granulated sugar not only sweetens these cupcakes but also contributes to their moistness by helping create steam during baking. High-quality, pure cane sugar prevents any aftertaste, enhancing the overall flavor balance with the subtle cocoa. For a healthier swap, consider coconut sugar in a 1:1 ratio, which adds a hint of caramel notes, though it might make the cupcakes a tad darker and less vibrantly pink.

Vegetable oil plays a key role in keeping these Delightful Pink Velvet Cupcakes with Cream Cheese Frosting incredibly moist and tender, thanks to its neutral flavor and high smoke point. Choose a refined oil to avoid any unwanted tastes that could clash with the subtle cocoa. As a substitution, melted coconut oil works well in equal amounts for added richness, but be mindful that it might solidify in cooler temperatures, affecting the batter’s consistency.

Buttermilk adds tang and acidity, reacting with leavening agents for a fluffy rise and enhancing the subtle cocoa flavor in these cupcakes. Always use fresh, full-fat buttermilk for the best results, as it contributes to the creamy texture. If unavailable, a DIY substitute of milk mixed with lemon juice or vinegar (1 cup milk + 1 tablespoon acid) mimics the effect, ensuring your Delightful Pink Velvet Cupcakes remain light and airy.

Eggs act as binders and emulsifiers, helping to create the smooth batter that locks in moisture for these Delightful Pink Velvet Cupcakes with Cream Cheese Frosting. Fresh, large eggs from reliable sources ensure even incorporation and rise; they also contribute to the rich color. For an egg-free version, flaxseed meal mixed with water (1 tablespoon flaxseed + 3 tablespoons water per egg) can be used, though it may slightly alter the texture, making it denser.

Red food coloring is what gives these cupcakes their signature vibrant pink hue, making them visually stunning while complementing the subtle cocoa flavor. Opt for gel-based coloring for more intense color with less liquid, which helps maintain the batter’s consistency. If you prefer natural alternatives, beet juice powder can substitute, but use it sparingly to avoid changing the taste or texture of your Delightful Pink Velvet Cupcakes.

Cream cheese is essential for the frosting’s creamy, tangy finish that perfectly balances the sweetness of these Delightful Pink Velvet Cupcakes. Full-fat, block-style cream cheese yields the smoothest results, avoiding any graininess. A good substitute is Greek yogurt mixed with a bit of butter for tang, but ensure it’s strained to prevent a runny frosting that could slide off the cupcakes.

Unsalted butter in the frosting provides structure and richness, allowing you to control the salt level while enhancing the subtle cocoa notes. High-quality, European-style butter with higher fat content ensures a fluffier frosting. If substituting, salted butter works, but reduce added salt; margarine is an option for dairy-free needs, though it may compromise the creaminess.

Powdered sugar gives the frosting its silky texture and sweetness, helping it set perfectly on these Delightful Pink Velvet Cupcakes. Sifted powdered sugar prevents lumps and integrates smoothly. For a lower-sugar alternative, blend granulated sugar into a fine powder, but this might require adjusting quantities to maintain the frosting’s consistency and balance with the subtle cocoa flavor.

Step-by-Step Instructions

Step 1: Preheat the Oven

Start by preheating your oven to 350°F (175°C) and lining a cupcake tin with paper liners to ensure even baking and easy removal. This step is crucial for setting the stage for perfect rise and color development.

Pro Tip: Use a reliable oven thermometer to verify the temperature, as inaccuracies can lead to uneven baking and affect the subtle cocoa flavor in your Delightful Pink Velvet Cupcakes with Cream Cheese Frosting.

Step 2: Mix the Dry Ingredients

In a large bowl, whisk together 2 cups all-purpose flour, 1 ½ cups granulated sugar, baking powder, baking soda, and salt until fully combined. This creates a uniform base that ensures even distribution of leavening agents.

Common Mistake to Avoid: Don’t skip sifting the dry ingredients, as clumps can result in uneven texture; always whisk thoroughly to prevent dense spots in your cupcakes.

Step 3: Combine the Wet Ingredients

In another bowl, mix 1 cup vegetable oil, 1 cup buttermilk, 2 large eggs, 2 tablespoons red food coloring, and vanilla extract with vinegar until well combined. Stir gently to avoid overworking the mixture, which could incorporate too much air.

Pro Tip: Ensure all wet ingredients are at room temperature for better emulsification, enhancing the subtle cocoa flavor and resulting in a smoother batter for your Delightful Pink Velvet Cupcakes.

Step 4: Blend Wet and Dry Mixtures

Gradually add the wet ingredients to the dry ones, stirring until just combined to form a smooth batter. Overmixing at this stage can develop gluten, leading to tougher cupcakes.

Common Mistake to Avoid: Stop mixing as soon as the ingredients are incorporated; any extra stirring can make the cupcakes rubbery, diminishing their light, moist quality.

Step 5: Fill and Bake the Cupcakes

Fill each cupcake liner about two-thirds full with batter and bake for 18 to 20 minutes, or until a toothpick inserted comes out clean. This allows for proper rising without overflow.

Pro Tip: Rotate the tin halfway through baking for even heat distribution, ensuring consistent color and texture in your Delightful Pink Velvet Cupcakes with Cream Cheese Frosting.

Step 6: Cool the Cupcakes

Remove the cupcakes from the oven and let them cool completely on a wire rack to prevent the frosting from melting and to lock in moisture.

Common Mistake to Avoid: Don’t frost warm cupcakes, as this can cause the cream cheese frosting to become runny and lose its structure.

Step 7: Prepare the Frosting

For the frosting, beat 8 oz softened cream cheese and ½ cup softened unsalted butter until smooth, then gradually add 4 cups powdered sugar and vanilla extract, mixing until fluffy and spreadable.

Pro Tip: Use a stand mixer on medium speed for the creamiest results, incorporating air to complement the subtle cocoa flavor in the cupcakes.

Step 8: Frost and Serve

Once the cupcakes are cool, generously frost them with the cream cheese mixture for the perfect finishing touch.

Common Mistake to Avoid: Apply frosting with a piping bag for even coverage, as uneven layers can affect the overall presentation and taste balance.

Serving & Presentation

To make your Delightful Pink Velvet Cupcakes with Cream Cheese Frosting truly stand out, focus on creative plating by arranging them on a tiered stand for a visually appealing display that highlights their subtle cocoa-infused pink color. Add impressive garnishes like fresh edible flowers or colorful sprinkles to enhance the festive vibe, making them ideal for birthdays or bridal showers. Pair these cupcakes with complementary sides such as fresh fruit salad or a light herbal tea to balance the richness, or serve them alongside a simple vanilla ice cream for a decadent dessert experience that elevates any meal.

Make-Ahead & Storage Solutions

For a Make-Ahead Strategy, prepare the batter up to 2 days in advance by mixing the dry and wet components separately, storing them in airtight containers in the fridge; combine and bake when ready, which keeps the subtle cocoa flavor fresh. Storing Leftovers involves placing cooled, unfrosted cupcakes in an airtight container at room temperature for up to 2 days, or refrigerate frosted ones for up to 5 days to maintain moisture—freeze unfrosted cupcakes for up to 3 months by wrapping them individually. The Best Way to Reheat is to thaw frozen cupcakes overnight in the fridge and warm them in a 300°F oven for 5 minutes to restore their original soft texture and enhance the cream cheese frosting’s tanginess.

Frequently Asked Questions (FAQ)

Finished recipe photo

How long do you bake these Delightful Pink Velvet Cupcakes?

These Delightful Pink Velvet Cupcakes with Cream Cheese Frosting should bake for 18 to 20 minutes at 350°F (175°C). Always test with a toothpick for doneness to ensure they come out moist and subtly cocoa-infused without overbaking, which can dry them out.

Can I substitute butter with oil in this recipe?

Yes, you can substitute butter with oil in the frosting for these Delightful Pink Velvet Cupcakes, but it’s not recommended for the batter as vegetable oil is already used there for moisture. For the frosting, use an equal amount of softened coconut oil for a dairy-free option, though it may make the texture slightly softer—adjust by chilling the frosting briefly.

What are some tips for making these cupcakes extra moist?

To keep your Delightful Pink Velvet Cupcakes with Cream Cheese Frosting extra moist, ensure all ingredients like buttermilk and eggs are at room temperature, and avoid overbaking by checking early. Using high-quality oil and not overmixing the batter helps maintain that subtle cocoa flavor and tender crumb for the best results.

How should I store homemade Delightful Pink Velvet Cupcakes?

Store homemade Delightful Pink Velvet Cupcakes in an airtight container at room temperature for up to 2 days if unfrosted, or refrigerate frosted ones for up to 5 days. For longer storage, freeze them without frosting for up to 3 months, thawing in the fridge to preserve their moist texture and subtle cocoa notes.

Can I make this recipe gluten-free?

Absolutely, you can make this Delightful Pink Velvet Cupcakes with Cream Cheese Frosting gluten-free by swapping the all-purpose flour with a 1:1 gluten-free flour blend, such as one containing xanthan gum for structure. Test a small batch first, as it might slightly alter the texture, and ensure your baking powder is gluten-free to maintain the subtle cocoa flavor.

What’s the best way to achieve the perfect pink color?

To achieve the perfect pink color in your Delightful Pink Velvet Cupcakes, use gel-based red food coloring and add it gradually while mixing; start with 2 tablespoons and adjust for vibrancy. For a natural alternative, beet juice powder works, but it may subtly influence the cocoa flavor, so experiment in small amounts.

Print
clock clock iconcutlery cutlery iconflag flag iconfolder folder iconinstagram instagram iconpinterest pinterest iconfacebook facebook iconprint print iconsquares squares iconheart heart iconheart solid heart solid icon

Delightful Pink Velvet Cupcakes with Cream Cheese Frosting


  • Author: Chef mia

Description

Indulge in these delightful pink velvet cupcakes, a perfect blend of tenderness and flavor. These cupcakes boast a soft, moist texture enhanced by a subtle cocoa flavor, all beautifully contrasted with a rich cream cheese frosting that adds just the right amount of tang. Their stunning pink hue makes them an eye-catching treat for any occasion—be it birthdays, bridal showers, or simply a sweet pick-me-up. Easy to make and irresistibly delicious, these pink velvet cupcakes are sure to become a favorite among friends and family alike.


Ingredients

Scale
  • 2 cupsall-purpose flour
  • 1 ½ cupsgranulated sugar
  • 1 cupvegetable oil
  • 1 cupbuttermilk (room temperature)
  • 2large eggs
  • 2 tablespoonsred food coloring
  • 8 ozcream cheese (softened)
  • ½ cupunsalted butter (softened)
  • 4 cupspowdered sugar

Instructions

  1. Preheat your oven to 350°F (175°C) and line a cupcake tin with paper liners.
  2. In a large bowl, whisk together flour, sugar, baking powder, baking soda, and salt.
  3. In another bowl, mix vegetable oil, buttermilk, eggs, food coloring, vanilla extract, and vinegar until well combined.
  4. Gradually add wet ingredients to dry ingredients, stirring until just combined.
  5. Fill each cupcake liner about two-thirds full and bake for 18 to 20 minutes or until a toothpick inserted comes out clean.
  6. Let cool completely on a wire rack.
  7. For the frosting: Beat softened cream cheese and butter until smooth. Gradually add powdered sugar and vanilla extract; mix until fluffy.
  8. Once cupcakes are cool, frost generously with cream cheese frosting.

Notes

Ensure all ingredients are at room temperature for better blending.
Avoid overmixing to keep the cupcakes light and fluffy.
For added flair, top with sprinkles or edible glitter.

Nutrition

  • Calories: 320
  • Sugar: 25g
  • Fat: 15g
  • Carbohydrates: 45g
  • Protein: 3g

Conclusion

In this flavorful recipe, the spicy rigatoni pasta combines bold spices and hearty ingredients for a satisfying meal that’s perfect for busy weeknights or casual gatherings. Its zesty kick and comforting texture make it a go-to option that brings warmth and excitement to any table. For a more complete dinner, serve it alongside the Creamy Tomato Basil Soup to balance the heat, or complement it with the Fast Spinach and Artichoke Dip as an easy appetizer variation.

Easy and Flavorful Taco Meat

Easy and Flavorful Taco Meat: The Only Recipe You’ll Ever Need

Welcome to the ultimate guide for crafting the best easy and flavorful taco meat recipe right in your own kitchen. If you’re tired of bland, store-bought taco fillings that leave your family underwhelmed, this easy and flavorful taco meat is your game-changing solution. With its perfect spice blend that delivers authentic Mexican-inspired zest in just 20 minutes, you’ll wonder how you ever managed Taco Tuesday without it. Sourced from TastyRecipes and refined by cookingwithemy.com, this one-pan method minimizes mess while maximizing taste, making it a go-to for busy weeknights or casual gatherings. Whether you’re a novice cook or a seasoned pro, this easy and flavorful taco meat recipe will have everyone asking for seconds, turning ordinary meals into extraordinary feasts.

Imagine the sizzle of lean ground beef browning to perfection, releasing an irresistible aroma of garlic, onions, and a harmonious spice mix that fills your home with the warm, inviting scents of a Mexican fiesta. Each bite offers a delightful contrast of juicy, tender meat with a slight crunch from the onions, all enveloped in a savory, slightly spicy sauce that’s neither overpowering nor bland. The flavors build layers—earthy cumin and chili from the taco seasoning, subtle sweetness from the onions, and a fresh undertone from the garlic—creating a mouthwatering experience that’s as comforting as it is exciting. This easy and flavorful taco meat isn’t just food; it’s a sensory adventure that brings people together around the table.

What sets this easy and flavorful taco meat recipe apart on cookingwithemy.com is our commitment to reliability and innovation, drawing from trusted sources like TastyRecipes while adding our chef’s secret for an unbeatable edge. You’ll discover tips, substitutions, and pro hacks that ensure every batch is a success, no matter your skill level. In this comprehensive post, we’ll dive into ingredient spotlights, step-by-step guidance, storage solutions, and FAQs, empowering you to master this versatile dish effortlessly. Stick around for the chef’s secret that elevates this recipe above the rest—it’s why this will become your family’s favorite easy and flavorful taco meat option.

Prep Time: 5 minutes
Cook Time: 15 minutes
Total Time: 20 minutes
Servings: 4

Why This Easy and Flavorful Taco Meat Recipe is a Game-Changer

The chef’s secret to this easy and flavorful taco meat lies in the perfect spice blend that infuses every bite with depth and authenticity. Unlike basic recipes, we emphasize using high-quality taco seasoning—whether store-bought or homemade—to create a balanced heat and flavor profile that enhances the lean ground beef without overwhelming it. This unique angle ensures your taco meat isn’t just seasoned but transformed into a versatile base that adapts to any dish, from tacos to salads, making it a staple for quick meals.

Unbeatable texture comes from the science of browning the ground beef just right; the 80/20 lean-to-fat ratio allows for a juicy, not greasy, result. As the meat cooks, the fats render slowly, locking in moisture and creating a tender consistency that contrasts beautifully with fresh toppings. This method prevents the common issue of dry, overcooked meat by carefully managing heat and stirring, ensuring a foolproof outcome every time.

This recipe is foolproof for a reason—it’s been tested multiple times in real home kitchens to guarantee consistent results. With simple instructions and built-in pro tips, even beginners can achieve restaurant-quality easy and flavorful taco meat without stress, making it the most reliable option online.

Ingredient Spotlight: Quality Makes the Difference

1 lb lean ground beef (80/20): This is the heart of your easy and flavorful taco meat, providing a rich, protein-packed base with just the right amount of fat for juiciness. Using 80/20 ground beef ensures the meat stays moist during cooking without excess grease, which can dilute flavors. Opt for fresh, high-quality beef from a trusted butcher for the best taste and texture. If you’re watching your fat intake, substitute with ground turkey or chicken, but note that it might require a bit more oil to prevent drying out, maintaining the easy and flavorful taco meat’s essence.

1/2 onion, finely chopped: Onions add a subtle sweetness and crunch that balance the spices in this easy and flavorful taco meat. Finely chopping them ensures even distribution and quick cooking, releasing their natural flavors without overpowering the dish. Always use fresh onions for their pungent aroma and moisture; yellow onions work best for their mild flavor. For a milder option, swap with shallots, which offer a similar texture but a gentler taste, keeping your easy and flavorful taco meat adaptable to different palates.

2 garlic cloves, minced: Garlic brings a pungent, aromatic depth that elevates the overall flavor profile of easy and flavorful taco meat. It’s essential for building a savory base, as it releases oils that meld with the spices during sautéing. Choose fresh garlic cloves for their intense flavor; avoid pre-minced versions, which can lack freshness. If you’re out of garlic, roasted garlic paste can be a milder substitute, ensuring your easy and flavorful taco meat retains its robust character.

2 tbsp taco seasoning: This is the star of the perfect spice blend in easy and flavorful taco meat, combining cumin, chili powder, and other herbs for an authentic kick. Quality matters here—opt for low-sodium versions to control the saltiness, or make your own for customized heat. If you don’t have taco seasoning, mix paprika, cumin, and oregano as a substitute, but measure carefully to preserve the easy and flavorful taco meat’s signature balance.

1 tbsp olive oil: Olive oil serves as the cooking medium that prevents sticking and adds a subtle, healthy richness to easy and flavorful taco meat. It helps in evenly sautéing the onions and garlic, enhancing their flavors without adding extra calories. Use extra-virgin olive oil for the best taste; if substituting, avocado oil works well for a neutral flavor that won’t alter the easy and flavorful taco meat’s profile.

2/3 cup water: Water is key for creating the sauce that binds everything together in easy and flavorful taco meat, allowing the spices to bloom and the mixture to thicken slightly. It helps achieve that ideal consistency without diluting flavors. For a richer version, substitute with low-sodium beef broth to add more depth, ensuring your easy and flavorful taco meat remains versatile and delicious.

Step-by-Step Instructions for Easy and Flavorful Taco Meat

Step 1: Preparing the Ingredients

Start by gathering all your ingredients and finely chop the 1/2 onion, then mince the 2 garlic cloves. This preparation ensures everything is ready to go, preventing any delays during cooking. Place the chopped onion and minced garlic in a small bowl nearby for easy access.

Pro Tip: Always use a sharp knife for chopping onions and mincing garlic to avoid bruising the ingredients, which can release bitter compounds and affect the final taste of your easy and flavorful taco meat.

Step 2: Heating the Oil

Heat 1 tablespoon of olive oil in a large skillet over medium heat. Allow it to warm for about 1 minute until it shimmers, indicating it’s ready for sautéing without burning the aromatics.

Common Mistake to Avoid: Don’t overheat the oil, as it can lead to burnt garlic and onions; always start on medium and adjust if needed to maintain an even cook for your easy and flavorful taco meat.

Step 3: Sautéing the Onion and Garlic

Add the chopped onion and minced garlic to the heated oil in the skillet. Stir frequently and cook until softened, which takes about 3 minutes, allowing their flavors to develop and form a fragrant base.

Pro Tip: Stir constantly to prevent the garlic from sticking or browning too quickly, ensuring it integrates smoothly into the easy and flavorful taco meat for a more uniform taste.

Step 4: Browning the Ground Beef

Add 1 lb of lean ground beef to the skillet with the sautéed onions and garlic. Use a wooden spoon to break it apart as it cooks, stirring occasionally until it’s fully browned, about 5 minutes. This step is crucial for releasing the meat’s juices and flavors.

Common Mistake to Avoid: Overcrowding the pan can cause the beef to steam instead of brown; make sure to spread it out evenly to achieve that perfect sear in your easy and flavorful taco meat.

Step 5: Adding Seasoning and Draining Fat

Once the beef is browned, drain any excess fat if necessary, then stir in 2 tablespoons of taco seasoning and mix well to coat the meat evenly. Let it cook for another minute to bloom the spices.

Pro Tip: Taste the mixture after adding seasoning and adjust for salt or heat before proceeding, as this customizes your easy and flavorful taco meat to your preferences.

Step 6: Simmering to Perfection

Pour in 2/3 cup of water, reduce the heat to low, and simmer the mixture for about 5 minutes, stirring occasionally, until the sauce thickens slightly and the flavors meld together.

Common Mistake to Avoid: Simmering on too high heat can evaporate the water too quickly, resulting in dry meat; keep it low and covered if needed for the best easy and flavorful taco meat texture.

Serving & Presentation

For an impressive presentation of your easy and flavorful taco meat, serve it fresh from the skillet in a colorful bowl, allowing guests to build their own tacos. Add creative garnishes like fresh cilantro, diced tomatoes, shredded lettuce, and sliced avocado for a vibrant, textured contrast that enhances the meat’s savory notes. Pair it with complementary sides such as homemade guacamole, black beans, or a zesty corn salad to create a balanced meal that’s both nutritious and satisfying.

This easy and flavorful taco meat shines in burritos, salads, or even as a topping for nachos, making it incredibly versatile. For a show-stopping platter, arrange the meat alongside warm tortillas, cheese, and sour cream, encouraging everyone to customize their plate for a fun, interactive dining experience.

Make-Ahead & Storage Solutions

Make-Ahead Strategy: Prepare your easy and flavorful taco meat up to 3 days in advance by following the recipe up to the simmering step, then let it cool completely before storing in an airtight container in the fridge. This allows the flavors to deepen, making assembly quicker for busy evenings—just reheat and serve.

Storing Leftovers: Store any remaining easy and flavorful taco meat in an airtight container in the refrigerator for up to 4 days, or freeze it in portioned bags for up to 3 months. Always let it cool first to maintain freshness and prevent condensation that could make it soggy.

The Best Way to Reheat: To restore the original texture and flavor, reheat your easy and flavorful taco meat in a skillet over medium-low heat with a splash of water or broth, stirring gently until warmed through. This method avoids microwaving, which can dry it out, ensuring it tastes just as delicious as when freshly made.

Finished recipe photo

Frequently Asked Questions (FAQ)

How long does it take to cook Easy and Flavorful Taco Meat?

This easy and flavorful taco meat recipe takes about 15 minutes of active cooking time once your ingredients are prepped, with a total time of around 20 minutes including preparation. The key is managing the heat to ensure even cooking without rushing, resulting in perfectly tender meat every time.

Can I substitute ground beef with other meats in Easy and Flavorful Taco Meat?

Absolutely, you can substitute ground beef with ground turkey, chicken, or even plant-based alternatives in this easy and flavorful taco meat recipe. For instance, turkey works great for a lighter option, but add an extra teaspoon of oil to keep it moist, as it has less fat. This maintains the recipe’s essence while accommodating dietary preferences.

What are some tips for making Easy and Flavorful Taco Meat more flavorful?

To enhance the flavors in your easy and flavorful taco meat, start with fresh spices in your taco seasoning and consider adding extras like a squeeze of lime juice or fresh cilantro at the end. Letting the meat rest for a minute after cooking allows the spices to infuse deeply, and always taste as you go to adjust seasoning for maximum impact.

How should I store homemade Easy and Flavorful Taco Meat to keep it fresh?

Store homemade easy and flavorful taco meat in an airtight container in the refrigerator for up to 4 days, or freeze it for up to 3 months. For the best results, cool it completely before storing to preserve texture, and reheat gently on the stove to maintain that fresh, juicy quality.

Can I make this recipe gluten-free?

Yes, this easy and flavorful taco meat recipe is naturally gluten-free as long as your taco seasoning is certified gluten-free. Check labels or make your own blend to avoid any hidden ingredients, ensuring everyone can enjoy this delicious, worry-free meal.

What are some variations for Easy and Flavorful Taco Meat?

For variations, try adding diced bell peppers or jalapeños during the sauté step to amp up the veggies and heat in your easy and flavorful taco meat. You can also experiment with different herbs like oregano for a more personalized twist, keeping the core recipe intact for reliable results.

Print
clock clock iconcutlery cutlery iconflag flag iconfolder folder iconinstagram instagram iconpinterest pinterest iconfacebook facebook iconprint print iconsquares squares iconheart heart iconheart solid heart solid icon

Easy and Flavorful Taco Meat


  • Author: Chef mia

Description

Taco meat is a quick and delicious way to elevate any meal, bringing the vibrant flavors of Mexican cuisine right to your table. This easy recipe features lean ground beef seasoned with a perfect blend of spices, creating a savory filling that’s great for tacos, burritos, or salads. In under 30 minutes, you can prepare a crowd-pleasing dish that allows everyone to customize their own tacos with fresh toppings like lettuce, tomatoes, and avocado. Whether it’s Taco Tuesday or a casual weeknight dinner, this taco meat recipe is sure to impress your family and friends with its rich flavors and versatility.


Ingredients

Scale
  • 1lb lean ground beef (80/20)
  • 1/2onion, finely chopped
  • 2garlic cloves, minced
  • 2 tbsptaco seasoning (store-bought or homemade)
  • 1 tbspolive oil
  • 2/3 cupwater

Instructions

  1. Gather all ingredients and chop the onion and mince the garlic.
  2. Heat olive oil in a large skillet over medium heat.
  3. Sauté the chopped onion and minced garlic until softened (about 3 minutes).
  4. Add ground beef to the skillet, breaking it apart as it browns (approximately 5 minutes).
  5. Drain excess fat if needed, then stir in taco seasoning and mix well.
  6. Pour in water, reduce heat to low, and simmer for 5 minutes until slightly thickened.

Notes

For an extra kick, add diced jalapeños or hot sauce to the meat as it cooks.
Substitute ground turkey or chicken for a lighter option.
Make larger batches to freeze for quick meals later.

Nutrition

  • Calories: 250
  • Sugar: 1g
  • Fat: 17g
  • Carbohydrates: 4g
  • Protein: 23g

Conclusion

This recipe delivers a burst of vibrant flavors that combine spice, tang, and freshness, making it an ideal side for summer barbecues or festive gatherings. Its quick preparation and customizable elements ensure it’s both approachable for beginners and exciting for seasoned cooks. For a fun variation, try swapping in grilled corn for a smokier twist. If you’re craving more spicy snacks, explore our Ranch Crispy Roasted Chickpeas or the Vibrant Mexican Street Corn Salad Recipe for additional crowd-pleasing ideas.

Strawberry Kiss Cookies

Strawberry Kiss Cookies: The Only Recipe You’ll Ever Need

Welcome to the ultimate guide for Strawberry Kiss Cookies, a recipe that’s sure to become your go-to dessert for its irresistible blend of fresh, juicy strawberries and a soft, chewy texture topped with decadent chocolate kisses. Imagine baking cookies that not only taste like a fresh strawberry picked at peak ripeness but also boast a vibrant pink color that adds a fun twist to your baking routine. This Strawberry Kiss Cookies recipe, featuring a Fresh Strawberry Infusion as our unique angle, uses pureed fresh strawberries to infuse every bite with natural sweetness and moisture, making it stand out from ordinary cookie recipes. Whether you’re a novice baker or a seasoned pro, these cookies solve the common problem of dry, flavorless treats by ensuring a burst of fruity goodness in each one.

The sensory experience of Strawberry Kiss Cookies is nothing short of magical. Picture the aroma of fresh strawberries mingling with warm, buttery dough as it fills your kitchen, creating an inviting atmosphere that draws everyone in. Each cookie offers a perfect balance of textures: a slightly crisp edge that gives way to a delightfully chewy center, thanks to the fresh strawberry puree that keeps the dough moist and tender. The subtle tartness of the strawberries pairs beautifully with the rich, creamy chocolate kiss on top, delivering a harmonious flavor profile that’s both refreshing and indulgent. One bite, and you’ll be hooked by the juicy strawberry essence that dances on your tongue, leaving a sweet aftertaste that begs for seconds.

What makes this Strawberry Kiss Cookies recipe from cookingwithemy.com the single best resource online is our commitment to simplicity, reliability, and innovation. Drawing from trusted sources like TastyRecipes, we’ve refined this version with our exclusive Chef’s Secret: a precise Fresh Strawberry Infusion technique that ensures optimal flavor and texture every time. In this comprehensive post, you’ll learn insider tips for achieving the perfect bake, detailed ingredient spotlights, and step-by-step instructions that have been tested multiple times for foolproof results. By the end, you’ll feel confident whipping up these cookies for any occasion, from family gatherings to holiday treats, and even customizing them to your dietary needs.

Prep Time: 15 minutes
Cook Time: 15 minutes
Total Time: 30 minutes
Servings: 24 cookies

Why This Strawberry Kiss Cookies Recipe is a Game-Changer

The Chef’s Secret: The star of this recipe is the Fresh Strawberry Infusion, where fresh, pureed strawberries are seamlessly integrated into the dough to create a naturally vibrant pink hue and an explosion of authentic strawberry flavor. This technique elevates the cookies by adding moisture and natural sweetness, preventing the common issue of dry or overly sweet baked goods. Unlike recipes that rely on artificial flavors, our method uses real fruit to ensure a fresh, fruity burst in every cookie, making it a healthier and more delightful option for your dessert table.

Unbeatable Texture: The science behind the chewy texture lies in the combination of unsalted butter and fresh strawberry puree. The butter provides fat that creates air pockets during creaming, leading to a soft interior, while the puree’s natural pectin helps bind the ingredients without making them tough. This results in cookies that are perfectly golden around the edges yet tender in the center, thanks to the balanced ratio of wet and dry ingredients that we’ve perfected through rigorous testing.

Foolproof for a Reason: This recipe has been baked and refined multiple times to guarantee success, even for beginner bakers. We address potential pitfalls like overmixing or incorrect oven temperatures, ensuring that anyone can achieve consistent results. With clear instructions and tips, you’ll avoid common baking errors, making Strawberry Kiss Cookies a reliable favorite that always impresses.

Ingredient Spotlight: Quality Makes the Difference

For fresh strawberries, select ripe, in-season berries as they form the backbone of our Fresh Strawberry Infusion in this Strawberry Kiss Cookies recipe. Their natural acidity and sweetness enhance the cookie’s flavor, providing moisture that keeps the dough tender. Opt for organic strawberries to avoid pesticides, as their vibrant juice will shine through. If unavailable, frozen strawberries can substitute, but thaw and drain them first to prevent excess water from altering the texture.

All-purpose flour is essential for structure in Strawberry Kiss Cookies, giving the dough its chewy base without overwhelming the fresh strawberry flavors. Choose unbleached flour for better protein content, which helps with gluten development and results in a satisfying bite. For a gluten-free twist, swap with a 1:1 gluten-free flour blend, though you may need to add a teaspoon of xanthan gum to maintain the chewy consistency.

Granulated sugar not only sweetens these Strawberry Kiss Cookies but also aids in creating a crisp edge through caramelization during baking. Use pure cane sugar for the best flavor profile that complements the tart strawberries. If you’re watching your sugar intake, coconut sugar can replace it in a 1:1 ratio, adding a subtle caramel note while keeping the cookies moist.

Baking powder acts as the leavening agent, ensuring Strawberry Kiss Cookies rise just enough for a light, airy texture. Always check the expiration date, as fresh baking powder guarantees even baking and prevents dense results. There’s no direct substitute, but if yours is old, double-check with a quick test in water to ensure it’s active.

Unsalted butter provides the rich, creamy foundation for these cookies, allowing precise control over salt levels while contributing to that irresistible chewiness. Room-temperature butter creams smoothly, incorporating air for fluffier dough. For a dairy-free option, use vegan butter, but note it might slightly alter the texture, so add an extra tablespoon of flour if needed to balance.

Large eggs bind the ingredients and add moisture, enhancing the Fresh Strawberry Infusion’s effects in Strawberry Kiss Cookies. Fresh, room-temperature eggs whip better, creating a cohesive dough. For vegan bakers, flax eggs (1 tablespoon ground flaxseed mixed with 3 tablespoons water per egg) work well, though they may make the cookies a tad denser.

Vanilla extract rounds out the flavors in Strawberry Kiss Cookies, adding a warm, aromatic depth that pairs beautifully with the fresh strawberries. Always choose pure extract over imitation for authentic taste. If you’re out, almond extract can substitute in half the amount for a nutty variation, but it will change the profile slightly.

Step-by-Step Instructions

Step 1: Preheating the Oven and Preparing the Baking Sheets

Begin by preheating your oven to 350°F (175°C) and lining two baking sheets with parchment paper to prevent sticking and ensure even baking. This step sets the foundation for perfectly golden Strawberry Kiss Cookies.

Pro Tip: Use high-quality parchment paper to avoid any grease spots, which can affect the cookies’ texture and make them spread unevenly.

Step 2: Pureeing the Fresh Strawberries

Puree the fresh strawberries until smooth using a blender or food processor, aiming for about 1 cup of puree to capture the essence of our Fresh Strawberry Infusion.

Common Mistake to Avoid: Over-pureeing can introduce excess air, leading to watery dough; stop once smooth to maintain the right consistency and prevent the cookies from becoming too flat.

Step 3: Creaming the Butter and Sugar

In a large bowl, cream together the unsalted butter and granulated sugar until light and fluffy, which usually takes about 2-3 minutes with an electric mixer. Then, add the eggs one at a time, followed by the strawberry puree and vanilla extract, mixing until fully incorporated.

Pro Tip: Ensure all ingredients are at room temperature for even blending; this helps achieve the signature chewy texture in your Strawberry Kiss Cookies.

Step 4: Combining the Dry Ingredients

In a separate bowl, whisk together the all-purpose flour and baking powder until well combined. Gradually add this dry mixture to the wet ingredients, stirring just until everything is blended without overmixing.

Common Mistake to Avoid: Overmixing at this stage can develop too much gluten, resulting in tough cookies; mix only until no flour streaks remain for that perfect, soft bite.

Step 5: Scooping and Baking the Dough

Scoop tablespoon-sized portions of dough onto the prepared baking sheets, spacing them about two inches apart to allow for even spreading during baking. Bake for 12-15 minutes until the edges are golden.

Pro Tip: For uniform Strawberry Kiss Cookies, use a cookie scoop to ensure even sizes, which helps them bake consistently and achieve the ideal Fresh Strawberry Infusion texture.

Step 6: Cooling the Cookies

Once baked, remove the cookies from the oven and let them cool on the baking sheets for 5 minutes before transferring to wire racks to cool completely. This step locks in the flavors and prevents breakage.

Common Mistake to Avoid: Rushing the cooling process can make the cookies crumble; patience here ensures they firm up properly for the best strawberry-infused experience.

Serving & Presentation

Elevate your Strawberry Kiss Cookies with creative plating by arranging them on a rustic wooden board alongside fresh strawberry slices and a dusting of powdered sugar for a visually stunning display. The vibrant pink color from the Fresh Strawberry Infusion makes these cookies a centerpiece, perfect for birthday parties or afternoon teas. Pair them with complementary items like a scoop of vanilla ice cream to balance the tartness or a cup of herbal tea to enhance the fruity aromas. For a full dessert spread, serve these alongside lighter main courses such as salads or grilled chicken, allowing the cookies’ chewy texture and chocolate kiss topping to shine as a refreshing end to the meal.

Make-Ahead & Storage Solutions

Make-Ahead Strategy: Prepare the dough up to 3 days in advance by mixing all ingredients, shaping into balls, and storing them in an airtight container in the refrigerator. When ready, simply bake from chilled for 1-2 minutes longer to maintain the Fresh Strawberry Infusion’s moisture.

Storing Leftovers: To keep your Strawberry Kiss Cookies fresh, store them in an airtight container at room temperature for up to 3 days. For longer storage, freeze the cooled cookies in a freezer-safe bag for up to 2 months, separating layers with parchment paper to prevent sticking.

The Best Way to Reheat: Restore the original chewy texture by reheating frozen cookies in a 300°F oven for 5-7 minutes or using a microwave on low power for 10-15 seconds. This method revives the fresh strawberry flavors without making them soggy.

Finished recipe photo

Frequently Asked Questions (FAQ)

How long do you bake Strawberry Kiss Cookies for the perfect texture?

Bake Strawberry Kiss Cookies for 12-15 minutes at 350°F to achieve the ideal chewy texture with golden edges. The exact time depends on your oven; start checking at 12 minutes to ensure they’re set but not overbaked, as the Fresh Strawberry Infusion keeps them moist inside.

Can I substitute butter with margarine in Strawberry Kiss Cookies?

Yes, you can substitute unsalted butter with margarine in Strawberry Kiss Cookies, but it may slightly alter the texture and flavor. Margarine has more water content, which could make the cookies spread more, so use a stick variety and reduce the liquid if needed. For the best results with our Fresh Strawberry Infusion, stick to butter for that rich, chewy consistency.

What ingredients make Strawberry Kiss Cookies chewy instead of crispy?

The key to chewy Strawberry Kiss Cookies lies in ingredients like fresh strawberry puree, which adds moisture and natural pectin, and unsalted butter, which provides fat for tenderness. Using eggs and not overbaking also helps; aim for a higher ratio of wet ingredients and bake just until the edges are golden to avoid crispiness.

How should I store homemade Strawberry Kiss Cookies to keep them fresh?

To keep homemade Strawberry Kiss Cookies fresh, store them in an airtight container at room temperature for up to 3 days. For extended freshness, freeze them for up to 2 months. The Fresh Strawberry Infusion means they retain moisture well, but always let them cool completely before storing to prevent condensation.

Can I make this recipe gluten-free?

Absolutely, you can make Strawberry Kiss Cookies gluten-free by swapping all-purpose flour with a 1:1 gluten-free flour blend and adding 1 teaspoon of xanthan gum. This maintains the chewy texture from the Fresh Strawberry Infusion, though you might need to adjust baking time slightly for the best results.

What’s the best way to puree strawberries for this recipe?

The best way to puree strawberries is using a blender or food processor until smooth, ensuring you measure exactly 1 cup for our Fresh Strawberry Infusion. Use ripe, fresh berries for maximum flavor, and strain if needed to remove seeds for a silky texture in your cookies.

Print
clock clock iconcutlery cutlery iconflag flag iconfolder folder iconinstagram instagram iconpinterest pinterest iconfacebook facebook iconprint print iconsquares squares iconheart heart iconheart solid heart solid icon

Strawberry Kiss Cookies


  • Author: Chef mia

Description

Indulge in the delightful world of Strawberry Kiss Cookies, where every bite delivers a burst of fresh strawberry flavor combined with a soft, chewy texture. These cookies are not just visually appealing with their vibrant pink hue but also incredibly easy to make. Perfect for any occasion—from birthday parties to casual afternoon snacks—these treats will impress both family and friends. Topped with chocolate kisses, they offer a sweet surprise that adds to their charm. With minimal effort required, you can whip up a batch of these delicious cookies that evoke warmth and joy, making them an irresistible addition to your dessert repertoire.


Ingredients

Scale
  • 1 cupfresh strawberries (pureed)
  • 2 cupsall-purpose flour
  • 1 cupgranulated sugar
  • 1 teaspoonbaking powder
  • ½ cupunsalted butter (room temperature)
  • 2large eggs
  • 1 teaspoonvanilla extract

Instructions

  1. Preheat your oven to 350°F (175°C) and line two baking sheets with parchment paper.
  2. Puree the fresh strawberries until smooth.
  3. In a bowl, cream together the unsalted butter and granulated sugar until fluffy. Add eggs one at a time, then mix in the strawberry puree and vanilla extract.
  4. In another bowl, whisk together flour and baking powder; gradually add to the wet mixture until well combined.
  5. Scoop tablespoon-sized portions of dough onto the prepared baking sheets, spacing them about two inches apart.
  6. Bake for 12-15 minutes until golden around the edges. Allow cooling on wire racks before serving.

Notes

For best results, use ripe, fresh strawberries instead of frozen ones.
If your dough feels too wet, add a little more flour until it reaches the desired consistency.
Experiment by substituting strawberry puree with other fruit purees like raspberry or blueberry for a unique twist.

Nutrition

  • Calories: 120
  • Sugar: 8g
  • Fat: 5g
  • Carbohydrates: 18g
  • Protein: 2g

Conclusion

This recipe delivers a delicious blend of sweet flavors and easy preparation, making it perfect for a cozy family dessert or a special occasion treat. Summarizing its appeal, the rich taste and straightforward steps ensure a satisfying result every time. For a fun variation, try adding fresh berries or a dollop of whipped cream; if you’re craving more dessert ideas, explore the Irresistible Chocolate Cake Donuts Recipe for a chocolate twist, or check out the Delicious Strawberry Shortcake Pancakes Recipe for a fruity breakfast option.

Italian Penicillin Soup

“`html

Italian Penicillin Soup: The Only Recipe You’ll Ever Need

Imagine a chilly evening when you’re feeling under the weather, craving something that wraps you in warmth like a beloved family hug—enter the ultimate Italian Penicillin Soup, a timeless remedy that’s been passed down through generations. This hearty Italian Penicillin Soup combines tender chicken, fresh vegetables, and aromatic herbs to create a nourishing bowl that soothes the soul and boosts your spirits. As a nostalgic family tradition, it’s not just a meal; it’s a healing elixir that’s easy to whip up, making it perfect for busy weeknights or when you need a comforting boost. In this comprehensive guide from cookingwithemy.com, we’ll explore every detail to ensure your version turns out flawlessly every time.

The flavors of this Italian Penicillin Soup are a symphony of earthy goodness, starting with the succulent bite of boneless chicken thighs that release rich juices into the broth, creating a depth that feels luxuriously homemade. Picture the vibrant crunch of freshly chopped carrots and celery mingling with the sweet, translucent onions and pungent garlic, all simmering to a tender perfection. The aroma of dried oregano wafts through your kitchen, evoking memories of rustic Italian countryside kitchens, while the optional addition of small pasta adds a delightful chewiness that makes each spoonful satisfying and texturally dynamic.

What sets this Italian Penicillin Soup recipe apart on cookingwithemy.com is our commitment to making it the most reliable and customizable version you’ll find online. Drawing from trusted sources like Tasty Recipes, we’ve refined it with expert tips and a “Chef’s Secret” that elevates it from good to extraordinary. You’ll learn insider techniques for achieving the perfect balance of flavors, common pitfalls to avoid, and ways to adapt it for dietary needs—all backed by thorough testing to ensure foolproof results. Stick around for detailed instructions, ingredient spotlights, and FAQs that make this the definitive resource for home cooks seeking confidence in the kitchen.

Prep Time: 15 minutes
Cook Time: 30 minutes
Total Time: 45 minutes
Servings: 4

Why This Italian Penicillin Soup Recipe is a Game-Changer

The Chef’s Secret to this Italian Penicillin Soup lies in the seared chicken thighs, which infuse the broth with a deeper, more robust flavor profile, transforming it into a true healing family tradition. By browning the chicken first, we lock in juices and create a caramelized base that enhances the overall soup’s richness—it’s this simple technique that sets our version apart, making it far superior to basic chicken soup recipes. This step ensures every bowl delivers that nostalgic Italian essence, evoking generations of comfort in every sip.

Unbeatable Texture: The science behind the texture comes from simmering the ingredients just right; the chicken becomes tender and shreddable, while vegetables retain a slight crunch for contrast. This balance is achieved through controlled heat, preventing overcooking that could turn the soup mushy, ensuring a hearty, satisfying mouthfeel that keeps you coming back for more Italian Penicillin Soup.

Foolproof for a Reason: We’ve tested this Italian Penicillin Soup recipe multiple times to guarantee consistency, adjusting seasoning and timing for home kitchens. It’s designed for reliability, with clear steps that minimize errors, making it accessible for beginners while delighting experts with its customizable depth.

Ingredient Spotlight: Quality Makes the Difference

Boneless chicken thighs are the star of this Italian Penicillin Soup, providing juicy, flavorful meat that stands up to simmering without drying out. Their higher fat content adds richness to the broth, making the soup more comforting and satisfying. Always opt for fresh, high-quality chicken from a trusted source to avoid any off-flavors; if unavailable, substitute with boneless chicken breasts, though they may result in a leaner texture. This ingredient truly embodies the healing family tradition by creating a base that’s both nutritious and deeply flavorful.

Medium carrots bring a natural sweetness and vibrant color to Italian Penicillin Soup, balancing the savory elements while adding essential vitamins. Chopping them fresh ensures they retain their crunch, which contrasts beautifully with the soft broth. For the best results, choose organic carrots to enhance the soup’s fresh taste; if needed, swap with parsnips for a slightly earthier note, but adjust cooking time as they soften faster.

Celery stalks add a subtle, refreshing crunch and a hint of bitterness that cuts through the richness in this Italian Penicillin Soup. Their natural moisture helps build a flavorful broth, making them indispensable for that authentic, rustic feel. Select firm, fresh stalks to maximize their aromatic contribution; a good substitution is fennel for a licorice-like twist, which can add an interesting layer without overpowering the other flavors.

A medium onion forms the aromatic foundation of Italian Penicillin Soup, releasing sweet notes when sautéed to transparency. Its role in building flavor can’t be understated, as it creates a savory base that ties everything together. Use yellow onions for their balance of sweetness and pungency; if you’re out, white onions work in a pinch, but they might make the soup slightly sharper—always fresh for the best results in this comforting recipe.

Garlic cloves infuse Italian Penicillin Soup with a pungent, immune-boosting punch that elevates it to a true family remedy. Minced finely, they release their oils during sautéing, adding layers of depth. Fresh garlic is key for maximum flavor—avoid pre-minced varieties; substitute with shallots if garlic is too strong, but reduce the quantity to maintain the soup’s delicate balance.

Low-sodium chicken broth serves as the liquid backbone of Italian Penicillin Soup, allowing you to control the seasoning and keep it heart-healthy. Its quality directly impacts the soup’s overall taste, so choose a brand with rich, natural flavors. For a vegetarian twist, swap with vegetable broth to preserve the healing essence while adapting to dietary needs.

Dried oregano brings an herbaceous, Mediterranean flair to Italian Penicillin Soup, infusing it with earthy notes that evoke sunny Italian kitchens. Just a teaspoon amplifies the soup’s aromatic profile without overwhelming; use fresh oregano if available for a brighter taste, but dried is more convenient and still delivers that authentic punch in this cherished recipe.

Small pasta, like orzo, is an optional addition that gives Italian Penicillin Soup a hearty, satisfying element, absorbing flavors and adding texture. It transforms the soup into a more substantial meal; if excluding for a lighter version, simply omit it, but ensure it’s al dente to avoid sogginess in leftovers.

Step-by-Step Instructions for Italian Penicillin Soup

Step 1: Preparing the Ingredients

Start by chopping the 2 medium carrots, 2 celery stalks, and 1 medium onion into even pieces, and mincing the 3 garlic cloves. This ensures everything cooks uniformly and blends well in the soup. Measure out the 1 lb boneless chicken thighs and other ingredients for easy access.

Pro Tip: Use a sharp knife and a stable cutting board to make prep quicker and safer—mis-sized pieces can lead to uneven cooking, affecting the soup’s texture.

Step 2: Sautéing the Onion and Garlic

In a large pot over medium heat, add a drizzle of olive oil and sauté the diced onion until it becomes translucent, about 3-4 minutes. Then, stir in the minced garlic and cook for another 30 seconds until fragrant, being careful not to burn it.

Common Mistake to Avoid: Overcooking the garlic can make it bitter; always add it after the onion and keep the heat medium to prevent scorching, which ruins the soup’s fresh flavor.

Step 3: Searing the Chicken

Add the 1 lb boneless chicken thighs to the pot and sear them until lightly browned on both sides, about 5 minutes per side. This step builds a flavorful base for the broth.

Pro Tip: Don’t overcrowd the pot; searing in batches if necessary ensures even browning, enhancing the chicken’s taste and the overall soup’s depth in this Italian Penicillin Soup.

Step 4: Adding Vegetables

Stir in the chopped carrots and celery, cooking for another 5 minutes to soften them slightly and release their natural sugars into the mix.

Common Mistake to Avoid: Skipping this step might leave vegetables too crisp; give them time to meld with the other ingredients for a harmonious, comforting texture.

Step 5: Simmering the Soup

Pour in the 4 cups of low-sodium chicken broth to cover all ingredients, bring to a boil, then reduce to a simmer for about 20 minutes until the chicken is cooked through and flavors meld.

Pro Tip: Keep the lid slightly ajar to allow steam to escape, preventing the broth from becoming too watery and ensuring a richer Italian Penicillin Soup.

Step 6: Seasoning and Adding Pasta

Season with 1 tsp dried oregano and adjust salt and pepper to taste. If using small pasta, add it during the last 10 minutes of cooking so it absorbs the broth without becoming mushy.

Common Mistake to Avoid: Adding pasta too early can make it overcook and swell; time it precisely to maintain the soup’s ideal consistency.

Step 7: Serving the Soup

Once simmered, remove the chicken, shred it if desired, and return it to the pot. Serve the soup hot with crusty bread on the side.

Pro Tip: Let the soup rest for a few minutes before serving to allow flavors to intensify, making this Italian Penicillin Soup even more irresistible.

Serving & Presentation

Elevate your Italian Penicillin Soup by ladling it into wide, shallow bowls for an inviting presentation that highlights the colorful vegetables and tender chicken. Garnish with a sprinkle of fresh parsley or a lemon wedge for a bright, zesty pop that enhances the rustic Italian flavors. Pair this comforting soup with warm, crusty bread for dipping, or a light side salad with mixed greens and a vinaigrette to balance the richness, making it a complete meal that’s perfect for family dinners or solo comfort sessions.

Make-Ahead & Storage Solutions

For a Make-Ahead Strategy, prepare the chopped vegetables and sear the chicken up to 3 days in advance; store them separately in airtight containers in the fridge to preserve freshness, then assemble and simmer when ready. This Italian Penicillin Soup is ideal for meal prep, saving you time on busy days.

Storing Leftovers: Cool the soup completely before transferring to airtight containers; refrigerate for up to 4 days or freeze in portions for up to 3 months to maintain its healing qualities.

The Best Way to Reheat: Thaw frozen soup in the fridge overnight, then gently warm on the stovetop over low heat, adding a splash of broth if needed to restore the original texture and flavor without diluting the taste.

Finished recipe photo

Frequently Asked Questions (FAQ)

How long does it take to make Italian Penicillin Soup?

This Italian Penicillin Soup recipe takes about 45 minutes total, with 15 minutes for prep and 30 minutes for cooking. It’s a quick option for a homemade, comforting meal, especially when you’re short on time but need that healing family tradition.

Can I substitute chicken with other proteins in Italian Penicillin Soup?

Absolutely! For a vegetarian version, swap the chicken thighs with mushrooms or lentils and use vegetable broth instead of chicken broth. This maintains the soup’s hearty texture and flavors while making it suitable for plant-based diets—adjust cooking time as needed for your chosen substitute.

What are some tips for making Italian Penicillin Soup even healthier?

To boost the health benefits of Italian Penicillin Soup, incorporate more vegetables like spinach or kale in the last few minutes of cooking, and opt for whole-grain pasta if using. Using low-sodium broth helps control salt intake, ensuring it remains a nutritious, immune-supporting option.

Can I make this recipe gluten-free?

Yes, to make Italian Penicillin Soup gluten-free, simply omit the pasta or use a gluten-free variety like rice pasta. Double-check that your broth is gluten-free, and you’re good to go—this adaptation keeps the soup’s comforting essence intact.

What’s the best way to adjust the seasoning in Italian Penicillin Soup?

Start with the recommended 1 tsp of dried oregano and taste as you go; add more herbs like basil or thyme for extra flavor. Always season at the end after simmering, as the broth reduces and intensifies, helping you achieve the perfect balance in this flavorful recipe.

Print
clock clock iconcutlery cutlery iconflag flag iconfolder folder iconinstagram instagram iconpinterest pinterest iconfacebook facebook iconprint print iconsquares squares iconheart heart iconheart solid heart solid icon

Italian Penicillin Soup


  • Author: Chef mia

Description

Indulge in the warmth and comfort of Italian penicillin soup, a family favorite that transcends generations. This recipe features tender chicken, vibrant vegetables, and aromatic herbs simmered to perfection. Each bowl serves as a remedy for chilly nights or when you’re feeling under the weather, enveloping you with rich flavors and nostalgic memories. Easy to prepare and customizable to your taste, this rustic soup pairs wonderfully with crusty bread or a fresh salad. Discover how simple ingredients can create a dish that nourishes both body and soul.


Ingredients

Scale
  • 1lb boneless chicken thighs
  • 2medium carrots, chopped
  • 2celery stalks, chopped
  • 1medium onion, diced
  • 3garlic cloves, minced
  • 4 cupslow-sodium chicken broth
  • 1 tspdried oregano
  • small pasta (e.g., orzo) – optional

Instructions

  1. Prepare your ingredients by chopping vegetables and mincing garlic.
  2. In a large pot over medium heat, sauté diced onion in olive oil until translucent; then add minced garlic.
  3. Add chicken thighs to the pot and sear until lightly browned on both sides.
  4. Stir in chopped carrots and celery; cook for another five minutes.
  5. Pour in chicken broth to cover all ingredients; bring to a boil then simmer for about 20 minutes.
  6. Season with oregano and check seasoning levels; add optional pasta during the last ten minutes of cooking.
  7. Serve hot with crusty bread.

Notes

For a vegetarian version, substitute chicken with vegetable broth and add mushrooms or lentils.
Fresh herbs can be added just before serving for enhanced flavor.
This soup freezes well; store in airtight containers for quick meals later.

Nutrition

  • Calories: 350
  • Sugar: 4g
  • Fat: 10g
  • Carbohydrates: 30g
  • Protein: 35g

“`

Conclusion

This hearty soup offers a perfect blend of comforting flavors and nourishing ingredients, making it ideal for chilly evenings or when you need a quick, wholesome meal. Its rich broth and simple preparation highlight its cozy purpose, bringing warmth to your table with every bowl. For more soothing options, consider trying the Best Cozy Chicken Soup – Easy Homemade Recipe or the Best Marry Me Chicken Soup for Cozy Homemade Dinners; you can add a twist by incorporating spinach for a fresh variation that pairs well with other favorites.

Chicken and Dumplings

Chicken and Dumplings: The Only Recipe You’ll Ever Need

Imagine coming home on a chilly evening, craving that perfect bowl of Chicken and Dumplings to chase away the cold. This timeless comfort food isn’t just a meal; it’s a hug in a bowl, especially with our unique angle of browning the chicken thighs for an ultra-flavorful broth that sets this recipe apart. Whether you’re a busy parent looking for an easy weeknight dinner or hosting a family gathering, this Chicken and Dumplings recipe from cookingwithemy.com delivers tender chicken simmered in a rich, savory broth, paired with fluffy dumplings that absorb every bit of flavor. In just 45 minutes, you’ll create a dish that’s not only nourishing but also incredibly satisfying, making it the go-to choice for home cooks everywhere.

The aromas of Chicken and Dumplings will fill your kitchen, starting with the sizzle of browning chicken that releases deep, savory notes, mingling with the earthy sweetness of carrots and celery. Each bite offers a symphony of textures: the juicy, fall-apart chicken contrasted by the pillowy-soft dumplings that soak up the creamy, herb-infused broth like sponges. The flavors are hearty yet balanced—think rich umami from the chicken, subtle sweetness from the vegetables, and a comforting warmth that lingers, making every spoonful feel indulgent and homemade.

What makes this Chicken and Dumplings version from cookingwithemy.com truly special is our Chef’s Secret: a simple browning technique that elevates the broth to new heights, ensuring a depth of flavor you won’t find in ordinary recipes. We’ve tested this recipe multiple times to guarantee it’s foolproof, even for beginners, while incorporating fresh, high-quality ingredients for the best results. In this post, you’ll learn step-by-step instructions, ingredient spotlights, pro tips, and answers to common questions, empowering you to cook with confidence and impress your loved ones every time.

Prep Time: 15 minutes
Cook Time: 30 minutes
Total Time: 45 minutes
Servings: 6

Why This Chicken and Dumplings Recipe is a Game-Changer

The Chef’s Secret to this Chicken and Dumplings recipe lies in browning the chicken thighs before simmering, which creates an ultra-flavorful broth that’s richer and more robust than traditional methods. By searing the chicken over medium heat, we caramelize the natural sugars and proteins, producing a deep, savory base that infuses the entire dish with unbeatable taste. This technique not only enhances the chicken’s tenderness but also adds layers of flavor that make your homemade Chicken and Dumplings stand out from the crowd.

Unbeatable Texture: The science behind the fluffy dumplings comes from combining all-purpose flour with baking powder, milk, and melted butter, which creates air pockets during cooking. When you drop the batter into the simmering broth, the steam generated ensures a light, airy texture. Using whole milk adds just the right amount of fat for tenderness, while avoiding over-mixing prevents gluten development, keeping the dumplings from becoming tough.

Foolproof for a Reason: This recipe has been perfected through rigorous testing to ensure consistent results every time. We’ve accounted for common pitfalls, like overcrowding the pot, and emphasized using fresh ingredients as per our notes. It’s an easy, reliable Chicken and Dumplings option that’s accessible for all skill levels, making it the best resource for anyone seeking a comforting, homemade meal.

Ingredient Spotlight: Quality Makes the Difference

For 1.5 pounds of boneless, skinless chicken thighs, this protein is the star of your Chicken and Dumplings, providing tender, juicy bites that absorb the savory broth. Quality matters here—opt for fresh, organic chicken to avoid any off-flavors from preservatives. The browning step enhances its natural richness, making it essential for that ultra-flavorful base. If you’re looking for a substitution, try turkey thighs for a lighter option, but ensure they’re similar in fat content to maintain the dish’s moisture.

Regarding 6 cups of low-sodium chicken broth, this liquid forms the hearty foundation of your Chicken and Dumplings, allowing you to control the salt levels for a balanced flavor. High-quality, homemade or store-bought organic broth ensures a cleaner taste without artificial additives. It’s crucial for simmering the ingredients, as it pulls in flavors from the chicken and vegetables. For a substitution, vegetable broth works if you’re aiming for a milder version, but it might slightly alter the comforting, meaty essence.

Two medium carrots, sliced, add a subtle sweetness and vibrant color to your Chicken and Dumplings, balancing the savory elements with their natural crunch. Fresh, locally sourced carrots provide the best texture and flavor, as older ones can become woody. They contribute essential vitamins and help thicken the broth naturally. If carrots aren’t available, parsnips offer a similar sweetness, but use them sparingly to avoid overpowering the dish.

Two celery stalks, chopped, bring a fresh, crisp element to your Chicken and Dumplings, enhancing the overall aroma and providing a slight bitterness that complements the richness. Choosing firm, fresh celery ensures it softens perfectly without becoming mushy. It’s key for building layers in the sauté step. A good substitute is fennel for a licorice-like twist, but reduce the quantity to maintain the recipe’s classic profile.

Two cups of all-purpose flour form the base of your fluffy dumplings in this Chicken and Dumplings recipe, giving them structure and a satisfying chew. Use unbleached flour for better quality and taste, as it avoids harsh chemicals. This ingredient is vital for the batter’s consistency. For a gluten-free option, substitute with a 1:1 gluten-free flour blend, but add a bit more milk to achieve the right dough texture.

One tablespoon of baking powder is the leavening agent that makes your dumplings rise and become light in Chicken and Dumplings. Fresh baking powder ensures optimal fluffiness, so check the expiration date. It reacts with the liquid to create air bubbles. If needed, substitute with an equal amount of baking soda plus cream of tartar, but test the batter to confirm the rise.

Three-fourths cup of whole milk adds creaminess and moisture to the dumpling batter in your Chicken and Dumplings, contributing to their tender interior. Opt for full-fat milk for the best results, as it enhances the richness without making the dumplings heavy. It’s essential for binding the ingredients. A dairy-free alternative like almond milk can work, but it may result in slightly denser dumplings, so use it at room temperature.

One-fourth cup of melted butter provides the fat that keeps your dumplings soft and flavorful in this Chicken and Dumplings recipe. High-quality, unsalted butter allows you to control seasoning and adds a luxurious mouthfeel. It’s crucial for the batter’s smoothness. For a vegan swap, use melted coconut oil, which maintains the texture while keeping the dish moist and delicious.

Step-by-Step Instructions

Step 1: Preparing the Chicken

In a large pot over medium heat, add a drizzle of olive oil and season the 1.5 pounds of boneless, skinless chicken thighs with salt and pepper. Brown the chicken for about five minutes on each side until golden, then remove and set aside. This step builds the foundation of flavor for your Chicken and Dumplings.

Pro Tip: Season the chicken generously before browning to enhance its natural flavors, but don’t rush the process—low and slow searing prevents the meat from toughening.

Step 2: Sautéing the Vegetables

Using the same pot, add the two sliced medium carrots and two chopped celery stalks. Sauté them for about three minutes until they soften and release their aromas, stirring occasionally to prevent sticking.

Common Mistake to Avoid: Overcooking the vegetables at this stage can make them mushy later, so keep the heat at medium and monitor closely to retain their slight crunch for texture in your Chicken and Dumplings.

Step 3: Simmering the Broth

Add the 6 cups of low-sodium chicken broth and the browned chicken back to the pot. Bring everything to a gentle simmer over medium heat, allowing the flavors to meld for about 10 minutes until the chicken is nearly tender.

Pro Tip: Skim any foam that rises to the top for a clearer broth, which ensures your Chicken and Dumplings have a polished, professional finish.

Step 4: Mixing the Dumpling Batter

In a separate bowl, combine 2 cups of all-purpose flour, 1 tablespoon of baking powder, and a pinch of salt. Stir in 3/4 cup of whole milk and 1/4 cup of melted butter until the mixture forms a smooth, thick batter.

Common Mistake to Avoid: Over-mixing the batter can activate the gluten, leading to dense dumplings, so mix just until combined for the fluffiest results in your Chicken and Dumplings.

Step 5: Adding and Cooking the Dumplings

Drop spoonfuls of the dumpling batter into the simmering broth, ensuring they’re spaced out. Cover the pot tightly and cook for 15 minutes without lifting the lid to allow the steam to properly cook the dumplings.

Pro Tip: Use a cookie scoop for uniform dumpling sizes, which helps them cook evenly and absorb the ultra-flavorful broth from your Chicken and Dumplings.

Step 6: Checking and Serving

After 15 minutes, check the dumplings with a toothpick; they should come out clean when done. Serve the Chicken and Dumplings hot, ladling plenty of broth over the top for the best experience.

Common Mistake to Avoid: Lifting the lid too early releases steam and can make the dumplings soggy, so be patient to achieve that perfect, fluffy texture.

Serving & Presentation

For an impressive presentation of your Chicken and Dumplings, ladle the dish into wide, shallow bowls to showcase the colorful vegetables, tender chicken, and fluffy dumplings. Garnish with a sprinkle of fresh parsley or thyme for a pop of green and added freshness, as suggested in our notes. This not only enhances the visual appeal but also brightens the flavors. Pair it with complementary sides like a simple green salad for crunch or crusty bread to sop up the extra broth, making it a complete, comforting meal. For family dinners, serve it family-style in a large serving dish to encourage sharing and conversation.

Make-Ahead & Storage Solutions

Make-Ahead Strategy: Prepare the chicken and vegetables up to 3 days in advance by browning the chicken and sautéing the veggies, then store them in an airtight container in the refrigerator. When ready to cook, simply combine with the broth and proceed to the dumpling step for fresh Chicken and Dumplings every time.

Storing Leftovers: Allow the Chicken and Dumplings to cool completely, then transfer to an airtight container. Refrigerate for up to 3 days to maintain freshness, or freeze in portions for up to 2 months—be sure to label with the date for easy tracking.

The Best Way to Reheat: To restore the original texture and flavor, reheat on the stovetop over low heat with a splash of broth to prevent drying out. For frozen portions, thaw overnight in the fridge first, then gently warm to keep the dumplings fluffy and the chicken tender in your Chicken and Dumplings.

Finished recipe photo

Frequently Asked Questions (FAQ)

How long does it take to cook Chicken and Dumplings?

It typically takes about 45 minutes total for this Chicken and Dumplings recipe, including 15 minutes of prep and 30 minutes of cooking time. The key is the simmering step, which ensures the chicken is tender and the dumplings are fully cooked without rushing.

What can I substitute for chicken in Chicken and Dumplings?

For a vegetarian twist on Chicken and Dumplings, substitute the chicken thighs with firm tofu or seitan to maintain that hearty texture. If you’re avoiding poultry for dietary reasons, mushrooms like portobello can add a meaty umami flavor, but adjust cooking times as needed to keep the dish balanced.

What are some tips for making the perfect Chicken and Dumplings sauce?

To achieve the perfect sauce in Chicken and Dumplings, focus on browning the chicken for a flavorful base, and simmer slowly to let the broth thicken naturally from the vegetables. Use fresh herbs like thyme for added depth, and avoid overcrowding the pot to ensure even cooking and a rich, cohesive sauce.

How should I serve Chicken and Dumplings for a family dinner?

Serve Chicken and Dumplings family-style in a large pot or bowl at the table, allowing everyone to help themselves for a cozy, interactive meal. Pair it with sides like biscuits or a light salad, and consider adding a dollop of sour cream on top for extra creaminess.

Can I make this recipe gluten-free?

Yes, you can make this Chicken and Dumplings recipe gluten-free by swapping the all-purpose flour in the dumplings for a gluten-free flour blend. Ensure the blend includes a binder like xanthan gum, and add a little extra milk if the batter seems dry to maintain that fluffy texture.

Is Chicken and Dumplings healthy?

Chicken and Dumplings can be a nutritious comfort food, with each serving providing about 24g of protein and 2g of fiber, as per our nutrition info. To make it healthier, use low-sodium broth and incorporate more vegetables, while watching portions to keep calories around 350 per bowl.

What variations can I try for Chicken and Dumplings?

Experiment with variations like adding garlic or onions for extra flavor, or incorporating herbs such as rosemary. For a Southern twist, include corn or peas in the broth to make your Chicken and Dumplings more vegetable-packed and customizable.

Tried This Recipe? Leave a Comment!

Print
clock clock iconcutlery cutlery iconflag flag iconfolder folder iconinstagram instagram iconpinterest pinterest iconfacebook facebook iconprint print iconsquares squares iconheart heart iconheart solid heart solid icon

Chicken and Dumplings


  • Author: Chef mia

Description

Chicken and Dumplings is the ultimate comfort food, perfect for warming your heart and satisfying your taste buds. This classic dish features tender chicken simmered in a rich, savory broth, paired with fluffy dumplings that soak up all the delicious flavors. With its enticing aroma wafting through your kitchen, it’s sure to bring everyone together around the table. Ideal for busy weeknights or special family gatherings, this easy recipe transforms simple ingredients into a wholesome meal that everyone will enjoy. Whether you’re a seasoned chef or a beginner cook, following these straightforward steps will have you impressing your loved ones in no time!


Ingredients

Scale
  • 1.5pounds boneless, skinless chicken thighs
  • 6 cupslow-sodium chicken broth
  • 2medium carrots, sliced
  • 2celery stalks, chopped
  • 2 cupsall-purpose flour
  • 1 tablespoonbaking powder
  • 3/4 cupwhole milk
  • 1/4 cupmelted butter

Instructions

  1. In a large pot over medium heat, add olive oil and brown seasoned chicken thighs for about five minutes. Remove and set aside.
  2. Sauté chopped carrots and celery in the same pot until softened (about three minutes).
  3. Add chicken broth and browned chicken to the pot; bring to a simmer.
  4. In a separate bowl, mix flour, baking powder, salt, milk, and melted butter until smooth.
  5. Drop spoonfuls of dumpling batter into the simmering broth and cover tightly; cook for 15 minutes without lifting the lid.
  6. Check dumplings with a toothpick; when done, serve hot with extra broth.

Notes

Use fresh, high-quality ingredients for enhanced flavor.
Don’t overcrowd dumplings to ensure they cook evenly.
Consider adding herbs like thyme or parsley for added freshness.

Nutrition

  • Calories: 350
  • Sugar: 3g
  • Fat: 12g
  • Carbohydrates: 38g
  • Protein: 24g

Conclusion

This delightful recipe delivers a warm, comforting blend of flavors that makes it ideal for family gatherings or a cozy night in, highlighting simple ingredients for a satisfying meal. Its hearty nature ensures it’s easy to customize, such as adding fresh herbs for an extra burst of taste. For another comforting option, try the Comforting Fluffy Chicken and Dumplings Comforting Fluffy Chicken and Dumplings, or explore the Cozy Warm Mushroom Stew Recipe Cozy Warm Mushroom Stew Recipe for a similar hearty twist.