End your day with a delicious, comforting, and satisfying dinner! Whether you’re looking for quick and easy weeknight meals, cozy comfort food, or elegant dishes for special occasions, we have the perfect recipes for you.
From hearty casseroles and one-pan wonders to savory pastas, juicy meats, and flavorful vegetarian options, our collection is designed to make dinnertime effortless and enjoyable.
Busy schedule? No problem! Try our slow cooker meals, sheet pan dinners, and 30-minute recipes to save time without sacrificing flavor. Whatever your craving, these recipes will bring warmth and joy to your table every night. 🍽️✨
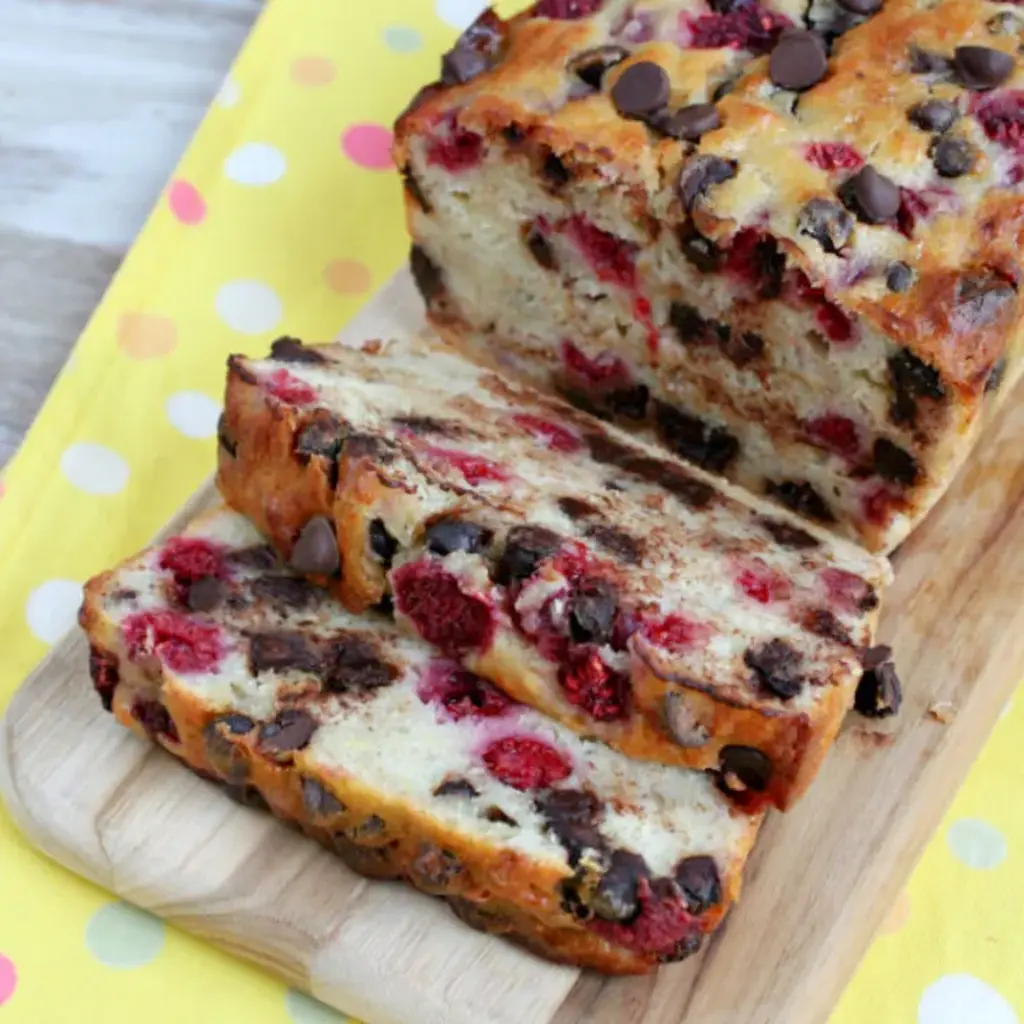
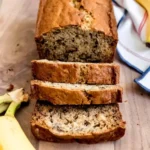
For when you need a little something more in your banana bread!
Ingredients
Scale
2 cups all purpose flour
¾ teaspoon baking soda
½ teaspoon salt
1 cup granulated white sugar
4 tablespoons (½ stick) unsalted butter, at room temperature
2 large eggs
1½ cups mashed ripe banana (about 3 bananas)
cup plain low fat yogurt
1 teaspoon vanilla extract
1 cup dark chocolate chunks or chips
1 cup halved raspberries, tossed in 1 tablespoon all-purpose flour
Instructions
Preheat oven to 350°F. Spray a 9×5-inch loaf pan with cooking spray.
In a medium bowl, whisk together the flour, baking soda and salt.
In a separate large bowl, beat the sugar and butter with an electric mixer at medium speed until well blended (about 1 minute). Add the eggs one at a time, beating well after each addition. Add the banana, yogurt, and vanilla; beat until blended. Stir in the flour mixture; just until moist. Don't over-mix. Stir in the chocolate chunks and then gently stir in the raspberries. If you want, you can sprinkle a few additional chocolate chunks and raspberries on the top to make it look pretty.
Spoon the batter into the prepared pan. Bake for 50 to 60 minutes or until a wooden pick inserted in center comes out clean. Cool 15 minutes in the pan on a wire rack. Remove from pan and cool completely on the wire rack.
Nutrition
Calories:304kcal
Sugar:26g
Protein:5g
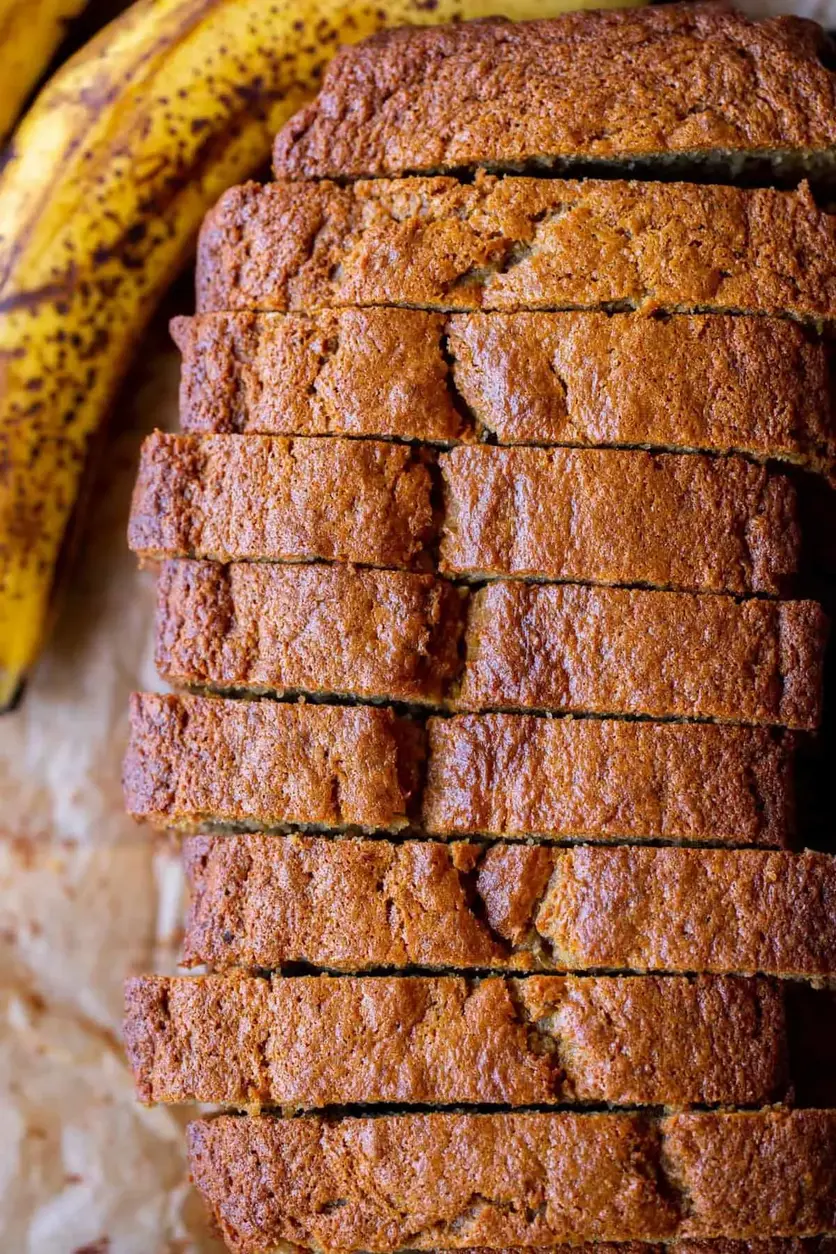
Best Banana Bread Recipe (Moist!) from The Food Charlatan
The moist Banana Bread recipe you’ve been searching for! I tested a ton of different recipes so you don’t have to. The result is a bread that is super moist (thank you sour cream) and perfectly fluffy. It’s full of banana flavor without being too dense. It’s my favorite banana nut bread! And it’s easy to make!
Ingredients
Scale
1/2 cup butter, 1 stick, softened
1/2 cup brown sugar, packed
1/2 cup granulated sugar
2 large eggs
2 teaspoons vanilla extract
1 cup mashed ripe banana, 9 ounces*, about 2 and 1/2 medium bananas
1 cup all-purpose flour, spooned and leveled
1/2 cup old fashioned oats, blended into a powder**
1 teaspoon baking soda
1 & 1/2 teaspoons baking powder
3/4 teaspoon kosher salt
1/2 cup sour cream
1/4 teaspoon cinnamon, optional
1/8 teaspoon nutmeg, optional
1/8 teaspoon cloves, optional
1/2 to 3/4 cup toasted pecans or walnuts, optional
Instructions
Preheat your oven to 350 degrees F. Spray a 9×5 inch loaf pan with nonstick spray, or line with parchment paper. I prefer using the paper so that you can lift the bread out for easy slicing.
If you plan to add nuts, toast them now so they have time to cool. Add 1/2 or 3/4 cup chopped nuts (I like either walnuts or pecans) to a dry baking sheet. Bake at 350 for 5-7 minutes, stirring every 2 minutes. You will know they are done when they are very fragrant. Set aside to let cool.
In a large bowl or stand mixer, beat the butter until it is smooth, scraping the sides of the bowl. Add 1/2 cup brown sugar and 1/2 cup white sugar and cream together. This means beat it for about 2 minutes until it is fluffy, making sure to scrape the sides and bottom of the bowl.
Add 2 eggs and 2 teaspoons vanilla. Beat well until incorporated, scraping the sides.
In a small bowl, use a fork or potato masher to mash about 2 and 1/2 very ripe bananas. It should come out to about 1 cup.* A little more or a little less banana, and you are still going to get banana bread. (More banana=more dense. Less banana does NOT make your banana bread not-moist.) 1 cup is the magic number for me. Add the mashed banana to the butter mixture and stir until incorporated.
Add 1 cup flour to the bowl, but do not stir yet. (You can mix the dry ingredients in a separate bowl but I am too lazy.)
Add 1/2 cup old fashioned oats to a blender or food processor. Blend until the mixture has turned into powder, if it's a little gritty that's okay. Add the oat flour to the bowl but don't stir.
Use a small spoon to stir 1 teaspoon baking soda, 1 and 1/2 teaspoons baking powder, and 3/4 teaspoon kosher salt into the flour. You don't want any clumps of salt or soda in your bread.
At this point, you can add 1/4 teaspoon cinnamon and 1/8 teaspoon each cloves and nutmeg. This bread is still really good without the spices, they are optional.
Stir the dry ingredients into the wet ingredients until incorporated, scraping the sides and bottom.
Lastly (don’t forget!!) fold in the 1/2 cup sour cream.
If you want to add nuts, fold them into the batter now. (Next time I think I will save 1/4 cup to sprinkle on top of the bread before going in the oven. Just an idea!)
Pour the batter into the prepared pan and smooth out the top.
Bake at 350 for 55-65 minutes. Every oven is different and you are probably going to have to check it a few times. There is nothing sadder than undercooked banana bread, so I rely completely on the toothpick test: a toothpick inserted very deeply into the center of your bread (stick it right into the crack that has formed) should come out with no wet batter on it. Very moist crumbs are ok, as the bread will continue cooking just a bit once pulled out of the oven. The bread should look nice and brown on top and should be pulling away from the sides of the pan.
Let the bread cool completely (okay, well at least for 20 minutes or so) on a cooling rack before slicing into it. If you don't devour a warm slice immediately with copious amounts of butter, it's a crime against bananas everywhere.
Store covered on the counter for up to 2 days, then if there is by some miracle some leftover, I would stick it in the fridge.
Banana bread freezes beautifully. You can wrap an entire loaf in foil and then ziplock and freeze (thaw on the counter with the bag sealed) or you can slice it and wrap and freeze individual portions for when you need a quick fix. Let thaw on the counter in the sealed container. Toss thawed slices in the toaster for a minute to get rid of extra moisture.
Notes
*I like 1 cup banana bread, but as discussed in the post, you can add up to 2 cups (18 ounces) of mashed banana (and change NOTHING else in the recipe), and it will turn out fine. “Fine” meaning overly dense and gummy in my opinion 😉 But if you serve it to people they will still say, “ooh, this is great banana bread!” Trust me, I did. There are many, many banana bread recipes out there that call for these same proportions with 2 cups banana.
** You can replace the oats with 1/2 cup all purpose flour if you want!
I published this recipe back in 2020 and since then, hundreds and hundreds of people have made this lovely bread. It’s one of my favorite recipes and one of the most popular posts on my site. The recipe is rated 4.8 stars, and you can read through the comments to see so many success stories with this bread.
BUT! Occasionally a comment comes in saying that the bread overflowed and made a mess in the oven. I’ve baked this recipe so many times and this NEVER happens for me, not even close. I was so befuddled. I asked my BFF (and recipe development assistant) Sarah to test the bread. HERS OVERFLOWED! I was devastated…then I asked her to bust out the measuring tape and measure the inside of what she was confident was a 9×5 inch pan…it was actually an 8.5 x 4.25 inch loaf pan. You would not think this makes much of a difference, but it totally does!
BUT, even more good news. I tested the recipe a bunch more, reducing the baking powder to 1.5 teaspoons instead of 2.5, and I was happy with the result. So hopefully for all the bakers out there who have slightly-smaller-than-9×5 inch pans, this will solve the overflow problem. If you have been making this recipe successfully, you can make it the same way you always have! For newcomers, I’m changing the recipe to 1.5 teaspoons baking powder, just to save the small-pan people from having to scrub their ovens 😉
Blueberry Cream Cheese Bread is a quick and simple recipe that comes together in no time! Moist and flavor packed with juicy, plump, fresh blueberries throughout! This easy Blueberry Bread pairs perfectly with your morning coffee, or as an anytime snack!
Ingredients
Scale
1 cup butter *softened/unsalted
8 oz cream cheese *softened
¾ cup sugar
2 teaspoon vanilla extract
4 eggs
2 cups flour *all purpose
1 ½ teaspoon baking powder
½ teaspoon salt
2 cups blueberries *fresh, tossed in 1 tablespoon flour
Instructions
Preheat oven to 350 degrees and grease 2 loaf pans (9×5)
In a large bowl, cream together the butter, cream cheese, and sugar.
Add in the vanilla extract and eggs.
Slowly add in the flour, baking powder, and salt.
Once combined, carefully fold in the fresh blueberries.
Pour batter (it will be quite thick, that is okay) into the prepared pans evenly.
Place into preheated oven and bake for about 50 minutes, or until toothpick comes out clean once inserted in center of bread.
Remove from oven and allow to cool slightly before removing from pan and slicing!
Nutrition
Calories:363kcal
Sugar:16g
Protein:6g
Easy One-Bowl BEST Banana Bread Recipe – House of Nash Eats
Super moist, EASY, and delicious, this is the Best Banana Bread recipe ever! It’s our favorite way to use up overripe bananas and it freezes really well too!
Ingredients
Scale
3–4 ripe bananas (about 2 cups mashed)
1/3 cup salted butter melted
3/4 cup (150g) granulated sugar
1 large egg beaten
1 teaspoon pure vanilla extract
1 teaspoon baking soda
1 teaspoon baking powder
1/4 teaspoon ground cinnamon
1/8 teaspoon salt
1 1/2 cups (212g) all-purpose flour
1 cup chopped walnuts or chocolate chips, plus extra for topping if desired
Instructions
Preheat oven to 350 (177). Lightly grease and flour an 8.5×4.5-inch loaf pan or spray with baking spray.
In a large bowl, combine the mashed bananas with the melted butter, then add the sugar, egg, and vanilla. Stir well with a large wooden spoon.3-4 ripe bananas, ⅓ cup salted butter, ¾ cup (150g) granulated sugar, 1 large egg, 1 teaspoon pure vanilla extract
Sprinkle the baking soda, baking powder, cinnamon, and salt over the banana mixture. Stir to combine.1 teaspoon baking soda, 1 teaspoon baking powder, ¼ teaspoon ground cinnamon, ⅛ teaspoon salt
Add flour and walnuts or chocolate chips (if desired), and stir just until no streaks of flour remain. Pour the batter into the prepared loaf pan.1 ½ cups (212g) all-purpose flour, 1 cup chopped walnuts
Bake for 50-60 minutes, until a knife inserted in the center of the loaf comes out clean. Cool in the pan for 10 minutes, then turn out onto a wire rack and cool completely. Slice into 10 thick slices and serve.
Notes
Notes Storage: Store your banana bread in a ziploc bag or in another airtight container on the counter for a few days. Refrigerating it will help it last a day or two longer. But after about 5 days banana bread starts tasting stale, even if it has been wrapped tightly or kept in an airtight container in the fridge. Baking time: If your bread pans are larger or smaller than mine, your bake time might be on the shorter or longer side, respectively. Muffins: This banana bread recipe can also be made as muffins. Just divide between the cups of a muffin tin and bake for 20-24 minutes until muffins are done and a toothpick inserted into the center of a muffin comes out clean. This recipe can be found on page 50 of my cookbook, House of Nash Eats Everyday!
Nutrition
Calories:296kcal
Sugar:20g
Protein:5g
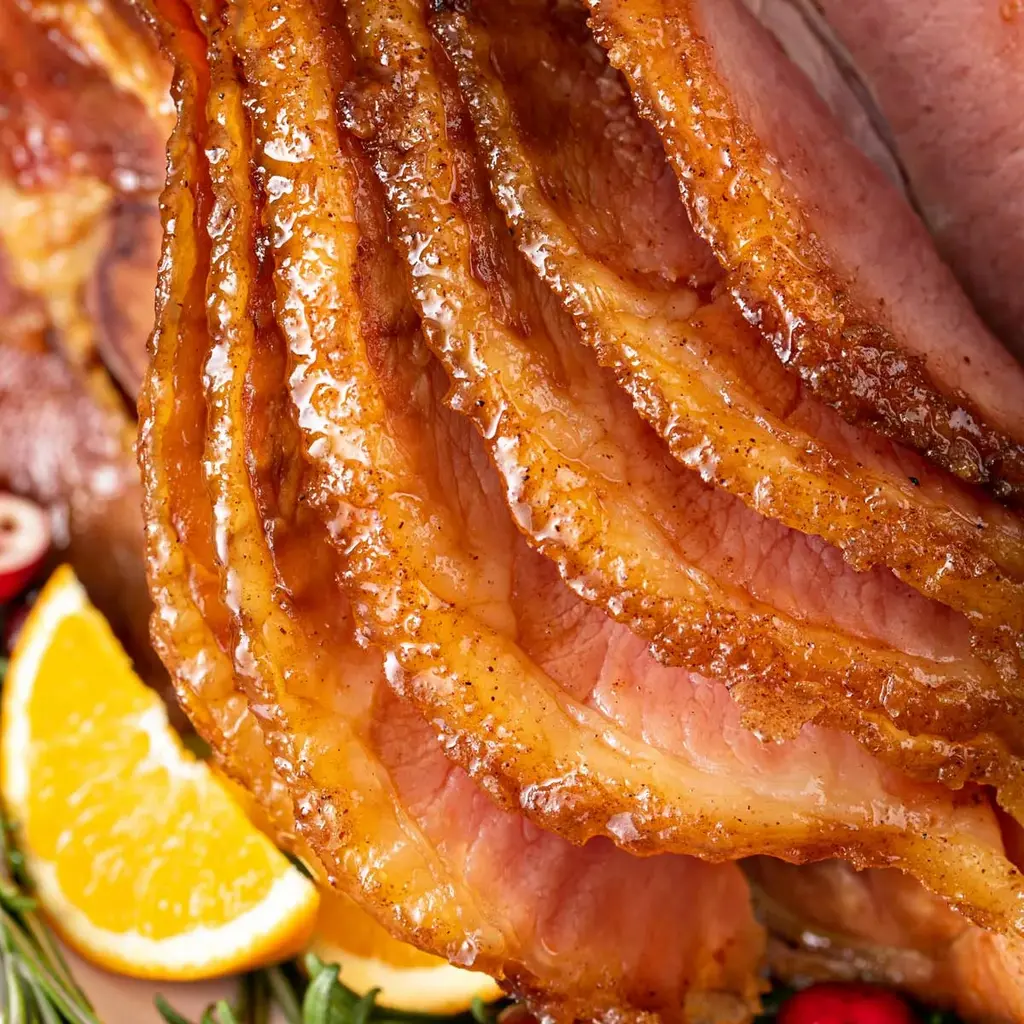
Copycat Honey Baked Ham Recipe
This copycat Honey Baked Ham recipe is insanely delicious and will definitely help you save money on your holiday meal. Juicy and tender spiral ham gets extra flavor with a caramelized and sticky layer of butter and sweet honey glaze. Oven, slow cooker and Instant pot directions provided. #lemonblossoms #honeybaked #ham #holidays #Christmas #Easter #Thanksgiving #crockpot #instantpot #baked
Copycat Honey Baked Ham made with a spiral-cut ham with a caramelized and sticky layer of butter and spiced sweet honey glaze. This juicy and tender ham can be made in the oven, the slow cooker and the Instant Pot. Directions provided.
Ingredients
Scale
1 (8-pounds) half spiral cut ham, bone in or boneless
2 tablespoons butter, melted
1/3 cup honey
Instructions
Preheat the oven to 325º Fahrenheit and place the oven rack in the lower 1/3 part of the oven. Cover a roasting pan or rimmed baking sheet with foil and coat the metal wire rack insert with cooking spray. Remove the ham from its package. If using bone in ham, remove the plastic cap thats over the bone. Place the ham flat-side down on the roasting rack
In a small bowl combine the melted butter and the honey. Pat the ham dry with paper towels. Using a pastry brush (or with your hands), slather or massage the mixture all over the outside of the ham and in between the slices. If any of the honey glaze lands at the bottom of the roasting pan, you can scoop it up and slather it on the ham.
Add about a cup of water to the bottom of the roasting pan or rimmed baking sheet. This will create a moist environment in the oven so you end up with a juicy ham. Bake covered for about 2.5 hours (about 20 minutes per pound of ham) or until an instant-read thermometer registers 140º Fahrenheit when inserted into the thickest part of the ham. Remove ham from the oven and tented with aluminum foil to keep it warm
Combine the spice sugar mixture in a small bowl. Uncover the ham. If the edges are dry, baste the ham with the pan juices then, pat half of the spice sugar mixture (about 3/4 cup) all over the surface of the ham. Alternatively, you can place the sugar mixture on a sheet pan and then roll the ham through the sugar mixture until nicely coated.
Return the ham to the oven and broil until caramelized and bubbly. You can also use a blow torch if preferred.
In a small saucepan, combine the remaining sugar mixture with about 1/3 cup of ham drippings (pan juices) or water (or a combination of both). Bring the mixture to a boil over medium heat and cook until it reaches a glaze consistency, about 2 minutes.
Pour or brush the glaze over the ham. Broil for 1-2 minutes or until bubbly. Keep an eye on it as it can burn quickly.
Remove from the oven and let rest for 5-10 minutes. Serve warm or cold.
Notes
Although the ham is already precooked, it should be baked until it reaches an internal temperature of 140 degrees Fahrenheit to make sure is warm through.
Instant Pot Honey Baked Ham:
Nutrition
Calories:765kcal
Sugar:49g
Protein:49g
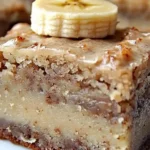
Banana Bread Brownies – A Deliciously Moist, Sweet Twist on Banana Bread!
These Banana Bread Brownies combine the best of both worlds, with the moist, dense texture of banana bread and the richness of brownies. A perfect treat for banana bread lovers who crave a little extra chocolate!
Banana Bread Brownies combine the moist sweetness of banana bread with the rich, fudgy texture of brownies for the ultimate treat. Quick, easy, and perfect for any occasion, these brownies are sure to impress. ezstandalone.cmd.push(function { ezstandalone.showAds(147); });
Ingredients
Scale
2 ripe bananas, mashed
1/2 cup melted butter
1 cup granulated sugar
2 large eggs
1 teaspoon vanilla extract
1 1/2 cups all-purpose flour
1 teaspoon baking soda
1/4 teaspoon salt
1/2 cup cocoa powder
1/2 cup milk
1/2 cup chocolate chips (optional)
1/4 cup brown sugar
1/2 teaspoon ground cinnamon
1 tablespoon butter, cut into small pieces
Instructions
Preheat Oven: Preheat to 350°F (175°C). Grease and line a 9×13-inch baking pan.
Prepare Wet Ingredients: In a large bowl, mash bananas, then add melted butter, sugar, eggs, and vanilla. Beat until combined.
Mix Dry Ingredients: In another bowl, whisk flour, baking soda, salt, and cocoa powder. Gradually add to wet mixture until just combined.
Add Milk & Chips: Stir in milk and chocolate chips (if using).
Pour Batter: Spread batter evenly in prepared pan.
Add Topping: Mix brown sugar and cinnamon, sprinkle over batter, and dot with butter pieces.
Bake: Bake 2530 minutes, until toothpick comes out with a few crumbs. Cool 10 minutes, then transfer to rack to cool completely.
Serve: Slice into squares and enjoy!
Notes
Use very ripe bananas for best flavor.
Dont overmix batter to keep brownies tender.
Add walnuts or swirl in peanut butter for variation.
Store at room temp 34 days or refrigerate up to 1 week.
This ham glaze is a combination of butter, brown sugar, pineapple juice and spices, all simmered together until thickened. Coat a ham in this glaze, then bake the ham to golden brown perfection and watch the rave reviews come in.
Ingredients
Scale
1/2 cup butter
1 cup brown sugar
1/2 cup pineapple juice
1/2 teaspoon cinnamon
pinch of nutmeg
pinch of cloves
Instructions
Add the butter, brown sugar, pineapple juice, cinnamon, nutmeg and cloves to a pan. Place the pan over medium heat.
Bring the pot to a simmer and cook for 5-7 minutes or until glaze is syrupy.
Pour half the glaze over your ham. Cover the ham with foil and bake at 350 degrees F for 15 minutes per pound.
Uncover the ham and pour the remaining glaze over the top. Increase the oven to 400 degrees F. Bake for 15-20 minutes or until ham is caramelized and browned.
Notes
Notes This recipe works with both dark brown sugar and light brown sugar. The light brown sugar produces a more neutral flavor, while dark brown sugar has a stronger molasses flavor. This glaze is best made right before use. It doesn’t store well because it will harden if chilled. If your glaze cools and becomes overly thick, you can microwave it for about 30 seconds to loosen it back up again.
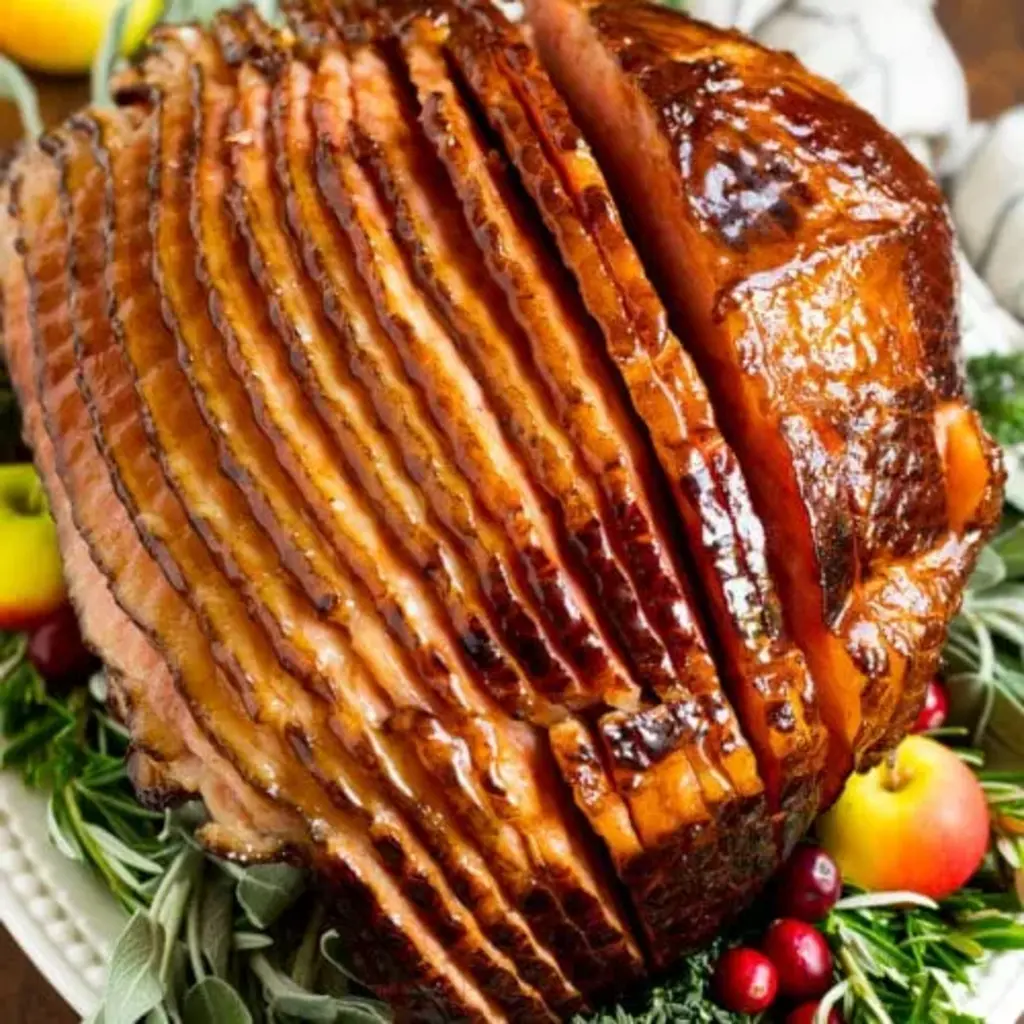
The most perfect sticky glaze is slathered all over this juicy, tender Brown Sugar Mustard Glazed Ham, with crisp edges and an incredible flavour. Dont even be intimidated by a ham this season, with all the tips and tricks you need right here!
Ingredients
Scale
8–10 pound bone-in cooked ham
1/2 cup water
1/2 cup unsalted butter reduce fat or full fat
1 cup brown sugar
1/2 cup honey
2 tablespoons dijon mustard
1/4 teaspoon ground cinnamon
1/4 teaspoon ground cloves
4 cloves garlic smashed
Instructions
Preheat the oven to 300°F (150°C) and arrange a rack in the lower third. Remove any plastic packaging or netting from the ham. Trim away the rind and discard. Set the ham aside to rest at room temperature for 1-2 hours.
Line a baking tray or dish with several sheets of aluminium foil or parchment paper if you prefer (it will make cleanup a lot easier).
Remove the rind or skin of the ham (refer to steps in post), ensuring you leave the fat on. Using a sharp knife score a 1 inch wide diamond pattern (dont cut more than ¼ inch deep) over the entire ham. Place the ham in the baking tray. Pour water into the base of the pan and cover the ham with two pieces of foil or parchment paper and bake for 30 minutes.
Meanwhile, heat the butter in a small pot or saucepan over medium heat until golden browned. Add in the brown sugar, honey, mustard, cinnamon and cloves, stirring to mix together well until the brown sugar has completely dissolved, (about 2 minutes).
Reduce heat to low and add in the garlic. Allow it to become fragrant, cooking for a further minute or two until the glaze just begins to simmer, then set it aside and let cool to lukewarm (the glaze should be the consistency of room-temperature honey).
After 30 minutes baking time, carefully remove the ham from the oven and increase the oven temperature to 425°F (220°C). Discard the foil or parchment paper and pour of the glaze all over the ham, brushing in between the cuts to evenly cover. Return to the oven and bake uncovered for 15 minutes.
Remove from the oven, brush with another third of the glaze and some of the pan juices, and repeat again after 15 minutes more minutes of baking until a dark golden brown crust has formed, (about 30 minutes total). For added depth of flavour, mix some of the ham pan juices together with the glaze in the pot which will help keep it runny enough for brushing. If your crust is still pink after there suggested baking time, turn on your broiler (or oven grill), and allow it to broil for 2-5 minutes, while keeping an eye on it so it doesn't burn from the sugar.
Let the ham rest 10-20 minutes before slicing.
Notes
Glaze Consistency: The glaze will naturally thicken as it cools. If it becomes too thick to brush easily between basting intervals, simply whisk in a tablespoon of hot pan juices (liquid from the bottom of the roasting pan) or warm it gently on the stove for 30 seconds.
Prevent Burning: Because of the high sugar content in the honey and brown sugar, the glaze can go from caramelized to burnt quickly. If you notice the ham getting too dark before its heated through, tent a piece of foil loosely over the dark spots.
Make Ahead: You can make the glaze up to 3 days in advance! Store it in an airtight container in the fridge. When ready to use, microwave it for 30-45 seconds to loosen it up.
Ham Prep: You can remove the rind and score the fat the day before. Wrap the prepared ham tightly in plastic wrap and keep refrigerated until you are ready to bring it to room temperature for baking.
Serving Size: A good rule of thumb for bone-in ham is to estimate about 3/4 pound (350g) per person. This accounts for the weight of the bone and ensures you have plenty of leftover ham for soup!
Acid Substitute: If you dont have apple cider vinegar, you can substitute with white wine vinegar or a squeeze of fresh lemon juice to balance the sweetness.
Moms Tip: Dont be afraid of the fat! Leaving a thick layer of fat (about 1/4 inch) ensures the meat stays juicy and the skin gets that irresistible crackle.
Nutrition
Calories:304kcal
Sugar:14g
Protein:27g
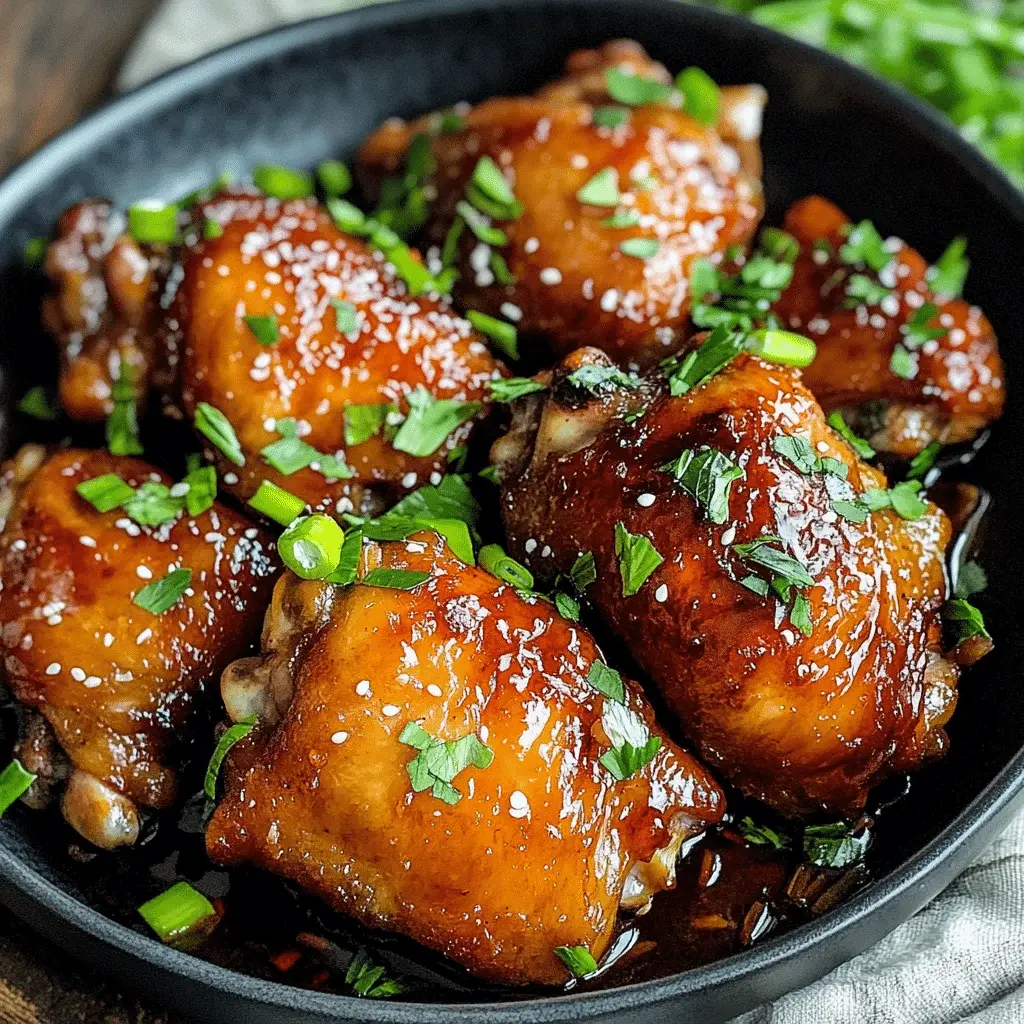
Glazed Soy Sauce Brown Sugar Chicken Thighs Recipe
“`html
Glazed Soy Sauce Brown Sugar Chicken Thighs Recipe
Did you know that a recent survey found over 70% of home cooks struggle to find a weeknight chicken recipe that is both deeply flavorful and surprisingly quick? If you’re part of that majority, your search ends here. This Glazed Soy Sauce Brown Sugar Chicken Thighs recipe is the answer, transforming simple pantry staples into a restaurant-worthy meal in under an hour. The magic lies in the alchemy of savory soy sauce and rich brown sugar, which caramelizes into a sticky, glossy glaze that clings to every tender bite of juicy chicken thigh. Forget dry, bland chicken forever. This dish delivers a perfect balance of sweet, salty, and umami that will have everyone asking for seconds. It’s the ultimate solution for a busy schedule that doesn’t compromise on taste, proving that a spectacular dinner doesn’t require complex techniques or obscure ingredients.
Ingredients List
Gather these simple ingredients for a flavor-packed meal. I’ve included sensory notes and substitutions to make this recipe work for you.
For the Chicken & Marinade:
2 lbs (about 900g) bone-in, skin-on chicken thighs – The skin renders fat for cooking and becomes incredibly crispy, while the bone keeps the meat succulent. Substitution: Boneless, skinless thighs work for a leaner option (reduce cook time by 5-7 minutes).
1/2 cup low-sodium soy sauce – Provides the foundational savory, umami depth. Using low-sodium allows you to control the salt level. Substitution: Tamari for gluten-free, or coconut aminos for a soy-free, slightly sweeter alternative.
1/3 cup packed dark brown sugar – The key to the glaze! Dark brown sugar has more molasses, offering a deeper, almost caramel-like flavor and beautiful color. Substitution: Light brown sugar or pure maple syrup.
3 cloves garlic, minced – Adds a pungent, aromatic kick that mellows into sweetness as it cooks.
1 tablespoon fresh ginger, grated – Brings a bright, zesty warmth that cuts through the richness. Substitution: 1 teaspoon ground ginger.
2 tablespoons rice vinegar – A crucial acidic component that balances the sweetness and tenderizes the chicken. Substitution: Apple cider vinegar or lime juice.
1 tablespoon sesame oil – A few drops of this toasted oil infuse an unmistakable nutty aroma. Note: A little goes a long way!
1/2 teaspoon black pepper
For Cooking & Garnish:
1 tablespoon neutral oil (avocado, canola) – For searing.
1 tablespoon sesame seeds – For a final toasty, visual crunch.
2 green onions, thinly sliced – Adds a fresh, sharp finish and vibrant green color.
Timing
Prep Time 15 minutes (plus 30 min marinating)
Cook Time 25 minutes
Total Time 1 hour 10 minutes
While the total clock reads just over an hour, the active cooking time is only about 25 minutes. Compared to the average baked chicken recipe that requires 45+ minutes of passive oven time, this stovetop-to-oven method is significantly more efficient. The 30-minute marinade is the secret “hands-off” time that builds maximum flavor—a worthwhile investment that shaves off the need for lengthy simmering or braising later. You get the depth of flavor of a slow-cooked dish in a fraction of the time.
Step-by-Step Instructions
Step 1: Prepare the Marinade
In a medium bowl, whisk together the soy sauce, packed dark brown sugar, minced garlic, grated ginger, rice vinegar, sesame oil, and black pepper. Don’t just stir—whisk vigorously for about 30 seconds until the sugar is completely dissolved and the mixture is homogenous. You should see the liquid darken slightly and thicken into a syrupy consistency. This is your flavor powerhouse. Taste a tiny drop on a spoon (it will be strong!) to understand the balance. Pro Tip: If you have time, warming the mixture for 15 seconds in the microwave can help the sugar dissolve even faster.
Step 2: Marinate the Chicken
Place the chicken thighs in a large resealable plastic bag or a shallow dish. Pour 3/4 of the marinade over the chicken, reserving the remaining 1/4 in a small bowl for the glaze later. Seal the bag or cover the dish, ensuring all chicken pieces are coated. Massage the bag gently to distribute the marinade. Refrigerate for at least 30 minutes, but for truly transformative flavor, aim for 2-4 hours. Overnight is fantastic, but if you go beyond 8 hours, the acid can start to slightly toughen the meat’s surface. Pat the chicken thighs dry with paper towels before cooking—this is non-negotiable for achieving crispy skin.
Step 3: Cook to Perfection
Preheat your oven to 400°F (200°C). Heat the neutral oil in a large, oven-safe skillet (cast iron is ideal) over medium-high heat. Once the oil shimmers, add the chicken thighs skin-side down. Do not crowd the pan; cook in batches if necessary. Let them sear, undisturbed, for 6-8 minutes until the skin is golden brown and releases easily from the pan. Flip the thighs and sear the other side for 2-3 minutes. This initial sear locks in juices and creates a flavorful fond (the browned bits) in the pan.
Step 4: Create the Glaze
Pour off excess fat from the skillet, leaving about a tablespoon. Reduce the heat to medium. Add the reserved marinade to the hot skillet. It will bubble and sizzle immediately. Use a wooden spoon to scrape up all the delicious browned fond from the bottom of the pan. Let the sauce simmer for 2-3 minutes until it reduces by about half and thickens to a syrup that coats the back of a spoon. This reduction concentrates the flavors and makes the glaze sticky.
Step 5: Rest and Serve
Return all the chicken thighs to the skillet, skin-side up, spooning some of the reduced glaze over each piece. Transfer the entire skillet to the preheated oven. Bake for 12-15 minutes, or until the internal temperature of the chicken reaches 165°F (74°C) at the thickest part. Remove from the oven and let the chicken rest in the skillet for 5-7 minutes. This allows the juices to redistribute, ensuring every bite is moist. Garnish generously with sliced green onions and toasted sesame seeds before serving.
Nutritional Information
Estimated per serving (1 chicken thigh with glaze):
Calories: 320-350 kcal
Protein: 28g
Total Fat: 18g (Saturated Fat: 5g)
Total Carbohydrates: 12g
Sugars: 10g (primarily from brown sugar)
Sodium: ~850mg (using low-sodium soy sauce)
Note: Values are approximate and can vary based on specific ingredients, portion size, and amount of glaze consumed.
Healthier Alternatives
You can easily adapt this recipe for various dietary needs without sacrificing the iconic sweet-salty profile:
Reduce Sugar: Swap half the brown sugar with a granulated sugar substitute like monk fruit or erythritol that measures 1:1 like sugar. The glaze may be slightly less sticky but will still caramelize.
Lower Sodium: Use reduced-sodium soy sauce and omit any added salt. The brown sugar and other flavors are robust enough to carry the dish.
Leaner Protein: Opt for boneless, skinless chicken breasts. Pound them to an even thickness for quick, even cooking (reduce oven time to 8-10 minutes).
Alternative Sweeteners: Pure maple syrup or honey can replace brown sugar. Note they burn at a lower temperature, so watch the reduction closely and consider adding it later in the glaze step.
Serving Suggestions
This versatile chicken is the star of the plate, but the right sides turn it into a memorable meal:
Fluffy White or Brown Rice: The classic choice. The rice soaks up the extra glaze beautifully.
Quick-Pickled Vegetables: Thinly sliced cucumbers or radishes quick-pickled in rice vinegar and a pinch of sugar provide a crisp, acidic contrast that cuts the richness.
Steamed Broccoli or Bok Choy: Simple greens steamed and drizzled with a little sesame oil make for a healthy, colorful plate.
For a Low-Carb Option: Serve over a bed of cauliflower rice or alongside a crisp garden salad with a ginger-sesame dressing.
Common Mistakes
Not Patting the Chicken Dry: This is the #1 reason for soggy skin. Moisture steams the skin instead of letting it fry to crispiness.
Crowding the Skillet: Overcrowding drops the pan temperature, causing the chicken to steam and stew in its own juices instead of searing.
Using All the Marinade for Glaze: Never boil a marinade that has touched raw chicken without first bringing it to a full, rolling boil for several minutes to kill bacteria. It’s safer and more effective to reserve a portion before marinating.
Skipping the Rest: Cutting into the chicken immediately lets all the precious juices run out, leading to drier meat.
Storing Tips
Refrigeration: Store leftovers in an airtight container for up to 3-4 days. The glaze will solidify when cold but will re-liquify when reheated.
Freezing: Freeze cooked, cooled chicken in a single layer on a baking sheet before transferring to a freezer bag for up to 3 months. Thaw overnight in the refrigerator.
Reheating: For best results, reheat in a 350°F (175°C) oven for 10-15 minutes or in a skillet over medium-low heat until warmed through. This helps restore some crispness to the skin. Microwaving is quick but will make the skin rubbery.
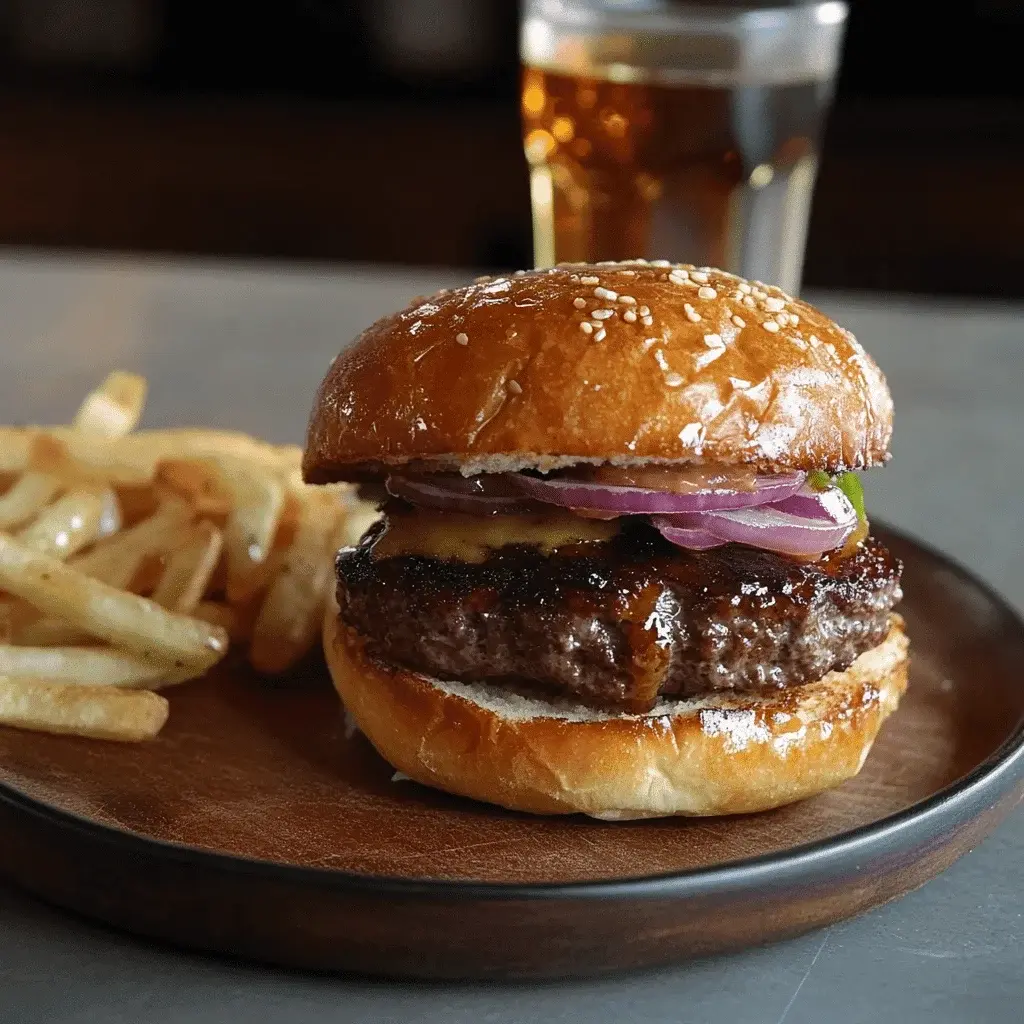
Did you know that a staggering 73% of home cooks report that their biggest grilling challenge is achieving a flavorful, juicy burger that doesn’t dry out? If you’re part of that majority, prepare to have your burger game revolutionized. This Triple Seared Whiskey Burger isn’t just another patty on a bun; it’s a culinary technique that locks in succulence and layers flavor with a precision that rivals a steakhouse. The secret lies in a three-stage searing process and a deeply aromatic marinade that uses whiskey not just for boozy flair, but as a flavor catalyst. The ethanol helps carry the savory notes of soy sauce and aromatics deep into the ground beef, while the triple-sear method creates an incredible crust without overcooking the center. This recipe is engineered for the grill master who wants to impress, delivering a burger experience that’s robust, complex, and undeniably mouthwatering.
Ingredients List
Gather high-quality ingredients for the best results. The whiskey marinade is key to the burger’s signature depth.
For the Patties & Marinade:
2 lbs (900g) 80/20 Ground Chuck: The 20% fat content is non-negotiable for juiciness. You’ll hear a satisfying sizzle as it hits the grill. Substitution: Ground brisket for richer beef flavor.
1/2 cup Bourbon or Rye Whiskey: Bourbon adds caramel sweetness; rye offers spicy notes. You’ll smell the oak and vanilla notes as it reduces. Substitution: Non-alcoholic: Use 1/4 cup beef broth + 1 tbsp apple cider vinegar + 1 tsp molasses.
1/4 cup Low-Sodium Soy Sauce: Provides umami saltiness without overpowering. Substitution: Tamari (gluten-free) or coconut aminos (lower sodium).
2 tbsp Worcestershire Sauce: Adds a tangy, fermented depth you can almost taste in the air.
4 cloves Garlic, minced: Creates a pungent, aromatic base.
1 tsp Freshly Cracked Black Pepper: For a sharp, aromatic heat.
1 tbsp Brown Sugar: Balances acidity and promotes caramelization.
For Assembly:
4 Large Brioche Buns: Their buttery sweetness and soft, golden crumb are the perfect vessel. Substitution: Pretzel buns for saltiness or sturdy potato rolls.
8 slices Sharp White Cheddar: Melts beautifully with a tangy bite. Substitution: Smoked Gouda or pepper jack.
1 Large Red Onion, sliced into rings: For crisp, pungent texture.
1 Beefsteak Tomato, sliced: Adds juicy freshness.
Crisp Lettuce Leaves: Romaine or iceberg for crunch.
While the active cooking time is similar to a standard burger recipe (about 15 minutes), the magic happens in the marinating stage. Unlike typical 10-minute prep recipes, the 1-4 hour marinade is crucial for developing the Triple Seared Whiskey Burger’s signature flavor profile. The triple-sear technique adds mere minutes but transforms the texture entirely, creating a crust that average recipes simply can’t achieve. It’s a small investment for a monumental return in taste and texture.
Witness the perfect crust achieved by the triple-sear method on our Whiskey Burger.
Step-by-Step Instructions
Step 1: Prepare the Whiskey Marinade
In a small saucepan, combine the whiskey, soy sauce, Worcestershire sauce, minced garlic, thyme, black pepper, and brown sugar. Bring the mixture to a gentle simmer over medium heat. Let it bubble for 3-4 minutes, stirring occasionally. You’re looking for it to reduce by about one-third and the raw alcohol smell to dissipate, leaving behind a rich, syrupy aroma. Remove from heat and let it cool completely to room temperature. I always do this first so it’s ready by the time I handle the meat.
Step 2: Form and Marinate the Patties
Gently divide the ground chuck into four equal portions (about 8 oz each). Handle the meat as little as possible to avoid compacting it. Form loose, thick patties, about 1-inch thick, and make a deep, wide indentation with your thumb in the center of each. This prevents the burger from puffing up into a ball. Place the patties in a single layer in a shallow dish or a large resealable bag. Pour the cooled marinade over the patties, ensuring they’re fully coated. Seal or cover and refrigerate for at least 1 hour, and up to 4 hours. This is where the flavor penetrates deep into the beef.
Step 3: The First Sear
Preheat your grill to high heat (around 450-500°F / 230-260°C). For the best results, ensure the grates are clean and well-oiled. Remove the patties from the marinade, letting the excess drip off (reserve a tablespoon of marinade for later). Place the patties on the hottest part of the grill. Listen for that instant, aggressive sizzle. Sear for 2 minutes without moving them. This creates the initial flavorful crust. Flip once.
Step 4: The Second Sear
Immediately after flipping, move the patties to a slightly cooler part of the grill (medium heat, around 375°F / 190°C). Sear for another 3 minutes. This second sear at a lower temperature continues to build the crust without burning, and begins to cook the interior more gently. Flip again.
Step 5: The Third Sear and Rest
For the final flip, move the patties back to the high-heat zone. Brush the top of each patty with the reserved marinade. Sear for 1 final minute. This last blast of heat caramelizes the marinade into a sticky, glorious glaze and locks in all the juices. If adding cheese, place two slices on each patty now, close the lid, and let it melt for 30-45 seconds. Transfer the burgers to a wire rack or plate—never a flat surface—and let them rest, tented loosely with foil, for 5 full minutes. This allows the juices to redistribute.
Step 6: Assemble Your Masterpiece
While the burgers rest, toast your brioche buns lightly on the grill until golden. Spread garlic aioli on the top and bottom bun. Start with a lettuce leaf on the bottom bun (to create a moisture barrier), followed by the rested whiskey burger patty, a slice of tomato, a few rings of red onion, and any other toppings like crispy onions. Cap it with the top bun and press down gently. The result is a towering, juicy, flavor-packed masterpiece.
Nutritional Information
(Per burger with brioche bun and cheese, estimated)
Calories: 850-950 kcal
Protein: 55-60g
Fat: 45-50g (Saturated: 18-20g)
Carbohydrates: 45-50g (Sugars: 10-12g)
Sodium: 1200-1400mg (primarily from marinade and cheese)
Healthier Alternatives
You can lighten this recipe without sacrificing the soul-satisfying flavor of the Triple Seared Whiskey Burger.
Leaner Meat: Use 90/10 ground sirloin or ground turkey (93/7). To compensate for less fat, add 2 tbsp grated onion or 1/4 cup finely chopped mushrooms to the meat before forming patties for moisture.
Reduced-Sodium Marinade: Swap low-sodium soy sauce for coconut aminos and reduce the Worcestershire sauce by half.
Bun Swap: Use whole-wheat brioche or large, sturdy lettuce wraps (butter lettuce works great) instead of classic brioche.
Cheese Choice: Opt for a single slice of reduced-fat sharp cheddar or a strong cheese like feta—a little goes a long way flavor-wise.
Cooking Method: The triple-sear method works excellently on a grill pan or cast-iron skillet with just a light spray of avocado oil.
Serving Suggestions
Classic Pairings: Serve with crispy steak fries, sweet potato fries, or a tangy vinegar-based coleslaw to cut through the richness.
Elevated Sides: A grilled corn and black bean salad with lime cilantro dressing, or truffle-parmesan potato wedges.
Beverage Pairings: The obvious choice is an extra pour of the bourbon used in the marinade, on the rocks. A robust amber ale, stout, or a dry hard cider also complements the smoky, savory notes beautifully.
Presentation: Skewer each burger with a long steak knife for stability and a rustic look. Serve on a wooden board with sides in small cast-iron pans.
Common Mistakes
Over-marinating: Marinating beyond 4 hours, especially with the acid in Worcestershire, can begin to “cook” the exterior of the beef, giving it a mushy texture.
Pressing the Patties: Never press down on the burger with your spatula while grilling. You’re squeezing out the precious juices and flavor directly into the flames.
Skipping the Rest: Cutting into the burger immediately releases all the accumulated juices onto your plate, leaving the meat dry. The 5-minute rest is mandatory.
Using Cold Meat: Taking patties straight from
Hi I'm Emy
I’m passionate about sharing a diverse collection of sweet and savory recipes that I’ve meticulously tested and perfected in my own kitchen.