“`html
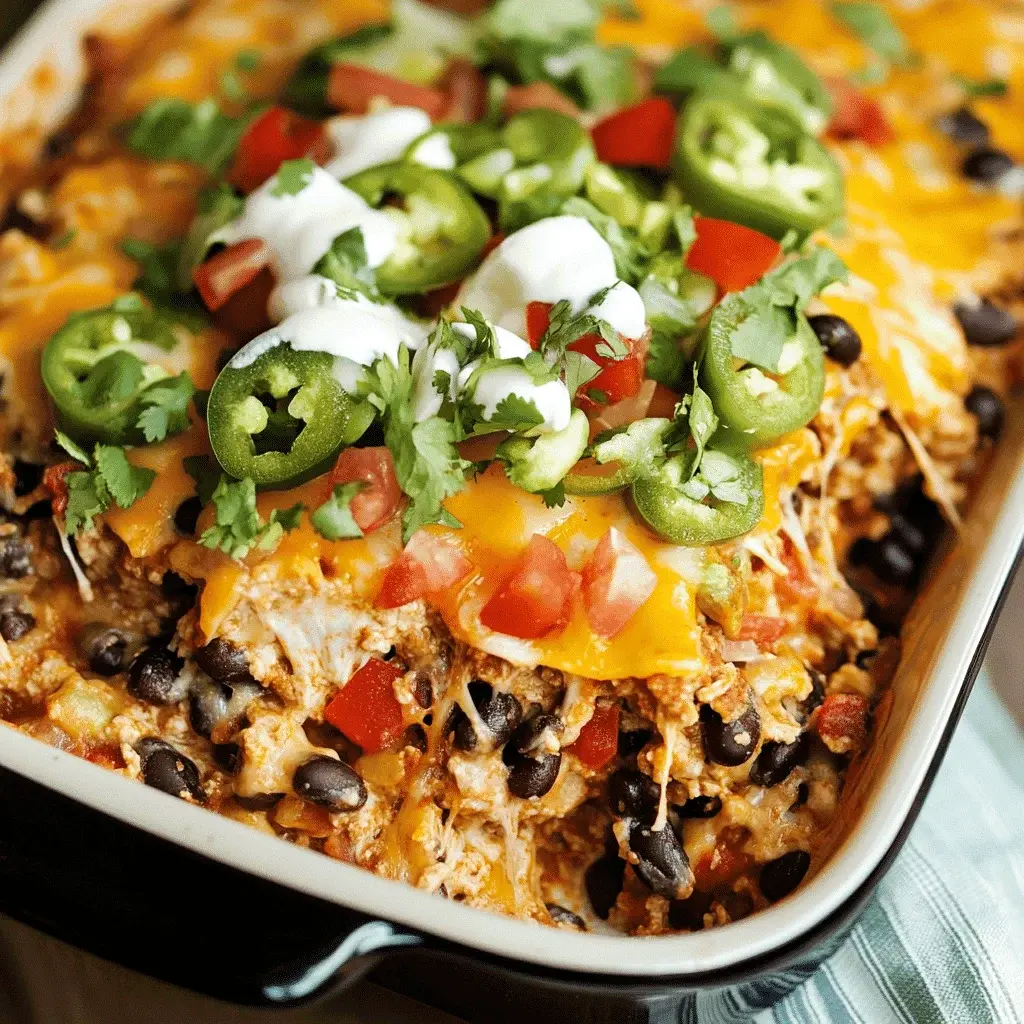
Beef Enchilada Bake Recipe
Table of Contents
Introduction
Did you know that casserole-style dishes like this Beef Enchilada Bake are the secret weapon for 72% of busy families seeking a comforting, one-pan meal? If you’re craving the deep, savory flavors of traditional enchiladas but want to skip the tedious rolling and individual assembly, you’ve found your perfect recipe. This hearty bake layers all the classic components—spiced ground beef, creamy beans, melty cheese, and soft corn tortillas—under a blanket of rich enchilada sauce, creating a casserole that’s as satisfying to make as it is to eat. It’s the ultimate solution for a weeknight dinner that feels like a celebration, delivering maximum flavor with minimal fuss. Let’s dive into how you can bring this crowd-pleaser to your table.
Ingredients List
Gather these simple ingredients for a flavor-packed dish. Sensory notes and substitutions are included to help you customize.
- 1.5 lbs (680g) Lean Ground Beef (90/10): The star protein, providing a rich, meaty base. For a lighter option, use ground turkey or chicken. For a vegetarian twist, use 2 cans of black beans, rinsed and mashed slightly.
- 1 medium Yellow Onion, diced: Adds a sweet, aromatic foundation. A white or red onion works just as well.
- 3 cloves Garlic, minced: Infuses a pungent, savory depth that is essential to the flavor profile.
- 2 cups (16 oz) Red Enchilada Sauce: Look for a rich, brick-red sauce with a balance of chili and tomato notes. Homemade or store-bought both work beautifully.
- 1 (15 oz) can Pinto Beans, rinsed and drained: Adds creamy texture and fiber. Black beans or kidney beans are excellent substitutes.
- 12 (6-inch) Corn Tortillas: They provide the classic, slightly sweet corn flavor and sturdy layers. Flour tortillas can be used for a softer texture.
- 3 cups (12 oz) Shredded Mexican Cheese Blend: A mix of Monterey Jack, Cheddar, Asadero, and Queso Quesadilla creates the ultimate gooey, stretchy melt. For more heat, use a Pepper Jack blend.
- 1 tbsp Chili Powder: Delivers a warm, earthy heat and that signature enchilada color.
- 1 tsp Ground Cumin: Offers a warm, nutty, and slightly citrusy note that is quintessential to Tex-Mex cuisine.
- 1/2 tsp Dried Oregano (preferably Mexican): Lends a subtle, floral bitterness that rounds out the spice profile.
- Salt and Black Pepper to taste: The essential flavor enhancers.
- Optional Garnishes: Fresh cilantro (bright and herbal), diced avocado (cool and creamy), sour cream (tangy and rich), sliced jalapeños (for a fresh kick).
Timing
This Beef Enchilada Bake clocks in at under an hour from start to finish. Compared to the average rolled enchilada recipe, which can take 75-90 minutes due to individual assembly and potentially frying tortillas, this streamlined bake method saves you significant time without sacrificing an ounce of flavor. The 20-minute active prep is perfect for getting dinner on the table fast, while the 35-minute bake time allows the flavors to meld beautifully and gives you time to prepare sides or simply relax.
Step-by-Step Instructions
Step 1: Prepare the Beef Filling
Preheat your oven to 375°F (190°C). In a large skillet or Dutch oven over medium-high heat, brown the ground beef, breaking it up with a wooden spoon. As the pink color fades and those delicious browned bits (fond) start to form on the bottom of the pan—this is pure flavor—add the diced onion. Cook for 5-7 minutes until the onion is translucent and the beef is fully cooked. Stir in the minced garlic, chili powder, cumin, and oregano, cooking for just one more minute until incredibly fragrant. This bloomsthe spices, unlocking their full potential. Drain any excess grease if necessary. Stir in 1/2 cup of the enchilada sauce and the entire can of rinsed pinto beans. Let this mixture simmer for 2-3 minutes to combine. Season generously with salt and pepper. Remove from heat.
Step 2: Assemble the Bake
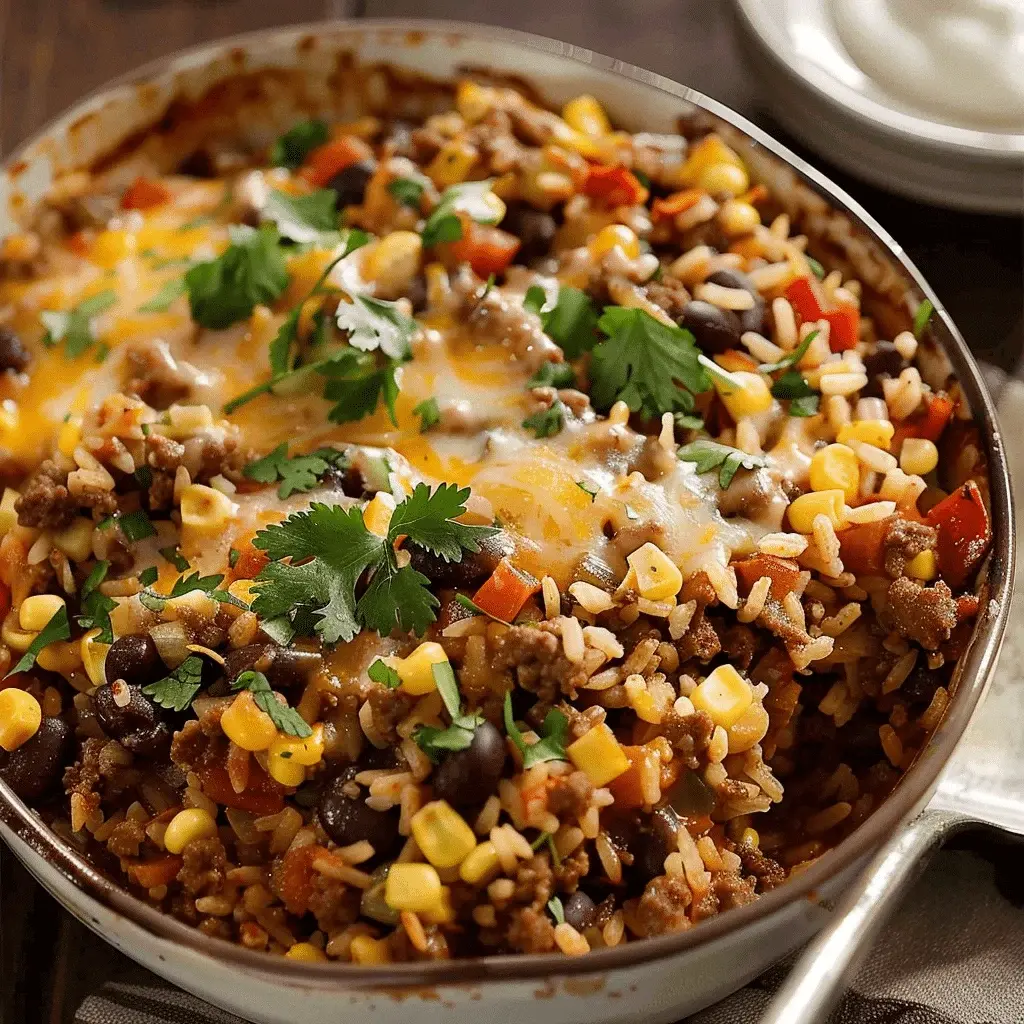
Grab your 9×13 inch baking dish. Spread a thin layer (about 1/4 cup) of enchilada sauce on the bottom—this prevents the tortillas from sticking and adds moisture. Now, let’s build! Arrange 4 corn tortillas in a single layer, slightly overlapping, to cover the bottom. You may need to tear one in half to fit the corners. Spoon half of the warm beef and bean mixture evenly over the tortillas. Drizzle with about 1/3 cup of enchilada sauce, then sprinkle with 1 cup of the shredded cheese. Repeat the layers: 4 more tortillas, the remaining beef mixture, another 1/3 cup of sauce, and another cup of cheese. For the final layer, place the last 4 tortillas on top. Pour the remaining enchilada sauce over them, spreading it evenly to cover every inch. Finally, blanket the entire surface with the last cup of cheese.
Step 3: Bake to Perfection
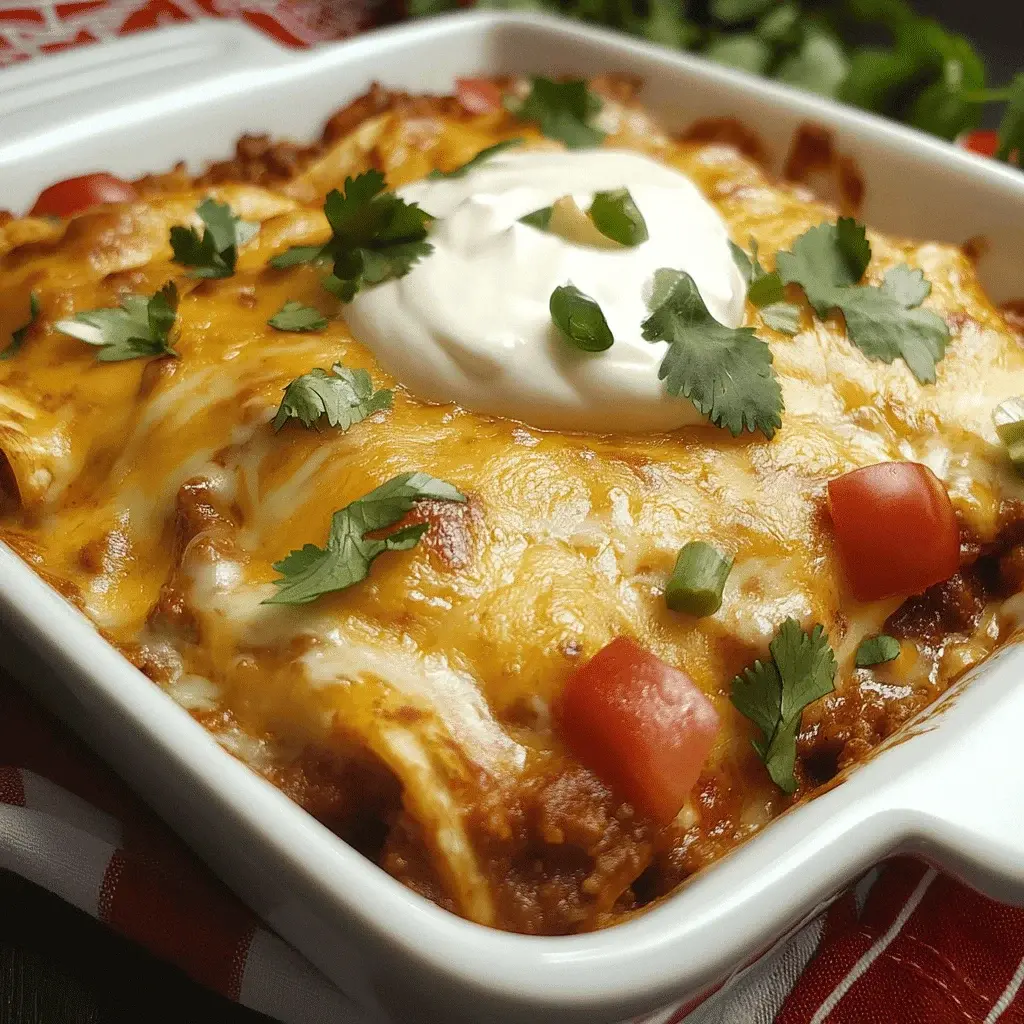
Cover the baking dish tightly with aluminum foil. This crucial step traps steam, ensuring the tortillas become tender and the casserole heats through evenly without drying out. Bake in your preheated oven for 25 minutes. Then, carefully remove the foil. This is the moment of transformation! Switch your oven to broil (or simply continue baking at 375°F) and cook for an additional 8-10 minutes, or until the cheese on top is gloriously bubbly, slightly golden in spots, and the edges are lightly browned. Remove from the oven and let it rest for 5-10 minutes. This rest period allows the layers to set, making it much easier to cut clean squares and serve.
Nutritional Information
(Approximate values per serving, based on 8 servings)
- Calories: 480 kcal
- Protein: 32g
- Carbohydrates: 35g
- Dietary Fiber: 6g
- Sugars: 4g
- Fat: 24g
- Saturated Fat: 11g
- Cholesterol: 85mg
- Sodium: 850mg
Healthier Alternatives
You can easily lighten up this bake without losing its soul-satisfying essence. For the beef, opt for 93% lean or use ground turkey breast. Swap the pinto beans for an extra can of black beans to boost fiber and plant-based protein. Use low-sodium enchilada sauce and reduced-fat cheese to significantly cut down on sodium and saturated fat. For an even bigger veggie boost, stir in 2 cups of fresh spinach or a cup of diced zucchini into the beef mixture during the last minute of cooking—they’ll wilt and blend right in. These swaps maintain the rich, comforting texture and flavor while aligning with healthier eating goals.
Serving Suggestions
This hearty bake is a complete meal on its own, but a few well-chosen sides can turn it into a feast. For a refreshing contrast, serve it with a simple Mexican Street Corn Salad or a crisp Jicama Slaw. A bowl of Cilantro Lime Rice or Charro Beans on the side is perfect for soaking up any extra sauce. Don’t forget the garnishes! Set out small bowls of cool sour cream or Greek yogurt, chunky guacamole, pico de gallo, pickled red onions, and fresh lime wedges. This allows everyone to customize their plate, creating an interactive and fun dining experience.
Common Mistakes
- Skipping the Sauce on the Bottom: This leads to dry, tough tortillas on the bottom layer. That thin layer of sauce is non-negotiable for perfect texture.
- Overfilling the Layers: Piling the beef mixture too high can make the casserole unstable and difficult to cut. Aim for even, moderate layers.
- Using Cold Tortillas Straight from the Fridge: Cold corn tortillas are more likely to crack. Let them come to room temperature, or quickly warm them in a dry skillet for a few seconds per side to make them pliable.
- Skipping the Rest Time: Cutting into the bake immediately will result in a soupy, messy presentation. The 5-10 minute rest allows everything to set.
- Not Blooming the Spices: Adding dried spices to the raw meat or at the very end misses the opportunity to deepen their flavor. Always cook them briefly in the hot fat.
Storing Tips
Refrigeration: Cool the bake completely, then cover tightly with plastic wrap or transfer portions to airtight containers. It will keep in the fridge for 3-4 days. The flavors often meld and improve by the second day! Freezing: This casserole freezes exceptionally well. Wrap the entire cooled dish (or individual portions) tightly in plastic wrap and then in foil. Label and freeze for up to 3 months. Thaw overnight in the refrigerator before reheating. Reheating: For best results, reheat individual portions in the microwave covered with a damp paper towel to retain moisture. For larger amounts, cover with foil and reheat in a 350°F (175°C) oven for 20-25 minutes, or until heated through.

Conclusion
This Beef Enchilada Bake is more than just a recipe; it’s a guaranteed path to a delicious, stress-free dinner that brings everyone to the table. With its layers of savory beef, creamy beans, soft tortillas, and melted cheese, it delivers all the comfort of traditional enchiladas in a fraction of the time. It’s forgiving, customizable, and makes fantastic leftovers. We hope this becomes a new favorite in your weekly rotation. Now it’s your turn! Give this recipe a try this week and share your creation with us. Tag @spicemingle on social media or leave a comment below—we love seeing your kitchen triumphs!
Sausage and Peppers Sandwich with Cheese Recipe
“`html
Table of Contents
Sausage and Peppers Sandwich with Cheese Recipe
Introduction
Did you know that the classic sausage and peppers sandwich is not just a street fair staple but a powerhouse of flavor and satisfaction that can be made at home in under 30 minutes? This iconic dish, beloved for its juicy Italian sausage, vibrant bell peppers, and gooey melted cheese, is the perfect answer to the question: “What’s for dinner?” Whether you’re feeding a hungry family, hosting a game-day gathering, or simply craving a hearty, flavorful meal, this sandwich delivers. The magic lies in the simplicity of its components and the symphony of textures and tastes they create when combined. The savory, slightly spicy sausage, the sweet and tender peppers, and the rich, stretchy mozzarella all nestled in a soft, toasted roll create a handheld masterpiece. Let’s dive into how you can master this crowd-pleaser in your own kitchen.
Ingredients List
Gather these fresh, high-quality ingredients for the best flavor. Sensory notes are included to help you shop and understand the role of each component.
- 4 Italian Sausage Links (Sweet or Hot, about 1 lb): Look for plump, fresh sausages with a fragrant, herby aroma. The casing should be taut. Substitution: Chicken or turkey Italian sausage for a leaner option. Plant-based Italian sausages work well too.
- 2 large Bell Peppers (1 red, 1 green or yellow): Choose firm, glossy peppers with vibrant, unblemished skin. The red ones bring a sweeter, fruitier note, while green adds a slight bitterness for balance.
- 1 large Yellow Onion: A sweet or yellow onion is ideal for its mellow, caramelizing quality. It should feel heavy for its size with a dry, papery skin.
- 2 tbsp Olive Oil: Use extra virgin for its fruity, peppery notes that will enhance the sauté.
- 3 cloves Garlic, minced: Fresh garlic provides a pungent, aromatic base. Substitution: 1 tsp garlic powder in a pinch.
- 1 tsp Dried Oregano: Its earthy, slightly bitter flavor is classic to Italian cooking.
- 1/2 tsp Crushed Red Pepper Flakes (optional): For a gentle heat that tingles on the palate.
- Salt and Black Pepper to taste.
- 4 Hoagie or Sub Rolls: Seek out soft yet sturdy rolls with a slight chew. A good roll should have a golden, slightly crisp exterior and a soft, airy interior.
- 8 oz Fresh Mozzarella Cheese, sliced: The star of the show! Fresh mozzarella offers milky, delicate flavor and that iconic, luxurious melt. Substitution: Provolone (for a sharper taste), fontina (for creaminess), or a vegan mozzarella-style shred.
- Optional for serving: Marinara sauce for dipping, fresh basil leaves for a pop of color and freshness.
Timing
15 minutes
20 minutes
35 minutes
Compared to the average sandwich recipe, this sausage and peppers sandwich requires a bit more active cooking time (about 20 minutes) due to the need to properly brown the sausage and soften the vegetables. However, this 35-minute total is significantly faster than many slow-cooked versions or recipes that call for roasting the peppers separately. The payoff is immense flavor in a very reasonable timeframe, making it a fantastic weeknight winner.
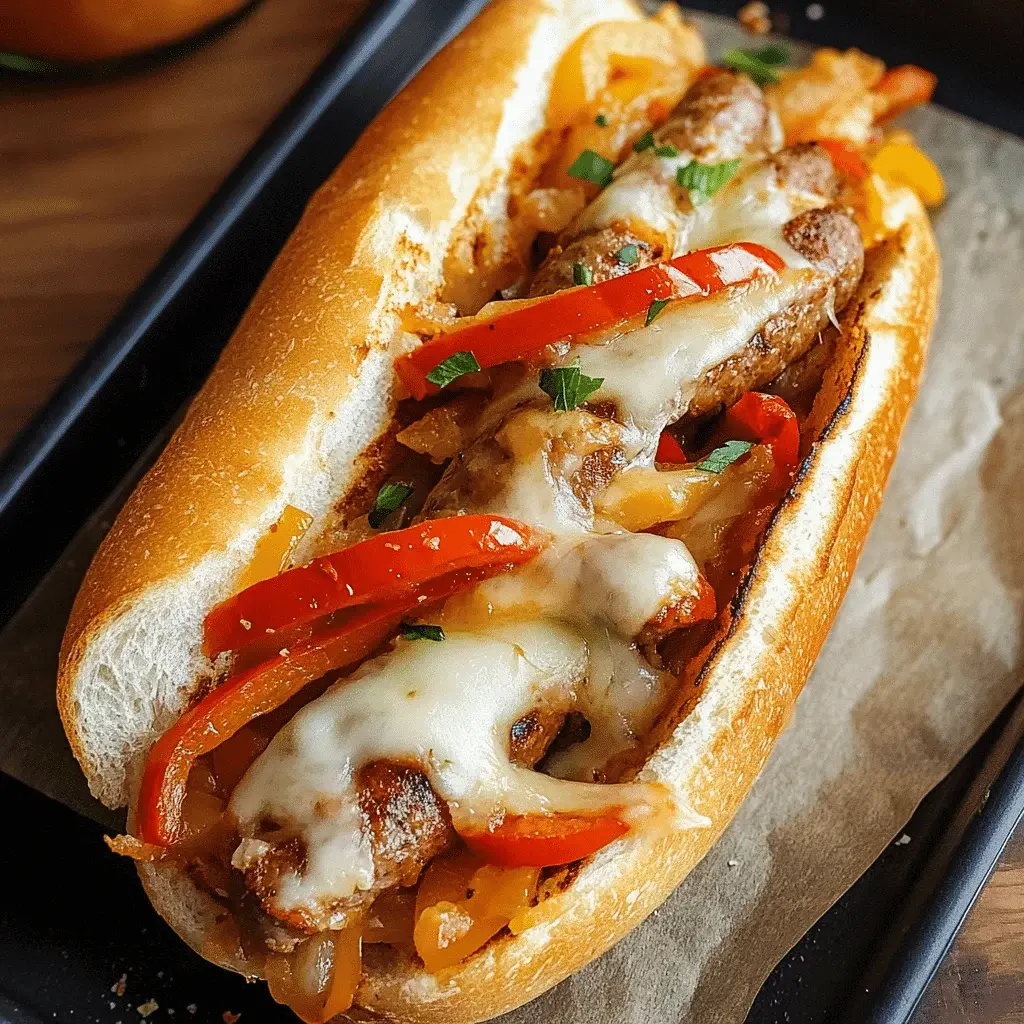
A perfectly assembled sausage and peppers sandwich, showcasing the gooey melted cheese and vibrant peppers.
Step-by-Step Instructions
Step 1: Prepare the Sausage and Peppers
Start by prepping all your ingredients. This “mise en place” makes the cooking process smooth and stress-free. Slice the bell peppers into long, thin strips, about 1/4-inch wide. This shape is perfect for piling onto a sandwich. Slice the onion into similar half-moon strips. Mince the garlic cloves. Pat the sausage links dry with a paper towel – this helps them achieve a beautiful, crisp sear.
Step 2: Cook the Sausage
Heat 1 tablespoon of olive oil in a large skillet or cast-iron pan over medium-high heat. Once the oil shimmers, carefully add the sausage links. Cook for 8-10 minutes, turning occasionally, until they are browned on all sides and cooked through (internal temperature should reach 160°F). Don’t crowd the pan; cook in batches if necessary. Once cooked, transfer the sausages to a plate. They will finish cooking later, so don’t worry if they’re not 100% done in the center.
Step 3: Sauté the Peppers and Onions
In the same skillet with the sausage drippings (this is flavor gold!), add the remaining tablespoon of olive oil if the pan seems dry. Reduce the heat to medium. Add the sliced peppers and onions. Sauté for 8-10 minutes, stirring occasionally, until they have softened and developed some lovely caramelized edges. The onions should become translucent and sweet, and the peppers should be tender-crisp.
Step 4: Combine and Simmer
Push the peppers and onions to the sides of the skillet. Add the minced garlic, oregano, and red pepper flakes (if using) to the center. Let them sizzle for about 30 seconds until fragrant – be careful not to burn the garlic. Now, mix everything in the pan together. Slice the cooked sausages on a diagonal into 1-inch thick pieces and add them back to the skillet. Stir to combine. Reduce heat to low, cover, and let everything simmer together for 5 minutes. This allows the flavors to marry and the sausage to be fully heated through. Season generously with salt and black pepper to taste.
Step 5: Toast and Assemble the Sandwich
While the sausage and pepper mixture simmers, preheat your oven’s broiler. Slice your hoagie rolls open lengthwise, but not all the way through, creating a hinge. Place them on a baking sheet, cut side up. Toast under the broiler for 1-2 minutes until just golden – watch closely! Remove the rolls. Pile the hot sausage and pepper mixture generously into each roll. Top immediately with slices of fresh mozzarella. Return the loaded sandwiches to the baking sheet and broil for another 1-2 minutes, just until the cheese is melted, bubbly, and slightly spotted with brown. Serve immediately, perhaps with a side of warm marinara for dipping.
Nutritional Information
(Per sandwich, approximate values)
- Calories: 650-750 kcal
- Protein: 28-32g
- Carbohydrates: 45-55g
- Dietary Fiber: 3-4g
- Sugars: 8-10g (primarily from peppers and onions)
- Fat: 38-45g
- Saturated Fat: 13-16g
- Sodium: 1200-1500mg (varies greatly with sausage brand; opt for lower-sodium if concerned)
Healthier Alternatives
You can enjoy all the robust flavor of this sandwich with some smart swaps that don’t sacrifice taste:
- Leaner Protein: Use chicken or turkey Italian sausage. They are significantly lower in fat but are still well-seasoned. For maximum flavor, ensure you get a good sear on them.
- Cheese Choice: Opt for part-skim mozzarella or a lighter provolone. You’ll still get that essential melt and salty tang with fewer calories and less saturated fat.
- Bread Base: Choose whole-wheat or multigrain hoagie rolls. They add fiber, nutrients, and a nutty flavor that pairs wonderfully with the savory filling.
- Oil & Cooking Method: Use a high-quality non-stick pan and reduce the olive oil to 1 tablespoon total. You can also “sauté” the peppers and onions with a splash of vegetable broth or water to prevent sticking.
- Open-Faced: For a carb-conscious option, serve the sausage and pepper mixture over a bed of leafy greens or inside a hollowed-out bell pepper, topped with cheese and broiled.
Serving Suggestions
This sandwich is a meal in itself, but it can be part of a fantastic spread:
- Classic Pairing: Serve with a side of crispy oven-baked fries or sweet potato fries for the ultimate comfort food plate.
- Lighter Side: Balance the richness with a simple arugula salad dressed with lemon juice, olive oil, and a pinch of salt and pepper.
- For a Crowd: Set up a “sausage and peppers bar” for parties. Keep the filling warm in a slow cooker, provide an array of rolls (gluten-free included), cheeses, and condiments like hot honey, giardiniera, or different mustards.
- Beyond the Bun: The filling is incredibly versatile! Use it as a topping for pasta, pizza, or polenta, or fold it into an omelet the next morning.
Common Mistakes
- Overcrowding the Pan: This steams the sausage and peppers instead of browning them. Cook in batches if your pan isn’t large enough to give each ingredient space.
- Underseasoning the Vegetables: Peppers and onions need salt to bring out their natural sweetness. Season them in layers as they cook.
- Using Pre-Shredded Cheese: Pre-shredded cheese contains anti-caking agents that prevent it from melting as smoothly and luxuriously as freshly sliced cheese. Take the extra minute to slice your own mozzarella.