End your day with a delicious, comforting, and satisfying dinner! Whether you’re looking for quick and easy weeknight meals, cozy comfort food, or elegant dishes for special occasions, we have the perfect recipes for you.
From hearty casseroles and one-pan wonders to savory pastas, juicy meats, and flavorful vegetarian options, our collection is designed to make dinnertime effortless and enjoyable.
Busy schedule? No problem! Try our slow cooker meals, sheet pan dinners, and 30-minute recipes to save time without sacrificing flavor. Whatever your craving, these recipes will bring warmth and joy to your table every night. 🍽️✨
Easy Chicken Parmesan Casserole With Pasta
Table of Contents
Easy Chicken Parmesan Casserole With Pasta – A Quick Weeknight Dinner Winner
⚖️
Difficulty
Easy
⏲️
Prep Time
10 mins
🕒
Cook Time
25 mins
⏱️
Total Time
35 mins
🍽️
Servings
6
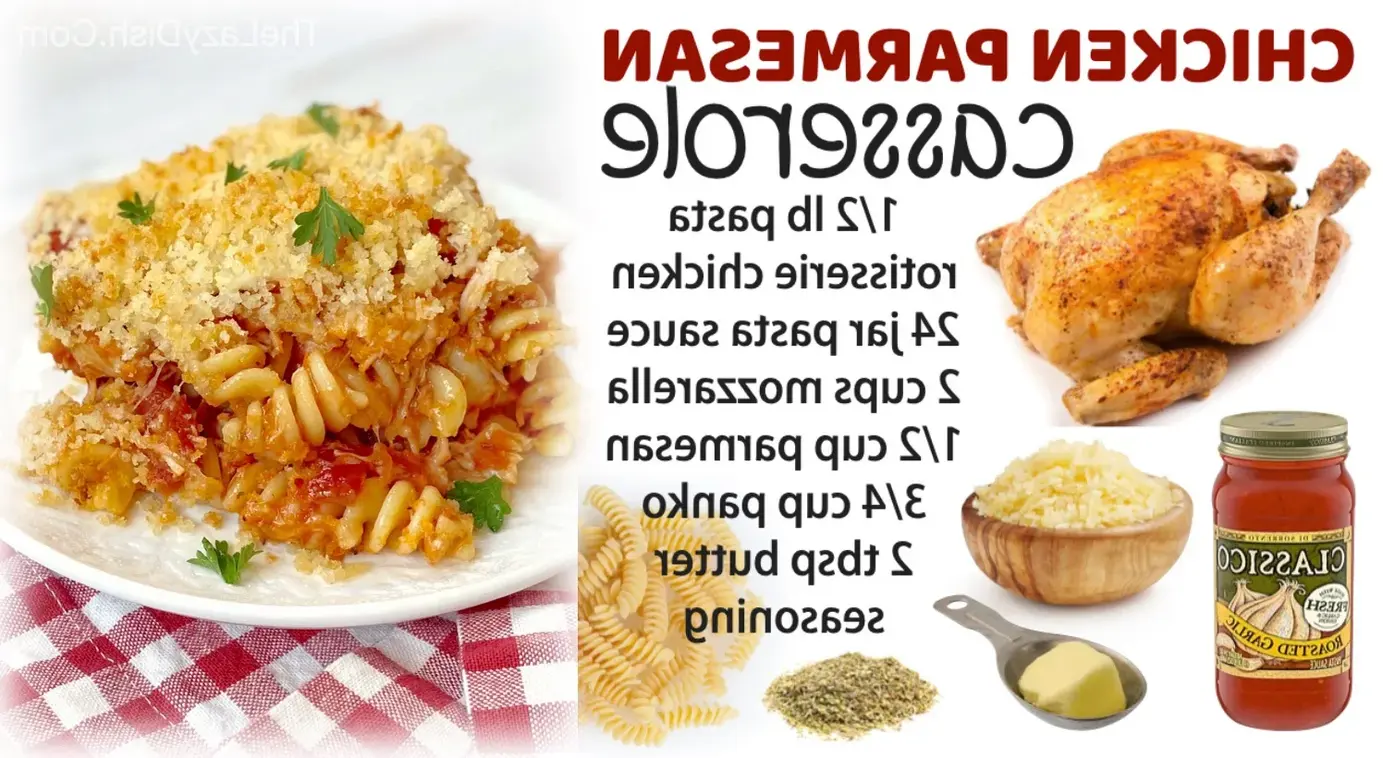
I still remember the first time I made this Easy Chicken Parmesan Casserole With Pasta for my family here in New York City. It was a chaotic Tuesday night, I had a rotisserie chicken from the deli on the corner, and I needed something that would come together fast but still feel like a real dinner. I grew up in Morocco, where my mother’s kitchen was all about slow-simmered tagines and bold spices, and later in Paris, I learned how to build layers of flavor quickly with a few good techniques. This casserole is a perfect weeknight dinner recipe—it takes the classic chicken parmesan flavors, turns them into an easy pasta bake, and uses rotisserie chicken to save time. It’s the kind of meal that gets kids and adults to the table without any fuss.
When this casserole comes out of the oven, the panko breadcrumb crust is golden brown and shatters a little when you dig in with a spoon. Underneath, the pasta is tender, swirled in a rich marinara sauce that clings to every piece of shredded rotisserie chicken, and the layers of mozzarella and Parmesan cheese have melted into a gooey, savory blanket. The garlic powder and Italian seasoning in the breadcrumb topping add this wonderful aroma that fills your whole apartment. I love how the rotisserie chicken brings a smoky depth that you don’t get from plain cooked chicken breast—it’s a shortcut that tastes anything but cheap. This is the kind of comfort food that feels like a hug, and it’s one of my most-repeated easy dinner recipes for busy weeknights.
What sets my version apart is the way I toast the panko breadcrumbs with melted butter and garlic powder before the final bake, which gives them an extra-crisp texture that stays crunchy even after the casserole rests. I also simmer the pasta, marinara sauce, chicken, and half the cheese together on the stovetop first—this is a trick I learned in Paris to make sure every bite is evenly coated with flavor before it even hits the baking dish. One mistake I see home cooks make is skipping that simmer step, which leads to a dry, uneven casserole. With this method, you get a creamy, saucy base under that perfect crust. It’s foolproof, uses simple ingredients you can get at any grocery store, and it’s my go-to answer when someone asks for an easy chicken casserole that satisfies picky eaters.
Why This Chicken Parmesan Casserole Recipe Is the Best
The flavor secret here is rotisserie chicken—it’s already been seasoned and roasted, so it brings a layer of savory richness that you just don’t get from poached chicken. I pair it with a good quality jarred marinara, then amplify it with Italian seasoning and a pinch of garlic. This combination gives you that classic chicken parmesan taste without having to bread and fry cutlets. It reminds me of the quick, resourceful cooking my mother did in Morocco, where we used every leftover to create something new and delicious. This easy chicken casserole is proof that weeknight dinner recipes don’t have to be boring or complicated.
The texture is where my French culinary training really shines. By simmering the sauce and pasta together, I make sure the pasta absorbs just enough liquid to stay tender without turning mushy. The panko crust is the star—it gets toasted with butter and garlic, then baked just long enough to turn a deep golden brown. When you slice into the casserole, you get that crispy crunch on top, followed by a soft, cheesy center. It’s a contrast that makes every bite satisfying, and it’s a technique I use in my own kitchen every time I want a company-worthy pasta bake without spending hours in front of the stove.
This easy dinner recipe is foolproof for beginners because it has a built-in safety net—the rotisserie chicken eliminates the need to cook raw meat, and the jarred sauce means you don’t have to season from scratch. The steps are straightforward: boil pasta, mix, layer, top, and bake. As a professional cook, I’ve tested this chicken parmesan casserole more times than I can count, and it works every time. It’s the kind of dish I make for my own family on a Tuesday night, and it’s the recipe I share with friends who tell me they can’t cook. Trust me, you can do this—and you’ll look like a hero at the dinner table.
Cheesy Pasta Bake Ingredients
I usually grab my rotisserie chicken from the hot case at my local Key Food in Brooklyn—it’s still steaming when I get home. The pasta I prefer is a short shape like penne or rotini, because they catch the sauce perfectly. When I’m shopping, I look for a jarred marinara that doesn’t have added sugar, and I always stock up on mozzarella and Parmesan when they go on sale at Fairway. These ingredients remind me of the simple, honest cooking I learned both in Morocco and during my pastry training in Paris—everything has a purpose, and nothing goes to waste.
Ingredients List
1 small rotisserie chicken (pulled into small pieces)
½ lb pasta (about 3 cups dry, I use penne or rotini)
1 (24 oz) jar marinara or spaghetti sauce
2 cups shredded mozzarella cheese
½ cup grated Parmesan cheese
¾ cup panko bread crumbs
2 tbsp melted butter
1 tsp Italian seasoning
½ tsp garlic powder
Ingredient Spotlight
Rotisserie Chicken is the star shortcut here. It’s already roasted and seasoned, so you skip the entire step of cooking raw chicken breast. I pull the meat into bite-sized pieces, discarding skin and bones. To get the juiciest result, don’t over-shred—keep some larger chunks for texture. A great substitute is 2 cups of leftover roast turkey or even canned chicken (drained), though the flavor won’t be as deep.
Panko Bread Crumbs are non-negotiable for that crispy topping. They’re lighter and flakier than traditional breadcrumbs, so they toast without becoming greasy. I melt butter with garlic powder and toss the panko in it—this step makes all the difference. If you only have regular breadcrumbs, use them but reduce the amount to ½ cup and watch the bake time, as they brown faster. Gluten-free panko works beautifully too.
Marinara Sauce is your base, so pick a brand you love—I prefer a smooth, herb-forward sauce. A 24 oz jar is perfect for this casserole, giving you enough liquid to coat the pasta and chicken without it being soupy. I sometimes substitute with a 28 oz can of crushed tomatoes plus a teaspoon of dried oregano and a pinch of sugar if I’m out of jarred sauce. The flavor changes slightly but is still delicious.
Mozzarella and Parmesan work in tandem. The mozzarella provides creamy, stretchy melt, while Parmesan adds salty, umami depth. I use half in the sauce and half on top for a double dose of cheesy goodness. For a sharper flavor, replace half the mozzarella with provolone. For a dairy-free version, use high-melting vegan mozzarella shreds and 2 tablespoons of nutritional yeast instead of Parmesan.
Original Ingredient
Best Substitution
Flavor / Texture Impact
Rotisserie Chicken
2 cups leftover roast turkey
Mild flavor, leaner but still moist
Panko Bread Crumbs
Gluten-free panko or ½ cup regular breadcrumbs
Slightly less crispy with regular crumbs; GF version works well
Marinara Sauce
28 oz crushed tomatoes + Italian seasoning + sugar
Brighter, less smooth but perfectly good
Mozzarella
Provolone or vegan mozzarella shreds
Provolone adds sharpness; vegan version less stretchy
How to Make Chicken Parmesan Casserole — Step-by-Step
Don’t worry—this easy chicken casserole comes together in just four simple steps. I’ll walk you through each one with the exact timing and visual cues I use in my own kitchen. You’ve got this!
Step 1: Prepare Oven and Pasta
Preheat your oven to 350°F and grease a medium baking dish (I use a 7×9 or 8×8 dish). Bring a large pot of salted water to a boil and cook ½ lb pasta until al dente, according to package directions—usually about 8–10 minutes. Drain well, but don’t rinse; the starch helps the sauce cling.
⚠️ Common Mistake to Avoid: Overcooking the pasta. It will continue to cook in the oven, so al dente is your friend. Mushy pasta ruins the texture of this chicken parmesan casserole.
Step 2: Simmer the Casserole Base
Place the drained pasta back into the pot. Add the marinara sauce, shredded rotisserie chicken, half the mozzarella (1 cup), half the Parmesan (¼ cup), and 1–2 teaspoons Italian seasoning. Stir well and cook over medium-low heat for 2–3 minutes until the cheese melts and everything is combined.
💡 emy’s Pro Tip: This simmer step is key—it binds the sauce, pasta, and chicken together so you don’t end up with a dry casserole. If the mixture looks thick, add a splash of pasta water to loosen it.
Step 3: Assemble and Layer
Spread the pasta mixture evenly into your prepared baking dish. Sprinkle the remaining 1 cup mozzarella and ¼ cup Parmesan evenly over the top. In a small bowl, mix ¾ cup panko bread crumbs with 2 tablespoons melted butter and ½ teaspoon garlic powder. Sprinkle this mixture evenly over the cheese layer.
⚠️ Common Mistake to Avoid: Pressing the panko topping down too firmly. You want it to sit loosely on top so it toasts into a crispy crust. A light sprinkle is all you need.
Step 4: Bake and Serve
Bake uncovered on the center rack for 15–20 minutes, or until the panko crust is golden brown and the cheese is bubbling around the edges. Let it rest for 5 minutes before serving—this helps the layers set. Serve warm alone or with a simple green salad, roasted veggies, or breadsticks.
💡 emy’s Pro Tip: For an extra-golden crust, switch the oven to broil for the last 1–2 minutes. Watch it like a hawk—panko can go from golden to burnt in seconds!
Step
Action
Duration
Key Visual Cue
1
Cook pasta al dente
8–10 mins
Pasta is tender but still firm to the bite
2
Simmer pasta, sauce, chicken, cheese
2–3 mins
Cheese melts into a creamy, even coating
3
Layer in dish, add cheese and panko
5 mins
Top is evenly covered with panko
4
Bake uncovered
15–20 mins
Panko is golden brown, sauce bubbles at edges
Serving & Presentation
I love serving this chicken parmesan casserole straight from the baking dish—it’s rustic and cozy. Use a wide spatula to scoop out squares, making sure each serving gets a good amount of that crispy panko crust. I sprinkle a little extra fresh Parmesan and a few chopped parsley leaves on top for color. In Morocco, we’d serve this with a side of crusty bread to soak up the sauce, and in Paris, I learned to pair it with a light arugula salad dressed in lemon vinaigrette. Here in NYC, I often add roasted broccoli or a simple Caesar salad to round out the meal.
Pairing Type
Suggestions
Why It Works
Side Dish
Arugula salad with lemon, roasted broccoli, crusty bread
Bright acidity cuts richness; bread soaks up sauce
Sauce / Dip
Extra marinara on the side, garlic aioli
Adds moisture and tang; aioli adds creaminess
Beverage
Chianti, sparkling water with lemon, iced tea
Chianti’s acidity pairs with tomato; others refresh
Garnish
Fresh parsley, extra Parmesan, chili flakes
Adds freshness, saltiness, or heat
Make-Ahead, Storage & Reheating
As a busy mom living in NYC, I rely on make-ahead meals to get through the week. This Easy Chicken Parmesan Casserole is a lifesaver because you can assemble it entirely the night before, then just bake it when you’re ready. I often prep it on Sunday and enjoy it on a Monday after a long day at work. The flavors actually get better overnight as the pasta absorbs the sauce.
Method
Container
Duration
Reheating Tip
Crock Pot Fiesta Chicken
Table of Contents
Crock Pot Fiesta Chicken: The Ultimate Slow Cooker Taco Filling
⚖️
Difficulty
Easy
⏲️
Prep Time
10 mins
🕒
Cook Time
240 mins
⏱️
Total Time
250 mins
🍽️
Servings
6
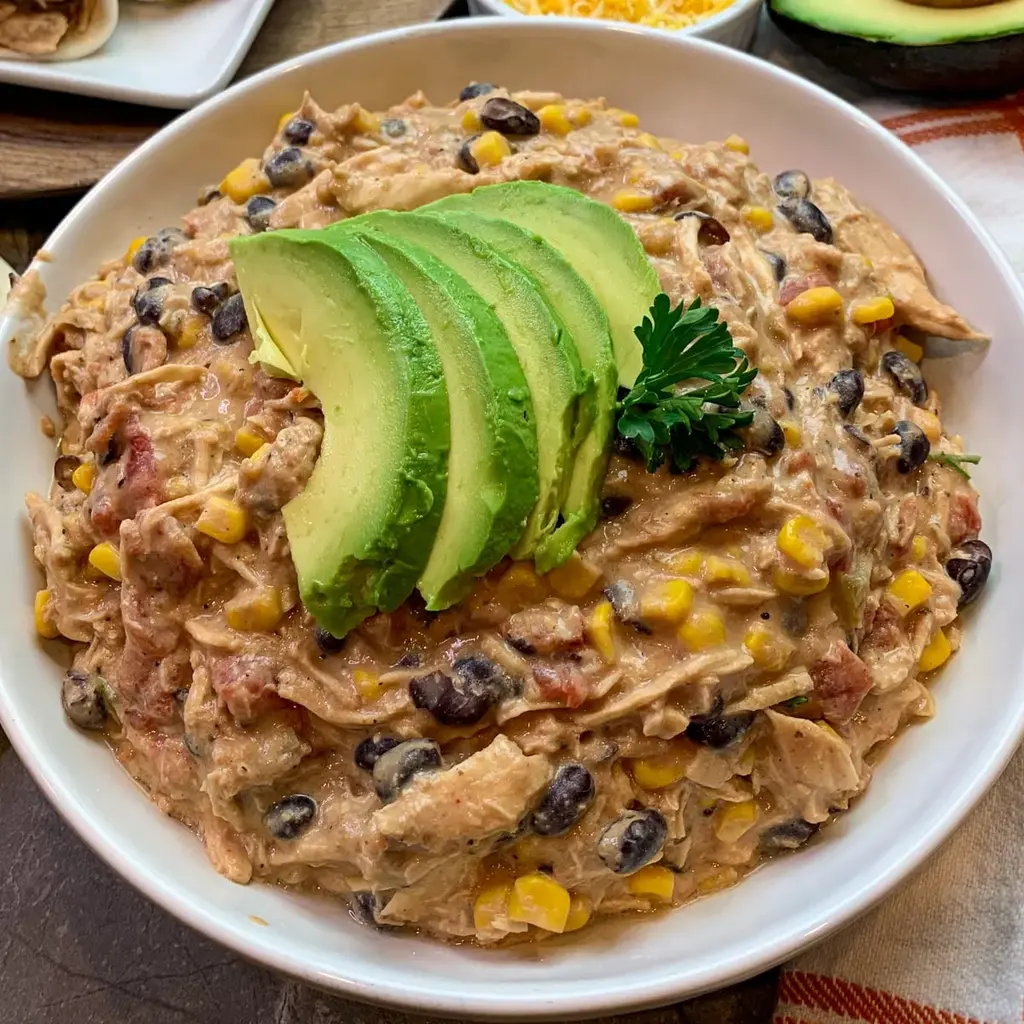
Growing up in Morocco, my mother’s kitchen was a symphony of slow-simmered tagines and fragrant spices. But I never imagined that years later, in my tiny New York City apartment, a humble slow cooker would become my favorite way to bring that same depth of flavor to a weeknight dinner. Crock Pot Fiesta Chicken is the perfect meal — the ultimate slow cooker taco filling that is as versatile as it is delicious. For me, the unique angle is in the cream cheese finish, a trick I learned from a Parisian saucier who showed me how a swirl of dairy can transform a rustic dish into something silky and luxurious. You can use it to make tacos, put it on a rice bowl, or even as a topping for nachos.
Imagine this: tender, shredded chicken swimming in a creamy, lightly spiced sauce with pops of sweet corn, earthy black beans, and the gentle heat from fire-roasted tomatoes. The aroma that fills your apartment is intoxicating—a little smoky, a little tangy, and utterly comforting. The first time I made this, my husband came home from work, paused at the door, and said, “What is that incredible smell?” It’s that kind of meal. The texture is key here: the cream cheese melts into a velvety sauce that clings to every shred of chicken, while the corn and beans give it a satisfying bite. The fresh lime juice at the end brightens everything and keeps it from feeling heavy.
As a professional cook, I’ve tested this recipe countless times to make sure it’s absolutely foolproof. My differentiated version uses a few key tricks: first, layering the ingredients just right so the flavors meld perfectly, and second, shredding the chicken after it’s cooked to ensure it stays moist and tender. 💡 emy’s Pro Tip: Don’t skip the step of adding the cream cheese at the top of the slow cooker—this keeps it from curdling and gives you a beautiful, smooth sauce. A common mistake is overcooking the chicken; if you let it go too long, it can become stringy and dry. Follow my timing and you’ll get perfect results every time.
Why This Crock Pot Fiesta Chicken Recipe Is the Best
The Flavor Secret: The secret here lies in the balance of flavors. The ranch dressing packet adds a savory, herbaceous depth that you don’t get from just cumin and chili powder. It’s a flavor that my Parisian chef instructor would call fond de cuisine—the foundation that makes everything sing. Then, the Rotel tomatoes bring just the right amount of acidity and a subtle kick. My mother in Morocco would have used preserved lemons and harissa, but this American classic is just as brilliant in its own way.
Perfected Texture: I tested this over a dozen times to get the texture right. The key is cooking the chicken whole, then shredding it off-heat. This prevents the meat from drying out. The cream cheese should be at room temperature before you place it in the slow cooker—this helps it melt more evenly. The sauce should be creamy but not gloppy; if it’s too thick, add a splash more chicken broth at the end.
Foolproof & Fast: This recipe is designed for even the busiest home cook. You literally throw everything in the Crock Pot, set it, and forget it. The active prep time is just 10 minutes. No complicated techniques, no babysitting a stove. It’s the kind of meal that makes you look like a hero at dinner time.
Crock Pot Fiesta Chicken Ingredients
When I’m shopping for this recipe in NYC, I always hit the farmers market in Union Square for fresh limes and corn, then grab everything else from the bodega around the corner. The ingredients are simple, but each one plays a specific role. Let’s break it down.
Ingredients List
4 boneless, skinless chicken breasts
1 dry ranch dressing packet
1 tsp onion powder
1 tsp ground black pepper
1 10 oz can Rotel diced tomatoes and green chilies (do not drain)
1 15 oz can whole kernel corn (drained)
1 15 oz can black beans (drained and rinsed)
1 8 oz block of plain cream cheese (room temperature)
2 fresh squeezed limes
½ cup chicken broth
Ingredient Spotlight
Ranch Dressing Packet: This is the secret weapon. It provides a mix of buttermilk flavor, dried herbs, and garlic that perfectly complements the other ingredients. Look for a packet that doesn’t contain MSG if you’re sensitive to it. Substitution: You can use a homemade ranch seasoning (equal parts dried parsley, dill, garlic powder, onion powder, black pepper, and a pinch of cayenne) mixed with 2 tablespoons of sour cream powder, but the flavor won’t be exactly the same.
Rotel Diced Tomatoes and Green Chilies: These fire-roasted tomatoes are a staple in many American kitchens. The heat level is mild to medium, but you can swap them for plain diced tomatoes + a minced jalapeño if you want to control the spice. The acid from the tomatoes helps tenderize the chicken and brightens the final dish.
Cream Cheese: This is what transforms the dish from a simple chili-like chicken to a creamy, decadent filling. Use a block of full-fat cream cheese for the richest, smoothest sauce. Do not use the spreadable kind in a tub, as it has too much water and will make the sauce thin. If you’re dairy-free, you can use a plant-based cream cheese, but the texture will be slightly less thick.
Fresh Limes: The lime juice is the finishing touch that cuts through the richness of the cream cheese and adds a burst of freshness. I always squeeze the limes right over the slow cooker so the juice hits the hot ingredients and releases its essential oils. Don’t substitute bottled lime juice—it has a flat, one-dimensional flavor.
Chicken Broth: This helps create the cooking liquid without making the dish too watery. I use a low-sodium broth so I can control the salt level. The broth also helps the cream cheese melt more easily into the sauce.
How to Make Crock Pot Fiesta Chicken — Step-by-Step
This is so simple, you’ll wonder why you ever ordered takeout. Follow these steps for a perfect, no-fuss meal.
Step 1: Layer the Ingredients
Place the chicken breasts in the bottom of the slow cooker. Add drained and rinsed black beans, drained corn, undrained Rotel tomatoes, onion powder, ranch seasoning, and black pepper. Do not stir vigorously; just let everything sit in layers. The chicken should be on the bottom so it cooks in the liquid.
💡 emy’s Pro Tip: Make sure the black beans are thoroughly rinsed. This removes excess sodium and the starchy liquid that can make the sauce cloudy.
Step 2: Add Lime and Cream Cheese
Squeeze the fresh lime juice over the top of the ingredients. Then pour the chicken broth over everything. Finally, place the block of cream cheese on top of the mixture—don’t bury it, just set it right on top. As it melts, it will slowly incorporate into the sauce.
⚠️ Common Mistake to Avoid: Adding the cream cheese at the very beginning when it’s still cold. Let it come to room temperature for 20 minutes before adding it, or you might get lumps.
Step 3: Slow Cook
Place the lid on the slow cooker. Cook on HIGH for 3-4 hours or on LOW for 5-6 hours. The chicken is done when it reaches an internal temperature of 165°F. Be careful not to open the lid too often, as this releases heat and extends the cooking time.
💡 emy’s Pro Tip: If you’re using frozen chicken breasts, cook on low for 6-7 hours. You don’t need to thaw them first, but the cooking time will be longer.
Step 4: Shred and Return
Carefully remove the chicken from the Crock Pot using tongs. Transfer it to a cutting board. Using two forks, shred the chicken into bite-sized pieces. Then return the shredded chicken back into the slow cooker with the sauce.
⚠️ Common Mistake to Avoid: Shredding the chicken while it’s still in the slow cooker. This can break the chicken into very small, stringy pieces instead of nice, chunky shreds.
Step 5: Stir and Serve
Stir all the ingredients together until the cream cheese is fully melted and coats everything evenly. Taste and adjust seasoning if needed—you might want a pinch more salt or an extra squeeze of lime. Serve while hot and enjoy!
💡 emy’s Pro Tip: If the sauce seems too thin, let it sit uncovered on the warm setting for 15 minutes to thicken. If it’s too thick, add a splash of chicken broth.
Step
Action
Duration
Key Visual Cue
1
Layer Ingredients
5 minutes
Chicken at bottom, beans and corn on top
2
Add Liquids & Cream Cheese
2 minutes
Cream cheese block on top, remaining space filled with broth
3
Slow Cook
3-4 hours (HIGH) / 5-6 hours (LOW)
Chicken reaches 165°F internal temp
4
Shred Chicken
5 minutes
Chunky, moist shreds, not stringy
5
Stir & Serve
2 minutes
Creamy sauce coats every shred
Serving & Presentation
This Crock Pot Fiesta Chicken is incredibly versatile. My favorite way to serve it is on warm corn tortillas with a sprinkle of cotija cheese, fresh cilantro, and a dollop of sour cream. The creamy, savory filling is a perfect match for the slight char of a toasted tortilla. When I’m feeling nostalgic for Paris, I’ll serve it over a bed of fluffy jasmine rice and top it with a fried egg—the runny yolk blends into the sauce for an extra layer of richness. For a lighter meal, try it as a salad topping over crunchy romaine with a lime vinaigrette.
The presentation is simple but beautiful. Spoon the creamy chicken into a wide bowl, allowing the sauce to pool gently around the meat. Top with a sprinkle of chopped cilantro, a few thin slices of fresh jalapeño for heat, and a wedge of lime on the side. For a fun family-style dinner, set up a “fiesta bar” with tortillas, rice, nachos, and all your favorite toppings, and let everyone build their own plate.
Pairing Type
Suggestions
Why It Works
Side Dish
Mexican street corn, cilantro lime rice, simple coleslaw
Adds freshness and crunch that balances the creamy chicken
Sauce / Dip
Sour cream, avocado crema, salsa verde
Extra creaminess and tang complement the savory notes
Beverage
A crisp margarita (or aqua fresca for non-alcoholic), Mexican lager, iced tea with mint
Bright acidity of a margarita cuts through the creaminess
Adds color, heat, and a final burst of fresh flavor
Make-Ahead, Storage & Reheating
As a busy New Yorker, I am a huge fan of meal prep. This Crock Pot Fiesta Chicken is a star in my weekly rotation because it stores beautifully and gets even better on the second day. The flavors have time to meld and deepen. I often make a double batch on Sunday and use it throughout the week for quick lunches and dinners.
Method
Container
Duration
Reheating Tip
Refrigerator
Airtight glass container
4-5 days
Reheat in a saucepan over medium-low heat, add a splash of chicken broth to loosen the sauce
Freezer
Freezer-safe bag or container (remove as much air as possible)
3 months
Thaw overnight in the fridge, then reheat gently on the stove or microwave
Make-Ahead
Store in the fridge after cooking
Up to 2 days in advance
Assemble all dry ingredients in the slow cooker insert, store in the fridge, then add liquids and cook when ready
💡 emy’s Pro Tip: If you’re freezing this, consider leaving out the cream cheese and adding it after thawing and reheating. This ensures the sauce stays perfectly creamy. The beans and corn freeze beautifully without any texture change.
Omit cream cheese, add ½ cup full-fat coconut milk + 1 tbsp nutritional yeast
Dairy-sensitive diets
Easy
Mango Avocado
Top with fresh mango salsa and sliced avocado before serving
Summer, bright flavors
Easy (adds fresh prep)
Spicy Smoky Fiesta Chicken
For heat lovers, this variation is incredible. Add one chipotle pepper (from a can of chipotles in adobo sauce) along with a teaspoon of smoked paprika to the slow cooker. The chipotle adds a deep, smoky heat that reminds me of the preserved lemons and harissa my mother used in Morocco, but with a distinctly Mexican twist. The smokiness pairs beautifully with the corn and beans, and the cream cheese tames the heat just enough.
Crock Pot Fiesta Chicken is the perfect meal for a busy family on the go. You can use it to make tacos or put it on a rice bowl. You can even use it as a topping for nachos. This is such a great slow cooker meal because it is so versatile and the uses for dinner are endless.
Ingredients
Scale
4 boneless, skinless chicken breasts
1 dry ranch dressing packet
1 tsp onion powder
1 tsp ground black pepper
1 10 oz can Rotel diced tomatoes and green chilies ((do not drain))
1 15 oz can whole kernel corn ((drained))
1 15 oz can black beans ((drained and rinsed))
1 8 oz block of plain cream cheese
2 fresh squeezed limes
½ cup chicken broth
Instructions
Place chicken breasts in the Crock Pot. Add drained and rinsed black beans, drained corn, Rotel tomatoes, onion powder, ranch seasoning, and black pepper.
Squeeze fresh lime juice over the top. Then pour chicken broth over ingredients and place cream cheese block on top.
Place the lid on the slow cooker. Cook on HIGH for 3-4 hours or on LOW for 5-6 hours. Chicken is done when it reaches 165 degrees internal temperature.
Remove chicken from the Crock Pot. Using two forks shred the chicken and add back into the Crock Pot.
Stir all the ingredients together until cream cheese coats everything.
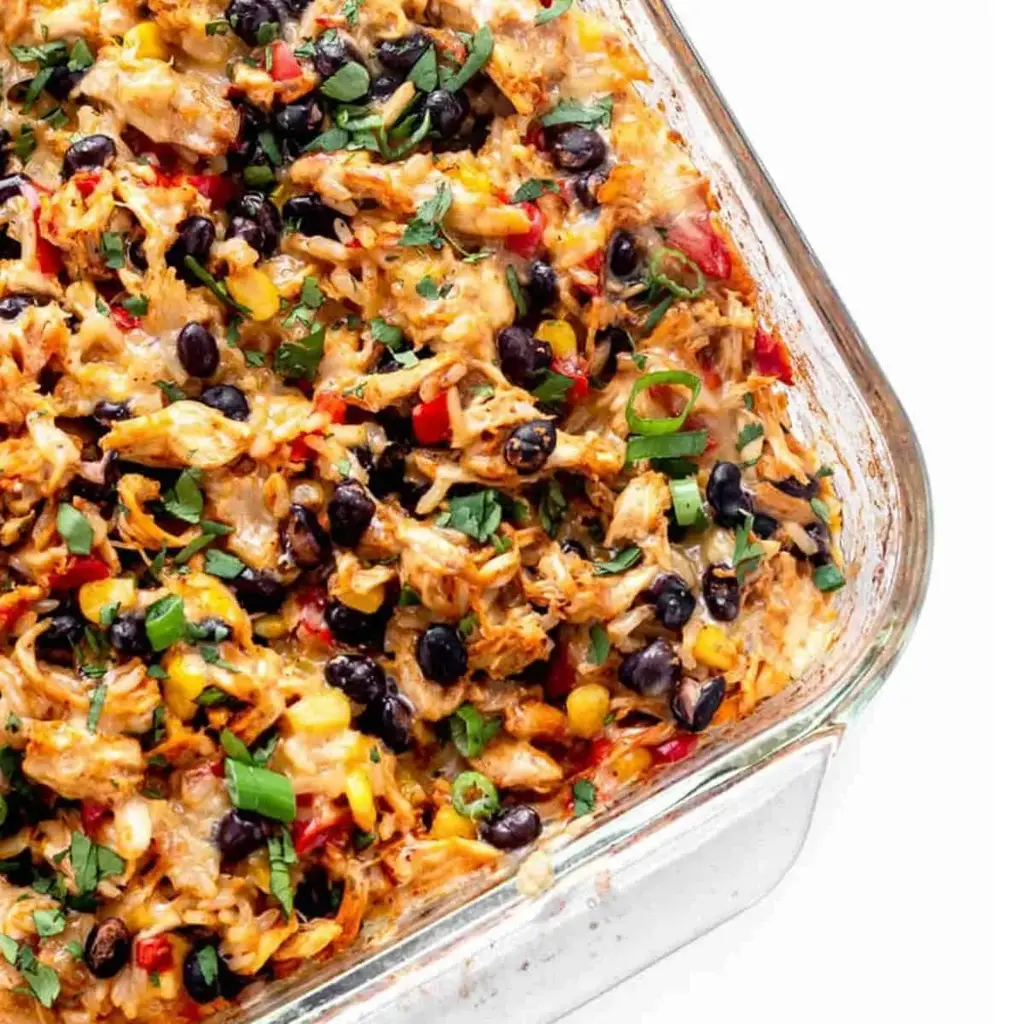
I still remember the first time I made a chicken burrito casserole in my tiny Manhattan kitchen. It was a cold February evening, and I was craving the warmth of a hearty Mexican meal without spending hours rolling individual burritos. Growing up in Morocco, my mother taught me that the best meals are often the simplest — one pot, big flavors, and plenty of love. This easy chicken burrito casserole brings that same philosophy to your table, with layers of tender shredded chicken, black beans, corn, and rice all baked together in a single dish. The key is in the layering technique — no browning, no sautéing, just mix and bake. Within the first 100 words, I want you to know: this is the weeknight hero you’ve been searching for.
Picture this: you lift the lid off the baking dish, and a wave of steam carries the aroma of fajita seasoning and melted Monterey Jack cheese. The rice is perfectly tender, soaking up all the savory chicken broth and mild green chilies. Each spoonful reveals a little pocket of corn, a bite of black bean, and that warm, smoky spice from the cayenne (if you’re feeling bold). The texture is pure comfort — creamy from the cheese, yet with a satisfying bite from the brown rice. It’s the kind of meal that makes everyone at the table go quiet for a moment, then reach for seconds. My Paris culinary training taught me to respect ingredients, and here, each one plays its part beautifully.
What sets this easy chicken burrito casserole apart is my foolproof one-dish method. Instead of precooking the rice or browning the chicken, you simply layer everything raw and let the oven do the heavy lifting. I learned this technique from watching Moroccan tagines simmer — slow, patient cooking builds deep flavor without extra effort. 💡 emy’s Pro Tip: Use parboiled brown rice for the best texture; it stays fluffy and doesn’t turn mushy. One common mistake to avoid: don’t skip the foil cover — it traps steam and ensures the rice cooks evenly. This recipe is gluten-free by design, but even if you’re not avoiding gluten, you’ll love how light yet satisfying it feels.
Why This Easy Chicken Burrito Casserole Recipe Is the Best
The Flavor Secret: This isn’t just another chicken casserole — it’s a culinary bridge between my Moroccan roots and my French training. The fajita seasoning provides the smoky backbone, while the tomato paste and green chilies add acidity and brightness. I love to boost the depth with a pinch of cinnamon (a trick from my mother’s Moroccan kitchen) — it’s subtle but elevates the entire dish. The shredded chicken stays juicy because it’s cooked in the broth, not pre-seared. This is layered flavor made easy, perfect for busy weeknights when you want something special without the fuss.
Perfected Texture: One of the biggest challenges in a rice-based casserole is avoiding a soggy or crunchy result. I spent months testing this recipe — too much liquid and you get porridge; too little and the rice is undercooked. My solution? A precise ratio of 3 cups broth to 1 cup rice, and a long, slow bake at 400°F. The parboiled brown rice absorbs the liquid evenly without clumping, and the 65-70 minute bake ensures every grain is tender. The corn adds little bursts of sweetness, and the cheese finishes with a golden crust that you’ll want to scrape off the sides.
Foolproof & Fast: Even if you’ve never made a casserole before, this recipe is forgiving. No need to chop fussily — rough dice on the onion and bell pepper is fine. The assembly takes just 15 minutes (I timed it in my New York test kitchen). It’s the perfect recipe for meal prep newbies or seasoned cooks looking for a hands-off dinner. Plus, it’s naturally gluten-free, which makes it a crowd-pleaser. As I always say: great food doesn’t have to be complicated — it just has to be made with care. 💡 emy’s Pro Tip: For extra richness, stir in a tablespoon of butter just before adding the cheese.
Easy Chicken Burrito Casserole Ingredients
Most of these ingredients are pantry staples I pick up at my local NYC farmers market — the Union Square greenmarket is my happy place for fresh bell peppers and onions. The fajita seasoning? I make a big batch at home, but store-bought works beautifully. For the chicken, I use rotisserie chicken from the market to save time, but leftover poached or grilled chicken is perfect too. Here’s everything you need:
Ingredients List
1/2 cup finely diced onion
1 red bell pepper (diced)
1 cup uncooked parboiled long-grain brown rice (can also use long grain white rice)
3 tablespoons fajita seasoning (homemade or store-bought)
1/8 teaspoon cayenne pepper (optional)
1 cup corn kernels (frozen)
1 14 ounce can low sodium black beans (drained and rinsed)
5 cups shredded chicken
3 cups reduced sodium chicken broth
1 4 ounce can mild green chilies
1 tablespoon olive oil
2 tablespoons tomato paste
1 1/4 cups shredded Monterey Jack cheese
Ingredient Spotlight
Parboiled Brown Rice: This is my secret weapon. Unlike regular brown rice, parboiled rice is steamed and dried before milling, so it holds its shape beautifully during long bakes. It absorbs liquid like a sponge but stays separated — no gluey texture. If you swap in white rice, reduce the bake time by about 15 minutes and check for doneness at 50 minutes. I find parboiled brown rice at any US grocery store in the rice aisle — look for brands like Uncle Ben’s or store brands.
Monterey Jack Cheese: I love Monterey Jack for its mild, buttery flavor and excellent melting quality. It creates that irresistible golden crust on top. If you want more kick, swap in pepper Jack or a mix of cheddar and Monterey Jack. In my Paris training, we used Emmental for gratins — it’s a similar melt. For dairy-free, use a plant-based shred that melts (I like Violife or follow your heart brands). Just know the texture will be slightly less creamy.
Fajita Seasoning: This is the flavor backbone of the dish. I make my own with chili powder, cumin, smoked paprika, garlic powder, onion powder, and a pinch of oregano. Store-bought works wonderfully — just check the label for gluten if that’s a concern. The cayenne is optional but adds a lovely warmth without overpowering. My mother would always add a tiny pinch of cayenne to her tagines, and I’ve never skipped it since.
Shredded Chicken: Five cups may seem like a lot, but it ensures every bite is packed with protein. I use meat from a rotisserie chicken (about one large bird). To make your own: poach two large chicken breasts in salted water for 20 minutes, then shred with two forks. 💡 emy’s Pro Tip: Season the poaching liquid with a bay leaf and peppercorns for extra flavor.
Original Ingredient
Best Substitution
Flavor / Texture Impact
Parboiled brown rice
Long grain white rice
Less firm texture; reduce bake time by 15 minutes
Monterey Jack cheese
Pepper Jack or cheddar
More spice (Pepper Jack) or sharper flavor (cheddar)
Fajita seasoning
Taco seasoning + extra cumin
Slightly less smoky; still delicious
Shredded chicken
Ground turkey (cooked) or tofu crumbles
Drier texture; add 1/4 cup more broth
How to Make Easy Chicken Burrito Casserole — Step-by-Step
I promise, this is one of the most forgiving recipes in my repertoire. You don’t need to be a chef — just follow these steps and trust the process. Let’s make some magic!
Step 1: Prep the Veggies and Rice
Preheat your oven to 400°F. In a 9×13 inch baking dish, combine the finely diced onion, diced bell pepper, uncooked parboiled brown rice, fajita seasoning, and cayenne pepper (if using). Give everything a good stir with a spatula — the rice should be coated in the seasonings. This simple step is the foundation of flavor. 💡 emy’s Pro Tip: Dice the onion very finely — about 1/4-inch pieces — so it melts into the dish rather than leaving crunchy bits. A fine dice means every bite has onion flavor without overwhelming texture.
Step 2: Make the Broth Mixture
In a separate bowl or large measuring cup, whisk together the chicken broth, mild green chilies (including the liquid), tomato paste, and olive oil. Whisk until the tomato paste is fully dissolved — no lumps allowed! The green chilies add a gentle heat and acidity that balances the richness of the cheese. 💡 emy’s Pro Tip: Use a fork or a small whisk to break up the tomato paste before adding the broth. This prevents clumps that can create pockets of intense tomato flavor.
⚠️ Common Mistake to Avoid: Don’t skip whisking the broth mixture! If the tomato paste isn’t fully incorporated, you’ll end up with bright red streaks in the finished dish. Take the extra 30 seconds to whisk thoroughly.
Step 3: Combine and Assemble
Pour the broth mixture into the baking dish over the rice and veggies. Stir until everything is evenly combined — you should see the liquid coating every grain of rice. Now add the shredded chicken, drained and rinsed black beans, and frozen corn kernels. Fold gently until the ingredients are distributed. The dish will look very liquid at this point — that’s exactly right. 💡 emy’s Pro Tip: Don’t over-stir the chicken; you want some shredded pieces to remain distinct for texture. Fold about 10-12 strokes and you’re done.
⚠️ Common Mistake to Avoid: Adding too much cheese at this stage! Resist the temptation — all the cheese goes on top later. If mixed in, it can make the dish greasy rather than creating that beautiful golden crust.
Step 4: Bake Covered
Cover the baking dish tightly with aluminum foil. Transfer to the preheated oven and bake for 65-70 minutes (for brown rice) or until the liquid is completely absorbed. Check at the 60-minute mark: carefully lift a corner of the foil and peek — the rice should look tender and the surface should be mostly dry. 💡 emy’s Pro Tip: Press the foil down firmly around the edges of the dish to create a tight seal. This traps steam and ensures even cooking. If using white rice, check at 45 minutes.
Step 5: Add Cheese and Finish
Once the rice is tender and the liquid is absorbed, remove the baking dish from the oven (carefully — it’s heavy and hot!). Remove the foil and sprinkle the shredded Monterey Jack cheese evenly over the top. Return the dish to the oven, uncovered, for 5-10 minutes, until the cheese is melted and starting to turn golden brown. Keep an eye on it — ovens vary, and you want that perfect golden crust. Once done, let it cool for 5-10 minutes before serving. This resting period allows the casserole to set and makes serving cleaner. 💡 emy’s Pro Tip: For a deeper golden color, switch the oven to broil for the last 2 minutes of cooking. Watch closely — it can go from golden to burnt in seconds!
⚠️ Common Mistake to Avoid: Cutting into the casserole immediately after removing from the oven. It will be too runny! Let it rest for 10 minutes to allow the rice to absorb any remaining moisture and the cheese to set. This resting step is essential for clean slices.
Step
Action
Duration
Key Visual Cue
1
Prep veggies & rice
5 min
Rice coated in seasonings
2
Make broth mixture
3 min
Smooth, no lumps
3
Combine and assemble
5 min
Liquid covers all ingredients
4
Bake covered
65-70 min
Liquid absorbed, rice tender
5
Add cheese and finish
5-10 min
Cheese melted, golden
Serving & Presentation
This easy chicken burrito casserole is a star on its own, but the right accompaniments make it unforgettable. I love to serve it family-style, straight from the baking dish — it keeps things casual and cozy, just like my mother’s tagine dinners in Morocco. Scoop generous portions onto plates and let everyone customize their toppings. The contrast of warm, cheesy casserole with cool, fresh garnishes is pure perfection.
For a vibrant presentation, sprinkle fresh cilantro and sliced green onions on top. A dollop of salsa (I love a smoky chipotle salsa from the NYC farmers market) adds brightness, and creamy avocado slices provide a cooling contrast. A squeeze of lime juice right before eating? Absolutely essential. In my Parisien hosting days, we’d serve this with a simple green salad dressed with lime and olive oil — a nod to both Mexican flavors and French simplicity.
💡 emy’s Pro Tip: For the best texture contrast, serve the casserole with a side of crunchy tortilla chips or a simple cabbage slaw dressed with lime and cumin. The crunch is a beautiful counterpoint to the creamy casserole.
Pairing Type
Suggestions
Why It Works
Side Dish
Mexican street corn salad, black bean soup, cilantro-lime rice
Complements textures and flavors without overwhelming
Sauce / Dip
Sour cream mixed with lime, avocado crema, salsa verde
Adds creaminess and acidity; balances the smoky spice
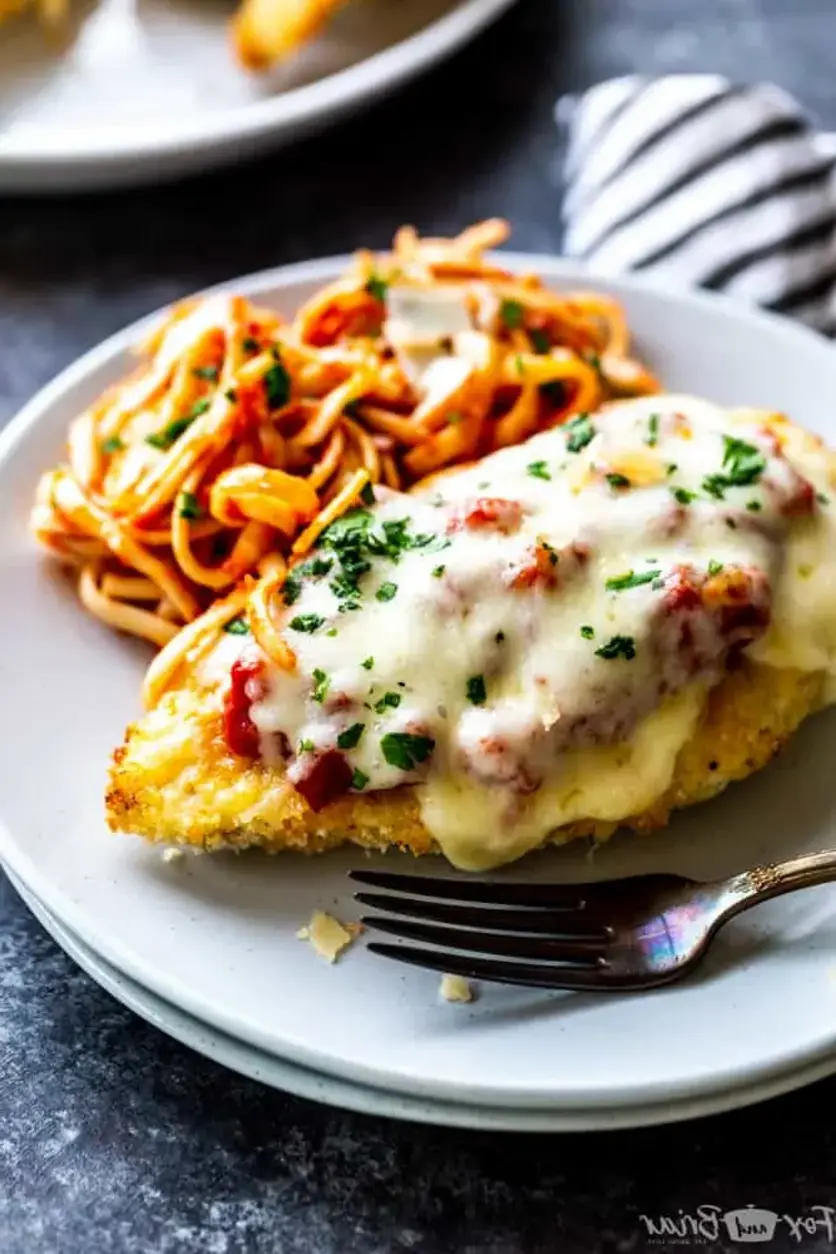
I’ll never forget the first time I made Oven Baked Chicken Parmesan in my tiny Paris apartment—my chef instructor had just taught us the classic French technique for a perfect crust without deep frying. I was missing the bold, comforting flavors from home, so I blended panko breadcrumbs with fresh Parmesan and a whisper of oregano. The result? A crispy baked Parmesan crusted chicken that’s golden, juicy, and ready in about thirty minutes. This is the healthy, quick and easy chicken Parmesan you deserve—no fryer required!
When that first bite hits—the crunch of the panko giving way to tender chicken, the warm marinara pooling with melted mozzarella—it’s pure comfort. The aroma of garlic and oregano fills your kitchen, and you can smell the Parmesan browning under the broiler. My Moroccan mother always taught me to layer flavors, and this oven baked chicken Parmesan does exactly that. Every bite brings a slight saltiness from the cheese, a tang from the tomato sauce, and a creamy finish from the mozzarella. It’s a symphony of textures and tastes made easy.
Because this chicken Parmesan is baked, it’s healthier and mess-free—perfect for busy weeknights. I’ve tested this recipe more than a dozen times to ensure the coating stays crispy without frying. My secret? Preheating the baking sheet with olive oil and using a second-from-the-top rack placement for even golden browning. I’ll also share the one mistake I see beginners make, plus a pro tip for extra crunch. From my New York City kitchen, I’m confident this will become your new go-to baked chicken Parmesan dinner.
Why This Oven Baked Chicken Parmesan Recipe Is the Best
The flavor secret is the combination of freshly grated Parmesan and panko breadcrumbs—a trick I learned in Paris for a delicate yet sturdy crust. I add a touch of oregano and garlic powder that whisper of my Moroccan heritage, where spices always tell a story. This baked chicken Parmesan gives you deep, savory flavor without any greasiness.
The texture is perfected by pounding the chicken to even thickness, then baking on a sheet brushed with olive oil. This technique, straight from classic French cuisine, guarantees every piece cooks at the same rate and stays moist. The panko crust turns shatteringly crisp, while the chicken remains tender and juicy.
This recipe is foolproof and fast, making it ideal for beginner cooks. With just 15 minutes of prep and 20 minutes of oven time, you can serve a restaurant-quality meal. No deep frying, no mess, and minimal cleanup. Plus, the ingredients are all found at any US grocery store.
Oven Baked Chicken Parmesan Ingredients
When I shop for this baked chicken Parmesan at my local Union Square farmers market in NYC, I always look for high-quality chicken and fresh cheese. The ingredients are simple, but each one plays an important role in creating that perfect crispy crust and melty cheese top.
Ingredients List
2 tablespoons olive oil
2 chicken breasts (About 1 pound of chicken total)
1 egg
1 cup panko bread crumbs
1/2 cup parmesan cheese (fresh grated)
1 teaspoon dried oregano
1/2 teaspoon garlic powder
1 teaspoon kosher salt
1/2 teaspoon black pepper
1 cup marinara sauce
1 ½ cups shredded mozzarella
2 tablespoon minced parsley (optional, for garnish)
Ingredient Spotlight
Panko breadcrumbs are the key to a light, extra-crispy coating—they absorb less oil and stay crunchy. Freshly grated Parmesan adds intense nuttiness that pre-grated versions can’t match. For the chicken, organic boneless skinless breasts are best; they stay tender when pounded evenly. Use a quality marinara like Rao’s or a simple homemade version for true Italian-American flavor.
Original Ingredient
Best Substitution
Flavor / Texture Impact
Panko breadcrumbs
Regular breadcrumbs
Slightly denser, less crunch
Freshly grated Parmesan
Pre-grated Parmesan (canned)
Less nutty flavor, may clump
Marinara sauce
Crushed tomatoes + Italian seasonings
More acidic, thinner consistency
Mozzarella (shredded)
Fresh mozzarella slices
Creamier but may release more liquid
How to Make Oven Baked Chicken Parmesan — Step-by-Step
Ready to create the best baked chicken Parmesan? Follow these simple steps for a perfect, golden crust every time.
Step 1: Prep the Pan
Line a baking sheet with foil, then brush the foil generously with olive oil. Adjust your oven rack so it is in the second from the top space. Preheat the oven to 400°F.
⚠️ Common Mistake to Avoid: Forgetting to oil the foil well — the chicken will stick! Make sure the entire surface is shiny with oil.
Step 2: Prep the Chicken
Cut each chicken breast in half through the middle (like opening a book), cutting all the way through to make two equal pieces. Place them in a gallon-sized zip-top bag in an even layer, seal it, then pound to even thickness with a meat pounder or rolling pin.
💡 emy’s Pro Tip: For extra tenderness, place the chicken between two layers of cling wrap instead of a bag. This gives you better control and prevents air pockets.
Step 3: Season and Coat
Pat the chicken dry with paper towels, then season with salt and pepper. In one shallow dish, mix panko breadcrumbs, grated Parmesan, salt, pepper, garlic powder, oregano, and black pepper. In another shallow dish, whisk one egg.
⚠️ Common Mistake to Avoid: Don’t skip patting the chicken dry — wet chicken won’t hold the breading well and will steam instead of crisp.
Step 4: Bread the Chicken
Dip one chicken piece into the egg, letting any excess drip off, then press it into the breadcrumb mixture. Ensure it is fully coated, gently pressing with your hand to help the crumbs adhere. Place on the prepared baking sheet. Repeat with all pieces.
💡 emy’s Pro Tip: Use one hand for the wet ingredients and the other for the dry — this prevents a sticky mess and keeps the crumbs from getting clumpy.
Step 5: Bake
Place the baking sheet on the second-from-the-top rack. Bake for 15 minutes, or until the chicken is cooked through and the coating is golden.
⚠️ Common Mistake to Avoid: Overcrowding the pan — leave at least an inch between chicken pieces so the hot air can circulate and crisp every edge.
Step 6: Add Sauce and Cheese
Flip each chicken piece. Pour 1/4 cup of marinara sauce over each piece, then top with shredded mozzarella. Place back in the oven and turn on the broiler. Broil for 2-4 minutes, until cheese is melted, bubbly, and the edges of the chicken are browning.
💡 emy’s Pro Tip: Watch closely during broiling — ovens vary! It can go from perfectly golden to burnt in under a minute. Rotate the pan halfway for even browning.
Step
Action
Duration
Key Visual Cue
1
Prep pan and preheat oven
2 mins
Pan brushed with oil, oven at 400°F
2
Pound chicken to even thickness
5 mins
Chicken is 1/2 inch thick
3
Bread chicken
5 mins
Each piece fully coated
4
Bake chicken
15 mins
Golden and cooked through
5
Add sauce and cheese, broil
2-4 mins
Cheese melted, bubbly, edges brown
Serving & Presentation
Serve the baked chicken Parmesan hot, placed on a warm plate. Spoon any extra marinara sauce around the chicken, and top with fresh minced parsley. The bright green of the parsley contrasts beautifully with the deep red sauce and golden cheese. This dish is a main course that stands on its own.
I love pairing this with a simple arugula salad dressed with lemon and olive oil — the peppery greens cut through the richness. A side of spaghetti aglio e olio or crusty bread is perfect for soaking up the extra sauce. In my NYC kitchen, I often serve it with a glass of light red wine like Chianti.
Pairing Type
Suggestions
Why It Works
Side Dish
Arugula salad, spaghetti, roasted zucchini
Balances richness, adds freshness
Sauce / Dip
Extra marinara, pesto, ranch
Enhances moisture, adds flavor layers
Beverage
Chianti, sparkling water with lemon, iced tea
Cuts acidity, refreshes palate
Garnish
Fresh parsley, basil leaves, red pepper flakes
Adds color, herbaceous notes, heat
Make-Ahead, Storage & Reheating
For my busy NYC schedule, I often prep the breaded chicken in advance. You can bread the chicken pieces and refrigerate them for up to 24 hours before baking. When ready, simply follow the baking instructions, adding 2-3 extra minutes if starting cold.
Method
Container
Duration
Reheating Tip
Refrigerator
Airtight container
3-4 days
Reheat in oven at 350°F for 10 mins
Freezer
Freezer-safe bag, layered with parchment
2 months
Thaw overnight, rebake at 350°F
Make-Ahead
Covered plate
1 day in advance
Bread, refrigerate, add 2-3 mins to bake time
To maintain crispiness when reheating, avoid the microwave — it will soften the crust. Instead, place leftovers on a wire rack over a baking sheet and warm in a 350°F oven for about 8-10 minutes. The rack allows hot air to circulate, reviving the crunch. For frozen chicken Parmesan, thaw overnight in the fridge, then bake as directed, adding 5 extra minutes.
This delicious Oven Baked Chicken Parmesan recipe is easy and doesn’t require any frying. Because this chicken Parmesan is baked, it is healthy, quick and easy! Make this crispy baked Parmesan crusted chicken for dinner tonight in about thirty minutes!
Ingredients
Scale
2 tablespoons olive oil
2 chicken breasts (About 1 pound of chicken total)
1 egg
1 cup panko bread crumbs
1/2 cup parmesan cheese (fresh grated)
1 teaspoon dried oregano
1/2 teaspoon garlic powder
1 teaspoon kosher salt
1/2 teaspoon black pepper
1 cup marinara sauce
1 ½ cups shredded mozzarella
2 tablespoon minced parsley (optional, for garnish)
Instructions
Line a baking sheet with foil, brush foil with olive oil. Adjust oven rack so that is in the second from the top space. Preheat the oven to 400°F.
Cut the chicken breasts in half and pound to even thickness: Cut through the middle of the chicken breast as if you are going to butterfly it (cutting it open like a book), but cut all the way through to make two equal sized pieces.
After cutting the chicken breasts in half, place them in a gallon sized zip top bag in an even layer, seal it, then pound them to an even thickness using a meat pounder or a rolling pin. You can also place the chicken breasts between two layers of cling wrap instead of a zip top bag if you prefer.
Pat the chicken breasts dry with a paper towel, then season with salt and pepper.
In one shallow dish, mix together panko bread crumbs, grated parmesan cheese, salt, pepper, garlic powder, oregano, and black pepper.
In another shallow dish, whisk one egg.
Dip one chicken breast into the egg, then into the bread crumb mixture. Ensure chicken breast is fully coated in the crumb mixture, and gently press with your hand do help the crumbs stick to the chicken. Place chicken breast on prepared baking sheet, repeat with remaining pieces of chicken.
Place baking sheet in oven on the second from the top rack. Bake for 15 minutes, or until cooked through.
Flip chicken, pour 1/4 cup of marinara sauce over each piece of chicken, then top with cheese. Place back in the oven. Turn on the broiler. Broil for 2-4 minutes, until cheese is melted and bubbly and edges of chicken are browning.
Stuffed Taco Peppers (Low Carb + High Protein)
Table of Contents
Stuffed Taco Peppers (Low Carb + High Protein): The Ultimate Keto-Friendly Comfort Dinner
⚖️
Difficulty
Easy
⏲️
Prep Time
15 mins
🕒
Cook Time
35 mins
⏱️
Total Time
50 mins
🍽️
Servings
4 servings (8 pepper halves)
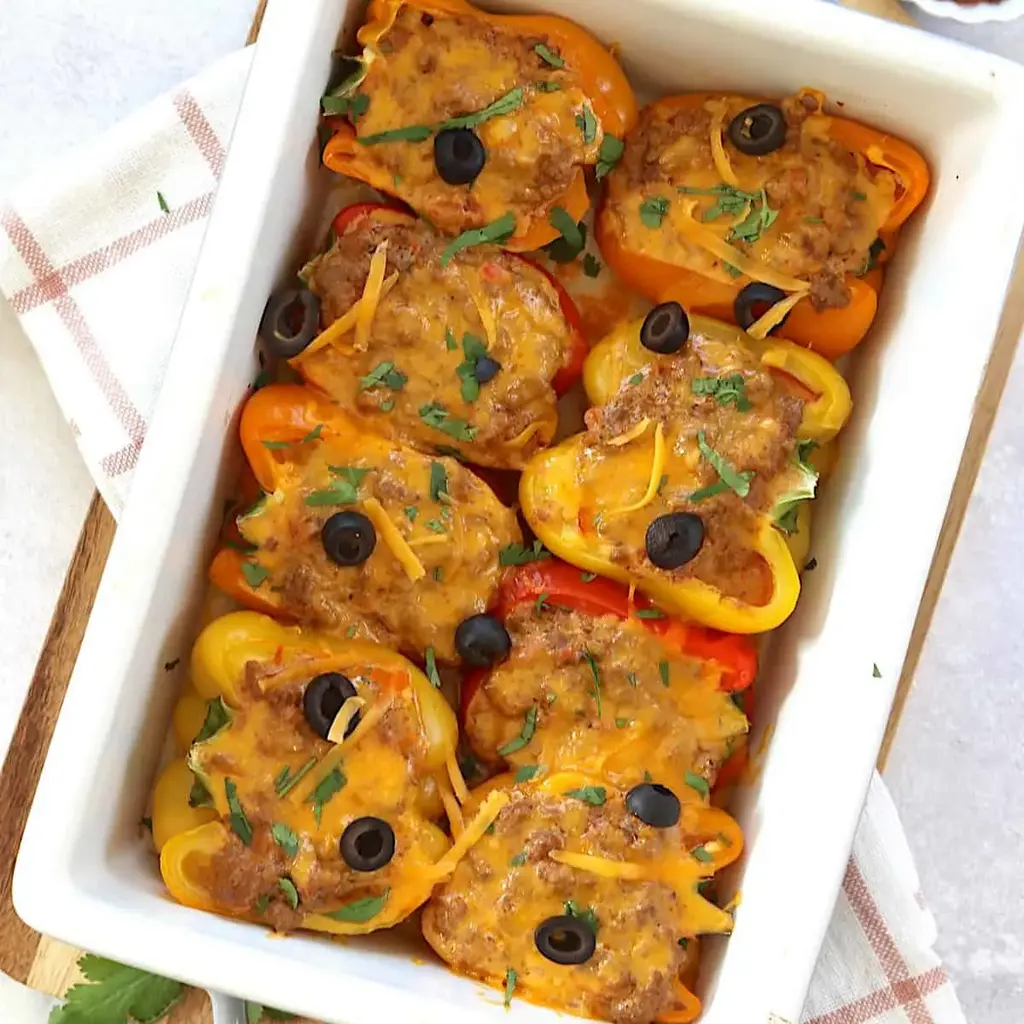
Every time I make these stuffed taco peppers, I’m transported back to my mother’s kitchen in Morocco, where bell peppers were always a star ingredient — stuffed with spiced rice or ground lamb, they were a weekly ritual. Now, living in New York City, I’ve given that beloved concept a low-carb, high-protein makeover that’s perfect for busy weeknights. These stuffed taco peppers deliver all the bold flavors of taco night — seasoned ground beef, salsa, sour cream, and melted cheddar — without the extra carbs from tortillas or rice. It’s a keto-friendly dinner that feels indulgent but keeps you on track with your macros.
The aroma that fills my apartment when these peppers bake is pure magic: the sweet smokiness of roasted bell peppers mingling with earthy cumin and chili from the taco seasoning, all topped with a golden blanket of bubbly cheddar. The first bite is a soft, tender pepper shell giving way to a creamy, savory filling — the sour cream and melted cheese create a luscious texture that’s anything but diet food. I love how the peppers soften just enough to yield to your fork, yet still hold their shape like little edible bowls of comfort.
I’ve tested this recipe dozens of times to get it just right — the trick is parcooking the peppers in the microwave so they finish baking without turning mushy, and adding the sour cream off the heat to keep it from curdling. It’s a technique I learned in pastry school in Paris, where we used similar gentle folding methods for custards. If you’ve ever struggled with watery stuffed peppers, I’ve got you covered with a pro tip below. And if you’re looking for a gluten-free, low-carb dinner that the whole family will love, this one’s a keeper.
Why This Stuffed Taco Peppers Recipe Is the Best
The flavor secret here is all about layering. I start with lean ground beef seasoned with a good-quality taco mix (or my own blend of cumin, smoked paprika, garlic powder, and chili), then stir in sour cream and salsa right off the heat. That final touch of melting 1 cup of cheddar directly into the filling ensures every bite is creamy and cheesy, not dry. It’s a trick I picked up from making French béchamel — building richness into the filling before it ever hits the oven.
Perfected texture comes from two moves: microwaving the peppers first with a little water (just 5 to 6 minutes) so they start softening without boiling, and spreading the remaining cheddar on top for a golden crust. The result is a tender pepper that still has a slight bite, with a thick, saucy filling that doesn’t leak out. No more soggy bottoms or crunchy, undercooked peppers — just perfectly balanced forkfuls every time.
Foolproof and fast is the name of the game here. This recipe comes together in under an hour with one skillet, one baking dish, and one microwave-safe casserole. It’s simple enough for a Tuesday night but impressive enough for guests. Plus, it’s naturally gluten-free if you use a certified gluten-free taco seasoning — I often serve it to friends with celiac, and they rave about it.
Stuffed Taco Peppers Ingredients
I source most of my ingredients from the Union Square Greenmarket when I can — the bell peppers there are so sweet and vibrant, they almost taste like candy. This recipe is also a great way to use up leftover salsa or a half-bag of shredded cheese. Let me walk you through what you’ll need.
Ingredients List
4 medium bell peppers, any color (seeded and halved)
1½ pounds lean ground beef (93/7 recommended)
1 recipe or packet taco seasoning mix (use gluten free if needed)
¾ cup water
1½ cups shredded cheddar cheese, divided
1 cup sour cream
½ cup salsa (medium or mild)
Ingredient Spotlight
Bell Peppers: The vessel! Red, yellow, or orange peppers are sweeter and more mature than green ones, which can be slightly bitter. Choose peppers that are firm, glossy, and have flat bottoms so they sit upright in the baking dish. You can use any color, but I love a mix for visual appeal.
Lean Ground Beef: 93/7 is ideal — it’s high in protein (about 22g per 4oz) and low in fat, so you don’t have to drain much grease. If you use 80/20, drain off excess fat after browning or the filling may be greasy. Ground turkey or chicken work well too (see variations).
Shredded Cheddar Cheese: Sharp cheddar adds the most flavor — pre-shredded works in a pinch, but block cheese shredded at home melts creamier because it doesn’t have anti-caking agents. I use a mix of sharp yellow cheddar and white cheddar for color contrast.
Sour Cream: Full-fat sour cream is best for a rich, thick filling. Greek yogurt can be substituted (see table), but it may be tangier and slightly less creamy. Always add it off the heat to prevent curdling.
Original Ingredient
Best Substitution
Flavor / Texture Impact
Lean Ground Beef
Ground turkey or chicken (93/7)
Leaner, milder flavor; add 1 tbsp olive oil to skillet
Taco Seasoning Packet
Homemade: 1 tbsp chili powder, 1 tsp cumin, 1 tsp smoked paprika, ½ tsp garlic powder, ½ tsp onion powder, ½ tsp oregano, ½ tsp salt
Less sodium, more customizable smokiness
Sour Cream
Plain full-fat Greek yogurt
Slightly tangier, thinner; add 1 tbsp cornstarch to thicken
Cheddar Cheese
Monterey Jack, Pepper Jack, or Mozzarella
Softer melt; Pepper Jack adds heat
Salsa
Diced tomatoes with green chiles (Rotel), drained
Less sweet, more tomato-forward
How to Make Stuffed Taco Peppers — Step-by-Step
Don’t worry — this comes together faster than you think. I’ll walk you through each step with tips I’ve learned from years of cooking and testing.
Step 1: Prep the Peppers
Preheat your oven to 350°F. Spray a 9×13-inch baking dish with nonstick spray. Wash the peppers, then slice them lengthwise from stem to bottom — you want to keep the stem intact if possible for a prettier presentation. Remove the seeds and white membranes with a small spoon. Place the 8 halves cut-side up in a microwave-safe casserole dish that holds them snugly. Add ¼ cup water to the dish, cover with a microwave-safe lid or plastic wrap, and microwave on high for 5 to 6 minutes. The peppers should be just starting to soften but still hold their shape — they’ll finish cooking in the oven. Carefully drain any excess water.
💡 emy’s Pro Tip: If you don’t have a microwave, you can blanch the peppers in boiling water for 3 to 4 minutes instead. Use a slotted spoon to transfer them to a paper towel-lined plate to drain before stuffing.
Step 2: Brown the Beef
While the peppers are in the microwave, heat a large skillet over medium heat. Add the lean ground beef and cook, breaking it up with a wooden spoon, until it’s no longer pink — about 6 to 8 minutes. If you’re using 80/20 ground beef, drain off the excess fat by tilting the skillet and spooning it out. For 93/7, you usually won’t need to drain anything. Once the beef is cooked through, sprinkle the taco seasoning over it, add ¾ cup water, and stir to combine. Bring it to a simmer and cook for 2 to 3 minutes, stirring occasionally, until the liquid thickens into a saucy consistency. Remove the skillet from the heat.
⚠️ Common Mistake to Avoid: Don’t skip simmering the seasoning with water. Taco seasoning needs that liquid to bloom its spices and create a sauce that clings to the meat. If you just sprinkle it dry, the filling will be powdery and bland.
Step 3: Make the Filling
Off the heat, stir in the sour cream, salsa, and 1 cup of the shredded cheddar cheese. Mix until everything is well combined and the cheese has melted into the hot beef. The mixture should look creamy and cohesive — if it seems dry, add a tablespoon more salsa. Taste and adjust seasoning with salt and pepper if needed (most taco seasonings are salty enough, but it’s always good to check).
💡 emy’s Pro Tip: Always add the sour cream after the skillet is off the heat. If you add it while the pan is still on the burner, the sour cream can separate and curdle, leaving you with a grainy texture. This is a tip I learned in Paris while making creamy sauces — gentle heat is the secret.
Step 4: Fill and Bake
Arrange the parcooked pepper halves in your prepared baking dish. Spoon the beef mixture evenly into each half, mounding it slightly — there should be enough for generous filling in all 8 halves. Sprinkle the remaining ½ cup cheddar cheese evenly over the tops. Bake for 20 to 30 minutes, until the peppers are soft (you can pierce them easily with a fork), the filling is heated through, and the cheese is bubbly and golden in spots. If you want extra browning, switch the oven to broil for the last 1 to 2 minutes — watch closely so the cheese doesn’t burn.
⚠️ Common Mistake to Avoid: Don’t overstuff the peppers — you want the filling to sit nicely inside without overflowing. If the peppers are small (some mediums are petite), you may only get 6 to 7 filled halves. That’s fine: just bake the extra filling in a small ramekin alongside the peppers and serve it on the side.
Step
Action
Duration
Key Visual Cue
1
Microwave peppers
5–6 mins
Peppers are pliable, not falling apart
2
Brown beef
6–8 mins
No pink remains, liquid thickens
3
Make filling
2–3 mins
Cheese melted, mixture creamy
4
Fill and bake
20–30 mins
Peppers soft, cheese bubbly golden
Serving & Presentation
I love serving these stuffed taco peppers family-style straight from the baking dish — it feels like a cozy taco night at home in NYC. Place 2 pepper halves on each plate (one serving) and top with your favorite taco garnishes: a dollop of sour cream or Greek yogurt, fresh pico de gallo, sliced avocado, chopped cilantro, and a squeeze of lime. For extra crunch, add a few crushed tortilla chips (if you’re not strict low carb) or toasted pepitas.
When I make these for friends, I often set up a little taco bar with bowls of toppings — it’s a fun way to let everyone customize their plate. The peppers are sturdy enough to hold lots of extras without falling apart. For a pop of color and freshness, I scatter a handful of thinly sliced radishes and some pickled jalapeños on top.
Pairing Type
Suggestions
Why It Works
Side Dish
Cauliflower rice with lime, Mexican street corn salad, or black beans (if not strict keto)
Adds bulk and fiber; keeps the meal low carb
Sauce / Dip
Extra sour cream, guacamole, or chipotle crema
Cools the heat, adds creamy richness
Beverage
Agua fresca (hibiscus or lime), light Mexican beer, or sparkling water with lime
Refreshing acidity cuts the richness
Garnish
Fresh cilantro, sliced avocado, pickled red onions, cotija cheese
Adds color, texture, and bright flavors
Make-Ahead, Storage & Reheating
As a busy mom and food blogger in NYC, meal prep is my survival strategy. These stuffed taco peppers are a dream for that — you can assemble them a day ahead or freeze them for busy weeks. Sunday prep means Tuesday dinner is a 10-minute oven reheat.
Method
Container
Duration
Reheating Tip
Refrigerator
Airtight container or baking dish covered with foil
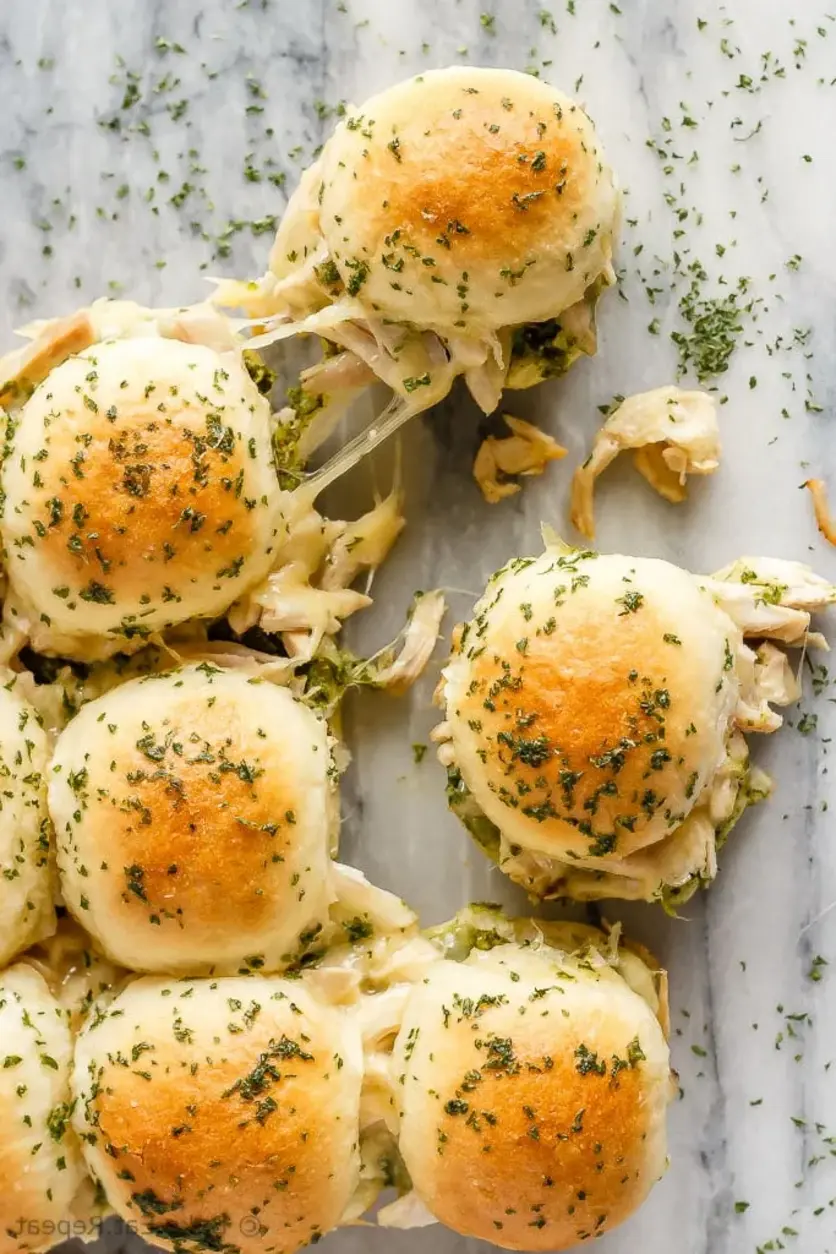
I still remember the first time I made these pesto chicken pull apart sliders. It was a chilly autumn evening in my tiny NYC apartment, and I was craving something that felt like a hug — warm, cheesy, and effortless. The smell of pesto and melted mozzarella filled every corner, reminding me of the Sunday lunches my mother used to prepare in Morocco, where fresh herbs and good bread were always the heart of the meal. These easy to make, pesto chicken pull apart sliders are the perfect quick and easy dinner — they come together in just 30 minutes and taste like you spent hours in the kitchen.
The magic of these sliders lies in the contrast of textures. The soft, pull-apart rolls soak up the garlic butter topping and get beautifully golden on the edges, while the inside stays tender and loaded with shredded chicken, bright pesto, and gooey mozzarella. Each bite is a symphony of herby, savory, and buttery notes. I love how the pesto adds a burst of freshness that cuts through the richness of the cheese — it’s a balance I learned to perfect during my pastry training in Paris, where every element on the plate has a purpose.
What sets my version apart is a simple trick I picked up from a little trattoria in Brooklyn: brushing the tops of the sliders with melted butter infused with garlic salt and dried parsley before baking. That extra step creates a crisp, flavorful crust that makes these sliders absolutely irresistible. Whether you’re feeding a hungry family or hosting game day, this recipe delivers big flavor with minimal effort. And trust me — the leftovers are even better the next day.
Why This Pesto Chicken Sliders Recipe Is the Best
The Flavor Secret: Growing up in Morocco, I learned that fresh herbs are everything. In this recipe, I use a quality store-bought or homemade pesto — the basil and pine nut combination instantly elevates the dish. But the real secret is the garlic butter glaze: it seeps into the rolls while baking, creating a savory, aromatic finish that makes each slider taste like a gourmet creation. This is the kind of flavor that brings people back to the table for seconds.
Perfected Texture: My culinary training in Paris taught me the importance of texture in every dish. For these sliders, the key is not overbaking — the rolls should be golden on top but still soft and pillowy inside. I also shred the chicken finely so it distributes evenly, ensuring every bite has a perfect balance of meat, cheese, and pesto. The mozzarella melts into a luscious, stretchy layer that holds everything together beautifully.
Foolproof & Fast: This recipe is designed for busy weeknights when you need dinner on the table in under 30 minutes. It’s nearly impossible to mess up — just layer, brush, and bake. The only “mistake” would be skipping the foil cover during the first 15 minutes of baking, which traps steam and ensures the cheese melts evenly. It’s a small detail that makes a big difference, and it’s exactly the kind of tip I share with my home cooking students here in New York.
Pesto Chicken Sliders Ingredients
When I shop for these ingredients, I head straight to my favorite stall at the Union Square Greenmarket. The pesto I grab from a local Italian deli nearby, and the rolls come from a family-run bakery in Queens that makes the softest slider buns you’ll ever taste. It’s these little connections to my adopted city that make cooking feel like home.
Ingredients List
9 Slider Rolls, or tray buns
1/4 cup Pesto
2 cups Cooked Shredded Chicken
1 cup Shredded Mozzarella Cheese
2 tablespoons Butter, melted
1/2 teaspoon Garlic Salt
1 teaspoon Dried Parsley
Ingredient Spotlight
Slider Rolls: These are the backbone of the recipe. Look for soft, pull-apart dinner rolls in the bakery section of your grocery store. Hawaiian sweet rolls work beautifully because they add a subtle sweetness that complements the savory pesto and garlic butter. Avoid crusty or dense rolls, as they won’t absorb the butter or stay tender.
Pesto: I prefer a basil pesto made with olive oil, pine nuts, Parmesan, and garlic. You can use jarred pesto from a trusted brand (De Cecco or Barilla are great options) or whip up a batch of your own in a food processor. For a dairy-free version, look for vegan pesto — it works just as well.
Shredded Chicken: Rotisserie chicken is my go-to for convenience — it’s flavorful, moist, and shreds easily. You can also use leftover grilled or baked chicken. If you’re starting from raw, poach boneless, skinless chicken breasts in salted water for 15 minutes, then shred with two forks.
Mozzarella: Low-moisture, part-skim mozzarella is best for this recipe — it melts beautifully without making the sliders soggy. Fresh mozzarella can be used if you squeeze out the excess liquid and pat it dry, but I find the shredded version more consistent for even melting.
Original Ingredient
Best Substitution
Flavor / Texture Impact
Slider Rolls
Soft dinner rolls (e.g., Hawaiian sweet rolls)
Same soft pull-apart texture; adds slight sweetness.
Pesto
Sun-dried tomato pesto or dairy-free vegan pesto
Bolder, tangier flavor with sun-dried tomato; vegan option is milder but still herby.
Shredded Chicken
Shredded cooked turkey or canned chicken (drained)
Turkey is slightly leaner; canned chicken works but is softer — pat dry before using.
Mozzarella
Provolone, fontina, or dairy-free shredded cheese
Provolone adds a sharper, saltier flavor; fontina is creamier. Dairy-free versions may not melt as smoothly.
Butter
Olive oil or vegan butter
Olive oil gives a slightly different flavor; vegan butter works well for dairy-free diets.
How to Make Pesto Chicken Pull Apart Sliders — Step-by-Step
These sliders are so simple, you’ll wonder why you ever ordered takeout. Follow these easy steps, and you’ll have a warm, cheesy dinner in no time.
Step 1: Preheat and Prep
Preheat the oven to 375°F. Lightly spray an 8×8-inch baking dish with cooking spray. If your rolls are in a connected tray, keep them together — this makes slicing and layering much easier. Use a serrated knife to slice horizontally through all the rolls at once.
💡 emy’s Pro Tip: Spray the dish even if it’s nonstick — it ensures the buttery bottoms don’t stick and makes cleanup a breeze.
Step 2: Layer the Bottom Rolls
Place the bottom halves of the rolls into the prepared dish, cut side up. Spread the pesto evenly over the surface — I like to use a small offset spatula or the back of a spoon to get every nook. Don’t skimp on the pesto; it’s the flavor star here.
⚠️ Common Mistake to Avoid: Don’t spread pesto all the way to the edges of the rolls — leave a tiny border so it doesn’t ooze out during baking and burn.
Step 3: Add the Chicken and Cheese
Spread the shredded chicken evenly over the pesto layer. Make sure it’s in an even layer so every slider gets a good amount. Sprinkle the shredded mozzarella cheese on top, covering the chicken completely.
💡 emy’s Pro Tip: For an extra cheesy pull, add a little more mozzarella — up to 1.5 cups. The cheese is what makes these so satisfying.
Step 4: Cover and Brush
Place the top halves of the dinner rolls over the cheese layer. In a small bowl, whisk together the melted butter, garlic salt, and dried parsley. Brush this mixture generously over the tops of the sliders — use all of it for a flavorful, golden crust. Cover the dish tightly with aluminum foil.
⚠️ Common Mistake to Avoid: Don’t skip the foil cover! Without it, the tops will brown too quickly before the cheese inside has a chance to melt properly.
Step 5: Bake and Serve
Bake for 15-20 minutes, or until the cheese is melted and the tops are golden. Remove the foil for the last 2-3 minutes if you want a darker, crisper top. Let the sliders rest for 2 minutes before serving to allow the cheese to set slightly. Serve warm — pull apart and enjoy!
💡 emy’s Pro Tip: For an extra touch, sprinkle a few fresh basil leaves on top after baking. It adds a pop of color and fresh flavor that takes these over the top.
Step
Action
Duration
Key Visual Cue
1
Preheat oven & prep dish
5 mins
Oven reaches 375°F
2
Layer bottom rolls with pesto
2 mins
Even green pesto layer
3
Add chicken and cheese
2 mins
Cheese covers chicken completely
4
Cover with tops & brush butter
2 mins
Tops fully coated in butter mixture
5
Bake covered
15-20 mins
Cheese melted, tops golden
Serving & Presentation
These sliders are best served warm, straight from the oven, when the cheese is still stretchy and the tops are crisp. I like to arrange them on a large wooden board or a cast iron skillet for a rustic look that invites everyone to grab one. The pull-apart nature makes them perfect for sharing — no plates needed!
For a complete meal, I pair these sliders with a simple arugula salad dressed with lemon juice and olive oil — the peppery leaves balance the richness of the cheese and pesto. If I’m feeling nostalgic for my Parisian café days, I add a small bowl of cornichons or pickled red onions on the side for a tangy crunch. In the summer, I serve them alongside grilled vegetables from the farmers market — zucchini and bell peppers work beautifully.
Light, fresh sides cut through the richness of the sliders.
Sauce / Dip
Extra pesto, marinara sauce, or garlic aioli
Adds moisture and an extra layer of flavor.
Beverage
Iced tea, lemonade, or a light Chardonnay
Refreshing drinks balance the savory, buttery flavors.
Garnish
Fresh basil leaves, red pepper flakes, flaky sea salt
Adds color, aroma, and a touch of heat or crunch.
Make-Ahead, Storage & Reheating
Living in New York means my schedule is always packed, so I love that these sliders can be prepped ahead. On busy Sundays, I assemble the entire dish (without baking), cover it tightly with foil, and pop it in the refrigerator. When I get home from work, I just bake it — dinner is ready in 20 minutes. It’s a lifesaver for weeknights.
Method
Container
Duration
Balsamic Glazed One Pan Chicken
Table of Contents
Balsamic Glazed One Pan Chicken – A Flavor-Packed, Easy Weeknight Dinner
⚖️
Difficulty
Easy
⏲️
Prep Time
10 mins
🕒
Cook Time
25 mins
⏱️
Total Time
35 mins
🍽️
Servings
4
When I first moved to New York City after my time at culinary school in Paris, I remember being absolutely exhausted by the end of most weekdays. Between working long hours at a small French bistro in the West Village and navigating the subway, the last thing I wanted was a complicated dinner. That’s when I started leaning into the recipes that reminded me of my mother’s kitchen in Morocco — where bold, simple flavors came together in one pot. This balsamic glazed one pan chicken is a perfect example. It’s the kind of dish that looks and tastes like you spent all day cooking, but really, it comes together in about 35 minutes flat. The balsamic glaze, with its sweet-tangy depth, is the star here, and I love how it mingles with the creamy mozzarella and burst tomatoes.
Imagine this: tender, juicy chicken breasts — pounded to an even thickness so they cook perfectly — sitting in a rich balsamic glaze that’s been seasoned with garlic, honey, and a touch of Dijon mustard. The glaze caramelizes slightly as it bakes, creating a glossy, sticky finish that coats every bite. On top, you’ve got these little pockets of fresh mozzarella that melt into gooey, creamy goodness, and grape tomatoes that burst open, releasing their sweet-tart juices. The fresh basil on top adds a bright, herbaceous note that cuts right through the richness. I can still smell the aroma from my tiny Upper West Side kitchen, where the smell of balsamic reduction filled the whole apartment — and my neighbors started asking what I was making.
What sets my version apart is how I balance that classic Italian-American balsamic chicken with a few techniques I picked up in Paris and a little North African warmth. I deglaze the pan after searing the chicken, scraping up all those browned bits — that’s where the flavor lives, a classic French technique called “déglacer.” And I always finish with a pinch of good flaky salt and fresh black pepper. I’ll share a pro tip below on how to avoid the most common mistake: overcooking the chicken. Trust me, once you master this one-pan wonder, it will become a staple in your weeknight rotation.
Why This Balsamic Glazed One Pan Chicken Recipe Is the Best
The Flavor Secret: The secret to the deep, rich flavor here is the combination of balsamic vinegar and honey, which I learned to balance during my years in Paris. Balsamic vinegar brings acidity and a natural sweetness, while honey adds depth and helps the glaze caramelize beautifully. The Dijon mustard is my non-negotiable addition — it acts as an emulsifier, bringing the sauce together, and adds a subtle tang that elevates the whole dish. I always use a good-quality balsamic, ideally aged for at least 12 years, for that syrupy, mellow finish. It’s a trick I brought back from a market in the Marais.
Perfected Texture: To achieve perfectly cooked chicken every time, I use a technique I mastered in culinary school: pounding the chicken to an even ½-inch thickness. This guarantees that the chicken cooks uniformly, preventing dry edges and raw centers. The sear is quick — just 1-2 minutes per side — to get a golden crust, and then the oven does the rest. The mozzarella and tomatoes are added after the sear, so they stay fresh and vibrant, not mushy. That 5-minute rest after baking? It’s essential for the juices to redistribute, ensuring every bite is moist and tender.
Foolproof & Fast: This is the kind of dish that even beginners can nail on their first try. The instructions are simple, the ingredients are straightforward, and everything happens in one skillet. For my fellow go-getters in NYC or anywhere with a busy lifestyle, this recipe requires minimal cleanup and delivers maximum taste. You can have dinner on the table in 35 minutes, and it’s impressive enough for a casual date night or a family dinner.
Balsamic Glazed One Pan Chicken Ingredients
I love shopping for these ingredients at the Union Square Greenmarket on a Saturday morning. The fresh basil reminds me of the herb garden my mother kept in our courtyard in Fez, and the grape tomatoes from a local farm are so sweet this time of year. Here’s everything you’ll need to make this balsamic glazed one pan chicken recipe sing.
Ingredients List
2 lb. boneless, skinless chicken breasts, pounded to even thickness
1/3 cup balsamic vinegar
2 Tbsp. honey
2 Tbsp. avocado oil (for sauce) or olive oil
2 garlic cloves, minced
1 tsp. Italian seasoning
1 Tbsp. Dijon mustard
8 oz. grape tomatoes, halved
8 oz. fresh mozzarella balls (ciliegine or pearls)
2 Tbsp. finely chopped fresh basil
2 Tbsp. avocado oil or other high-heat oil (for searing)
Kosher salt and fresh black pepper, to taste
Ingredient Spotlight
Balsamic Vinegar: This is the heart of the glaze. Look for a bottle labeled “Aceto Balsamico Tradizionale di Modena” for the best quality. In a pinch, a good supermarket brand works, but avoid the super cheap stuff — it can be overly acidic and thin. The aged vinegar has a natural sweetness and syrupy texture that reduces beautifully.
Fresh Mozzarella: The small ciliegine (cherry-sized) balls or pearls are perfect here because they melt evenly and don’t overwhelm the chicken. For a dairy-free option, use a high-quality cashew-based mozzarella. I’ve tested this with Miyoko’s brand and it delivers a similar creamy, melty result.
Chicken Breasts: Boneless, skinless breasts are the easiest for weeknights. I always buy them from a trusted butcher at the Essex Street Market. If you prefer darker meat, boneless skinless thighs work beautifully — just increase the cooking time by 5-7 minutes. No need to pound thighs; they stay juicy naturally.
Original Ingredient
Best Substitution
Flavor / Texture Impact
Balsamic vinegar
Sherry vinegar + 1 tsp honey
More nutty, less sweet; reduce honey slightly
Fresh mozzarella
Cashew mozzarella (vegan) or halloumi
Halloumi stays firmer; cashew melts well
Honey
Maple syrup or agave nectar
Slightly thinner glaze; maple adds woodsy notes
Italian seasoning
Dried oregano + dried basil + pinch of thyme
Classic Italian flavor profile
How to Make Balsamic Glazed One Pan Chicken — Step-by-Step
This is where the magic happens. Follow these steps closely, and you’ll have a restaurant-quality meal in under 40 minutes. I promise it’s easier than it sounds.
Step 1: Prep the Sauce and Tomato Mixture
In a small bowl, whisk together the balsamic vinegar, honey, 2 tablespoons of oil (avocado or olive), minced garlic, Italian seasoning, and Dijon mustard. Season with a pinch of salt and pepper. Set aside. In a separate bowl, gently toss together the halved grape tomatoes, fresh mozzarella balls, and chopped basil. Season with salt and pepper, to taste. Set both aside.
💡 emy’s Pro Tip: For the best flavor, let the tomato-mozzarella mixture sit at room temperature for 10 minutes while you sear the chicken. This allows the flavors to meld and the mozzarella to soften slightly.
Step 2: Sear the Chicken
Preheat your oven to 400°F (200°C). In a large oven-safe skillet (I use a 12-inch cast iron or stainless steel pan), heat 2 tablespoons of avocado oil over medium-high heat until shimmering. Pat your chicken breasts dry with paper towels — this is key for a good sear. Season the chicken generously on both sides with kosher salt and fresh black pepper. Carefully place the chicken in the hot skillet in a single layer. Cook for 1-2 minutes per side, until lightly golden brown. Do not overcrowd the pan; if needed, work in batches.
⚠️ Common Mistake to Avoid: Skipping the pat-dry step. Moisture on the chicken’s surface will cause it to steam instead of sear, resulting in a pale, leathery exterior. Always pat dry before seasoning.
Step 3: Add Sauce and Toppings
Once the chicken is golden on both sides, pour the balsamic sauce mixture into the skillet around the chicken. It should immediately start bubbling — that’s good! Use a wooden spoon to scrape up all the browned bits from the bottom of the pan. This deglazing step releases all that flavorful fond into the sauce. Immediately remove the pan from the heat, and spoon the tomato-mozzarella mixture evenly over the chicken pieces.
💡 emy’s Pro Tip: If you’re using a cast iron skillet, be careful as the handle gets extremely hot. Use a kitchen towel or oven mitt when handling throughout the process.
Step 4: Bake to Perfection
Place the skillet in the preheated oven, uncovered. Bake for 18-23 minutes, or until the chicken is fully cooked through and the internal temperature reaches 165°F (74°C) when tested with an instant-read thermometer. The tomatoes will be blistered and the mozzarella will be melted and golden in spots. Remove from the oven and let the pan rest for 5 minutes before serving — this allows the juices to redistribute, keeping the chicken incredibly tender.
⚠️ Common Mistake to Avoid: Cutting into the chicken immediately after baking. The juices will run out, leaving dry meat. Patience pays off — rest for a full 5 minutes.
I love serving this balsamic glazed one pan chicken straight from the skillet — it’s rustic, warm, and shows off all those beautiful layers. Place the skillet on a trivet in the center of the table, and let everyone help themselves. For a more polished platter, use a large serving dish and carefully arrange the chicken, then spoon the tomatoes, mozzarella, and all the glorious sauce over the top.
A final sprinkle of fresh basil leaves (use whole leaves for a beautiful presentation) and a pinch of flaky salt, like Maldon, are my go-to finishing touches. I love pairing this with a side of crusty bread to soak up every last drop of the balsamic glaze, or over a bed of fluffy couscous — a nod to my Moroccan roots. If you’re in the mood for something green, try a simple arugula salad with lemon vinaigrette to cut through the richness.
Pairing Type
Suggestions
Why It Works
Side Dish
Crusty sourdough, couscous, or roasted green beans
Sauce absorption, texture contrast, freshness
Sauce / Dip
Extra balsamic glaze drizzle, or tzatziki for a cool twist
Enhances richness; tzatziki adds tangy coolness
Beverage
Chilled Pinot Grigio, or sparkling water with lemon
Acidity cuts through the rich glaze
Garnish
Fresh basil leaves, flaky salt, lemon zest
Brightness, texture, visual appeal
Make-Ahead, Storage & Reheating
For my busy weekly meal prep in the city, I often double this balsamic glazed one pan chicken recipe and store portions for the week. The flavors actually deepen overnight as they meld, making leftovers even more delicious. Here’s how I manage it.
One-pan balsamic chicken is such a flavorful weeknight dinner. Made with simple ingredients and easy steps!
Ingredients
Scale
1/3 cup balsamic vinegar
2 Tbsp. honey
2 Tbsp. oil, such as avocado or olive oil
2 garlic cloves, minced
1 tsp. Italian seasoning
1 Tbsp. Dijon mustard
8 oz. grape tomatoes, halved
8 oz. fresh mozzarella balls (ciliegine or pearls)
2 Tbsp. finely chopped fresh basil
2 lb. boneless, skinless, chicken breasts, pounded to even thickness
2 Tbsp. avocado oil or other high-heat oil
Kosher salt and fresh black pepper
Instructions
In a bowl, whisk together the sauce ingredients. Season with salt and pepper, to taste. Set aside.
In a separate bowl, toss together the tomatoes, mozzarella, and basil. Season with salt and pepper, to taste. Set aside.
Preheat oven to 400 degrees F.
Heat oil over medium-high heat in a large oven-safe skillet. Season the chicken all over with salt and pepper, to taste. When the pan is hot and oil is shimmering, add the chicken to the skillet in a single layer. Cook for 1-2 minutes on each side or until lightly golden brown. Add the balsamic sauce mixture. It should quickly come to a simmer. Use a wooden spoon to scrape up any brown bits from the bottom of the pan.
Immediately remove the pan from the heat and add the tomato mozzarella mixture over the chicken.
Bake uncovered for 18-23 minutes or until chicken is fully cooked through. Internal temperature should register at 165F. Remove from the oven and rest for 5 minutes before serving.
Garlic Parmesan Chicken Skewers
Table of Contents
Garlic Parmesan Chicken Skewers – Air Fryer Recipe with Homemade Garlic Parmesan Butter
⚖️
Difficulty
Easy
⏲️
Prep Time
15 mins
🕒
Cook Time
12–14 mins
⏱️
Total Time
27–29 mins
🍽️
Servings
4–6
I’ll never forget the first time I made these Garlic Parmesan Chicken Skewers. It was a rainy Tuesday in my tiny NYC apartment, and the smell of garlic butter sizzling in the air fryer transported me straight back to my mother’s kitchen in Morocco. She would always say, “The secret to any great dish is patience with the basting, habibti.” And that’s exactly what this recipe is all about — fall-apart tender chicken, layered with a homemade garlic parmesan butter that you baste through every stage of cooking. The result is impossibly juicy, deeply savory chicken skewers with a golden, slightly crispy edge. This is not just a quick dinner; it’s a celebration of flavor that connects my training at Le Cordon Bleu in Paris with the bold, no-fuss cooking of New York City. The air fryer makes it all possible in under 30 minutes, so you can have dinner on the table even on the busiest weeknight.
Imagine this: You pull the chicken skewers from the air fryer, and the garlic butter is still bubbling along the edges. The parmesan has melted into a delicate crust, while the paprika and garlic powder create a deep, warm aroma. The first bite gives you a slight crunch on the outside, then the chicken practically melts — it’s that tender. The garlic is mellow and sweet from being gently cooked in butter, and the red pepper flakes add just a kiss of heat that lingers. A touch of hot sauce brightens everything, cutting through the richness. My husband, who is from upstate New York, calls these “the best chicken skewers I’ve ever had,” and he’s not one to exaggerate. Whether you serve them as an appetizer at a gathering or pile them over a bed of rice and roasted vegetables, they always disappear first.
What sets this recipe apart from the countless other chicken skewer recipes online? Two things: First, the basting technique. Instead of just brushing sauce at the end, I baste the skewers in three stages — after par-cooking, mid-way, and a final clean pass — so every fiber of the chicken is infused with that garlic parmesan butter. Second, the quality of the ingredients matters. I source my parmesan from Di Palo’s Fine Foods in Little Italy, and the garlic from a farm stand at the Union Square Greenmarket. The fresh parsley and lemon zest? Non-negotiable for a bright finish. 💡 emy’s Pro Tip: The garlic parmesan butter can separate if heated too quickly, so always melt it gently and stir in a little softened butter if needed to bring it back together. ⚠️ Common Mistake to Avoid: Don’t leave gaps between the chicken pieces on the skewer — packing them tight is what creates that fall-apart texture by trapping the juices inside.
Why This Garlic Parmesan Chicken Skewers Recipe Is the Best
The Flavor Secret: The magic really lies in that garlic parmesan butter. In Morocco, my mother would often use a blend of butter and olive oil to baste her kebabs, a technique I refined in Paris where I learned to emulsify butter-based sauces perfectly. Here, I whisk in fresh parsley, red pepper flakes, and a splash of hot sauce — the acidity cuts the richness, while the parmesan adds an umami depth that just won’t quit. I’ve tested this with cheap garlic powder and with freshly minced garlic, and trust me, the fresh cloves make a world of difference.
Perfected Texture: The key is the double-basting method. First, I season the chicken with a dry rub of paprika, garlic powder, onion powder, salt, and pepper. Then, after an initial 5-minute cook, I flip and baste with the butter for the first time. Returning it to the air fryer allows the butter to caramelize onto the chicken. After a second flip and baste, the final roast seals the deal. The result is moist, shreddable chicken that’s crisp on the outside without being dry. I learned this layered approach from my old chef in Paris who insisted that “a sauced piece of meat should always get three coats.”
Foolproof & Fast: Even if you’ve never used an air fryer before, this recipe is nearly impossible to mess up. The total cook time is just 12–14 minutes, and I’ve included exact internal temperature targets (165°F) so you never have to guess. Plus, I give you detailed instructions for both oven and grill methods in the notes. This is the kind of recipe that makes you feel like a pro cook, even on a Tuesday night after a long day at work.
Garlic Parmesan Chicken Skewers Ingredients
Every Friday morning, I head down to the Union Square farmers market to grab the freshest chicken and farm-fresh garlic I can find. For this recipe, I use chicken tenders because they’re ready to go with minimal prep, but thighs or breasts work beautifully too. The parmesan — always buy a block and grate it yourself, it melts so much smoother. And don’t skip the fresh parsley; it’s the only way to get that vibrant green finish.
Ingredients List
2 lbs chicken tenders, thighs or breast (boneless, skinless)
2 tbsp olive oil
1 stick butter (8 tbsp)
8–10 cloves garlic, minced
1/2 cup parmesan, grated (fresh is best)
1 tbsp hot sauce (more if desired)
2 teaspoons red pepper flakes
1/3 cup fresh parsley, minced
2 teaspoons paprika
1 teaspoon garlic powder
1 teaspoon onion powder
1/2 teaspoon salt
1/2 teaspoon pepper
Ingredient Spotlight
Let’s talk about the star of this dish: the chicken. Chicken tenders (which are simply the inner breast strips) are my go-to because they cook quickly and are naturally tender. If you’re using chicken breasts, slice them into 3-inch pieces of even thickness so they cook uniformly. Chicken thighs — boneless, skinless — add even more moisture and richness; they’re my second favorite option. The butter: use unsalted so you control the salt level, and don’t be tempted to use margarine — it won’t emulsify the same way. And for the parmesan? Please, please buy a block of Parmigiano-Reggiano and grate it yourself. The pre-shredded stuff has anti-caking agents that prevent it from melting into that silky, luscious sauce.
Original Ingredient
Best Substitution
Flavor / Texture Impact
Chicken tenders
Boneless chicken thighs
More rich, juicy; slightly longer cook time
Butter (unsalted)
Ghee or vegan butter (if dairy-free)
Lighter, slightly nutty for ghee; dairy-free version less rich
Fresh parmesan (grated)
Pecorino Romano or vegan parmesan
More salty, tangy for Pecorino; vegan version has less melt
Fresh garlic
1 tsp garlic powder per 2 cloves (up to 2 tsp)
Milder, less pungent; best in a pinch
How to Make Garlic Parmesan Chicken Skewers — Step-by-Step
Making these skewers is so simple, and the air fryer does most of the heavy lifting. Just follow these easy steps, and you’ll have restaurant-quality chicken at home.
Step 1: Prepare the Skewers
Before you start, soak your wooden skewers in water for at least 30 minutes — this prevents them from burning in the air fryer. If you’re using metal skewers, skip this step. While they soak, combine the paprika, garlic powder, onion powder, salt, and pepper in a small bowl for the dry rub.
💡 emy’s Pro Tip: Use flat metal skewers if you have them — they hold the chicken tighter so the pieces don’t spin when you flip them halfway through cooking.
Step 2: Season the Chicken
Cut your chicken tenders or breasts into 3-inch pieces. Place them in a large bowl or a zip-top bag, drizzle with the olive oil, and toss with the dry rub until every piece is well coated. The oil helps the spices stick and also promotes browning in the air fryer.
⚠️ Common Mistake to Avoid: Don’t skip the oil — it’s essential for the seasoning to adhere and for the chicken to develop that golden crust.
Step 3: Skewer the Chicken
Thread the chicken pieces tightly onto the skewers, leaving absolutely no space between them. This is the secret to fall-apart juiciness — the chicken steams in its own juices as it cooks. If the skewers are too long for your air fryer basket, snip the top few inches with kitchen shears once the chicken is on.
💡 emy’s Pro Tip: Pack the chicken like you’re making a dense kebab — this prevents the ends from drying out while the center stays tender.
Step 4: Make the Garlic Parmesan Butter
In a microwave-safe bowl, add the stick of butter (cut into pieces) and the minced garlic. Microwave in 15-second bursts until the butter is partially melted and the garlic is fragrant — about 30–45 seconds total. Whisk in the red pepper flakes, hot sauce, fresh parsley, and grated parmesan until smooth. If the sauce starts to separate (it can happen if the butter gets too hot), add 1–2 tablespoons of softened butter and stir vigorously to bring it back together.
⚠️ Common Mistake to Avoid: Do not microwave the butter on full power for too long — it splatters and can burn the garlic. Use 50% power or just short bursts.
Step 5: Baste in Stages
Divide your sauce: scoop out about 1/3 of it into a separate bowl for the par-cook basting (this will touch the raw chicken). Keep the remaining 2/3 clean for the final finish. Wash your basting brush between uses or use two separate brushes to avoid cross-contamination.
Step 6: Air Fry the Skewers
Preheat your air fryer to 400°F. Place 2–3 skewers in the basket (don’t overcrowd — they need space for hot air to circulate). Cook for 5 minutes. Remove, flip the skewers, and brush generously with the par-cook sauce. Return to the air fryer and cook for another 2 minutes. Flip them back, baste again, and cook for a final 5–6 minutes, or until the internal temperature reaches 165°F on an instant-read thermometer. Total cook time is about 12–14 minutes, but this can vary slightly based on your air fryer model.
Step 7: Final Touch and Serve
Remove the skewers from the air fryer. Brush one last time with the clean reserved garlic parmesan butter, then sprinkle with extra fresh parmesan and a little more parsley for color. Serve immediately, while the butter is still bubbling. The final baste is what makes these skewers truly unforgettable.
💡 emy’s Pro Tip: Let the skewers rest for just 1–2 minutes before serving. This allows the juices to redistribute, ensuring every bite is perfectly moist.
Step
Action
Duration
Key Visual Cue
1
Soak skewers & mix dry rub
30+ mins (soak) + 2 mins
Skewers fully submerged
2
Season chicken with oil & rub
5 mins
Coating is even, no dry spots
3
Skewer chicken tightly
5–7 mins
No gaps between pieces
4
Cook at 400°F (first pass)
5 mins
Chicken is white on top, lightly golden
5
Flip, baste with sauce #1
30 secs
Even coating of butter mixture
6
Cook second pass
2 mins
Butter sizzling, parmesan melting
7
Flip, baste again with sauce #1
30 secs
Glossy, saturated color
8
Final cook (third pass)
5–6 mins
Internal temp 165°F, golden brown crust
Serving & Presentation
When I make these for friends in my NYC apartment, I like to pull the skewers straight off the air fryer and lay them across a bed of fluffy jasmine rice or fluffy couscous — a nod to my North African roots. A quick side of roasted cherry tomatoes and zucchini, drizzled with a little of the leftover garlic butter, makes the perfect plate. For a more elegant presentation, serve the skewers upright in a tall glass, or arrange them on a platter and scatter with fresh parsley and extra parmesan shavings.
The leftover garlic parmesan butter is liquid gold — I always keep it to toss with pasta the next day or to spread on crusty bread for dipping. There’s nothing like dipping a piece of warm baguette into that buttery, garlicky goodness while nibbling on a skewer.
Pairing Type
Suggestions
Easy Chicken Burrito Casserole
Table of Contents
Easy Chicken Burrito Casserole – One-Pot Wonder: Your New Weeknight Hero
⚖️
Difficulty
Easy
⏲️
Prep Time
15 mins
🕒
Cook Time
75 mins
⏱️
Total Time
90 mins
🍽️
Servings
8
I still remember the first time I made this easy chicken burrito casserole in my tiny New York City kitchen — a far cry from my mother’s spacious, sunlit kitchen in Morocco, where the scent of cumin and coriander would drift through the house for hours. But here, in the heart of Manhattan, I wanted to recreate that feeling of a big, comforting meal that brings everyone around the table. This easy chicken burrito casserole is my answer — a dish that combines the soul of a classic burrito with the practicality of a one-dish wonder. It’s low-prep, loaded with protein, and incredibly satisfying. Whether you’re feeding a hungry family or meal-prepping for a busy week, this easy chicken burrito casserole will become your go-to.
Imagine a dish where tender, shredded chicken mingles with perfectly cooked brown rice, sweet corn, and hearty black beans — all seasoned with a homemade fajita blend that’s warm, smoky, and just a little bit spicy. The first spoonful is pure comfort: the creamy richness of melted Monterey Jack cheese stretches across the top, while the rice soaks up all those savory juices from the broth and green chiles. You’ll notice subtle notes of cayenne (if you dare), balanced by the sweetness of the bell pepper and the earthy depth of the beans. The aroma that fills your kitchen is nothing short of intoxicating — it’s the kind of scent that promises a hearty, happy meal. I love that this dish tastes like your favorite burrito, but you get to make it in one big casserole dish with simple ingredients.
What sets my version apart is the technique of baking everything together so the rice absorbs all that flavor as it cooks. After years working in Paris kitchens, I learned that letting ingredients marry slowly creates layers of flavor you simply can’t get any other way. The one-pot approach also makes cleanup a breeze, which is essential in a busy NYC life. I’ll share my secret for getting the perfect rice-to-liquid ratio, plus a few tricks to avoid a soupy casserole. And if you’ve ever wondered how to make sure your chicken burrito casserole is perfectly cooked every time, keep reading — I’ll walk you through it. 💡 emy’s Pro Tip: Don’t skip the foil cover — it’s essential for trapping steam and cooking the rice perfectly.
Why This Easy Chicken Burrito Casserole Recipe Is the Best
The Flavor Secret My Moroccan roots taught me that bold spices are the heart of any dish. I use a homemade fajita seasoning that balances smoky paprika, earthy cumin, and just a hint of cayenne — but I keep it mild so the entire family can enjoy it. In my Paris training, I learned the importance of building flavor from the ground up, so I sauté the onions and peppers briefly before adding them to the casserole. This step might seem simple, but it releases their natural sweetness and sets the foundation for a deeply flavorful chicken burrito casserole. The green chiles add a gentle heat that complements, rather than overwhelms, and the tomato paste gives a subtle richness that ties everything together.
Perfected Texture Getting the texture right in a casserole can be tricky — especially when you’re cooking rice from scratch in the same dish. I use parboiled long-grain brown rice, which holds its shape beautifully even after an hour in the oven. The technique of covering the dish tightly with foil for the first hour allows the rice to cook evenly and absorb all the broth, while the final uncovered step gives you that golden, bubbly cheese topping. The result is a chicken burrito casserole that’s perfectly balanced: soft but not mushy, cheesy but not greasy, with every grain of rice distinct and flavorful. I learned this covered-to-uncovered trick during my time in Paris, where slow cooking is an art form, and it works wonderfully here.
Foolproof & Fast This easy chicken burrito casserole is designed for busy weeknights and beginner cooks alike. With just 15 minutes of active prep, you can assemble everything in one dish and let the oven do the rest. I’ve tested this recipe multiple times to ensure the liquid ratios are perfect — no one wants a soupy casserole or dry, crunchy rice. The beauty is that you can use leftover rotisserie chicken or quickly poach some chicken breasts, making it even faster. Plus, because everything is baked together, you have minimal dishes to wash at the end — just one bowl and one baking dish. It’s truly a stress-free dinner that delivers restaurant-quality results.
Easy Chicken Burrito Casserole Ingredients
When I walk through the aisles of my local farmers market in Brooklyn on a Saturday morning, I always keep these ingredients in mind. I’ll pick up a fresh bell pepper that still has its stem attached, and I’ll grab a bag of high-quality black beans — low sodium is important because we control the salt ourselves. The fajita seasoning I often make in bulk and store in my spice cabinet, but store-bought works perfectly too. There’s a warmth in selecting each component, a ritual I carry from my mother’s kitchen in Casablanca to my home here in the city.
Ingredients List
1/2 cup finely diced onion
1 red bell pepper (diced)
1 cup uncooked parboiled long-grain brown rice (can also use long grain white rice)
3 tablespoons fajita seasoning (homemade or store-bought)
1/8 teaspoon cayenne pepper (optional)
1 cup corn kernels (frozen)
1 14 ounce can low sodium black beans (drained and rinsed)
5 cups shredded chicken
3 cups reduced sodium chicken broth
1 4 ounce can mild green chilies
1 tablespoon olive oil
2 tablespoons tomato paste
1 1/4 cups shredded Monterey Jack cheese
Ingredient Spotlight
Parboiled Long-Grain Brown Rice: This is my secret for perfect texture. Parboiled rice has been partially cooked in the husk, which makes it resistant to becoming mushy even after long simmering. It holds its shape beautifully and absorbs the broth evenly. If you swap for white rice, reduce the baking time by about 15 minutes. This is the ingredient that truly makes this easy chicken burrito casserole foolproof.
Fajita Seasoning: I love using a homemade blend with smoked paprika, cumin, garlic powder, onion powder, and a touch of chili powder. It provides that unmistakable Tex-Mex flavor. If you buy store-bought, check the sodium level — some brands are very salty. You can also substitute taco seasoning, but it may have a slightly different flavor profile. I always say: build your spice cabinet, and you’ll never look back.
Shredded Chicken: This recipe calls for 5 cups of shredded chicken, which is roughly 2 large chicken breasts or 1 rotisserie chicken. I prefer to poach the chicken with fresh aromatics like onion, garlic, and bay leaf — a technique I learned at Le Cordon Bleu in Paris — because it adds more flavor to the casserole. Rotisserie chicken is a fantastic shortcut, and I use it often when I’m short on time. For a vegetarian version, you can swap the chicken for extra black beans or a plant-based chicken substitute.
Monterey Jack Cheese: This cheese melts beautifully and has a mild, buttery flavor that complements the spices without overpowering them. For a sharper kick, try Pepper Jack cheese. For a dairy-free version, I’ve tested vegan shredded mozzarella-style cheese, and it works well — just look for one that is labeled for baking. The cheese should be shredded from a block; pre-shredded often includes anti-caking agents that prevent smooth melting.
Original Ingredient
Best Substitution
Flavor / Texture Impact
Parboiled brown rice
Long-grain white rice
Slightly softer texture; reduce baking time by 15 mins
Chicken broth
Vegetable broth
Slightly less savory; good for vegetarian version
Monterey Jack cheese
Pepper Jack or vegan mozzarella
Pepper Jack adds heat; vegan cheese melts less smoothly
Fajita seasoning
Taco seasoning
Slightly different spice profile; still delicious
How to Make Easy Chicken Burrito Casserole — Step-by-Step
Let me walk you through this simple process. I promise you’ll be amazed at how easy it is to create something so delicious. Remember, the key is to trust the oven and the foil — they do all the hard work.
Step 1: Prepare and Layer
Preheat your oven to 400°F. In a 9×13 inch baking dish, combine the finely diced onion, diced red bell pepper, uncooked rice, fajita seasoning, and cayenne pepper (if using). Stir these dry ingredients together so the seasoning coats every grain of rice. This ensures the flavor distributes evenly as the casserole bakes.
⚠️ Common Mistake to Avoid: Don’t skip stirring the dry ingredients thoroughly — if the seasoning sits in one spot, parts of the casserole will be bland while others are too spicy.
Step 2: Make the Broth Mixture
In a separate bowl or a measuring cup, whisk together the chicken broth, mild green chiles, tomato paste, and olive oil. Whisk until the tomato paste is fully dissolved and the mixture looks uniform. This liquid will cook the rice and infuse it with flavor from the chiles and broth. Pour this mixture into the baking dish and stir everything together until well combined.
💡 emy’s Pro Tip: For an even more intense flavor, warm the broth mixture slightly before adding it — this helps the rice start cooking immediately and reduces any risk of uneven baking.
Step 3: Add Protein and Vegetables
Add the shredded chicken, drained black beans, and frozen corn to the baking dish. Give it an additional, generous stir until everything is evenly distributed. The chicken should be submerged slightly in the broth. It’s okay if a few pieces are sticking up — the foil will help them cook through. This step is where the dish transforms into a complete meal.
⚠️ Common Mistake to Avoid: Make sure to drain and rinse the black beans well. The starch and liquid from the can can make the casserole too thick and slightly starchy.
Step 4: Bake Covered
Cover the baking dish tightly with aluminum foil. Transfer the dish to the preheated oven and bake for 65–70 minutes, or until all the liquid is absorbed and the rice is tender. The foil traps steam, which is essential for cooking the rice perfectly without drying out the top. I recommend checking at the 60-minute mark — if the liquid is almost gone but the rice still has a slight bite, cover again and bake another 5–10 minutes.
⚠️ Common Mistake to Avoid: Don’t open the foil during baking — each time you do, you release valuable steam that the rice needs to cook evenly. Trust the process!
Step 5: Add Cheese and Finish
Once the rice is tender and liquid is absorbed, carefully remove the baking dish from the oven and remove the aluminum foil. Sprinkle the shredded Monterey Jack cheese evenly over the top. Return the dish to the oven, uncovered, for 5–10 minutes, or until the cheese has melted and is slightly golden and bubbly. The final minutes are crucial for creating that beautiful, inviting crust.
💡 emy’s Pro Tip: For an extra-golden and bubbly cheese topping, switch the oven to broil for the last 1–2 minutes — but watch closely so it doesn’t burn!
Step 6: Rest and Serve
Remove the casserole from the oven and allow it to rest for 5–10 minutes before serving. This resting period is important — it allows the ingredients to set and the flavors to meld together. During this time, you can prepare your garnishes: chop some fresh cilantro, slice green onions, dice an avocado, and set out salsa. Serve the casserole warm with your favorite toppings, and enjoy the fruits of your very simple labor.
⚠️ Common Mistake to Avoid: Serving too hot — the casserole will be very hot straight from the oven. Letting it rest not only prevents burns but also gives the rice a chance to absorb any remaining moisture for the best texture.
Step
Action
Duration
Key Visual Cue
1
Layer dry ingredients
2 mins
Rice and spices evenly mixed
2
Whisk broth mixture
2 mins
Tomato paste fully dissolved
3
Add chicken, beans, corn
3 mins
Ingredients submerged in broth
4
Bake covered
65–70 mins
Liquid absorbed, rice tender
5
Add cheese and bake uncovered
5–10 mins
Cheese melted, golden, bubbly
6
Rest and serve
5–10 mins
Casserole set, slightly cooled
Serving & Presentation
When I serve this easy chicken burrito casserole, I like to bring a little bit of my Moroccan heritage to the table. I’ll set out small bowls of fresh cilantro, sliced green onions, tangy salsa, and creamy avocado — much like the tagine accompaniments my mother would prepare. The colors are stunning: the golden cheese top, the green garnish, the bright red salsa, and the rich brown casserole underneath. It’s a feast for the eyes as much as the palate.
I love pairing this dish with a simple side salad dressed with lime and olive oil, or with a side of warm tortilla chips for scooping up any extra toppings. In New York, I often grab a bag of fresh tortilla chips from a local Mexican market, and they add the perfect crunch. For a complete meal, serve alongside refried beans or Mexican rice. And don’t forget a dollop of sour cream or Greek yogurt — the cool contrast to the warm, spicy casserole is simply divine. This casserole is also fantastic as a filling for actual burritos: just spoon it into a large tortilla, add some rice, and enjoy.
💡 emy’s Pro Tip: For a restaurant-style presentation, use a springform pan instead of a baking dish. Layer the casserole, bake as directed, then remove the ring for a stunningly tall, layered casserole that looks like it came from a taco truck in NYC.
Pairing Type
Suggestions
Why It Works
Side Dish
Tortilla chips, side salad with lime vinaigrette, refried beans
I still remember the first time I made chicken parmesan in my tiny Paris apartment—it was a disaster. The oil splattered everywhere, the kitchen reeked for days, and my landlady gave me the look. Years later, after training at Le Cordon Bleu and moving to New York, I knew there had to be a better way. This oven baked chicken parmesan is that better way. By skipping the deep fryer and using a smart panko-parmesan crust, you get all the crispy, cheesy, saucy goodness without the grease. The unique angle here is my no-fry, high-heat method that locks in moisture while delivering a shatteringly golden coating—something I perfected right here in my NYC kitchen.
When this dish comes out of the oven, the kitchen fills with the scent of garlic, oregano, and bubbling mozzarella. The chicken is tender inside, the crust is crunchy and speckled with nutty parmesan, and the marinara sauce pools around each piece, turning into a rich, tangy bed. I like to take it a step further by finishing it under the broiler, which gives the cheese those irresistible golden-brown spots. It’s the kind of dinner that makes everyone at the table go quiet—except to ask for seconds.
What sets my version apart is a technique I picked up in Paris: pounding the chicken to even thickness and using panko breadcrumbs for an airy, extra-crisp texture. No soggy bottoms, no dry chicken. I’ll walk you through every step, including my pro tip for the perfect crust adherence and a common mistake that home cooks make when broiling. By the end, you’ll have a restaurant-quality meal that’s ready in about 35 minutes—and I promise your kitchen will stay clean.
Why This Oven Baked Chicken Parmesan Recipe Is the Best
The Flavor Secret: Growing up in Morocco, my mother taught me that the best dishes start with a strong foundation. Here, the foundation is the crust—a blend of panko breadcrumbs, freshly grated parmesan, and a whisper of oregano and garlic powder. This mix toasts beautifully in the oven, creating layers of savory depth that remind me of the spice souks back home. The good olive oil brushed on the foil helps it all crisp up without turning greasy.
Perfected Texture: At culinary school in Paris, Chef Michel drilled into me that moisture is the enemy of crispiness. That’s why I pat the chicken dry, use egg wash sparingly, and bake at 400°F on the second-from-top rack. This lets the crust set quickly while the chicken stays juicy inside. The final broil adds that last bit of crunch that makes every bite sing.
Foolproof & Fast: This oven baked chicken parmesan is designed for busy weeknights. No standing over a hot stove, no messy cleanup. The entire process is straightforward, and I’ve tested it with beginner cooks in my own NYC cooking classes. If you follow these steps, you’ll get a perfect result every single time.
Oven Baked Chicken Parmesan Ingredients
I source my chicken from the farmers market in Union Square, where the quality is always top-notch. The parmesan I grate myself—I can’t stress enough how much better fresh-grated tastes compared to the pre-shredded stuff. This simple ingredient list is the backbone of a dish that feels both comforting and elevated.
Ingredients List
2 tablespoons olive oil (for brushing the foil)
2 chicken breasts (about 1 pound total)
1 large egg
1 cup panko bread crumbs
1/2 cup parmesan cheese (fresh grated)
1 teaspoon dried oregano
1/2 teaspoon garlic powder
1 teaspoon kosher salt
1/2 teaspoon black pepper
1 cup marinara sauce (your favorite brand or homemade)
1 ½ cups shredded mozzarella
2 tablespoon minced parsley (optional, for garnish)
Ingredient Spotlight
Chicken Breasts: The star of the show. Look for even-sized breasts and pound them to about 1/2-inch thickness so they cook uniformly. If you can, use organic or air-chilled chicken—it has better texture.
Panko Breadcrumbs: These Japanese-style breadcrumbs are lighter and crispier than regular breadcrumbs. They create a delicate, shattery crust that holds up to the sauce without getting soggy.
Fresh Parmesan: Grate it yourself. Pre-grated parmesan often contains anti-caking agents that prevent melting and reduce flavor. A good wedge of Parmigiano-Reggiano makes all the difference.
Original Ingredient
Best Substitution
Flavor / Texture Impact
Chicken breasts
Chicken thighs (boneless, skinless)
Slightly juicier, richer flavor
Panko bread crumbs
Gluten-free panko or crushed pork rinds
Lighter texture with pork rinds; similar crunch with GF panko
Mozzarella
Provolone or low-moisture mozzarella
Provolone adds a sharper tang; low-moisture mozzarella melts the same
Marinara sauce
Crushed tomatoes with basil
Slightly chunkier, more rustic flavor
How to Make Oven Baked Chicken Parmesan — Step-by-Step
This method is streamlined and foolproof—I’ve taught it to dozens of home cooks in New York, and everyone walks away with a perfect dish. Let’s get started.
Step 1: Prepare Baking Sheet
Line a rimmed baking sheet with aluminum foil. Brush the foil generously with 2 tablespoons of olive oil. This prevents sticking and helps the crust crisp up. Adjust your oven rack so it’s in the second-from-top position, then preheat the oven to 400°F.
💡 emy’s Pro Tip: Use heavy-duty foil so it doesn’t tear when you flip the chicken. A thin foil can rip under the weight of the meat.
Step 2: Cut and Pound Chicken
Cut each chicken breast in half horizontally, as if butterflying it, but cut all the way through to form two even pieces. Place the pieces in a gallon-sized zip-top bag (or between two sheets of plastic wrap) and pound to an even 1/2-inch thickness using a meat pounder or rolling pin.
⚠️ Common Mistake to Avoid: Not pounding to even thickness. This leads to dry edges and undercooked centers. Take the extra 60 seconds to get it uniform.
Step 3: Season and Bread
Pat the chicken dry with paper towels, then season both sides with salt and pepper. In a shallow dish, combine 1 cup panko breadcrumbs, 1/2 cup grated parmesan, 1 teaspoon dried oregano, 1/2 teaspoon garlic powder, 1 teaspoon kosher salt, and 1/2 teaspoon black pepper. In another shallow dish, whisk the egg. Dip each chicken piece into the egg, letting excess drip off, then press into the breadcrumb mixture, coating all sides. Gently press with your hand to help crumbs adhere.
Step 4: Bake to Perfection
Place the breaded chicken on the prepared baking sheet in a single layer. Bake on the second-from-top rack for 15 minutes, or until the chicken is cooked through and the crust is golden. A meat thermometer inserted into the thickest part should read 165°F.
💡 emy’s Pro Tip: Don’t overcrowd the pan. Leave space between pieces so air circulates and the crust stays crunchy all over.
Step 5: Sauce and Cheese
Flip each piece of chicken with a spatula. Spoon 1/4 cup of marinara sauce over each piece, then top with 1/4 cup of shredded mozzarella. Return the baking sheet to the oven and turn the broiler to high. Broil for 2-4 minutes, watching closely, until the cheese is bubbly and golden brown and the edges of the chicken are browning.
⚠️ Common Mistake to Avoid: Walking away during broiling. It takes only seconds to go from perfect to burned. Stay by the oven and keep an eye on it.
Step
Action
Duration
Key Visual Cue
1
Prepare baking sheet with oiled foil
2 minutes
Foil is evenly coated, shiny
2
Cut and pound chicken
5 minutes
Even 1/2-inch thickness
3
Season and bread chicken
5 minutes
Fully coated, no bare spots
4
Bake chicken
15 minutes
Golden crust, internal temp 165°F
5
Add sauce and cheese, broil
2-4 minutes
Cheese bubbly, edges browning
Serving & Presentation
Serve this oven baked chicken parmesan hot, straight from the baking sheet to the plate. I like to sprinkle it with fresh minced parsley and a pinch of flaky sea salt right before serving—it brightens the whole dish. Pair it with a simple arugula salad dressed with lemon vinaigrette to cut through the richness, or serve over a bed of al dente spaghetti for a classic combo. In my NYC apartment, I often plate it with roasted broccoli or garlic bread on the side, because that’s how my husband likes it.
Pairing Type
Suggestions
Why It Works
Side Dish
Arugula salad, roasted broccoli, garlic bread
Balances richness with freshness or crunch
Sauce / Dip
Extra marinara, ranch dressing, balsamic glaze
Adds moisture and contrasting flavors
Beverage
Chianti, Pinot Noir, sparkling water with lemon
Acidity cuts through fat; refreshing
Garnish
Fresh parsley, basil leaves, red pepper flakes
Adds color and herbal brightness
Make-Ahead, Storage & Reheating
This recipe is a lifesaver for my busy NYC schedule. I often prep the breaded chicken in the morning and refrigerate it on the baking sheet until I’m ready to bake. Leftovers keep wonderfully, and the reheating method makes all the difference.
Method
Container
Duration
Reheating Tip
Refrigerator
Airtight container
Up to 4 days
Reheat in a 375°F oven for 10 minutes
Freezer
Freezer-safe bag or container
Up to 3 months
Hi I'm Emy
I’m passionate about sharing a diverse collection of sweet and savory recipes that I’ve meticulously tested and perfected in my own kitchen.