End your day with a delicious, comforting, and satisfying dinner! Whether you’re looking for quick and easy weeknight meals, cozy comfort food, or elegant dishes for special occasions, we have the perfect recipes for you.
From hearty casseroles and one-pan wonders to savory pastas, juicy meats, and flavorful vegetarian options, our collection is designed to make dinnertime effortless and enjoyable.
Busy schedule? No problem! Try our slow cooker meals, sheet pan dinners, and 30-minute recipes to save time without sacrificing flavor. Whatever your craving, these recipes will bring warmth and joy to your table every night. 🍽️✨
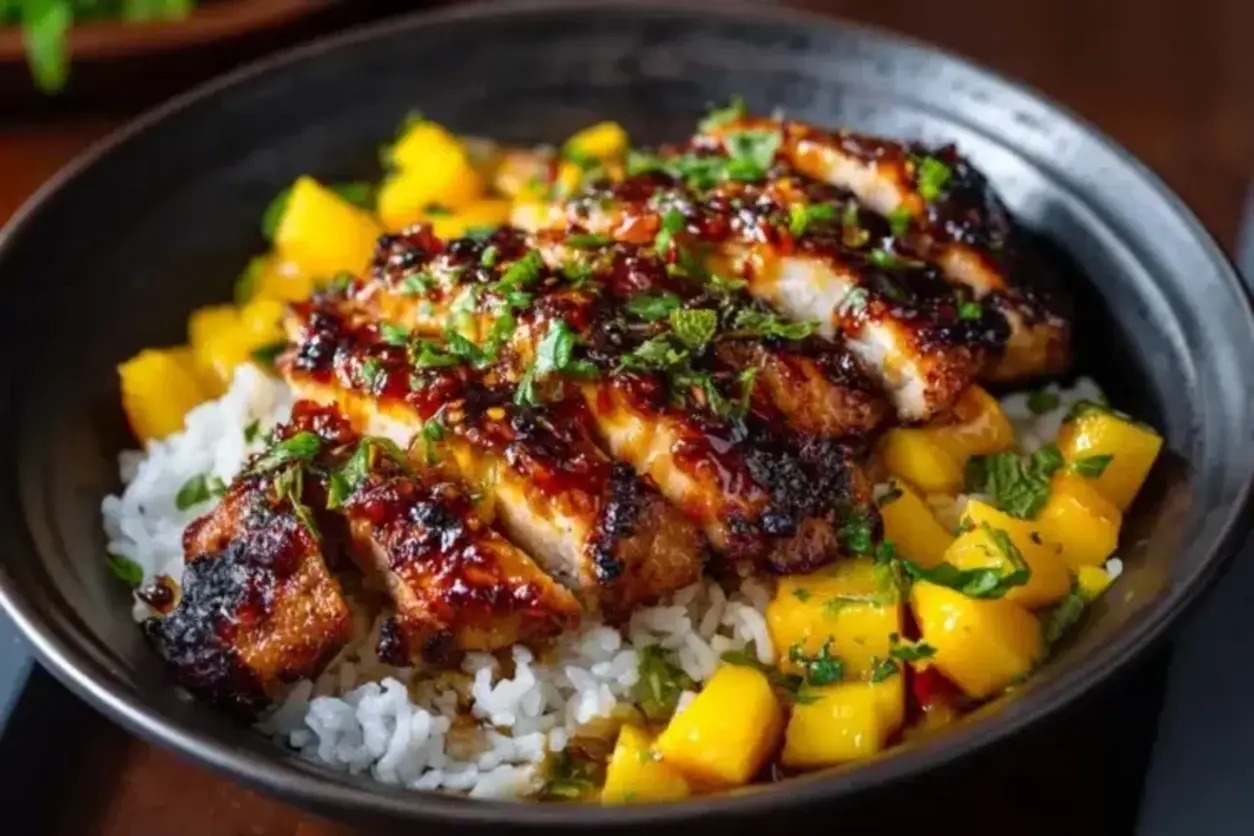
Irresistible Sweet & Savory Asian Mango Glazed Chicken Twists
Irresistible Sweet & Savory Asian Mango Glazed Chicken Twists Elevate your weeknight dinners with four mouthwatering twists on Sweet & Savory Asian Mango Glazed Chicken! From oven-baked to skillet-seared, these chicken breast recipes are bursting with bold flavor and a hint of fruity sweetness. Ideal for your collection of healthy dinner, quick lunch recipes, and dinner ideas, these variations bring variety without complicating your cooking routine. Perfect for anyone who loves simple yet exciting chicken recipes! Get the recipe and start cooking today
Indulge in the comfort of cheesy Queso Chicken Enchiladas, a delightful dish that transforms a regular weeknight dinner into a flavorful experience. These enchiladas are filled with tender shredded chicken and creamy melted Velveeta queso, all wrapped in soft tortillas. With just 10 minutes of preparation, they are perfect for busy evenings while being family-friendly and satisfying enough to impress your guests. Customize the fillings to your liking or make them ahead of time for ultimate convenience. Serve with fresh sides like guacamole or pico de gallo for a complete meal that everyone will love.
Ingredients
Scale
5 Burrito Size Flour Tortillas
2 ½ cups Shredded Chicken
½ Packet Taco Seasoning
1 cup Sour Cream
1 cup Cheddar Cheese (shredded)
2 tablespoons Chopped Green Chilies
10 ounces Diced Tomatoes with Green Chilies (undrained)
1 pound Queso Blanco Velveeta (cubed)
Instructions
In a large mixing bowl, combine shredded chicken, taco seasoning, sour cream, cheddar cheese, and green chilies. Mix well.
In a saucepan over medium-high heat, melt cubed Velveeta with the undrained diced tomatoes until smooth.
Lay tortillas flat and spoon about ½ to ¾ cup of the chicken mixture into each. Roll tortillas tightly like burritos.
Place filled tortillas side by side in a casserole dish.
Pour warm queso over the top.
Bake at 350°F for 2025 minutes until bubbly and heated through.
Nutrition
Calories:370
Sugar:3g
Protein:19g
Creamy Chicken Florentine
A rich and comforting dish featuring tender chicken breasts, sautéed spinach, and a creamy garlic Parmesan sauce. Perfect for a cozy dinner or special occasion, this Chicken Florentine is simple yet indulgent.
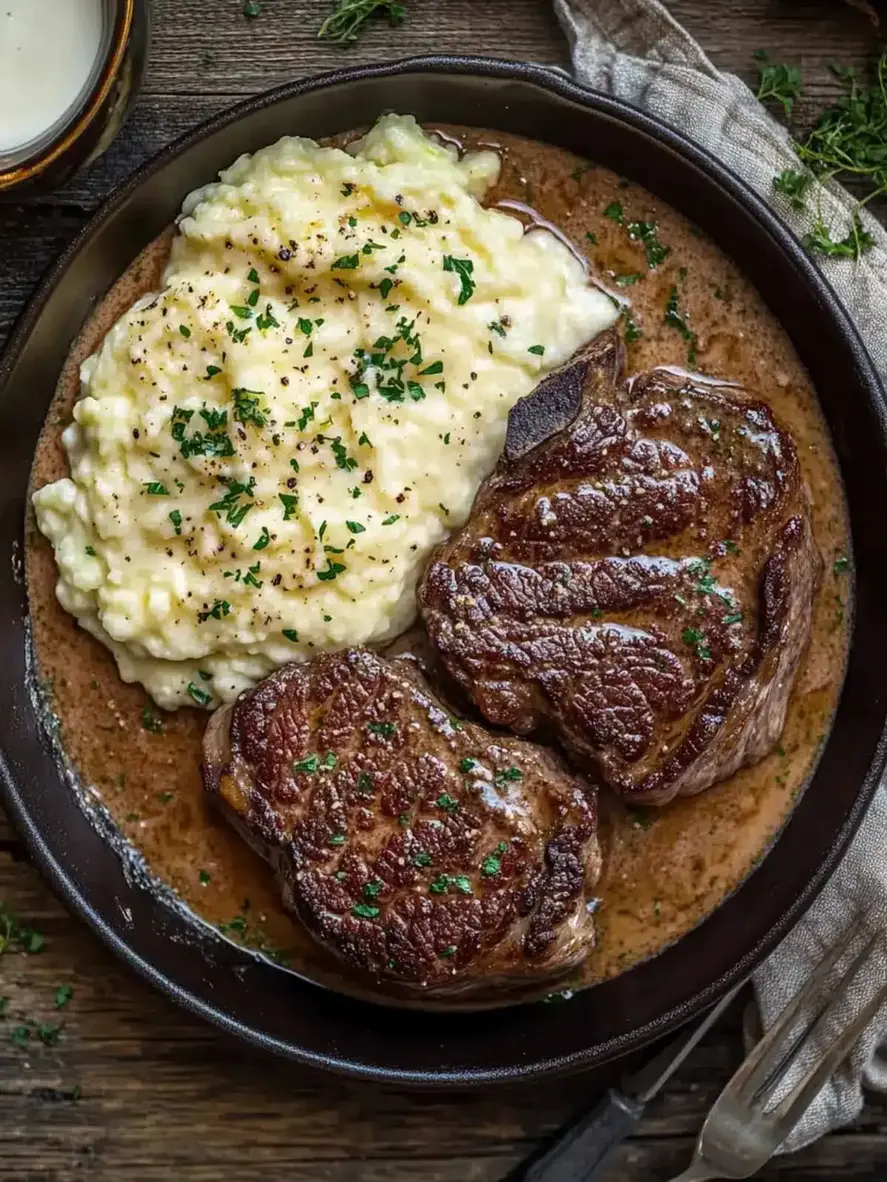
Indulge in rich flavors with Gaelic Irish Steaks with Whiskey Cream and Colcannon for a comforting dinner.
Ingredients
Scale
1 lb Sirloin Steak A quality cut is essential for rich flavor and tenderness.
1/2 cup Irish Whiskey e.g., Jameson, adds depth and smokiness.
2 tbsp Butter Brings richness and enhances the marinade.
Instructions
Marinate the Steak: Combine melted butter and Irish whiskey in a bowl. Immerse the sirloin steak in this mixture and let it marinate for at least 3 hours.
Sear the Steak: Preheat a cast iron pan over medium-high heat. Sear the marinated steak for about 3-4 minutes on each side.
Bake the Steak: Transfer the seared steaks to a preheated oven at 350°F. Bake for approximately 10 minutes until desired doneness.
Prepare Colcannon: Boil the potatoes until tender, then mash with cooked kale, seasoning with salt and pepper to taste.
Make the Whiskey Cream Sauce: In the same pan, sauté shallots until translucent, deglaze with whiskey, and stir in the cream, simmering until thickened.
Serve: Plate the steak on a bed of colcannon and drizzle with whiskey cream sauce. Serve immediately.
Notes
Garnish with fresh chopped parsley for added color and flavor. Adjust seasoning according to taste.
Nutrition
Calories:600kcal
Sugar:2g
Protein:35g
Savory Garlic Pork Bites: An Easy Flavor Explosion
Get ready for a flavor explosion with these super tasty garlic pork bites! They’re really easy to make and perfect for a quick meal. You won’t believe how good they taste with simple ingredients. If you love pork, you’ll definitely want to try this recipe. It’s a great way to make dinner exciting. Tap to see how to make them!
Savory Garlic Pork Bites are a flavorful and easy-to-make appetizer perfect for gatherings.
Ingredients
Scale
1 lb Pork Tenderloin Lean meat for best flavor and texture
4 cloves Garlic Minced
2 tbsp Olive Oil Extra virgin recommended
¼ cup Soy Sauce For umami flavor
1 tbsp Honey Balances savory with sweetness
1 tsp Smoked Paprika For warmth and smokiness
½ tsp Black Pepper
1 tsp Salt Adjust to taste
1 tbsp Fresh Thyme Fresh herbs preferred
Instructions
In a mixing bowl, combine minced garlic, olive oil, soy sauce, honey, smoked paprika, black pepper, salt, and fresh thyme. Stir well to create a fragrant marinade.
Place your pork tenderloin cubes into the bowl and ensure every piece is coated with the marinade. Cover and refrigerate for at least 30 minutes, or up to 2 hours.
Heat your grill or skillet over medium-high heat, adding a splash of olive oil if using a skillet.
Remove the pork from the marinade and cook in the hot grill or skillet until golden brown and cooked through, about 8-10 minutes.
Once cooked, transfer the pork bites to a plate and let them rest for about 5 minutes.
Garnish the pork bites with fresh parsley and serve with lemon wedges.
Notes
Optional: Serve alongside roasted vegetables for a complete meal.
Craving bold, saucy, and irresistibly spicy chicken? Look no further than Dragon Chickena punchy Indo-Chinese fusion dish thats perfect for when youre in the mood for homemade takeout with a serious kick.
23 dried red chilies (or crushed red pepper flakes)
½ cup tomato ketchup
2 tablespoons soy sauce
1 tablespoon chili garlic sauce
1 tablespoon vinegar
1 tablespoon sugar or honey
¼ cup water (to loosen the sauce, if needed)
Salt to taste
Sliced green onions
Toasted sesame seeds
Thin strips of fried onion or bell pepper for crunch
Instructions
Notes
Sweetness from ketchup and sugar balances the heat
Heat from chili garlic sauce and dried chiliesadjust to your taste
Umami from soy sauce brings depth
Acidity from vinegar keeps things bright
Nutrition
Calories:380
Protein:40g
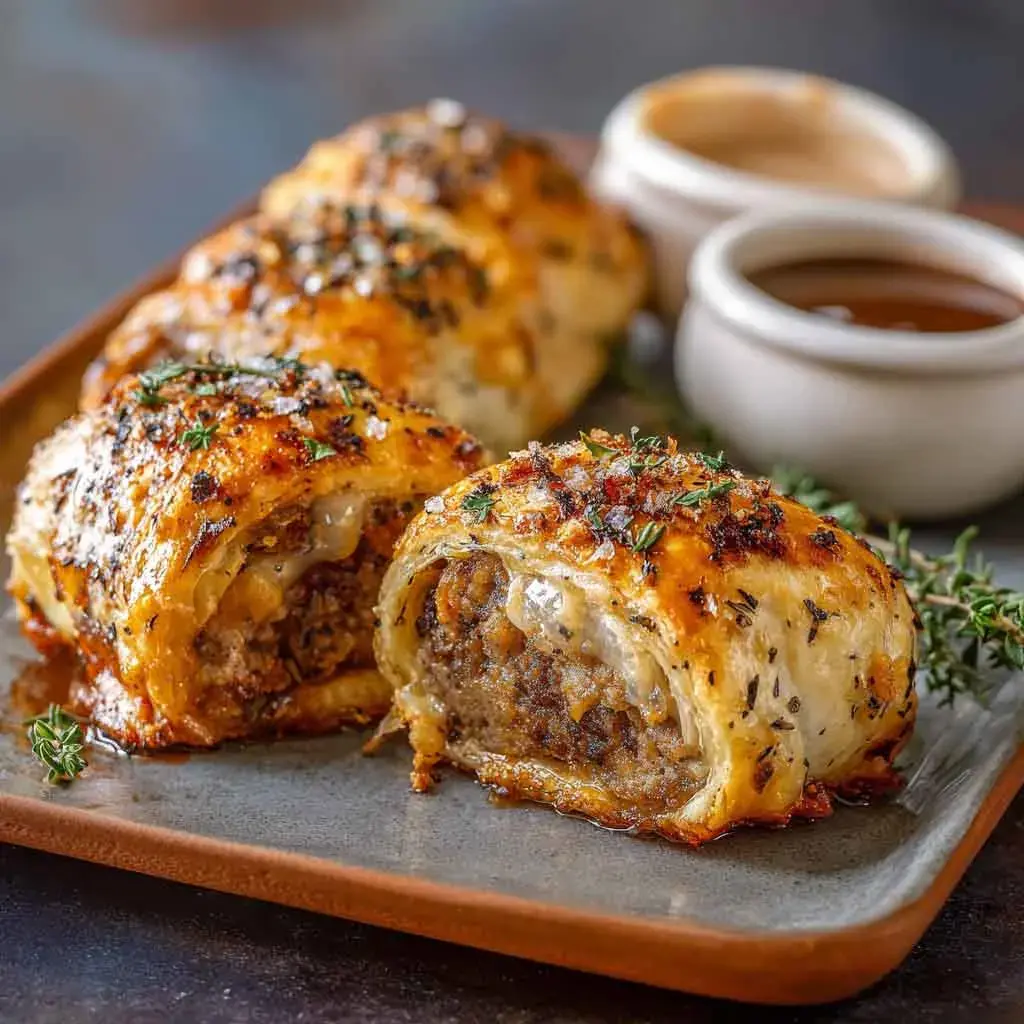
Savory French Onion Sausage Rolls – Golden, Flaky & Full of Flavor
Take your snack game up a notch with these Savory French Onion Sausage Rolls! Juicy sausage is wrapped in flaky pastry and combined with caramelized onions for a rich, flavorful bite. Perfect as an appetizer, party snack, or cozy comfort food. Easy to make, crowd-pleasing, and absolutely delicious!
Take your snack game up a notch with these Savory French Onion Sausage Rolls! Juicy sausage is wrapped in flaky pastry and combined with caramelized onions for a rich, flavorful bite. Perfect as an appetizer, party snack, or cozy comfort food. Easy to make, crowd-pleasing, and absolutely delicious!
Ingredients
Scale
1 lb (450g) pork mince (ground pork)
1 packet French onion soup mix (or 1 cup sautéed onions + 1 tsp onion powder)
1 tbsp tomato ketchup
1 tsp Worcestershire sauce
1 tsp Dijon mustard
Freshly cracked black pepper, to taste
Instructions
Preheat Oven: Set oven to 200°C (392°F). Line a baking tray with parchment paper.
Prepare Filling: In a large bowl, combine pork mince, French onion soup mix, ketchup, Worcestershire sauce, Dijon mustard, and cracked black pepper. Mix until evenly incorporated.
Assemble Rolls: Roll out puff pastry sheets and cut in half lengthwise. Place a portion of filling along one edge of each sheet. Roll the pastry over the filling and seal the edges using water or egg wash.
Apply Egg Wash: Beat the egg with milk. Brush over the tops of the rolls for a golden, glossy finish.
Bake: Place rolls on the prepared tray and bake 2025 minutes, or until golden brown and cooked through.
Cool & Serve: Allow rolls to rest for a few minutes before slicing. Serve warm with dips, sides, or enjoy as-is.
Notes
Storage: Keep in an airtight container in the fridge for up to 3 days.
Freezing: Freeze unbaked rolls on a tray, then transfer to a freezer bag; bake from frozen.
Reheating: Oven reheat preserves crispness; microwave may soften pastry.
Variations: Add cheese, fresh herbs, or chili flakes for custom flavors.
Vegetarian Option: Use mushrooms, lentils, and cheese in place of meat.
Korean Pancakes (Pajeon)
Experience the delightful crunch and savory flavor of Korean Pancakes with this easy Pajeon recipe. Packed with fresh scallions and a hint of umami, these crispy pancakes are perfect as a snack, appetizer, or side dish. Serve them with a soy dipping sauce for a truly authentic taste of Korean cuisine.
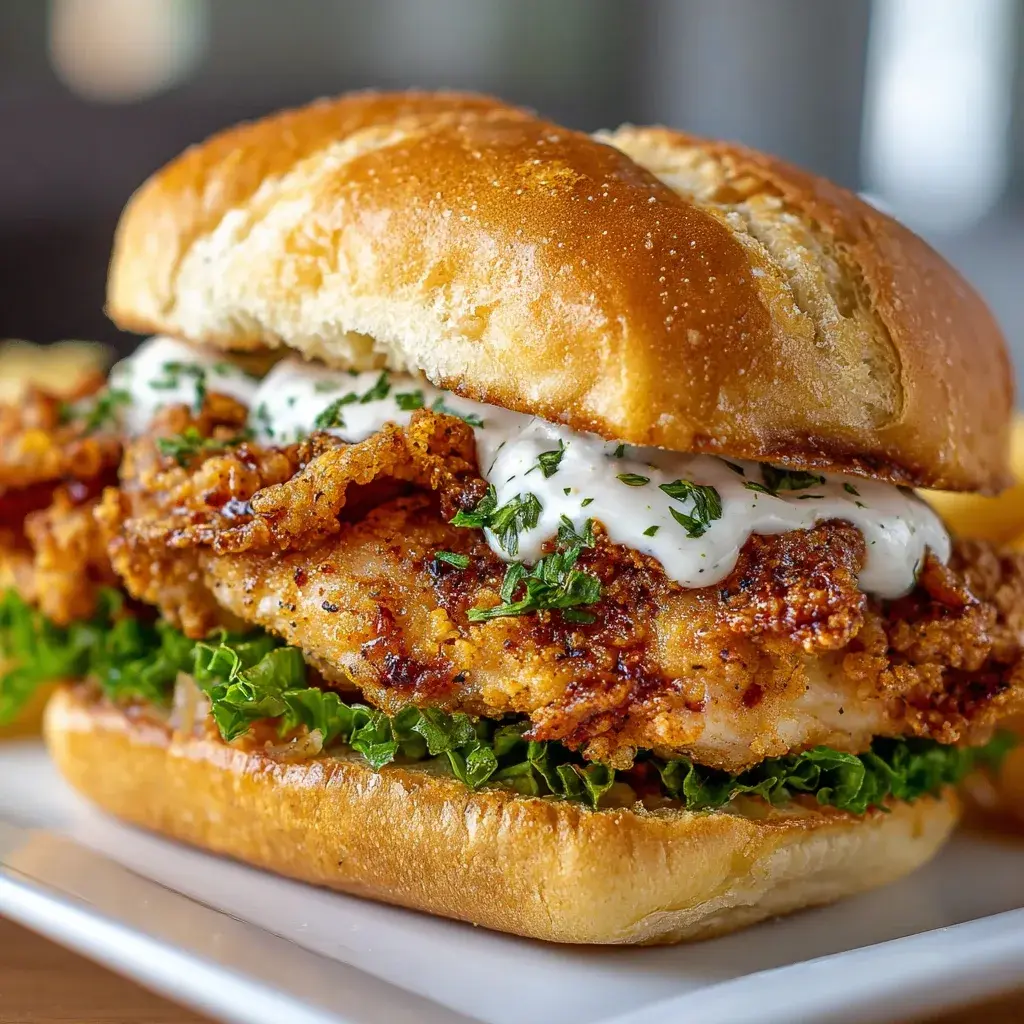
Make this Cajun Crispy Chicken Sandwich with cool, creamy garlic aioli and perfectly seasoned, crunchy chicken. This recipe includes a sensory-rich introduction, ingredients, step-by-step instructions, pro tips, variations, and serving ideas. Ideal for weeknight dinners, meal prep, game day, or satisfying comfort food cravings. Save this recipe for a crispy chicken sandwich bursting with bold Cajun flavor.
The Cajun Crispy Chicken Sandwich is a delightful explosion of flavors, featuring a perfectly seasoned, crunchy exterior that gives way to a juicy, tender chicken breast. The creamy garlic aioli adds a rich, zesty finish, enhancing the sandwichs overall taste experience with every bite.
Ingredients
Scale
For the Chicken: 2 boneless, skinless chicken breasts
1 cup buttermilk
1 tablespoon Cajun seasoning
1 cup all-purpose flour
1 teaspoon paprika
1 teaspoon garlic powder
1 teaspoon onion powder
1/2 teaspoon salt
1/2 teaspoon black pepper
Vegetable oil for frying
For the Garlic Aioli: 1/2 cup mayonnaise
2 cloves garlic, minced
1 tablespoon lemon juice
1/2 teaspoon salt
1/4 teaspoon black pepper
For Assembly: 4 brioche buns
Leafy romaine lettuce
Sliced tomatoes
Instructions
In a bowl, combine buttermilk and Cajun seasoning. Add chicken breasts, cover, and marinate in the refrigerator for at least 1 hour.
In a separate bowl, mix flour, paprika, garlic powder, onion powder, salt, and pepper.
Heat vegetable oil in a deep skillet over medium-high heat (about 350°F).
Remove chicken from buttermilk, allowing excess to drip off, then dredge in the flour mixture, ensuring an even coating.
Carefully place chicken in the hot oil and fry for 5-7 minutes on each side, or until golden brown and cooked through (internal temperature should reach 165°F).
While chicken is frying, prepare the garlic aioli by mixing mayonnaise, minced garlic, lemon juice, salt, and pepper in a small bowl.
Once chicken is cooked, drain on paper towels and let rest for a few minutes.
To assemble, spread garlic aioli on the bottom half of each brioche bun, add lettuce, a slice of tomato, and the crispy chicken. Top with the other half of the bun and serve immediately.
Notes
This sandwich can be made ahead by frying the chicken and storing it in the refrigerator for up to 2 days. Reheat in the oven to maintain crispiness.
Store leftover garlic aioli in an airtight container in the refrigerator for up to 1 week.
For a gluten-free option, substitute all-purpose flour with a gluten-free flour blend.
Nutrition
Calories:650
Sugar:2 grams
Protein:30 grams
Easy Zesty Lemon Pecorino Crispy Chicken
Transform your weeknight dinners with this Easy Zesty Lemon Pecorino Crispy Chicken recipe. Juicy chicken coated in a crispy, flavor-packed pecorino crust and finished with a refreshing lemon kick brings both comfort and sophistication to your table. This dish is perfect for busy evenings and will impress your family and friends alike!
4 boneless, skinless chicken breasts ½ cup all-purpose flour 2 large eggs 1 cup breadcrumbs (preferably panko) ½ cup grated Pecorino cheese Zest of 1 large lemon Juice of 1 large lemon 2 cloves garlic, minced 1 teaspoon salt 1 teaspoon black pepper ½ teaspoon paprika ½ teaspoon dried oregano Fresh parsley, chopped (for garnish) Olive oil (for frying)
Instructions
Nutrition
Calories:450 kcal
Protein:40g
Hi I'm Emy
I’m passionate about sharing a diverse collection of sweet and savory recipes that I’ve meticulously tested and perfected in my own kitchen.