Delicious Spaghetti & Spinach in Creamy Sun-Dried Tomato Sauce Recipe

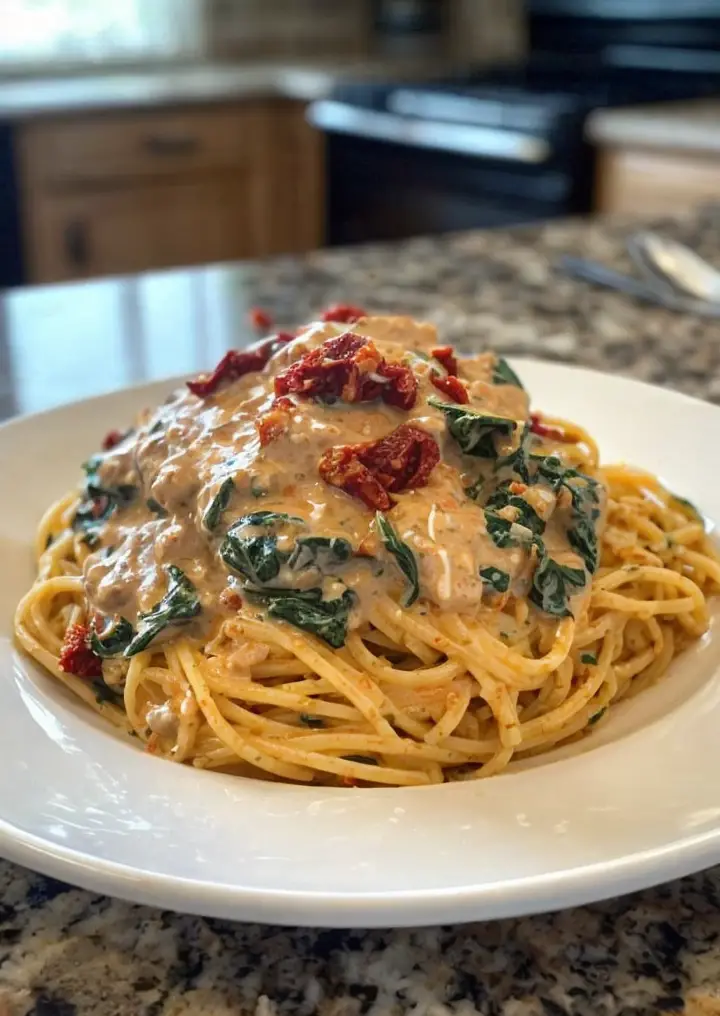
Spaghetti & Spinach with Sun-Dried Tomato Cream Sauce: A Delicious Twist on Pasta

⚖️
Difficulty
Medium

⏲️
Prep Time
15 mins

🕒
Cook Time
20 mins

⏱️
Total Time
35 mins

🍽️
Servings
4

Embark on a culinary journey with Spaghetti & Spinach with Sun-Dried Tomato Cream Sauce. This delectable dish marries the vibrant flavors of sun-dried tomatoes with the creamy textures of a luxurious sauce, all perfectly hugging al dente spaghetti. The subtle sweetness of the sun-dried tomatoes intertwines with the earthy notes of fresh spinach, creating a nutritious and flavor-packed meal.

Imagine the comfort of a creamy pasta dish that doesn’t compromise on freshness or zest. With its velvety sauce and nourishing spinach, this meal is a feast not only for your taste buds but also for your soul. Whether it’s a family weeknight dinner or a small gathering with friends, this pasta creation is bound to captivate your guests with its elegant simplicity and unmatched flavor.

Quick Recipe Highlights

  • Flavor Profile: A rich blend of tangy sun-dried tomatoes coupled with a creamy, decadent sauce that brings balance to the dish.
  • Texture: Silky smooth sauce coating well-cooked spaghetti, with tender spinach woven throughout, offering delightful bites.
  • Aroma: Aromatic notes of garlic and herbs meld with the sweet scent of sun-dried tomatoes, creating an inviting fragrance.
  • Visual Appeal: A stunning dish showcasing vibrant green spinach amidst a rich cream-colored sauce dotted with sun-kissed tomatoes.
  • Skill Level Needed: Basic cooking skills are sufficient; the dish requires attention to detail for the sauce.
  • Special Equipment: A good quality skillet and pasta pot are essential to achieve the perfect texture and sauce consistency.

Recipe Overview

  • Difficulty Level: This dish is categorized as medium difficulty due to the sauce’s precision and pasta’s readiness consistency.
  • Category: Ideal as a main course dish, it can also serve as an impressive offering in a multi-course meal.
  • Cuisine: This pasta dish carries Italian influences with a modern twist that caters to contemporary taste preferences.
  • Cost: A budget-friendly meal as it utilizes pantry staples, fresh greens, and a bit of indulgence with cream and tomatoes.
  • Season: Perfect for spring and summer as the vibrant ingredients are in bloom, though equally comforting in colder months.
  • Occasion: A versatile dish that suits everything from family weeknight dinners to more formal occasions with equal appeal.

Why You’ll Love This Recipe

Savor the taste and texture appeal of the creamy sauce clinging to strands of spaghetti, accentuated by the bursts of flavor from sun-dried tomatoes. This dish is a delightful blend of comfort food and gourmet indulgence that will leave your palate wanting more.

The convenience of this recipe lies in its straightforward preparation and the minimal use of complex kitchen equipment. Even with a busy schedule, you can whip up a nutritious meal that feels like a rewarding culinary experience.

Nutritionally, this dish offers a rich supply of vitamins from the spinach, alongside an energy-boosting carb from the pasta. It manages to combine indulgence with health, offering a satisfying meal without unnecessary guilt.

Socially, Spaghetti & Spinach with Sun-Dried Tomato Cream Sauce shines as a conversation starter at gatherings. Its blend of flavors and attractive presentation makes it a perfect shared meal, fostering connections one bite at a time.

Cost-effectiveness and accessibility are intrinsic to this recipe. Leveraging easily obtainable ingredients, you can enjoy a restaurant-quality meal at home, making it possible to dine marvelous without the extravagant price tag.

Historical Background and Cultural Significance


Spaghetti, an iconic pillar of Italian cuisine, lays the foundation for this dish. Its history dates back to ancient Rome, where pasta slowly evolved to its modern-day iterations, beloved across the globe. Pairing it with a cream sauce pays homage to the rich sauces that define many traditional Italian dishes.

Sun-dried tomatoes, once a method to preserve fresh produce in the sunny regions of Southern Italy, lend this recipe a deep cultural significance. Their bold and tangy flavor is a testament to culinary creativity in utilizing available resources.

The evolution of cream sauces in Italian cuisine reflects the blend of unctuousness with fresh ingredients, a hallmark of balanced Italian cooking. This adaptation focuses on emphasizing healthful greens such as spinach while maintaining the creamy base signature.

Culinary regionality encourages variations where local ingredients find a place within classic recipes. Thus, while spinach features prominently here, other regional greens might substitute, reflecting local tastes and seasonal availability.

Ingredient Deep Dive


Sun-dried tomatoes are cherished in Italian cooking for their concentrated flavor and lengthy shelf-life. Historically, sun-dried tomatoes allowed for consumption of summer bounty throughout the year, enhancing dishes with their intense taste.

Nutritionally, sun-dried tomatoes are antioxidant-rich, providing lycopene and other vital nutrients. When selecting, look for pliable yet firm pieces; they should be bright with a strong tomato aroma indicating quality. Store in a cool, dry place to maintain their bold flavor.

Spinach carries its weight culturally as both a staple and a nutritious powerhouse. Full of iron, vitamin C, and antioxidants, it offers substantial health benefits, important for balance within hearty meals.

Select vibrant, fresh spinach, ideally without signs of wilting. For storage, keep it dry and refrigerated, consuming it within a week for maximum freshness. Frozen spinach serves as an excellent substitute, retaining nutrients and easing preparation.

Common Mistakes to Avoid

  • Overcooking the pasta, leading to a mushy texture. Always cook to al dente following package instructions.
  • Neglecting to season the pasta water, which adds flavor depth. Salt generously for optimal taste.
  • Rushing the sauce, which results in an unbalanced flavor. Allow ingredients to meld for perfect creaminess.
  • Using inferior quality sun-dried tomatoes, affecting the dish’s flavor intensity. Invest in premium ingredients for the best result.
  • Forgetting to reserve pasta water, which helps in achieving a perfect sauce consistency.
  • Undercooking spinach, which may lead to a raw, uninviting taste. Lightly wilt for the best texture.
  • Allowing sauce to over-reduce, making it too thick. Monitor closely and adjust heat as necessary.
  • Starting with cold ingredients, which can prolong cooking times and affect taste. Ensure all ingredients are at room temperature before beginning.

Essential Techniques

Mastering pasta’s cooking requires vigilance and tasting for that perfect al dente bite. It’s crucial to understand the transformation of grains into pliable noodles without tipping into over-saturation.

Cream sauce precision is vital, particularly in balancing creaminess with the sundry flavors of tomatoes and herbs. Don’t rush the process; allow each ingredient its time to shine within the sauce.

Heating spinach uniformly is essential to extract not only texture but inherent flavors as well. Wilt your greens gently for an optimal mouthfeel, yielding depth without overwhelming.

Visual cues help ensure the perfect consistency in your sauce. Aim for a silky appearance and flawless adherence to the spaghetti, showcasing a glossy sheen without any clumping.

Pro Tips for Perfect Spaghetti & Spinach with Sun-Dried Tomato Cream Sauce


Ensure your sun-dried tomatoes soak ahead of preparation, softening to achieve an even blend within the sauce.

Add a splash of lemon juice or zest to the finished dish for an added burst of brightness, which complements the richness of the cream sauce.

For a deeper flavor profile, incorporate freshly chopped herbs like basil or oregano towards the end of the cooking process.

Toast your spaghetti slightly post-cooking for an added nutty undertone, elevating the dish’s complexity.

Experiment with cheese alternatives, such as a sprinkle of pecorino romano instead of parmesan, for distinct saltiness.

If a thicker sauce is desired, incorporate more reserved pasta water gradually, adjusting consistency to your preference.

Variations and Adaptations


Regional variations might substitute spinach with equally nutritious greens, such as kale in Mediterranean versions, providing a robust twist to the dish.

Embrace seasonal adaptations with veggies like zucchini blossoms in summer, adding vibrancy and refreshing new textures to the pasta.

Dietary modifications are readily achievable by swapping traditional cream with a plant-based version, making the meal suitable for vegan preferences without losing its signature depth.

Enhance flavor variations by incorporating chili flakes for a spicy kick or roasted red peppers for added depth to your sauce’s complexity.

Textural modifications can involve adding a crunchy crumble of seasoned bread crumbs or toasted pine nuts, providing contrast to the creamy pasta.

Presentation alternatives include twirling the spaghetti into individual nests, adding height and elegance to the plate, capturing a sophisticated dining atmosphere.

Serving and Presentation Guide


Experiment with plating techniques by creating a volcano mound of pasta on center plates, drizzling sauce artfully around the edges for an artistic touch.

Garnishing ideas can include fresh basil leaves, sun-dried tomato slivers, or a sprinkle of crushed black pepper to enhance visual allure and hint refreshingly bold flavors.

Traditional accompaniments like a simple arugula salad with a lemon vinaigrette play beautifully against the rich pasta flavors, balancing the density with crisp layers.

Modern serving suggestions embrace communal bowls, allowing for family-style sharing and embracing sociable dining traditions accentuated by this adaptable dish.

Temperature considerations emphasize serving immediately for best indulgence, ensuring sauce consistency remains impeccable alongside warm pasta strands.

Portion control tips suggest arranging servings in a star pattern on a larger platter, which assists in mindful dining while still indulging guests with stunning visual complexity.

Wine and Beverage Pairing


Pair this pasta with a bright, unoaked Chardonnay whose crisp notes contrast nicely with the cream sauce’s richness, cleansing the palate of excess dairy.

For a non-alcoholic alternative, try a sparkling water flavored with lime or mint, heightening freshness to counterbalance hearty pasta meals.

Coffee or tea pairings can enhance the end of a dining experience, with an espresso offering a robust contrast or a chamomile tea bringing calming flavors to counteract any richness.

Temperature considerations suggest serving wines slightly chilled, especially whites or sparklings, to maintain refreshing qualities against the pasta’s warm colors.

Serving suggestions include opting for glasses with wider mouths, particularly those that maximize aroma dispersion to emphasize wine complexity alongside your pasta creation.

Storage and Shelf Life


Store leftovers in an airtight container, ensuring minimal exposure to air to maintain flavors at their peak freshness for up to 3 days in the refrigerator.

Temperature requirements emphasize cooling the dish fully before sealing, as it prevents condensation build-up contributing to waterlogging when transformed into storage.

Container recommendations include glass or BPA-free plastic, providing a clean vessel that keeps odors from permeating and resisting flavor transference effectively.

Signs of spoilage revolve around off aromas or significantly altered colorations, indication enough to dispose of for safety.

Reheating instructions suggest employing microwave-safe dishes or stovetop methodologies, remobilizing any cream sauce with gentle heat additions like milk for optimal texture recovery.

Freezing guidelines convey possibilities but caution against potential sauce separation. Freeze in one-portion sizes if desired, defrosting gently and remixing flavors diligently before serving.

Make Ahead Strategies


A prep timeline breaking down components a day or two in advance can lighten load; spinach washing and tomato chopping lend notable efficiency.

Consider storage between steps; partially prepare the sauce and refrigerate two days before finishing. Assemble when needed, knocking a significant portion off your cooking time.

Quality impact assessment confirms flavor intensifies with refrigerator rest, paving the way for improved integration when planned accordingly.

Assembly tips encourage reheating sauce gently before recombining with fresh pasta for an instant dinner solution, retaining optimal taste.

Reheating guidelines highlight microwaving or stovetop methods across low-medium heat for gentle resuscitation without losing sauce lusciousness or integrity.

Fresh element additions suggest infusing additional herbs just prior to serving, amplifying freshness no matter how far ahead initial preparation occurred.

Scaling Instructions


Halve the recipe easily by reducing each ingredient proportionally, mindful of pasta amounts aligning with desired servings without sacrificing robustness.

Doubling or tripling carries benefits for larger groups but requires extended attention on texture to merge increased quantities without losing sauce vibrancy or cohesion.

Equipment adjustments advocate for proportionally larger pots or skillets to achieve adequate cooking surface areas, ensuring regularity across extended family-style portions.

Timing modifications, in-batch preparation for pasta or sauce components further streamline operations without deterring quality.

Storage considerations articulate preserving remaining goods in diverse container options, attempting tight storage conditions to prolong life when dealing with vast quantity preparations.

Nutritional Deep Dive

Macro breakdown characterizes balanced carbohydrates courtesy of spaghetti colliding with healthy fats through creamy sauces, noting dietary satisfaction pursuits.

Micronutrient analysis celebrates vital contributions like spinach’s iron and vitamin C, supporting bodily functions while enhancing overall energy levels post-consumption.

Health benefits arise through incorporation of tomato’s lycopene, and antioxidants loaded within spinach, advocating heart health while diminutive reductions on dietary concerns.

Dietary considerations acknowledge creamy ingestion may conflict with certain lactose-restricted diets – gauging cream replacements to maintain dish integrity.

Portion analysis, relying on a pasta base, complements bulking but demands moderation; consider serving size limitations meeting nutritional guidelines appropriately.

Weight management tips postulate observing one-seventh servings for confidence in dietary compatibility and self-control, striking a successful nutritional balance.

Dietary Adaptations


For a gluten-free version, substitute traditional spaghetti with gluten-free pasta, ensuring all other ingredients adhere to safe dietary practices.

For a dairy-free modification, swap cream with a plant-based variant like coconut or almond cream, achieving a similar juxtaposition texture without negatively impacting flavor.

Vegan alternatives involve selecting nutritional yeast for cheese elements while omitting any animal-derived components, maximizing plant-based integrity.

Low-carb adaptation includes zucchini noodles as a pasta substitute, re-imagining dish outlines around carb reduction without forsaking influence from the sauce’s identity.

Keto guidelines accommodate by focusing on higher fat content creams and a controlled intake of alternative, less composed noodle options, aligning better with the diet’s foundation.

Paleo selections accentuate vegetable bases interpreting the dish through organic components only, maintaining flavor symposium without deviation.

Low-FODMAP paths navigate by employing selective ingredients for reduction in specific fermentable carbohydrate structures, challenging but feasible through guided alternate options

Troubleshooting Guide

Should you encounter texture issues, begin with observing pasta cooking intent closely, adjusting water to tenderness equilibrium addressing any misalignments.

Flavor balance might waver; temper cream and spices by incrementally adjusting each component by taste to regain harmony among competing culinary elements.

Temperature problems manifest in cold ingredients entering a hot preparation process; pre-warm or standardize ingredient temperatures facilitating smoother dish execution.

Equipment challenges often stem from inadequate gear size; scale solutions revolve around matching capacity to cooking requirements while overseeing safety margins.

Ingredient substitutions may inadvertently alter dish structure; ensure respective replacements maintain harmonizing role functions or face outcome variations.

Timing concerns refine as core resolution by tracking preparation times diligently, avoiding laborious waits or complications, guarding final presentation steadfastly throughout cooking routines.

Recipe Success Stories

Community feedback applauds the dish for bridging flavor with accessibility, allowing even novice cooks a chance at gourmet success without cognitive or exotic ingredient barriers.

Variation successes documented by readers attest to creativity with fresh herbs or indulgent cheese incorporations, tailoring enhancements to personal taste preferences yielding satisfaction.

Adaptation stories detail friends and family gatherings impressed by adjusted versions free for dietary restrictions, maintaining integrity while reinforcing universal accessibility.

Reader suggestions illustrate incorporation of shrimp, roasted chicken, or equivalent protein augmentations yielding balanced meal structures resonating beyond vegetarian limitations.

Photography tips from contributors articulate appreciation for natural lighting benefits accentuating vibrant pasta and sauce aesthetics, aspiring all to venture into attractive publication avenues.

Frequently Asked Questions

Can I use fresh tomatoes instead of sun-dried tomatoes?

Yes, fresh tomatoes can be used, but note that they will alter the flavor profile and texture. You may need to cook them longer to achieve desired taste and rich consistency similar to sun-dried tomatoes.

How do I make this dish ahead of time?

Prepare the sauce in advance and store it in the refrigerator for up to 2 days. Simply reheat gently and combine with freshly cooked pasta when you’re ready to serve. This approach retains flavor without hastening last-minute preparation.

What can I substitute for spinach?

Consider arugula or kale as suitable alternatives to spinach. Each offers a unique taste while preserving the dish’s nutritional benefits. Remember to adjust the cooking time accordingly to maintain greenery freshness.

Is there a vegetarian option for parmesan cheese?

Nutritional yeast or dairy-free store offerings present a cheese alternative, providing an equally savory component without reliance on animal-based derivatives.

Can I use any type of pasta for this recipe?

Spaghetti works best due to its smooth surface for sauce adherence. However, penne or fettuccine can also function, providing they are cooked accordingly to ensure similar enjoyment in texture and taste.

How should I adjust the cooking time for gluten-free pasta?

Gluten-free pasta often requires less boiling time. Follow package instructions for timeline optimization. Taste-testing throughout boiling compliments ensemble development and precise consistency realization.

What protein can I add to suit non-vegetarian preferences?

Grilled chicken or sautéed shrimp can enhance the meal, complementing the creamy sauce harmoniously. Ensure proteins are adequately seasoned and cooked separately before integrating just prior to final serving.

Why is my sauce curdling, and how can it be fixed?

Curdling can result from rapid heating or incorporating cold cream into hot mixtures. To remedy, slowly introduce dairy over moderate heat, stirring consistently to prevent temperature oscillation, thus safeguarding sauce consistency.

Are there any low-fat substitutes for cream in this recipe?

Try using Greek yogurt or light sour cream as feasible substitutes, managing texture with additional pasta water if desired due to differences in consistency between standard creams of recipe index.

How do I thicken the sauce if it turns out too watery?

Adding simmer time can naturally reduce sauce liquid quantity. Alternatively, utilize cornstarch slurry seamlessly incorporating into sauce volumes for thickening without affecting taste profiles.

Can this recipe be made without garlic?

Garlic-free versions are achievable, relying on alternative herbs like chives or shallots for aromatic depth, ensuring the overall flavor profile derives from rich tomato and cream base highlights.

Additional Resources

Explore related recipes like Creamy Tomato Basil Pasta or Sun-dried Tomato Pesto for similar flavor palettes with unique culinary narratives driving enticing conversions between family experiences.

Technique guides elaborate on defining moment entrees like fresh tomato blanching or garlic roasting, crafts deserving visualized recognition appealing to passionate home chefs.

Ingredient information dives deep into appreciated tomatoes or creamy philosophy debates, delving into why certain emulsions work over others amongst witting matrices.

Equipment recommendations revolve around endorsements like non-stick pan excellence, differentiating between cookware brands ensuring superior finishing throughout meal preparation.

Seasonal variations highlight ingredients punctuating transitions between spring vibrance or fall substance through particular vegetable selections tailored towards climate-driven preferences.

Join the Conversation

Engage with us on social media by sharing your culinary results and tagging us to join our delightful community celebrating a multitude of shared experiences.

Photography tips stem from daily discoveries, such as natural lighting devotion endorsing sunlight’s grace amplifying clarity and detail among eye-pleasing harvest meals.

Recipe reviews voice encouragement, fostering thoughtful elucidation, channeling others towards embarking on this culinary journey customizing beloved parameters or frameworks.

Community engagement encompasses narrative sharing post-development avenues as reflectively enlightening as the recipes themselves, uniting enthusiasts through ongoing discourses.

Recipe variations embolden endless interpretations, accommodating individuality’s emblem pure in essence, steering vibrant visionaries towards further honors substantively impactful yet uniquely theirs.

The Recipe

Spaghetti & Spinach with Sun-Dried Tomato Cream Sauce

Serves: 4

Prep Time: 15 mins

Cook Time: 20 mins

Total Time: 35 mins

Kitchen Equipment Needed

  • Large pot for boiling pasta
  • Skillet for sauce preparation
  • Strainer or colander
  • Medium-sized mixing bowl
  • Wooden spoon or spatula

Ingredients

  • 12 oz spaghetti
  • 1 cup sun-dried tomatoes, thinly sliced
  • 2 cups fresh spinach, washed and trimmed
  • 1 cup heavy cream
  • 2 cloves garlic, minced
  • 1/2 cup grated parmesan cheese
  • Salt and pepper to taste
  • 2 tbsp olive oil
  • 1/4 cup reserved pasta water
  • Optional: fresh basil for garnish

Directions

  1. Bring a large pot of salted water to a boil and cook the spaghetti according to package directions until al dente. Reserve 1/4 cup of pasta water, and drain spaghetti.
  2. In a large skillet over medium heat, warm olive oil and gently sauté garlic until fragrant, about 1 minute.
  3. Add sliced sun-dried tomatoes to the skillet, stirring occasionally, until heated through and slightly soft.
  4. Pour in heavy cream, stirring to combine thoroughly with the tomatoes and garlic.
  5. Reduce heat to low, adding the spinach and stirring gently until wilted.
  6. Toss the cooked spaghetti with the sauce, adding reserved pasta water as needed to reach desired sauce consistency.
  7. Stir in grated parmesan cheese, adjusting seasoning with salt and pepper as desired.
  8. Serve hot, garnished with fresh basil if using.

Recipe Notes

  • For a spicier kick, add a pinch of red pepper flakes during the garlic sautée.
  • To make it gluten-free, substitute spaghetti with your choice of gluten-free pasta.
  • Store leftovers in an airtight container in the refrigerator for up to three days for best quality.

Irresistible Garlic Butter Baked Scallops for a Gourmet Experience

Garlic Butter Baked Scallops: A Delectable Seafood Delight

⚖️
Difficulty
Easy

⏲️
Prep Time
15 mins

🕒
Cook Time
10 mins

⏱️
Total Time
25 mins

🍽️
Servings
4

Treat yourself and your family to the savory goodness of Garlic Butter Baked Scallops. This delightful seafood dish combines the rich flavors of garlic and butter to enhance the succulent taste of fresh scallops. Imagine digging into a plate where each bite bursts with oceanic freshness enveloped in a buttery, garlicky coating that melts in your mouth. The easy preparation makes this an ideal choice for both weeknight dinners and special occasions alike.

Scallops, revered for their tender texture and mild sweetness, are a seafood lover’s dream. When baked in the oven, these little treasures turn a beautiful golden brown, offering a crisp exterior that gives way to a melt-in-your-mouth center. Not only do they taste sublime, but their elegant appearance also makes them a showstopper at any dining table. Whether you’re a novice cook or a seasoned chef, this Garlic Butter Baked Scallops recipe is simple yet sophisticated enough to impress all your guests.

Quick Recipe Highlights

  • Flavor Profile: These baked scallops boast a luxurious combination of buttery richness, enhanced by the aromatic zing of garlic.
  • Texture: Enjoy the satisfying contrast of a slightly crispy exterior with the delicate, tender interior of perfectly cooked scallops.
  • Aroma: The inviting fragrance of garlic butter fills the room, promising a meal that’s both comforting and sophisticated.
  • Visual Appeal: Their golden crust paired with parsley garnish makes these scallops as visually appealing as they are delicious.
  • Skill Level Needed: This recipe is approachable for beginners, offering straightforward steps that result in a gourmet dish.
  • Special Equipment: A baking dish and a broiler are all you need to create this seafood masterpiece.

Recipe Overview

  • Difficulty Level: The simplicity of this dish lies in its quick preparation and minimal ingredients, suitable for cooks of all levels.
  • Category: Perfect as an appetizer or a main course, these scallops are a versatile addition to any meal plan.
  • Cuisine: Rooted in European culinary traditions, this recipe brings classic flavors to your modern kitchen.
  • Cost: While scallops are a premium ingredient, this dish delivers restaurant-quality at a fraction of the dining-out price.
  • Season: Best enjoyed year-round, though peak Scallop seasons in autumn and winter ensure the freshest catch.
  • Occasion: Ideal for everything from weeknight dinners to holiday feasts, these scallops are sure to impress.

Why You’ll Love This Recipe


Experience a taste sensation with every bite of these Garlic Butter Baked Scallops. The taste is unmatched, with the natural sweetness of scallops coming alive through the concert of garlic and butter. The recipe maintains the delicate texture of scallops—firm yet tender, offering an indulgent mouthfeel. For seafood enthusiasts, it’s a taste of the ocean in a few bites, expertly balanced with rich and savory elements that never overpower.

Say goodbye to culinary stress. This recipe brings ease to your kitchen, requiring a mere 25 minutes to prepare and cook. The convenience is in the simplicity—minimal chopping, no complicated techniques, and a few basic ingredients pack an impressive flavor punch. Rest easy knowing you can whip up a gourmet-seeming meal with minimal effort.

In addition to its taste and simplicity, this dish offers nutritional benefits. Scallops are a low-calorie source of protein, rich in omega-3 fatty acids and vitamin B12, supporting heart and brain health. Pairing them with buttery garlic provides a satisfying meal without excessive calories, aligning with a balanced diet.

Beyond the individual experience, these scallops become a shared delight. They make a tantalizing appetizer or a refined main dish that garners rave reviews at dinner parties. Their mouthwatering aroma and elegant presentation spark conversations and elevate your entertaining game.

Bring the luxury of dining out into your home without breaking the bank. Scallops are a cost-effective choice for creating a high-end dining experience at home. Buy them in bulk or when they’re on sale to save money while still treating yourself to a culinary indulgence.

Historical Background and Cultural Significance


Scallops have been cherished as a delicacy for centuries. In ancient coastal communities, these bivalves were a staple due to their ease of collection and nutritious value. They were often bartered and traded, playing a crucial role in the sustenance economies along the Atlantic and Pacific coasts.

In global cuisine, scallops are revered for their delicate flavor. The French, with their love for refinement, have mastered scallops in classic dishes such as Coquilles Saint-Jacques. Meanwhile, Italians favor them in pasta dishes, and the Japanese enjoy them raw in sushi, showcasing the ingredient’s versatility.

Through time, scallops have seen an evolution in preparation techniques, evolving from open-fire cooking to sophisticated baking methods. Today, with appliances like broilers, achieving the perfect texture and flavor of scallops is easier than ever, reflecting advancements in culinary technology.

Regional variations showcase the unique characteristics of local waters. Scallops from Maine exude a sweeter taste, while those from Japan offer a firmer texture. These differences highlight the interplay between nature’s bounty and cultural culinary practices.

Ingredient Deep Dive


Key to the flavor, garlic has been a staple in kitchens worldwide, renowned for its aromatic allure and its use throughout history in various medicinal and culinary applications. Its savory profile melds flawlessly with butter, bolstering the umami punch of seafood dishes. Garlic’s role in this recipe extends beyond taste—its aroma invites diners to the table with mouthwatering anticipation.

Butter, the next essential ingredient, has long held a luxurious status in culinary circles. It acts as both a flavor enhancer and a vital binding agent, contributing richness and depth to the scallops. When melted and infused with garlic, it wraps around the scallops, providing a luscious, silky mouthfeel.

Scallops themselves stand out for their tender sweetness and high-quality protein content. To choose the best, opt for dry-packed scallops with a fresh sea smell and firm texture. Once home, store them in the coldest part of your fridge and use them promptly to maintain optimal freshness. If unavailable, shrimp or firm white fish can substitute, although the unique texture of scallops is unmatched.

Common Mistakes to Avoid

  • Avoid overcooking. Scallops only need a brief time under heat. When overcooked, they become rubbery instead of tender.
  • Make sure your scallops are dry before baking. Pat them with a paper towel to absorb excess moisture, enhancing the browning process.
  • Don’t skimp on seasoning. Properly salt and pepper the scallops before cooking to draw out their natural flavors.
  • Use quality ingredients. Fresh garlic and real butter make a noticeable difference in the dish’s flavor.
  • Avoid crowding the baking dish. Scallops need space for even cooking and to achieve a proper crust.
  • Ensure your oven is preheated to the correct temperature to guarantee even cooking throughout.
  • Don’t rush the broiling. Allow the dish to sit briefly under the broiler for additional browning.
  • Avoid heavy sauces that overshadow the scallops’ delicate flavor. Let their natural taste shine with simple seasoning and butter.

Essential Techniques


Understanding why browning is essential brings your cooking game to the next level. Achieving a crispy edge while keeping the interior tender is key for a textural feast. Master browning by drying scallops thoroughly and ensuring good contact with the baking surface until a golden crust is achieved.

Balancing garlic’s boldness is also crucial. When garlic overpowers a dish, its presence becomes a distraction. A precise mince and gentle sauté in butter ensures a balanced interplay, coaxing out sweetness and mellowing its potency, resulting in a perfect harmony of flavors.

Pro Tips for Perfect Garlic Butter Baked Scallops


Enhance your dish by finishing with a squeeze of fresh lemon juice. It cuts through the richness and adds a burst of freshness, elevating the flavors without overpowering them.

Consider the quality of your elements. Opt for grass-fed butter and fresh, locally sourced scallops when possible, as fresh ingredients form the base of exquisite cooking.

Maintain scallops’ temperature integrity. Allow them to come to room temperature before cooking, which promotes even cooking and retains internal juiciness.

Don’t skip the resting period. Allowing the dish to sit briefly after baking lets flavors meld and achieve the best serving temperature for an optimal tasting experience.

Incorporate herbs like thyme or parsley, either freshly chopped on top before serving or in the garlic-butter mix, for extra depth and color.

Pay attention to presentation. Plate scallops in an attractive pattern, sprinkle with fresh herbs, and drizzle any remaining pan sauce on top to boost visual appeal.

Variations and Adaptations


Regional variations offer room for creativity. Incorporate local spices or citrus zest into the garlic butter for a personalized touch, infusing familiar flavors into a timeless dish.

Adapt the recipe seasonally by timing your garnish choices. In spring, fresh herbs and young greens celebrate the renewal of the season. Autumn might see heartier accompaniments like roasted root vegetables.

For dietary modifications, substitute butter with olive oil for a dairy-free version, and integrate gluten-free sides to accompany, maintaining the recipe’s core essence while diversifying its accessibility.

Serving and Presentation Guide


Consider a series of small plates where scallops act as a luxurious starter, each portion artfully presented with a light garnish of microgreens or a citrus wedge for added vibrancy.

Garnishing with zest from the reserved lemon, alongside freshly cracked pepper, heightens visual appeal and enriches tasting profiles. Classic parsley sprigs or dill fronds finish with a touch of elegance.

The introduction of crusty bread as a traditional accompaniment offers a hearty texture contrast, encouraging diners to soak up every drop of savory sauce.

Wine and Beverage Pairing


A chilled glass of crisp Chardonnay or Sauvignon Blanc perfectly complements the scallops, matching their richness with vibrant acidity. These wines’ citrus and oaky notes weave seamlessly with the garlic butter sauce.

For those abstaining from alcohol, consider a sparkling mineral water with a lemon slice to offer a palate-cleansing sip between bites, fostering freshness throughout the meal experience.

Storage and Shelf Life


Use an airtight container to refrigerate leftovers promptly, keeping them viable for up to two days. Scallops lose their delicate flavor over extended storage, so enjoy them sooner rather than later.

Reheat gently on low heat, maintaining texture integrity and avoiding rubbery results. Always check for spoilage signs before consumption, such as off-odors or slimy textures.

If freezing, place scallops in a single layer on a baking sheet until frozen, then transfer to a bag for longer storage, retaining quality better than a bulk freeze.

Make Ahead Strategies


Adopt a prep timeline to streamline your cooking process. Chop garlic and prepare the baking dish as the scallops reach room temperature, shaving minutes off your cook time.

Proper storage between steps, particularly keeping scallops cold while prepping other ingredients, ensures freshness without sacrificing quality.

For best results, assemble and bake just before serving, retaining the texture and flavor that could diminish during lengthy hold times. Add fresh elements right before serving to bolster flavor and visual appeal.

Scaling Instructions


Scaling this dish to suit more or fewer servings is seamless. When adjusting the quantity, ensure the baking dish size accommodates scallops in a single layer to preserve desired texture outcomes.

Equipment adjustments might involve using multiple baking dishes for larger quantities or reducing the broiler time due to different sized dishes’ heat conductivities.

Nutritional Deep Dive


Scallops’ macros include approximately 20 grams of protein per serving, supporting muscle maintenance and growth, while their fat content remains low, making them an excellent choice for lean, nutritional meals.

These shellfish exceed in vitamin B12, magnesium, and phosphorus. They also supply omega-3s, underpinning cardiovascular wellness and cognitive function.

Dietary Adaptations


Modify this scallop dish to fit a keto diet by using grass-fed butter exclusively and complementing with low-carb, high-fat side dishes. For a gluten-free meal, choose naturally GF sides like rice or quinoa.

To cater to a paleo palate, substitute with ghee instead of butter. This modification maintains the richness without the dairy proteins, aligning with paleo principles.

Troubleshooting Guide


Combat excessive chewiness by ensuring scallops are not overcooked; err on the side of slight translucency, as residual heat continues cooking post-oven.

Balance flavor by tasting the garlic butter before applying, adjusting salt and pepper to harmonize the buttery richness and highlight scallops naturally.

If oven browning proves uneven, reposition scallops during baking for consistent exposure, or utilize a broiler at an adjusted height for fine-tuning finishes.

Recipe Success Stories


Feedback flourishes when you serve these Garlic Butter Baked Scallops. Variations like adding crushed red pepper flakes offer a touch of heat, exciting adventurous taste buds without detouring the dish’s classic roots.

Community inputs often circulate, suggesting alternatives for vegetarians using mushrooms with similar flavoring, referring to them affectionately as “Neptune’s shelves,” drawing on shared culinary enthusiasm.

Frequently Asked Questions

Q: Can I use frozen scallops for this recipe?

A: Yes, frozen scallops work well if properly thawed beforehand. Ensure they’re dried thoroughly to prevent excess moisture affecting the texture.

Q: What’s the best way to thaw scallops?

A: Thaw frozen scallops overnight in the refrigerator for even defrosting. Avoid room temperature thawing to maintain freshness and food safety standards.

Q: Can I substitute the garlic with something less pungent?

A: Shallots or chives serve as excellent options for a milder flavor, retaining the aromatic benefits without overwhelming the palate.

Q: How can I tell if scallops are fresh?

A: Fresh scallops typically exhibit a mild ocean scent with none of the ammonia smell indicative of spoilage; their texture should be firm yet moist.

Q: Why are my scallops rubbery?

A: Overcooked scallops tend to become rubbery. Correct heat timing by adhering closely to recipe instructions and monitoring them closely.

Q: Are there non-dairy options for the butter?

A: Olive oil or coconut oil can replace butter to achieve a similar sauce consistency, appealing to lactose-intolerant or dairy-free diners.

Q: Do shell-on scallops require extra preparation?

A: Yes, shell-on scallops need to be shucked with a delicate knife, being careful to discard the muscle which can be fibrous and less desirable.

Q: How do I store leftover garlic butter?

A: Refrigerate leftover garlic butter in an airtight container for up to a week, using as needed to enhance future dishes with its rich flavor.

Q: Can I marinate scallops beforehand?

A: While it’s unnecessary, a brief marinade in lemon or lime juice elevates them with subtle citrus notes, complementing the butter sauce.

Q: Are there vegetarian alternatives to scallops?

A: Thick slices of king oyster mushrooms replicate scallops’ texture well when pan-seared, keeping the seasoning profile similar for continuity.

Additional Resources


Explore pairing techniques through related recipes like our Lemon Herb Seared Scallops, which adopt similar ingredients for a zestier outcome.

Examine technique guides that delve deeper into mastering seafood preparations and the science of achieving ideal Maillard reactions through browning.

Join the Conversation


Share your experiences and adaptations of Garlic Butter Baked Scallops on our social platforms. Engage with fellow seafood enthusiasts by posting pictures and commentary under our communal hashtag, garnering feedback and accolades for your culinary endeavors.

The Recipe

Garlic Butter Baked Scallops

Serves: 4

Prep Time: 15 mins

Cook Time: 10 mins

Total Time: 25 mins

Kitchen Equipment Needed

  • Baking dish
  • Mixing bowls
  • Broiler
  • Sharp knife
  • Garlic press

Ingredients

  • 1 pound sea scallops
  • 1/4 cup unsalted butter, melted
  • 3 cloves garlic, minced
  • 1 tablespoon lemon juice
  • 1/4 teaspoon salt
  • 1/4 teaspoon black pepper
  • 2 tablespoons freshly chopped parsley
  • 1/4 cup grated parmesan cheese

Directions

  1. Preheat your broiler. Rinse the scallops and pat dry with paper towels to remove excess moisture.
  2. In a mixing bowl, combine the melted butter, minced garlic, lemon juice, salt, and pepper.
  3. Arrange scallops in a baking dish, ensuring they are in a single layer. Drizzle the garlic butter mixture over them evenly.
  4. Sprinkle grated parmesan cheese over the top of the scallops.
  5. Broil in the oven for 6-8 minutes until the scallops are opaque and the cheese is golden brown.
  6. Garnish with freshly chopped parsley before serving.

Recipe Notes

  • Ensure scallops are as dry as possible for a better crust.
  • Substitute olive oil for a different flavor dimension and dairy-free option.
  • Try adding a pinch of red pepper flakes for a subtle kick.

Deliciously Indulgent Creamy Lobster Chowder Recipe for Seafood Lovers

Creamy Lobster Chowder: A Luxurious Seafood Delight

⚖️
Difficulty
Medium

⏲️
Prep Time
20 mins

🕒
Cook Time
30 mins

⏱️
Total Time
50 mins

🍽️
Servings
4

Dive into the rich, savory flavors of the sea with our Creamy Lobster Chowder. This luscious dish combines the sweet, delicate taste of lobster with a blend of fresh herbs and cream to create a fulfilling meal that will tantalize your taste buds. Whether you’re aiming for a casual family dinner or an elegant gathering with friends, this lobster chowder is the epitome of comfort and sophistication. The creamy lobster chowder exudes a delightful aroma that will fill your kitchen and leave you yearning for more.

Quick Recipe Highlights

  • Flavor Profile: The creamy lobster chowder boasts a perfect harmony of savory and slightly sweet notes, accentuated by the natural umami of the seafood.
  • Texture: Expect a smooth, velvety broth with chunks of tender, succulent lobster meat complemented by the subtle crunch of veggies.
  • Aroma: This dish emits a mouth-watering aroma driven by the blend of fresh herbs and savory seafood notes.
  • Visual Appeal: With its creamy white base, garnished with vibrant herbs and fresh lobster, this chowder is as beautiful as it is delicious.
  • Skill Level Needed: Requires basic culinary skills – sautéing, simmering, and seasoning to taste.
  • Special Equipment: A large pot, a whisk, and a ladle are essential for crafting this luxurious chowder.

Recipe Overview

  • Difficulty Level: The medium difficulty level reflects the necessity of watching over the chowder as it simmers to ensure the ideal consistency and lobster doneness.
  • Category: Perfect for lunch or dinner, this creamy delight fits comfortably into comfort food and fine dining categories.
  • Cuisine: Rooted in New England culinary tradition, this chowder takes inspiration from the classic American seafood fare.
  • Cost: With lobster as the premium ingredient, anticipate a moderate to slightly high cost, making it a treat for special occasions.
  • Season: Best savored during the colder months when you crave warmth and heartiness, though it can be enjoyed year-round.
  • Occasion: Ideal for celebratory dinners, family gatherings, or as an impressive first course in a multi-course meal.

Why You’ll Love This Recipe


The Creamy Lobster Chowder captivates not just the palate but the heart. Its rich flavors transform a simple meal into a culinary masterpiece. The symphony of succulent lobster in a creamy broth delivers a depth of flavor that is both comforting and sophisticated. Each spoonful balances the creamy richness with the delicate sweetness of the lobster, making it an indulgent yet balanced dish.

From a convenience standpoint, despite its gourmet appeal, the preparation is straightforward. The ingredients are readily accessible, and the recipe does not demand extensive kitchen skills. This ensures that even novice cooks can achieve impressive results, instilling confidence in your culinary abilities.

Unbeknownst to many, this dish also offers nutritional benefits. Lobster is an excellent source of protein and omega-3 fatty acids, supporting heart health and aiding in maintaining muscle mass. The inclusion of vegetables adds essential vitamins and minerals, contributing to overall well-being.

This recipe shines as a magnificent choice for social gatherings. Its elegance and luxurious taste make it a conversation centerpiece, perfect for entertaining guests. Sharing a bowl of creamy lobster chowder evokes warmth and intimacy, transforming any gathering into an unforgettable experience.

The ingredients may seem upscale, but this dish remains cost-effective. Budgeting for a special evening cooking a gourmet dish like this can compare favorably against dining out in a high-end restaurant. Seasonal adaptations and shopping smartly can further stretch the value without compromising flavor.

Historical Background and Cultural Significance


The tale of lobster chowder is steeped in maritime history, originating from the coastal communities of New England. Fishermen’s hearty catches inspired them to create dishes that were not only filling but also reflected their abundant access to seafood.

Over time, lobster evolved from a humble fisherman’s fare to a delicacy synonymous with luxury. This evolution illustrates the shift in culinary tastes and the growing appreciation of lobster’s unique flavors and textures.

Cultural importance is found in the community traditions surrounding seafood. New England’s shores are dotted with lobster festivals, celebrating heritage, and the art of preparing incredible lobster dishes. Lobster chowder stands as a testament to this rich culinary tradition.

Variations of lobster chowder have sprung up across regions. In Maine, it might feature more potatoes or corn, while Boston versions go heavy on the cream. Each iteration respects its roots while showcasing local flavors and ingredients, highlighting the adaptability of the creamy lobster chowder through the ages.

Ingredient Deep Dive


Lobster is the star of this chowder, a seafood revered for its sweet flavor and tender texture. Historically, lobster was considered the poor man’s protein, fed mostly to prisoners and servants in colonial times. Over centuries, however, it has risen to gourmet status, especially prized in coastal regions.

From a nutritional perspective, lobster is lean, high in protein, and rich in vitamins B12, and E, and essential minerals like zinc and selenium. Experts recommend selecting lobsters that are lively and show no signs of discoloration. Store them in a cool, moist environment, and consume them shortly after purchase to savagely retain their flavor.

Meanwhile, potatoes serve as the hearty base of the chowder. They provide a creamy texture when cooked down, enhancing the comforting quality of the dish. Rich in carbohydrates and potassium, potatoes offer energy and are the ubiquitous staple in many global cuisines.

Fresh herbs like thyme bring an aromatic depth to the chowder, balancing the richness of the cream with their herbal freshness. For the best flavor, choose herbs that are bright and fragrant and store them in the refrigerator wrapped in damp paper towels.

Common Mistakes to Avoid

  • Overcooking the lobster can render it tough and chewy. Keep a close eye during cooking.
  • Neglecting to properly season will result in a bland chowder. Taste and adjust accordingly.
  • Using old or wilted herbs reduces the chowder’s aromatics significantly. Opt for fresh selections.
  • Substituting half-and-half for heavy cream will alter the consistency; the latter is essential for desired creaminess.
  • Not simmering the chowder long enough can result in an underdeveloped flavor. Allow sufficient time for flavors to meld.
  • Using too hot a flame can cause the cream to separate. Maintain a gentle simmer.
  • Skimping on fresh lobster in favor of canned will diminish the dish’s quality.
  • Overcooking the potatoes can lead to them disintegrating, leaving an undesirable texture.

Essential Techniques


Sautéing the aromatic vegetables like onions and celery in butter is crucial. This initial step brings out their natural sweetness and sets a foundational flavor base for the cream.

Mastering the simmer is essential to produce the perfect chowder. A low, steady heat allows ingredients’ flavors to meld without scorching the thick creamy base.

Visual cues like the chowder’s consistency guide when it’s correctly reduced. It should coat the back of a spoon, indicating the flavors are concentrated enough.

Whisking occasionally helps maintain a smooth, combined broth and prevents ingredients from sticking to the bottom of the pot.

Pro Tips for Perfect Creamy Lobster Chowder


Ensuring your lobster is as fresh as possible greatly influences the final flavor. Seek out the freshest lobster available to maximize taste.

If possible, have your seafood supplier steam the lobster for you to remove an element of preparation stress and ensure perfect tenderness.

Incorporate bacon into the base for a smoky depth of flavor that complements the sweetness of the lobster beautifully.

When reheating, do so gently to prevent the creamy base from curdling. A splash of cream can help restore any lost thickness during storage.

Consider adding a squeeze of lemon juice for a hit of brightness that elevates the savory richness of the chowder.

Use fresh, crusty bread as an accompaniment – it’s perfect for soaking up the luxurious broth, enhancing the dining experience.

Variations and Adaptations


Regional variations see ingredients like corn or sweet peppers infused during summer months when they are fresh and abundant.

For a lighter version, reduce the cream and substitute a portion with vegetable stock without sacrificing too much richness.

For dietary adaptations, consider dairy-free alternatives like coconut milk which bring a unique sweet dimension to the chowder.

Enhance the flavor by experimenting with smoked paprika or chili flakes for a spicy kick that contrasts beautifully with the creamy base.

For presentation, top with freshly chopped chives or dill, providing a visual allure and a fresh pop of flavor.

Texture enhancements can be achieved by adding chunks of firm white fish or scallops, playing with the dish’s sumptuous quality.

Serving and Presentation Guide


For optimal presentation, serve the creamy lobster chowder in warmed bowls to maintain heat. White porcelain dishes best complement the vibrant accents of the chowder.

Add a drizzle of herb oil on top for a burst of color and additional flavor complexity. A light dusting of smoked paprika adds visual drama and depth.

Garlic toasts make for an excellent side, perfect for dipping and balancing the chowder’s creaminess with their toasted crunch.

Modern takes might include serving the chowder in small, elegant cups for appetizer-sized portions at events or parties.

Ensure the chowder is served hot but not boiling, as extreme temperatures can dull the nuanced flavors.

Portion control is easily managed by serving in ramekins or small coupes, providing an elegant presentation especially suited for formal occasions.

Wine and Beverage Pairing


A buttery Chardonnay complements the richness of the chowder magnificently, its citrus notes balancing the cream.

For non-alcoholic options, consider a sparkling water with a twist of lime for a refreshing contrast.

Should coffee play a role in your dining experience, a medium roast with subtle chocolate notes pairs well post meal.

Temperature is key; serve wines chilled to contrast with the hot chowder, providing an elegant dining experience.

For best results, carefully pour and serve wine in wide-rimmed glasses to aerate and intensify the aromas.

Storage and Shelf Life


Refrigerate leftover chowder in an airtight container and consume within two days to retain the fresh flavors and textures.

Store in the coldest part of the fridge, ensuring a consistent temperature to prevent spoilage.

Signs of spoilage to watch for include off-odors and a change in texture, both indicating it should be discarded.

Reheat chowder slowly over low heat, stirring frequently to prevent separation, adding a splash of cream may reinstate the supremely smooth texture.

If needed, freeze chowder in a sturdy container for up to one month, although fresh is always preferable.

Make Ahead Strategies


Preparing the chowder a day ahead allows flavors more time to develop and meld, often enriching the final dish when reheated.

Segment and store components separately if needed, combining only during reheating to maintain the freshest texture.

Be mindful of additional seasoning during reheat; the time melds the flavors, often making additional salt unnecessary.

Save the addition of certain garnishes like fresh herbs until serving to avoid wilted appearances and loss of aromatic potency.

Scaling Instructions


Halving the recipe is indeed an option for small gatherings without significant impact on flavor, just ensure proper seasoning adjustments.

For larger parties, double the ingredients and utilize a larger pot. Be patient — larger volumes may require slightly extended cooking times.

Invest in larger kitchen tools, like ladles and pots, to efficiently manage and serve the increased volume.

Consider additional storage containers if scaling up significantly to accommodate leftovers.

Take note of the cooking time which varies with volume, ensuring equal heat distribution for a consistent result.

Nutritional Deep Dive


Each serving is a nutrient-rich powerhouse, loaded with proteins from the lobster and essential carbs from the potatoes.

Vitamins like A and C come from the vegetable bases and herbs, contributing to a balanced, well-rounded meal.

Its high protein count supports muscle repair and maintenance, beneficial for post-workout nutritional needs.

Chowder’s rich ingredient profile requires attention to portion control for those monitoring weight.

Pair responsibly with sides and beverages to maintain a well-balanced nutritional intake suitable for respective dietary needs.

Dietary Adaptations


For gluten-free needs, ensure all additional ingredients see cross-contamination checks, particularly in commercially prepared stocks or spices.

Lactose-free cream alternatives can adjust this dish into six dairy-sensitive diets, without sacrificing its luxurious texture.

Low-carb enthusiasts may look towards cauliflower as a potato substitute, retaining chowder’s warmth and comfort.

In keeping with keto principles, limiting carbohydrate load is possible with various creative vegetable substitutions.

Paleo followers can appreciate minor adjustments like coconut cream, aligning with grain-free theses.

For low-FODMAP adherents, replace traditional onions with the green parts of scallions for balanced flavor devoid of digestive distress.

Troubleshooting Guide


If a thick texture remains elusive, a simple flour-based or potato starch thickener, whisked in, often rectifies the issue.

Should the chowder taste flat, a splash of an acidic element like lemon juice or vinegar enhances flavor complexity.

For consistency concerns, if it feels too runny, additional reduction time can help as the liquids evaporate.

Equipment like unevenly heating pots may result in scorching; ensure uniform heating and stirring when possible.

Ingredient substitutions can alter the dish; verify prior for flavors and consistency altered by changes.

Overcooking, leading to rubbery lobster, requires diligent timing adjustments for a perfectly cooked texture.

Recipe Success Stories


Our community has marveled at the simplicity and elegance, turning out various beautiful iterations of this chowder.

Successes range from culinary students mastering restaurant-style presentations to home cooks rediscovering the joy of seafood.

Creative readers have taken inspiration by using different seafood like crab or shrimp, maintaining flexibility and intrigue within the recipe.

Photography among readers showcases an impressive display of plating, serving as inspiration for others cooking the dish.

Reader suggestions include adding different handpicked herbs to subtly alter and personalize each chowder batch.

Frequently Asked Questions

Can I use frozen lobster in this Creamy Lobster Chowder?

Yes, you can use frozen lobster; just ensure it’s thoroughly thawed and drained to retain the ideal texture and doneness.

What’s the best way to cook the lobsters ahead of time?

Boiling or steaming the lobsters is recommended, as these methods preserve the tender texture needed for this chowder.

How can I make this recipe vegetarian?

For a vegetarian twist, substitute the lobster with mushrooms or cauliflower to experience a different, hearty flavor profile.

What should I serve with lobster chowder?

A freshly baked, crusty baguette or a simple side salad pairs wonderfully with creamy lobster chowder to round out the meal.

Can this chowder be used as a base for seafood pasta?

Absolutely! Its richness and flavor profile make it an excellent sauce for a luxurious seafood pasta dish.

Can I incorporate additional seafood?

Certainly! Including shrimp, scallops, or even a firm white fish can increase the protein variety and depth.

Why does my chowder separate when reheating?

Rapid reheating can cause separation; use gentle heat and stir frequently to maintain the creamy consistency.

What wine pairs best with creamy lobster chowder?

An oaked Chardonnay or any crisp white wine complements and balances the richness of the chowder beautifully.

How do I thicken my chowder?

If needed, a little flour or potato starch whisked in can thicken the chowder without altering flavors.

Is it possible to freeze lobster chowder?

Yes, while some may prefer it fresh, you can freeze chowder if stored in airtight containers, then thaw and reheat gently.

Additional Resources


For more indulgent seafood recipes, explore our Lobster Newburg or Shrimp Scampi white wine pasta guides, showcasing seafood’s versatile use in fine dining.

Access our creamy soup technique guide, complementing any chowder enthusiast looking to hone their soup game.

Ingredient deep-dives are available for both lobster and other essential components, enhancing understanding of gourmet fare.

Essential equipment recommendations detail the best kitchen tools to optimize your overall cooking efficiency and results.

Examine seasonal recipe adaptations that cater to ingredient availability and freshness per varying climatic conditions.

Join the Conversation


Share your Creamy Lobster Chowder creations on social media platforms using our unique hashtags, connecting with a global food-loving community.

Contribute photography to our evolving online gallery, celebrating individual spins on this classic chowder, and share your unique presentation secrets.

Engage with an enthusiastic community to provide reviews and suggestions that continue the evolution and culinary excellence of this timeless dish.

Bring your variations to the fore, sharing tweaks and adaptations that reflect your personal tastes and regional influences.

The Recipe

Creamy Lobster Chowder

Serves: 4

Prep Time: 20 mins

Cook Time: 30 mins

Total Time: 50 mins

Kitchen Equipment Needed

  • Large pot
  • Whisk
  • Ladle
  • Knives and cutting board
  • Measuring cups and spoons

Ingredients

  • 2 cups fresh lobster meat, chopped
  • 1 onion, finely chopped
  • 2 celery stalks, diced
  • 2 potatoes, peeled and diced
  • 4 cups seafood or chicken stock
  • 1 cup heavy cream
  • 2 tablespoons butter
  • 1 teaspoon thyme
  • Salt and pepper to taste

Directions

  1. Melt butter in a large pot over medium heat. Add onion and celery; sauté until tender.
  2. Add potatoes and stock to the pot. Bring to a boil, then reduce heat and simmer until potatoes are tender.
  3. Stir in the lobster meat, heavy cream, thyme, salt, and pepper.
  4. Simmer on low heat for about 10-15 minutes, stirring occasionally, until rich and creamy.
  5. Adjust seasoning with additional salt and pepper according to taste.
  6. Serve hot, garnished with fresh herbs if desired.

Recipe Notes

  • For extra flavor, include a splash of white wine at the stock stage.
  • Substitute half of the cream with milk for a lighter version.
  • Lobster can be replaced with shrimp or crab for variation.

Spice Up Your Dinner with Cajun Grilled Chicken and Alabama White Sauce

Cajun Grilled Chicken with Alabama White Sauce: A Southern Delight

⚖️
Difficulty
Medium

⏲️
Prep Time
20 mins

🕒
Cook Time
30 mins

⏱️
Total Time
50 mins

🍽️
Servings
4

Welcome to the world of Southern cuisine where the zesty kick of Cajun spices meets the creamy tang of Alabama White Sauce. This Cajun Grilled Chicken is a mouthwatering dish that pairs perfectly cooked chicken with a sauce rich in heritage and flavor. The juxtaposition of spicy and creamy flavors promises a delightful journey for your taste buds. Whether it’s a weekend barbecue or a family dinner, this dish will become a staple in your kitchen repertoire, offering a perfect balance of spice and comfort.

Quick Recipe Highlights

  • Flavor Profile: The dish boasts a rich combination of spicy, smoky Cajun flavors balanced by the tangy, creamy Alabama White Sauce.
  • Texture: Enjoy a tender, juicy chicken texture with a delightful creamy sauce, adding a smooth finish to each bite.
  • Aroma: The aroma is inviting with notes of grilled spices, garlic, and the distinctive zest of vinegar-based white sauce.
  • Visual Appeal: This dish boasts vibrant, charred chicken pieces contrasted with a pale, velvety sauce, making it as appealing to the eyes as it is to the palate.
  • Skill Level Needed: Perfect for intermediate cooks, this recipe requires simple grilling techniques paired with sauce preparation.
  • Special Equipment: A grill or grill pan is essential to achieve the authentic taste and texture.

Recipe Overview

  • Difficulty Level: This medium-difficulty recipe involves understanding grilling techniques and perfecting a homemade sauce, ideal for those looking to enhance their cooking skills.
  • Category: Ideal for lunch or dinner, it can be a star entrée in American and Southern-style meals.
  • Cuisine: Rooted in Southern cuisine, the dish draws from Creole and Cajun traditions with a nod to Alabama’s unique barbecue culture.
  • Cost: Reasonably priced with affordable ingredients like chicken and pantry staples, enhancing the experience without breaking the bank.
  • Season: Best enjoyed in the summer grilling season but equally delightful year-round indoors.
  • Occasion: Perfect for casual family dinners, outdoor barbecues, and festive celebrations.

Why You’ll Love This Recipe


The Cajun Grilled Chicken with Alabama White Sauce is all about indulging your senses. The exciting spice blend creates a lively dance of flavors, ensuring each bite is packed with zest and culinary intrigue. Its crispy golden exterior, contrasted with tender, juicy insides, is a testament to the charms of perfect grilling. The creamy Alabama White Sauce further elevates the dish with its cool, tangy profile that marries beautifully with the Cajun heat.

In terms of convenience, this recipe is pleasingly straightforward. Simple steps and versatile ingredients align beautifully for a hassle-free cooking experience. It’s quick enough for a busy weeknight yet sophisticated enough for a weekend culinary exploration.

Nutritionally, this dish offers a balanced profile. Lean chicken is a great source of protein while the sauce, flavored with vinegar and mayonnaise, allows for indulgence within respectable calorific limits.

For social gatherings or family meals, this dish shines as a centerpiece of camaraderie and flavor. Whether grilled in the backyard or prepared indoors, it invites lively conversation and shared enjoyment.

Finally, it’s an economical recipe that makes great use of staple ingredients, ensuring a high flavor profile with low investment. This accessibility makes it an excellent choice for cooks on a budget without sacrificing satisfaction.

Historical Background and Cultural Significance


The Cajun Grilled Chicken merges two significant culinary influences – the bold, spicy flavors of Cajun cuisine and the unique touch of Alabama White Sauce. Cajun cooking originates from the Acadian people in Louisiana, integrating French, African, and Spanish flavors in a harmonious blend known for its robust heat and complex spices.

Alabama White Sauce, on the other hand, is a quintessential Southern barbecue sauce characterized by its mayonnaise base, invented by Robert Gibson in Decatur, Alabama. Known for its distinct tang and creaminess, it pairs beautifully with poultry, cutting through spices while complementing grilled notes.

Over time, this fusion has grown, encouraging regional adaptations and personal twists, making it a beloved addition to Southern barbecues and picnics. The mix of these two elements celebrates an evolution of culinary techniques and cross-cultural flavor narratives.

Embracing regional variations, each preparation of the dish offers subtle differences based on available ingredients and chef preferences. This intimate customization reflects the personal touch endemic to home cooking, showcasing the broad embrace of traditional recipes while encouraging creativity.

Ingredient Deep Dive


Chicken, the star of our dish, is integral in Southern and Cajun cuisines. Cherished for its versatility, chicken boasts a rich cultural significance tied to home cooking and family gatherings. As a lean protein source, it’s valued for its health benefits, offering nutrients like niacin and selenium.

For selection, choose high-quality, fresh chicken, ensuring a tender outcome. Organic or free-range varieties are recommended for superior texture and flavor. Store chicken in the refrigerator and use it within a few days of purchase to maintain freshness. Substitutions can include turkey breast or vegan alternatives like tofu based on dietary needs.

Cajun seasoning is a cornerstone of Cajun cooking, composed of paprika, cayenne, garlic powder, and herbs. Beyond flavor, it celebrates the vibrant history of Louisiana cuisine. Opt for fresh, vivid spices for maximum flavor impact. Store your seasoning in a cool, dark place to preserve its potency. You can create your own blend or use commercial options for convenience, adjusting spice levels to taste. These ingredients are the backbone of the Cajun Grilled Chicken, ensuring each bite is resplendent with deep-rooted tradition and flavorful depth.

Common Mistakes to Avoid

  • Over-marination: Allowing the chicken to sit in Cajun seasoning for too long can overpower the taste; 30 minutes is sufficient.
  • Uneven Cooking: Avoid inconsistent cooking by ensuring even-sized chicken pieces to ensure uniform grilling.
  • Skipping Preheating: Failing to preheat the grill can result in uneven cooking and poor texture.
  • Infrequent Turning: Turning only once or twice can lead to burnt or overly charred surfaces instead of a crispy finish.
  • Under-seasoning the Sauce: Be generous with seasoning in the Alabama White Sauce to balance the spicy chicken.
  • Using Low-Quality Ingredients: Opt for fresh and high-quality chicken and spices for optimal results.
  • Neglecting Rest Time: Letting chicken rest after grilling allows juices to redistribute, ensuring tenderness.
  • Improper Sauce Storage: Store leftover sauce in an airtight container in the refrigerator to maintain freshness.

Essential Techniques


Mastering grilling is crucial for perfect Cajun Grilled Chicken. It locks in the natural flavors while imparting a unique, smoky essence critical to this dish. To master it, preheat the grill and maintain a consistent medium heat. Brush oil on the grill to prevent sticking and ensure beautiful sear marks.

Equally important is the sauce preparation. Balance is key in Alabama White Sauce—mix mayonnaise, vinegar, salt, pepper, and optional horseradish. Whisk until smooth, and adjust seasoning to taste. Ensure an even consistency for dipping or drizzling.

Pro Tips for Perfect Cajun Grilled Chicken with Alabama White Sauce


– Let the chicken reach room temperature before grilling for even cooking.
– Use a meat thermometer: Ensures precise grilling; chicken should reach 165°F.
– Experiment with spice levels in Cajun seasoning to cater to your heat preference.
– Marinate longer for more intense flavors, but not over an hour to avoid overpowering.
– Use fresh herbs like thyme or oregano for a fresh twist in Alabama White Sauce.
– Rest the chicken post-grill for about 5 minutes to seal in juices.
– Apply Alabama White Sauce generously—its tangy creaminess is transformative.

Variations and Adaptations


Regional variations include incorporating local spices or modifying the sauce with regional mustard or honey for a distinct edge. Adapting the recipe for seasonal variances allows for lighter preparations during summer or heartier marinades for winter. For low-carb or keto variations, omit sugar from the sauce and opt for alternatives like Greek yogurt instead of mayo.

Serving and Presentation Guide


To present this dish like a pro, place grilled chicken on a rustic wooden board, drizzled with Alabama White Sauce and garnished with chopped parsley for a fresh pop of color. Complement with side dishes like coleslaw or grilled vegetables for a balanced plate.

Wine and Beverage Pairing


Opt for crisp, white wines like a Sauvignon Blanc to complement the spice and tanginess, while non-alcoholic pairings such as iced tea or lemonade maintain the dish’s Southern charm.

Storage and Shelf Life


Store leftovers in an airtight container in the fridge for up to 3 days. The sauce can last slightly longer, making it a great make-ahead component for convenient use.

Make Ahead Strategies


Prepare Alabama White Sauce in advance; its flavors meld beautifully over time. Marinade chicken ahead, storing it in the refrigerator to streamline meal preparation.

Scaling Instructions


Effortlessly double or halve the recipe according to the number of servings required. This versatility suits everything from intimate dinners to large gatherings.

Nutritional Deep Dive


Explore the macro aspects of the dish, featuring protein-rich chicken complemented by a sauce that, while rich, offers beneficial fats ensuring a nutritionally balanced meal.

Dietary Adaptations


For gluten-free adaptations, ensure all seasonings and sauce ingredients are certified gluten-free to accommodate dietary needs effortlessly.

Troubleshooting Guide


Adjust texture issues by monitoring grill temperature, flavor balance tweaking via seasoning, and managing timing for the perfect outcome.

Recipe Success Stories


Our vibrant cooking community shares variations and adaptation stories that build a shared tapestry of satisfied, adventurous home meals.

Frequently Asked Questions

How long can leftovers be kept? Leftovers stored properly can be kept for up to three days in the refrigerator.
How do I make the dish spicier? Increase the cayenne in the Cajun spice mix or add hot sauce to the marinade.
Can this be made in advance? Yes, make the sauce and marinade the chicken ahead of time to streamline meal prep.
How do I prevent burning? Monitor grill temperature closely and turn chicken frequently for even cooking without charring.

Additional Resources


Delve into related recipes, explore our extensive Cajun and barbecue techniques, and elevate your culinary prowess with our comprehensive guides.

Join the Conversation


Connect on social media, share your versions, interpretations, and flavor enhancements of this beloved recipe, or tag your creations with #CajunChickenDelight.

The Recipe

Cajun Grilled Chicken with Alabama White Sauce

Serves: 4

Prep Time: 20 mins

Cook Time: 30 mins

Total Time: 50 mins

Kitchen Equipment Needed

  • Grill or grill pan
  • Mixing bowls
  • Whisk
  • Meat thermometer

Ingredients

  • 4 boneless chicken breasts
  • 2 tablespoons Cajun seasoning
  • 1 cup mayonnaise
  • 1/4 cup apple cider vinegar
  • 1 teaspoon horseradish
  • Salt and pepper to taste
  • 1 tablespoon olive oil

Directions

  1. Preheat your grill to medium-high heat.
  2. Rub chicken breasts with olive oil and Cajun seasoning, ensuring even coverage.
  3. Grill chicken for 6-8 minutes on each side until cooked through and internal temperature reaches 165°F.
  4. While grilling, prepare Alabama White Sauce by mixing mayonnaise, vinegar, horseradish, salt, and pepper in a bowl; whisk until creamy.
  5. Let chicken rest for 5 minutes post-grilling. Serve drizzled with Alabama White Sauce.

Recipe Notes

  • For a spicier kick, add extra cayenne pepper to the marinade.
  • Store leftover sauce in an airtight container in the refrigerator for up to a week.

Irresistible Cranberry Feta Pinwheels: Easy Holiday Appetizer Recipe

Cranberry Feta Pinwheels with Cream Cheese: Your Perfect Party Appetizer

⚖️
Difficulty
Easy

⏲️
Prep Time
15 mins

🕒
Cook Time
5 mins

⏱️
Total Time
20 mins

🍽️
Servings
10

Looking for an appetizer that’s bound to impress without the stress? These Cranberry Feta Pinwheels with Cream Cheese might just be your next culinary masterpiece. With a bold blend of flavors that speak directly to the holiday season, these pinwheels are not only appetizing but also visually stunning. Imagine a soft tortilla wrapped around a creamy filling combining the tanginess of feta cheese and the sweetness of dried cranberries. It’s a bite-sized delight you can prepare in no time and with minimal effort.

The Cranberry Feta Pinwheels are a culinary adventure, combining sweet and savory elements in an irresistible spiral. Perfect as a quick snack or a sophisticated appetizer, these pinwheels can turn a casual gathering into an elegant affair. Their vibrant red and creamy white contrast against the tortilla creates a festive and inviting appearance that’s ideal for holiday gatherings. Easy to make and delicious to eat, these appetizers are perfect for any occasion and an excellent way to impress your guests.

Quick Recipe Highlights

  • Flavor Profile: The interplay of tangy feta and sweet cranberries creates a perfect balance of sweet and savory.
  • Texture: Creamy cheese contrasts with the soft tortilla and chewy cranberries, offering an enticing range of textures.
  • Aroma: The subtle savory aroma of feta mingled with the mild sweetness of cranberries is inviting and pleasant.
  • Visual Appeal: The spirals showcase a pop of festive red from the cranberries against the creamy filling and pale tortilla.
  • Skill Level Needed: This recipe requires minimal cooking expertise, making it perfect for beginners.
  • Special Equipment: Only basic kitchen tools are needed, allowing for easy preparation at home.

Recipe Overview

  • Difficulty Level: Easy. This recipe involves simple steps and ingredients readily available, making it suitable for home cooks at any skill level.
  • Category: Appetizers & Snacks. These pinwheels work wonderfully as appetizer bites or party snacks, perfect for any gathering.
  • Cuisine: This dish leans towards American cuisine with a twist, thanks to its fusion of Mediterranean influences like feta cheese.
  • Cost: Relatively inexpensive, as it requires only a few ingredients that won’t break the bank.
  • Season: Ideally enjoyed during the holiday season thanks to their colorful, festive look and flavors.
  • Occasion: These are suitable for parties, potlucks, or casual get-togethers where guests can appreciate a tasty, handheld treat.

Why You’ll Love This Recipe


The taste and texture appeal of Cranberry Feta Pinwheels is what truly sets them apart. The silky cream cheese provides a perfect base that accentuates the sharpness of feta and the natural tartness of cranberries. Together, these ingredients create a symphony of flavors that delight the palate, making these pinwheels a must-try.

This recipe is incredibly convenient. With a prep time of just 15 minutes and simple steps to follow, it’s perfect for last-minute gatherings. The pinwheels can be made ahead of time, making them an ideal choice for stress-free entertaining and allowing hosts to enjoy their own party.

Nutritionally, these pinwheels offer a balance of macronutrients. The feta cheese provides calcium and the cranberries bring a touch of fiber and antioxidants. This combination supports a balanced diet while indulging in a delicious snack that remaining health-conscious guests can enjoy.

Socially and for entertaining value, Cranberry Feta Pinwheels create that “wow” factor at any event. Their festive appearance makes them a showstopper that guests will be eager to photograph and share, granting you culinary praise and admiration.

Cost-effectiveness is another advantage. These pinwheels utilize ingredients that are not only affordable but also versatile, allowing you to use them in a variety of other recipes beyond this one, stretching your food budget further.

Historical Background and Cultural Significance


The concept of pinwheels as appetizers has an interesting origin tied to the idea of roulades or rolls, which have been a part of culinary traditions across the globe. Roulades are often associated with European dishes and have been tailored into more modern, creative interpretations like these pinwheels.

Culturally, appetizers play a significant role as a precursor to meals, allowing people to experiment with flavors and textures. These pinwheels fit seamlessly into this culinary scenario, bringing together Mediterranean-inspired ingredients in an accessible format.

The evolution of this recipe is marked by adaptable flavors—beginning with cream cheese-based spreads, which are incredibly popular in American cuisine, and advancing into more gourmet combinations with ingredients like feta and cranberries.

Regionally, the variations of pinwheels are broad, with each culture adding its unique spin. While this recipe focuses on a sweet and savory blend, there are versions around the world that incorporate cheeses, meats, and herbs that reflect their local tastes.

Ingredient Deep Dive


Feta cheese, a staple in Mediterranean diets, has a rich history rooted in Greek cuisine. Its tangy, salty flavor adds depth to dishes. Nutritionally, feta offers a good source of calcium and protein, contributing to bone health. Selective purchases should favor feta packaged in brine for maximum freshness. It remains best stored in the fridge, well-sealed. If needed, a mild goat cheese can substitute its place without compromising much on taste.

Dried cranberries provide a sweet contrast to this savory dish. Known for their vibrant color and tart bite, cranberries were initially harvested by Native Americans. They are high in antioxidants and vitamin C. When selecting, look for plump, unsweetened options. Store them in an airtight container for lasting freshness. Raisins or chopped dried apricots can work as substitutes if cranberries are unavailable.

Common Mistakes to Avoid

  • Overfilling the tortillas can lead to difficulty in rolling and potential tearing.
  • Not chilling the pinwheels before slicing may result in uneven, messy cuts.
  • Using feta crumbles instead of block feta can lead to uneven cheese distribution.
  • Choosing low-fat cream cheese might compromise the rich, creamy texture.
  • Skipping the resting time might affect the pinwheels’ flavors as they need time for the ingredients to meld.
  • Using dry tortillas instead of fresh ones may result in cracks during rolling.
  • Not slicing pinwheels evenly affects presentation and serving portions.
  • Failing to incorporate all ingredients evenly leads to flavor imbalance in each bite.
  • Rolling the tortillas too tightly can squeeze out and disperse the filling unevenly.

Essential Techniques


Spreading ingredients evenly is crucial to ensure that every bite of your pinwheels is balanced. Use a spatula to distribute the cream cheese mixture consistently over the tortilla, hitting all corners and edges for an even layer. This ensures a harmonious distribution of flavors.

Rolling the tortilla tightly without bursting is another vital technique. Start at one edge and roll steadily, applying gentle pressure to avoid tearing. Aim for a consistent, tight roll that hugs the filling without crushing it. Visual cues, such as a steady, circular roll without bulging, indicate success.

Chilling the rolled wraps is essential before slicing. This technique firms up the filling, ensuring the pinwheels hold their shape once cut. It also allows flavors to meld together. Aim to refrigerate for at least an hour. An adequately chilled roll will feel firm to the touch, leading to crisp, clean slices.

Pro Tips for Perfect Cranberry Feta Pinwheels


Room temperature cream cheese is easier to work with and helps achieve a smooth consistency when mixing and spreading.

Incorporate fresh herbs like dill or parsley into the cream cheese for an extra burst of flavor and a touch of freshness.

If time permits, make the cream cheese filling the day before to deepen the flavor fusion as the ingredients marry overnight.

For a festive touch, consider using both plain and spinach tortillas to add contrasting hues to your appetizer platter.

To boost the flavor, consider adding a pinch of ground cinnamon to complement the cranberries, enhancing the sweet and savory balance.

Use a sharp, serrated knife to slice the pinwheels, as this preserves the integrity of the presentation and keeps the edges neat and clean.

Variations and Adaptations

For regional variations, consider swapping feta with creamy ricotta for an Italian-inspired flair. This substitution upholds the creaminess while integrating a lighter cheese flavor.

Adaptations for summer could include substituting cranberries for sun-dried tomatoes, giving the pinwheels a fresh and tangy approach suited for warmer months.

For a vegan adaptation, replace the cream cheese with a plant-based alternative and choose a vegan feta to maintain quantity and consistency while observing dietary preferences.

Introduce a spicy flavor variation by adding finely chopped jalapeños to the filling, offering an exciting twist to the traditional pinwheels, adding a heat kick.

Alter the texture by incorporating a crunchy element like chopped nuts, such as walnuts or almonds, to mix up the mouthfeel while preserving the taste.

Presentation alternatives include serving the pinwheels stacked on appetizer plates, or threaded onto decorative skewers for easy grab-and-go bites during gatherings.

Serving and Presentation Guide

To achieve the best plating techniques, arrange the pinwheels in concentric circles on a large platter for a striking visual effect.

Consider garnishing with fresh herbs or a sprinkle of chopped nuts to include a fresh, crunchy element and vibrant color.

Traditional accompaniments like a side of cranberry sauce amplify the cranberry flavor profile, enhancing the dish’s cohesiveness.

Modern serving suggestions recommend pairing with a light salad of arugula and shaved fennel to balance the creaminess of the pinwheels.

Temperature considerations mean serving the pinwheels chilled for optimal flavor and texture. This also aids in maintaining the shape and preventing them from becoming soft.

Portion control tips involve slicing into small rounds, ensuring guests can easily enjoy more than one without overindulging.

Wine and Beverage Pairing

An ideal wine pairing might include a crisp and light Sauvignon Blanc, which complements the savory and sweet elements without overpowering them.

For non-alcoholic alternatives, a lightly infused water with cucumber and mint offers refreshing palate-cleansing between bites.

If offering coffee or tea, consider a mild green tea or a light white tea as a pairing, as it won’t overshadow the more delicate flavors of the pinwheels.

Temperature considerations recommend serving beverages chilled or room temperature to align with the refreshment profile of the dish.

Serving suggestions highlight using elegant glassware for beverages to maintain the sophistication of the setup, enhancing the overall dining experience.

Storage and Shelf Life


To store these pinwheels effectively, wrap them tightly in plastic wrap before slicing to maintain freshness and shape.

Consider a fridge temperature of around 40°F (4°C), which is optimal for preserving the pinwheels without risking spoilage.

Opt for airtight containers when storing sliced pinwheels. This prevents air exposure and extends freshness for up to three days.

Signs of spoilage include a sour smell, a change in color, or a slimy texture. These indicators suggest compromised quality and potential food safety issues.

Reheating instructions are unnecessary as pinwheels are best served cold. For freshness, allow pinwheels to acclimate to room temperature briefly before serving.

Freezing guidelines suggest avoiding freezing due to changes in the texture of the cheese and tortilla, which can result in a soggy dish.

Make Ahead Strategies


For effective prep timelines, plan to make the cream cheese mixture a day ahead, allowing more time on the event day for assembly.

Store rolled but unsliced pinwheels wrapped tightly in the refrigerator until ready to serve, ensuring optimal freshness and flavor fusion.

Assess quality impacts by testing a small batch a day ahead, observing any changes in flavor or texture to adjust ingredients or timing as required.

During assembly, slice pinwheels just before serving to maintain sharp edges and avoid any changes in appearance due to fridge conditions.

Reheating guidelines are not applicable, but consider adding fresh herbs or a sprinkle of zest before serving to refresh flavors.

Incorporate fresh element additions like adding a spritz of lemon or lime juice prior to presenting for added vibrancy and taste boost.

Scaling Instructions


When halving the recipe, maintain ingredient ratios to preserve the balance of flavors, ensuring no element overpowers another.

Doubling or tripling the recipe requires meticulous ingredient scaling, paying close attention to seasoning and mixing to avoid inconsistencies.

Equipment adjustments may involve using larger mixing bowls and ample workspace to accommodate increased ingredient quantities.

Timing modifications could include additional chilling time as larger rolls may require extra time to set and achieve the ideal slicing texture.

Consider additional storage space if scaling up, ensuring larger airtight containers are available for prepared pinwheels.

Nutritional Deep Dive


The macro breakdown offers a balanced profile with carbohydrates from tortillas and healthy fats from cheese to support energy needs.

Micronutrient analysis includes calcium from cheese and antioxidants from cranberries, promoting bone health and reducing inflammation.

Health benefits align with a moderate intake, supporting bone strength through calcium and promoting heart health via unsaturated fats.

Dietary considerations highlight moderation, especially in sodium-sensitive diets, as feta cheese can contain higher salt levels.

Portion analysis suggests serving 2-3 pinwheels per person to maintain balance without overconsumption of calories.

Weight management tips include focusing on portion control and potentially substituting low-fat cheese options without altering key flavors.

Dietary Adaptations

For gluten-free versions, opt for gluten-free tortillas and verify all filling ingredients, including cream cheese, are certified gluten-free.

To achieve a dairy-free version, substitute both the cream cheese and feta cheese with their lactose-free, plant-based counterparts.

Creating a vegan adaptation involves selecting plant-based cheese substitutes and ensuring all ingredients are free from animal products.

Implementing a low-carb option could involve utilizing low-carb tortillas and adjusting the filling proportion for a macro-friendly version.

Keto modifications align with low-carb adaptations but focus on maximizing fats and minimizing carbohydrates.

Paleo and Low-FODMAP diets necessitate a more significant adaptation, using compliant cheese substitutes and focusing on fresh, non-processed tortillas.

Troubleshooting Guide


For texture issues, ensure cream cheese is adequately softened to facilitate smooth spreading and the cheese’s distinct, creamy texture.

To address flavor balance, taste the mixture and adjust seasoning prior to assembly, ensuring the optimal balance of salty, sweet, and creamy elements.

Managing temperature problems means ensuring ingredients are properly chilled before serving to maintain freshness and structure.

Effective solutions for equipment challenges include utilizing a sharp knife for slicing and ensuring workspace readiness for assembly.

Ingredient substitutions that retain quality involve using similar texture and flavor profile substitutes, ensuring guest dietary preferences are met.

Attend to timing concerns by organizing assembly efficiently, reducing unnecessary delays between preparing and serving to maintain freshness.

Recipe Success Stories


Community feedback has frequently highlighted the ease and versatility of this recipe, with numerous praises for its taste and festive presentation.

Variation successes often involve adding additional herbs or spices, expanding the flavor profile while still adhering to the core recipe.

Adaptation stories reveal the unique twists readers have implemented, such as using different cheese varieties, which offer personalized touches.

Reader suggestions have inspired us to include fruits like finely chopped apples, adding crunch alongside the cranberries to amplify the texture.

Photography tips shared by the community suggest emphasizing the colorful pinwheel slices in natural lighting, showcasing their full visual potential.

Frequently Asked Questions

Can I make Cranberry Feta Pinwheels in advance?

Yes, you can make them ahead of time. Prepare the mixture and assemble the rolls the day before. Slice before serving for the freshest presentation.

What can I use instead of feta cheese?

Goat cheese or a firm ricotta can substitute. They maintain the texture and flavor, although they will slightly alter the final flavor profile.

Are Cranberry Feta Pinwheels suitable for kids?

They are generally kid-friendly, but it’s best to consider the tang of feta and adjust to the children’s taste preferences.

What’s the best way to transport these for a party?

Wrap uncut rolls in plastic wrap and store in an airtight container. Slice onsite if possible, maintaining their presentation and freshness.

How long do Cranberry Feta Pinwheels last?

When stored properly in the fridge, they maintain good quality for up to three days. Ensure they are in an airtight container to retain freshness.

Can I use fresh cranberries instead of dried?

Fresh cranberries can be too sour—it’s preferable to use dried, as they offer the sweetness and texture balance necessary for this dish.

What’s the best cutting technique?

Utilize a serrated knife for sawing motions to prevent smashing the pinwheels. This method ensures neat, round slices every time.

How can I achieve a perfectly round pinwheel?

Ensure even spreading of filling and maintain consistent pressure when rolling to avoid lumps or elongated areas.

What’s the serving size for each person?

Plan for 2-3 pinwheels per guest to serve as an appetizer, offering a moderate portion while leaving room for other dishes.

Are there alternative ways to serve this dish?

Besides traditional plating, consider skewering them for grab-and-go convenience or topping a salad for a creative twist.

Do Cranberry Feta Pinwheels freeze well?

Freezing isn’t advised as the texture and flavors may degrade. It’s best to enjoy them fresh for optimal taste and quality.

How can I make pinwheels spicier?

Introduce finely chopped jalapeños or red pepper flakes to the cream cheese mixture. Adjust to the desired spice level for a kick.

Additional Resources


Explore related recipes, such as other bite-sized appetizers suitable for parties, offering a variety of flavors for your next event.

Delve into technique guides to master rolling and cutting techniques, ensuring your presentation shines with professional appeal.

Ingredient information resources can provide valuable insights into selecting the freshest, most flavorful choices for your dish.

Equipment recommendations may enhance your preparation experience, ensuring you have the necessary tools for efficient slicing and assembly.

Seasonal variations in appetizers introduce adaptable recipes across the year, capitalizing on seasonal flavors and ingredients.

Join the Conversation


We invite you to share your thoughts and tweaks to the Cranberry Feta Pinwheel recipe on our social media platforms. Your insights enrich our community.

Capture your culinary masterpiece and submit photos or comments to inspire others. We value aesthetic and innovative interpretations and love to see yours.

Engage with recipe reviews on our site to learn how others have succeeded and what alterations have thrived in practice.

Explore community engagement by participating in online cooking challenges we host, expanding your culinary repertoire and testing creativity.

Experiment with recipe variations and bring fresh ideas to traditional concepts, using our platform to document and share your unique creations.

The Recipe

Cranberry Feta Pinwheels with Cream Cheese

Serves: 10

Prep Time: 15 mins

Cook Time: 5 mins

Total Time: 20 mins

Kitchen Equipment Needed

  • Mixing bowl
  • Spatula
  • Sharp, serrated knife
  • Plastic wrap
  • Cutting board

Ingredients

  • 4 large flour tortillas
  • 8 ounces cream cheese, softened
  • 1 cup feta cheese, crumbled
  • 1 cup dried cranberries
  • 1 tablespoon honey (optional)
  • Fresh herbs, like parsley or dill, for garnish

Directions

  1. In a mixing bowl, combine the softened cream cheese, feta cheese, dried cranberries, and honey. Mix thoroughly until well combined.
  2. Spread the mixture evenly over each tortilla, ensuring full coverage to the edges.
  3. Roll each tortilla tightly. Wrap in plastic wrap and refrigerate for at least 1 hour.
  4. When ready to serve, unwrap and slice each roll into 1-inch pieces using a sharp, serrated knife.
  5. Arrange on a serving platter, garnish with fresh herbs, and serve chilled.

Recipe Notes

  • For variation, try adding walnuts or chopped apples to the filling.
  • If using low-fat cream cheese, ensure even mixing for a smooth consistency.
  • To enhance flavor, consider a sprinkle of cinnamon over the filling before rolling.

Irresistible Stuffed Seafood Soup Bread Bowl for Ultimate Comfort Food

Stuffed Seafood Soup Bread Bowl: Your Irresistible Comfort Meal

⚖️
Difficulty
Medium

⏲️
Prep Time
20 mins

🕒
Cook Time
40 mins

⏱️
Total Time
60 mins

🍽️
Servings
4

Imagine diving into a warm, cozy seafood delight nestled perfectly inside a freshly baked bread bowl. Our Stuffed Seafood Soup Bread Bowl brings together a medley of savory seafood flavors, combined with the comforting crunch of artisan bread. This culinary masterpiece isn’t just a treat for your taste buds; it’s an experience for all your senses. The lush aroma of the sea infuses the air, as the vibrant colors of shrimp, mussels, and herbs captivate your eyes, laying the groundwork for an unforgettable meal. Perfect for a family dinner or an impressive dinner party appetizer, you’ll find this dish strikes the perfect balance between warmth and sophistication.

The texture is everything you could hope for – the soft bread bowl perfectly soaks up the rich, creamy base, while the seafood contributes just the right amount of chewiness. It’s a symphony of flavors and sensory pleasures you won’t want to miss. And if you’ve never tried making a bread bowl soup before, rest assured that this recipe will guide you through every step with ease and confidence.

Quick Recipe Highlights

  • Flavor Profile: A wonderful blend of creamy richness and oceanic brine, enhanced with aromatic herbs and gentle hints of garlic and onion.
  • Texture: The bread bowl absorbs the soup, offering a combination of crisp crust, soft interior, and tender yet toothsome seafood.
  • Aroma: Savory notes of the sea intermingled with the deep, earthy scents of sautéed garlic, onion, and fresh herbs.
  • Visual Appeal: Bright seafood colors against the earthy canvas of the bread bowl add a touch of gourmet flair to your table.
  • Skill Level Needed: Intermediate cooks will find this recipe inviting, with just enough complexity to satisfy culinary adventurousness.
  • Special Equipment: You’ll need a large pot, baking sheet, and a sturdy bread knife if you plan to bake your own bread bowls.

Recipe Overview

  • Difficulty Level: Classified as medium due to the need to balance flavors, cook seafood to perfection, and craft the bread bowl.
  • Category: Ideal as a main dish or a standout appetizer for seafood lovers looking to indulge in something unique and satisfying.
  • Cuisine: A fusion of coastal culinary traditions, drawing inspiration from both Mediterranean and American comfort cuisines.
  • Cost: Moderately priced, accounting for quality seafood. All other ingredients are pantry staples, making this dish quite accessible.
  • Season: Best enjoyed in colder months when hearty comfort foods are most appreciated, but delightful year-round for seafood fans.
  • Occasion: Perfect for intimate family dinners, festive gatherings, or any event where you want to showcase a remarkable seafood creation.

Why You’ll Love This Recipe

The taste and texture of Stuffed Seafood Soup Bread Bowl will elevate your dining experience. The comforting richness of the soup combined with the seafood’s fresh pop and the bread’s soothing crunch creates a dish that is both hearty and elegant. The preparation is easier than it seems, making this an approachable realm of decadence for home cooks. Nutritionally, seafood brings omega-3s and lean protein, adding a healthy edge to this indulgent meal.

This recipe’s adaptability means you can impress guests or create a memorable family meal with ease. Serve it at a social gathering or during a cozy evening at home for a truly satisfying experience. Plus, utilizing accessible ingredients ensures this gourmet delight remains budget-friendly. Share this delectable creation with loved ones, experiencing the magic of quality seafood and inventive presentation in every spoonful.

Historical Background and Cultural Significance

The alluring Stuffed Seafood Soup Bread Bowl has origins steeped in coastal traditions where fresh seafood was king. Born from the necessity of utilizing available oceanic resources, such soups became a symbol of culinary ingenuity in coastal regions across the world. The evolution of bread bowls from plain bread to artistic servings has roots in French and Italian rustic kitchens, where practicality met aesthetic appeal.

As seafood remains a staple in many culinary traditions, the combination with bread emerges as a universal homage to the sea’s bounty and artisanal baking. Throughout history, regional variations have highlighted local seafood varieties, bringing a world of flavors to this timeless concept. From the shores of the Mediterranean to the Atlantic coasts, this dish resonates with the stories of fishermen and bakers who fused their crafts to create a culinary masterpiece.

Ingredient Deep Dive

Seafood, the star ingredient, has been a dietary cornerstone for coastal communities for centuries. Rich in omega-3 fatty acids and lean protein, it supports heart health and offers an abundant source of essential nutrients. Selection is crucial: choose fresh or sustainably sourced seafood to ensure quality and flavor. Stored correctly in the coldest part of your fridge, seafood maintains freshness for this delectable soup.

The bread bowl adds another layer of history and culture. Often homemade where local grains are milled into flour, its creation is a delightful nod to the artisanal skills still cherished in many cultures. Choose rustic, dense breads like sourdough to hold and absorb the soup without becoming soggy. Fresh bread complements the savory flavors, while stale bread offers depth.

Common Mistakes to Avoid

  • Overcooking seafood can lead to a rubbery texture; keep an eye on them for tenderness.
  • Not letting the soup simmer long enough can result in a thin flavor profile; give it time to develop depth.
  • Adding bread to hot soup immediately can cause it to disintegrate; let soup cool slightly before serving.
  • Using low-quality bread can result in a soggy bowl; opt for artisan breads with a thick crust.
  • Skipping on seasoning will leave the soup bland; taste and adjust herbs and spices as needed.
  • Failing to clean seafood properly can introduce grit into the soup; rinse thoroughly before cooking.
  • Neglecting to preheat the bread bowl might lead to uneven soup absorption; warm it before serving.
  • Ignoring the balance of flavors can make soup too rich or bland; adjust seasonings gradually.

Essential Techniques

Mastering seafood cooking techniques is crucial for this recipe. The delicate timing ensures your shrimp, mussels, and fish stay tender and flavorful. Sautéing aromatics like garlic and onions first releases their flavors, creating the soup’s aromatic base. Cooking with a gentle simmer allows the seafood to infuse sweetness without overcooking.

Creating the bread bowl involves gently cutting the top off the loaf and hollowing it out. Practice careful, steady hand movements to retain as much structure as possible, leaving a thick enough wall to support the soup. A pre-warmed bowl can enhance soup absorption, complementing its rich, hearty flavors.

Pro Tips for Perfect Stuffed Seafood Soup Bread Bowl

– Always use fresh seafood to ensure the best flavors and avoid the risk of off-tasting ingredients.
– Keep your bread crusty to handle the soup well without falling apart.
– Experiment with herbs like dill or thyme, which pair beautifully with seafood.
– Gently toast the hollowed bread under a broiler for an extra crisp experience.
– Make sure your soup isn’t too thin; it should be creamy enough to hold its own inside the bread.
– Add cream just before serving for a luscious finish that won’t overextend cooking times.

Variations and Adaptations

Regional variations introduce a vibrant array of possibilities. In a New England twist, include clams and potatoes for a chowder-like bounty. During summer, swap out heavy cream for a broth base with fresh corn and tomatoes. Consider a low-carb adaptation by using gluten-free bread or hollowed-out vegetables as vessels.

Amp up the heat with spices like cayenne or smoked paprika to provide depth and warmth, making it ideal for winter adaptation. Transform textures by blending part of the soup before adding seafood, creating a creamy, bisque-style experience. Opt for modern serving suggestions, plating seafood artistically atop soup for gourmet presentation.

Serving and Presentation Guide

Enhance your dish by presenting it on a slate or wooden board, which highlights its rustic charm. Garnish using fresh herbs or a lemon wedge for color and an aromatic boost. Pair with a light salad or roasted veggies as traditional sides for a well-rounded meal.

For modern flair, consider serving soup bowls on individual platters with small garnishes laid out separately. Experiment with temperatures: lightly chilled seafood within a hot soup creates a refreshing contrast. Remember to keep servings moderate, ensuring the bread structure holds up throughout the meal.

Wine and Beverage Pairing

Pair this Seafood Soup Bread Bowl with a crisp, chilled Sauvignon Blanc to enhance the dish’s freshness and acidity. A light-bodied Chardonnay also works wonderfully, adding a buttery complement to the creaminess. For non-alcoholic alternatives, consider a ginger-infused iced tea or a lemon-thyme soda.

If you prefer hot beverages, lightly steeped green tea provides a cleansing finish, balancing the meal. Choose beverage temperatures that won’t overpower the delicate seafood notes, maintaining a balance on your palate and enhancing your dining experience.

Storage and Shelf Life

Store cooled seafood soup separately in airtight containers in the refrigerator to help retain freshness for up to three days. Bread bowls are best stored separately, wrapped tightly in foil or plastic wrap to maintain crust integrity. Signs of spoilage include a sour odor or off coloration; discard if noted.

To reheat, gently warm soup on the stovetop over medium heat, stirring frequently to preserve seafood texture. Bread bowls can be lightly reheated in the oven for a refreshed crust. Freezing is possible but impacts seafood texture; if necessary, freeze soup components separately from bread.

Make Ahead Strategies

Divide your prep work by preparing the soup base a day in advance, allowing flavors to meld overnight for complexity. Store in the fridge and gently reheat before adding seafood. This prep doesn’t affect quality negatively and lets you focus on final assembly.

Ensure elements like bread bowls stay fresh by keeping them airtight. During assembly, introduce freshly sautéed seafood into the pre-warmed bowls to maintain textural integrity and visual appeal. Following these guidelines ensures a seamlessly executed meal without the stress of last-minute cooking.

Scaling Instructions

Halving this recipe is straightforward: reduce all ingredient quantities by half and adjust seasoning to taste. Doubling or tripling requires careful attention to cooking vessel sizes to ensure even heat distribution and maintain the right texture without compromising quality. Larger pots are essential for upscaling soup.

Cooking time may increase with larger quantities, so allow for these adjustments in your schedule. With leftovers, consider smaller storage containers for portioning which yields optimal freshness retention through the week. This flexibility makes the recipe suitable for any gathering size or preference.

Nutritional Deep Dive

Rich in lean protein from seafood, this soup integrates healthy fats and essential vitamins into your diet. With omega-3 fatty acids, shrimp, and mussels offer cardiovascular benefits. Vitamin-rich, they contribute to immune health whilst providing antioxidants.

Balancing protein with carbohydrates from the bread bowl, the dish presents an energetic meal choice. Its complex flavors require mindful eating, promoting satiety and assisting with weight management. Moderating portions allows for an indulgence that fits within nutritious eating frameworks.

Dietary Adaptations

For a gluten-free adaptation, replace regular bread bowls with gluten-free equivalents or consider using bell peppers as nature’s soup vessel. Dairy-free versions follow easily by substituting cream with coconut milk, adding a slight tropical twist to traditional flavors.

Vegan players opt for plant-based seafood alternatives, like faux shrimp, paired with vegetable broth. Low-carb followers find hollowed zucchinis offer a suitable soup vessel, introducing a different flavor layer. This diversity demonstrates the recipe’s versatility within dietary preferences.

Troubleshooting Guide

Struggling with texture issues? Ensure seafood isn’t overcooked; this keeps the dish tender. For flavor balance, gradually introduce seasonings and taste throughout to hit the mark. If temperature problems arise, a gentle reheating on the stovetop avoids overcooking.

Lacking specialized equipment? Consider equipment alternatives like a regular pot for Dutch ovens or sharp knives in bread removal. Ingredient substitutions may present challenges; always aim for the closest taste profiles.

Recipe Success Stories

Our community raves about the Stuffed Seafood Soup Bread Bowl for its restaurant-quality elegance at home. Success stories frequently highlight personal touches that customize flavors: adding favorite spices or attempting low-carb versions by reader request.

Photos from home chefs show these bowls as centerpiece items, bringing joy through both taste and presentation. Stepping into this recipe presents opportunities to showcase creativity, inviting fans to share their individual adaptations with our growing culinary community.

Frequently Asked Questions

Can I make this recipe dairy-free? Absolutely, replace the cream with a thick coconut milk or alternative non-dairy cream to maintain the soup’s richness and depth.

What bread should I use for the bowl? Select a dense, crusty bread like sourdough or pumpernickel. They provide structural integrity and delightful textures when paired with the soup.

Can I freeze leftovers? Yes, but separate the soup and bread bowl. Freeze soup in tight containers, keeping seafood palatable on thawing, though textural changes may occur.

Are there low-carb options available? Utilize hollow vegetables such as zucchini or bell peppers. They hold soup effectively while contributing minimal carbohydrates.

What can I use instead of seafood? Vegetarian eaters can replace seafood with protein-rich vegetables, like mushrooms or legumes, for a hearty alternative.

Can this soup be spicy? Definitely, incorporate chili flakes or hot sauces according to your spice preference for an added kick.

How can I stabilize the bread bowl? Cut a thin bottom slice for stability, or serve bowls in shallow dishes to catch potential overflow while eating.

How should I store leftovers? Keep soup in airtight containers inside the refrigerator, consuming within three days to retain freshness and flavor.

Is substituting fresh herbs for dried ones suitable? Fresh herbs provide bright notes, but dried versions work in a pinch. Use half the amount if substituting.

What’s a good non-seafood soup option for these bread bowls? Consider a hearty vegetable or bean soup, which complements the bread’s earthiness effectively.

Additional Resources

For those eager to explore further, find related recipes bringing together seafood and bread, dive into techniques for perfecting bread making, or gain deeper knowledge on ingredient choices specific to hearty, comforting soups. Reference seasonal variations that guide how to adapt other beloved recipes to changing produce availability.

Join the Conversation

Share your Stuffed Seafood Soup Bread Bowl adventures on social media, tagging us to join the ever-growing community of home chefs perfecting this dish. Share photography tips or food styling techniques that enhance your plating and photo capturing, inspiring fellow cooks to innovate.

Whether you’re sharing a tried-and-true adaptation or seeking feedback, engaging with fellow foodies enriches your recipe experience, contributing to sustaining this tradition. Display your unique spin, from ingredient swaps to artistic presentations, adding your personal touch to a globally loved recipe.

The Recipe

Stuffed Seafood Soup Bread Bowl

Serves: 4

Prep Time: 20 mins

Cook Time: 40 mins

Total Time: 60 mins

Kitchen Equipment Needed

  • Large pot
  • Baking sheet
  • Sturdy bread knife

Ingredients

  • 4 medium-sized sourdough bread bowls
  • 1 lb mixed seafood (shrimp, mussels, fish)
  • 2 cups seafood broth
  • 1 cup heavy cream
  • 2 tbsp olive oil
  • 1 onion, finely chopped
  • 2 cloves garlic, minced
  • Salt and pepper, to taste
  • 1 tsp fresh dill, chopped
  • Lemon wedges, for garnish

Directions

  1. Preheat the oven to 350°F (180°C). Gently cut the tops off the bread bowls and hollow out enough of the center to hold the soup.
  2. Heat olive oil in a large pot over medium heat. Sauté the onion and garlic until translucent and aromatic.
  3. Add the mixed seafood, cooking gently until just opaque and tender.
  4. Pour in the seafood broth, bringing the mixture to a simmer. Stir occasionally as flavors meld.
  5. Lower the heat, add heavy cream, and season with salt, pepper, and dill. Simmer until the soup thickens slightly.
  6. Warm the bread bowls in the oven for 5-10 minutes, ensuring they’re crisp.
  7. Fill each bread bowl with the seafood soup, garnishing with lemon wedges and extra dill if desired.

Recipe Notes

  • Substitute cream with a non-dairy alternative for a dairy-free version.
  • Experiment with different seafood varieties based on availability.
  • Adjust the quantity of heavy cream to achieve desired soup consistency.

Irresistible Honey Garlic Chicken Skewers: A Flavorful Grilling Delight

Honey Garlic Chicken Skewers Recipe: The Perfect Grilled Delicacy

⚖️
Difficulty
Easy

⏲️
Prep Time
20 mins

🕒
Cook Time
15 mins

⏱️
Total Time
35 mins

🍽️
Servings
4

Experience the mouthwatering delight of Honey Garlic Chicken Skewers, a perfect fusion of sweetness and savory flavors. Whether you’re planning a summer barbecue or an indoor grilling session, these chicken skewers offer a delightful combination of honey’s natural sweetness and garlic’s aromatic punch. The dish is a symphony of taste and texture, thanks to the succulent chicken marinated in a heavenly sauce that brings depth and freshness to every bite. Your senses will be captivated by the enticing aroma and the beautiful golden brown color of perfectly grilled skewers that invite everyone to feast upon them.

Quick Recipe Highlights

  • Flavor Profile: These skewers offer a balanced sweetness and savory depth, highlighting the honey and garlic beautifully.
  • Texture: Juicy chicken pieces glide off the skewers, offering a tender bite that melts in your mouth.
  • Aroma: Enjoy the aromatic infusion of garlic, combined with the irresistible scent of cooked honey.
  • Visual Appeal: Each skewer showcases a glossy, golden brown hue, making them an appealing centerpiece.
  • Skill Level Needed: Perfect for novice to experienced cooks, requiring basic grilling techniques.
  • Special Equipment: A grill or grill pan, skewers, and a brush for basting.

Recipe Overview

  • Difficulty Level: This recipe is categorized as easy, making it accessible for all skill levels. The key steps include simple marinating and grilling, error-free even for beginners.
  • Category: Enjoy this dish as a main course or appetizer, versatile for various meal settings.
  • Cuisine: Rooted in a fusion of Asian and Western influences, this dish brings the best of both culinary worlds.
  • Cost: This recipe remains budget-friendly, primarily using chicken and pantry staples.
  • Season: Ideal for summer grilling, but equally enjoyable year-round when you crave a taste of grill-season food.
  • Occasion: Perfect for casual dinners, parties, or special occasions when you want to impress guests with minimal effort.

Why You’ll Love This Recipe

Honey Garlic Chicken Skewers are loved for their perfect marriage of sweet and savory elements, attributed to the honey and garlic marinade that flavors every juicy bite. The ease of preparation allows you to create a gourmet dish with minimal effort, making it convenient for weekdays and impressive for weekend parties. Nutritionally, the lean protein of the chicken breast combined with garlic’s benefits makes this a wholesome meal choice that doesn’t compromise on flavor.

This recipe shines in social settings, providing a delightful dish for gatherings or casual get-togethers. Its cost-effectiveness is another reason for its popularity; with simple ingredients, you can create a feast that won’t break the bank. Bring warmth to your palette and joy to your table with this inviting recipe that promises deliciousness and satisfaction.

Historical Background and Cultural Significance

Honey Garlic Chicken Skewers trace their origin to the marriage of Asian culinary practices and Western barbecue culture. The sweet and savory profile is a hallmark of Asian cuisine, particularly Chinese and Japanese, known for balancing these flavors harmoniously. Over time, Western influences introduced grilling techniques, creating a fusion dish adored across continents.

Their cultural importance is seen in their popularity at family gatherings and festive occasions, symbolizing joy and togetherness around a shared meal. As the recipe evolved, variations emerged across regions, with some adding a spicy element for extra zing or substituting chicken with other proteins. The skewer format enables versatility, mirroring techniques found in satay and kebabs from various cultures.

Ingredient Deep Dive

Chicken is the star of this recipe, bringing lean protein to the table. Culturally, chicken is a versatile staple worldwide, known for absorbing flavors while maintaining its own subtle taste. It’s important to choose fresh, skinless chicken breasts or thighs for their tenderness and ability to soak up marinades efficiently. Nutritionally, chicken is rich in lean protein, essential for muscle growth and repair, and low in fats compared to other meats.

Honey, with its historical significance as a natural sweetener, provides a unique taste, balancing the savory garlic. Its antibacterial properties also offer health benefits. Garlic, a culinary favorite known for its bold flavor, also packs numerous health benefits, including heart health promotions. Fresh garlic cloves should be firm and tightly packed, and they can be stored in a cool, dry place for longevity. Substitutions like maple syrup for honey or green onions for garlic add different flavor twists.

Common Mistakes to Avoid

  • Over-Marinating: Ensure chicken is marinated for just the right time, around 2-4 hours, to avoid a mushy texture.
  • Uneven Skewer Sizes: Keep chicken pieces uniform to ensure even cooking and perfect doneness.
  • High Grill Temperature: Avoid overly high heat to prevent burning the exterior before the chicken cooks through.
  • Skipping Basting: Baste the chicken during grilling to keep it moist and flavorful.
  • Improper Skewer Soaking: If using wooden skewers, soak them in water for at least 30 mins to avoid burning.
  • Ignoring Resting Time: Allow skewers to rest for a few minutes post-cooking for juicier results.
  • Overloading Flavors: Balance marinade ingredients to complement, not overpower, the chicken’s natural taste.
  • Skipping Preheat: Ensure the grill is preheated to ensure the chicken sears beautifully.

Essential Techniques

Mastering marination is crucial for the Honey Garlic Chicken Skewers recipe. Marination allows the spices and juices to infuse thoroughly into the chicken. It is important to combine the marinade ingredients in a sealable plastic bag or container for easy storage and maximum contact with the chicken. Pay attention to the marination time; too short won’t impart much flavor, and too long can affect the texture.

Grilling is another vital technique, where you aim for a steady, medium heat to ensure cooked-through, tender chicken. Patience is key; avoid flipping the skewers too frequently. Look for a golden brown char as the perfect cue. Practice basting mid-cook for an additional layer of sauce, increasing flavor and juiciness.

Pro Tips for Perfect Honey Garlic Chicken Skewers

Ensure that your marinade penetrates effectively by slightly scoring the chicken before marinating. Opt for thigh meat if you desire a richer flavor, as it withstands longer cooking times better. To keep skewers juicy, maintain a small space between chicken pieces, allowing heat to circulate freely. Stay attentive to the grill’s temperature, adjusting as needed to prevent burning.

Complement your skewers with fresh herbs such as chopped parsley or cilantro for an aromatic boost. Consider a final drizzle of fresh lemon juice post-grilling to enhance flavors and balance sweetness. Use reserved marinade as a dipping sauce by heating it gently to ensure it’s safe for consumption. Lastly, brush a bit of oil on the grates before grilling to reduce sticking.

Variations and Adaptations

Regional variations can involve adding spices like dried chili flakes for a hint of heat. For seasonal adaptations, pair the skewers with grilled seasonal vegetables, such as zucchini or bell peppers, offering a refreshing crunch. Dietary modifications include using tofu instead of chicken for a plant-based version, ensuring the marinade includes soy sauce for flavor depth.

Flavor variations might involve infusing the marinade with a splash of citrus for brightness or ginger for warmth. For texture modifications, try grilling bacon-wrapped chicken pieces for an additional savory layer. Presentation alternatives include serving the skewers atop a bed of fluffy jasmine rice or alongside a crisp garden salad for a complete meal.

Serving and Presentation Guide

To create a stunning presentation, arrange the skewers on a large platter garnished with sprigs of fresh herbs, such as cilantro or parsley. Consider plating them on a rustic wooden board for a casual, earthy approach. Add bold color with a side of vibrant vegetable slaw or roasted peppers.

Traditional accompaniments like a simple vegetable side or steamed rice work well, balancing flavors with the skewer’s richness. For a modern twist, serve with a creamy yogurt cucumber dip. Temperature considerations include serving the skewers hot off the grill, while portion control ensures guests enjoy 2-3 skewers per person, leaving room for other dishes.

Wine and Beverage Pairing

These skewers pair beautifully with a crisp white wine, such as Sauvignon Blanc, complementing the dish’s sweetness and garlic undertones. For non-alcoholic alternatives, consider serving iced tea with a hint of lemon or a sparkling lemon water to refresh the palate.

If tea or coffee is fitting, opt for a mild, floral green tea echoing the skewer’s aromatic elements. Ensure beverages are served at an optimal temperature to enhance flavors. Top off with fresh mint leaves for a sophisticated touch, elevating the overall dining experience.

Storage and Shelf Life

Store leftover skewers in an airtight container in the refrigerator, where they will remain fresh for up to three days. To prevent drying out, ensure pieces aren’t stacked too tightly. Look for containers that provide an airtight seal to maintain moisture.

Watch for signs of spoilage, such as off smells or color changes, and discard any questionable leftovers. For reheating, opt for the microwave or sauté them in a pan over low heat to prevent drying. Freezing is not recommended, as it may affect texture and flavor, but if necessary, ensure to reheat thoroughly.

Make Ahead Strategies

Preparation in advance can involve marinating the chicken a day ahead, which intensifies flavor without altering texture, ensuring you save time on cooking day. After marinating, store the skewers in the fridge until ready to grill. This helps in balancing the household or hosting activities better.

Avoid skewering too early, as wooden skewers may degrade in moisture. Once grilled, keep the skewers warm in the oven until serving. Consider adding a sprinkle of fresh herbs just before serving to introduce a fresh element and enhance visual appeal.

Scaling Instructions

When halving the recipe, minimize ingredient portions evenly to maintain flavor balance while adjusting cooking times slightly if using fewer skewers. For doubling or tripling, ensure a grill pan size increase for uniform cooking, and consider batch cooking to control temperature.

Equipment adjustments might include using metal skewers for stability with larger batches. Timing modifications should monitor skewer crowding, adjusting space accordingly on the grill. Keep storage in mind for larger recipes, ensuring refrigeration space is adequate.

Nutritional Deep Dive

The macro breakdown for Honey Garlic Chicken Skewers highlights lean protein from chicken with balanced carbohydrate sources from honey. Micronutrients such as vitamins B6 and C are present, alongside garlic’s immune-boosting properties. Health benefits include lean meat consumption, benefiting muscle growth and energy levels.

Portion analysis ensures adequate caloric intake, maintaining dietary goals without overindulgence. Suitable for weight management, the dish’s high protein-to-calorie ratio ensures satisfaction while aiding muscle preservation.

Dietary Adaptations

To make the recipe gluten-free, check soy sauce labels or use tamari as an alternative. For dairy-free solutions, simply avoid yogurt-based sauces or substitutes with dairy-free options. To create a vegan dish, swap chicken with tofu or mushrooms, enhancing flavor with the same marinade.

Low-carb alternatives might limit honey quantity or use a sugar-free substitute. For keto, focus on protein-rich, high-fat marinades, utilizing oils like olive or avocado. Paleo enthusiasts can savor this meal using organically sourced chicken and natural sweeteners.

Troubleshooting Guide

For texture issues like dry chicken, consider reducing grilling time, ensuring constant basting to introduce moisture. Should flavor imbalances arise, adjust marinade ingredients, emphasizing a balanced ratio between sweet and savory components. If temperature problems occur, regulate grill heat, maintaining moderate temperatures to avoid burning.

Equipment challenges involve ensuring proper grilling tools, such as reliable skewers and a grill pan. Ingredient substitutions might necessitate testing variations before full implementation. Timing concerns help precision in grilling, resulting in tender, well-cooked dishes.

Recipe Success Stories

Reader feedback highlights how accessible and delightful these chicken skewers have become. Many share success in adding spicy elements for a kick, doubling the marinade for extra saucy finishes. Some enjoy these skewers accompanied by family-favorite sides or incorporating them into creative wraps.

Others showcase stunning photography, capturing the skewers’ radiant colors and inviting presentation. Community members frequently share adaptations, inspiring creativity, and inviting positivity, illustrating the recipe’s versatility and home-cooked appeal.

Frequently Asked Questions

1. Can I use a different protein? Yes, pork or tofu can be excellent substitutes, but adjust cooking time accordingly.
2. How should I store leftovers? Place them in an airtight container in the fridge for up to three days.
3. Are there bitter taste risks? If garlic is burnt, it might give a bitter bite, so watch closely as it cooks.
4. Can I use metal skewers? Absolutely! Metal skewers eliminate the need for soaking, providing heat stability.
5. Is the marinade suitable as a sauce? Yes, heat to a safe temperature if used as a dip or finish.
6. What’s a good side dish? Rice, veggie skewers, or a fresh garden salad complement the flavors well.
7. How do different honeys affect taste? Floral honey varieties add distinct notes, while clover honey provides balance.
8. Any wine recommendations? A crisp Sauvignon Blanc or a refreshing Riesling complements the savory-sweet profile.
9. How do I prevent skewers from spinning? Double-prong skewers or skewer forks provide stability during grilling.
10. What’s the best grill temperature? Medium heat around 350° F ensures an even cooking process without burning.
11. What if I lack grilling equipment? An oven or stovetop grill pan can be effective substitutes, adjusting for broiling settings.
12. How to make it spicier? Add chili flakes or sriracha to the marinade for an elevated spice level.

Additional Resources

Delve into related recipes like teriyaki chicken or grilled shrimp skewers for a similarly delicious experience. Technique guides offer insight into precise grilling methods, ensuring perfect execution. Engage with ingredient information for choosing and storing honey and garlic effectively.

Equipment recommendations have been discussed, essential for cooking success. Consider exploring seasonal variations to make use of fresh, local produce, elevating your dish with original flavors and ingredients.

Join the Conversation

Connect with fellow food lovers by sharing your own versions of Honey Garlic Chicken Skewers on social media. Capture stunning photos using natural light, emphasizing the skewers’ glistening finish. Leave a review and let us know your thoughts, modifications, or tips to enhance this beloved recipe.

Join our community, exchanging ideas and inspiring each other with fresh twists on this timeless dish. Together, let’s celebrate the joys of cooking, experimenting, and savoring these delicious skewers, perfect for any occasion you envision.

The Recipe

Honey Garlic Chicken Skewers

Serves: 4

Prep Time: 20 mins

Cook Time: 15 mins

Total Time: 35 mins

Kitchen Equipment Needed

  • Grill or grill pan
  • Skewers (bamboo or metal)
  • Mixing bowls
  • Brush for basting

Ingredients

  • 1 lb chicken breast, cubed
  • ¼ cup honey
  • 2 tablespoons soy sauce
  • 2 garlic cloves, minced
  • 1 tablespoon vegetable oil
  • Salt and pepper to taste

Directions

  1. In a mixing bowl, combine honey, soy sauce, minced garlic, and oil. Season with salt and pepper.
  2. Add chicken cubes to the marinade, tossing to coat. Refrigerate for 2-4 hours.
  3. If using bamboo skewers, soak in water for 30 minutes.
  4. Preheat the grill to medium heat.
  5. Skewer marinated chicken cubes evenly onto skewers.
  6. Grill skewers for 12-15 minutes, turning periodically, until fully cooked.
  7. Baste occasionally with leftover marinade for additional flavor.

Recipe Notes

  • For spicier skewers, add a pinch of chili flakes to the marinade.
  • Ensure chicken pieces are similar in size for even cooking.
  • Leftover marinade can be reduced over heat and used as a sauce.

Delicious Honey Garlic Butter Roasted Carrots for Perfect Side Dish

Honey Garlic Butter Roasted Carrots: A Deliciously Sweet and Savory Side Dish

⚖️
Difficulty
Easy

⏲️
Prep Time
10 mins

🕒
Cook Time
25 mins

⏱️
Total Time
35 mins

🍽️
Servings
4

Transform humble carrots into a gourmet delight with this Honey Garlic Butter Roasted Carrots recipe. The natural sweetness of the carrots is enhanced with a luscious glaze of honey and butter, balanced with the aromatic depth of garlic. This dish not only appeals to the taste buds but is a visual feast with its vibrant color, delivering a delightful culinary experience.

These roasted carrots are perfect for any occasion, whether you’re looking for a simple weeknight side dish or a standout accompaniment for a holiday feast. The combination of honey and garlic creates a caramelized exterior with a tender, melt-in-your-mouth interior. Plus, they are incredibly easy to prepare, making them an ideal choice even for beginner cooks who want to impress their guests.

Quick Recipe Highlights

  • Flavor Profile: Sweet and savory with a hint of butteriness and garlic undertones that make it an irresistible combination.
  • Texture: The carrots are tender on the inside with a slightly crispy, caramelized coating on the outside.
  • Aroma: Earthy notes from the roasted carrots paired with fragrant garlic and the subtle sweetness of honey waft through your kitchen.
  • Visual Appeal: Bright, glossy carrots sure to add a pop of color to your table.
  • Skill Level Needed: Simple enough for novices, involving basic roasting techniques with minimal preparation.
  • Special Equipment: All you need is a baking tray and some foil or parchment paper for easy clean-up.

Recipe Overview

  • Difficulty Level: Easy. This recipe is straightforward with minimal steps, suitable for both novice and experienced cooks.
  • Category: Side Dish. These carrots complement a wide variety of main dishes, from roasted meats to plant-based meals.
  • Cuisine: This dish fits into traditional American comfort food with a global twist using honey and garlic.
  • Cost: Budget-friendly, relying on inexpensive ingredients commonly found in most kitchens. Expect to spend around $5 for four servings.
  • Season: Best during spring and fall when carrots are in peak season, ensuring the sweetest flavor.
  • Occasion: Suitable for family dinners, potlucks, and festive gatherings where a simple yet elegant dish is desired.

Why You’ll Love This Recipe


The Honey Garlic Butter Roasted Carrots offer a perfect blend of taste and texture that’s hard to resist. The interplay of sweetness from the honey and the richness of the butter is perfectly offset by the garlic’s savory notes. The roasting process enhances the carrots’ natural sugars, offering a rich, caramelized flavor that transforms simple ingredients into a gourmet delight.

Convenience is another draw; with just a few minutes of prep and a quick roasting time, this recipe is perfect for busy weeknights or last-minute side dish needs. All the ingredients are likely already in your pantry, making this recipe not only easy but also economical and accessible.

Nutritionally, carrots are a powerhouse of vitamins and antioxidants, notably beta-carotene, vital for maintaining eye health and boosting your immune system. Combined with honey’s natural sugars and the healthy fats of butter, this dish provides not only a flavor punch but also a nutritious addition to your meal.

Entertaining is a breeze with this dish. Its vibrant presentation and complex flavors make it a fitting choice for impressing guests or adding a special touch to family dinners. The simplicity of the process ensures that you can spend more time enjoying your company rather than tending to the kitchen.

Cost-effectiveness doesn’t mean sacrificing flavor or quality. This recipe proves that you can create a dish that’s both luxurious and budget-friendly. The ingredients are affordable, yet the end result feels indulgent and restaurant-worthy, providing luxury dining at home.

Historical Background and Cultural Significance


Carrots have a rich history, originating from Central Asia, where they were first cultivated for their seeds and leaves rather than their roots. It wasn’t until much later that the root became the primary focus. Historically, carrots were initially purple or yellow; the sweet orange variety we know today was developed by the Dutch in the 17th century.

The carrot has played a significant role in various cuisines worldwide, often used as a primary ingredient for their natural sweetness and vibrant color. In American cuisine, carrots’ versatility allows them to be incorporated into both sweet and savory dishes, making them a staple in countless kitchens.

With the evolution of culinary techniques and global influences, recipes incorporating honey and garlic have become popular for their flavorful depth. The combination of roasting with sweet honey and aromatic garlic not only enhances the carroty sweetness but introduces a delightful fusion of flavors revered in both Eastern and Western cuisines.

Regional variations showcase diverse influences and adaptations. In Mediterranean areas, carrots are frequently paired with harissa or cumin, while Asian cuisines might infuse them with ginger or sesame oil. Despite the variation, the underlying appeal of carrots remains their delightful balance of flavor, nutrition, and versatility.

Ingredient Deep Dive


Carrots, a staple in kitchens worldwide, are known for their vibrant color and natural sweetness. Rich in beta-carotene, they are essential for maintaining good vision and immune health. When choosing carrots, look for firm, bright orange ones with no visible cracks. Store them in a cool, dark place to preserve their freshness and nutritional value.

Honey, a natural sweetener beloved for its unique flavor profiles, adds a glossy shine and sweetness to the dish. Select raw honey when possible to enjoy its full health benefits. It’s best stored at room temperature, away from direct sunlight to ensure it maintains its liquid form.

Garlic, with its pungent aroma and savory flavor, complements the sweetness of the honey and the earthiness of the carrots. Opt for fresh garlic cloves for the most robust flavor. Store them in a dry, cool place with good ventilation to prolong their shelf life.

Common Mistakes to Avoid

  • Overcrowding the baking tray can hinder caramelization. Ensure the carrots are spread out in a single layer for even roasting.
  • Using low-quality honey can affect the final flavor. Select a pure, high-quality honey for the best results.
  • Neglecting to stir the carrots halfway through roasting can result in uneven cooking. Stir them to ensure an even glaze and texture.
  • Skipping garlic can lead to a lack of depth in flavor. Fresh garlic is vital for the savory balance.
  • Not preheating the oven can result in soggy carrots. Ensure your oven is fully preheated before adding the tray.
  • Discarding carrot tops can be wasteful. Consider using them in broths or vegetable stock for added flavor.
  • Ignoring seasoning can lead to a bland dish. Salt and pepper are crucial to enhance the natural flavors.
  • Failing to monitor the cooking time can lead to burnt carrots. Keep an eye on them during the last few minutes of roasting.

Essential Techniques


Roasting is a fundamental technique in this recipe, crucial for flavor and texture. It brings out the natural sweetness of the carrots and facilitates the caramelization of the honey glaze. Mastering this technique involves evenly spreading the carrots on the baking sheet, ensuring each piece is in contact with the surface for uniform browning.

Deglazing with the garlic butter mixture adds layers to the flavor profile. After roasting, drizzle the hot carrots with the mixture, allowing them to soak up the flavors as they cool. This step enhances the savory notes and ensures the carrots are perfectly coated with the silky, flavorful sauce.

Pro Tips for Perfect Honey Garlic Butter Roasted Carrots


Cut the carrots uniformly to ensure they cook evenly. This will prevent some pieces from being over or under-cooked compared to others.

For extra caramelization, opt for a high oven temperature, around 425°F (220°C). The higher heat encourages the honey to caramelize quickly, giving the carrots a more robust flavor.

Toss the carrots halfway through roasting to ensure each piece is well-coated with the honey garlic sauce and acquires a nice golden-brown color.

Use parchment paper to line your baking tray, allowing for an easy clean-up and preventing any sticking during the roasting process.

For a deeper honey flavor, choose a variety with a rich, darker hue, such as buckwheat honey, which complements the earthiness of the carrots.

If serving as part of a larger meal, prepare ahead and reheat gently before serving to save time without sacrificing flavor.

Add a touch of fresh herbs like thyme or parsley before serving for an added layer of flavor and visual appeal.

Variations and Adaptations


To adapt this recipe for seasonal availability, consider incorporating root vegetables like parsnips or sweet potatoes during winter months, providing both texture and flavor complexity.

For those looking to lower sugar content, reduce the honey slightly and introduce maple syrup for its lower glycemic index and added flavor depth.

If you desire a spicier kick, add a pinch of red pepper flakes or a drizzle of sriracha before serving, making the flavors more dynamic.

For a Mediterranean twist, sprinkle with feta cheese and fresh mint post-roast, enhancing both taste and presentation with these vibrant additions.

Texture modifications can involve leaving the carrots slightly al dente for a crunchier bite, perfect for those who enjoy more texture contrast.

In terms of presentation, consider slicing the carrots into coin shapes or diagonals, heightening visual appeal when arranged uniformly on a serving platter.

Serving and Presentation Guide


Plating techniques should emphasize the dish’s vibrant color. Use a white or light-colored platter to make the orange of the carrots pop, arranging them in a single layer for a sleek presentation.

Garnishing ideas can elevate the aesthetics and flavor; fresh parsley or chives not only add a touch of green but also a hint of freshness, balancing the flavors.

Traditional accompaniments such as a simple roast chicken or a savory beef roast highlight the carrots’ sweet and savory profile, making for a well-rounded meal.

Modern serving suggestions might involve pairing the carrots with a grain salad or quinoa, making use of contrasts in both color and texture.

Temperature considerations involve serving the carrots warm, as cooling will cause the glaze to harden, altering both texture and flavor.

Portion control tips suggest allowing ½ cup of carrots per person, adjusted based on other components in the meal, ensuring a balanced plate.

Wine and Beverage Pairing


For wine pairings, opt for a light, acidic white such as a Sauvignon Blanc or a dry Riesling. These wines complement the carrots’ sweetness and cut through the buttery glaze.

Non-alcoholic alternatives could include a crisp apple cider or a sparkling water infused with lemon or lime, providing a refreshing contrast to the dish’s sweetness.

Coffee or tea pairings aren’t typically suggested, but a mild herbal tea like chamomile could work as a calming post-meal option, balancing the savory elements.

Temperature considerations ensure all beverages are served appropriately chilled for whites and ciders, or at a soothing warm temperature for herbal teas.

Serving suggestions might include a delicate stemmed wine glass for whites and chilled sparkling water in a tall glass garnished with a slice of citrus.

Storage and Shelf Life


For storage methods, place any leftover carrots in an airtight container. This ensures they remain fresh and retain their flavors when refrigerated.

Proper temperature requirements suggest keeping the carrots in the refrigerator; avoid leaving them out at room temperature for extended periods to prevent spoilage.

Container recommendations involve using a shallow, airtight container that allows the carrots to be spread in a single layer, maintaining their texture.

Signs of spoilage include a sour smell or slippery texture, indicating that the carrots are no longer safe to consume.

Reheating instructions recommend using the oven set to a low heat to gently warm the carrots, preserving their texture and flavor without drying them out.

If freezing, allow the cooked carrots to cool completely, then store them in a freezer-safe container or bag, making sure to remove excess air to prevent freezer burn.

Make Ahead Strategies


Prepare the carrots by peeling and cutting them a day in advance, storing them covered in water in the refrigerator to maintain freshness.

Storage between steps includes storing the prepped carrots in water, delaying the honey garlic butter preparation until just before roasting to ensure flavor integrity.

A quality impact assessment of making ahead highlights that while flavors benefit from marinating, the carrots should be roasted close to serving time for optimal texture.

Assembly tips involve combining the carrots with the glaze right before serving, ensuring the flavors meld and the dish remains visually appealing.

Reheating guidelines suggest a low oven temperature to gently warm the carrots without altering their caramelized surface or flavor profile.

To keep the dish fresh, add a sprinkle of fresh herbs just before serving, enhancing both taste and aesthetic appeal.

Scaling Instructions


For halving the recipe, simply reduce all ingredient measurements by half, maintaining the cooking time since the quantity will still cook evenly.

Doubling or tripling the recipe may require a larger baking sheet or splitting the batch between two trays. Ensure even distribution for consistent cooking.

Equipment adjustments for larger batches might include using a convection oven setting if available, promoting faster, more even heat distribution.

Timing modifications are minimal, but if cooking in multiple batches, keep each tray closer to the oven’s top for optimal caramelization.

Storage considerations for larger batches involve dividing the leftover carrots into smaller containers to facilitate quick and even reheating.

Nutritional Deep Dive


The macro breakdown of this recipe reveals a balanced combination of carbohydrates from the carrots and honey, healthy fats from the butter, and a moderate protein content.

Micronutrient analysis highlights significant contributions from vitamin A and potassium, crucial for eye health and maintaining electrolyte balance.

Health benefits are numerous, with carrots offering a strong antioxidant profile, supporting immune function and reducing inflammation.

Dietary considerations can accommodate various needs, with possibilities for substitution and adaptation to suit different health goals and preferences.

Portion analysis ensures balanced nutrient intake, providing essential vitamins and minerals while maintaining a moderate caloric profile.

Weight management tips encourage enjoying this dish as part of a balanced meal, emphasizing its nutrient density rather than caloric value.

Dietary Adaptations


For a gluten-free version, verify that all ingredients, especially any sauces or spices used, are certified gluten-free to avoid contamination.

A dairy-free adaptation might include replacing butter with a plant-based margarine or coconut oil, preserving the glaze’s richness without dairy.

Vegan variations require substituting honey with maple syrup or agave nectar, paired with a plant-based butter alternative for the same sweet-savory profile.

To accommodate a low-carb diet, consider reducing the honey and supplementing with a low-carb sweetener if needed, while maintaining the recipe’s essence.

Keto modifications may involve decreasing the carrot ratio and substituting with lower-carb vegetables while maintaining the rich glaze as a dynamic flavor agent.

Paleo adherence can be ensured by using grass-fed butter and raw honey, aligning with the diet’s emphasis on whole, unprocessed ingredients.

Low-FODMAP considerations involve reducing garlic to tolerated levels or substituting with garlic-infused oil for flavor without triggering symptoms.

Troubleshooting Guide


Address texture issues by ensuring even cutting and consistent oven temperature; failure to do so may result in unevenly cooked carrots.

Balance flavor by tasting the sauce before baking, adjusting honey and garlic according to personal preference to avoid an overly sweet or pungent dish.

For temperature problems, keep a reliable oven thermometer on hand, ensuring accurate heat levels for optimal roasting and caramelization.

If facing equipment challenges, invest in a high-quality baking sheet and parchment paper to avoid sticking and ensure a clean roasting process.

Ingredient substitutions should be mindful of flavor impacts, testing new options in small batches to ensure desired taste and consistency are maintained.

Timing concerns can be alleviated through batch preparation and cooking practice, honing efficiency and ensuring each component is perfectly timed.

Recipe Success Stories


Join the ranks of readers who have enjoyed this Honey Garlic Butter Roasted Carrots recipe, each sharing unique twists and personal experiences.

Community feedback often praises the recipe’s simplicity and crowd-pleasing flavors, making it a go-to for various dining occasions.

Variation successes include incorporating additional herbs or spices, enhancing the flavor while maintaining the original recipe’s core appeal.

Adaptation stories sometimes involve substituting ingredients for dietary preferences, with many still achieving the same tantalizing outcome.

Reader suggestions often highlight creative serving ideas, like mixing with salads or pairing alongside different main entrees for varied experiences.

Photography tips from the community suggest capturing the dish in natural light, emphasizing the carrots’ vibrant color and lustrous glaze.

Frequently Asked Questions

How can I make the carrots more flavorful?

Enhancing flavor can be achieved by adding extra garlic or incorporating herbs like thyme or rosemary for added aroma and taste.

Can I use baby carrots for this recipe?

Yes, baby carrots can be a convenient alternative, but be sure to adjust the roasting time as they tend to cook faster than larger carrots.

How do I prevent the honey from burning?

Ensure the oven is at the correct temperature, and complete the cooking in preheated conditions to allow the carrots to roast evenly without burning.

What’s the best way to reheat leftovers?

Reheat gently in the oven on low heat to preserve the glaze and texture, preventing the carrots from drying out or becoming overly crisp.

Can I add other vegetables?

Absolutely! Root vegetables like parsnips or sweet potatoes complement the carrots well and can be roasted together for a harmonious blend.

How do I store leftovers?

Store in an airtight container in the refrigerator for up to three days, ensuring freshness and flavor retention for subsequent meals.

Is there an alternative to butter?

Coconut oil or a good quality vegan margarine can substitute butter, maintaining the glaze’s richness while accommodating dietary preferences.

What can I do if my carrots turn out soggy?

Ensure they are evenly spaced on the baking tray and not overcrowded to promote even caramelization and crispy exteriors.

How do I enhance the visual presentation?

For a beautiful finish, garnish with fresh herbs just before serving and plate on a contrasting background to highlight the vibrant colors.

What’s the secret to even roasting?

Uniformly cut carrots and consistent oven temperature are key, ensuring even exposure to heat and thorough cooking results.

Additional Resources


Explore related recipes like roasted root vegetables with similar honey and garlic profiles to enrich your repertoire of vibrant side dishes.

Technique guides for perfect roasting techniques offer valuable tips for achieving ideal caramelization and texture in various vegetables.

Dive into ingredient information, providing a deeper understanding of the nutritional benefits each component offers within your culinary creations.

Equipment recommendations can elevate your process efficiency, highlighting the best tools for roasting and kitchen preparation.

Seasonal variations emphasize adapting recipes to ensure ingredient availability and peak freshness, enhancing both taste and texture.

Join the Conversation


Engage with fellow food enthusiasts on social media by sharing your own twist on the Honey Garlic Butter Roasted Carrots, sparking creative conversations.

Photography tips can help you capture the perfect shot, showcasing the vibrant color and enticing glaze, inviting others to try the recipe themselves.

Contribute your thoughts in the recipe reviews section, offering valuable insights and feedback for the community’s collective culinary journey.

Embrace community engagement by sharing your results, encouraging others to explore various versions and modifications that fit their tastes.

Discuss different recipe variations, fostering an environment of sharing and experimentation where food enthusiasts can learn and grow together.

The Recipe

Honey Garlic Butter Roasted Carrots

Serves: 4

Prep Time: 10 mins

Cook Time: 25 mins

Total Time: 35 mins

Kitchen Equipment Needed

  • Baking tray
  • Parchment paper or aluminum foil
  • Mixing bowl
  • Knife
  • Spoon or spatula

Ingredients

  • 1 lb carrots, peeled and cut into sticks
  • 2 tbsp honey
  • 3 tbsp butter, melted
  • 2 cloves garlic, minced
  • Salt and pepper to taste
  • Fresh parsley, chopped (optional for garnish)

Directions

  1. Preheat your oven to 425°F (220°C) and line a baking tray with parchment paper or foil.
  2. In a mixing bowl, combine melted butter, honey, and minced garlic. Stir to blend them together.
  3. Place peeled and cut carrots on the lined baking tray; season with salt and pepper.
  4. Pour the honey garlic butter mixture over the carrots, ensuring each is evenly coated.
  5. Roast in the preheated oven for about 25 minutes or until the carrots are tender and slightly caramelized, stirring halfway through.
  6. Remove from the oven and let them cool slightly. Add parsley for garnish if desired.
  7. Serve warm, enjoying the delightful blend of flavors in this versatile side dish.

Recipe Notes

  • Feel free to use baby carrots for an easier prep, reducing the cooking time accordingly.
  • For a spicier version, add a pinch of chili flakes to the butter mixture.
  • This recipe can easily be doubled or tripled for larger gatherings.

Savor Authentic Greek Flavor with Homemade Lamb Gyros Recipe

Lamb Gyros: A Delightfully Savory Mediterranean Treat

⚖️
Difficulty
Moderate

⏲️
Prep Time
20 mins

🕒
Cook Time
15 mins

⏱️
Total Time
35 mins

🍽️
Servings
4

Imagine biting into a tender, juicy lamb gyro enveloped in a soft, warm pita, with lush layers of fresh vegetables and aromatic tzatziki. Lamb gyros offer a journey of flavors inspired by Mediterranean cuisine. This classic recipe incorporates savory, spiced lamb, which is roasted to perfection, releasing aromatics that transport you straight to the bustling streets of Greece. With every bite, the rich flavors and textures are perfectly balanced, making it an ideal meal for both casual dining and gourmet praise.

Quick Recipe Highlights

  • Flavor Profile: A harmonious blend of earthy spices, tender lamb, and refreshing cucumber yogurt sauce.
  • Texture: The juicy and tender lamb contrasts with crisp, fresh veggies and fluffy pita.
  • Aroma: Delightful scents of garlic, herbs, and spices permeate the air.
  • Visual Appeal: Vibrant greens, deep-hued lamb, and creamy tzatziki create an inviting presentation.
  • Skill Level Needed: Manageable for home cooks with intermediate skills due to marinating and grilling requirements.
  • Special Equipment: A grill or grill pan is recommended to achieve authentic Mediterranean flavors.

Recipe Overview

  • Difficulty Level: Lamb gyros require precise marinating and grilling, considered a moderate skill level task by many enthusiasts.
  • Category: Perfect as a main course for lunches and dinners.
  • Cuisine: Stemming from Greek culinary tradition with Middle Eastern influences.
  • Cost: A cost-effective dish using lamb cuts that are often reasonably priced or even budget-friendly.
  • Season: While enjoyable year-round, they shine in spring and summer, pairing well with seasonal veggies.
  • Occasion: Suitable for family meals, entertaining guests, and a festive BBQ setting.

Why You’ll Love This Recipe


Dive into a world of flavors with lamb gyros that offer a perfect mix of taste and texture. The lamb’s tender juiciness pairs beautifully with the crispness of fresh veggies and the creaminess of tzatziki. These homemade gyros provide the convenience of familiar street food right at home, allowing you to explore new culinary horizons with ease. Packed with protein and served with a variety of veggies, they offer a nutritious meal choice.

Entertaining family or friends? Lamb gyros serve as a crowd-pleaser, with customizable ingredients to cater to varied preferences. The preparation is straightforward, keeping your culinary endeavors stress-free. In terms of cost, they are surprisingly economical. Opt for tender lamb cuts without breaking the bank, especially when you balance with budget-friendly sides.

Historical Background and Cultural Significance


Lamb gyros trace back to the heart of Greek street food culture, echoing the traditional preparation of skewered meats dating back to ancient times. Throughout history, the gyro has become a symbol of Mediterranean gastronomy, celebrated for its simplicity and flavor appeal. The concept has evolved through geographical migrations and cultural exchanges.

Regional variations have emerged, with notable differences in spices used or the choice of accompanying sauces. Yet, the base remains authentically Greek, rooted in a people’s love for fresh and aromatic dishes that bring communities together.

Ingredient Deep Dive


Lamb, the star of this dish, carries a rich cultural heritage, frequently featured in celebratory and communal meals across Mediterranean societies. Loaded with high-quality protein and essential vitamins, it’s a nutrient powerhouse. Opt for fresh boneless lamb shoulder or leg for the best flavor and tenderness, storing it refrigerated, and using it within a couple of days for peak freshness.

Tzatziki, a Greek staple, adds a refreshing and creamy dimension. Made from yogurt, cucumber, and garlic, it’s both flavorful and nutritious, a source of probiotics and a great way to add moisture to your dish. Make in advance and store in an airtight container, keeping its flavors intact for up to three days in the fridge.

Common Mistakes to Avoid

  • Over-marinating lamb can lead to an overpowering flavor that masks its natural taste.
  • Using stale pita bread impacts texture; opt for fresh or homemade versions.
  • Skimping on herbs and spices deprives the meat of authentic gyro flavors.
  • Incorrect grilling temperatures can leave the lamb either dry or undercooked.
  • Neglecting to rest the cooked meat for a few minutes affects tenderness.
  • Overloading the pita with filling leads to messy eating; balance is key.
  • Using low-fat yogurt in tzatziki reduces its creamy texture.
  • Forgetting to pat the cucumber dry in tzatziki can make it watery.
  • Skipping the cooling time for tzatziki hinders full flavor development.
  • Failing to season veggies impacts overall taste complexity.

Essential Techniques


Grilling the lamb to perfection is crucial, ensuring a tender texture and deep flavor. Begin with a preheated grill to create a deep sear, locking juicy goodness inside. Resting the cooked lamb before serving lets the juices redistribute, enhancing every bite’s luxury.

Tzatziki’s freshness defines the gyro’s profile— mastering it requires patience and balance, using high-quality yogurt and properly strained cucumber to achieve a creamy and thick consistency. Combining herbs and garlic requires a touch of restraint to prevent overpowering the sauce.

Pro Tips for Perfect Lamb Gyros


Allow marinades to soak into lamb for at least two hours for optimal infusion of flavors without overpowering. Choose high-quality bread for the best gyro experience; lightly toasting can add a delightful crunch. When assembling gyros, layer ingredients thoughtfully to showcase textures and visual appeal.

Experiment with spices to tailor flavor combinations to personal preference. For busy cooks, prep components a day ahead—this reduces kitchen stress and enhances flavors as they meld in storage. When making tzatziki, consider incorporating a splash of fresh lemon juice before serving for vibrant acidity that revitalizes the dish.

Variations and Adaptations


Regional gyro variations abound: the Middle Eastern take may introduce hummus, while some might opt for sweet notes like cinnamon or nutmeg in their spice blend. Seasonal adaptations include incorporating summer-fresh bell peppers or opting for fall-spiced lamb with a hint of clove.

For dietary considerations, substitute traditional pita with gluten-free alternatives or explore low-carb wraps. Vegans can recreate the dish using seasoned seitan or tofu. Enhancing flavors could involve smoked paprika or roasted garlic for added depth, and a swap of lamb for chicken caters to lighter dining preferences.

Serving and Presentation Guide


For an elegant presentation, consider rolling gyros tightly to retain the fillings, slicing each for bite-sized servings. Garnish with fresh herbs like parsley or dill for a pop of color. Traditional accompaniments such as olive salad or a small dollop of tzatziki on the side can elevate the visual appeal and flavor pairing.

Modern iterations might include serving deconstructed gyros in a bowl format, offering a refreshing twist. Serve chilled beverages alongside this dish to contrast the hearty flavors—consider a serving platter to manage portions easily for groups.

Wine and Beverage Pairing


Pair lamb gyros with full-bodied red wines, such as a Greek Xinomavro or Merlot, to complement the meat’s richness. For those preferring non-alcoholic options, a chilled glass of mint-infused lime juice adds a refreshing counterbalance.

Coffee drinkers may appreciate a Greek-style frappe, its bold flavors harmonizing with the gyro’s savory elements. All beverages should be served cool to accentuate the gyro’s flavor profile without overpowering it. Offering a variety ensures accommodation of all guests’ preferences.

Storage and Shelf Life


Store cooked lamb and tzatziki separately in airtight containers to prevent cross-contamination of flavors. Keep refrigerated for up to three days, ensuring they remain sealed to maintain freshness. Signs of spoilage include a sour smell or change in color, both calling for disposal.

For reheating, gently warm lamb over low heat to avoid drying out. Tzatziki should be served cold for the best taste balance. Lamb can be frozen for longer storage, though fresh is preferred for noticeable flavor differences.

Make Ahead Strategies


You can efficiently incorporate lamb gyros into your meal prep cycle, marinating lamb a day in advance to intensify its flavor. Store chopped vegetables separately to maintain crispness, assembling all elements shortly before mealtime for peak freshness.

Once assembled, artisanal gyros can maintain quality when slightly cooled, enhancing the natural blending of flavors. Aim to add fresh elements like herbs only before serving to preserve their vibrancy and aromatic appeal.

Scaling Instructions


For halving the recipe, maintaining precise measurements is key, specifically with spices, to preserve the authentic balance. When doubling or tripling the recipe, ensure your kitchen equipment can accommodate the increased volume, such as larger grill space or storage capacity.

Timing may need adjusting; grill larger portions more slowly to ensure uniform cooking. When storing larger batches, divide servings into smaller containers for ease, avoiding spoilage and promoting efficient reheating.

Nutritional Deep Dive


Protein-packed lamb gyros offer sustained energy and muscle repair benefits. Rich in zinc, iron, and B vitamins, these nutrients support immune function and energy production. Tzatziki contributes beneficial probiotics and calcium through yogurt.

For those managing caloric intake, mindful portion control of pita and additional toppings can balance a healthier meal approach. Vegetarians can use plant-based proteins to modify while retaining nutritional density.

Dietary Adaptations


For those gluten-sensitive, opting for gluten-free pita allows continued enjoyment. Dairy-free tzatziki is achievable by using coconut yogurt alternatives, ensuring similar textures. Vegans can duplicate the gyro essence using marinated tofu or jackfruit.

Low-carb versions replace pita with lettuce wraps, maintaining a satisfying crunch without extra carbohydrates. Keto enthusiasts benefit from high-fat, low-carb yogurt options in their tzatziki, complementing the lamb’s nutritious profile.

Troubleshooting Guide


Resolve dry lamb issues by marinating properly and not overcooking. Tighten weak spices by revisiting measurements, ensuring adherence to blending recommendations. Adjust cooking temperature if grill settings introduce inconsistencies, using visual cues like color and texture.

Relieve timing struggles with a practice run prior to a main event, developing proficiency. Equipment shortages can often be creatively bypassed using household items like a stovetop grill pan if a true grill is unavailable.

Recipe Success Stories


Community members have shared joy in mastering lamb gyros, with tales of simple yet stunning kitchen triumphs. Substitute success is common, with lamb swaps to other proteins seamlessly complementing Mediterranean spirit.

Engaged readers contribute valuable insights, offering tips such as freezing leftover lamb for future creations. Capture these special occasions with photography that showcases contrasts of colors and textures—visual records that inspire and inform.

Frequently Asked Questions

Can I make gyros with a different type of meat?
Absolutely! Chicken and beef are popular alternatives, adjusting marinade spices to suit the meat choice.

How do I prevent the lamb from being chewy?
Ensure you’re using the correct lamb cuts—shoulders or legs are ideal. Also, do not overcook and rest before slicing to relax the meat fibers.

Can tzatziki be prepared in advance?
Yes, preparing tzatziki a day prior allows flavors to meld, enhancing taste and ensuring it’s ready when needed.

What’s the best way to reheat lamb gyros?
Gently warm the lamb in a skillet or over a grill, avoiding high heat to prevent drying. Tzatziki should remain chilled.

Do I need a special grill for lamb gyros?
No special equipment is needed; a stove-top grill pan suffices if a traditional grill is unavailable.

Are there plant-based gyro options?
Yes, plant-based proteins like seasoned tofu or seitan can successfully recreate the gyro texture and taste.

Can lamb gyros be made spicy?
Integrate chili powder or crushed red pepper into the marinade for an added kick, adjusting to your spice preference.

How can I keep pitas fresh?
Store pitas in a sealed bag to prevent drying or heat briefly for added softness before serving.

Can leftovers be frozen?
Cooked lamb can be frozen, maintaining quality, though fresh preparations offer superior taste.

What side dishes complement gyros?
Greek salad, orzo, or roasted vegetables make excellent companions, enhancing the Mediterranean experience.

Should gyros be served warm or cold?
They are typically enjoyed warm with chilled tzatziki, providing a dynamic temperature contrast.

How can I add more greens to my gyros?
Layer spinach or arugula into the gyro for an extra nutritional boost and vibrant color.

Additional Resources


For more inspiration, explore related Mediterranean recipes such as falafel or couscous salad. Consider technique guides focusing on perfecting grill marks or mastering the art of homemade pita bread.

Delve into ingredient choices like exploring different lamb breeds and their flavor profiles, enhancing your understanding of how to achieve authentic culinary experiences. Seasonal variations offer fresh takes on traditional recipes, keeping your kitchen adventurous and exciting.

Join the Conversation


Engage with fellow cooking enthusiasts by sharing your lamb gyro creations on social media. Use filters and lighting techniques for captivating food photography that highlights your dish’s vibrant details, and invite others to review and comment on your recipe adventures.

Encourage community members to suggest innovative gyro variations or time-saving tips. Participate in recipe swaps, broadening your palate and repertoire with shared knowledge and diverse perspectives.

The Recipe

Lamb Gyros

Serves: 4

Prep Time: 20 mins

Cook Time: 15 mins

Total Time: 35 mins

Kitchen Equipment Needed

  • Grill or stovetop grill pan
  • Mixing bowls
  • Sharp knife
  • Cutting board

Ingredients

  • 1 lb lamb shoulder or leg, thinly sliced
  • 4 pita breads
  • 1 cup tzatziki sauce
  • 2 tablespoons olive oil
  • 1 teaspoon ground cumin
  • 1 teaspoon ground coriander
  • 1 teaspoon paprika
  • Salt and pepper to taste
  • 1 cup sliced tomatoes
  • 1 cup sliced red onions
  • 1 cup shredded lettuce

Directions

  1. Combine olive oil, cumin, coriander, paprika, salt, and pepper in a bowl. Add lamb slices, and coat evenly. Marinate for at least 2 hours.
  2. Preheat grill to medium-high heat. Grill lamb slices for 3-4 minutes on each side until cooked through and tender.
  3. Warm pita breads on the grill for about 1 minute on each side.
  4. Assemble gyros by layering lamb, tomatoes, onions, lettuce, and tzatziki onto each pita.
  5. Wrap pitas tightly and serve warm.

Recipe Notes

  • For added spice, include a pinch of chili flakes in the marinade.
  • Consider a side of hummus or roasted vegetables for a complete meal.

Ultimate Comfort: The Best Goulash Recipe for Cozy Dinners

The Best Goulash: A Cozy Classic for Any Occasion

⚖️
Difficulty
Easy

⏲️
Prep Time
15 mins

🕒
Cook Time
45 mins

⏱️
Total Time
60 mins

🍽️
Servings
5

Discover the rich, hearty flavors of the best goulash, a dish that promises to warm your heart and fill your home with delicious aromas. This savory meal brings together the robust taste of paprika-infused beef, tender noodles, and delightful hints of carrots and bell peppers. Ideal for weeknight dinners or cozy get-togethers, it’s a splendid comfort food that offers a taste of tradition with every bite.

Quick Recipe Highlights

  • Flavor Profile: The best goulash is a savory delight, combining sweet paprika, tender beef, and the subtle zing of tomatoes for a truly unforgettable taste.
  • Texture: Expect a luscious blend of tender beef, soft noodles, and the slight crunch of bell peppers, creating a perfect harmony in each mouthful.
  • Aroma: The scent of slow-cooked beef melded with paprika and garlic will beckon everyone to the table with its comforting and inviting aroma.
  • Visual Appeal: This dish is a vibrant masterpiece with its reddish hue, punctuated by rich brown beef chunks and bright vegetable slices.
  • Skill Level Needed: Simple enough for beginners, while offering flavor complexity that even seasoned cooks will appreciate.
  • Special Equipment: A large pot or Dutch oven is essential for simmering the goulash to perfection, ensuring even cooking and melding of flavors.

Recipe Overview

  • Difficulty Level: This goulash recipe is marked as easy, requiring minimal culinary skills due to straightforward chopping and simmering processes.
  • Category: Perfect for dinners and meal prep, this dish is categorized as a main course that satisfies with its hearty ingredients and rich flavors.
  • Cuisine: Rooted in Hungarian cuisine, the goulash brings Eastern European flavors to your table, admired for its rustic and authentic taste.
  • Cost: With common, budget-friendly ingredients, crafting this dish is an economical choice that doesn’t compromise on taste or satisfaction.
  • Season: Ideal for autumn and winter months due to its warming qualities, yet equally delightful as a comforting meal year-round.
  • Occasion: Suitable for family dinners, casual gatherings, or meal prepping for busy weeks, goulash suits a variety of occasions.

Why You’ll Love This Recipe


The best goulash captures the essence of comfort with its robust flavors and satisfying ingredients. Each bite offers a mix of savory notes and tender textures, ensuring a dining experience that delights the senses. The simplicity of preparation makes it a convenient choice for busy weeknights, while also serving as a delightful dish for entertaining guests. Nutritionally, this meal provides a wholesome, balanced option loaded with proteins and vegetables. Hosting a meal with goulash allows for a culinary journey that sparks conversation and enjoyment among friends and family. Its cost-effectiveness and accessibility of ingredients ensure that it’s a beloved choice across different households.

Historical Background and Cultural Significance


Originating in Hungary, goulash is a dish steeped in history, renowned as a symbol of Hungarian heritage across the world. Traditionally served by herdsmen, it was prepared with beef and condiments that traveled well. Over centuries, it evolved from an outdoor meal to a beloved household dish, with regional variations emerging across Europe. These adaptations showcase the diversity and adaptability of goulash, each maintaining a cultural essence while introducing local twists. Today, goulash stands as an emblem of unity and cultural richness—simple yet profound.

Ingredient Deep Dive


Paprika, the spice that defines goulash, holds pride of place in Hungarian kitchens. Rich in vitamins A and C, paprika adds warmth and depth. To ensure quality, choose a vibrant, aromatic brand, storing it in a cool, dry place to preserve its potency. Goulash welcomes paprika in both sweet and hot varieties, allowing you to customize the spice level. Substituting smoked paprika adds a new dimension for those seeking a smoky taste.

Common Mistakes to Avoid

  • Overcooking the beef: Use a low, slow cooking method to keep beef tender.
  • Skipping paprika: Paprika is crucial for authentic taste; skipping it leads to blandness.
  • Using the wrong cut of beef: Avoid lean cuts; choose chuck or brisket for best results.
  • Ignoring simmer time: Adequate simmering allows flavors to meld beautifully.
  • Misjudging consistency: Ensure a balance between thick stew and soupy dish.
  • Not seasoning properly: Sample throughout to ensure balanced seasoning.
  • Using too much liquid: Avoid a watery goulash by adding liquids mindfully.
  • Allowing burn: Stir occasionally to prevent the bottom from burning.

Essential Techniques


Searing the beef is crucial for flavor development, providing rich, caramelized notes that deepen the dish. Start with a hot pot to achieve a good sear, cooking in batches to avoid overcrowding. Simmering is equally vital, allowing flavors to meld and meat to tenderize. Remember: patience and time equal depth of flavor.

Pro Tips for Perfect Goulash


For a creamier consistency, mix part of the stew’s broth with sour cream before serving. To enhance flavor, consider adding a bay leaf and caraway seeds during simmering. Use a splash of red wine for depth and richness, if desired. To thicken, mash some vegetables and stir them back in. Consider fresh herbs as a garnish for added freshness. Aim for a balance of broth and meat to avoid it being too soupy.

Variations and Adaptations


Goulash allows for endless variations to suit diverse palates and dietary needs. Embrace its Serbian version with smoked pork or try the Czech adaptation with dumplings. Adapt the recipe for seasons: add fresh winter root vegetables or summer squash. Explore health-conscious options by using whole-grain pasta or zoodles in place of traditional noodles.

Serving and Presentation Guide


Goulash thrives when accompanied by rustic bread, ideal for soaking up rich sauce. Serve in deep bowls to retain warmth, garnished with fresh parsley or a dollop of sour cream. For a modern touch, present alongside a vibrant side salad with acidic dressing. Consider warmer servings in winter and lighter presentations incorporating garden greens in summer.

Wine and Beverage Pairing


Red wines, especially those with earthy tones, harmonize beautifully with goulash. Consider Chianti or Pinot Noir for a pleasing match. For non-alcoholic options, a tart cherry juice or herbal tea complements well. Coffee pairs elegantly for post-dinner relaxation, offering a robust end to a hearty meal.

Storage and Shelf Life


Store leftover goulash in airtight containers, refrigerated for up to four days. Freezing is possible for up to three months, allowing for convenient meal planning. Reheat gently on the stovetop, adding a splash of broth if needed to maintain texture. Ensure consumption is within guidelines to enjoy peak flavor while avoiding spoilage.

Make Ahead Strategies


Prepare broth elements in advance and store separately, combining them fresh for assembly. Cook in stages if needed, refrigerating between periods while locking in flavors. Achieve success by stirring gently upon reheating and incorporating herbs just before serving to brighten the dish anew.

Scaling Instructions


Easily scale the best goulash up or down, adjusting quantities while maintaining ingredient ratios. When doubling, consider using multiple pots or larger Dutch ovens to ensure even cooking. Adjust seasoning to taste as portions increase and plan storage for leftovers.

Nutritional Deep Dive


Goulash offers a balanced meal rich in proteins and veggies. Lean beef provides iron and B vitamins, while paprika adds antioxidants. Ensure proper portion sizes by balancing carb sources such as noodles within dietary goals. It’s a heartening meal supporting an active lifestyle.

Dietary Adaptations


For a gluten-free version, substitute traditional noodles with gluten-free pasta or rice. Create a dairy-free delight by omitting sour cream; enhance richness with coconut milk if needed. Vegans can enjoy a version with hearty mushrooms and plant-based protein substitutes, maintaining its robust nature.

Troubleshooting Guide


If the goulash is overly thick, introduce more broth gradually to loosen. For blandness, enhance with additional paprika or a touch of salt incrementally. Should beef be tough, prolong simmering until tender and succulent. Consider flavor balance when modifying ingredients to maintain satisfying depth.

Recipe Success Stories


Join our community delighted by successful variations. A reader replaced beef with turkey and was thrilled by a lighter texture. Another used sweet potatoes yielding an unexpected yet flavorful twist. Share experiences and photos, celebrating the diversity within this beloved dish.

Frequently Asked Questions

Q: Can I make goulash in advance?

A: Yes, it’s perfect for make-ahead meals. Prepare early, cool, and refrigerate until serving day. Reheat gently.

Q: What’s the best beef cut for goulash?

A: Opt for well-marbled cuts like chuck or brisket. These become tender and flavorful with slow cooking.

Q: Can I freeze goulash?

A: Absolutely. Allow it to cool, then store in airtight containers for up to three months. Thaw overnight in the fridge before reheating.

Q: How do I thicken my goulash?

A: Use flour or cornstarch mixed with water and add during the simmering stage for the desired consistency.

Q: Can I add more vegetables?

A: Certainly! Experiment with seasonal veggies for added nutrition and variety like zucchini or green beans.

Q: Do I have to use tomato paste?

A: Tomato paste adds depth and richness, but can be adjusted to your taste preference or substituted with tomato puree.

Q: Is wine necessary in goulash?

A: While it enriches flavor, wine is optional. Replace it with broth or water if desired.

Q: What if my goulash is too salty?

A: Add sliced potatoes during the final few minutes of cooking. They can absorb excess salt.

Q: How do I keep leftovers fresh?

A: Store in airtight containers within two hours of cooking and refrigerate or freeze promptly.

Q: Can goulash be spicy?

A: Certainly, spice lovers can add chili flakes or hot paprika, adjusting until reaching the desired heat level.

Additional Resources


Explore complementary recipes like homemade Hungarian bread to accompany your goulash. Enhance your technique with guides on perfecting stew textures. Familiarize yourself with paprika varieties and their role across global cuisines for richer culinary knowledge.

Join the Conversation


Engage with us on social media, sharing photos and stories of your goulash creations. Offer tips, post reviews, and explore a growing community passionate about culinary diversity and comfort food reimagined.

The Recipe

The Best Goulash

Serves: 5

Prep Time: 15 mins

Cook Time: 45 mins

Total Time: 60 mins

Kitchen Equipment Needed

  • Large Dutch oven
  • Sharp chef’s knife
  • Cutting board
  • Wooden spoon

Ingredients

  • 1 pound beef chuck, cubed
  • 2 tablespoons olive oil
  • 1 large onion, chopped
  • 3 cloves garlic, minced
  • 1 tablespoon sweet paprika
  • 1 teaspoon caraway seeds
  • 2 carrots, sliced
  • 1 red bell pepper, diced
  • 1 can (14.5 oz) diced tomatoes
  • 3 cups beef broth
  • Salt and pepper to taste
  • 2 cups egg noodles

Directions

  1. In a large Dutch oven, heat olive oil over medium heat. Add beef and sear until browned all over. Remove and set aside.
  2. Add onions to the pot, sautéing until translucent. Stir in garlic, paprika, and caraway seeds till aromatic.
  3. Return beef to the pot. Add carrots, bell pepper, tomatoes, and beef broth. Bring to a simmer.
  4. Reduce heat, cover, and let simmer gently until the beef is tender, about 45 minutes.
  5. Before serving, cook egg noodles according to package instructions. Stir into goulash or serve alongside.
  6. Season with salt and pepper to taste. Garnish with fresh parsley if desired.

Recipe Notes

  • For a heartier meal, incorporate additional root vegetables like potatoes or parsnips.
  • Adjust the thickness by allowing goulash to simmer uncovered for a few minutes if desired.