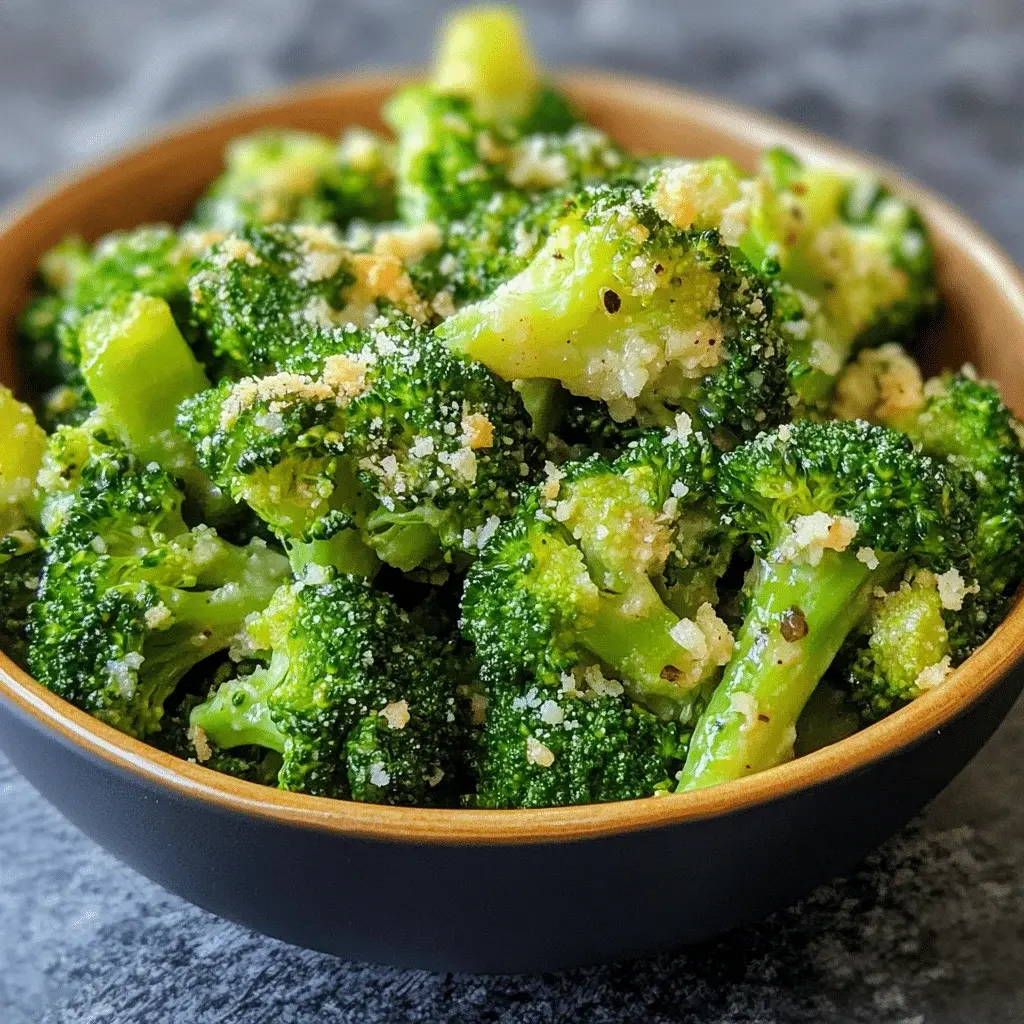
Best Roasted Potatoes with Baked Feta and Garlic

best-roasted-potatoes-baked-feta

Introduction

Hi there! I’m Emily, the heart and soul behind brekcakes.com. From my earliest memories, the kitchen has always been a place of warmth and creativity. It’s where I discovered the magic of turning simple ingredients into extraordinary meals and learned that the best dishes are often made with love as the main ingredient.

There’s something undeniably comforting about a dish that brings people together, and that’s exactly what Roasted Potatoes with Baked Feta and Garlic does. Whether you’re hosting a cozy dinner or simply craving a hearty side, this recipe wraps you in warmth with every bite. Plus, it’s incredibly versatile—perfect for weeknights yet elegant enough for special occasions. Trust me, once you try it, you’ll understand why it’s become a staple in my kitchen.

Roasted Potatoes with Baked Feta and Garlic is a celebration of simplicity and flavor. Crispy golden potatoes mingle with creamy, tangy feta and aromatic roasted garlic, creating a harmony of textures and tastes. What makes this dish special is how effortlessly it elevates humble ingredients into something extraordinary. It’s the kind of recipe that fits right into the brekcakes.com ethos—approachable, delicious, and made with heart. If you love easy yet impressive dishes, you’ll adore this one as much as my Garlic Herb Roasted Chicken or my Creamy Tuscan Soup. Whether you’re a seasoned cook or just starting out, this recipe promises to delight.

Why I Love This Recipe

Roasted Potatoes with Baked Feta and Garlic holds a special place in my heart because it reminds me of Sunday dinners with my family. The aroma of garlic and herbs filling the kitchen instantly transports me back to those cherished moments. More than that, I love how this dish brings people together—it’s the first to disappear at potlucks and the one friends always ask me to make. Simple, satisfying, and full of flavor, it’s a recipe that feels like home.

Health and Nutrition

Why it’s good for your body

Roasted Potatoes with Baked Feta and Garlic packs a nutritious punch while delighting your taste buds. First, potatoes provide a solid dose of complex carbohydrates, which fuel your energy levels throughout the day. Additionally, they offer fiber to support digestion and keep you feeling full longer. Meanwhile, the baked feta adds a creamy richness along with protein and calcium for strong bones and muscles.

Garlic, a star ingredient in this dish, brings powerful antioxidants and immune-boosting properties. Studies even suggest it may help lower blood pressure and cholesterol. Furthermore, roasting the ingredients preserves their nutrients better than frying, so you get maximum benefits without excess oil. The olive oil drizzle contributes heart-healthy fats, making Roasted Potatoes with Baked Feta and Garlic a balanced choice.

Finally, this dish combines savory flavors with wholesome ingredients, proving that healthy eating doesn’t mean sacrificing taste. Whether you enjoy it as a side or a main, Roasted Potatoes with Baked Feta and Garlic delivers both satisfaction and nourishment in every bite.

How it fits in a healthy lifestyle

Roasted Potatoes with Baked Feta and Garlic fits seamlessly into a balanced diet. For gluten-free eaters, it’s a naturally safe option, and its high fiber content supports gut health. If you’re focusing on heart health, the olive oil and garlic work together to promote better circulation and lower inflammation.

This dish also pairs well with lean proteins or a crisp salad for a complete meal. If you’re meal prepping, it reheats beautifully, making weekday lunches both easy and nutritious. For more gluten-free meal ideas, check out our gluten-free dinner roundup. And if you love balancing flavor and nutrition, our healthy comfort food guide offers plenty of inspiration. Roasted Potatoes with Baked Feta and Garlic proves that smart eating can be simple, delicious, and adaptable to any lifestyle.

Print
clock clock iconcutlery cutlery iconflag flag iconfolder folder iconinstagram instagram iconpinterest pinterest iconfacebook facebook iconprint print iconsquares squares iconheart heart iconheart solid heart solid icon

Roasted Potatoes with Baked Feta and Garlic


  • Author: Chef Emy

Description

A delicious and comforting dish featuring crispy roasted potatoes paired with creamy baked feta and roasted garlic.


Ingredients

Scale

For the Crust:

  • 1.5 lbs baby potatoes, halved
  • 8 oz feta cheese block
  • 4 cloves garlic, peeled
  • 3 tbsp olive oil
  • 1 tsp dried oregano
  • 1/2 tsp paprika
  • Salt and pepper to taste
  • Fresh parsley for garnish

Instructions

1. Prepare the Crust:

  1. Preheat oven to 400°F (200°C).
  2. Toss potatoes with 2 tbsp olive oil, oregano, paprika, salt, and pepper. Spread on a baking sheet.
  3. Place feta block in the center of the baking sheet. Drizzle with remaining olive oil and top with garlic cloves.
  4. Bake for 25-30 minutes until potatoes are golden and feta is soft.
  5. Garnish with fresh parsley before serving.

Notes

You can customize the seasonings to taste.

How to Prepare This Dish

Steps and time-saving tips

Start by preheating your oven to 400°F to ensure even cooking for your Roasted Potatoes with Baked Feta and Garlic. While the oven heats, scrub and chop the potatoes into even one-inch cubes so they roast uniformly. Toss them in a large bowl with olive oil, salt, and pepper until fully coated. Spread them in a single layer on a parchment-lined baking sheet to prevent sticking and promote crispiness. Meanwhile, place a block of feta in the center of a small oven-safe dish and surround it with whole garlic cloves. Drizzle everything with olive oil and a sprinkle of dried oregano for extra flavor. Slide both the potatoes and feta into the oven, roasting the potatoes for 35-40 minutes and the feta for just 20. Halfway through, flip the potatoes for even browning. Once golden, remove both trays and let the feta cool slightly before crumbling it over the potatoes. For a time-saving twist, prep the potatoes the night before and store them covered in the fridge. If you’re short on time, parboil the potatoes for five minutes to speed up roasting.

Mistakes I’ve made and learned from

I once rushed the prep and unevenly chopped my potatoes, which led to some pieces turning mushy while others stayed undercooked. Now I take an extra minute to measure uniform sizes—trust me, it’s worth it. Another blunder? Overcrowding the baking sheet, which steamed the potatoes instead of crisping them. Spreading them out made all the difference, just like I learned in my guide to perfect roasted vegetables. And don’t skip the parchment paper unless you enjoy scraping pans! The feta can also dry out if baked too long, so I set a timer religiously. For more cheese-saving tricks, check out my baking with feta tips. These small tweaks transformed my dish from mediocre to foolproof.

Cultural Connection and Variations

Where this recipe comes from

Roasted Potatoes with Baked Feta and Garlic feels like a love letter to Mediterranean flavors, where simple ingredients shine. The dish likely draws inspiration from Greek and Turkish kitchens, where feta and olive oil turn humble potatoes into something extraordinary. In Greece, cooks often toss potatoes with oregano and lemon, while Turkish versions might add smoky paprika or fresh herbs like dill.

My grandmother made her own spin by layering thinly sliced potatoes with crumbled feta and garlic, then roasting them until the edges crisped. Meanwhile, in Northern Europe, you might find similar dishes with caraway seeds or a splash of cream for richness. No matter the variation, Roasted Potatoes with Baked Feta and Garlic always delivers comfort with every bite.

Seasonally, this dish adapts beautifully. Summer cooks might add cherry tomatoes or zucchini, while winter versions lean on rosemary and thyme. Some families even serve it as a centerpiece during holidays, proving that good food needs no fancy labels—just good company.

How it fits in today’s cooking

Today, Roasted Potatoes with Baked Feta and Garlic fits perfectly into our fast-paced lives. It’s a one-pan wonder for weeknights, yet fancy enough for dinner parties. Modern cooks love swapping ingredients—try vegan feta or sweet potatoes for a twist. Plus, it pairs effortlessly with other Mediterranean staples, like our Grilled Lemon Herb Chicken or a crisp salad.

Social media has given this dish a second life, too. Food bloggers highlight its versatility, and meal preppers adore how well it reheats. Whether you’re craving nostalgia or exploring global flavors, this recipe bridges the gap. For more easy crowd-pleasers, check out our Garlic Butter Shrimp Pasta—another dish that proves simplicity wins every time.

Taste and Texture

What makes it delicious

Roasted Potatoes with Baked Feta and Garlic deliver a symphony of textures and flavors in every bite. The potatoes turn golden and crisp on the outside while staying fluffy inside, creating a satisfying contrast. Meanwhile, the feta softens into a creamy, tangy pool that clings to each potato wedge. Garlic roasts alongside, becoming mellow and sweet, infusing the dish with its warm, fragrant aroma. A hint of herbs like rosemary or thyme adds an earthy depth, making Roasted Potatoes with Baked Feta and Garlic irresistible from the first whiff to the last forkful.

Boosting the flavor

Elevate your Roasted Potatoes with Baked Feta and Garlic by tossing in a handful of kalamata olives for a briny punch or drizzling with a bright lemon herb sauce to cut through the richness. For extra heat, sprinkle crushed red pepper flakes before baking. If you love bold flavors, try swapping feta for tangy goat cheese or adding a spoonful of sun-dried tomato pesto for a savory twist. A final garnish of fresh parsley or chives keeps the dish vibrant and fresh.

Tips for Success

Best practices for results

Cut your potatoes into even-sized pieces so they roast uniformly. Meanwhile, always toss them in oil before baking to ensure a crispy exterior. For the best flavor, roast the garlic cloves whole with the potatoes until they turn soft and caramelized. Additionally, place the feta block in the center of the pan so it melds with the other ingredients as it bakes. Finally, let your Roasted Potatoes with Baked Feta and Garlic rest for a few minutes after baking—this helps the flavors blend beautifully.

Mistakes to avoid

Avoid overcrowding the pan, as this steams the potatoes instead of roasting them. Instead, spread them in a single layer with space between each piece. Also, don’t skip preheating the oven—a hot start ensures the Roasted Potatoes with Baked Feta and Garlic cook evenly. If you struggle with dry feta, check out our guide on choosing the right cheese for tips on picking a creamy block. For more roasting tricks, our perfect roasted vegetables post covers ideal temperatures and timing.

Serving and Pairing Suggestions

How to serve this dish

Roasted Potatoes with Baked Feta and Garlic shines as a versatile dish perfect for both casual dinners and special occasions. For a rustic yet elegant presentation, serve it straight from the baking dish with a sprinkle of fresh parsley or dill. Alternatively, transfer the potatoes and creamy feta to a platter, drizzle with extra olive oil, and add lemon wedges for a bright touch. This dish makes a fantastic centerpiece for holiday gatherings, but it also works wonderfully for weekend brunch alongside eggs or avocado toast. To elevate the visual appeal, scatter pomegranate seeds or chopped chives on top for a pop of color.

What goes well with it

Pair Roasted Potatoes with Baked Feta and Garlic with a crisp white wine like Sauvignon Blanc to balance the richness of the feta. For a non-alcoholic option, try sparkling water with a squeeze of lemon or a refreshing iced herbal tea. If you want to turn this into a full meal, serve it with a light salad like our Mediterranean Chopped Salad for contrast. Another great match is grilled chicken or our Lemon Herb Salmon, which adds a protein boost while letting the flavors of the dish stand out.

What type of potatoes work best for roasted potatoes with baked feta and garlic?

Yukon Gold or baby potatoes are ideal for roasted potatoes with baked feta and garlic because they hold their shape well and develop a creamy interior. Russet potatoes also work but may require slightly longer roasting. Avoid waxy varieties like red potatoes if you prefer a crispier texture.

Can I substitute the feta cheese in roasted potatoes with baked feta and garlic?

Yes, goat cheese or ricotta can replace feta in roasted potatoes with baked feta and garlic, though the flavor profile will change. For a vegan option, try crumbled tofu with nutritional yeast. Authentic feta provides the best tangy, salty contrast to the dish.

How long should I roast potatoes with feta and garlic?

Roast potatoes with feta and garlic for 35-45 minutes at 400°F (200°C), stirring halfway. The potatoes should be golden and fork-tender, while the feta becomes slightly caramelized. Smaller potato cuts will cook faster, so adjust timing accordingly.

What herbs pair well with roasted potatoes with baked feta and garlic?

Rosemary, thyme, and oregano complement roasted potatoes with baked feta and garlic beautifully. Fresh parsley or dill added after baking brightens the dish. For Mediterranean flair, try a sprinkle of za’atar or dried mint with the feta.

Best Roasted Potatoes with Baked Feta and Garlic

best-roasted-potatoes-baked-feta

Introduction

Hi there! I’m Emily, the heart and soul behind brekcakes.com. From my earliest memories, the kitchen has always been a place of warmth and creativity. It’s where I discovered the magic of turning simple ingredients into extraordinary meals and learned that the best dishes are often made with love as the main ingredient.

There’s something undeniably comforting about a dish that brings people together, and that’s exactly what Roasted Potatoes with Baked Feta and Garlic does. Whether you’re hosting a cozy dinner or simply craving a hearty side, this recipe wraps you in warmth with every bite. Plus, it’s incredibly easy to make, which means more time savoring and less time stressing. Trust me, once you try it, you’ll understand why it’s become a staple in my kitchen.

Roasted Potatoes with Baked Feta and Garlic is a dish that celebrates simplicity without sacrificing flavor. Crispy golden potatoes mingle with creamy, tangy feta and aromatic roasted garlic, creating a harmony of textures and tastes. What makes it special is how effortlessly it elevates a weeknight meal or impresses guests at a gathering. It aligns perfectly with brekcakes.com’s philosophy of approachable yet unforgettable recipes. If you love dishes that feel like a hug on a plate, you’ll adore this one. For more inspiration, check out my guide to easy weeknight dinners or explore comfort food classics that never disappoint.

Why I Love This Recipe

Roasted Potatoes with Baked Feta and Garlic holds a special place in my heart because it reminds me of Sunday dinners with my family. The aroma of garlic and herbs filling the kitchen instantly transports me back to those cherished moments. Beyond nostalgia, I love how versatile it is—whether paired with a juicy roast chicken or enjoyed on its own, it never fails to delight. Most importantly, it’s a recipe that invites you to slow down and savor the little joys, something we all need more of in our busy lives.

Health and Nutrition

Why it’s good for your body

Roasted Potatoes with Baked Feta and Garlic packs a nutritious punch while delighting your taste buds. First, potatoes provide complex carbohydrates for steady energy, and roasting them preserves more fiber than boiling. Meanwhile, feta cheese adds a protein boost and essential calcium for strong bones. Plus, garlic not only enhances flavor but also offers immune-boosting compounds like allicin.

Additionally, this dish delivers healthy fats from olive oil, which supports heart health and helps your body absorb fat-soluble vitamins. The combination of roasted potatoes and baked feta creates a satisfying meal that keeps you full longer, reducing the urge to snack on less nutritious options. Furthermore, the herbs and spices often used in this recipe, like rosemary or thyme, contribute antioxidants that fight inflammation.

Finally, Roasted Potatoes with Baked Feta and Garlic balances indulgence with nourishment. The dish avoids excessive processed ingredients, making it a wholesome choice for any meal. Whether you need a hearty side or a light main course, this recipe fuels your body without compromising on flavor.

How it fits in a healthy lifestyle

Roasted Potatoes with Baked Feta and Garlic fits seamlessly into a balanced diet. For gluten-free eaters, this dish naturally avoids gluten while still offering rich flavors. If you follow a Mediterranean-inspired eating plan, the olive oil, feta, and fresh herbs align perfectly with heart-healthy principles. Even better, the protein from feta helps maintain muscle, especially when paired with an active routine.

You can easily incorporate this recipe into weekly meal prep since it reheats well and pairs with lean proteins or salads. For more ideas on balancing meals, check out our guide to easy meal prep strategies. If you’re exploring other nutrient-dense dishes, our vegetarian protein sources roundup complements this recipe beautifully. With simple ingredients and flexible serving options, Roasted Potatoes with Baked Feta and Garlic makes healthy eating both effortless and enjoyable.

Print
clock clock iconcutlery cutlery iconflag flag iconfolder folder iconinstagram instagram iconpinterest pinterest iconfacebook facebook iconprint print iconsquares squares iconheart heart iconheart solid heart solid icon

Roasted Potatoes with Baked Feta and Garlic


  • Author: Chef Emy

Description

A delicious and comforting dish featuring crispy roasted potatoes paired with creamy baked feta and roasted garlic.


Ingredients

Scale

For the Crust:

  • 1.5 lbs baby potatoes, halved
  • 8 oz block feta cheese
  • 4 cloves garlic, minced
  • 2 tbsp olive oil
  • 1 tsp dried oregano
  • 1/2 tsp smoked paprika
  • Salt and pepper to taste
  • Fresh parsley for garnish

Instructions

1. Prepare the Crust:

  1. Preheat oven to 400°F (200°C).
  2. Toss halved potatoes with olive oil, minced garlic, oregano, smoked paprika, salt, and pepper. Spread evenly on a baking sheet.
  3. Place the feta block in the center of the potatoes. Drizzle with a little olive oil.
  4. Bake for 25-30 minutes until potatoes are golden and crispy, and feta is soft.
  5. Garnish with fresh parsley before serving.

Notes

You can customize the seasonings to taste.

How to Prepare This Dish

Steps and time-saving tips

Start by preheating your oven to 400°F to ensure it’s hot enough for perfectly crispy Roasted Potatoes with Baked Feta and Garlic. While the oven heats, scrub and chop your potatoes into even, bite-sized pieces so they cook uniformly. Toss them in a large bowl with olive oil, salt, pepper, and a pinch of smoked paprika for extra depth. Spread the potatoes in a single layer on a parchment-lined baking sheet, giving them space to crisp up. Meanwhile, place a block of feta in the center of a small baking dish, drizzle it with olive oil, and surround it with whole garlic cloves. Slide both the potatoes and feta into the oven, but remember to stir the potatoes halfway through for even browning. After about 25 minutes, the feta will turn golden and creamy while the potatoes crisp to perfection. For a time-saving hack, prep the potatoes and feta the night before and store them separately in the fridge. Just pop them in the oven when you’re ready—no extra prep needed!

Mistakes I’ve made and learned from

I’ve learned the hard way that overcrowding the baking sheet leads to soggy Roasted Potatoes with Baked Feta and Garlic. Once, I piled them too high, and they steamed instead of crisping. Now, I always use two trays if needed. Another blunder? Underseasoning the feta. It needs a generous drizzle of oil and a sprinkle of herbs to shine. If you’re new to working with feta, check out my guide on perfecting Mediterranean cheeses for more tips. And don’t forget the garlic—overbaking turns it bitter. I pull it out as soon as it’s soft and caramelized. For more on balancing flavors, my post on garlic roasting secrets breaks it down simply. Trust me, these small tweaks make all the difference!

Cultural Connection and Variations

Where this recipe comes from

Roasted Potatoes with Baked Feta and Garlic feels like a love letter to Mediterranean flavors, where simple ingredients shine. The dish likely draws inspiration from Greek and Turkish kitchens, where feta cheese and olive oil transform humble potatoes into something extraordinary. In Greece, cooks might toss in oregano or lemon zest for brightness, while Turkish versions often feature smoky paprika or a drizzle of honey for balance.

My grandmother made her own spin by adding rosemary from her garden, claiming it “woke up the garlic.” Meanwhile, in colder regions like Scandinavia, you’ll find similar dishes with dill or caraway seeds—proof that Roasted Potatoes with Baked Feta and Garlic adapts to local tastes. Some families even swap feta for halloumi or goat cheese, creating a richer texture.

Seasonally, this recipe bridges cozy winters and breezy summers. Picture it at a Greek Easter feast or a summer picnic—versatility is its superpower. Whether served alongside grilled meats or as a standalone vegetarian star, the dish carries stories of shared tables and creative tweaks.

How it fits in today’s cooking

Today, Roasted Potatoes with Baked Feta and Garlic thrives in modern kitchens because it’s both nostalgic and effortless. Meal preppers roast big batches for weekday lunches, while food bloggers pair it with trendy grain bowls. Its one-pan simplicity aligns with our love for easy dinner recipes, and the bold flavors satisfy plant-forward eaters.

During holidays, it’s a crowd-pleasing side that steals attention from the main course. Yet it’s just as home in casual meals, like a cozy night with comfort food classics. Modern twists? Try air-frying the potatoes or crumbling vegan feta for a dairy-free version. No matter how you tweak it, this dish proves that tradition and innovation can share a baking sheet.

Taste and Texture

What makes it delicious

Roasted Potatoes with Baked Feta and Garlic deliver a symphony of textures and flavors. The potatoes turn golden and crisp on the outside while staying fluffy inside, creating a satisfying contrast. Meanwhile, the feta softens into a creamy, tangy pool that clings to every bite. Garlic infuses the dish with a warm, fragrant aroma, and a hint of herbs adds earthy depth. Each forkful balances salty, savory, and buttery notes, making Roasted Potatoes with Baked Feta and Garlic irresistibly comforting. The dish feels hearty yet bright, perfect for cozy nights or lively gatherings.

Boosting the flavor

Elevate your Roasted Potatoes with Baked Feta and Garlic by tossing in lemon zest for a citrusy kick or sprinkling smoked paprika for a smoky twist. For extra richness, drizzle with homemade tahini sauce or top with chopped fresh herbs like dill or parsley. If you love heat, add crushed red pepper flakes or serve with a side of creamy avocado dip. Experiment with different potato varieties, like buttery Yukon Golds or rustic red potatoes, to vary the texture. Small tweaks can transform this dish into a showstopper.

Tips for Success

Best practices for results

Cut your potatoes into even chunks so they roast uniformly. Meanwhile, coat them thoroughly in oil to ensure crispy edges. Always place the feta block in the center of the pan so it softens perfectly alongside the potatoes. For extra flavor, toss minced garlic with the potatoes halfway through roasting. Finally, let your Roasted Potatoes with Baked Feta and Garlic rest for five minutes before serving to let the flavors meld.

Mistakes to avoid

Avoid overcrowding the pan, as this steams the potatoes instead of crisping them. Instead, spread them in a single layer with space between each piece. Also, don’t skip preheating the oven—a hot start ensures the Roasted Potatoes with Baked Feta and Garlic cook evenly. For more roasting tips, check out our guide on perfect roasted vegetables. Another common mistake is using cold feta straight from the fridge. Let it sit at room temperature for 15 minutes first, just like we recommend in our cheese handling guide, for creamier results.

Serving and Pairing Suggestions

How to serve this dish

Roasted Potatoes with Baked Feta and Garlic shines as a versatile dish perfect for both casual meals and special occasions. For a rustic yet elegant presentation, serve it family-style on a large wooden board or in a ceramic baking dish to keep it warm. Meanwhile, garnish with fresh herbs like rosemary or thyme to add a pop of color and aroma. If you’re hosting a brunch, pair it with a sunny-side-up egg for a hearty touch. Alternatively, during holidays, let it take center stage alongside roasted meats or as part of a Mediterranean-inspired spread. The creamy feta and crispy potatoes make it visually appealing, so don’t be afraid to let them steal the spotlight.

What goes well with it

Roasted Potatoes with Baked Feta and Garlic pairs beautifully with light, refreshing drinks like a crisp white wine or a citrusy sparkling water. For a heartier meal, try serving it with our Herb-Roasted Chicken, which balances the dish’s rich flavors. Additionally, a tangy yogurt dip or a simple Lemon Tahini Dressing enhances the creamy feta while adding a bright contrast. Whether you choose a protein-packed side or a zesty sauce, each pairing elevates the dish’s comforting yet vibrant profile.

What type of potatoes work best for roasted potatoes with baked feta and garlic?

Yukon Gold or baby potatoes are ideal for roasted potatoes with baked feta and garlic because they hold their shape well and develop a creamy interior. Russet potatoes also work but may require slightly longer roasting times to achieve the perfect texture.

Can I use crumbled feta instead of a block for roasted potatoes with baked feta and garlic?

While a block of feta melts beautifully and creates a creamy texture, you can use crumbled feta in a pinch. Just sprinkle it over the roasted potatoes during the last 10 minutes of baking to prevent it from drying out.

How long should I roast potatoes for roasted potatoes with baked feta and garlic?

Roast the potatoes for 30-40 minutes at 400°F (200°C) until golden and crispy. Add the feta and garlic during the last 15 minutes to prevent burning while still infusing the dish with rich flavor.

What herbs pair well with roasted potatoes with baked feta and garlic?

Rosemary, thyme, and oregano complement roasted potatoes with baked feta and garlic perfectly. Fresh herbs added after baking brighten the dish, while dried herbs mixed before roasting deepen the savory notes.

Best Honey Lime Chicken & Avocado Rice Stack

best-honey-lime-chicken-avocado

Introduction

Hi there! I’m Emily, the heart and soul behind brekcakes.com. From my earliest memories, the kitchen has always been a place of warmth and creativity. It’s where I discovered the magic of turning simple ingredients into extraordinary meals and learned that the best dishes are often made with love as the main ingredient.

If you’re craving a meal that’s both vibrant and satisfying, you’re in the right place. Today, I’m sharing my Honey Lime Chicken & Avocado Rice Stack—a dish that balances zesty flavors with creamy textures in every bite. Whether you’re cooking for a busy weeknight or a weekend gathering, this recipe brings joy to the table without demanding hours in the kitchen. Plus, it’s a fantastic way to brighten up your meal rotation with fresh, wholesome ingredients.

The Honey Lime Chicken & Avocado Rice Stack is a layered masterpiece that combines tender, marinated chicken with fluffy rice, creamy avocado, and a tangy lime dressing. What makes it special? First, the honey lime marinade infuses the chicken with a sweet-and-savory depth, while the avocado adds a buttery richness that ties everything together. Second, it’s incredibly versatile—serve it as a hearty lunch, a light dinner, or even a showstopping appetizer for guests. Inspired by my love for easy weeknight dinners and healthy meal prep ideas, this dish perfectly fits the brekcakes.com ethos: approachable, flavorful, and designed to make everyday cooking feel like a celebration.

Why I Love This Recipe

This recipe holds a special place in my heart because it reminds me of summer evenings spent with friends, sharing stories over plates piled high with colorful food. The Honey Lime Chicken & Avocado Rice Stack captures that same sense of togetherness—it’s a dish meant to be enjoyed slowly, with good company and plenty of laughter. Every time I make it, I’m transported back to those warm, golden moments, and I hope it brings a little of that magic to your kitchen too.

Health and Nutrition

Why it’s good for your body

Honey Lime Chicken & Avocado Rice Stack packs a powerful nutritional punch while keeping flavors bright and satisfying. First, the lean chicken delivers high-quality protein to support muscle repair and keep you full longer. Meanwhile, the avocado adds heart-healthy monounsaturated fats, which help reduce inflammation and improve cholesterol levels. Additionally, the honey lime marinade offers a natural sweetness without refined sugars, giving you energy without the crash.

Beyond protein and healthy fats, Honey Lime Chicken & Avocado Rice Stack provides a boost of fiber from the avocado and rice. Fiber aids digestion and helps stabilize blood sugar, making this dish a smart choice for sustained energy. Furthermore, lime juice adds a dose of vitamin C, which strengthens immunity and enhances iron absorption from the chicken. The combination of these ingredients creates a meal that’s as nourishing as it is delicious.

Finally, the dish balances macronutrients perfectly. Whether you need a post-workout refuel or a wholesome family dinner, Honey Lime Chicken & Avocado Rice Stack covers all the bases. With its mix of lean protein, healthy fats, and complex carbs, it’s a meal that truly supports your body from the inside out.

How it fits in a healthy lifestyle

Honey Lime Chicken & Avocado Rice Stack fits seamlessly into a balanced diet, whether you’re focusing on high-protein meals, gluten-free eating, or heart-healthy choices. The dish naturally avoids gluten, making it a great option for those with sensitivities. If you’re meal prepping for the week, it stores well and stays fresh for quick, nutritious lunches.

For those prioritizing heart health, the avocado’s healthy fats and chicken’s lean protein align perfectly with heart-healthy dinner guidelines. Plus, if you’re looking to add more protein to your diet, you can easily double the chicken portion. Pair it with a side of roasted veggies or a light salad for a complete, well-rounded meal.

Busy weeknights don’t have to derail healthy habits. Honey Lime Chicken & Avocado Rice Stack comes together quickly, proving that nutritious meals don’t require hours in the kitchen. For more easy, wholesome recipes, check out our meal prep ideas to keep your routine on track.

Print
clock clock iconcutlery cutlery iconflag flag iconfolder folder iconinstagram instagram iconpinterest pinterest iconfacebook facebook iconprint print iconsquares squares iconheart heart iconheart solid heart solid icon

Honey Lime Chicken & Avocado Rice Stack


  • Author: Chef Emy

Description

A refreshing and flavorful dish featuring marinated chicken, creamy avocado, and fluffy rice layered into a delicious stack.


Ingredients

Scale

For the Crust:

  • 2 boneless, skinless chicken breasts
  • 2 tbsp honey
  • 2 tbsp lime juice
  • 1 clove garlic, minced
  • 1 tsp cumin
  • 1 cup cooked white rice
  • 1 ripe avocado, sliced
  • 1/4 cup chopped cilantro
  • Salt and pepper to taste

Instructions

1. Prepare the Crust:

  1. In a bowl, whisk together honey, lime juice, minced garlic, cumin, salt, and pepper.
  2. Add chicken breasts to the marinade, ensuring they are fully coated. Let marinate for at least 30 minutes.
  3. Grill or pan-sear the chicken over medium heat until fully cooked, about 6-7 minutes per side. Let rest before slicing.
  4. In a separate bowl, mix cooked rice with chopped cilantro and a pinch of salt.
  5. To assemble the stack, layer rice, sliced avocado, and chicken in alternating layers. Drizzle with any remaining marinade if desired.

Notes

You can customize the seasonings to taste.

How to Prepare This Dish

Steps and time-saving tips

Start by marinating the chicken to lock in flavor. Whisk together honey, lime juice, garlic, and a pinch of salt in a bowl, then coat the chicken evenly. Let it sit for at least 15 minutes—or up to 2 hours for deeper flavor. While the chicken marinates, cook the rice according to package instructions, then fold in diced avocado, cilantro, and a squeeze of lime for a creamy, zesty base. Next, heat a skillet over medium-high and cook the chicken for 5-6 minutes per side until golden and cooked through. Let it rest for a few minutes before slicing. To assemble the Honey Lime Chicken & Avocado Rice Stack, layer the avocado rice first, then top with sliced chicken, a drizzle of the leftover marinade, and a sprinkle of sesame seeds. For a time-saving hack, use pre-cooked rice or a rotisserie chicken, but don’t skip the fresh lime—it brightens the whole dish. Serve immediately for the best texture.

Mistakes I’ve made and learned from

I once rushed the marinating step, thinking 5 minutes would suffice, but the Honey Lime Chicken & Avocado Rice Stack tasted bland. Now I know even a short 15-minute soak makes a difference. Another time, I overmixed the avocado into the rice, turning it mushy. Gently folding preserves the texture, as I learned from my guide to perfect textures. If your rice sticks, try my rice cooking hacks for fluffy grains every time. Trust me, patience and gentle handling elevate this dish from good to unforgettable.

Cultural Connection and Variations

Where this recipe comes from

The Honey Lime Chicken & Avocado Rice Stack feels like a love letter to fresh, vibrant flavors. While it doesn’t tie to one specific culture, it borrows inspiration from tropical cuisines—think Hawaiian poke bowls or Mexican-inspired layered dishes. The sweet-tangy marinade on the chicken nods to Caribbean jerk traditions, while the creamy avocado and fluffy rice bring a comforting, almost universal appeal.

In my family, we tweak the recipe depending on the season. During summer, we grill the honey lime chicken for a smoky twist. Come winter, we bake it and add a sprinkle of chili flakes for warmth. Some versions swap jasmine rice for cilantro-lime quinoa, and others pile on mango salsa for extra brightness. No matter the variation, the Honey Lime Chicken & Avocado Rice Stack always feels like a celebration of simple, wholesome ingredients.

Around the world, similar dishes take on local flair. In Thailand, they might add lemongrass to the marinade. In California, you’ll find it stuffed into tortillas as a fresh wrap. The beauty of this recipe? It adapts effortlessly, inviting everyone to make it their own.

How it fits in today’s cooking

Today, the Honey Lime Chicken & Avocado Rice Stack fits perfectly into our fast-paced, flavor-driven lives. It’s a meal prep superstar, with components that hold up well in the fridge. Busy cooks love layering it into mason jars for grab-and-go lunches, or serving it as a stunning centerpiece for weekend gatherings.

Seasonally, it shines in spring and summer when avocados peak and fresh herbs abound. Yet it’s hearty enough for cozy nights, especially when paired with a side of garlic butter roasted carrots. Modern twists include swapping chicken for tofu or adding a drizzle of sriracha mayo—proof that this dish evolves without losing its essence.

It also bridges the gap between healthy and indulgent. For lighter takes, try grilled lemon herb salmon instead of chicken. No matter how you spin it, the Honey Lime Chicken & Avocado Rice Stack stays a crowd-pleaser, proving some flavors never go out of style.

Taste and Texture

What makes it delicious

The Honey Lime Chicken & Avocado Rice Stack delivers a vibrant burst of flavors and textures in every bite. First, the tender, juicy chicken soaks up the sweet-tangy honey lime marinade, creating a caramelized glaze that crackles slightly at the edges. Meanwhile, the creamy avocado adds a buttery richness that melts into the fluffy, lightly seasoned rice. A sprinkle of fresh cilantro and a squeeze of lime brighten the dish, while the crisp cucumber or radish slices (if added) give a refreshing crunch. Together, these layers make the Honey Lime Chicken & Avocado Rice Stack irresistibly balanced—sweet, zesty, and satisfyingly hearty.

Boosting the flavor

For an extra flavor kick, try swapping regular rice with fragrant coconut rice to complement the tropical honey lime notes. Alternatively, top your stack with a drizzle of spicy mayo for a creamy, slightly fiery contrast. You can also amp up the marinade with a pinch of smoked paprika or a splash of orange juice for deeper citrus undertones. Whether you tweak the spices or play with textures, these small upgrades keep the Honey Lime Chicken & Avocado Rice Stack exciting every time you make it.

Tips for Success

Best practices for results

First, marinate the chicken for at least 30 minutes to let the honey lime flavors fully soak in. Meanwhile, cook the rice slightly firmer than usual so it holds its shape when stacking. Additionally, gently fold the avocado into the rice to prevent mashing it. For the best presentation, press each layer firmly into your mold or bowl before flipping. Finally, serve your Honey Lime Chicken & Avocado Rice Stack immediately to enjoy the contrast of warm chicken and cool avocado.

Mistakes to avoid

Avoid over-marinating the chicken beyond 4 hours, as the lime juice can start to toughen the meat. Similarly, don’t skip resting the rice after cooking, or it may turn sticky and clump together. If your stack falls apart, try using a smaller mold or chilling it briefly for better stability. For more layering tricks, check out our guide on perfect layer cakes. Also, if the avocado browns too quickly, learn how to keep it fresh with our avocado storage tips.

Serving and Pairing Suggestions

How to serve this dish

Elevate your Honey Lime Chicken & Avocado Rice Stack by serving it on a wide, shallow bowl or a colorful plate to highlight its vibrant layers. For a restaurant-worthy touch, garnish with fresh cilantro leaves, a drizzle of extra lime juice, or a sprinkle of toasted sesame seeds. This dish shines at casual gatherings, like summer picnics or weeknight dinners, but it also makes a stunning centerpiece for brunch spreads. If you want to impress guests, layer the ingredients in a clear glass for a modern, Instagram-ready presentation.

What goes well with it

Pair your Honey Lime Chicken & Avocado Rice Stack with a crisp, citrusy white wine like Sauvignon Blanc to enhance the tangy lime notes. For a non-alcoholic option, try a sparkling agua fresca with mango or cucumber for a refreshing contrast. If you love bold flavors, serve it alongside a zesty black bean and corn salsa for extra texture. Alternatively, balance the dish with a light side like our garlic herb roasted carrots, which add a savory, earthy touch.

What ingredients are needed for Honey Lime Chicken & Avocado Rice Stack?

You’ll need boneless chicken breasts, honey, lime juice, avocado, cooked rice, cilantro, garlic, olive oil, and spices like cumin and paprika. The Honey Lime Chicken & Avocado Rice Stack combines these fresh ingredients for a flavorful, balanced meal.

How do you make the honey lime marinade for the chicken?

Whisk together honey, fresh lime juice, minced garlic, olive oil, salt, and pepper in a bowl. Coat the chicken evenly and let it marinate for at least 30 minutes. This marinade gives the Honey Lime Chicken & Avocado Rice Stack its signature sweet and tangy flavor.

Can I use brown rice instead of white rice for this recipe?

Yes, brown rice works perfectly in the Honey Lime Chicken & Avocado Rice Stack for a healthier option. Just adjust cooking times since brown rice takes longer to prepare. The nutty flavor of brown rice pairs well with the honey lime chicken and creamy avocado.

How long does it take to prepare Honey Lime Chicken & Avocado Rice Stack?

From start to finish, this dish takes about 45 minutes, including marinating time. The Honey Lime Chicken & Avocado Rice Stack comes together quickly once the chicken is grilled and the rice is cooked. It’s a great weeknight meal with minimal prep time.

Best Creamy Parmesan Italian Sausage Ditalini Soup

best-creamy-parmesan-sausage-soup

Introduction

Hi there! I’m Emily, the heart and soul behind brekcakes.com. From my earliest memories, the kitchen has always been a place of warmth and creativity. It’s where I discovered the magic of turning simple ingredients into extraordinary meals and learned that the best dishes are often made with love as the main ingredient.

There’s something undeniably comforting about a bowl of soup that warms you from the inside out, especially when it’s as rich and flavorful as this Creamy Parmesan Italian Sausage Ditalini Soup. Whether you’re craving a cozy weeknight dinner or need a dish that impresses without the stress, this recipe delivers. Plus, it’s packed with hearty ingredients that make every spoonful feel like a hug.

Creamy Parmesan Italian Sausage Ditalini Soup is the ultimate comfort food, blending savory Italian sausage, tender ditalini pasta, and a luxuriously creamy broth infused with garlic, herbs, and nutty Parmesan. What sets it apart is its perfect balance of textures and flavors—each bite offers a little bit of everything. This soup isn’t just a meal; it’s an experience. It’s the kind of dish that brings people together, whether you’re serving it at a family gathering or enjoying it solo on a chilly evening. If you love dishes like my Creamy Tuscan Chicken Pasta, you’ll adore this soup’s similar depth of flavor with its own unique twist. And if you’re looking for more cozy recipes, my Hearty Beef and Barley Soup is another must-try.

Why I Love This Recipe

This Creamy Parmesan Italian Sausage Ditalini Soup holds a special place in my heart because it reminds me of snowy evenings spent with my grandmother, who taught me the joy of cooking with intention. She believed the simplest meals could become unforgettable with the right ingredients and a little patience. Every time I make this soup, I feel that same warmth and connection. It’s more than just food—it’s a reminder of love, family, and the magic that happens when we slow down and savor the moment.

Health and Nutrition

Why it’s good for your body

Creamy Parmesan Italian Sausage Ditalini Soup packs a nutritious punch while delivering rich, comforting flavors. First, the Italian sausage provides a hearty dose of protein, which helps build muscle and keeps you full longer. Additionally, the ditalini pasta offers energizing carbohydrates, fueling your body for daily activities. Meanwhile, the creamy parmesan base adds calcium for strong bones and a satisfying texture.

Beyond macronutrients, this soup brims with vitamins and minerals. For example, tomatoes in the broth contribute lycopene, an antioxidant that supports heart health. Furthermore, onions and garlic add immune-boosting properties, perfect for colder months. With each spoonful of Creamy Parmesan Italian Sausage Ditalini Soup, you also get a balance of savory and wholesome ingredients.

Finally, the dish includes customizable elements for even more benefits. You can swap in whole-grain pasta for extra fiber or use lean turkey sausage to reduce fat. Whether you enjoy it as-is or tweak it slightly, Creamy Parmesan Italian Sausage Ditalini Soup delivers both taste and nourishment.

How it fits in a healthy lifestyle

Creamy Parmesan Italian Sausage Ditalini Soup fits seamlessly into a balanced diet. Its protein-rich sausage and fiber-packed pasta make it a satisfying meal that curbs cravings. If you’re watching your gluten intake, simply substitute gluten-free pasta to enjoy this dish without compromise.

For those focused on heart health, opt for low-sodium broth and lean sausage to keep the dish light yet flavorful. Pair it with a crisp side salad from our Mediterranean salad recipe for a well-rounded meal. Plus, the soup’s versatility means you can batch-cook it for busy weeknights, aligning with practical eating habits.

Looking for more high-protein meal ideas? Check out our protein-packed dinners guide to keep your nutrition goals on track. Whether you need a cozy dinner or a make-ahead lunch, Creamy Parmesan Italian Sausage Ditalini Soup supports your healthy lifestyle effortlessly.

Print
clock clock iconcutlery cutlery iconflag flag iconfolder folder iconinstagram instagram iconpinterest pinterest iconfacebook facebook iconprint print iconsquares squares iconheart heart iconheart solid heart solid icon

Creamy Parmesan Italian Sausage Ditalini Soup


  • Author: Chef Emy

Description

A rich and comforting soup with Italian sausage, ditalini pasta, and a creamy Parmesan broth.


Ingredients

Scale

For the Crust:

  • 1 lb Italian sausage, casings removed
  • 1 small onion, diced
  • 3 cloves garlic, minced
  • 4 cups chicken broth
  • 1 cup heavy cream
  • 1 cup grated Parmesan cheese
  • 1 cup ditalini pasta, uncooked
  • 1 tsp dried basil
  • 1 tsp dried oregano
  • Salt and pepper to taste
  • 2 cups fresh spinach, chopped

Instructions

1. Prepare the Crust:

  1. In a large pot, brown the Italian sausage over medium heat, breaking it into small pieces as it cooks.
  2. Add the diced onion and minced garlic, sautéing until the onion is translucent.
  3. Pour in the chicken broth and bring to a boil. Add the ditalini pasta and cook according to package instructions.
  4. Reduce heat to low and stir in the heavy cream, Parmesan cheese, basil, and oregano. Simmer for 5 minutes.
  5. Add the chopped spinach and cook until wilted. Season with salt and pepper to taste.
  6. Serve hot with extra Parmesan cheese if desired.

Notes

You can customize the seasonings to taste.

How to Prepare This Dish

Steps and time-saving tips

Start by browning the Italian sausage in a large pot over medium heat, breaking it into small crumbles as it cooks. Meanwhile, chop your onions, carrots, and celery to save time later. Once the sausage turns golden, transfer it to a plate and sauté the veggies in the same pot—this builds flavor without extra dishes. Stir in minced garlic for just 30 seconds until fragrant, then pour in chicken broth and diced tomatoes. Bring everything to a gentle boil before adding ditalini pasta; this ensures the noodles cook evenly. Reduce the heat and let the soup simmer for about 10 minutes, stirring occasionally to prevent sticking. While waiting, whisk together heavy cream and grated Parmesan in a separate bowl. Slowly fold this into the soup off the heat to keep the cheese from clumping. Finally, season with salt, pepper, and a pinch of red pepper flakes for a subtle kick. For a quicker cleanup, use pre-shredded Parmesan, but freshly grated melts smoother. Let the soup rest for 5 minutes before serving—it thickens perfectly as it cools slightly.

Mistakes I’ve made and learned from

I once rushed the sautéing step and ended up with crunchy onions—now I patiently cook them until translucent for the best texture. Another time, I added the cream too early, and it curdled from the high heat. Lesson learned: temper dairy by stirring it in last. If your soup thickens too much overnight, thin it with a splash of broth when reheating, just like I do with my Hearty Chicken Pot Pie Soup. And don’t skip deglazing the pot after browning the sausage—those browned bits add depth, similar to the technique in my Beef Stroganoff recipe. Trust me, scraping the pot makes all the difference.

Cultural Connection and Variations

Where this recipe comes from

Creamy Parmesan Italian Sausage Ditalini Soup carries the heartwarming essence of Italian comfort food, blending rustic flavors with creamy indulgence. Originating from Italy’s tradition of pairing pasta with rich broths, this dish likely evolved from classic minestrone or pasta e fagioli. However, the addition of Italian sausage and Parmesan gives it a bolder, more luxurious twist. Families in Southern Italy might use locally made sausages and fresh herbs, while Northern versions could swap ditalini for larger pasta shapes.

In my own kitchen, this soup became a winter staple after a friend from Tuscany shared her family’s version. She insisted on fennel-spiced sausage and a splash of white wine, which deepened the flavors. Meanwhile, American adaptations often include spinach or kale for extra greens. Whether served at a casual weeknight dinner or a festive gathering, Creamy Parmesan Italian Sausage Ditalini Soup bridges tradition and creativity. Some cooks even turn it into a slow-cooker meal, letting the aromas fill the house all day.

How it fits in today’s cooking

Today, Creamy Parmesan Italian Sausage Ditalini Soup fits perfectly into our love for hearty, one-pot meals. Busy home cooks appreciate its flexibility—swap the sausage for plant-based alternatives or use gluten-free pasta without losing the soul of the dish. It’s also a star during chilly months, rivaling classics like chicken pot pie soup for comfort food supremacy.

Modern twists include topping it with crispy pancetta or serving it alongside garlic butter dinner rolls for dipping. Meal preppers love how it reheats beautifully, making it a smart choice for lunches. Whether you’re craving nostalgia or a quick family dinner, this soup proves that timeless flavors always find their way back to our tables.

Taste and Texture

What makes it delicious

Every spoonful of Creamy Parmesan Italian Sausage Ditalini Soup wraps you in rich, comforting flavors. The savory Italian sausage delivers a bold, slightly spicy kick, while the Parmesan cheese melts into a velvety, umami-packed broth. Meanwhile, the ditalini pasta adds a delightful chewiness that contrasts perfectly with the soup’s silky texture. Fragrant garlic and herbs like thyme and oregano deepen the aroma, making each bite as inviting as the last. Whether you savor it on a chilly evening or as a hearty lunch, Creamy Parmesan Italian Sausage Ditalini Soup feels like a warm hug in a bowl.

Boosting the flavor

For an extra layer of flavor, try stirring in a splash of heavy cream or a sprinkle of red pepper flakes to amplify the soup’s richness and heat. Crumbled crispy bacon or toasted breadcrumbs on top add a satisfying crunch. If you love fresh herbs, garnish with chopped parsley or basil for a bright finish. Pair it with a slice of garlic butter dinner rolls to soak up every last drop, or serve alongside a crisp Italian chopped salad for a balanced meal. Small tweaks can make this already-delicious soup unforgettable.

Tips for Success

Best practices for results

Always brown the Italian sausage thoroughly before adding other ingredients, as this builds deep flavor for your Creamy Parmesan Italian Sausage Ditalini Soup. Meanwhile, stir the ditalini pasta occasionally while it simmers to prevent sticking. For the creamiest texture, gradually whisk in the parmesan cheese off the heat so it melts smoothly. Finally, taste and adjust the seasoning just before serving, since sausage saltiness can vary.

Mistakes to avoid

One common misstep is overcooking the ditalini, which turns it mushy. Instead, check for doneness a minute early, as pasta keeps softening in the hot soup. Also, avoid adding parmesan while the soup boils, as high heat can make it grainy. For more on perfect pasta textures, see our guide to cooking pasta al dente. Lastly, don’t skip deglazing the pot after browning the sausage—those crispy bits add tons of flavor. Learn why deglazing matters for soups and sauces.

Serving and Pairing Suggestions

How to serve this dish

For a cozy family dinner, ladle the Creamy Parmesan Italian Sausage Ditalini Soup into warm, rustic bowls to keep it piping hot. Meanwhile, sprinkle extra grated Parmesan and fresh parsley on top for a pop of color and rich flavor. Alternatively, serve it in bread bowls for a fun, edible presentation that guests will love. Since this soup feels indulgent yet comforting, it works perfectly for holiday gatherings or chilly weeknight meals. Finally, pair it with crusty garlic bread for dipping, and watch everyone savor every bite.

What goes well with it

A crisp, refreshing salad like our Italian Chopped Salad balances the richness of Creamy Parmesan Italian Sausage Ditalini Soup with bright, tangy flavors. For a heartier meal, try serving it alongside our Garlic Herb Focaccia, which soaks up the creamy broth beautifully. If you prefer a drink pairing, a light white wine like Pinot Grigio or a sparkling lemonade cuts through the savory notes for a delightful contrast.

What type of sausage works best for Creamy Parmesan Italian Sausage Ditalini Soup?

Sweet or mild Italian sausage is ideal for Creamy Parmesan Italian Sausage Ditalini Soup because it balances the rich flavors without overpowering the dish. For a spicier kick, try hot Italian sausage. Remove the casings and crumble the meat while browning for even distribution.

Can I substitute the ditalini pasta in this soup?

Yes, small pasta like elbow macaroni, small shells, or orzo work well as substitutes in Creamy Parmesan Italian Sausage Ditalini Soup. Adjust cooking times slightly based on the pasta shape. The soup’s creamy texture and sausage flavor will still shine through.

How do I store and reheat leftover Creamy Parmesan Italian Sausage Ditalini Soup?

Store the soup in an airtight container in the fridge for up to 3 days. Reheat gently on the stovetop with a splash of broth or milk to restore the creamy consistency. Avoid microwaving at high power, as it can separate the Parmesan sauce.

What sides pair well with Creamy Parmesan Italian Sausage Ditalini Soup?

Serve this hearty soup with crusty bread, garlic knots, or a crisp green salad to balance the richness. A side of roasted vegetables also complements the creamy Parmesan and Italian sausage flavors in the ditalini soup perfectly.

Best Million Dollar Ravioli Casserole Recipe

best-million-dollar-ravioli-casserole

Introduction

Hi there! I’m Emily, the heart and soul behind brekcakes.com. From my earliest memories, the kitchen has always been a place of warmth and creativity. It’s where I discovered the magic of turning simple ingredients into extraordinary meals and learned that the best dishes are often made with love as the main ingredient.

If you’re craving a dish that feels like a warm hug, you’ve come to the right place. Today, I’m sharing my Million Dollar Ravioli Casserole—a recipe that’s as comforting as it is indulgent. Whether you’re feeding a crowd or just treating yourself, this dish delivers rich flavors and creamy textures that will make every bite unforgettable. Plus, it’s surprisingly easy to whip up, even on busy weeknights.

Million Dollar Ravioli Casserole combines tender cheese-filled ravioli, a luscious homemade sauce, and a golden, bubbly cheese topping. Unlike traditional pasta bakes, this recipe elevates store-bought ravioli into something truly special. The secret lies in layering flavors, from the savory marinara to the creamy ricotta blend. Perfect for potlucks or family dinners, it’s a crowd-pleaser that fits my blog’s mission: approachable recipes with restaurant-quality results. If you love cozy, hearty meals, you’ll adore this twist on classic Italian comfort food. For more easy weeknight ideas, check out my quick dinner recipes, or explore my comfort food favorites for similar dishes.

Why I Love This Recipe

This Million Dollar Ravioli Casserole holds a special place in my heart because it reminds me of Sunday dinners with my grandparents. They taught me that food brings people together, and this dish does exactly that. Every time I pull it out of the oven, the aroma takes me back to those cherished moments around the table. It’s more than just a meal—it’s a celebration of simplicity, love, and the joy of sharing something delicious.

Health and Nutrition

Why it’s good for your body

Million Dollar Ravioli Casserole packs a nutritious punch while delivering incredible flavor. First, the dish combines protein-rich cheese and ground meat, which help build and repair muscles. Additionally, the tomato-based sauce provides lycopene, an antioxidant that supports heart health. Because the recipe layers fresh ravioli with wholesome ingredients, you get a balanced meal in every bite.

Moreover, Million Dollar Ravioli Casserole includes calcium from the cheese, promoting strong bones and teeth. The dish also offers fiber from the pasta and vegetables, aiding digestion and keeping you full longer. Since it’s baked, you avoid the excess oil of fried foods while still enjoying a satisfying texture. Plus, the herbs and spices boost immunity and add flavor without extra calories.

Finally, Million Dollar Ravioli Casserole balances indulgence with nourishment. While it feels like a comfort food treat, it delivers essential nutrients your body needs. Whether you serve it as a family dinner or a potluck favorite, you’re choosing a meal that fuels your body and satisfies your cravings.

How it fits in a healthy lifestyle

Million Dollar Ravioli Casserole fits seamlessly into a balanced diet. For protein-focused eaters, the cheese and meat provide a hearty dose to support muscle growth. If you prefer lighter options, you can easily swap in lean turkey or plant-based alternatives. The dish also pairs well with a fresh salad or steamed veggies for added nutrition.

For those managing gluten intake, try using gluten-free ravioli to enjoy the same rich flavors without compromise. Heart-healthy eaters will appreciate the tomato sauce’s benefits, and you can reduce sodium by opting for low-salt ingredients. If you love meal prepping, this casserole stores beautifully, making it a practical choice for busy weeks. Check out our meal prep guide for more time-saving ideas.

Whether you’re cooking for a crowd or just yourself, Million Dollar Ravioli Casserole adapts to your needs. For more inspiration on balancing comfort food and nutrition, explore our healthy comfort food roundup. With simple tweaks, this dish becomes a staple in any health-conscious kitchen.

Print
clock clock iconcutlery cutlery iconflag flag iconfolder folder iconinstagram instagram iconpinterest pinterest iconfacebook facebook iconprint print iconsquares squares iconheart heart iconheart solid heart solid icon

Million Dollar Ravioli Casserole


  • Author: Chef Emy

Description

A rich and creamy ravioli casserole loaded with cheese and savory flavors, perfect for a comforting family dinner.


Ingredients

Scale

For the Crust:

  • 1 (25 oz) package frozen cheese ravioli
  • 1 (24 oz) jar marinara sauce
  • 2 cups shredded mozzarella cheese
  • 1/2 cup grated Parmesan cheese
  • 1 (8 oz) package cream cheese, softened
  • 1/2 cup sour cream
  • 1/2 teaspoon garlic powder
  • 1/2 teaspoon Italian seasoning
  • 1/4 teaspoon black pepper
  • 1/4 cup chopped fresh basil (optional)

Instructions

1. Prepare the Crust:

  1. Preheat oven to 375°F (190°C). Lightly grease a 9×13-inch baking dish.
  2. Cook the frozen ravioli according to package instructions, then drain and set aside.
  3. In a medium bowl, mix the cream cheese, sour cream, garlic powder, Italian seasoning, and black pepper until smooth.
  4. Spread a thin layer of marinara sauce on the bottom of the baking dish. Arrange half of the cooked ravioli in a single layer over the sauce.
  5. Spread half of the cream cheese mixture over the ravioli, then sprinkle with half of the mozzarella and Parmesan cheeses.
  6. Repeat the layers with the remaining ravioli, cream cheese mixture, and cheeses.
  7. Bake for 25-30 minutes, or until bubbly and golden brown on top.
  8. Garnish with fresh basil if desired before serving.

Notes

You can customize the seasonings to taste.

How to Prepare This Dish

Steps and time-saving tips

Start by preheating your oven to 375°F so it’s ready when you finish assembling the Million Dollar Ravioli Casserole. Meanwhile, grab a large mixing bowl and whisk together the ricotta, egg, garlic powder, and half the shredded cheese until smooth. This creamy filling will give your dish that rich, indulgent flavor. Next, spread a thin layer of marinara sauce at the bottom of a 9×13 baking dish to prevent sticking. Now, layer half the frozen ravioli over the sauce, followed by the ricotta mixture, spreading it evenly with a spatula. Top with the remaining ravioli, then pour the rest of the marinara over them, making sure every piece gets coated. Sprinkle the remaining cheese on top for a golden, bubbly finish. Cover the dish with foil and bake for 25 minutes, then remove the foil and bake another 10 minutes until the cheese melts perfectly. Let it rest for 5 minutes before serving—this helps the layers set. For a time-saving hack, use store-bought ravioli and jarred marinara, but if you’re feeling ambitious, try homemade versions for extra flair.

Mistakes I’ve made and learned from

I’ve definitely learned a few lessons the hard way with this Million Dollar Ravioli Casserole. The first time I made it, I skipped letting the dish rest after baking, and the layers collapsed into a saucy mess—patience is key! Another mistake? Overloading the ricotta mixture with too much cheese, which made it dense instead of creamy. Now, I stick to the measured amounts and add a splash of milk if needed for a lighter texture. If you’re new to casseroles, my guide on layering casseroles perfectly can help avoid uneven bites. Also, don’t forget to check your ravioli’s cook time—some brands need a quick boil first, as I learned from my frozen ravioli hacks post. Trust me, these small tweaks make all the difference!

Cultural Connection and Variations

Where this recipe comes from

Million Dollar Ravioli Casserole feels like a love letter to comfort food, blending Italian inspiration with American ingenuity. While traditional ravioli dishes trace their roots to Northern Italy, where families stuff fresh pasta with ricotta or meat, this casserole version takes a hearty, crowd-pleasing twist. Instead of labor-intensive handmade pockets, it layers store-bought ravioli with rich cheeses, savory sauces, and sometimes a crispy topping—perfect for busy weeknights or potlucks.

Across regions, cooks put their own spin on Million Dollar Ravioli Casserole. In the Midwest, you might find it baked with extra mozzarella and a buttery breadcrumb crust, while Southern versions could add a kick of Cajun spices or swap marinara for a creamy Alfredo base. Some families even sneak in spinach or ground beef for extra heartiness. Meanwhile, in Italy, nonnas might raise an eyebrow at the shortcut, but hey—we bet they’d secretly enjoy a forkful of this cheesy, bubbly dish.

How it fits in today’s cooking

Today, Million Dollar Ravioli Casserole holds its own as a versatile favorite. Busy parents adore it for its dump-and-bake simplicity, while foodies dress it up with artisanal cheeses or homemade sauces. It’s a star at holiday gatherings, especially when paired with easy holiday side dishes that round out the meal. Plus, it’s a lifesaver during back-to-school chaos or chilly Sundays when everyone craves something warm and satisfying.

Modern twists keep it fresh—think gluten-free ravioli, plant-based fillings, or even air-fryer adaptations for smaller batches. Whether you’re meal-prepping or hosting a casual dinner, this casserole fits right in. And if you’re looking for more comfort food inspiration, check out these cozy fall recipes to pair with it. After all, good food evolves, but Million Dollar Ravioli Casserole? That’s a classic that never goes out of style.

Taste and Texture

What makes it delicious

Million Dollar Ravioli Casserole delivers a rich, comforting experience with every bite. The tender cheese-filled ravioli melts in your mouth, while the savory ground beef and tangy marinara sauce create a bold, hearty flavor. Creamy layers of melted mozzarella and ricotta add a luxurious texture, and the golden, bubbly cheese topping offers a slight crispness. Fragrant garlic and herbs like basil and oregano infuse the dish with warmth, making it irresistible. Whether you savor it fresh from the oven or as leftovers, Million Dollar Ravioli Casserole always feels like a decadent treat.

Boosting the flavor

Elevate your Million Dollar Ravioli Casserole with a few easy tweaks. For extra depth, swap ground beef for spicy Italian sausage or mix in sautéed mushrooms for an earthy twist. A sprinkle of red pepper flakes or a dash of smoked paprika will add a subtle kick. Top it with fresh basil or a drizzle of homemade pesto for a bright contrast. If you love cheesy goodness, try blending in a layer of creamy Alfredo sauce alongside the marinara. These small changes make a big difference, turning an already delicious dish into something unforgettable.

Tips for Success

Best practices for results

First, always preheat your oven before assembling the Million Dollar Ravioli Casserole to ensure even cooking. Additionally, use fresh ravioli instead of frozen for the best texture, as it holds its shape better during baking. Meanwhile, layer the cheese generously between the ravioli and sauce to create that signature gooey richness. Finally, let the casserole rest for 5 minutes after baking so the flavors meld perfectly.

Mistakes to avoid

Avoid overcooking the ravioli before baking, as it can turn mushy in the casserole. Instead, slightly undercook it since it will finish in the oven. Similarly, don’t skip the breadcrumb topping—it adds essential crunch to the Million Dollar Ravioli Casserole. For more layering tips, check out our casserole layering guide. Also, resist overloading the dish with sauce, which can make it soggy. If you need help balancing flavors, our sauce consistency guide has simple fixes.

Serving and Pairing Suggestions

How to serve this dish

Million Dollar Ravioli Casserole deserves a showstopping presentation. For a family dinner, scoop generous portions onto warm plates and top with fresh basil or parsley for a pop of color. Alternatively, serve it straight from the baking dish for a cozy, family-style vibe. This dish shines at potlucks or holiday gatherings, especially when paired with a crisp green salad or garlic bread. To elevate the experience, garnish with grated Parmesan or a drizzle of high-quality olive oil just before serving.

What goes well with it

A light, refreshing side like this Italian Salad balances the richness of Million Dollar Ravioli Casserole perfectly. For a heartier meal, add warm, buttery garlic knots or crusty bread to soak up every bite. Meanwhile, a glass of chilled white wine or sparkling water with lemon enhances the flavors without overpowering them. If you love pairing pasta with bold flavors, try this Roasted Garlic Bread for an irresistible crunch. Whether you keep it simple or go all out, these pairings make every bite even more satisfying.

What makes Million Dollar Ravioli Casserole so special?

Million Dollar Ravioli Casserole stands out because it combines creamy cheeses, rich meat sauce, and tender ravioli for a decadent comfort dish. The name comes from its luxurious taste that feels indulgent without requiring expensive ingredients. It’s a crowd-pleaser that’s perfect for family dinners or potlucks.

Can I make Million Dollar Ravioli Casserole ahead of time?

Yes! Million Dollar Ravioli Casserole is ideal for meal prep—assemble it up to 24 hours in advance and refrigerate until baking. Just add 5-10 extra minutes to the cooking time if baking straight from the fridge. The flavors meld beautifully when prepared ahead.

What type of ravioli works best for Million Dollar Ravioli Casserole?

Cheese-filled ravioli is the classic choice, but meat or spinach varieties work well too. For the best texture, use refrigerated (not frozen) ravioli in your Million Dollar Ravioli Casserole. The pasta holds its shape better during baking while absorbing the delicious sauce.

How do I prevent my Million Dollar Ravioli Casserole from drying out?

Cover the dish with foil for the first 20 minutes of baking to lock in moisture. Also ensure your sauce has enough liquid—the ravioli will absorb some as it cooks. Letting the Million Dollar Ravioli Casserole rest for 5 minutes after baking helps redistribute juices.

Easy Philly Cheesesteak Sloppy Joes Recipe

easy-philly-cheesesteak-sloppy-joes

Introduction

Hi there! I’m Emily, the heart and soul behind brekcakes.com. From my earliest memories, the kitchen has always been a place of warmth and creativity. It’s where I discovered the magic of turning simple ingredients into extraordinary meals and learned that the best dishes are often made with love as the main ingredient.

If you crave comfort food that’s both nostalgic and exciting, you’re in the right place. Today, I’m sharing my twist on a family favorite—Philly Cheesesteak Sloppy Joes. Imagine tender beef, melted cheese, and caramelized onions piled high on a soft bun. Whether you’re feeding a crowd or just treating yourself, this recipe delivers big flavors with minimal effort. Plus, it’s the perfect way to bring a taste of Philly into your kitchen without the fuss.

Philly Cheesesteak Sloppy Joes combine the best of two classics: the hearty, meaty goodness of a cheesesteak and the easy, messy fun of a sloppy joe. Unlike traditional versions, this recipe skips the long prep time but keeps all the rich, savory flavors. You’ll love how the melty cheese clings to the seasoned beef, while the peppers and onions add just the right amount of sweetness. It’s a meal that feels indulgent yet approachable, much like the other comfort food recipes I love sharing. Whether you’re a busy parent or just someone who appreciates a satisfying bite, this dish fits seamlessly into weeknight dinners or weekend gatherings. And if you’re a fan of creative twists, you’ll adore how it pairs with my homemade bread ideas for the ultimate experience.

Why I Love This Recipe

Philly Cheesesteak Sloppy Joes hold a special place in my heart because they remind me of lazy Sunday dinners with my family. My dad used to make classic cheesesteaks, but when time was tight, I’d whip up this quicker version. The first time I served it, my kids devoured every last bite—and that’s when I knew it was a keeper. There’s something magical about how simple ingredients come together to create a meal that feels like a hug. Every time I make it, I’m transported back to those cozy, laughter-filled moments around the table.

Health and Nutrition

Why it’s good for your body

Philly Cheesesteak Sloppy Joes pack a flavorful punch while delivering key nutrients. First, lean ground beef provides high-quality protein to support muscle growth and repair. Additionally, the dish includes onions and peppers, which add fiber and antioxidants to promote digestion and overall wellness. Moreover, the melted cheese offers calcium for strong bones and a satisfying richness.

Because Philly Cheesesteak Sloppy Joes balance protein, veggies, and dairy, they keep you full longer. The iron in beef helps maintain energy levels, while the vitamin C in peppers boosts immunity. Furthermore, you can easily tweak the recipe to reduce sodium or fat without sacrificing taste. For example, opting for low-fat cheese or whole-grain buns enhances the nutritional profile.

Ultimately, Philly Cheesesteak Sloppy Joes make a hearty meal that fuels your body. By combining wholesome ingredients, they deliver comfort and nourishment in every bite. Whether you need a post-workout meal or a family-friendly dinner, this dish satisfies cravings while supporting health.

How it fits in a healthy lifestyle

Philly Cheesesteak Sloppy Joes fit seamlessly into balanced eating habits. For protein-focused diets, the lean beef and cheese help meet daily requirements without excess calories. If you prefer gluten-free options, simply swap the bun for a lettuce wrap or gluten-free roll. The dish also pairs well with a side salad or roasted veggies for added nutrients.

For heart-healthy choices, use lean ground sirloin and reduced-fat cheese. This keeps the flavor bold while cutting saturated fat. If you love meal prepping, Philly Cheesesteak Sloppy Joes store well for quick lunches. Check out our meal prep guide for more time-saving ideas.

Even on busy nights, this recipe comes together fast. It’s a smarter alternative to takeout, offering control over ingredients. For more high-protein dinner inspiration, explore our protein-packed recipes. With simple adjustments, Philly Cheesesteak Sloppy Joes become a versatile staple in any healthy routine.

Print
clock clock iconcutlery cutlery iconflag flag iconfolder folder iconinstagram instagram iconpinterest pinterest iconfacebook facebook iconprint print iconsquares squares iconheart heart iconheart solid heart solid icon

Philly Cheesesteak Sloppy Joes


  • Author: Chef Emy

Description

A delicious twist on classic sloppy joes with the flavors of a Philly cheesesteak, featuring ground beef, peppers, onions, and melted cheese.


Ingredients

Scale

For the Crust:

  • 1 lb ground beef
  • 1 green bell pepper, diced
  • 1 onion, diced
  • 2 cloves garlic, minced
  • 1/2 cup beef broth
  • 2 tbsp Worcestershire sauce
  • 1 tbsp ketchup
  • 1 tsp mustard
  • 1 tsp paprika
  • Salt and pepper to taste
  • 4 slices provolone cheese
  • 4 hamburger buns, toasted

Instructions

1. Prepare the Crust:

  1. In a large skillet over medium heat, brown the ground beef until fully cooked. Drain excess fat.
  2. Add the diced bell pepper, onion, and minced garlic to the skillet. Cook until vegetables are softened, about 5 minutes.
  3. Stir in the beef broth, Worcestershire sauce, ketchup, mustard, paprika, salt, and pepper. Simmer for 10 minutes, stirring occasionally.
  4. Place a slice of provolone cheese on each toasted bun. Spoon the beef mixture over the cheese and serve immediately.

Notes

You can customize the seasonings to taste.

How to Prepare This Dish

Steps and time-saving tips

Start by heating a large skillet over medium-high heat and browning the ground beef until it’s fully cooked. Break it into small crumbles as it cooks for the perfect texture. Meanwhile, chop the onions and bell peppers into thin strips so they soften quickly. Toss them into the skillet with the beef and stir everything together. Next, pour in the beef broth and Worcestershire sauce, letting the mixture simmer for a few minutes to blend the flavors. Sprinkle in the garlic powder and a pinch of salt, then stir in the provolone cheese until it melts into a creamy, gooey sauce. Toast the buns lightly under the broiler or in a toaster oven for extra crunch. Finally, spoon the Philly Cheesesteak Sloppy Joes mixture onto the buns and serve immediately. For a time-saving hack, prep the veggies ahead of time or use frozen sliced peppers and onions to cut down on chopping. If you’re feeding a crowd, double the recipe and keep the filling warm in a slow cooker until ready to serve.

Mistakes I’ve made and learned from

I used to overcook the beef, leaving it dry and tough, until I realized that pulling it off the heat just as it browns keeps it juicy. Another mistake? Skipping the toasting step for the buns—trust me, it makes a world of difference in texture. If your filling seems too runny, let it simmer a bit longer to thicken, or add a sprinkle of cornstarch mixed with water. I also learned the hard way that not all cheeses melt the same; provolone works best here, but if you’re in a pinch, try my cheese substitutes guide for alternatives. For more tips on balancing flavors, check out my umami boosters post to elevate your Philly Cheesesteak Sloppy Joes even further.

Cultural Connection and Variations

Where this recipe comes from

Philly Cheesesteak Sloppy Joes mash up two American comfort food classics, blending the hearty flavors of a Philadelphia cheesesteak with the easy, saucy appeal of a sloppy joe. While the traditional Philly cheesesteak hails from—you guessed it—Philadelphia, this twist likely emerged from home cooks looking for a quicker, family-friendly version. After all, not everyone has time to thinly slice ribeye or toast hoagie rolls on a busy weeknight.

Interestingly, regional takes on this dish pop up across the country. In the Midwest, for example, some cooks swap the classic green peppers for poblano or add a splash of beer to the sauce. Meanwhile, in the South, you might find a version with a touch of Cajun seasoning or served over cornbread instead of buns. Even overseas, creative cooks adapt Philly Cheesesteak Sloppy Joes to local tastes, using ingredients like gouda in the Netherlands or spicy kimchi in Korea.

In my own kitchen, this recipe became a game-changer for casual gatherings. My uncle, a Philly native, insists on adding fried onions for extra crunch, while my sister skips the beef entirely for mushrooms. Whether you stick to tradition or experiment, Philly Cheesesteak Sloppy Joes always bring people together with their rich, satisfying flavors.

How it fits in today’s cooking

Today, Philly Cheesesteak Sloppy Joes remain a go-to for busy households and comfort food lovers alike. They fit perfectly into modern meal prep routines, since the filling freezes well and reheats in minutes. Plus, they’re versatile enough for game-day spreads, weeknight dinners, or even a fun twist on comfort food classics.

Health-conscious cooks lighten them up with ground turkey or plant-based crumbles, while others lean into indulgence with extra cheese or a drizzle of garlic aioli. Seasonal tweaks keep things fresh too—think adding roasted pumpkin in fall or topping with crisp summer slaw. And let’s not forget how easily they pair with sides, from easy side dishes like sweet potato fries to simple salads.

Ultimately, this dish proves that some flavors never go out of style. Whether you’re craving nostalgia or a quick crowd-pleaser, Philly Cheesesteak Sloppy Joes deliver every time.

Taste and Texture

What makes it delicious

Philly Cheesesteak Sloppy Joes deliver a mouthwatering explosion of savory, cheesy goodness with every bite. The rich, beefy flavor mingles with caramelized onions and bell peppers, creating a sweet yet smoky depth. Melted provolone or Cheez Whiz blankets the mixture, adding a creamy, gooey texture that contrasts perfectly with the tender, juicy meat. Meanwhile, the soft bun soaks up the flavorful juices, making each bite irresistibly messy yet satisfying. You’ll love how the aromatic garlic and Worcestershire sauce elevate the dish, filling your kitchen with an irresistible, hearty fragrance. Philly Cheesesteak Sloppy Joes aren’t just a meal—they’re a crave-worthy experience.

Boosting the flavor

Take your Philly Cheesesteak Sloppy Joes to the next level with a few easy tweaks. For extra tang, swap provolone for sharp cheddar or pepper jack, or drizzle with a homemade garlic aioli for a punchy kick. Crispy fried onions or pickled jalapeños add crunch and brightness, while a sprinkle of smoked paprika deepens the umami notes. If you’re craving more heat, stir in a dash of hot sauce or top with spicy pickled vegetables for a zesty contrast. Don’t forget to toast the buns lightly—it adds a subtle crispness that holds up to the saucy filling. With these small upgrades, every bite becomes even more unforgettable.

Tips for Success

Best practices for results

Always use fresh, thinly sliced ribeye for Philly Cheesesteak Sloppy Joes to ensure tender, flavorful meat. Meanwhile, toast the buns lightly to prevent sogginess and add a satisfying crunch. Additionally, cook the onions and peppers until they caramelize, as this deepens the flavor. Finally, stir in the cheese sauce off the heat to keep it smooth and creamy. These small steps guarantee delicious Philly Cheesesteak Sloppy Joes every time.

Mistakes to avoid

Avoid overcooking the meat, as it can turn tough and dry. Instead, brown it just until it loses its pinkness for the best texture. Furthermore, don’t skip draining excess grease after cooking the beef, or your Philly Cheesesteak Sloppy Joes may end up overly greasy. For more tips on handling ground meat, check out our guide on perfect ground beef techniques. Also, resist the urge to rush the onions and peppers—undercooked veggies lack sweetness. If you need help with knife skills, our chopping vegetables tutorial makes prep faster and safer.

Serving and Pairing Suggestions

How to serve this dish

Philly Cheesesteak Sloppy Joes shine when you serve them on toasted brioche buns for a buttery crunch. For a fun twist, try stacking them open-faced with extra melted provolone on top. Meanwhile, a sprinkle of fresh parsley or thinly sliced green onions adds a pop of color that makes the dish Instagram-worthy. These hearty sandwiches work perfectly for game day gatherings or casual weeknight dinners. If you’re hosting a crowd, set up a DIY topping bar with pickled jalapeños, sautéed mushrooms, or crispy fried onions so everyone can customize their own.

What goes well with it

Crispy air fryer French fries balance the rich flavors of Philly Cheesesteak Sloppy Joes with their salty crunch. Alternatively, a tangy side like creamy coleslaw cuts through the savory goodness for a refreshing contrast. For drinks, pair them with an ice-cold lager or a fizzy cherry soda to enhance the meal’s bold, comforting vibe.

What’s the difference between Philly Cheesesteak Sloppy Joes and regular Sloppy Joes?

Philly Cheesesteak Sloppy Joes swap the traditional tomato-based sauce for a creamy cheese sauce and include thinly sliced steak, peppers, and onions—just like a classic Philly cheesesteak. Regular Sloppy Joes use ground beef in a sweet and tangy tomato sauce, while this version leans into the rich, savory flavors of the Philly-inspired dish.

Can I use ground beef instead of steak for Philly Cheesesteak Sloppy Joes?

Yes, ground beef works as a budget-friendly alternative, but for authentic Philly Cheesesteak Sloppy Joes, thinly sliced ribeye or sirloin steak delivers the best texture and flavor. If using ground beef, brown it well and add extra Worcestershire sauce to boost the umami taste.

What kind of cheese is best for Philly Cheesesteak Sloppy Joes?

Provolone or Cheez Whiz are classic choices for Philly Cheesesteak Sloppy Joes, but American cheese or white cheddar also melt well. Avoid hard cheeses like Parmesan—opt for creamy, melty varieties to replicate the gooey goodness of a traditional Philly cheesesteak.

How do you keep Philly Cheesesteak Sloppy Joes from being too watery?

Drain excess grease after cooking the meat, and sauté the peppers and onions until most of their moisture evaporates. For Philly Cheesesteak Sloppy Joes, thicken the cheese sauce with a cornstarch slurry or let the mixture simmer uncovered for a few extra minutes to reduce.

Best Air Fried Potato Wedges – Crispy & Easy Recipe

best-air-fried-potato-wedges

Introduction

Hi there! I’m Emily, the heart and soul behind brekcakes.com. From my earliest memories, the kitchen has always been a place of warmth and creativity. It’s where I discovered the magic of turning simple ingredients into extraordinary meals and learned that the best dishes are often made with love as the main ingredient.

There’s something undeniably comforting about crispy, golden potatoes, especially when they come straight from the air fryer. Whether you’re craving a quick snack or a crowd-pleasing side dish, these Air Fried Potato Wedges deliver every time. Not only do they satisfy that irresistible crunch we all love, but they also bring back memories of cozy family dinners and lazy weekend treats. Plus, they’re surprisingly simple to make—no deep-frying required!

Air Fried Potato Wedges are the perfect blend of crispy exteriors and fluffy interiors, all achieved with minimal oil and maximum flavor. Unlike traditional frying methods, the air fryer gives you that satisfying texture without the guilt. These wedges work beautifully as a side for burgers, a snack with dips, or even a standalone treat when you need something hearty. If you’ve ever struggled with soggy oven-baked potatoes or greasy deep-fried versions, this recipe will change your game. For more air fryer inspiration, check out my favorite air fryer recipes, or if you’re new to the appliance, my beginner’s guide to air frying will help you get started.

Why I Love This Recipe

Air Fried Potato Wedges hold a special place in my heart because they remind me of Sunday dinners with my dad. He’d always sneak a few extra wedges onto my plate, insisting they were “just for taste-testing.” Now, whenever I make them, I can’t help but smile at those memories. What I love most is how versatile they are—whether I’m serving them with a fancy steak or enjoying them straight from the basket while binge-watching my favorite show, they never disappoint. Simple, nostalgic, and downright delicious—that’s why this recipe stays in my regular rotation.

Health and Nutrition

Why it’s good for your body

Air Fried Potato Wedges offer a delicious way to enjoy a classic snack with fewer calories and less fat than traditional frying. Because air frying requires minimal oil, you still get that crispy texture without the excess grease. Additionally, potatoes provide essential nutrients like potassium, vitamin C, and fiber, which support heart health and digestion.

When you choose Air Fried Potato Wedges, you also reduce your intake of unhealthy trans fats often found in deep-fried foods. Meanwhile, the natural starches in potatoes give you lasting energy, making them a smarter choice for satisfying cravings. Plus, the cooking process preserves more nutrients compared to boiling or microwaving, so you get the most out of every bite.

Another benefit of Air Fried Potato Wedges is their versatility. You can easily customize them with heart-healthy seasonings like garlic, paprika, or rosemary. Whether you enjoy them as a side or a snack, they fit seamlessly into a nutrient-rich diet. Best of all, air frying locks in flavor while keeping the dish light and guilt-free.

How it fits in a healthy lifestyle

Air Fried Potato Wedges work well in balanced meal plans, especially if you pair them with lean proteins or fiber-rich veggies. They’re naturally gluten-free, making them a great option for those with dietary restrictions. For a heart-healthy twist, try seasoning them with olive oil and herbs instead of salt.

If you’re watching your carb intake, enjoy Air Fried Potato Wedges in moderation alongside high-protein dishes like grilled chicken or tofu. They also make a satisfying post-workout snack when combined with a source of healthy fats, such as avocado. For more gluten-free meal ideas, check out our gluten-free dinner recipes.

Busy weeknights call for simple, wholesome meals, and Air Fried Potato Wedges deliver. Prep them ahead and reheat for a quick side that complements almost any dish. Want more inspiration for easy, healthy cooking? Explore our meal prep guide to save time without sacrificing nutrition.

Print
clock clock iconcutlery cutlery iconflag flag iconfolder folder iconinstagram instagram iconpinterest pinterest iconfacebook facebook iconprint print iconsquares squares iconheart heart iconheart solid heart solid icon

Air Fried Potato Wedges


  • Author: Chef Emy

Description

Crispy and flavorful potato wedges made easily in the air fryer with minimal oil.


Ingredients

Scale

For the Crust:

  • 4 medium russet potatoes, cut into wedges
  • 2 tablespoons olive oil
  • 1 teaspoon garlic powder
  • 1 teaspoon paprika
  • 1/2 teaspoon salt
  • 1/4 teaspoon black pepper

Instructions

1. Prepare the Crust:

  1. Preheat air fryer to 400°F (200°C).
  2. In a large bowl, toss potato wedges with olive oil, garlic powder, paprika, salt, and black pepper until evenly coated.
  3. Place wedges in the air fryer basket in a single layer, working in batches if necessary.
  4. Cook for 15-20 minutes, flipping halfway through, until golden brown and crispy.
  5. Serve immediately with your favorite dipping sauce.

Notes

You can customize the seasonings to taste.

“`html

How to Prepare This Dish

Steps and time-saving tips

Start by scrubbing your potatoes clean and patting them dry with a kitchen towel. Slice each potato into even wedges, about ½-inch thick, so they cook uniformly. Toss the wedges in a large bowl with olive oil, salt, pepper, and any other seasonings you love—paprika or garlic powder work wonders. Meanwhile, preheat your air fryer to 400°F for about 3 minutes to ensure it’s hot and ready. Arrange the potato wedges in a single layer in the air fryer basket, leaving space between them for crispier results. Cook for 15 minutes, shaking the basket halfway through to promote even browning. If you prefer extra crunch, add 2-3 more minutes at the end. Serve your Air Fried Potato Wedges immediately with a side of ketchup, ranch, or your favorite dipping sauce.

For a time-saving hack, soak the sliced potatoes in cold water for 10 minutes before seasoning. This removes excess starch and speeds up cooking. Another trick? Double the batch and freeze half for later—just reheat them in the air fryer for 5 minutes straight from frozen. If you’re short on prep time, skip the peeling step. The skins add texture and nutrients, making your Air Fried Potato Wedges even more satisfying. Keep an eye on them during the last few minutes to prevent over-browning, especially if your air fryer runs hot.

Mistakes I’ve made and learned from

I’ve definitely overcrowded the air fryer basket, thinking I could fit more wedges in one go. The result? Soggy, unevenly cooked potatoes that stuck together. Now I always cook in batches—it’s worth the extra few minutes for perfect crispiness. Another lesson? Skipping the preheat step. My first few attempts at Air Fried Potato Wedges took forever because the air fryer wasn’t hot enough. Now I never skip it, just like I never skip preheating my oven for baking projects. And if your wedges still aren’t crispy enough, try blotting them drier before seasoning or adding a light dusting of cornstarch. For more troubleshooting, check out my guide on common air fryer fixes—it’s saved me more than once!

“`

Cultural Connection and Variations

Where this recipe comes from

Air Fried Potato Wedges might seem like a modern twist, but their roots dig deep into global comfort food traditions. From British chip shops to American diners, thick-cut potatoes have always been a crowd-pleaser. In my family, we’d toss them with paprika and roast them for Sunday dinners, but the air fryer? That’s our game-changer. Meanwhile, in Spain, they might drizzle wedges with smoky pimentón, while in India, turmeric and cumin turn them into a vibrant side. Even the Belgians, who famously perfected fries, might raise an eyebrow at how crispy Air Fried Potato Wedges get without a drop of oil.

Seasonally, these wedges shine year-round. Think summer barbecues or cozy winter nights—they adapt. Some cultures serve them with aioli, others with spicy ketchup. My grandma swore by a sprinkle of garlic powder, while my neighbor insists on Parmesan. The beauty? No two kitchens make them exactly alike. Whether you’re craving nostalgia or a quick snack, Air Fried Potato Wedges bridge the gap between tradition and convenience.

How it fits in today’s cooking

Today, Air Fried Potato Wedges fit seamlessly into busy lives. They’re a healthier swap for fast-food fries, and meal preppers love their versatility. Toss them into lunchboxes, pair them with air-fryer chicken tenders for a kid-friendly dinner, or serve them as a party appetizer. Modern cooks tweak the recipe, too—some add cayenne for heat, while others keep it classic with just salt and pepper.

They’re also a staple for holidays. Imagine a Super Bowl spread or a Fourth of July cookout without them. Plus, with trends like plant-based eating, these wedges star as a satisfying side. For more inspiration, check out how they complement vegan BBQ jackfruit sandwiches. Whether you’re a novice or a pro, Air Fried Potato Wedges prove that some traditions only get better with a little innovation.

Taste and Texture

What makes it delicious

Air Fried Potato Wedges deliver a crave-worthy combination of crispy edges and fluffy centers, making every bite irresistible. The golden-brown exterior crackles with a satisfying crunch, while the inside stays tender and buttery. Aromatic garlic powder and smoky paprika add depth, while a hint of sea salt enhances the natural sweetness of the potatoes. Best of all, air frying locks in moisture without excess oil, so each wedge feels light yet indulgent. Whether you dip them or enjoy them solo, Air Fried Potato Wedges offer a balanced texture and savory flavor that keeps you reaching for more.

Boosting the flavor

For an extra kick, toss your Air Fried Potato Wedges with grated parmesan and fresh rosemary before serving. Alternatively, a drizzle of truffle aioli or a sprinkle of chili flakes elevates the dish with minimal effort. If you prefer bold contrasts, pair them with a tangy avocado lime dip for a creamy, zesty finish. Experiment with smoked salt or Cajun seasoning to tailor the flavor to your taste—each tweak transforms these wedges into a new favorite.

Tips for Success

Best practices for results

First, always soak your potato wedges in cold water for 20 minutes to remove excess starch, which ensures crispier results. Next, pat them completely dry before seasoning—moisture prevents even browning in the air fryer. For the best texture, lightly coat your Air Fried Potato Wedges with oil and spices, then arrange them in a single layer with space between each piece. Additionally, shake the basket halfway through cooking to promote uniform crispness. Finally, let them rest for 2 minutes after cooking so the exterior stays perfectly crunchy.

Mistakes to avoid

Avoid overcrowding the air fryer basket, as this steams the wedges instead of crisping them. If you notice uneven cooking, check out our guide on air fryer troubleshooting for quick fixes. Another common mistake is skipping the preheating step—always preheat your air fryer for 3-5 minutes to jumpstart cooking. For more tips on perfecting crispy potatoes, explore our crispy potato recipes to avoid soggy results. Remember, undersalting before cooking dulls the flavor, so season generously right before air frying.

Serving and Pairing Suggestions

How to serve this dish

Serve your Air Fried Potato Wedges hot and crispy for the best experience. For a fun twist, arrange them in a cone-shaped paper holder or a rustic wooden bowl to mimic a gourmet bistro style. Meanwhile, sprinkle fresh parsley or chives on top for a pop of color. These wedges shine at casual gatherings, game nights, or even as a holiday appetizer. If you want to impress guests, pair them with a trio of dipping sauces in small ramekins for a shareable centerpiece.

What goes well with it

Air Fried Potato Wedges pair perfectly with a creamy garlic aioli or a smoky chipotle mayo for dipping. Alternatively, try serving them alongside a crisp, refreshing salad like our Avocado Ranch Salad to balance the richness. For drinks, a cold craft beer or a zesty lemonade enhances the savory flavors. If you’re planning a full meal, consider adding our Jalapeño Cheddar Burgers for a satisfying combo that everyone will love.

How long do you cook potato wedges in an air fryer?

Air Fried Potato Wedges typically take 15–20 minutes at 400°F (200°C), flipping halfway through. Cooking time may vary slightly depending on the thickness of your wedges and your air fryer model. For extra crispiness, spray them lightly with oil before air frying.

Do you need to soak potato wedges before air frying?

Soaking potato wedges in cold water for 30 minutes removes excess starch, resulting in crispier Air Fried Potato Wedges. Pat them dry thoroughly before seasoning and cooking. This step is optional but recommended for the best texture.

What’s the best seasoning for air fryer potato wedges?

A classic blend of paprika, garlic powder, salt, and black pepper works perfectly for Air Fried Potato Wedges. For a spicy kick, add cayenne pepper or chili powder. Toss the wedges with olive oil before applying the seasoning for even coverage.

Can you freeze air fried potato wedges for later?

Yes, you can freeze Air Fried Potato Wedges after cooling them completely. Store them in an airtight container for up to 3 months. Reheat them in the air fryer at 375°F (190°C) for 5–7 minutes to restore crispiness.

Easy Pizza Sliders – Quick and Cheesy Party Appetizer

easy-pizza-sliders-cheesy-appetizer

Introduction

Hi there! I’m Emily, the heart and soul behind brekcakes.com. From my earliest memories, the kitchen has always been a place of warmth and creativity. It’s where I discovered the magic of turning simple ingredients into extraordinary meals and learned that the best dishes are often made with love as the main ingredient.

If you’re craving a crowd-pleasing snack that’s as fun to make as it is to eat, you’re in the right place. Today, I’m sharing my ultimate Pizza Sliders recipe—a gooey, savory twist on classic sliders that brings everyone to the table. Whether you’re hosting game night or need a quick family dinner, these mini flavor bombs deliver big satisfaction. Plus, they’re so easy to customize, even picky eaters will ask for seconds.

Pizza Sliders are the perfect fusion of two beloved favorites: soft slider buns and the bold flavors of a loaded pizza. Imagine melty mozzarella, zesty marinara, and your favorite toppings tucked between golden, buttery rolls. Not only do they bake in minutes, but they also solve the age-old problem of feeding a hungry crowd without fuss. For busy home cooks, these sliders are a lifesaver—quick to assemble, endlessly adaptable, and guaranteed to disappear fast. If you love easy weeknight recipes or need a dish for potlucks, Pizza Sliders check every box. And if you’re a fan of creative twists, you’ll adore how they capture the essence of a homemade pizza in bite-sized form.

Why I Love This Recipe

Pizza Sliders hold a special place in my heart because they remind me of lazy Sunday afternoons with my family. My kids love helping me layer the toppings, and I love watching their faces light up when the cheese pulls apart in that perfect, stretchy way. They’re more than just food—they’re a reason to gather, laugh, and savor the little moments. Every time I make them, I’m reminded why cooking isn’t just about feeding people; it’s about creating joy.

Health and Nutrition

Why it’s good for your body

Pizza sliders pack a surprising nutritional punch while delivering the classic flavors you love. First, they offer a balanced mix of protein, carbs, and fats, especially when you use whole-grain buns and lean toppings. For example, adding turkey pepperoni or grilled chicken boosts protein without excess saturated fat. Meanwhile, the tomato sauce in pizza sliders provides lycopene, an antioxidant linked to heart health.

Additionally, pizza sliders let you sneak in veggies effortlessly. You can load them with spinach, bell peppers, or mushrooms for extra fiber and vitamins. These ingredients not only enhance flavor but also support digestion and immunity. Plus, because pizza sliders are portion-controlled, they help prevent overeating while satisfying cravings.

Finally, pizza sliders adapt easily to dietary needs. Whether you swap in gluten-free buns or use low-fat cheese, you can tailor them for better nutrition. With smart ingredient choices, pizza sliders become a tasty way to fuel your body without guilt.

How it fits in a healthy lifestyle

Pizza sliders fit perfectly into a balanced diet when you prioritize quality ingredients. For a heart-healthy twist, try whole-wheat buns and part-skim mozzarella. If you’re watching carbs, cauliflower crust sliders or gluten-free alternatives keep things light without sacrificing taste.

They also work well for meal prep. Make a batch ahead for quick lunches or post-workout snacks, pairing them with a side salad for extra greens. For protein-packed versions, add ingredients like grilled chicken or turkey sausage, which align with high-protein meal plans. Pizza sliders prove that convenience and nutrition can go hand in hand.

Print
clock clock iconcutlery cutlery iconflag flag iconfolder folder iconinstagram instagram iconpinterest pinterest iconfacebook facebook iconprint print iconsquares squares iconheart heart iconheart solid heart solid icon

Pizza Sliders


  • Author: Chef Emy

Description

Mini pizza-inspired sliders perfect for parties or a quick snack.


Ingredients

Scale

For the Crust:

  • 12 slider buns
  • 1 cup marinara sauce
  • 1 1/2 cups shredded mozzarella cheese
  • 30 slices pepperoni
  • 1/4 cup melted butter
  • 1 tsp garlic powder
  • 1 tsp Italian seasoning

Instructions

1. Prepare the Crust:

  1. Preheat oven to 350°F (175°C).
  2. Slice slider buns in half and place the bottom halves in a baking dish. Spread marinara sauce evenly over the buns.
  3. Layer mozzarella cheese and pepperoni on top. Cover with the top halves of the buns.
  4. Mix melted butter, garlic powder, and Italian seasoning. Brush over the tops of the sliders.
  5. Bake for 15-20 minutes until cheese is melted and buns are golden.

Notes

You can customize the seasonings to taste.

“`html

How to Prepare This Dish

Steps and time-saving tips

First, preheat your oven to 375°F and grab a large baking sheet. While the oven heats, slice your slider buns in half horizontally, keeping them connected if possible. Spread a generous layer of marinara sauce on the bottom half, then sprinkle shredded mozzarella evenly over the sauce. Next, layer your favorite pizza toppings—pepperoni, sautéed mushrooms, or bell peppers work great. Top everything with another handful of cheese for extra gooeyness. Place the top half of the buns over the fillings and brush melted butter mixed with garlic powder on top. Bake for 12-15 minutes until golden and bubbly. Let them cool for 2 minutes before slicing into individual sliders. For a time-saving hack, prep the fillings ahead and assemble just before baking. If you’re short on time, store-bought marinara and pre-shredded cheese speed things up without sacrificing flavor.

Mistakes I’ve made and learned from

I once rushed the baking time and ended up with Pizza Sliders that were still doughy in the middle. Now I always check for a crisp top and melted cheese before pulling them out. Another blunder? Overloading the sliders with toppings, which made them messy to eat. I’ve since learned that less is more—just like with my Perfect Cheeseburger Sliders. Also, skipping the butter wash left the tops dry, so now I never forget that step. If you’re new to sliders, my Slider Buns Guide has more tips to avoid common pitfalls. Trust me, these small adjustments make all the difference between good and great Pizza Sliders.

“`

Cultural Connection and Variations

Where this recipe comes from

Pizza Sliders might feel like a modern party snack, but they actually weave together two beloved culinary traditions. The concept takes inspiration from Italian-American pizza and the classic slider, a mini sandwich with roots in 1940s diners. Families often put their own spin on Pizza Sliders, whether by using grandma’s homemade marinara or topping them with spicy pepperoni for a kick. In some regions, cooks swap the traditional mozzarella for provolone or add a sprinkle of oregano to honor old-world flavors.

Meanwhile, other cultures adapt Pizza Sliders to local tastes. In Brazil, for example, you might find them stuffed with catupiry cheese, while in Japan, they could feature teriyaki-glazed chicken. Even within the U.S., variations pop up—think Philly cheesesteak-style sliders or a veggie-packed version for meatless Mondays. Whether served at game-day gatherings or weeknight dinners, Pizza Sliders bridge comfort food and creativity, making them a universal crowd-pleaser.

How it fits in today’s cooking

Today, Pizza Sliders shine as a versatile staple for busy cooks and entertainers alike. They fit perfectly into meal-prep routines, since you can bake a batch ahead and reheat them for quick lunches. Many families also include them in holiday spreads, pairing them with other easy appetizers like air fryer appetizers for stress-free hosting. Plus, with gluten-free or cauliflower crust options, they adapt to nearly any dietary need.

Social media fuels new twists, too, like viral TikTok versions stuffed with extra cheese or drizzled with hot honey. For weeknight wins, try pairing Pizza Sliders with a crisp salad or one-pot meals to round out the table. No matter how you serve them, these mini bites prove that good food doesn’t need to be complicated—just delicious.

Taste and Texture

What makes it delicious

Pizza Sliders deliver a mouthwatering explosion of flavors and textures in every bite. The soft, buttery rolls cradle a gooey layer of melted mozzarella, while the savory marinara sauce adds a tangy sweetness. Crispy pepperoni or seasoned ground beef brings a satisfying crunch, contrasting perfectly with the pillowy bread. Garlic butter brushed on top adds a fragrant, golden finish that makes Pizza Sliders irresistible. Each slider packs the nostalgic taste of pizza but in a fun, handheld format—perfect for sharing or devouring solo.

Boosting the flavor

For an extra flavor kick, try swapping classic pepperoni for spicy Italian sausage or smoky bacon. A sprinkle of grated parmesan or a drizzle of homemade garlic butter right before serving elevates the richness. If you love heat, add sliced jalapeños or a dash of red pepper flakes. Don’t forget a side of creamy ranch dip for dipping—its cool, herby notes balance the sliders’ bold flavors. With these tweaks, Pizza Sliders become even more crave-worthy.

Tips for Success

Best practices for results

Always preheat your oven before baking Pizza Sliders to ensure even cooking. Meanwhile, use fresh mozzarella instead of pre-shredded cheese for the best melt and flavor. Additionally, lightly brush the slider buns with garlic butter before assembling to add extra richness. For crispier edges, space the sliders slightly apart on the baking sheet. Finally, let them rest for 5 minutes after baking so the cheese sets perfectly.

Mistakes to avoid

Avoid overloading Pizza Sliders with toppings, as this can make them soggy or difficult to eat. Instead, stick to a balanced ratio of sauce, cheese, and meats. Also, don’t skip the parchment paper—it prevents sticking and helps with cleanup. If you’re unsure about seasoning, check out our guide to seasoning blends for foolproof flavor combinations. Another common mistake is using cold dough straight from the fridge; for easier handling, let it soften slightly, as explained in our dough preparation tips.

Serving and Pairing Suggestions

How to serve this dish

Serve Pizza Sliders warm and fresh from the oven for the best flavor and texture. Arrange them on a wooden board or colorful platter to create a casual, shareable vibe. For a festive touch, garnish with fresh basil leaves or a sprinkle of grated Parmesan. These sliders shine at game-day parties, family gatherings, or even as a fun weeknight dinner. If you’re hosting a brunch, pair them with a light salad for a balanced meal. No matter the occasion, Pizza Sliders always bring a crowd-pleasing twist to the table.

What goes well with it

Pair Pizza Sliders with a crisp Caesar salad for a refreshing contrast to their rich, cheesy goodness. Alternatively, try them alongside garlic knots or roasted vegetables for extra comfort. For drinks, a chilled lemonade or sparkling soda balances the savory flavors perfectly. If you love dipping sauces, our homemade marinara or creamy ranch dressing takes these sliders to the next level. Explore more pairing inspiration with our favorite appetizers or crowd-pleasing party snacks for a full spread.

What are pizza sliders made of?

Pizza sliders are mini sandwiches made with slider buns, pizza sauce, mozzarella cheese, and your favorite pizza toppings like pepperoni, sausage, or veggies. They combine the flavors of a classic pizza with the convenience of a handheld snack, perfect for parties or quick meals.

How do you keep pizza sliders from getting soggy?

To prevent soggy pizza sliders, lightly toast the buns before assembling and use a moderate amount of sauce. You can also layer cheese directly on the bun to create a barrier between the sauce and bread. Baking them uncovered helps crisp the edges.

Can you make pizza sliders ahead of time?

Yes! Assemble pizza sliders up to 24 hours in advance, cover tightly with foil, and refrigerate until ready to bake. For best results, add fresh toppings like basil after baking. This makes them ideal for meal prep or entertaining.

What sides go well with pizza sliders?

Pizza sliders pair perfectly with marinara or ranch dipping sauce, a crisp green salad, or garlic Parmesan fries. For parties, serve them alongside other finger foods like mozzarella sticks or vegetable trays to complement the pizza flavors.

Easy Sweet & Spicy Meatballs – Perfect Party Appetizer

easy-sweet-spicy-meatballs

Introduction

Hi there! I’m Emily, the heart and soul behind brekcakes.com. From my earliest memories, the kitchen has always been a place of warmth and creativity. It’s where I discovered the magic of turning simple ingredients into extraordinary meals and learned that the best dishes are often made with love as the main ingredient.

If you’re craving a dish that balances bold flavors with effortless preparation, you’re in the right place. These Easy Sweet & Spicy Meatballs deliver the perfect harmony of heat and sweetness, making them a crowd-pleaser for weeknight dinners or game-day gatherings. Whether you’re a busy parent or a flavor enthusiast, this recipe promises to simplify your cooking while packing a punch. Plus, it’s versatile enough to pair with your favorite sides or even garlic butter noodles for a complete meal.

Easy Sweet & Spicy Meatballs combine ground meat, a blend of spices, and a sticky glaze that caramelizes beautifully. What sets them apart is their ability to cater to diverse tastes—kids love the sweetness, while adults appreciate the subtle kick. Unlike fussy recipes, this one requires minimal prep and common pantry staples. It’s a testament to my belief that great food doesn’t need complexity. For more inspiration, check out my honey sriracha chicken, which shares the same sweet-heat philosophy. The meatballs also freeze well, making them a practical choice for meal preppers. Above all, they embody the brekcakes.com spirit: approachable, flavorful, and designed to bring people together.

Why I Love This Recipe

These Easy Sweet & Spicy Meatballs hold a special place in my kitchen because they remind me of family potlucks where everyone raved about them. I perfected the recipe over years of tweaking, and now it’s my go-to when I need something reliably delicious. The way the glaze clings to each bite never fails to impress, and seeing guests reach for seconds always brings me joy. It’s more than a recipe—it’s a little piece of my culinary journey.

Health and Nutrition

Why it’s good for your body

Easy Sweet & Spicy Meatballs pack a nutritious punch while delighting your taste buds. First, they deliver a solid dose of protein from lean ground meat, which helps build muscle and keeps you full longer. Additionally, the blend of spices like garlic and chili powder offers anti-inflammatory benefits, supporting your immune system. Meanwhile, the touch of natural sweetness from ingredients like honey balances the heat without relying on processed sugars.

Moreover, Easy Sweet & Spicy Meatballs include wholesome ingredients like fresh herbs and tomato-based sauces, which provide antioxidants. These compounds fight free radicals and promote overall wellness. The dish also contains healthy fats if you use olive oil, which supports heart health. Plus, the fiber from any added vegetables aids digestion and keeps blood sugar stable.

Finally, Easy Sweet & Spicy Meatballs are versatile enough to fit various dietary preferences. Whether you serve them over zucchini noodles or whole-grain rice, you can customize the meal for extra nutrients. With balanced flavors and nourishing ingredients, this dish proves that healthy eating doesn’t have to be boring.

How it fits in a healthy lifestyle

Easy Sweet & Spicy Meatballs easily adapt to different health goals. For a high-protein diet, pair them with quinoa or lentils to boost your intake. If you’re watching carbs, try serving them with cauliflower rice or a crisp salad. The recipe also works well for gluten-free eaters since you can use almond flour or gluten-free breadcrumbs as binders.

For heart-healthy eating, opt for lean turkey or chicken and cook with olive oil. The dish’s bold flavors mean you won’t miss excess salt, making it a smart choice for blood pressure management. If you love meal prepping, these meatballs freeze beautifully for quick, balanced lunches. Check out our meal prep guide for more time-saving ideas.

Even busy families can enjoy Easy Sweet & Spicy Meatballs without guilt. They’re a great way to sneak veggies into picky eaters’ meals. For more family-friendly recipes, explore our kid-approved dinner roundup. With simple swaps and smart pairings, this dish fits seamlessly into any healthy routine.

Print
clock clock iconcutlery cutlery iconflag flag iconfolder folder iconinstagram instagram iconpinterest pinterest iconfacebook facebook iconprint print iconsquares squares iconheart heart iconheart solid heart solid icon

Easy Sweet & Spicy Meatballs


  • Author: Chef Emy

Description

Juicy meatballs coated in a sweet and spicy glaze, perfect as an appetizer or main dish.


Ingredients

Scale

For the Crust:

  • 1 lb ground beef
  • 1/2 cup breadcrumbs
  • 1 egg
  • 1 tsp garlic powder
  • 1 tsp onion powder
  • 1/2 tsp salt
  • 1/2 tsp black pepper
  • 1/2 cup ketchup
  • 1/4 cup honey
  • 1 tbsp sriracha sauce
  • 1 tbsp soy sauce

Instructions

1. Prepare the Crust:

  1. Preheat oven to 375°F (190°C). Line a baking sheet with parchment paper.
  2. In a large bowl, mix ground beef, breadcrumbs, egg, garlic powder, onion powder, salt, and black pepper until well combined.
  3. Shape the mixture into 1-inch meatballs and place them on the prepared baking sheet.
  4. Bake for 20-25 minutes, or until the meatballs are cooked through.
  5. In a small saucepan, combine ketchup, honey, sriracha, and soy sauce. Simmer over low heat for 5 minutes, stirring occasionally.
  6. Toss the baked meatballs in the glaze until evenly coated. Serve warm.

Notes

You can customize the seasonings to taste.

How to Prepare This Dish

Steps and time-saving tips

Start by preheating your oven to 375°F so it’s ready when you are. While it heats, grab a large bowl and mix the ground meat, breadcrumbs, egg, and seasonings until just combined—overmixing can make the Easy Sweet & Spicy Meatballs tough. Roll the mixture into evenly sized balls, about 1.5 inches in diameter, and place them on a parchment-lined baking sheet for easy cleanup. Next, whisk together the sweet and spicy sauce in a small bowl, then drizzle half of it over the meatballs before baking. This step locks in flavor and keeps them juicy. Bake for 18-20 minutes, flipping halfway through for even browning. Meanwhile, warm the remaining sauce in a saucepan for serving. To save time, prep the meatball mixture the night before and store it covered in the fridge. If you’re short on time, skip rolling and use a small cookie scoop for uniform meatballs in seconds. Let them rest for 5 minutes after baking—this helps them hold their shape when tossed in the extra sauce.

Mistakes I’ve made and learned from

I once rushed the mixing process and ended up with dense, dry Easy Sweet & Spicy Meatballs—now I know gentle hands make tender results. Another time, I skipped the parchment paper, and the meatballs stuck stubbornly to the pan. Lesson learned: always line your sheet! If your sauce thickens too much while reheating, thin it with a splash of broth or water, a trick I picked up from my favorite sauce guide. And if you’re doubling the recipe, avoid overcrowding the baking sheet (trust me, I’ve been there). For more on balancing heat in dishes, check out my spicy flavor pairings tips—it’s a game-changer for adjusting the kick in this recipe.

Cultural Connection and Variations

Where this recipe comes from

Easy Sweet & Spicy Meatballs have roots that stretch across continents, blending flavors from Asia, the Middle East, and America. In Sweden, meatballs often feature creamy gravy, while in Thailand, they might include fish sauce and chili. This recipe, however, strikes a perfect balance between sweet and heat, making it a crowd-pleaser no matter where you serve it. My grandmother used to make a version with grape jelly and chili sauce, proving that even humble ingredients can create something unforgettable.

Around the world, cooks put their own spin on meatballs. In Italy, they simmer in tomato sauce, while in Morocco, they might include cumin and cinnamon. Easy Sweet & Spicy Meatballs borrow from these traditions but keep things simple for busy home chefs. During holidays, some families add cranberry sauce for a festive twist, while others stick to the classic combo of brown sugar and sriracha. No matter the variation, the dish always brings people together.

How it fits in today’s cooking

Today, Easy Sweet & Spicy Meatballs remain a go-to for weeknight dinners, potlucks, and game-day spreads. They’re versatile enough to pair with rice, noodles, or even as a standalone appetizer. Modern cooks love how quickly they come together, especially when using an Instant Pot to speed up the process. Others swap ground turkey or plant-based meat to fit dietary preferences, proving the recipe adapts to any lifestyle.

Seasonal twists keep the dish fresh year-round. In summer, grill the meatballs for a smoky kick, or serve them at holiday parties alongside festive desserts. Whether you’re meal prepping or hosting friends, Easy Sweet & Spicy Meatballs deliver flavor without fuss. They’re proof that some recipes never go out of style.

Taste and Texture

What makes it delicious

Easy Sweet & Spicy Meatballs deliver a mouthwatering balance of flavors and textures. Each bite starts with a sticky-sweet glaze that caramelizes slightly, followed by a gentle kick of heat that lingers just enough to excite your taste buds. The meatballs themselves stay juicy and tender inside, while the edges develop a subtle crispness from baking or searing. Fragrant garlic and ginger deepen the savoriness, while a touch of soy sauce or brown sugar rounds out the umami-rich profile. Whether served as an appetizer or over rice, Easy Sweet & Spicy Meatballs offer a satisfying contrast of sticky, savory, and spicy—perfect for anyone craving bold, crowd-pleasing flavor.

Boosting the flavor

For an extra flavor boost, try swapping honey for brown sugar in the glaze to add floral sweetness or mixing in a dash of sriracha for more heat. Topping Easy Sweet & Spicy Meatballs with toasted sesame seeds or chopped scallions adds crunch and freshness. Pair them with a cooling drizzle of creamy avocado dressing or serve alongside garlic butter noodles for a comforting meal. Experiment with smoked paprika or a splash of lime juice to brighten the dish—every small tweak can elevate these meatballs to new heights.

Tips for Success

Best practices for results

For the best Easy Sweet & Spicy Meatballs, always mix your ground meat gently to avoid tough results. Additionally, preheat your oven fully before baking to ensure even cooking. If you prefer a stickier glaze, simmer the sauce a few extra minutes until it thickens. Finally, let the meatballs rest for 5 minutes after baking so they hold their shape when serving.

Mistakes to avoid

One common error is overpacking the meatball mixture, which can make them dense. Instead, lightly roll them for a tender bite. Another mistake is skipping the breadcrumb soak—this step keeps Easy Sweet & Spicy Meatballs juicy. For more on perfect meat texture, check out our guide on choosing the right ground meat. Also, avoid overcrowding the baking sheet, or they’ll steam instead of brown. Learn pro baking tray tricks in our baking sheet hacks post.

Serving and Pairing Suggestions

How to serve this dish

Easy Sweet & Spicy Meatballs shine as a crowd-pleasing appetizer or a hearty main course. For parties, arrange them on a platter with colorful toothpicks for easy grabbing. Alternatively, drizzle extra glaze over the top and sprinkle chopped cilantro for a vibrant finish. During holidays, serve them in a slow cooker to keep warm while guests mingle. If you prefer a family-style meal, pair them with fluffy rice or noodles for a satisfying dinner.

What goes well with it

Cooling sides balance the bold flavors of Easy Sweet & Spicy Meatballs perfectly. Try a crisp cucumber salad or our refreshing Creamy Coleslaw to cut through the heat. For drinks, a citrusy sparkling lemonade or a light lager complements the sweetness and spice. If you want a heartier pairing, serve them alongside our Garlic Butter Dinner Rolls to soak up every bit of the delicious glaze.

What’s the best sauce for Easy Sweet & Spicy Meatballs?

A combination of sweet chili sauce and barbecue sauce works perfectly for Easy Sweet & Spicy Meatballs. You can also add a splash of sriracha or red pepper flakes for extra heat. The balance of sweet and spicy flavors makes these meatballs a crowd-pleaser.

Can I make Easy Sweet & Spicy Meatballs ahead of time?

Yes! Easy Sweet & Spicy Meatballs can be prepared in advance and stored in the fridge for up to 3 days. Reheat them in the oven or slow cooker before serving to maintain their juicy texture and bold flavor.

What sides go well with Easy Sweet & Spicy Meatballs?

Serve Easy Sweet & Spicy Meatballs with rice, mashed potatoes, or crusty bread to soak up the delicious sauce. A fresh green salad or roasted vegetables also pairs nicely to balance the rich flavors.

How do I keep Easy Sweet & Spicy Meatballs from falling apart?

Use a binder like breadcrumbs or egg to help hold the meatballs together. Chilling the mixture for 20-30 minutes before shaping also ensures Easy Sweet & Spicy Meatballs stay firm while cooking.

Best Marry Me Chicken Pasta – Creamy & Delicious

best-marry-me-chicken-pasta

Introduction

Hi there! I’m Emily, the heart and soul behind brekcakes.com. From my earliest memories, the kitchen has always been a place of warmth and creativity. It’s where I discovered the magic of turning simple ingredients into extraordinary meals and learned that the best dishes are often made with love as the main ingredient.

If you’ve ever craved a dish that feels like a warm hug, Marry Me Chicken Pasta is your answer. This recipe isn’t just food—it’s a story on a plate, one that whispers comfort and celebration with every bite. Whether you’re cooking for a special someone or simply treating yourself, this dish promises to deliver rich flavors and unforgettable moments. Plus, it’s surprisingly easy to make, even on busy weeknights.

Marry Me Chicken Pasta combines tender chicken, sun-dried tomatoes, and a creamy Parmesan sauce with a hint of garlic and herbs. Legend says it earned its name because it’s so delicious, it could inspire a marriage proposal. While I can’t guarantee romance, I can promise a meal that will have everyone asking for seconds. The dish perfectly fits the brekcakes.com ethos: approachable, flavorful, and made with heart. If you love cozy pasta dishes like my Creamy Garlic Parmesan Pasta, you’ll adore this recipe. And if you’re new to cooking with sun-dried tomatoes, don’t worry—my Sun-Dried Tomato Guide breaks down everything you need to know.

Why I Love This Recipe

Marry Me Chicken Pasta holds a special place in my kitchen because it’s the dish I made for my now-husband on our third date. He still jokes that the pasta sealed the deal. Beyond the sentimental value, I love how versatile it is—swap the protein, adjust the spice level, or add veggies, and it still shines. Most importantly, it reminds me that the best meals aren’t just about taste; they’re about the memories we create around the table.

Health and Nutrition

Why it’s good for your body

Marry Me Chicken Pasta packs a nutritious punch while delivering irresistible flavor. First, the lean chicken breast provides high-quality protein to support muscle growth and repair. Additionally, the sundried tomatoes and garlic offer antioxidants that help combat inflammation. Because of its balanced ingredients, Marry Me Chicken Pasta keeps you satisfied without feeling heavy.

Moreover, the dish includes healthy fats from olive oil, which promote heart health and nutrient absorption. The creamy sauce, when made with moderation in mind, adds richness without excessive calories. Furthermore, the pasta offers energizing carbohydrates, making this meal a great choice for active lifestyles. With each bite, Marry Me Chicken Pasta delivers both comfort and nourishment.

Finally, the herbs and spices in the recipe, like basil and oregano, contribute not just flavor but also potential immune-boosting benefits. Whether you need a post-workout meal or a cozy dinner, Marry Me Chicken Pasta checks all the boxes for taste and wellness.

How it fits in a healthy lifestyle

Marry Me Chicken Pasta easily adapts to various dietary preferences, making it a versatile choice for health-conscious eaters. For a gluten-free version, simply swap regular pasta for your favorite gluten-free alternative. If you’re focusing on protein intake, the chicken ensures you meet your goals while staying full longer.

This dish also fits well into meal prep routines. Pair it with a fresh vegetable side for added fiber and vitamins. For those watching portion sizes, dividing servings ahead of time helps maintain balance. Plus, the recipe’s flexibility means you can adjust ingredients to suit your needs, like using low-fat dairy or extra veggies.

Looking for more ways to enjoy wholesome meals? Check out our guide to quick healthy dinners for additional inspiration. Whether you’re cooking for one or feeding a family, Marry Me Chicken Pasta makes eating well simple and delicious.

Print
clock clock iconcutlery cutlery iconflag flag iconfolder folder iconinstagram instagram iconpinterest pinterest iconfacebook facebook iconprint print iconsquares squares iconheart heart iconheart solid heart solid icon

Marry Me Chicken Pasta


  • Author: Chef Emy

Description

A creamy and flavorful pasta dish with tender chicken, sun-dried tomatoes, and a rich sauce that’s sure to impress.


Ingredients

Scale

For the Crust:

  • 8 oz fettuccine pasta
  • 2 boneless, skinless chicken breasts
  • 1 tbsp olive oil
  • 1/2 cup sun-dried tomatoes, chopped
  • 3 cloves garlic, minced
  • 1 cup heavy cream
  • 1/2 cup chicken broth
  • 1/2 cup grated parmesan cheese
  • 1 tsp Italian seasoning
  • 1/4 tsp red pepper flakes
  • Salt and pepper to taste
  • Fresh basil for garnish

Instructions

1. Prepare the Crust:

  1. Cook the pasta according to package instructions. Drain and set aside.
  2. Season chicken breasts with salt and pepper. Heat olive oil in a large skillet over medium-high heat and cook chicken until golden and cooked through, about 6-7 minutes per side. Remove and slice into strips.
  3. In the same skillet, add sun-dried tomatoes and garlic. Sauté for 1-2 minutes until fragrant.
  4. Pour in heavy cream and chicken broth, stirring to combine. Bring to a simmer.
  5. Stir in parmesan cheese, Italian seasoning, and red pepper flakes. Simmer for 3-4 minutes until slightly thickened.
  6. Add cooked pasta and sliced chicken to the skillet, tossing to coat in the sauce.
  7. Garnish with fresh basil before serving.

Notes

You can customize the seasonings to taste.

How to Prepare This Dish

Steps and time-saving tips

Start by seasoning your chicken breasts generously with salt, pepper, and a pinch of garlic powder. Meanwhile, heat olive oil in a large skillet over medium-high heat. Sear the chicken for about 6 minutes per side until golden brown, then set it aside. In the same skillet, sauté minced garlic and sun-dried tomatoes for a minute until fragrant. Next, pour in heavy cream and chicken broth, whisking constantly to create a smooth sauce. Stir in grated Parmesan and a dash of Italian seasoning, letting it simmer until slightly thickened. Slice the cooked chicken into strips and fold them back into the sauce. Finally, toss in cooked pasta and fresh spinach, stirring until the spinach wilts. For a time-saving hack, use pre-cooked chicken or store-bought rotisserie chicken to skip the searing step. Just warm it through in the sauce instead. Serve your Marry Me Chicken Pasta immediately with an extra sprinkle of Parmesan and a drizzle of olive oil for a restaurant-worthy finish.

Mistakes I’ve made and learned from

Early on, I rushed the sauce and ended up with a grainy texture because I added the Parmesan too quickly. Now, I whisk the cheese in gradually over low heat to ensure it melts smoothly. Another blunder? Overcooking the chicken, which made it dry. I’ve since learned to pull it off the heat at 165°F and let it rest before slicing. If you’re new to cooking chicken perfectly, my guide on checking internal temperatures will save you from the same fate. And if your sauce ever feels too thick, don’t panic—just thin it with a splash of reserved pasta water, a trick I picked up from my pasta sauce secrets post. Trust me, these small adjustments make all the difference!

Cultural Connection and Variations

Where this recipe comes from

Marry Me Chicken Pasta might sound like a modern viral sensation, but its roots dig deep into Italian-American comfort food traditions. Legend says the dish earned its name because it’s so irresistibly delicious, it could inspire a marriage proposal. While the exact origin is hazy, many tie it to rustic Italian cooking, where creamy sauces and tender chicken pair with pasta for hearty family meals.

Across Italy, you’ll find regional twists on similar dishes. In the north, cooks might swap heavy cream for mascarpone, while southern versions often add sun-dried tomatoes or a kick of chili flakes. Some families even prepare Marry Me Chicken Pasta with a splash of white wine for extra depth. Meanwhile, in American kitchens, adaptations range from gluten-free pasta to dairy-free alternatives, proving how versatile this dish truly is.

In my own home, we make it for special occasions—birthdays, anniversaries, or just those nights when everyone needs a little extra comfort. The aroma of garlic and herbs fills the kitchen, and somehow, every bite feels like a warm hug. Whether you stick to the classic or put your own spin on it, Marry Me Chicken Pasta always brings people together.

How it fits in today’s cooking

Today, Marry Me Chicken Pasta holds its own as a go-to for busy weeknights and celebratory dinners alike. Its rich, creamy sauce and simple prep make it a favorite for meal preppers, while its indulgent flavor keeps it in rotation for date nights. Modern cooks often lighten it up with grilled chicken or sneak in extra veggies like spinach or mushrooms.

Seasonally, it shines in fall and winter, but let’s be honest—comfort food knows no calendar. Some even serve it as a twist on holiday classics, swapping out heavier mains for something equally satisfying. If you’re looking for more ways to adapt it, check out our guide to easy weeknight dinners or explore how to pair it with sides from our seasonal salads collection. No matter how you tweak it, Marry Me Chicken Pasta stays a timeless crowd-pleaser.

Taste and Texture

What makes it delicious

Marry Me Chicken Pasta delivers a luxurious blend of rich, savory flavors and irresistible textures. The tender, juicy chicken pairs perfectly with al dente pasta, while the creamy sun-dried tomato sauce coats every bite with a velvety smoothness. Fragrant garlic and aromatic herbs like thyme and oregano add depth, while a hint of Parmesan cheese brings a salty, umami kick. Each forkful of Marry Me Chicken Pasta balances the bright tang of sun-dried tomatoes with the subtle sweetness of caramelized shallots, creating a dish that’s as comforting as it is sophisticated. The sauce clings to the pasta just right, making every mouthful satisfyingly hearty yet surprisingly light.

Boosting the flavor

Elevate your Marry Me Chicken Pasta with a few easy tweaks. For extra richness, swap heavy cream for mascarpone cheese or stir in a spoonful of pesto for a herby punch. Crispy pancetta or toasted pine nuts add a delightful crunch, while a sprinkle of red pepper flakes brings gentle heat. If you love bold flavors, try a splash of white wine to deglaze the pan before adding the sauce. Pair it with a fresh garden salad to balance the dish’s richness, or serve it alongside garlic bread for soaking up every last drop of sauce. A squeeze of lemon juice just before serving brightens the entire dish, making the flavors pop even more.

Tips for Success

Best practices for results

Always sear the chicken first to lock in juices before adding it to your Marry Me Chicken Pasta. Meanwhile, use freshly grated Parmesan instead of pre-shredded cheese for a smoother, richer sauce. Additionally, simmer the sauce on low heat to prevent curdling and ensure perfect creaminess. Finally, taste and adjust seasoning just before serving to balance the flavors perfectly.

Mistakes to avoid

Avoid overcrowding the pan when browning the chicken, as this steams instead of sears the meat. Instead, cook in batches for a golden crust. Also, don’t skip deglazing the pan with broth—it adds depth to your Marry Me Chicken Pasta. For more on perfecting sauces, check out our creamy sauce guide. Lastly, resist overcooking the pasta; al dente texture works best. Learn more about ideal pasta doneness in our pasta cooking tips.

Serving and Pairing Suggestions

How to serve this dish

Marry Me Chicken Pasta deserves a show-stopping presentation to match its rich flavors. For a romantic dinner, plate it on warm, wide-rimmed dishes and top with fresh basil leaves or a sprinkle of grated Parmesan. Alternatively, serve it family-style in a large ceramic bowl for cozy gatherings. This dish shines at dinner parties, but it also makes a comforting weeknight meal when paired with crusty bread. To elevate the look, drizzle a touch of olive oil over the pasta just before serving.

What goes well with it

A crisp Caesar salad balances the creamy richness of Marry Me Chicken Pasta perfectly. The tangy dressing and crunchy romaine cut through the decadent sauce. For a heartier meal, try pairing it with garlic knots or our favorite garlic herb focaccia. Wine lovers will enjoy a chilled glass of Sauvignon Blanc, which highlights the dish’s herbal notes. If you prefer non-alcoholic options, our sparkling lemonade adds a refreshing contrast.

Why is it called Marry Me Chicken Pasta?

The name “Marry Me Chicken Pasta” comes from the dish’s irresistible flavor, which is so delicious it could supposedly inspire a marriage proposal. This creamy, flavorful pasta combines tender chicken, sun-dried tomatoes, and a rich sauce that makes it a standout meal. Many believe the name originated from viral recipes claiming the dish was “good enough to propose over.”

What makes Marry Me Chicken Pasta different from regular chicken pasta?

Marry Me Chicken Pasta stands out with its signature creamy sauce made with heavy cream, Parmesan, and sun-dried tomatoes, giving it a rich, tangy flavor. Unlike basic chicken pasta, this dish often includes herbs like basil or oregano and a touch of red pepper flakes for a subtle kick. The combination of flavors creates a more decadent and memorable meal.

Can I make Marry Me Chicken Pasta ahead of time?

Yes, you can prepare Marry Me Chicken Pasta in advance, but it’s best stored without the sauce to prevent the pasta from becoming mushy. Reheat the sauce separately and combine it with the pasta just before serving for the best texture. The flavors often deepen when allowed to sit, making leftovers just as delicious.

What sides go well with Marry Me Chicken Pasta?

Marry Me Chicken Pasta pairs well with a crisp green salad, garlic bread, or roasted vegetables like asparagus or broccoli. Since the dish is already rich, lighter sides help balance the meal. A glass of white wine or sparkling water with lemon complements the flavors perfectly.