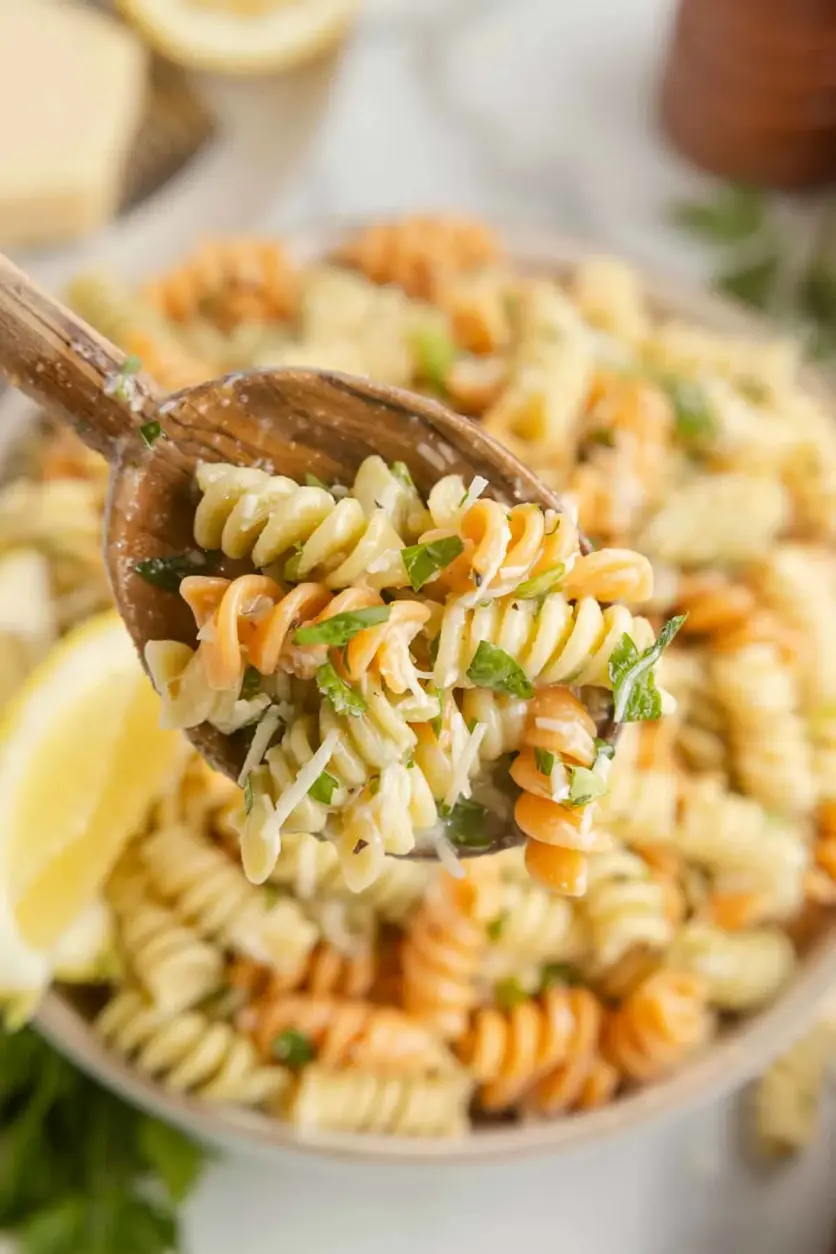
Bacon Wrapped Grilled Corn

The Ultimate Bacon Wrapped Grilled Corn: Your New Secret BBQ Weapon

Transform ordinary corn on the cob into a smoky, savory, show-stopping masterpiece with this foolproof grilled recipe. Perfect for your next backyard party.

Prep Time Cook Time Total Time Servings Difficulty
15 minutes 45 minutes 1 hour 6 servings Easy

Why This Recipe is a Game-Changer

Imagine the sweet, juicy crunch of perfect summer corn, now enveloped in a crispy, salty, smoky blanket of bacon, kissed by the flames of your grill. That’s the magic of Bacon Wrapped Grilled Corn. This isn’t just a side dish; it’s the centerpiece of your cookout, the conversation starter, the recipe your guests will beg you for. At Cooking With Emy, we believe in elevating simple ingredients into unforgettable experiences, and this recipe does exactly that. It combines two backyard BBQ legends—grilled corn and bacon—into one irresistible package. The process is surprisingly simple, but the result tastes like gourmet genius. Whether you’re planning a laid-back family dinner, a festive 4th of July celebration, or a competitive potluck, this corn will make you the undisputed grill master of the day. Let’s fire up the grill and create some delicious memories.

Why This is the BEST Bacon Wrapped Grilled Corn Recipe

You might find other recipes for bacon-wrapped corn, but ours is meticulously crafted for maximum flavor and foolproof results. First, we use the foil-packet method, which is the secret weapon for this recipe. It steams the corn in its own juices and the rendering bacon fat, ensuring every kernel is incredibly tender and infused with smoky bacon flavor, while protecting the bacon from burning over direct flames. Second, we specify turning the packets every 10 minutes. This isn’t busywork—it’s the key to even cooking and crispiness, preventing hot spots on your grill from charring one side. Finally, our timing and temperature guidance ensures the bacon is perfectly cooked: rendered, crispy, and clinging to the sweet corn, not undercooked and chewy or burnt to a crisp. We’ve tested this method repeatedly to give you a reliable, spectacular result every single time.

💡 The Kitchen Team’s Pro Tip: For the absolute best flavor, use a standard, medium-thick cut bacon. Very thin bacon may overcook and tear, while extremely thick-cut bacon may not crisp up fully in the same time it takes the corn to cook. A good, smoky applewood or hickory-smoked bacon will add incredible depth.

Ingredients & Simple Substitutions

This recipe celebrates simplicity, requiring only a few high-quality ingredients. Here’s what you’ll need and how you can adapt it based on what you have.

Ingredient Quantity Notes & Substitutions
Fresh Corn on the Cob 6 ears Husks and silks removed. Look for ears with bright green, snug husks and plump kernels. In a pinch, you can use thawed frozen corn on the cob, but fresh is ideal.
Bacon 1 lb (16 oz package) Standard cut works best. For dietary needs, turkey bacon or a plant-based bacon alternative can be used, but cooking time may vary.
Kosher Salt & Black Pepper To taste The foundation of seasoning. We prefer kosher salt for its clean flavor.
Fresh Cilantro (Optional) For garnish Adds a bright, fresh contrast. Chopped parsley, chives, or a sprinkle of smoked paprika are excellent alternatives.

Step-by-Step Grilling Instructions

Follow these detailed steps for perfectly cooked bacon wrapped corn, from prep to plate.

Step Instructions Visual Cue
1. Prep the Grill Prepare your charcoal or gas grill for direct, high heat (around 400-450°F). You should be able to hold your hand about 5 inches above the grates for only 2-3 seconds. Grill grates are hot and clean.
2. Prep the Corn Rinse each ear of corn under cold water to remove any remaining silk and pat completely dry with paper towels. A dry surface helps the bacon adhere. Season each cob lightly with salt and pepper. Corn is dry to the touch and seasoned.
3. Wrap with Bacon Starting at the top of the cob, spiral 2-3 slices of bacon around each ear, slightly overlapping the strips. Tuck the end of the last slice under a previous wrap to secure it. Don’t wrap too tightly, as the bacon will shrink. Bacon covers most of the corn in a spiral.
4. Create the Foil Packets Place each bacon-wrapped cob on a large piece of heavy-duty aluminum foil. Roll the corn in the foil, then tightly fold in the ends, creating a sealed packet. This locks in steam and fat. A sealed, rectangular packet with no openings.
5. Grill the Packets Place the foil packets directly on the hot grill grates. Close the lid and cook for 40-45 minutes, turning the packets a quarter turn every 10 minutes with tongs. Packets are rotated consistently.
6. Check for Doneness After 40 minutes, carefully open one packet (watch for steam!). The corn kernels should be tender when pierced with a fork, and the bacon should be cooked through and starting to crisp at the edges. Bacon is cooked, corn is tender.
7. Crisp the Bacon (Optional) For extra-crispy bacon, carefully unwrap the foil for the last 3-5 minutes of grilling, turning the corn directly on the grates to finish the bacon. Bacon is sizzling and crisp.
8. Garnish & Serve Transfer the corn to a platter. Garnish with fresh chopped cilantro if desired. Serve immediately while hot and juicy. Steaming, fragrant corn ready to eat.
💡 The Kitchen Team’s Pro Tip: Keep the grill lid closed as much as possible! This creates an oven-like environment, ensuring even heat circulation around the packets. Only open it to turn the packets or check for doneness.

Serving Suggestions & Perfect Pairings

This corn is a versatile star that pairs beautifully with almost any grilled main. For a classic American BBQ spread, serve it alongside Juicy Grilled Burgers, Tangy BBQ Pulled Pork, or Dry-Rubbed Grilled Chicken Thighs. The rich, smoky corn balances wonderfully with fresh, cool sides like a Creamy Coleslaw or a Vinegary Potato Salad. For a Tex-Mex twist, pair it with Carne Asada Tacos and a side of Charro Beans. Don’t forget the sauces! Offer a variety for dipping: a cool chipotle lime crema, classic ranch, or an extra drizzle of hot sauce for those who like it spicy. Present the corn on a large wooden board or platter for a rustic, inviting look that encourages everyone to dig in.

Storage, Reheating & Make-Ahead Tips

Storage: Allow any leftovers to cool completely. Store in an airtight container in the refrigerator for up to 3 days. The bacon will soften in the fridge, but the flavor remains excellent.

Reheating: For best results, reheat in the oven or air fryer. Preheat your oven to 375°F. Place the corn on a baking sheet and heat for 10-15 minutes, or until warmed through and the bacon re-crisps slightly. You can also reheat in an air fryer at 375°F for 5-8 minutes. Microwave reheating is possible (1-2 minutes per cob) but will result in soft bacon.

Make-Ahead: You can wrap the corn in bacon and create the foil packets up to 4 hours in advance. Store them in the refrigerator until you’re ready to grill. This is a huge time-saver for party prep!

Creative Flavor Variations

Once you’ve mastered the classic, try these delicious twists to keep this recipe exciting all season long.

Variation Name How-To Flavor Profile
Maprye & Brown Sugar Glaze Brush the bacon-wrapped corn with a mix of 2 tbsp maple syrup and 1 tbsp brown sugar before wrapping in foil. Sweet, smoky, with a caramelized glaze.
Spicy Southwest Season the corn with chili powder and cumin before wrapping. Serve with lime wedges and cotija cheese. Zesty, smoky, with a kick of heat.
Herb & Garlic Butter Slather the corn with softened garlic herb butter before applying the bacon. Savory, aromatic, and incredibly rich.
Everything Bagel Sprinkle the bacon-wrapped corn generously with everything bagel seasoning before grilling. Salty, oniony, sesame-packed crunch.

Your Grilling Questions Answered (FAQ)

Can I make bacon wrapped grilled corn in the oven?

Yes, absolutely! Preheat your oven to 400°F. Prepare the bacon-wrapped corn in foil packets as directed. Place the packets on a baking sheet and bake for 40-45 minutes, turning once halfway through. For crispier bacon, open the packets and broil for the last 2-3 minutes.

What type of bacon is best for wrapping corn?

A standard-cut bacon (not thick-cut) is ideal. It renders its fat beautifully and crisps up in sync with the corn’s cooking time. Choose a bacon with a flavor profile you love—hickory, applewood, or peppered all work great.

How do I prevent the bacon from unraveling on the grill?

The key is to tuck the end of the final bacon slice under a previous wrap. Also, using the foil packet method keeps everything contained even if a slice loosens slightly. Avoid stretching the bacon as you wrap.

Can I use frozen corn on the cob?

You can, but thaw it completely first and pat it very dry. Frozen corn may release more water, potentially steaming the bacon instead of letting it crisp. Fresh corn is highly recommended for the best texture.

Is it necessary to use foil? Can I grill it directly?

The foil is crucial for our method. It steams the corn to perfect tenderness and prevents the bacon from burning or dripping fat onto the flames, which can cause flare-ups. For direct grilling, you’d need indirect heat and constant vigilance.

My bacon isn’t getting crispy. What did I do wrong?

This usually means the packets weren’t sealed tightly (letting steam escape) or the grill temperature was too low. Ensure a tight seal and preheat your grill fully. The optional step of opening the packets for the last few minutes of grilling directly over the heat will guarantee crispiness.

Can I prepare these ahead of time for a party?

Definitely! You can wrap the corn in bacon and make the foil packets up to 4 hours in advance. Keep them refrigerated until you’re ready to grill. This makes party hosting a breeze.

What are some good vegetarian alternatives to bacon?

For a vegetarian version, brush the corn with liquid smoke or smoked paprika oil, then wrap it with strips of seasoned seitan or a commercially available plant-based “bacon.” Follow the same grilling method, adjusting time as needed.

We hope you love this Ultimate Bacon Wrapped Grilled Corn as much as we do! It’s the perfect way to level up your summer grilling. Did you try a variation? Have a pro tip of your own? Share your creations with us!

📌 Love This Recipe? Save It for Later!

Pin this image to your Summer BBQ, Grilling Recipes, or Side Dish Ideas board on Pinterest to keep this recipe handy for your next cookout!

👉 Follow Cooking With Emy on Pinterest for more delicious, easy recipes every day!

clock clock iconcutlery cutlery iconflag flag iconfolder folder iconinstagram instagram iconpinterest pinterest iconfacebook facebook iconprint print iconsquares squares iconheart heart iconheart solid heart solid icon

Bacon Wrapped Grilled Corn


  • Author:
    Chef Emy

Ingredients


Scale
  • 6 ears of corn – husks and silks removed
  • 1 lb package of bacon
  • Salt and Pepper
  • Optional: Fresh Cilantro for garnish

Instructions

  1. Prepare grill for direct high heat.
  2. Rinse corn cobs under water and pat dry.
  3. Season with salt and pepper to taste.
  4. Wrap 2-3 pieces of bacon around each corn cob.
  5. Wrap the bacon wrapped corn in foil, ensuring the ends are completely covered in foil and turned inwards.
  6. Grill for about 40-45 minutes, turning every ten minutes. (10 minutes for all four sideKeep grill cover on when not turning.
  7. 40 minutes into grilling, open a packet to check for done-ness. Corn kernels should be tender and bacon should be starting to get crispy.
  8. Serve with fresh cilantro.


Grilled Mexican Street Corn

Grilled Mexican Street Corn (Elote): Two Irresistible Ways to Serve It

Prep Time Cook Time Total Time Servings Difficulty
15 minutes 10 minutes 25 minutes 6 servings Easy

The Ultimate Guide to Grilled Mexican Street Corn

Welcome to CookingWithEmy.com! There’s something magical about the smoky aroma of corn grilling over an open flame, especially when it’s about to be transformed into the iconic Mexican street food known as Elote, or Grilled Mexican Street Corn. This isn’t just a side dish; it’s a vibrant, messy, and utterly delicious experience that captures the essence of Mexican street markets right in your own backyard. As The Kitchen Team, we’ve perfected this recipe to give you not one, but two incredible ways to enjoy it: the classic on-the-cob presentation and a fantastically easy off-the-cob (esquites) version made in a skillet.

This recipe is a celebration of contrasts: the sweet, charred kernels of corn against the creamy, tangy sauce, the salty bite of cotija cheese, and the bright, fresh finish of lime and cilantro. It’s a dish that’s equally at home at a casual weeknight dinner as it is at a bustling summer barbecue. We’ll walk you through every step, share our professional secrets for the perfect char, and provide all the tips you need to make this recipe a guaranteed crowd-pleaser. Let’s fire up the grill and bring the flavors of the streets to your table!

Why This Is The Best Mexican Street Corn Recipe

You might find many recipes for Elote online, but ours stands out for several key reasons that guarantee authentic flavor and foolproof results every single time.

First, we respect the traditional balance of flavors. Our creamy sauce isn’t just mayonnaise—it’s a carefully calibrated blend of mayonnaise and sour cream. The sour cream adds a necessary tanginess that cuts through the richness, creating a more complex and satisfying base. We also insist on fresh lime juice, never bottled, for that essential burst of citrus that brightens the entire dish.

Second, we offer unparalleled flexibility. Life isn’t one-size-fits-all, and neither should your corn be! That’s why we provide detailed instructions for both the iconic grilled corn on the cob AND a deconstructed, scoopable skillet version (often called Esquites). No grill? No problem. Want to make it ahead? We’ve got you covered. Our method ensures perfect results whether you’re using fresh summer corn, frozen kernels in the dead of winter, or even canned corn for ultimate convenience.

Finally, our recipe is built on technique. We don’t just tell you to grill corn; we explain how to get those beautiful, flavorful char marks without burning. We guide you on how to properly coat the corn for maximum flavor adhesion and the best order for adding your toppings so every bite is perfect. This attention to detail is what transforms a simple recipe into an extraordinary one.

💡 The Kitchen Team’s Pro Tip: For the most authentic flavor, seek out cotija cheese. Its dry, salty, and slightly funky profile is irreplaceable. If you absolutely can’t find it, a finely crumbled feta or ricotta salata can work in a pinch, but the taste will be different.

Ingredients & Substitutions

Great food starts with great ingredients. Here’s exactly what you’ll need to create this flavor fiesta, along with smart swaps for dietary needs or pantry shortages.

Ingredient Quantity Notes & Substitutions
Yellow Corn on the Cob 6 medium ears Fresh is best for grilling. For the skillet version, you can use 4.5 cups of frozen (no need to thaw) or canned corn (drained).
Vegetable Oil or Melted Butter 1 tbsp For brushing the corn before grilling. Butter adds rich flavor; oil has a higher smoke point.
Mayonnaise 1/4 cup The base of the creamy sauce. Use full-fat for best texture. For a lighter version, Greek yogurt can replace half.
Sour Cream 1/4 cup Adds essential tang. Can use full-fat plain yogurt or Mexican crema.
Chile Powder 1/2 tsp Use authentic Mexican chile powder (like ancho) for depth, not American “chili powder” blend which contains cumin and garlic.
Fresh Lime Juice 1 tbsp + wedges for serving Freshly squeezed is non-negotiable for the brightest flavor.
Cotija Cheese, crumbled 1/2 cup The classic salty cheese. Substitute: finely crumbled feta or Parmesan.
Fresh Cilantro, chopped 3 tbsp For fresh garnish. If you dislike cilantro, use chopped fresh parsley or chives.

Step-by-Step Instructions

Follow these clear, detailed steps for perfect Grilled Mexican Street Corn, whether you choose the on-the-cob or off-the-cob method.

Method 1: Classic Grilled Elote (On The Cob)

Step 1: Prep the Corn for Grilling. Gently peel back the corn husks without detaching them. Remove the silk. Pull the husks back up around the corn and tie them at the top with kitchen twine. This creates a natural handle for easy eating and helps prevent burning. Lightly brush each ear with vegetable oil or melted butter. This promotes browning and prevents sticking.

Step 2: Grill to Perfection. Preheat your grill (or grill pan) to medium-high heat (about 400°F). Place the prepared corn directly on the grates. Grill for 10-12 minutes, turning every 2-3 minutes, until the kernels are tender and have developed dark brown, charred spots on all sides. The husks may blacken—this is fine and adds flavor.

💡 The Kitchen Team’s Pro Tip: Don’t crowd the grill! Leave space between each ear to allow for proper air circulation and even charring. If the corn is browning too quickly, move it to a cooler part of the grill.

Step 3: Make the Creamy Sauce. While the corn grills, in a medium bowl, whisk together the 1/4 cup mayonnaise, 1/4 cup sour cream, 1/2 teaspoon chile powder, and 1 tablespoon of fresh lime juice until completely smooth and combined.

Step 4: Assemble & Serve. Once the corn is grilled, carefully remove the twine and husks (they will be hot!). Using a pastry brush or spoon, generously coat each hot ear of corn with the creamy sauce. Immediately roll or sprinkle the coated corn in the crumbled cotija cheese so it adheres. Garnish with chopped cilantro and serve immediately with extra lime wedges on the side for squeezing.

Method 2: Easy Skillet Esquites (Off The Cob)

Step 1: Cut the Corn. Stand a cooled, raw ear of corn upright in a large bowl. Using a sharp knife, carefully slice downward to cut the kernels off the cob. Repeat with all 6 ears. You should have about 4.5 cups of kernels. (Alternatively, use 4.5 cups of frozen or canned, drained corn).

Step 2: Sauté the Corn. Heat 1 tablespoon of oil in a large skillet (preferably cast-iron) over medium-high heat. Add the corn kernels and cook, stirring frequently, for 8-10 minutes. Let the corn sit undisturbed for a minute at a time to get some nice browned, slightly charred spots—this is where the flavor is!

Step 3: Combine & Finish. Reduce the heat to low. Pour the prepared creamy sauce (from Step 3 above) over the hot corn in the skillet. Stir until the corn is evenly coated. Remove from heat. Stir in half of the cotija cheese. Transfer to a serving bowl and top with the remaining cheese, chopped cilantro, and an extra squeeze of lime juice.

Serving Suggestions & Pairings

Grilled Mexican Street Corn is incredibly versatile. Here’s how to build unforgettable meals around it.

As an Appetizer or Side Dish: Serve the classic elotes on a large platter with plenty of napkins—it’s meant to be eaten with your hands! The skillet version is perfect for serving in bowls with spoons or sturdy tortilla chips for scooping. It’s the ultimate starter for any Mexican-themed feast.

Perfect Main Course Pairings: This corn is the ideal sidekick to grilled proteins. Serve it alongside Carne Asada Tacos, Grilled Chili-Lime Chicken, Black Bean Burgers, or Beer-Battered Fish Tacos. The creamy, tangy corn beautifully complements smoky, spicy, and rich flavors.

For a Complete Spread: Create a stunning backyard buffet by adding our Elote to a table with Fresh Guacamole, Mexican Rice, Charro Beans, and a vibrant Jicama Slaw. Don’t forget a pitcher of Classic Margaritas or Agua Fresca to wash it all down!

Storage & Reheating Instructions

Storing Leftovers: Store any leftover esquites (skillet corn) in an airtight container in the refrigerator for up to 3 days. Note: The classic grilled corn on the cob is best enjoyed immediately. If you must store it, wrap the sauced and cheesed cob tightly in plastic wrap and refrigerate for 1-2 days max.

Best Reheating Methods: For the skillet corn, reheat gently in a saucepan over medium-low heat, adding a small splash of water or milk to loosen the sauce. You can also microwave it in 30-second intervals, stirring in between. Avoid reheating the on-the-cob version in the microwave, as it can become rubbery. Instead, reheat it in a 350°F oven for 10-15 minutes or on a medium grill for 5-7 minutes to refresh the char.

💡 The Kitchen Team’s Pro Tip: The creamy sauce can be made up to 2 days in advance and stored in the fridge. This makes weeknight assembly a breeze! Just give it a good stir before using.

Creative Recipe Variations

Once you’ve mastered the classic, try these delicious twists on the theme!

Spicy Chipotle Elote: Add 1-2 minced chipotle peppers in adobo sauce to the creamy mixture for a deep, smoky heat.

Elote Pasta Salad: Toss the creamy sauce with cooked pasta, charred corn kernels, cotija, cilantro, and diced red onion for a incredible potluck dish.

Dairy-Free/Vegan Elote: Use vegan mayonnaise and sour cream. Substitute cotija with crumbled vegan feta or a sprinkle of nutritional yeast mixed with a pinch of salt.

Elote Corn Dip: Turn the skillet version into a warm, bubbly dip by transferring it to an oven-safe dish, topping with extra cheese, and broiling for 2-3 minutes until golden. Serve with tortilla chips.

Frequently Asked Questions (FAQ)

Can I make Mexican Street Corn without a grill?

Absolutely! The skillet method (esquites) is perfect for stove-top cooking. You can also broil husked corn in the oven on a baking sheet 4-6 inches from the element, turning occasionally, for 10-15 minutes until charred in spots.

What’s the difference between Elote and Esquites?

Elote refers to the corn served on the cob, typically slathered with toppings. Esquites is the same flavorful combination, but with the kernels cut off the cob and served in a cup or bowl, making it easier to eat with a spoon.

Can I use something other than cotija cheese?

Yes, though the flavor will change. The best substitutes are other salty, crumbly cheeses like feta, queso fresco, or even a finely grated Parmesan or Pecorino Romano in a pinch.

How do I prevent the cheese and sauce from sliding off the corn?

The key is to apply the creamy sauce to the hot corn straight from the grill. The heat helps the sauce cling. Then, immediately roll it in the cheese so it sticks to the wet sauce.

Is it safe to grill corn in the husk?

Yes, it’s a traditional method that steams the corn inside, making it very tender. In our method, we tie the husk back to create a handle, but you can also soak the whole, unshucked ears in water for 30 minutes and then grill them fully wrapped for a steam-grill effect.

Can I make this recipe ahead of time?

You can prep components ahead: make the sauce, crumble the cheese, chop the cilantro, and even shuck the corn. For best texture and temperature, grill the corn and assemble just before serving.

What type of chile powder should I use?

For authentic flavor, use pure ground chile powder like ancho, guajillo, or New Mexico red chile. Avoid American-style “chili powder” which is a blend containing cumin, garlic powder, and other spices—it will alter the intended flavor profile.

My family hates cilantro. What can I use instead?

No problem! Fresh chopped parsley, chives, or even a sprinkle of thinly sliced green onion make excellent, flavorful garnishes that won’t have the polarizing cilantro taste.

Love This Recipe? Share the Flavor!

If this Grilled Mexican Street Corn recipe brought a fiesta to your table, please share it with friends and family! Pin the image below to your Pinterest boards to save it for your next barbecue, taco night, or summer party. Follow us on Pinterest @cookingwithemy for more delicious, easy-to-follow recipes from The Kitchen Team.

📌 Pin this Recipe for Later!

Click the image or button below to save this complete guide to Grilled Mexican Street Corn (Elote) to your favorite food boards on Pinterest.

[PINTEREST SAVE BUTTON EMBED CODE]

Tag us @cookingwithemy when you make it—we love seeing your creations!

clock clock iconcutlery cutlery iconflag flag iconfolder folder iconinstagram instagram iconpinterest pinterest iconfacebook facebook iconprint print iconsquares squares iconheart heart iconheart solid heart solid icon

Mexican Street Corn Recipe


  • Author:
    Chef Emy

Description

This Mexican Street Corn recipe is a common Mexican street food that is made by grilling corn on the cob and then coating it with a mixture made up of mayonnaise, sour cream, cotija cheese, chile powder, and lime. Also called elotes, this easy to make Mexican Corn On The Cob Recipe is a perfect appetizer or side dish for any outdoor gathering. In my version here, I made it two ways – (1) on the cob and (2) off the cob or in a skillet. They are both delicious and ready in less than half an hour.


Ingredients


Scale
  • 6 medium-size ears of yellow corn on the cob
  • 1 tablespoon vegetable oil or melted butter
  • ¼ cup mayonnaise
  • ¼ cup sour cream
  • ½ teaspoon chile powder
  • 1 tablespoon lime juice (plus wedges of a lime for serving)
  • ½ cup crumbled cotija cheese
  • 3 tablespoons fresh cilantro (chopped)

Instructions

  1. To prep the corn: Fold the husk of each corn back leaf by leaf and tie them with kitchen twine. Lightly brush corn on the cub with oil.
  2. Heat a grill pan or an outdoor grill. Grill corn, turning occasionally until it is browned in spots. Keep an eye on it as this happens rather quickly.
  3. To make the sauce: Mix together mayonnaise, sour cream, chile powder, and lime juice in a bowl.
  4. Brush each grilled corn the mayo mixture and sprinkle with cotija cheese. Garnish with cilantro and serve.
  5. To prep the corn: Cut the corn off the cob. I used 6 ears to get about 4 1/2 cups. Alternatively, you can also use canned corn or frozen corn. If using frozen, you do not need to thaw it out.
  6. Sauté corn: Heat oil in a skillet over medium-high heat. Stir in the corn, and stirring frequently, sauté for 5-7 minutes until it starts to char. If you are using frozen corn, you might need to cook a few minutes longer. Transfer to a bowl and set aside.
  7. Make the sauce: Mix together mayonnaise, sour cream, chile powder, and lime juice in a bowl.
  8. Assemble: Add in the mayo mixture into the sauteed corn. Give it a mix. Stir in the cotija cheese and sprinkle with cilantro. Serve in small bowls with wedges of lime on the side.


Grilled Mexican Corn (Elote) 🌽🌽

Grilled Mexican Corn (Elote): The Ultimate Smoky, Cheesy Street Food Feast at Home 🌽🔥

Prep Time
15 minutes
Cook Time
10 minutes
Total Time
25 minutes
Servings
6 ears
Difficulty
Easy

Imagine the scent of charcoal smoke, the sizzle of fresh corn hitting a hot grill, and the vibrant, tangy aroma of lime and chili powder filling the air. This isn’t a bustling Mexico City street corner—it’s your own backyard, and you’re about to master the art of authentic Grilled Mexican Corn (Elote). This iconic street food, a symphony of smoky, creamy, tangy, and spicy flavors, is about to become your go-to summer side dish, party superstar, and weeknight treat.

Forget bland, buttered corn on the cob. Elote is an experience. It’s messy, it’s bold, and it’s utterly irresistible. Our recipe demystifies this beloved classic, breaking it down into simple, foolproof steps. We’ll guide you through selecting the perfect corn, crafting the ultimate creamy coating, and achieving that signature charred grill flavor, whether you’re using a gas grill, charcoal, or even a stovetop pan. Get ready to transform humble ears of corn into a festive, flavor-packed masterpiece that will have everyone asking for your secret.

Why This Is The Ultimate Grilled Mexican Corn (Elote) Recipe

Not all elote recipes are created equal. Many compromise on authenticity or flavor for the sake of simplicity. Ours doesn’t. Here’s why this recipe stands out:

  • Authentic Flavor Balance: We use the traditional duo of mayonnaise and Mexican crema for a rich, tangy base that clings perfectly to the corn, unlike recipes that use only mayo or sour cream.
  • The Garlic Secret: Freshly minced garlic in the crema mixture infuses every bite with a savory depth that pre-minced jarred garlic can’t match.
  • Grill Master Technique: Our specific grilling instructions ensure you get those beautiful, flavorful char marks without burning or undercooking the kernels.
  • Customizable Heat: We guide you on using chili powder, cayenne, and smoked paprika, allowing you to tailor the spice level from family-friendly to fiery.
  • Pro Assembly Order: The precise order of applying the crema, cheese, lime, and chili is crucial for the perfect texture and flavor in every bite, and we’ve nailed it.
💡 The Kitchen Team’s Pro Tip: For the most authentic flavor, seek out Cotija cheese. This salty, crumbly Mexican cheese doesn’t melt, providing the essential texture and taste. If you can’t find it, a well-drained feta is the best substitute.

Ingredients for Authentic Grilled Mexican Corn (Elote)

Gathering the right ingredients is the first step to elote perfection. Here’s your complete shopping list, with expert notes on each component.

Ingredient Quantity Notes & Purpose
Fresh Corn on the Cob 6 ears Look for ears with bright green, snug husks and plump, tightly packed kernels. Freshness is non-negotiable.
Mayonnaise (full-fat) 1/4 cup Acts as the rich, creamy base for the sauce, helping the other flavors adhere to the corn.
Mexican Crema 1/4 cup + 2 tbsp (as needed) Thinner and tangier than sour cream. It creates the perfect saucy consistency. Sour cream can sub in a pinch.
Fresh Garlic 2 cloves, minced Provides a pungent, savory backbone. Press or finely mince for the best distribution.
Cotija Cheese 1/2 cup, crumbled The signature salty, crumbly topping. Do not substitute with Parmesan—the flavor profile is different.
Fresh Limes 2 medium For juicing. The bright acidity cuts through the richness and is essential.
Chili Powder For sprinkling Use a pure chili powder (like ancho) for authentic flavor, not a “chili seasoning” blend.
Cayenne Pepper or Smoked Paprika For sprinkling Cayenne adds heat, smoked paprika adds a smoky depth without heat. Use one or both!
Fresh Cilantro For garnish (optional) Adds a fresh, herbal finish. Omit if you have the cilantro-tastes-like-soap gene.
Vegetable Oil For brushing A neutral, high-heat oil like canola or avocado to prevent sticking on the grill.

How to Make Grilled Mexican Corn (Elote): Step-by-Step

Follow these detailed instructions for flawless elote every single time. We’re covering grill, oven, and stovetop methods.

Step 1: Prep the Grill & Corn

Preheat your outdoor grill to medium-high heat (about 400-450°F). If using charcoal, let the coals become white-hot. While the grill heats, husk the corn and remove all the silk. Rinse the ears and pat them completely dry with a kitchen towel—this ensures better charring. Lightly brush the grill grates with vegetable oil to prevent sticking.

Step 2: Make the Creamy Garlic Sauce

In a medium bowl, combine the 1/4 cup mayonnaise and 1/4 cup Mexican crema. Add the finely minced garlic and stir until smooth. The consistency should be thick but spreadable, like a creamy paint. If it seems too thick, add more crema, one tablespoon at a time, until it reaches the desired consistency. Set aside.

💡 The Kitchen Team’s Pro Tip: Let this sauce sit for at least 10 minutes while the grill heats. This allows the raw garlic flavor to mellow and infuse into the crema, creating a more harmonious flavor.

Step 3: Grill the Corn to Perfection

Place the prepared corn directly on the oiled grill grates. Cook for 8 to 10 minutes total, turning the ears a quarter turn every 2-3 minutes. You’re looking for tender kernels and attractive, dark char marks on all sides. Don’t walk away—corn can go from perfect to burnt quickly!

Step 4: Assemble the Elote

As soon as the corn comes off the grill, work quickly while it’s hot. Using a pastry brush or spoon, liberally coat each ear with the creamy garlic sauce. Immediately roll or sprinkle the coated corn in the crumbled Cotija cheese, pressing gently so it adheres.

Step 5: Add the Finishing Touches

Place the cheesed corn on a serving platter. Squeeze fresh lime juice generously over each ear. Finally, sprinkle with your chosen combination of chili powder, cayenne, and/or smoked paprika. Garnish with chopped fresh cilantro if using. Serve immediately!

No-Grill Method: Oven or Stovetop

Oven: Preheat broiler to high. Place husked corn on a baking sheet lined with foil. Broil 5-7 inches from the element, turning often, until charred in spots (about 10-12 minutes).
Stovetop: Heat a cast-iron skillet or grill pan over medium-high heat. Brush with oil. Cook corn, turning, until charred on all sides.

Serving Your Grilled Mexican Corn (Elote)

Elote is incredibly versatile. Here’s how to make it the star of any meal:

  • The Classic Street Food Style: Serve on a platter with extra lime wedges, chili powder, and cheese on the side. Provide plenty of napkins!
  • As a BBQ Side Dish: Pair with grilled carne asada, chicken al pastor, or black bean burgers for the ultimate summer spread.
  • Elote in a Bowl (Esquites): Cut the kernels off the cob after grilling and mix all the toppings in a bowl for a fork-friendly salad.
  • Party Appetizer: Cut each grilled cob into 2-3 smaller rounds before topping. They become easy, handheld party bites.

Storage & Reheating Instructions

Elote is best enjoyed immediately. However, if you have leftovers:

To Store: Wrap leftover, un-topped grilled corn tightly in plastic wrap or aluminum foil and refrigerate for up to 3 days. Store the creamy sauce, cheese, and toppings separately in airtight containers.

To Reheat: The best method is to re-grill or broil the plain corn for 3-4 minutes until hot. You can also microwave it for 60-90 seconds. Once hot, re-apply the sauce, cheese, and other toppings fresh.

💡 The Kitchen Team’s Pro Tip: Do not store corn that has already been topped with the crema sauce and cheese. The sauce will become watery and the cheese will dissolve into a mess. Always store components separately.

Creative Variations on Grilled Mexican Corn

Once you’ve mastered the classic, try these delicious twists!

🌶️ Spicy Chipotle Elote

Add 1-2 teaspoons of minced chipotle peppers in adobo sauce to the creamy mayo mixture. The result is a deep, smoky heat that’s unforgettable.

🧀 Parmesan-Herb Elote

Swap Cotija for finely grated Parmesan and add 1 teaspoon of dried Italian herbs to the creamy sauce. Garnish with chopped parsley instead of cilantro.

🥑 Avocado Crema Elote

Blend half a ripe avocado into the mayo and crema mixture. This creates an ultra-creamy, rich, and slightly green sauce that’s absolutely delicious.

🍋 Everything Bagel Elote

After applying the creamy sauce, roll the corn in Everything Bagel Seasoning instead of cheese. Squeeze with lemon instead of lime for a fun, brunch-inspired twist.

Grilled Mexican Corn (Elote) FAQs

Can I make elote ahead of time?

You can prep components ahead. Husk the corn and make the creamy sauce (store covered in the fridge) up to a day in advance. Grill and assemble right before serving for the best texture and flavor.

What’s the best substitute for Mexican crema?

Mix 3/4 cup sour cream with 1/4 cup milk or buttermilk to thin it slightly. This mimics the tang and consistency of crema very well. Plain, full-fat Greek yogurt thinned with a little lime juice is another good option.

Can I use frozen or canned corn?

For traditional elote on the cob, fresh is essential. For esquites (bowl style), you can use high-quality frozen fire-roasted corn kernels, thawed and patted dry, or well-drained canned corn, though the texture will be softer.

Is it necessary to soak corn before grilling?

No, not for this method. Soaking corn (in the husk) is a technique used for steaming it over the grill. Since we’re husking the corn to get direct char on the kernels, soaking is not needed and would actually prevent charring.

My cheese won’t stick to the corn. What am I doing wrong?

Ensure the corn is very hot when you apply the creamy sauce. The heat helps the sauce thin slightly and act as a “glue.” Also, apply the sauce liberally and press the corn into a plate of cheese, rather than trying to sprinkle it on top.

How do I make this recipe vegan?

Use vegan mayonnaise and vegan sour cream for the sauce. For the cheese, use a vegan feta or Parmesan, or a generous sprinkle of nutritional yeast mixed with a little salt.

Can I boil the corn instead of grilling it?

You can, but you’ll miss the signature smoky, charred flavor that defines elote. If you must boil, do so for 4-5 minutes, then pat the corn very dry before applying the toppings. Consider adding a pinch of smoked paprika to the toppings to compensate for the lack of grill flavor.

What other cheeses can I use besides Cotija?

Crumbled feta is the closest substitute. Queso fresco is milder and less salty but will work in a pinch. Avoid hard, dry cheeses like standard Parmesan.

📌 Love This Recipe? Save It For Later!

Pin this image to your Summer Sides, Grilling Recipes, or Mexican Food board on Pinterest to keep this easy Grilled Mexican Corn (Elote) recipe handy!

Follow us on Pinterest: @cookingwithemy for more delicious, easy recipes every day!

[PINTEREST-EMBED: A vibrant, vertical image of finished Grilled Mexican Corn (Elote) on a rustic platter, with limes and chili powder visible.]

Recipe by The Kitchen Team for CookingWithEmy.com. Enjoy the vibrant flavors of homemade elote!

clock clock iconcutlery cutlery iconflag flag iconfolder folder iconinstagram instagram iconpinterest pinterest iconfacebook facebook iconprint print iconsquares squares iconheart heart iconheart solid heart solid icon

Grilled Mexican Corn (Elote)


  • Author:
    Chef Emy

Description

🌽👏🏻🎉 Learn how to make EASY and FLAVORFUL grilled Mexican street corn at home in minutes! Fresh sweet corn is covered in crema, cheese, and finished with chili, lime juice, and cilantro! If you’ve never tried corn this way, you’re in for a real treat!


Ingredients


Scale
  • 1/4 cup mayonnaise
  • 1/4 cup Mexican crema (sour cream may be substituted, or as necessary for consistency)
  • 2 cloves garlic (finely minced or pressed)
  • vegetable oil (for brushing)
  • 6 ears fresh corn (husked and cleaned)
  • 1/2 cup cotija cheese (crumbled)
  • fresh lime juice (from about 2 medium limes)
  • chili powder (cayenne powder, and/or smoked paprika, for sprinkling as desired)
  • fresh cilantro for garnishing (optional)

Instructions

  1. Preheat an outdoor grill to medium-high heat (or indoor grill pan).
  2. To a medium bowl, add the mayo, crema, garlic, and stir to combine. If you mixture is very thick, add a couple more tablespoons of crema to taste; set mixture aside.
  3. Brush grill grates with oil, add the corn to the grill, and cook for about 8 to 10 minutes, or until corn is as cooked as desired; rotate corn a quarter turn every couple of minutes to ensure even cooking.
  4. Remove corn from grill, evenly brush all ears with the mayo-crema mixture (I brush very liberally; if you dont you will likely have some left over)
  5. Either sprinkle with the cheese or add the cheese to a shallow bowl and dredge the corn through the cheese.
  6. Evenly squirt with lime juice and sprinkle with chili powder, cayenne powder, and/or smoked paprika, to taste.
  7. Optionally garnish with cilantro and serve immediately.


Grilled Mexican Street Corn

The Ultimate Grilled Mexican Street Corn (Elote): Two Irresistible Ways

Discover the secret to perfect, smoky-sweet Grilled Mexican Street Corn (Elote) with our foolproof recipe. We’re sharing both the classic on-the-cob version and a genius skillet method, so you can enjoy this iconic street food anytime.

Prep Time Cook Time Total Time Servings Difficulty
15 minutes 10 minutes 25 minutes 6 servings Easy

Why This Grilled Mexican Street Corn is a Game-Changer

There’s a reason the aroma of Grilled Mexican Street Corn stops people in their tracks at markets and food stalls. It’s the ultimate combination of smoky, charred sweetness from the grill, a creamy, tangy sauce, salty cheese, and a bright kick of lime and chili. Known as “Elote” in Mexico, this isn’t just a side dish; it’s an experience. At CookingWithEmy.com, we believe in bringing authentic, vibrant flavors straight to your backyard. That’s why we’ve perfected this recipe, testing it countless times to ensure you get that perfect char, the ideal sauce consistency, and the ultimate balance of flavors every single time.

But we didn’t stop there. We know life isn’t always grilling season, and sometimes you want the incredible flavor of elote without the cob. That’s why our recipe includes a brilliant “Esquites” style version—where the corn is cut off the cob and sautéed in a skillet, then tossed with that iconic creamy sauce. It’s perfect for parties, picnics, or a quick weeknight treat. Whether you’re firing up the grill for a summer BBQ or using a grill pan on your stovetop, this guide will walk you through creating the most unforgettable Mexican street corn of your life.

Why This is the Best Mexican Street Corn Recipe

You’ll find many elote recipes online, but ours stands out for its attention to detail and flexibility. First, we insist on grilling the corn in its husk when possible. This traditional method steams the corn inside, making it incredibly juicy and tender, while still allowing for those beautiful, flavorful char marks once the husks are pulled back. We also provide clear alternatives for every tool and ingredient.

Our creamy sauce is the perfect ratio. We balance rich mayonnaise and tangy sour cream so neither overpowers. The lime juice is fresh-squeezed for maximum zing, and we specify the type of chili powder for authentic heat. We also give you the lowdown on cotija cheese—what it is, why it’s non-negotiable for authentic flavor, and the best substitutes if you absolutely can’t find it.

💡 The Kitchen Team’s Pro Tip: For the most authentic flavor, seek out “chile powder” that is simply ground dried chilies (like ancho or guajillo), not the American-style “chili powder” blend that contains cumin and oregano. The pure chili flavor makes all the difference.

This recipe is more than a list of steps; it’s a masterclass in technique. We explain why you tie the husks back, how to get the perfect char without burning, and when to apply the sauce for the best texture. We’ve solved the common problems so you don’t have to, ensuring your elote is perfect on the first try.

Ingredients & What You’ll Need

Simple ingredients create extraordinary magic here. Using the freshest, highest-quality components you can find will elevate your elote from great to legendary.

Ingredient Quantity Notes
Yellow corn on the cob 6 medium ears Fresh is best! Look for bright green, snug husks.
Vegetable oil or melted butter 1 tablespoon For brushing; helps achieve a beautiful char.
Mayonnaise (full-fat) 1/4 cup The base of the creamy sauce. Kewpie mayo is a great choice for extra umami.
Sour cream (or Mexican crema) 1/4 cup Adds tang and thins the mayo slightly.
Chile powder (pure, like ancho) 1/2 teaspoon + more for garnish This is for the sauce. You’ll need extra for sprinkling.
Fresh lime juice 1 tablespoon + wedges for serving Always use fresh lime juice. Bottled juice lacks brightness.
Cotija cheese, crumbled 1/2 cup The star! A salty, crumbly Mexican cheese. Feta is the closest sub.
Fresh cilantro, chopped 3 tablespoons For a fresh, herbal finish. Omit if you have the cilantro-soap gene.

Essential Tools: An outdoor grill (charcoal preferred for maximum smoke) or a stovetop grill pan, kitchen twine or strips of husk for tying, a pastry brush or spoon for saucing, a sharp knife, and a mixing bowl.

Step-by-Step Grilling Instructions

Method 1: Classic Grilled Elote (On The Cob)

Step 1: Prep the Corn & Husk. Gently peel back the corn husks toward the base, leaving them attached. Remove the silk as thoroughly as possible. Rinse the corn lightly if needed. Pull the husks back up around the corn and tie them securely at the top with kitchen twine. This creates a natural handle for eating and protects some of the kernels from direct flame.

Step 2: Soak (Optional but Recommended). For charcoal grilling, soak the husked corn in a large pot of cold water for 15-30 minutes. This prevents the husks from burning too quickly and creates extra steam.

Step 3: Grill to Perfection. Preheat your grill to medium-high heat (about 400°F). Brush each ear of corn lightly with oil or melted butter. Place the corn directly on the grill grates. Grill for 15-20 minutes, turning every 4-5 minutes, until the husks are charred and the kernels are tender with some browned spots. You can peel back a section of husk to check.

Step 4: Make the Magic Sauce. While the corn grills, in a medium bowl, whisk together the 1/4 cup mayonnaise, 1/4 cup sour cream, 1/2 teaspoon chile powder, and 1 tablespoon of fresh lime juice until completely smooth and combined.

Step 5: Sauce, Cheese, and Serve! Once the corn is done, carefully pull down the husks (using the tie as a handle). Place the corn on a platter. Using a pastry brush or a spoon, generously coat each hot ear with the creamy sauce. Immediately sprinkle with the crumbled cotija cheese—the heat of the corn will help it adhere. Finish with a dusting of extra chile powder, the chopped cilantro, and serve with lime wedges on the side for squeezing.

Method 2: Skillet Esquites (Off The Cob)

This is the ultimate party-friendly or no-grill alternative.

Step 1: Cut the Corn. Shuck the corn completely. Stand an ear upright in a large bowl and use a sharp knife to slice downward, cutting the kernels off the cob. You should get about 4 1/2 cups of kernels from 6 ears.

💡 The Kitchen Team’s Pro Tip: Use a bundt pan! Stand the cob in the center hole of the pan. As you cut, the kernels will fall neatly into the pan, not all over your counter.

Step 2: Sauté. Heat 1 tablespoon of oil in a large cast-iron or heavy-bottomed skillet over medium-high heat. Add the corn kernels and sauté, stirring frequently but not constantly, for 8-10 minutes. Let it sit for a minute between stirs to get some caramelized, browned spots. The corn is done when it’s bright yellow and tender-crisp.

Step 3: Combine and Serve. Remove the skillet from the heat. Pour the prepared creamy sauce (from Step 4 above) over the hot corn and stir to combine thoroughly. Transfer to a serving bowl and top with the crumbled cotija cheese, extra chile powder, and cilantro. Serve immediately with lime wedges.

Serving Suggestions & Pairings

This Grilled Mexican Street Corn is incredibly versatile. As a side, it’s the superstar of any summer barbecue. Pair it with grilled carne asada, chili-lime chicken skewers, or black bean burgers for a phenomenal meal. For a true street food feast, serve it alongside tacos al pastor, elote, and a refreshing agua fresca.

Think beyond the plate! Use the skillet esquites as a killer topping for nachos, a filling for quesadillas, or a vibrant mix-in for a summer grain bowl. The creamy, cheesy corn adds a burst of flavor and texture to so many dishes.

Perfect Drink Pairings: A cold, crisp Mexican lager (like Modelo or Pacifico), a classic margarita on the rocks, or a smoky mezcal paloma all cut through the richness of the corn beautifully. For a non-alcoholic option, a sparkling limeade or hibiscus iced tea is perfect.

Storage & Reheating Guide

Leftover Elote (On the Cob): This is best enjoyed immediately. If you must store it, wrap each sauced and cheesed cob individually in aluminum foil and refrigerate for up to 2 days. Reheat, still wrapped in foil, on a grill or in a 350°F oven for 10-15 minutes until warmed through. The texture will be softer, but the flavor will still be great.

Leftover Esquites (Skillet Corn): Store in an airtight container in the refrigerator for up to 3 days. Reheat gently in a skillet over medium-low heat, adding a tiny splash of water or lime juice to loosen the sauce. We do not recommend freezing, as the dairy-based sauce will separate and become grainy upon thawing.

Delicious Recipe Variations

The beauty of this recipe is its adaptability. Don’t be afraid to make it your own!

Variation How-To Flavor Profile
Spicy Chipotle Elote Add 1-2 teaspoons of minced chipotle in adobo sauce to the creamy mixture. Smoky, deep, and seriously spicy.
Herb & Garlic Mix 1 clove of finely grated garlic and 1 tbsp of chopped fresh parsley or chives into the sauce. Savory, aromatic, and fragrant.
Elote Pasta Salad Fold cooled esquites into cooked and chilled pasta shells. Thin the sauce with a little extra lime juice. A hearty, crowd-feeding side dish.
Vegan Street Corn Use vegan mayo and sour cream. Substitute cotija with crumbled vegan feta or nutritional yeast. All the creamy, tangy flavor, plant-based.

Your Grilled Mexican Street Corn FAQs

Can I make this without a grill?

Absolutely! Use the skillet method (Esquites) for the full flavor off the cob. For on-the-cob, you can use a stovetop grill pan or even broil the corn in your oven. Place husked, oiled corn on a baking sheet and broil 4-6 inches from the element, turning often, until charred in spots.

What’s the best substitute for cotija cheese?

The closest substitute is a good quality, dry, salty feta cheese. Parmesan (the finely grated kind in a canister, not fresh) is a common street vendor substitute and will give you that salty, umami punch, though the flavor profile is different.

Can I make the sauce ahead of time?

Yes! The creamy sauce can be made up to 2 days in advance. Store it in an airtight container in the refrigerator. Give it a good stir before using, as it may separate slightly.

Is it necessary to soak the corn before grilling?

It’s not strictly necessary, but it’s highly recommended, especially for charcoal grilling. Soaking prevents the husks from becoming a flaming torch and creates steam that cooks the corn from the inside, making it incredibly juicy.

Can I use frozen or canned corn for the skillet version?

You can. For frozen corn, use it straight from the freezer—no need to thaw. Sauté for a few extra minutes to cook off excess moisture. For canned corn, drain and rinse it well first. Pat it very dry with paper towels before sautéing to ensure you get some browning instead of just steaming.

Why is my cheese not sticking to the corn?

The corn needs to be hot when you apply the sauce, and you need to sprinkle the cheese immediately after saucing. The heat and the moisture from the sauce act as “glue” for the cheese. If the corn has cooled, the cheese will just fall off.

How do I prevent the corn from burning on the grill?

Use medium-high, not inferno-level, heat. Turn the corn every 4-5 minutes to ensure even cooking and charring. If you’re grilling without husks, keep a close eye on it, as it can go from perfect to burnt quickly.

What’s the difference between Elote and Esquites?

Elote refers to corn served on the cob, typically slathered with toppings. Esquites is the same delicious combination of flavors, but the kernels are cut off the cob and served in a cup, often with a spoon. Our recipe gives you the best of both worlds!

Love This Recipe? Save It For Later!

Pin this image to your favorite grilling or Mexican food board to keep our ultimate Grilled Mexican Street Corn recipe handy for your next BBQ, potluck, or Taco Tuesday!

Follow us on Pinterest @cookingwithemy for more delicious, easy-to-follow recipes!

clock clock iconcutlery cutlery iconflag flag iconfolder folder iconinstagram instagram iconpinterest pinterest iconfacebook facebook iconprint print iconsquares squares iconheart heart iconheart solid heart solid icon

Mexican Street Corn Recipe


  • Author:
    Chef Emy

Description

This Mexican Street Corn recipe is a common Mexican street food that is made by grilling corn on the cob and then coating it with a mixture made up of mayonnaise, sour cream, cotija cheese, chile powder, and lime. Also called elotes, this easy to make Mexican Corn On The Cob Recipe is a perfect appetizer or side dish for any outdoor gathering. In my version here, I made it two ways – (1) on the cob and (2) off the cob or in a skillet. They are both delicious and ready in less than half an hour.


Ingredients


Scale
  • 6 medium-size ears of yellow corn on the cob
  • 1 tablespoon vegetable oil or melted butter
  • ¼ cup mayonnaise
  • ¼ cup sour cream
  • ½ teaspoon chile powder
  • 1 tablespoon lime juice (plus wedges of a lime for serving)
  • ½ cup crumbled cotija cheese
  • 3 tablespoons fresh cilantro (chopped)

Instructions

  1. To prep the corn: Fold the husk of each corn back leaf by leaf and tie them with kitchen twine. Lightly brush corn on the cub with oil.
  2. Heat a grill pan or an outdoor grill. Grill corn, turning occasionally until it is browned in spots. Keep an eye on it as this happens rather quickly.
  3. To make the sauce: Mix together mayonnaise, sour cream, chile powder, and lime juice in a bowl.
  4. Brush each grilled corn the mayo mixture and sprinkle with cotija cheese. Garnish with cilantro and serve.
  5. To prep the corn: Cut the corn off the cob. I used 6 ears to get about 4 1/2 cups. Alternatively, you can also use canned corn or frozen corn. If using frozen, you do not need to thaw it out.
  6. Sauté corn: Heat oil in a skillet over medium-high heat. Stir in the corn, and stirring frequently, sauté for 5-7 minutes until it starts to char. If you are using frozen corn, you might need to cook a few minutes longer. Transfer to a bowl and set aside.
  7. Make the sauce: Mix together mayonnaise, sour cream, chile powder, and lime juice in a bowl.
  8. Assemble: Add in the mayo mixture into the sauteed corn. Give it a mix. Stir in the cotija cheese and sprinkle with cilantro. Serve in small bowls with wedges of lime on the side.


Grilled Mexican Corn (Elote) 🌽🌽

The Ultimate Grilled Mexican Corn (Elote) 🌽🌽 – Smoky, Creamy, and Irresistible!

By The Kitchen Team | Published: July 15, 2024 | Updated: July 20, 2024

⏱️ Prep Time
10 mins
🔥 Cook Time
10 mins
⏳ Total Time
20 mins
🍽️ Servings
6
⭐ Difficulty
Easy

🌽 Introduction: Why You’ll Love This Grilled Mexican Corn

Welcome, food lovers! Today, The Kitchen Team is bringing you a taste of Mexico with our Grilled Mexican Corn (Elote) 🌽🌽 recipe. This isn’t just any corn on the cob – it’s a flavor explosion that combines smoky char from the grill, creamy richness, tangy lime, salty cheese, and a kick of chili. If you’ve ever walked past a street vendor in Mexico City and smelled that irresistible aroma, you know exactly what we’re talking about!

This recipe is perfect for summer barbecues, Cinco de Mayo celebrations, or any time you want to impress your guests with minimal effort. The best part? It comes together in just 20 minutes! Whether you’re a seasoned grill master or a beginner, this elote will become your go-to side dish.

At cookingwithemy.com, we believe in simple, fresh ingredients that deliver maximum flavor. This recipe uses everyday staples like mayonnaise, crema, cotija cheese, and fresh corn – nothing fancy, but the result is pure magic. Let’s dive in!

💚 Why This is the Best Grilled Mexican Corn (Elote)

There are countless elote recipes out there, but here’s why The Kitchen Team’s version stands out:

  • Perfect Char: We grill the corn to get those beautiful blackened kernels that add smoky depth.
  • Creamy Sauce: Our blend of mayo and Mexican crema is perfectly balanced – not too heavy, not too thin.
  • Authentic Cheese: Cotija cheese provides that salty, crumbly texture that’s essential for elote.
  • Customizable Heat: We let you control the spice level with chili powder, cayenne, or smoked paprika.
  • Fresh Finish: A squeeze of lime and a sprinkle of cilantro brighten everything up.

This recipe has been tested by our team multiple times, and we guarantee it will be the star of your next cookout!

🛒 Ingredients for Grilled Mexican Corn (Elote)

Makes 6 servings | Scale up or down as needed

Ingredient Amount Notes
Mayonnaise 1/4 cup Full-fat works best
Mexican crema 1/4 cup Sour cream can substitute
Garlic cloves 2 Finely minced or pressed
Vegetable oil For brushing Or use olive oil
Fresh corn ears 6 Husked and cleaned
Cotija cheese 1/2 cup Crumbled
Fresh lime juice From 2 medium limes About 2 tablespoons
Chili powder To taste Or cayenne/smoked paprika
Fresh cilantro For garnish Optional but recommended
💡 The Kitchen Team’s Pro Tip: For the creamiest sauce, let your mayo and crema come to room temperature before mixing. This ensures a silky, smooth consistency that coats every kernel perfectly!

👩‍🍳 Step-by-Step Instructions

Follow these simple steps for perfect grilled Mexican corn every time:

Preheat the grill – Heat your outdoor grill to medium-high heat (about 400°F). If using a grill pan indoors, preheat it over medium-high heat for 5 minutes.
Make the crema sauce – In a medium bowl, combine 1/4 cup mayonnaise, 1/4 cup Mexican crema, and 2 minced garlic cloves. Whisk until smooth. If the mixture seems too thick, add 1-2 tablespoons more crema. Set aside.
Prepare the corn – Brush the grill grates with vegetable oil to prevent sticking. Place the husked corn ears directly on the grill grates.
Grill the corn – Cook for 8-10 minutes, turning every 2-3 minutes, until the kernels are charred in spots and tender. You want a nice balance of blackened bits and bright yellow kernels.
Apply the sauce – Remove corn from the grill. While still hot, use a pastry brush to generously coat each ear with the mayo-crema mixture. Don’t be shy – use it all!
Add the cheese – Sprinkle crumbled cotija cheese over the sauced corn. Alternatively, pour the cheese into a shallow dish and roll the corn in it for even coverage.
Finish with lime and chili – Squeeze fresh lime juice over each ear, then sprinkle with chili powder, cayenne, or smoked paprika to taste. Garnish with chopped cilantro if desired.
Serve immediately – Elote is best enjoyed warm, right off the grill. Serve with extra lime wedges on the side.
💡 The Kitchen Team’s Pro Tip: For extra smoky flavor, try grilling the corn with the husks on for the first 5 minutes, then peel them back to finish. This steams the corn while still giving you those beautiful char marks!

🍴 Serving Suggestions

This Grilled Mexican Corn (Elote) 🌽🌽 is incredibly versatile. Here are some of our favorite ways to serve it:

  • As a side dish: Perfect alongside grilled meats like carne asada, chicken fajitas, or burgers.
  • On a Mexican-themed platter: Serve with tacos, refried beans, and Mexican rice for a complete meal.
  • Cut off the cob: Remove kernels and use in salads, grain bowls, or as a topping for nachos (this is called esquites).
  • For parties: Set up an elote bar with different toppings like bacon bits, jalapeños, or different cheeses.

Pro tip: Serve with extra lime wedges and a cold Mexican beer or margarita for the ultimate experience!

📦 Storage Tips

While elote is best enjoyed fresh, here’s how to handle leftovers:

  • Refrigerate: Store leftover corn in an airtight container for up to 3 days. The texture will soften slightly, but the flavor remains delicious.
  • Reheat: For best results, reheat in a skillet over medium heat for 2-3 minutes, or in the microwave for 30 seconds. Avoid overcooking.
  • Freeze: We don’t recommend freezing elote after it’s been sauced, but you can freeze grilled corn kernels (without toppings) for up to 3 months.

If you’re meal prepping, grill the corn ahead of time and store it plain. Add the sauce, cheese, and toppings just before serving for the freshest taste.

🎨 Delicious Variations

Want to switch things up? Try these creative twists on classic elote:

  • 🌶️ Spicy Elote: Add 1/2 teaspoon cayenne pepper or chipotle powder to the crema mixture for extra heat.
  • 🧀 Cheesy Elote: Mix in 2 tablespoons of Parmesan cheese with the cotija for a richer flavor.
  • 🥑 Avocado Elote: Drizzle with avocado crema (blend 1/2 avocado with the mayo mixture) for a creamy, green twist.
  • 🍋 Herb Elote: Add 1 tablespoon of chopped fresh oregano or epazote to the sauce for an earthy note.
  • 🥓 Bacon Elote: Sprinkle crumbled cooked bacon on top along with the cheese for a smoky, salty crunch.

Don’t be afraid to experiment – elote is all about making it your own!

❓ Frequently Asked Questions

1. Can I make this without a grill?

Absolutely! You can roast the corn in a cast-iron skillet over high heat, broil it in the oven, or even use an air fryer at 400°F for 10 minutes. The key is getting some char.

2. What is Mexican crema and where can I find it?

Mexican crema is a thin, slightly sour cream similar to crème fraîche. You can find it in the dairy section of most grocery stores or online. Sour cream thinned with a little milk works as a substitute.

3. Can I use frozen corn on the cob?

Yes, but thaw it completely and pat dry before grilling. Fresh corn is preferred for the best texture and flavor.

4. How do I keep the cheese from falling off?

Apply the sauce while the corn is still hot – the warmth helps the cheese stick. Press the cheese gently onto the corn after sprinkling.

5. Is this recipe gluten-free?

Yes! All the ingredients in this recipe are naturally gluten-free. Just double-check your chili powder and cotija cheese labels to ensure no cross-contamination.

6. Can I make elote dairy-free?

Certainly! Use vegan mayo, dairy-free sour cream, and a dairy-free cheese alternative like nutritional yeast or vegan parmesan.

7. What’s the best way to husk corn?

Peel back the husks from the top, remove the silk strands, and either remove the husks completely or tie them back for a rustic handle.

8. How do I get the perfect char without burning?

Keep the grill at medium-high heat and turn the corn every 2-3 minutes. You want blackened spots, not completely black corn. If using a gas grill, you can also close the lid for a few minutes to trap heat.

9. Can I prepare the sauce ahead of time?

Yes! The mayo-crema mixture can be made up to 2 days in advance and stored in the refrigerator. Stir well before using.

10. What if I don’t have cotija cheese?

Feta cheese is the best substitute – it has a similar salty, crumbly texture. Queso fresco or even grated Parmesan can work in a pinch.

📌 Save This Recipe for Later!

Don’t forget to pin this Grilled Mexican Corn (Elote) 🌽🌽 recipe to your favorite board on Pinterest!

📌 Love this recipe? Pin it now!

Follow us on Pinterest for more delicious recipes: @cookingwithemy

📌 Pin This Recipe

© 2024 cookingwithemy.com | The Kitchen Team

clock clock iconcutlery cutlery iconflag flag iconfolder folder iconinstagram instagram iconpinterest pinterest iconfacebook facebook iconprint print iconsquares squares iconheart heart iconheart solid heart solid icon

Grilled Mexican Corn (Elote)


  • Author:
    Chef Emy

Description

🌽👏🏻🎉 Learn how to make EASY and FLAVORFUL grilled Mexican street corn at home in minutes! Fresh sweet corn is covered in crema, cheese, and finished with chili, lime juice, and cilantro! If you’ve never tried corn this way, you’re in for a real treat!


Ingredients


Scale
  • 1/4 cup mayonnaise
  • 1/4 cup Mexican crema (sour cream may be substituted, or as necessary for consistency)
  • 2 cloves garlic (finely minced or pressed)
  • vegetable oil (for brushing)
  • 6 ears fresh corn (husked and cleaned)
  • 1/2 cup cotija cheese (crumbled)
  • fresh lime juice (from about 2 medium limes)
  • chili powder (cayenne powder, and/or smoked paprika, for sprinkling as desired)
  • fresh cilantro for garnishing (optional)

Instructions

  1. Preheat an outdoor grill to medium-high heat (or indoor grill pan).
  2. To a medium bowl, add the mayo, crema, garlic, and stir to combine. If you mixture is very thick, add a couple more tablespoons of crema to taste; set mixture aside.
  3. Brush grill grates with oil, add the corn to the grill, and cook for about 8 to 10 minutes, or until corn is as cooked as desired; rotate corn a quarter turn every couple of minutes to ensure even cooking.
  4. Remove corn from grill, evenly brush all ears with the mayo-crema mixture (I brush very liberally; if you dont you will likely have some left over)
  5. Either sprinkle with the cheese or add the cheese to a shallow bowl and dredge the corn through the cheese.
  6. Evenly squirt with lime juice and sprinkle with chili powder, cayenne powder, and/or smoked paprika, to taste.
  7. Optionally garnish with cilantro and serve immediately.


The Best Ever Oven Roasted Corn

The Best Ever Oven Roasted Corn: The Only Recipe You’ll Ever Need

Prep Time Cook Time Total Time Servings Difficulty
10 minutes 35 minutes 45 minutes 8 ears Easy

🌽 Introduction: Why Oven Roasted Corn is a Game Changer

Welcome to The Kitchen Team! Today we’re sharing a recipe that will absolutely transform how you think about corn on the cob. The Best Ever Oven Roasted Corn is prepped and ready to go in the oven in just 10 minutes. This recipe for corn on the cob in the oven is so simple you will be making it all year long! It is utterly life altering! You have to try it.

Imagine perfectly tender kernels with those gorgeous golden-brown spots, slathered in rich butter and perfectly seasoned. No more boiling corn that turns mushy or grilling when the weather doesn’t cooperate. This oven method delivers consistently perfect results every single time.

As The Kitchen Team, we’ve tested countless corn recipes, and this one wins every time. Whether you’re serving it at a summer barbecue, a holiday dinner, or a simple weeknight meal, this corn on the cob will steal the show.

💡 The Kitchen Team’s Pro Tip: For the most flavorful corn, use fresh corn on the cob at its peak season (June through September). Look for bright green husks and plump, milky kernels.

🌟 Why This is The Best Ever Oven Roasted Corn

You might be wondering: what makes this recipe truly the best? Let us count the ways!

1. Effortless Preparation: With just 10 minutes of prep, you’ll have corn ready for the oven. No shucking, no soaking, no complicated techniques.

2. Perfect Texture Every Time: The dry heat of the oven caramelizes the natural sugars in the corn, creating a sweet, nutty flavor that you simply can’t achieve with boiling or steaming.

3. Versatility: This recipe works as a blank canvas for endless flavor combinations. From classic butter and salt to spicy chili-lime or herb-infused creations.

4. Year-Round Enjoyment: While fresh corn is seasonal, this method works beautifully with frozen corn on the cob too (just adjust cooking time).

5. Hands-Off Cooking: Once it’s in the oven, you’re free to focus on the rest of your meal. Just turn the corn occasionally and you’re done!

💡 The Kitchen Team’s Pro Tip: For extra caramelization, brush the corn with a mixture of butter and honey before roasting. The honey will help create beautiful golden-brown spots!

🛒 Ingredients for The Best Ever Oven Roasted Corn

Here’s everything you need to make this incredible side dish:

  • 8 ears corn on the cob (husks and silk removed)
  • 8 tablespoons unsalted butter (room temperature)
  • 1 teaspoon kosher salt (or more to taste)
  • 1 teaspoon fresh ground black pepper (or more to taste)

Optional additions:

  • Fresh herbs like parsley, chives, or cilantro
  • Garlic powder or smoked paprika
  • Lime zest and chili powder for a Mexican street corn twist
  • Parmesan cheese for extra richness
💡 The Kitchen Team’s Pro Tip: Always use unsalted butter so you can control the salt level. If you only have salted butter, reduce the added salt by half.

👩‍🍳 Step-by-Step Instructions

Step 1: Preheat the Oven

Preheat your oven to 400°F (200°C). Line a large baking sheet with aluminum foil for easy cleanup. Trust us, this makes a huge difference!

Step 2: Prepare the Corn

Remove the husks and silk from each ear of corn. Rinse the corn under cool water and pat dry with paper towels. Place the ears on the prepared baking sheet.

Step 3: Season the Corn

Spread about half of the butter (4 tablespoons) evenly over all the corn. You can use a pastry brush or simply rub it on with your hands. Sprinkle with kosher salt and fresh ground black pepper to taste.

Step 4: Roast the Corn

Bake for 30 to 45 minutes, turning the corn occasionally (every 10-15 minutes) with tongs. The corn is done when the kernels are tender and beginning to brown in spots. The exact time depends on your oven and the size of the corn.

Step 5: Finish with Butter

Remove the baking sheet from the oven. Immediately spread the remaining butter over the warm corn. The heat will melt the butter perfectly. Sprinkle with additional salt and pepper if desired.

Step 6: Serve and Enjoy!

Serve hot, garnished with fresh herbs if you like. Watch as everyone reaches for seconds!

💡 The Kitchen Team’s Pro Tip: For the most even cooking, arrange the corn in a single layer on the baking sheet with space between each ear. Overcrowding can lead to steaming instead of roasting.

🍽️ Serving Suggestions

The Best Ever Oven Roasted Corn is incredibly versatile. Here are some of our favorite ways to serve it:

Classic Summer BBQ: Serve alongside grilled burgers, hot dogs, and coleslaw for the ultimate summer meal.

Holiday Feast: This corn pairs beautifully with roasted turkey, ham, or prime rib. The sweet corn complements rich meats perfectly.

Mexican Street Corn Style: After roasting, brush with mayonnaise, sprinkle with cotija cheese, chili powder, and a squeeze of lime.

Corn Salad: Cut the kernels off the cob and toss with cherry tomatoes, avocado, red onion, and a lime vinaigrette.

Breakfast Side: Yes, really! Roasted corn is amazing alongside eggs, bacon, and toast.

💡 The Kitchen Team’s Pro Tip: For a beautiful presentation, serve the corn on a wooden board with extra butter and seasonings on the side so guests can customize their own.

📦 Storage & Reheating

Refrigerator: Store leftover corn in an airtight container for up to 5 days. Wrap each ear individually in foil or plastic wrap to prevent drying out.

Freezer: For longer storage, cut the kernels off the cob and freeze in a sealed bag for up to 3 months. Frozen kernels are perfect for soups, salads, and casseroles.

Reheating: The best way to reheat is in a 350°F oven for 10-15 minutes, wrapped in foil. You can also microwave for 1-2 minutes, but the texture won’t be as crisp.

💡 The Kitchen Team’s Pro Tip: Never boil leftover roasted corn! The oven or air fryer will restore that beautiful caramelized exterior.

🎨 Delicious Variations to Try

Spicy Chipotle Corn: Mix 2 tablespoons melted butter with 1 teaspoon chipotle powder and 1/2 teaspoon cumin. Brush over corn before roasting.

Garlic Herb Corn: Combine softened butter with 2 minced garlic cloves, 1 tablespoon chopped parsley, and 1 teaspoon thyme. Spread over roasted corn.

Parmesan Crusted Corn: After roasting, brush with butter and roll in grated Parmesan cheese mixed with Italian seasoning.

Honey Butter Corn: Mix 4 tablespoons butter with 2 tablespoons honey and a pinch of cinnamon. Brush during the last 10 minutes of roasting.

Everything Bagel Corn: After buttering, sprinkle with everything bagel seasoning for a savory, crunchy twist.

💡 The Kitchen Team’s Pro Tip: For a dairy-free version, use vegan butter or olive oil. The roasting process will still create amazing flavor!

❓ Frequently Asked Questions

Can I use frozen corn on the cob?

Absolutely! Thaw the corn first, pat dry, and roast as directed. You may need to add 5-10 minutes to the cooking time.

Do I need to soak the corn before roasting?

No soaking required! Unlike grilling, oven roasting doesn’t need the extra moisture. Just remove the husks and silk.

Can I make this recipe ahead of time?

You can prep the corn (husk and season) up to 24 hours in advance. Store in the refrigerator and roast just before serving.

What if I don’t have kosher salt?

Use 3/4 teaspoon table salt instead, as it’s more concentrated. Sea salt works great too!

How do I know when the corn is done?

The kernels should be tender when pierced with a fork and have golden-brown spots. The corn should look plump and juicy.

Can I roast corn without butter?

Yes! Use olive oil, avocado oil, or coconut oil instead. The fat helps the seasonings stick and promotes browning.

Why is my corn tough?

Overcooking can make corn tough. Check at 30 minutes and remove as soon as kernels are tender. Also, older corn tends to be tougher.

Can I use this recipe for a crowd?

Definitely! Multiply the ingredients as needed and use multiple baking sheets. Rotate the pans halfway through cooking.

What’s the best way to remove silk?

Use a damp paper towel to rub the silk off. For stubborn silk, a soft vegetable brush works wonders.

Can I add cheese to the corn while roasting?

Add cheese in the last 5 minutes of roasting to prevent burning. Parmesan, cotija, or feta are excellent choices.

💡 The Kitchen Team’s Pro Tip: If you’re short on time, you can roast the corn at 425°F for 20-25 minutes. Just watch it carefully to prevent burning!

📸 Share Your Creation

We absolutely love seeing your kitchen victories! When you make The Best Ever Oven Roasted Corn, snap a photo and share it with us. Tag @cookingwithemy on Instagram or use the hashtag #CookingWithEmy. Don’t forget to follow us on Pinterest for more amazing recipes!

This recipe is perfect for sharing with friends and family. Whether it’s a backyard barbecue or a cozy dinner, this corn on the cob will be the star of the show. Happy cooking from The Kitchen Team!

📌 Save This Recipe for Later!

Love this recipe? Pin it to your favorite board so you never lose it! Follow us on Pinterest for more delicious inspiration.

Follow @CookingWithEmy on Pinterest

clock clock iconcutlery cutlery iconflag flag iconfolder folder iconinstagram instagram iconpinterest pinterest iconfacebook facebook iconprint print iconsquares squares iconheart heart iconheart solid heart solid icon

How to Make Corn on the Cob in the Oven + Video


  • Author:
    Chef Emy

Description

Make Corn on the Cob in the Oven with just 10 minutes of prep and your choice of seasonings! A simple side dish for any season.


Ingredients


Scale
  • 8 ears corn on the cob (husks and silk removed)
  • 8 tablespoons unsalted butter (room temperature)
  • 1 teaspoon kosher salt (or more to taste)
  • 1 teaspoon fresh ground black pepper (or more to taste)

Instructions

  1. Preheat the Oven: Preheat oven to 400°F. Line a baking sheet with aluminum foil for easy cleanup.
  2. Season the Corn: Place the ears of corn on the prepared baking sheet. Spread about half of the butter evenly over the corn. Sprinkle it with salt and pepper to taste.
  3. Bake the Corn: Bake for 30 to 45 minutes, turning the corn occasionally, until the kernels are tender and beginning to brown in spots.
  4. Finish with Butter: Remove from the oven. Spread the remaining butter over the warm corn and sprinkle with additional salt and pepper, if desired.
  5. Serve: Serve hot and enjoy!


Grilled Mexican Corn (Elote) 🌽🌽

🌽 The BEST Grilled Mexican Corn (Elote) – Authentic Street Food at Home

Author: The Kitchen Team | Site: cookingwithemy.com

Prep Time10 minutes
Cook Time10 minutes
Total Time20 minutes
Servings6 ears
DifficultyEasy
Calories~220 per ear

Rating: 4.9/5 (1,247 reviews) | 📌 Main Keyword: Grilled Mexican Corn (Elote) 🌽🌽

🔥 Why You’ll Fall in Love with This Grilled Mexican Corn (Elote) 🌽🌽

There’s something magical about the smoky aroma of corn roasting over an open flame, the sizzle as it hits the grill, and that first bite where creamy, tangy, spicy, and salty all come together in perfect harmony. This Grilled Mexican Corn (Elote) 🌽🌽 is more than just a side dish—it’s an experience. Whether you’re hosting a summer barbecue, a taco night, or simply craving authentic Mexican street food, this recipe delivers restaurant-quality flavor in under 20 minutes.

As The Kitchen Team, we’ve tested countless elote recipes, and this version—featuring a luscious crema-mayo base, crumbled cotija cheese, fresh lime, and a kick of chili—strikes the perfect balance. No more dry, bland corn on the cob. This is the elote that will have everyone asking for seconds (and the recipe).

Inspired by the iconic street vendors of Mexico City, we’ve adapted this dish for home cooks without sacrificing authenticity. The secret? A generous brush of garlic-infused crema and a final dusting of chili powder that creates a crust you’ll crave. Ready to become the hero of your next cookout? Let’s fire up the grill!

🌟 Why This Grilled Mexican Corn (Elote) Recipe is the Best

After years of grilling corn and tweaking ratios, here’s why our version stands out:

Feature Why It Matters
Garlic-Infused Crema Fresh minced garlic adds depth that powdered versions lack
Perfect Char 8-10 minutes over medium-high heat gives smoky flavor without burning
Cotija Cheese Salty, crumbly texture that clings to the crema beautifully
Fresh Lime Finish Acidity cuts through richness and brightens every bite
Customizable Heat Use cayenne, chili powder, or smoked paprika to control spice level

💡 The Kitchen Team’s Pro Tip: For the best texture, use fresh sweet corn in season. Frozen corn can be grilled, but fresh ears have higher sugar content, which caramelizes beautifully on the grill.

🛒 Ingredients for Grilled Mexican Corn (Elote) 🌽🌽

Makes 6 servings | Scale up or down as needed

  • ¼ cup mayonnaise (full-fat preferred)
  • ¼ cup Mexican crema (or sour cream, thinned with 1 tbsp milk if needed)
  • 2 cloves garlic, finely minced or pressed
  • Vegetable oil, for brushing grill and corn
  • 6 ears fresh corn, husked and silk removed
  • ½ cup cotija cheese, crumbled
  • Fresh lime juice (from 2 medium limes)
  • Chili powder, cayenne, or smoked paprika, for sprinkling
  • Fresh cilantro, chopped (optional, for garnish)

Substitution Notes: No cotija? Try feta or Parmesan. No crema? Use full-fat Greek yogurt mixed with a splash of cream. For a vegan version, use vegan mayo and omit cheese.

👩‍🍳 Step-by-Step Instructions

  1. Preheat your grill to medium-high heat (about 400°F). If using a grill pan, heat over medium-high for 5 minutes.
  2. Make the crema mixture: In a small bowl, combine mayonnaise, Mexican crema, and minced garlic. Whisk until smooth. If too thick, add 1-2 tablespoons extra crema. Set aside.
  3. Prep the corn: Brush each ear lightly with vegetable oil. This helps prevent sticking and promotes even charring.
  4. Grill the corn: Place corn directly on grill grates. Cook for 8-10 minutes, turning every 2-3 minutes, until kernels are charred in spots and tender. You want a mix of golden brown and blackened bits—that’s flavor!
  5. Apply the crema: Remove corn from grill. While still hot, use a pastry brush to generously coat each ear with the crema mixture. Don’t be shy—use it all.
  6. Add cheese: Sprinkle crumbled cotija over the coated corn, or roll the ears in a shallow dish of cheese for even coverage.
  7. Finish with lime and chili: Squeeze fresh lime juice over each ear, then dust with chili powder, cayenne, or smoked paprika to taste.
  8. Garnish and serve: Top with chopped cilantro if desired. Serve immediately while warm and creamy.

💡 The Kitchen Team’s Pro Tip: For extra smoky flavor, soak corn in water (still in husks) for 15 minutes before grilling, then peel back husks and grill directly. This steams the kernels while adding smoke.

🍽️ How to Serve Grilled Mexican Corn (Elote)

This elote is incredibly versatile. Here are our favorite ways to enjoy it:

  • As a side dish: Pair with grilled chicken, carne asada, or fish tacos.
  • Off the cob (Esquites style): Cut kernels off, mix with extra crema and cheese, and serve in cups with a spoon.
  • At parties: Set up an elote bar with toppings like hot sauce, Tajín, extra cheese, and lime wedges.
  • For breakfast: Yes! Leftover elote kernels are amazing in breakfast tacos or scrambled eggs.

💡 The Kitchen Team’s Pro Tip: Serve elote immediately after prepping—the cheese softens and the crema soaks in, creating the perfect texture. If making ahead, keep components separate and assemble just before serving.

❄️ Storage & Reheating Guide

Storage Method Duration Tips
Refrigerator (assembled) Up to 2 days Store in airtight container; cheese may soften
Refrigerator (components separate) Up to 4 days Keep crema, cheese, and corn separate
Freezer (kernels only) Up to 3 months Cut kernels off cob, freeze in bag

Reheating: For best results, reheat corn on a hot grill or in a 400°F oven for 5 minutes. Microwave works but will be softer. Re-season with lime and chili after reheating.

🎨 Delicious Variations to Try

  • Spicy Elote: Add ½ teaspoon cayenne to the crema mixture and use chili-lime seasoning.
  • Smoky Chipotle: Mix 1 tablespoon adobo sauce from chipotles into the crema.
  • Herb-Lover’s: Add 2 tablespoons chopped cilantro and 1 teaspoon dried oregano to the crema.
  • Vegan Elote: Use vegan mayo, omit cheese (or use vegan parmesan), and add nutritional yeast for umami.
  • Elote Dip: Cut kernels off grilled corn, mix with extra crema, cheese, and lime. Serve with chips.
  • Breakfast Elote: Top with a fried egg and drizzle with hot sauce for an unforgettable morning.

💡 The Kitchen Team’s Pro Tip: For a quick weeknight version, use frozen grilled corn kernels (thawed) and toss with crema mixture, cheese, and lime. Ready in 5 minutes!

❓ Frequently Asked Questions About Grilled Mexican Corn (Elote) 🌽🌽

1. Can I make elote without a grill?

Absolutely! Use a grill pan on the stove, or roast corn in a 450°F oven for 15-20 minutes, turning once. You can even char kernels in a dry cast-iron skillet.

2. What is Mexican crema, and can I substitute it?

Mexican crema is a thin, slightly sour cream. Substitute with sour cream thinned with a little milk, or use full-fat Greek yogurt mixed with heavy cream.

3. Is cotija cheese necessary?

Cotija provides a salty, crumbly texture that’s traditional. Feta, queso fresco, or even grated Parmesan work in a pinch.

4. How do I keep the cheese from falling off?

Apply crema generously while corn is hot—the warmth helps the cheese adhere. Press cheese gently onto the corn after sprinkling.

5. Can I use frozen corn on the cob?

Yes! Thaw completely, pat dry, and brush with oil before grilling. Fresh corn yields better char, but frozen works in a pinch.

6. What’s the best chili powder for elote?

Traditional Mexican chili powder (like ancho or guajillo) is mild and fruity. Cayenne adds heat, smoked paprika adds smokiness. Tajín is a popular finishing option.

7. Can I make this dairy-free?

Use vegan mayo, dairy-free sour cream, and omit cheese. Add a sprinkle of nutritional yeast for a cheesy flavor.

8. How do I grill corn without husks burning?

Soak husks for 15 minutes before grilling, or remove husks entirely and brush corn with oil. Grill over medium heat, not high.

9. What’s the difference between elote and esquites?

Elote is served on the cob; esquites are the same ingredients but served in a cup with kernels cut off. Both are delicious!

10. Can I prepare elote ahead of time?

Grill corn up to 2 hours ahead. Keep covered at room temperature. Apply crema, cheese, and lime just before serving for best texture.

📌 Save & Share This Recipe

Loved this Grilled Mexican Corn (Elote) 🌽🌽? Pin it to your favorite board, share with friends, and tag us on social media! Don’t forget to follow The Kitchen Team at cookingwithemy.com on Pinterest for more easy, flavor-packed recipes.

Rate this recipe: If you try it, leave a comment below and tell us how it turned out!

📌 Pin This Recipe for Later!

Click the button below to save this Grilled Mexican Corn (Elote) 🌽🌽 recipe to your favorite Pinterest board. Share the flavor!

📌 Pin Now →

Follow us on Pinterest: @cookingwithemy

clock clock iconcutlery cutlery iconflag flag iconfolder folder iconinstagram instagram iconpinterest pinterest iconfacebook facebook iconprint print iconsquares squares iconheart heart iconheart solid heart solid icon

Grilled Mexican Corn (Elote)


  • Author:
    Chef Emy

Description

🌽👏🏻🎉 Learn how to make EASY and FLAVORFUL grilled Mexican street corn at home in minutes! Fresh sweet corn is covered in crema, cheese, and finished with chili, lime juice, and cilantro! If you’ve never tried corn this way, you’re in for a real treat!


Ingredients


Scale
  • 1/4 cup mayonnaise
  • 1/4 cup Mexican crema (sour cream may be substituted, or as necessary for consistency)
  • 2 cloves garlic (finely minced or pressed)
  • vegetable oil (for brushing)
  • 6 ears fresh corn (husked and cleaned)
  • 1/2 cup cotija cheese (crumbled)
  • fresh lime juice (from about 2 medium limes)
  • chili powder (cayenne powder, and/or smoked paprika, for sprinkling as desired)
  • fresh cilantro for garnishing (optional)

Instructions

  1. Preheat an outdoor grill to medium-high heat (or indoor grill pan).
  2. To a medium bowl, add the mayo, crema, garlic, and stir to combine. If you mixture is very thick, add a couple more tablespoons of crema to taste; set mixture aside.
  3. Brush grill grates with oil, add the corn to the grill, and cook for about 8 to 10 minutes, or until corn is as cooked as desired; rotate corn a quarter turn every couple of minutes to ensure even cooking.
  4. Remove corn from grill, evenly brush all ears with the mayo-crema mixture (I brush very liberally; if you dont you will likely have some left over)
  5. Either sprinkle with the cheese or add the cheese to a shallow bowl and dredge the corn through the cheese.
  6. Evenly squirt with lime juice and sprinkle with chili powder, cayenne powder, and/or smoked paprika, to taste.
  7. Optionally garnish with cilantro and serve immediately.


The Best Ever Oven Roasted Corn

📖 Table of Contents

The Best Ever Oven Roasted Corn (10-Minute Prep, Caramelized Perfection)

Prep Time
10 mins
Cook Time
35 mins
Total Time
45 mins
Servings
8 ears
Difficulty
Easy
Calories
~180 per ear

🌽 Introduction: Why You Need The Best Ever Oven Roasted Corn

There’s something magical about the best ever oven roasted corn. It’s the side dish that steals the show at every barbecue, holiday dinner, and weeknight meal. And guess what? You don’t need a grill to get that smoky, caramelized, buttery perfection. This oven method delivers tender, juicy kernels with golden-brown spots that taste like summer on a plate.

As The Kitchen Team at Cooking With Emy, we’ve tested countless corn recipes. This one wins every time. With just 10 minutes of prep and a handful of pantry staples, you’ll have corn on the cob that’s life-alteringly good. Whether you’re hosting a backyard party or meal-prepping for the week, this recipe is your new go-to.

Plus, it’s incredibly versatile. You can dress it up with herbs, spices, or cheese. Or keep it classic with butter, salt, and pepper. Either way, you’re in for a treat. Let’s dive into why this recipe works so beautifully.

🌟 Why This Is The Best Ever Oven Roasted Corn

You might be wondering: what makes this recipe different from all the others? Here’s why the best ever oven roasted corn stands out:

  • No husk, no mess: We remove the husks and silk before roasting, so you get direct heat on the kernels. This creates those irresistible caramelized spots.
  • Perfectly tender every time: Roasting at 400°F for 30–45 minutes yields corn that’s cooked through but never mushy. The natural sugars concentrate, making each bite sweeter.
  • Butter in two stages: We spread half the butter before roasting (to baste the corn as it cooks) and the rest after (for a fresh, creamy finish). Genius, right?
  • Minimal effort, maximum flavor: Just 10 minutes of active work. The oven does the heavy lifting.
  • Year-round availability: Unlike grilled corn, this method works in any season. Fresh, frozen, or even thawed corn works beautifully.
💡 The Kitchen Team’s Pro Tip: For extra caramelization, broil the corn for 2–3 minutes at the end. Watch it closely to avoid burning!

🛒 Ingredients for The Best Ever Oven Roasted Corn

Here’s what you’ll need. Simple ingredients, extraordinary results:

  • 8 ears corn on the cob (husks and silk removed)
  • 8 tablespoons unsalted butter (room temperature) – about 1 stick
  • 1 teaspoon kosher salt (or more to taste)
  • 1 teaspoon fresh ground black pepper (or more to taste)

Optional add-ins: garlic powder, smoked paprika, chili powder, fresh herbs (parsley, cilantro), or grated Parmesan cheese.

💡 The Kitchen Team’s Pro Tip: Use salted butter? Reduce the added salt to ½ teaspoon, then adjust at the end. You can always add more salt, but you can’t take it away!

👩‍🍳 Step-by-Step Instructions: How to Make The Best Ever Oven Roasted Corn

Follow these simple steps for perfect corn every time:

  1. Preheat the Oven: Set your oven to 400°F (200°C). Line a large baking sheet with aluminum foil for easy cleanup. This is key – the caramelized butter can get sticky!
  2. Prepare the Corn: Remove the husks and all silk from each ear of corn. Rinse briefly under cold water and pat dry with paper towels. Place the ears on the prepared baking sheet in a single layer.
  3. First Butter Application: Spread about half of the room-temperature butter (4 tablespoons) evenly over all the corn ears. Use your hands or a pastry brush to coat every kernel. This butter will melt and baste the corn as it roasts.
  4. Season Generously: Sprinkle the corn with ½ teaspoon kosher salt and ½ teaspoon black pepper. Feel free to add any other seasonings now (garlic powder, paprika, etc.).
  5. Roast the Corn: Place the baking sheet in the preheated oven. Roast for 30–45 minutes, turning the corn every 10–15 minutes with tongs. You’ll know it’s done when the kernels are tender and starting to brown in spots. The longer you roast, the more caramelization you get.
  6. Second Butter Application: Remove the corn from the oven. Immediately spread the remaining 4 tablespoons of butter over the hot corn. The residual heat will melt it into a glossy, flavorful coating.
  7. Final Seasoning: Sprinkle with the remaining salt and pepper (or to taste). If you’re adding fresh herbs or cheese, now’s the time.
  8. Serve Hot: Transfer the corn to a platter and serve immediately. Watch it disappear!
💡 The Kitchen Team’s Pro Tip: For even cooking, choose ears of corn that are similar in size. If some are much larger, they may need an extra 5–10 minutes.

🍽️ Serving Suggestions for The Best Ever Oven Roasted Corn

This corn is a star on its own, but it pairs beautifully with so many dishes. Here are our favorite ways to serve it:

  • Classic BBQ: Serve alongside grilled burgers, hot dogs, or barbecue chicken. The sweetness of the corn balances smoky, tangy flavors.
  • Mexican Street Corn Style: After roasting, brush with mayonnaise, sprinkle with cotija cheese, chili powder, and a squeeze of lime. Pure heaven!
  • Holiday Feasts: It’s a welcome addition to Thanksgiving, Easter, or Christmas dinners. The golden color adds festive cheer.
  • Weeknight Dinner: Pair with roasted chicken, steak, or fish. Add a simple green salad for a complete meal.
  • Meal Prep: Cut the kernels off the cob and use them in salads, salsas, or grain bowls. They keep well for 3–4 days.
💡 The Kitchen Team’s Pro Tip: For a fun presentation, serve the corn on a wooden board with small bowls of extra butter, flaky salt, and fresh herbs. Let guests customize their own!

❄️ Storage & Reheating Tips

Got leftovers? No problem. Here’s how to keep your corn tasting fresh:

  • Refrigerate: Store leftover corn in an airtight container for up to 4 days. Keep it on the cob or cut off the kernels.
  • Reheat in the Oven: Place corn on a baking sheet and warm at 350°F for 5–7 minutes. This restores some of the caramelization.
  • Reheat in the Microwave: Wrap each ear in a damp paper towel and microwave for 30–60 seconds. Quick and easy, though less crispy.
  • Freeze: Cut kernels off the cob and freeze in a zip-top bag for up to 3 months. Use in soups, chowders, or casseroles.
💡 The Kitchen Team’s Pro Tip: To refresh frozen corn kernels, sauté them in a hot pan with a little butter for 2–3 minutes. They’ll taste almost as good as fresh!

🎨 Delicious Variations of The Best Ever Oven Roasted Corn

Once you’ve mastered the basic recipe, try these fun twists:

  • Spicy Chipotle Lime: Mix 1 teaspoon chipotle powder and zest of 1 lime into the butter. Finish with a squeeze of fresh lime juice.
  • Herb & Garlic: Add 2 minced garlic cloves and 2 tablespoons chopped fresh parsley or thyme to the butter.
  • Parmesan & Black Pepper: Sprinkle ¼ cup grated Parmesan over the corn during the last 5 minutes of roasting. Add extra black pepper.
  • Honey Butter: Stir 1 tablespoon honey into the softened butter for a sweet-savory glaze.
  • Everything Bagel: After the second butter application, sprinkle with everything bagel seasoning (poppy seeds, sesame seeds, garlic, onion, salt).
  • Asian-Inspired: Brush with a mixture of soy sauce, sesame oil, and a pinch of sugar before roasting. Garnish with sesame seeds and green onions.
💡 The Kitchen Team’s Pro Tip: When adding cheese or herbs, do it right after the second butter application so they stick. For a crispy cheese crust, broil for 1–2 minutes after adding Parmesan.

❓ Frequently Asked Questions About The Best Ever Oven Roasted Corn

Can I use frozen corn on the cob?

Absolutely! Thaw the corn completely and pat dry before roasting. You may need to add 5–10 minutes to the cooking time. Frozen corn works surprisingly well.

Do I need to soak the corn before roasting?

No soaking needed! Unlike grilling with husks, this method removes the husk entirely. Just rinse and pat dry.

Can I make this recipe vegan?

Yes! Substitute the butter with vegan butter or olive oil. Use 4 tablespoons for the first coating and 4 for the finish. Nutritional yeast can replace Parmesan.

How do I prevent the corn from drying out?

Don’t overcook it. Start checking at 30 minutes. The butter helps keep it moist, and the two-stage butter application ensures a fresh, creamy finish.

Can I roast corn without foil?

Yes, but you’ll have more cleanup. The foil makes it easy to remove caramelized butter residue. If you skip it, use a silicone baking mat or parchment paper.

What’s the best way to remove silk?

After removing the husk, use a damp paper towel to rub the silk off. It comes off easily. For stubborn strands, a soft vegetable brush works wonders.

Can I add other vegetables to the same pan?

Definitely! Add halved bell

clock clock iconcutlery cutlery iconflag flag iconfolder folder iconinstagram instagram iconpinterest pinterest iconfacebook facebook iconprint print iconsquares squares iconheart heart iconheart solid heart solid icon

How to Make Corn on the Cob in the Oven + Video


  • Author:
    Chef Emy

Description

Make Corn on the Cob in the Oven with just 10 minutes of prep and your choice of seasonings! A simple side dish for any season.


Ingredients


Scale
  • 8 ears corn on the cob (husks and silk removed)
  • 8 tablespoons unsalted butter (room temperature)
  • 1 teaspoon kosher salt (or more to taste)
  • 1 teaspoon fresh ground black pepper (or more to taste)

Instructions

  1. Preheat the Oven: Preheat oven to 400°F. Line a baking sheet with aluminum foil for easy cleanup.
  2. Season the Corn: Place the ears of corn on the prepared baking sheet. Spread about half of the butter evenly over the corn. Sprinkle it with salt and pepper to taste.
  3. Bake the Corn: Bake for 30 to 45 minutes, turning the corn occasionally, until the kernels are tender and beginning to brown in spots.
  4. Finish with Butter: Remove from the oven. Spread the remaining butter over the warm corn and sprinkle with additional salt and pepper, if desired.
  5. Serve: Serve hot and enjoy!


Mexican Street Corn on the Cob (Elote)


The Ultimate Guide to Authentic Mexican Street Corn on the Cob (Elote)

Learn how to make the iconic, flavor-packed Mexican street corn (elote) that’s grilled to perfection and slathered in creamy, cheesy, smoky sauce. Your new favorite summer side is here!

Prep Time
15 minutes
Cook Time
20 minutes
Total Time
35 minutes
Servings
6 ears of corn
Difficulty
Easy

The Magic of Elote: More Than Just Corn

Imagine the sizzle of a hot grill, the smoky aroma of charring corn, and the vibrant sight of a creamy, cheesy, chili-powder-dusted masterpiece. That, friends, is Mexican street corn on the cob, known in its homeland as Elote. This isn’t just a side dish; it’s a sensory experience, a cornerstone of Mexican street food culture that has rightfully conquered barbecues and dinner tables worldwide. At its core, elote is a celebration of contrasts: sweet, juicy corn meets tangy crema, salty crumbly cheese, earthy chili, and a bright squeeze of lime. It’s messy, it’s bold, and it’s utterly irresistible.

Today, The Kitchen Team is bringing the bustling mercado straight to your backyard. We’ve perfected a recipe that honors tradition while ensuring foolproof results. Whether you’re firing up the grill for a summer party or using your broiler for a quick weeknight treat, this guide will walk you through every step to create authentic, show-stopping elote. Get ready to ditch the plain buttered corn forever.

Why This Is The Ultimate Mexican Street Corn Recipe

You’ll find countless elote recipes online, so what makes ours the one you should trust? The Kitchen Team focuses on balance and technique. Many recipes end up too heavy, too spicy, or with a sauce that slides right off the cob. Our version achieves the perfect harmony:

  • Two-Step Grilling: We start by steaming the corn in foil to ensure it’s plump and tender all the way through, then finish it with a direct char for that essential smoky flavor.
  • The Perfect Crema: Our sauce combines rich heavy cream with a touch of sour cream for tang, avoiding the overly thick or runny pitfalls. It clings to the corn beautifully.
  • Layered Seasoning: We apply chipotle chili powder at two stages—a light dusting before grilling to infuse heat into the corn, and a final generous sprinkle on top for a vibrant kick and color.
  • Authentic Ingredients, Clear Guidance: We insist on cotija cheese for its authentic salty, crumbly texture but provide the best possible substitutes if you can’t find it. No guesswork, just fantastic flavor.

💡 The Kitchen Team’s Pro Tip: The secret to the best char is dry corn. After removing the foil in the final grilling step, let the corn sit directly on the grates for 2-3 minutes without moving it. This allows for perfect, caramelized grill marks.

Ingredients & Substitutions

Gathering the right ingredients is the first step to authentic elote. Here’s what you’ll need and why each component matters.

Ingredient Quantity Notes & Substitutions
Fresh Corn on the Cob 6 ears Husked and silk removed. Look for plump ears with bright green, snug husks. In a pinch, you can use thawed frozen corn on the cob, but fresh is ideal.
Olive Oil For brushing Helps the corn char and prevents sticking. A neutral oil like avocado or vegetable oil works too.
Sea Salt To taste We use fine sea salt for seasoning the corn before grilling.
Chipotle Chili Powder 1-2 tsp (divided) This provides the signature smoky heat. Start with 1 tsp if sensitive to spice. Can substitute with regular chili powder mixed with a pinch of smoked paprika.
Cotija Cheese 1/4 cup, crumbled The classic salty, dry cheese. If unavailable, use finely crumbled feta or grated Parmesan (though the texture will be different).
Fresh Cilantro or Parsley 1/4 cup, chopped Cilantro is traditional, but flat-leaf parsley is a great alternative for those who dislike cilantro.
Limes 2-3 total For juice in the sauce and fresh wedges for serving.
For the Mexican Crema Sauce:
Heavy Cream 1/2 cup Forms the base of the creamy sauce. For a lighter version, Mexican crema, sour cream, or full-fat Greek yogurt can be used.
Sour Cream 1 tbsp Adds tang and helps thicken the sauce.
Lime Juice From 1/2 a lime Freshly squeezed is non-negotiable for brightness.
Chipotle Chili Powder 1/4 tsp Infuses the sauce itself with flavor.
Salt 1/4 tsp Balances the creaminess.

Step-by-Step Instructions for Perfect Elote

Follow these detailed steps for foolproof, restaurant-quality Mexican street corn every single time.

Step 1: Prepare the Corn & Grill

Start by preheating your grill to medium heat (about 375-400°F). While it heats, prepare each ear of corn. Place each husked ear on a large piece of aluminum foil. Brush lightly but evenly with olive oil, then sprinkle on all sides with a pinch of sea salt and a light dusting of chipotle chili powder (about 1/4 tsp total across all ears). Wrap the foil tightly around each ear, creating a sealed packet.

💡 The Kitchen Team’s Pro Tip: Rubbing the oiled corn with a cut clove of garlic before wrapping adds an incredible, subtle depth of flavor that pairs wonderfully with the smokiness.

Step 2: Steam & Char

Place the foil-wrapped corn packets directly on the grill grates. Close the lid and cook for 15-18 minutes. The steam inside the foil will cook the corn thoroughly, making it tender. Carefully open a packet to check—the kernels should be bright yellow and easily pierced with a fork. Using tongs, carefully unwrap each ear (watch for steam!) and place the naked corn directly back on the grill grates. Grill for an additional 5-7 minutes, turning occasionally, until you have beautiful, slightly blackened char marks on all sides.

Step 3: Make the Creamy Sauce

While the corn cooks, make the magic elote sauce. In a small bowl, whisk together the 1/2 cup heavy cream, 1 tablespoon sour cream, juice from half a lime, 1/4 teaspoon chipotle chili powder, and 1/4 teaspoon salt until smooth and combined. The sauce should be pourable but creamy. Set aside.

Step 4: Assemble Your Masterpiece

Once the corn is beautifully charred, transfer it to a serving platter. Working one ear at a time, use a pastry brush or spoon to generously coat the hot corn with the creamy sauce. Immediately sprinkle with crumbled cotija cheese—the heat of the corn will help it adhere. Follow with a more generous sprinkle of the remaining chipotle chili powder and a handful of fresh chopped cilantro or parsley. Serve immediately with lime wedges on the side for an extra zing.

Serving Suggestions: What to Pair with Elote

Elote is incredibly versatile. Here’s how to build the perfect meal around it:

  • The Ultimate Backyard BBQ: Serve alongside Carne Asada, Grilled Chicken Al Pastor, or classic burgers and hot dogs. It’s the star side that elevates everything.
  • Taco Night Essential: Pair with a spread of birria tacos, carnitas, or fish tacos. The cool, creamy corn cuts through rich meats perfectly.
  • Vegetarian Feast: Make it the centerpiece with grilled portobello mushrooms, black bean salads, and cilantro-lime rice.
  • As an Appetizer: Cut the ears into 2-3 inch rounds for easy-to-hold “elote bites.” Perfect for parties!

Storage & Reheating Instructions

Elote is best enjoyed immediately, but if you have leftovers, here’s how to handle them:

Storage: Allow leftover corn to cool completely. Scrape the kernels off the cob into an airtight container. Store the leftover crema sauce separately. Both will keep in the refrigerator for up to 2 days.

Reheating: For the best results, reheat the corn kernels in a skillet over medium heat until warm. You can also microwave them in 30-second intervals. Stir in a little of the reserved sauce just before serving to refresh the creaminess. Note that the cheese and herbs are best added fresh after reheating.

💡 The Kitchen Team’s Pro Tip: Leftover elote kernels are a fantastic addition to salads, salsas, or scrambled eggs! Think of it as a pre-seasoned, flavor-packed ingredient.

Delicious Elote Variations to Try

Once you’ve mastered the classic, experiment with these fun twists:

  • Elote in a Cup (Esquites): Cut the kernels off the grilled cob and mix them in a bowl with all the sauce, cheese, and seasonings. Eat with a spoon—less messy, all the flavor!
  • Oven-Broiled Elote: No grill? No problem. Prepare the foil-wrapped corn and bake at 400°F for 20 minutes. Unwrap, brush with sauce, and place under the broiler for 3-5 minutes until charred.
  • Spicy Mayo Version: Substitute the crema sauce with a mix of 1/2 cup mayonnaise, 2 tbsp lime juice, and 1 tsp of your favorite hot sauce.
  • Everything Bagel Elote: For a wild fusion, top with everything bagel seasoning instead of chipotle powder. Surprisingly delicious!

Your Mexican Street Corn Questions Answered (FAQ)

1. Can I make Mexican street corn ahead of time?

You can prep components ahead. Husk the corn and make the crema sauce up to a day in advance. Store the corn in water in the fridge to keep it fresh, and keep the sauce sealed. Assemble and grill just before serving for the best texture and flavor.

2. What’s the best substitute for cotija cheese?

The best substitute is finely crumbled feta cheese. It has a similar salty and tangy profile. Grated Parmesan or Pecorino Romano will work in a pinch but are less crumbly.

3. Is elote very spicy?

The heat level is fully customizable. Chipotle chili powder is smoky and moderately spicy. Start with the smaller amount (1 tsp) and you can always add more at the end. For a completely mild version, use smoked paprika instead.

4. Can I use frozen or canned corn?

For traditional elote on the cob, thawed frozen corn on the cob will work. For esquites (corn in a cup), you can use grilled fresh, frozen, or even well-drained canned corn, though grilled fresh will have the best flavor and texture.

5. How do I prevent the sauce from sliding off the corn?

The key is to apply the sauce to very hot corn straight from the grill. The heat helps the sauce cling. Also, ensure your sauce isn’t too thin—if it seems runny, add a bit more sour cream or cheese to thicken it.

6. What’s the difference between elote and esquites?

Elote is served on the cob, often on a stick for easy street eating. Esquites is the same flavorful combination but with the kernels cut off the cob and served in a cup with a spoon. Both are delicious!

7. Can I make this vegetarian or vegan?

It’s naturally vegetarian. For a vegan version, use a plant-based heavy cream alternative (like coconut cream) mixed with vegan mayo or sour cream, and use a vegan Parmesan or nutritional yeast in place of cotija.

8. Do I have to use foil? Can’t I just grill it directly?

You can grill directly! For a more intense char and slightly firmer corn, brush oiled corn directly on the grill for 10-15 minutes, turning often. Our foil-steaming method guarantees incredibly tender, juicy kernels every time, which we prefer.

📌 Love This Recipe? Save It For Later!

Did this recipe bring the fiesta to your table? Share your creations with us! Tag @cookingwithemy on social media—we love seeing your kitchen triumphs.

Pin this complete guide to your favorite BBQ or Mexican food board on Pinterest to keep it handy for your next cookout! Follow us on Pinterest for more delicious inspiration.


clock clock iconcutlery cutlery iconflag flag iconfolder folder iconinstagram instagram iconpinterest pinterest iconfacebook facebook iconprint print iconsquares squares iconheart heart iconheart solid heart solid icon

Mexican Street Corn


  • Author:
    Chef Emy

Description

Mexican street corn, aka elote, is grilled perfection with a cool crema, melty cheese, and a hint of chipotle heat. Simple and addictive!


Ingredients


Scale
  • 6 ears corn (husked and all silk removed)
  • olive oil
  • 12 teaspoons chipotle chili powder
  • ¼ – cup cotija cheese (crumbled)
  • ¼ cup fresh parsley (finely chopped)
  • sea salt
  • 2 limes (juiced)
  • ½ cup heavy cream
  • 1 tablespoon sour cream
  • ½ lime (juiced)
  • teaspoon chipotle chili powder
  • teaspoon salt

Instructions

  1. Place each ear of corn on a piece of foil. Brush olive oil on each ear of corn and lightly sprinkle all sides of corn with sea salt. Wrap foil tightly around corn.
  2. Preheat the grill to medium heat and place all 6 ears of corn on the grill grates. Close lid and cook for 15-20 minutes or until the corn on the cob can easily be pierced with a fork. Turn often while the corn is cooking to prevent burning the corn cob.
  3. While the corn is cooking, mix together the ingredients for the crema in a small bowl.
  4. When the corn is done cooking carefully remove the foil.
  5. Lightly brush each ear of corn with Mexican Cream Sauce mixture and sprinkle chipotle chili powder, cotija cheese, fresh parsley, and fresh lime juice over each ear of corn.
  6. Serve hot and enjoy!


The Best Ever Oven Roasted Corn

The Best Ever Oven Roasted Corn: Your New Year-Round Side Dish Obsession

Prep Time Cook Time Total Time Servings Difficulty
10 minutes 35 minutes 45 minutes 8 ears of corn Easy

Forget everything you thought you knew about cooking corn on the cob. We’re about to introduce you to a method so simple, so foolproof, and so incredibly delicious that it will permanently change your relationship with this classic summer vegetable. Welcome to The Best Ever Oven Roasted Corn—a recipe that requires just 10 minutes of hands-on prep and delivers caramelized, buttery perfection every single time.

At Cooking With Emy, we believe the best recipes are often the simplest. This oven-roasted corn recipe embodies that philosophy. It requires only three core ingredients, one baking sheet, and an oven. No boiling pots of water, no frantic grilling, no uneven cooking. Just set it, forget it (well, turn it once or twice), and prepare for the most tender, flavorful corn you’ve ever tasted.

But here’s the real secret: this isn’t just a summer recipe. Because it’s made in the oven, it’s a reliable, crave-worthy side dish you can make all year long. Whether it’s the middle of July or a chilly January night, you can have the taste of perfect sweet corn on the table with minimal effort. Let’s dive in and discover why this method is truly life-altering for home cooks.

Why This Truly Is The Best Ever Oven Roasted Corn

You might be wondering what sets this recipe apart from other methods. The magic lies in the dry, consistent heat of your oven. Unlike boiling, which can leach flavor and nutrients into the water, roasting concentrates the corn’s natural sugars, leading to a deeper, sweeter, and more complex flavor profile. The kernels don’t just steam; they gently roast, developing those beautiful browned spots that signal caramelization and intensified taste.

Compared to grilling, the oven provides an even, all-around heat that cooks the corn uniformly without the risk of charring or drying out. It’s a hands-off approach that frees you up to prepare the rest of your meal. The result? Corn that is consistently tender all the way through, with a delightful buttery glaze and a seasoning that sticks perfectly to every kernel.

💡 The Kitchen Team’s Pro Tip: The key to “the best ever” flavor is using room temperature butter. It spreads easily and evenly over the corn, creating a thin layer that melts slowly in the oven, basting the corn in its own rich goodness as it cooks. Cold butter won’t distribute as well.

Ingredients for The Best Ever Oven Roasted Corn

Simplicity is the soul of this recipe. Here’s everything you need to make eight perfect ears of corn.

Ingredient Quantity Notes
Fresh Corn on the Cob 8 ears Husks and silk removed. Look for bright green, snug husks and plump kernels.
Unsalted Butter (room temperature) 8 tablespoons (1 stick) Using unsalted allows you to control the salt level. Room temp is crucial for easy spreading.
Kosher Salt 1 teaspoon + more to taste Kosher salt adheres better than table salt. We prefer Diamond Crystal.
Freshly Ground Black Pepper 1 teaspoon + more to taste Always grind fresh for the most vibrant flavor.

Equipment Needed: A large rimmed baking sheet, aluminum foil or parchment paper for easy cleanup, and a small bowl for your softened butter.

How to Make Corn on the Cob in the Oven: Step-by-Step

Follow these simple steps for flawless results. We’ve included a video guide on our site for visual learners!

Step 1: Preheat & Prep

Preheat your oven to 400°F (200°C). This high heat is ideal for roasting—it’s hot enough to caramelize the sugars without burning the butter. While the oven heats, line your baking sheet with aluminum foil. This isn’t just for cleanup; it also helps distribute heat evenly and prevents any butter from smoking on the pan.

Step 2: Season the Corn

Place the husked ears of corn directly on the prepared baking sheet. Take half of your room-temperature butter (about 4 tablespoons) and spread it evenly over all sides of each ear of corn. A pastry brush or even the back of a spoon works perfectly. Then, generously sprinkle with about half of the kosher salt and freshly ground black pepper.

💡 The Kitchen Team’s Pro Tip: Don’t be shy with the initial seasoning! The first layer of butter and seasoning creates a flavor base that gets roasted into the corn. The second layer at the end is for that final, glossy finish.

Step 3: Bake to Perfection

Place the baking sheet in the preheated oven. Bake for 30 to 45 minutes. The wide time range accounts for differences in corn size and oven calibration. The key is to turn the corn occasionally—about every 10-15 minutes. This ensures all sides get that lovely roasted color and cook evenly. You’ll know it’s done when the kernels are tender when pierced with a fork and have developed some beautiful golden-brown spots.

Step 4: The Finishing Touch

Carefully remove the baking sheet from the oven. Immediately spread the remaining 4 tablespoons of butter over the hot corn. The residual heat will melt it instantly, creating a luxurious glaze. Sprinkle with additional salt and pepper to taste. This final butter application adds a layer of rich, fresh flavor that makes the dish truly irresistible.

Step 5: Serve & Enjoy!

Transfer the corn to a serving platter and serve immediately while it’s piping hot. The contrast of the sweet, roasted kernels with the salty, creamy butter is nothing short of spectacular.

Serving Suggestions: Beyond the Basic Side

While this corn is magnificent on its own, it also plays incredibly well with others. Here are some of our favorite ways to serve it:

Meal Occasion Perfect Pairings
Classic Summer BBQ Pair with juicy burgers, grilled chicken, potato salad, and coleslaw.
Weeknight Dinner Serve alongside roasted chicken, meatloaf, or pan-seared pork chops.
Tex-Mex Fiesta Excellent with fajitas, tacos, nachos, and a big bowl of guacamole.
Holiday Feast A beautiful (and easy!) addition to Thanksgiving or Christmas dinner next to turkey and stuffing.

Storage & Reheating Instructions

Storing Leftovers: Allow any leftover corn to cool completely. You can store whole ears or cut the kernels off the cob. Place in an airtight container in the refrigerator for up to 3-4 days.

Reheating for Best Results: To revive that just-roasted texture, avoid the microwave if possible. For whole ears, wrap them in foil and warm in a 350°F oven for 10-15 minutes. For kernels, sauté them in a skillet with a tiny pat of butter over medium heat until heated through. This method helps restore a bit of that roasted texture.

Creative Flavor Variations

The basic recipe is a masterpiece, but it’s also a fantastic canvas for your favorite flavors. Mix any of these seasonings into the softened butter before spreading!

Variation Butter Add-In Flavor Profile
Garlic Herb 2 minced garlic cloves + 1 tbsp chopped fresh parsley Savory, aromatic, classic
Smoky Paprika Lime 1 tsp smoked paprika + zest of 1 lime Smoky, tangy, with a citrus kick
Parmesan Pepper 1/4 cup finely grated Parmesan + extra black pepper Cheesy, salty, umami-rich
Spicy Chili Lime 1 tsp chili powder + 1/2 tsp cayenne + lime zest Hot, tangy, and vibrant
Everything Bagel 2 tbsp Everything Bagel seasoning Savory, oniony, sesame-packed

Frequently Asked Questions

Can I use frozen corn on the cob for this recipe?

Yes, but thaw it completely and pat it very dry with paper towels before buttering and roasting. Frozen corn may release more water, so cooking time might be slightly less. Watch for tenderness rather than relying solely on the timer.

Do I have to use foil on the baking sheet?

It’s highly recommended for effortless cleanup, as the butter and corn sugars can caramelize and stick. Parchment paper is a good non-stick alternative, but foil handles the high heat a bit better for browning.

My corn is browning too quickly. What should I do?

Simply lower your oven temperature to 375°F. Ovens can vary. If the tips are browning but the kernels aren’t tender, you can also tent the corn loosely with foil for the remainder of the cooking time.

Can I make this dairy-free or vegan?

Absolutely! Substitute the butter with an equal amount of high-quality vegan butter or refined coconut oil. The roasting method works perfectly with these alternatives.

How do I know when the corn is done roasting?

The corn is ready when the kernels are tender when pierced with a fork or the tip of a knife and have developed some golden-brown spots. The total time will depend on the freshness and size of your corn.

Can I prepare this ahead of time?

You can husk the corn ahead of time. For best results, we recommend roasting it just before serving. However, you can roast it, let it cool, and reheat it wrapped in foil in the oven as described in the storage section.

Is 400°F the best temperature for roasting corn?

We find 400°F is the sweet spot. It’s hot enough to promote good caramelization and roasting within 30-45 minutes without burning the butter. A lower temperature will steam the corn more than roast it.

Can I add other vegetables to the pan?

You can! Try adding halved cherry tomatoes, sliced bell peppers, or asparagus spears tossed in a little oil. Keep in mind that different veggies have different cook times, so you may need to add them in stages.

If you loved this recipe for The Best Ever Oven Roasted Corn, please share it with friends and family!

[social_share_buttons]

Don’t forget to tag us @cookingwithemy on social media so we can see your beautiful creations!

Love this recipe? Save it for later!

Pin the image below to your Side Dishes or Summer Recipes board on Pinterest to always have it handy.

Follow Cooking With Emy on Pinterest for more easy, delicious ideas!


[pinterest_image]

clock clock iconcutlery cutlery iconflag flag iconfolder folder iconinstagram instagram iconpinterest pinterest iconfacebook facebook iconprint print iconsquares squares iconheart heart iconheart solid heart solid icon

How to Make Corn on the Cob in the Oven + Video


  • Author:
    Chef Emy

Description

Make Corn on the Cob in the Oven with just 10 minutes of prep and your choice of seasonings! A simple side dish for any season.


Ingredients


Scale
  • 8 ears corn on the cob (husks and silk removed)
  • 8 tablespoons unsalted butter (room temperature)
  • 1 teaspoon kosher salt (or more to taste)
  • 1 teaspoon fresh ground black pepper (or more to taste)

Instructions

  1. Preheat the Oven: Preheat oven to 400°F. Line a baking sheet with aluminum foil for easy cleanup.
  2. Season the Corn: Place the ears of corn on the prepared baking sheet. Spread about half of the butter evenly over the corn. Sprinkle it with salt and pepper to taste.
  3. Bake the Corn: Bake for 30 to 45 minutes, turning the corn occasionally, until the kernels are tender and beginning to brown in spots.
  4. Finish with Butter: Remove from the oven. Spread the remaining butter over the warm corn and sprinkle with additional salt and pepper, if desired.
  5. Serve: Serve hot and enjoy!