
Pepper Steak with Bell Peppers and Onion –

Print
End your day with a delicious, comforting, and satisfying dinner! Whether you’re looking for quick and easy weeknight meals, cozy comfort food, or elegant dishes for special occasions, we have the perfect recipes for you.
From hearty casseroles and one-pan wonders to savory pastas, juicy meats, and flavorful vegetarian options, our collection is designed to make dinnertime effortless and enjoyable.
Busy schedule? No problem! Try our slow cooker meals, sheet pan dinners, and 30-minute recipes to save time without sacrificing flavor. Whatever your craving, these recipes will bring warmth and joy to your table every night. 🍽️✨
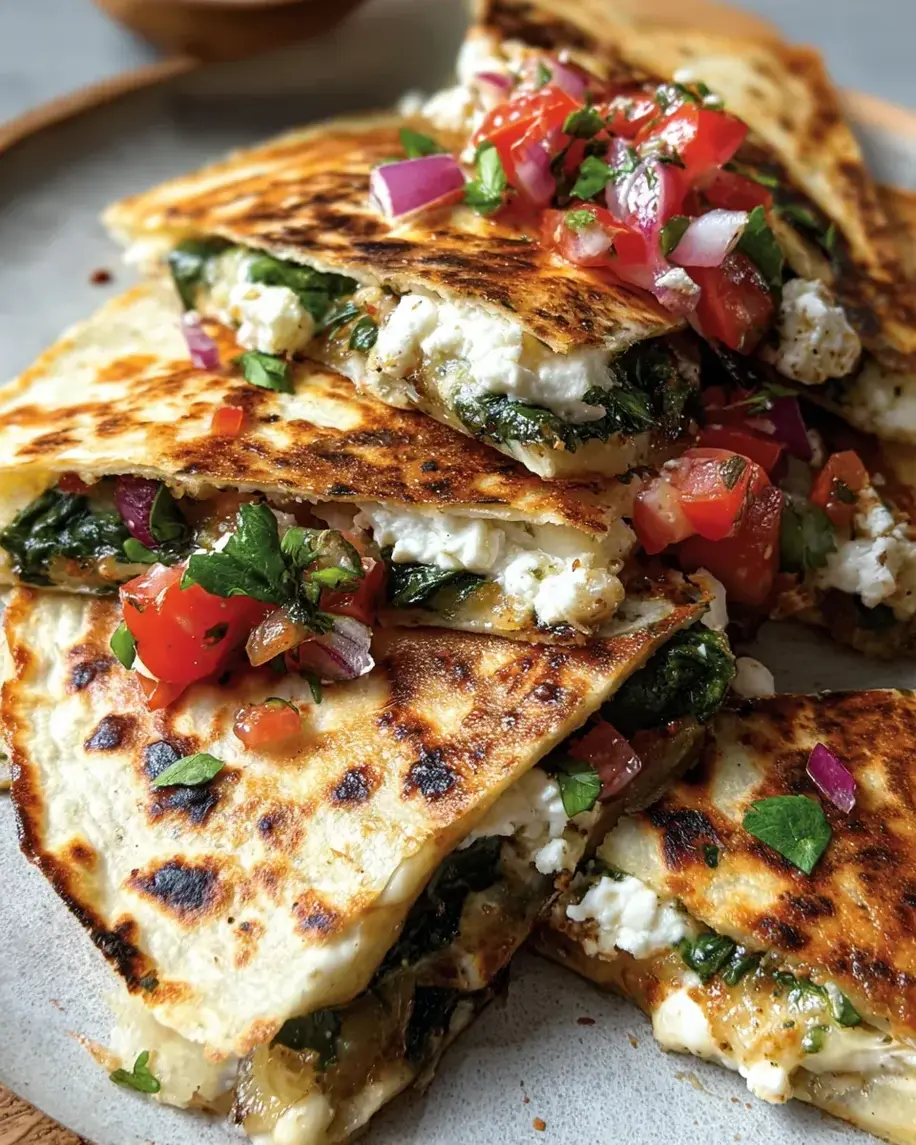
Discover the vibrant flavors of Mediterranean Quesadillas with Spinach, Feta, Mozzarella, and Red Onion! This delicious recipe fits perfectly into your Mediterranean Diet, offering a tasty option for filling healthy dinners or flavorful lunch ideas. Explore Mediterranean Diet Recipes with Quinoa and enjoy these delightful quesadillas as part of your Mexican Mediterranean food journey. Perfect for Mediterranean Meal Recipes or Mediterranean Dinners Recipes, they can even be adapted for grilling! Check out Eatinghealthytoday Recipes for more inspiration.
Print

Mediterranean Quesadillas with Spinach, Feta, Mozzarella, and Red Onion are a delicious twist on traditional quesadillas that bring fresh Mediterranean flavors to your table. This quick and easy recipe takes just 15 minutes to prepare, making it perfect for busy weeknights or casual gatherings. Packed with nutritious ingredients like spinach, feta, and mozzarella, these quesadillas offer a satisfying meal without compromising on health. Plus, they’re versatile enough to accommodate various dietary needs—simply swap in your favorite ingredients! Enjoy them warm with a refreshing salad or dip for an irresistible culinary experience.

This utterly delicious Chicken Caesar Sandwich features crunchy chicken, crisp romaine lettuce, and a creamy Caesar dressing, all nestled between two slices of crusty bread. Perfect for a quick and satisfying lunch or dinner!
Print

This Chicken Caesar Sandwich features crispy breaded chicken, creamy Caesar dressing, and fresh romaine on a crusty baguette for a mouthwatering, satisfying meal. Perfect for lunch or dinner!
Notes If starting with whole chicken thighs or breasts than pre-cut chicken cutlets, slice them in half horizontally and pound them to an even thickness. To prevent the sandwich from becoming soggy, assemble it just before serving. Add the dressed romaine and chicken at the last minute. You can also lightly toast the baguette. Maintain the right oil temperature while frying. Too hot, and the breading will burn before the chicken is fully cooked; too low, and the coating won’t crisp up properly. Heat the oil to around 175-180°C (350-360°F) to ensure even frying without burning the coating. The chicken is fully cooked when it reaches an internal temperature of 75°C (165°F).

Looking for the ultimate savory wrap? Try this Crispy Chicken Bacon Ranch Wrap! Packed with crispy chicken, smoky bacon, and creamy ranch dressing, this easy-to-make wrap is perfect for lunch or dinner. With a crunchy exterior and tender filling, it’s a flavor-packed meal everyone will love. Quick, satisfying, and irresistible – make this delicious wrap today and treat your taste buds to a savory, crispy delight that’s sure to please!
Print

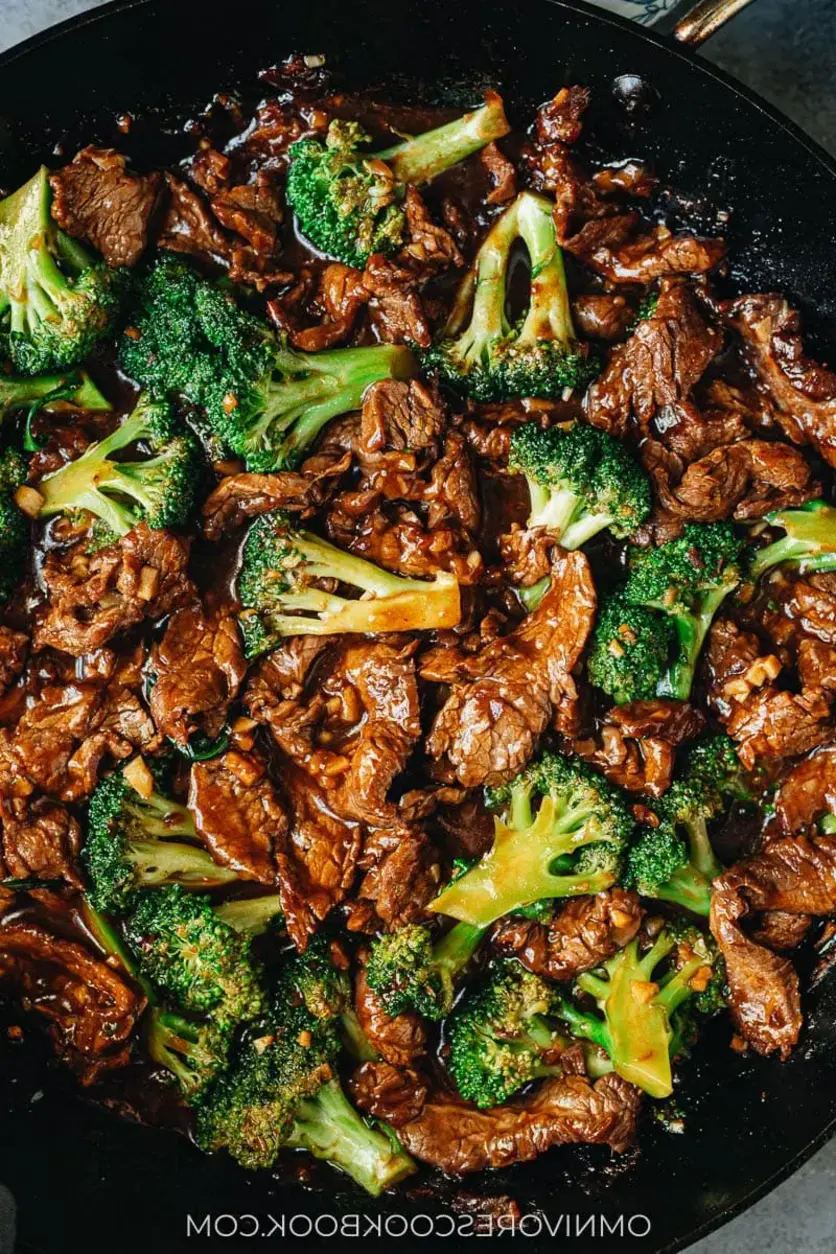
This beef and broccoli is a popular Chinese take-out meal and it’s also easy enough to make at home. It’s also healthier than most take-out meal options. With juicy tender beef and crisp broccoli brought together in a rich brown sauce, this quick dinner is as colorful as it is delicious. Serve it over hot rice for an authentic Chinese take-out dinner. {Gluten-Free Adaptable}
Print

This beef and broccoli is a popular Chinese take-out meal and it’s also easy enough to make at home. It’s also healthier than most take-out meal options. With juicy tender beef and crisp broccoli brought together in a rich brown sauce, this quick dinner is as colorful as it is delicious. Serve it over hot rice for an authentic Chinese take-out dinner. {Gluten-Free Adaptable}To make this dish gluten-free, use dry sherry instead of Shaoxing wine, and use tamari instead of soy sauce.
Notes If you need to use a cheaper but toucher cut of beef, for example, chuck, brisket, or round roast, add 1/2 teaspoon of baking soda to the marinade and marinate the beef for 30 minutes before cooking. This method tenderizes the beef and will create a very juicy result. Dark soy sauce will add an appetizing dark color to the sauce with a hint of caramel taste, but you can skip it if you don’t have it. If you skip the dark soy sauce, you can add 1/2 teaspoon molasses to enhance the flavor. If you do not have peanut oil, you can drizzle 1/2 teaspoon of toasted sesame oil at the end of the cooking after turning off the heat and mix together. It will boost the flavor.

This Mongolian Ground Beef Noodles recipe is a quick and flavorful meal that brings together savory ground beef, aromatic garlic, and a rich, sweet-savory sauce with tender linguine. It’s perfect for a weeknight dinner that’s both satisfying and easy to make.
Print

This Mongolian Ground Beef Noodles dish is a quick and flavorful meal combining savory ground beef, a rich and slightly sweet sauce, and tender linguine. Its perfect for a weeknight dinner thats both satisfying and easy to make.ezstandalone.cmd.push(function { ezstandalone.showAds(130); });
You can add vegetables like bell peppers or broccoli for extra texture and nutrition.
For a gluten-free version, substitute the soy sauce with tamari and use gluten-free pasta.
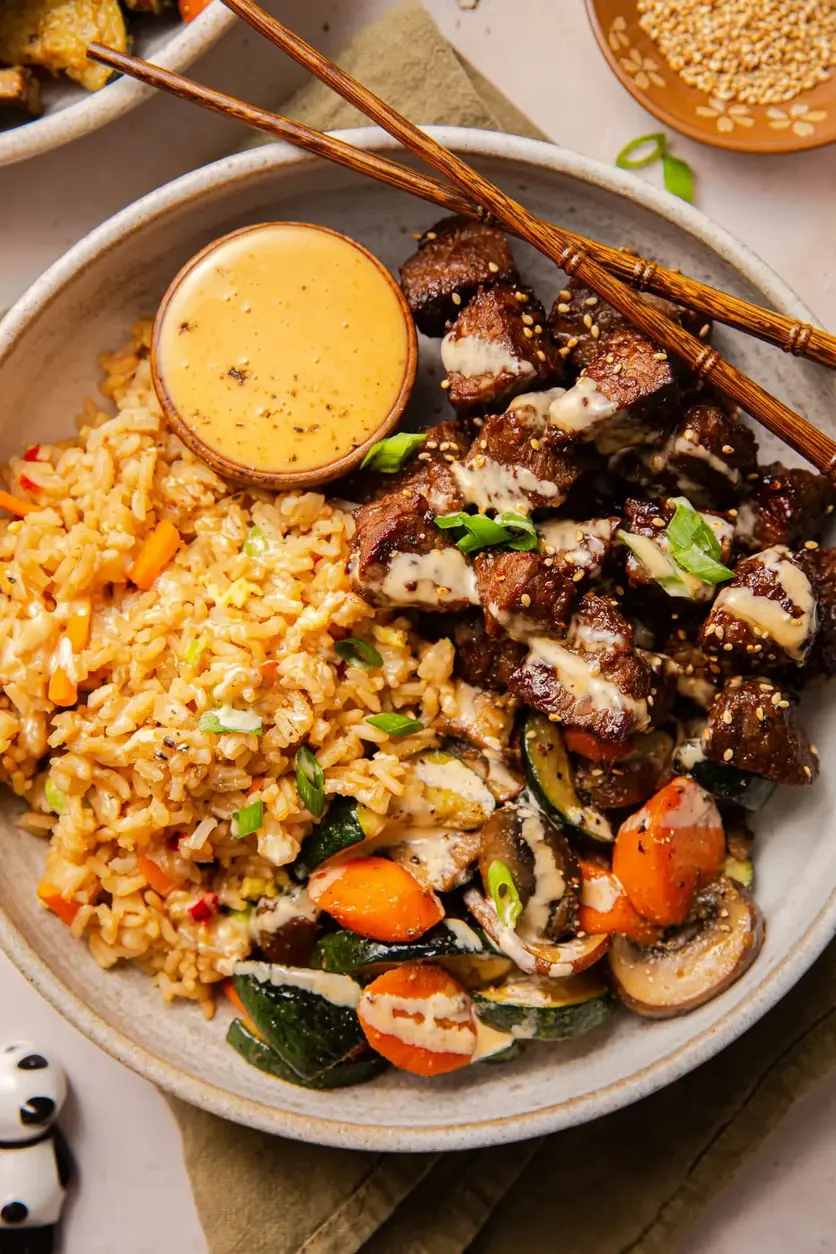

These Hibachi Steak Bowls are loaded with tender, flavorful pieces of sirloin, sautéed vegetables, and fried rice. If you love Benihana and Kobé Japanese steakhouses, you’ll enjoy these bowls inspired by those restaurants! This recipe is wildly easy and perfect for a delicious weeknight-friendly dinner or meal prepping!
Store-bought Yum Yum Sauce is typically found in the international section of your local grocery store (near the Asian goods). Stores like Publix, Target, Walmart, and Kroger usually keep it in stock. It’s also available online- I love Terry Ho’s brand!
Fried rice note: To keep the quick + easy theme rolling for this recipe, I like to use store-bought fried rice that just needs to be heated. It’s available in the freezer section of grocery stores- I love the InnovAsian brand! Otherwise, feel free to make your own or use your preferred choice of rice here.
Please read blog post in its entirety for more tips + tricks.

“`html
Did you know that over 70% of home cooks seek out family dinner recipes that are both comforting and easy to customize? If you’re part of that majority, you’ve landed on the perfect page. This stuffed peppers recipe is the ultimate answer to the weeknight dinner dilemma, offering a symphony of flavors encased in vibrant bell peppers. More than just a meal, it’s a versatile canvas that brings together the savory richness of ground beef and Italian sausage, the comforting texture of rice, and the tangy depth of a robust marinara sauce. Whether you’re feeding a hungry family or meal prepping for the week, this dish delivers satisfaction in every bite. Let’s dive into creating a classic that’s sure to become a regular on your dinner rotation.
Gather these fresh and flavorful components for your stuffed peppers masterpiece. I’ve included sensory notes and substitutions to help you tailor the dish to your pantry and preferences.
Compared to the average stuffed pepper recipe that can take nearly 90 minutes from start to finish, this version is optimized for efficiency. The 25-minute prep time is achievable by multitasking—cooking the rice and prepping the filling simultaneously. The 45-minute bake time is standard but crucial for achieving peppers that are tender but not mushy, with a perfectly melted and slightly crisped cheese topping. It’s a hands-off cooking period you can use to prepare sides or simply relax.
Beautifully baked stuffed peppers with a golden cheese topping, ready for a family dinner.
Preheat your oven to 375°F (190°C). Take your bell peppers and carefully slice off the tops (about 1/2 inch down). Remove and discard the stems, then finely chop the usable parts of the tops and set aside—this will go into your filling, minimizing waste! Use a small paring knife or your fingers to remove all the white ribs and seeds from inside the peppers. Rinse them under cold water to ensure no stray seeds remain. This creates a clean, hollow vessel ready to be packed with flavor. Place the peppers upright in a baking dish just large enough to hold them snugly. If they wobble, slice a tiny bit off the bottom to create a flat base, being careful not to cut through.
Heat the olive oil in a large skillet over medium heat. Add the diced onion and the chopped pepper tops you saved. Sauté for 4-5 minutes until they begin to soften and become fragrant. Add the minced garlic and cook for another minute, just until you can smell its wonderful aroma. Now, add the ground beef and Italian sausage. Use a wooden spoon to break the meat into small crumbles as it cooks. Continue cooking until the meat is no longer pink, about 6-8 minutes. If there’s excess grease, you can drain it off at this point. Stir in 1 cup of the marinara sauce, the cooked rice, oregano, basil, half of the mozzarella cheese, and all of the Parmesan. Season generously with salt and pepper. Give it a good stir, let it simmer together for 2-3 minutes, then remove from heat. Your kitchen should smell incredible right now!
Using a large spoon, generously pack the meat and rice filling into each prepared bell pepper. Press down gently as you fill to ensure they are well-stuffed. Pour the remaining 1 cup of marinara sauce into the bottom of the baking dish around the peppers (this creates a steamy environment and delicious sauce for serving). Sprinkle the remaining mozzarella cheese evenly over the top of each pepper. Cover the baking dish tightly with aluminum foil. Bake in the preheated oven for 35 minutes. Then, carefully remove the foil and bake for an additional 10-15 minutes, or until the peppers are tender when pierced with a fork and the cheese is bubbly and golden brown. Let them rest for 5-10 minutes before serving—this allows the filling to set slightly for cleaner slicing.
(Per serving, based on 1 stuffed pepper. Values are approximate.)
You can easily lighten up this dish without sacrificing the soul-satisfying flavor. Here are my top flavor-preserving swaps:
A perfectly stuffed pepper is a complete meal in itself, but these pairings can elevate your dinner spread:

A delicious cross-section revealing the perfectly cooked, savory filling inside the tender pepper.
This stuffed peppers recipe is more than just a meal; it’s a reliable, customizable, and deeply satisfying solution for your family dinner needs. Combining the hearty flavors of ground beef and Italian sausage with the sweet crunch of bell peppers and rich marinara creates a dish that feels both nostalgic and fresh. With the tips

“`html
Did you know that Shepherd’s Pie is one of the top 10 most-searched comfort food recipes in the United States and the UK, according to Google Trends data? This classic dish, born from the need for resourceful, hearty meals, has evolved into a beloved staple for family dinners and cozy gatherings. Our Easy Shepherd’s Pie recipe demystifies this comforting classic, offering a straightforward path to a rich, savory filling of ground lamb or beef, aromatic onion and garlic, and a colorful medley of peas, carrots, corn, and green beans, all crowned with a cloud of creamy mashed potatoes and a golden, optional cheddar cheese crust. It’s the ultimate one-pan wonder that promises to warm you from the inside out.
For the Mashed Potato Topping:
For the Savory Filling:
This Easy Shepherd’s Pie recipe clocks in at just over an hour from start to finish. Compared to the average recipe that often requires separate browning, boiling, and lengthy baking, our streamlined method shaves off about 15-20 minutes by using efficient prep and a hot oven finish. The active hands-on time is minimal, making it perfect for a weeknight dinner that feels like a weekend treat.
Place your peeled and quartered potatoes in a large pot of cold, salted water. Bring to a boil over high heat, then reduce to a simmer. Cook for 15-20 minutes, or until the potatoes are fork-tender. Drain them well and return them to the hot pot for a minute to evaporate any excess moisture—this is the chef’s secret for fluffier mash. Add the butter and milk, then mash with a potato masher or ricer until smooth and creamy. Season generously with salt and pepper. Stir in half the cheddar cheese now if you want it throughout the topping, or reserve it all for the top. Set aside.
While the potatoes cook, heat the olive oil in a large, oven-safe skillet or Dutch oven over medium heat. Add the diced onion and cook for 5-7 minutes, stirring occasionally, until they become soft and translucent. You’ll smell their sweet fragrance filling your kitchen. Add the minced garlic and cook for another minute until fragrant—be careful not to let it burn, as burnt garlic turns bitter.
Increase the heat to medium-high. Add the ground lamb or beef to the skillet, breaking it up with a wooden spoon. Cook until it’s no longer pink and has developed a nice, browned crust, about 8-10 minutes. This browning (the Maillard reaction) is non-negotiable for building deep, savory flavor. Season with salt, pepper, and the dried thyme or rosemary.
Sprinkle the flour over the browned meat and stir for 1 minute to cook off the raw flour taste. This will thicken your filling beautifully. Stir in the tomato paste, coating the meat. Pour in the beef broth and Worcestershire sauce, scraping up any delicious browned bits (fond) from the bottom of the pan. Add the frozen mixed vegetables. Bring the mixture to a simmer and let it cook for 5-7 minutes, until the sauce has thickened to a gravy-like consistency. Taste and adjust seasoning—this is your last chance!
Preheat your oven to 400°F (200°C). If your skillet isn’t oven-safe, transfer the meat filling to a 9×13 inch baking dish. Dollop the mashed potatoes over the hot filling, then use a fork to spread them evenly to the edges, creating swirls and peaks that will crisp up beautifully. If using, sprinkle the remaining cheddar cheese over the top. Bake for 20-25 minutes, or until the filling is bubbling around the edges and the topping is golden brown. For an extra-golden top, broil for the final 2-3 minutes, watching closely.
Per serving (based on 6 servings):
You can easily adapt this Shepherd’s Pie for various dietary needs without sacrificing the rich and comforting flavor:
This pie is a complete meal in itself, but a few simple sides can elevate it:
“`html
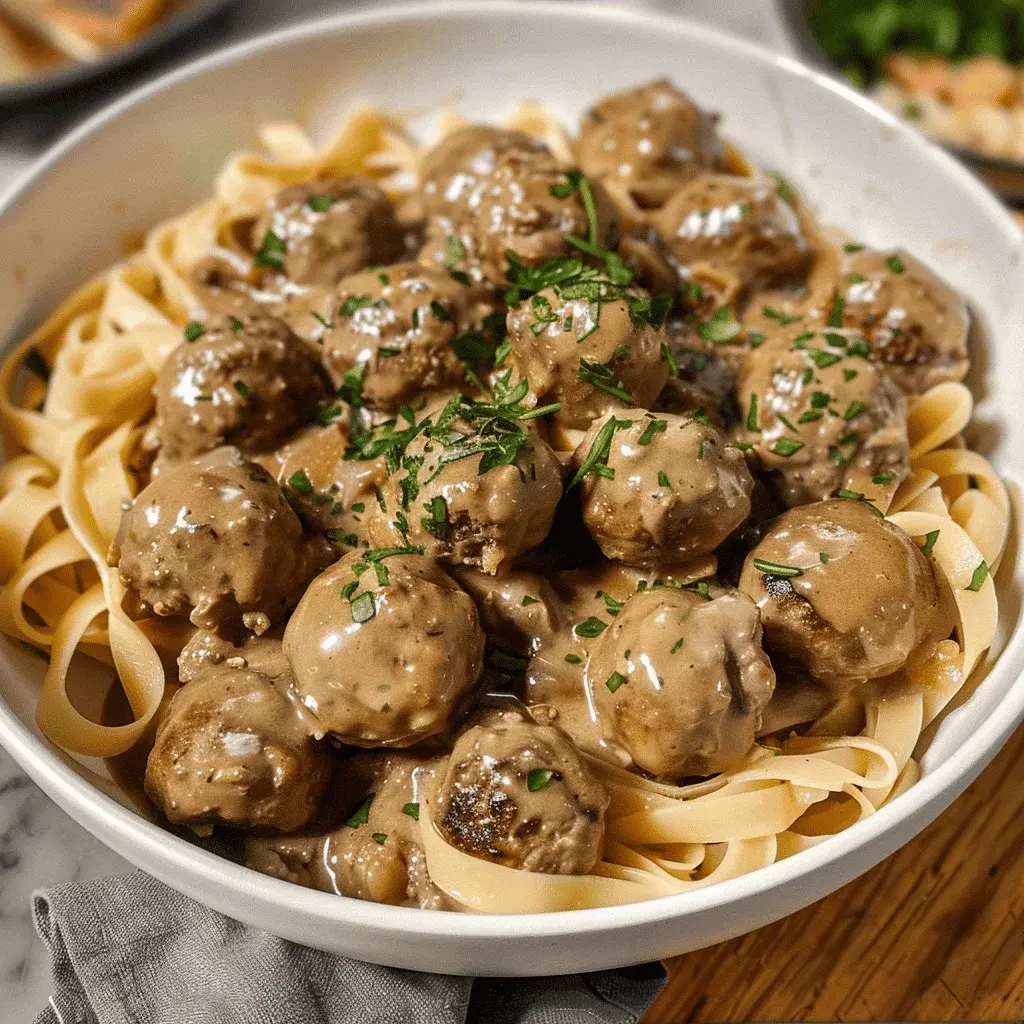
Did you know that classic comfort food dishes like stroganoff are experiencing a 34% surge in popularity for weeknight dinners? This Meatball Stroganoff recipe is your answer to that craving for something deeply satisfying, effortlessly elegant, and packed with flavor. By combining the timeless appeal of tender, homemade meatballs with the luxurious, creamy mushroom sauce of a traditional stroganoff, we create a dish that feels both nostalgic and excitingly new. It’s the perfect solution for a hearty family meal that doesn’t require hours at the stove, proving that gourmet comfort is absolutely achievable on a busy weeknight.
The magic of this recipe lies in its layers of flavor. We start with lean ground beef meatballs, seasoned to perfection, then nestle them in a rich, velvety sauce made from earthy mushrooms, pungent garlic, and tangy sour cream. Each component complements the other, creating a symphony of savory, creamy, and umami notes in every bite. Whether you’re looking to impress dinner guests or simply treat your family to something special, this Meatball Stroganoff is guaranteed to become a cherished staple in your recipe rotation.
Gather these fresh, quality ingredients for the best flavor. Sensory notes are included to help you select the perfect components.
This Meatball Stroganoff comes together in under an hour, making it a fantastic option for a weeknight dinner. Compared to many traditional stroganoff or meatball recipes that can take 75-90 minutes, our streamlined process—browning meatballs while building the sauce in the same pan—saves significant time without sacrificing an ounce of flavor. The active hands-on time is efficient, and the simmering time allows the flavors to meld beautifully while you prepare your chosen side, like egg noodles or mashed potatoes.
Follow these detailed steps for foolproof, restaurant-quality Meatball Stroganoff right at home.
In a large mixing bowl, combine the ground beef, Panko breadcrumbs, milk (or broth), egg, grated onion, minced garlic, Worcestershire sauce, Dijon mustard, smoked paprika, salt, and pepper. My pro tip: use your hands to mix gently but thoroughly. Overmixing can lead to tough, dense meatballs. Once combined, shape the mixture into about 20-24 evenly sized meatballs, roughly 1 to 1.5 inches in diameter. Rolling them between your palms ensures they cook evenly.
Heat a large, deep skillet or Dutch oven over medium-high heat. Add 1 tablespoon of olive oil. Once the oil shimmers, add the meatballs in a single layer, working in batches if necessary to avoid overcrowding. Crowding steams them instead of browning. Cook for 2-3 minutes per side, just until they develop a beautiful, golden-brown crust. They do not need to be cooked through at this stage—we’ll finish them in the sauce. Transfer the browned meatballs to a clean plate and set aside.
In the same skillet, reduce the heat to medium. Add the butter and the remaining tablespoon of olive oil. Once the butter melts, add the thinly sliced onion. Sauté for 4-5 minutes until the onions become soft and translucent. Then, add the sliced mushrooms. Cook, stirring occasionally, for 6-8 minutes until the mushrooms have released their liquid and turned a deep, golden brown. This step is crucial for building deep, savory flavor. Stir in the minced garlic and cook for just 30 seconds until fragrant—be careful not to burn it.
Sprinkle the flour evenly over the mushroom and onion mixture. Stir constantly and cook for 1 full minute. This cooks out the raw flour taste and creates the roux that will thicken our sauce. Slowly pour in the beef broth while whisking or stirring vigorously to prevent any lumps from forming. Add the tomato paste and Dijon mustard, stirring until fully incorporated. Bring the sauce to a gentle simmer. You’ll notice it begin to thicken nicely.
Carefully return the browned meatballs to the skillet, nestling them into the sauce. Reduce the heat to low, cover the skillet with a lid, and let it simmer gently for 12-15 minutes. This allows the meatballs to cook through completely and absorb the wonderful flavors of the sauce. The sauce will continue to thicken during this time.
Turn off the heat. It’s essential to remove the skillet from the burner to prevent the sour cream from curdling. Spoon a few tablespoons of the hot sauce into a small bowl with the room-temperature sour cream and whisk to temper it. Then, slowly stir this mixture back into the main skillet. This gradual process ensures a smooth, creamy sauce. Stir in half of the chopped parsley. Taste the sauce and adjust seasoning with salt and pepper as needed.
(Approximate values per serving, based on 4 servings, sauce included, without noodles):
You can easily adapt this recipe for dietary preferences without losing its soul-satisfying essence:
