End your day with a delicious, comforting, and satisfying dinner! Whether you’re looking for quick and easy weeknight meals, cozy comfort food, or elegant dishes for special occasions, we have the perfect recipes for you.
From hearty casseroles and one-pan wonders to savory pastas, juicy meats, and flavorful vegetarian options, our collection is designed to make dinnertime effortless and enjoyable.
Busy schedule? No problem! Try our slow cooker meals, sheet pan dinners, and 30-minute recipes to save time without sacrificing flavor. Whatever your craving, these recipes will bring warmth and joy to your table every night. 🍽️✨
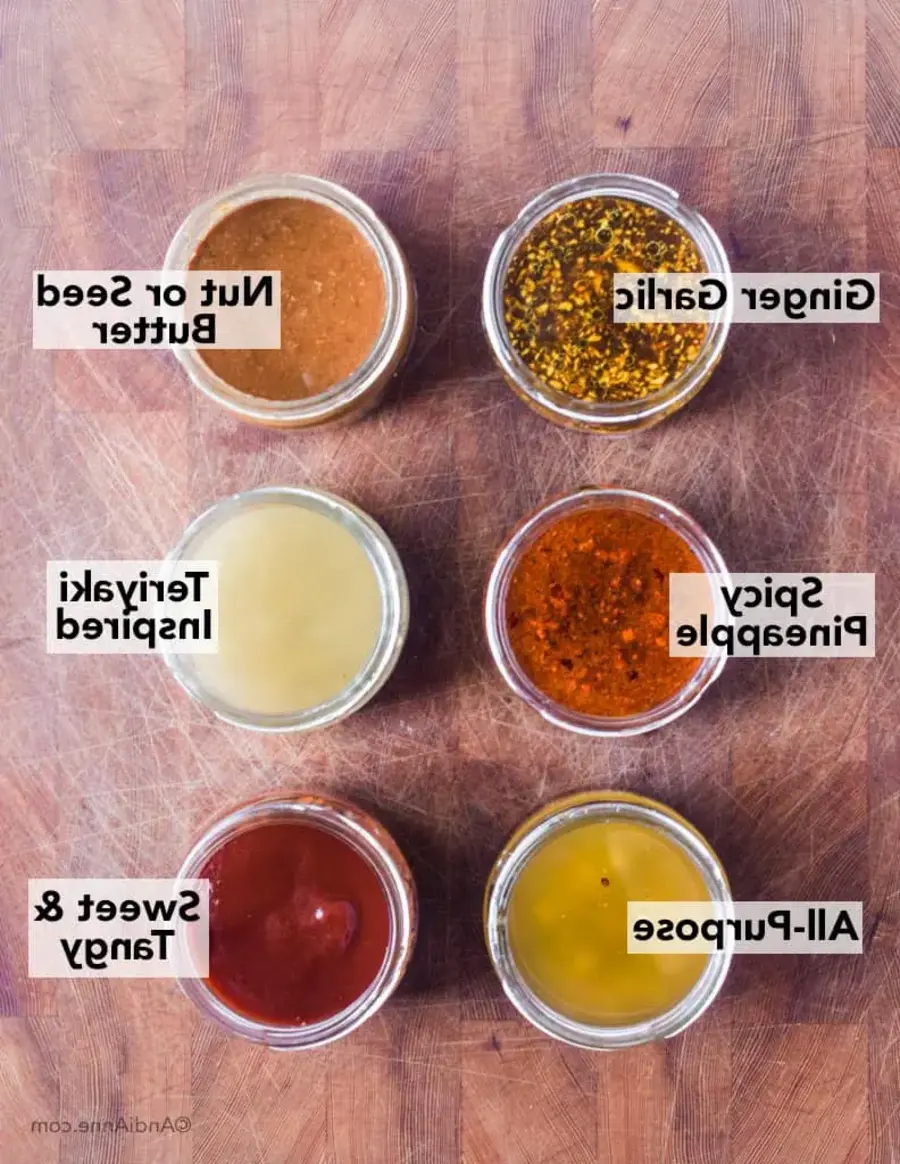
6 Stir Fry Sauce Recipes – These Are Versatile, Simple and Healthy!
Stir fry sauce recipes are a simple way to add incredible flavor to your vegetables, grains and meats. Made with fresh ingredients, these 6 healthy stir fry sauce recipes will add amazing flavor without overpowering your dish. Learn just how easy stir fry sauces are to make, including substitutions.
Stir fry sauces are a simple way to add incredible flavor to your vegetables, grains and meats. Made with fresh ingredients, these six healthy stir fry sauce recipes will add amazing flavor without overpowering your dish.
Start Your Grains First What will the base of your stir fry be? Will you need to cook rice, quinoa, buckwheat groats or even pasta? The base you choose should be cooked first before starting the rest of the meal.
Wash, prep and chop all the ingredients before you start Grab all the ingredients youll need and place them on the counter. This will make the cooking process so much easier. First, prep the stir fry sauce in a bowl or mason jar. Then wash and chop all the vegetables. And last, slice the meat.
First, heat a high smoke point cooking oil in the pan over medium heat for 2 mins (I use avocado oil).
Next add the veggies and cook until theyre almost done stirring occasionally. Pour the veggies into a bowl and set aside for now.
Add a bit more cooking oil and the meat to the pan cook 3 minutes until meat starts to brown. Now add all the veggies back to the pan.
Pour the stir fry sauce overtop. Cook an additional 2-3 minutes.
Place in a serving dish or right on top of a bed of rice, quinoa, buckwheat groats etc. Drizzle extra sauce from pan on top. Serve and enjoy!
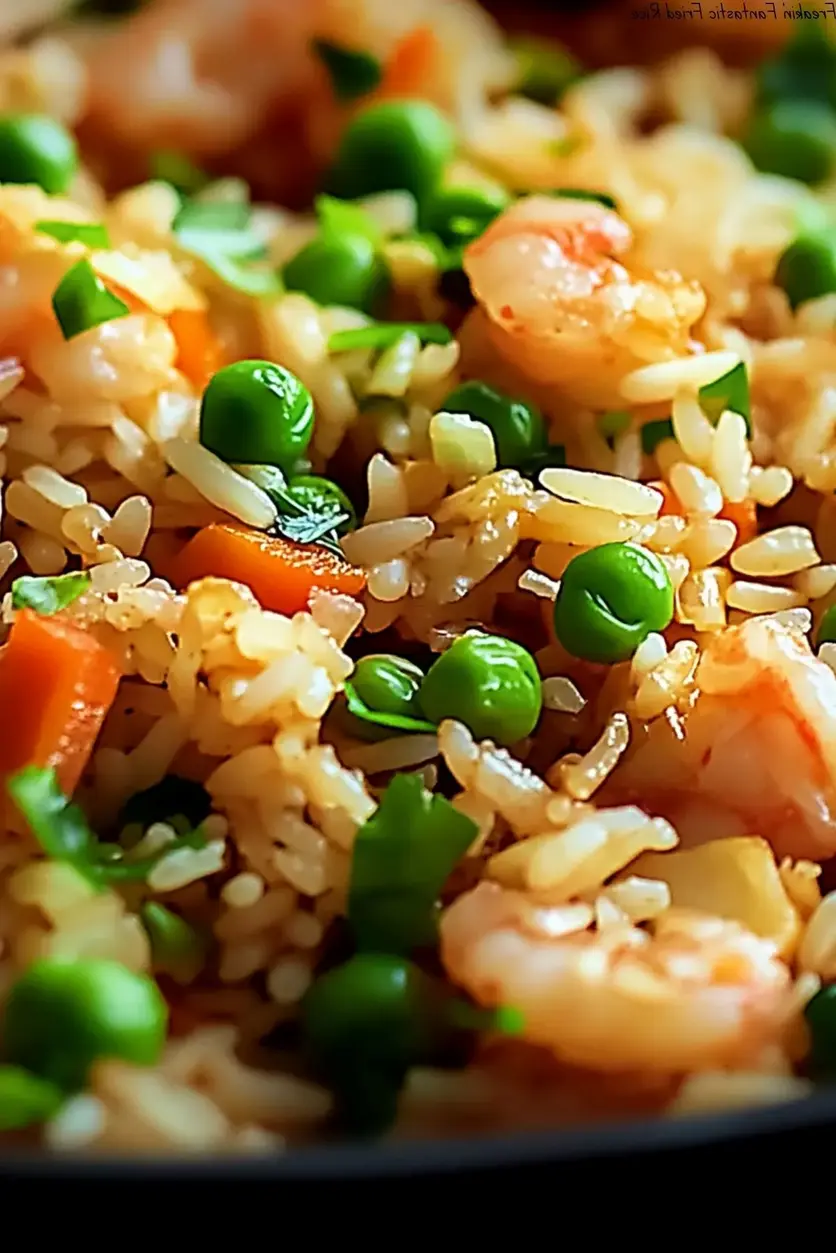
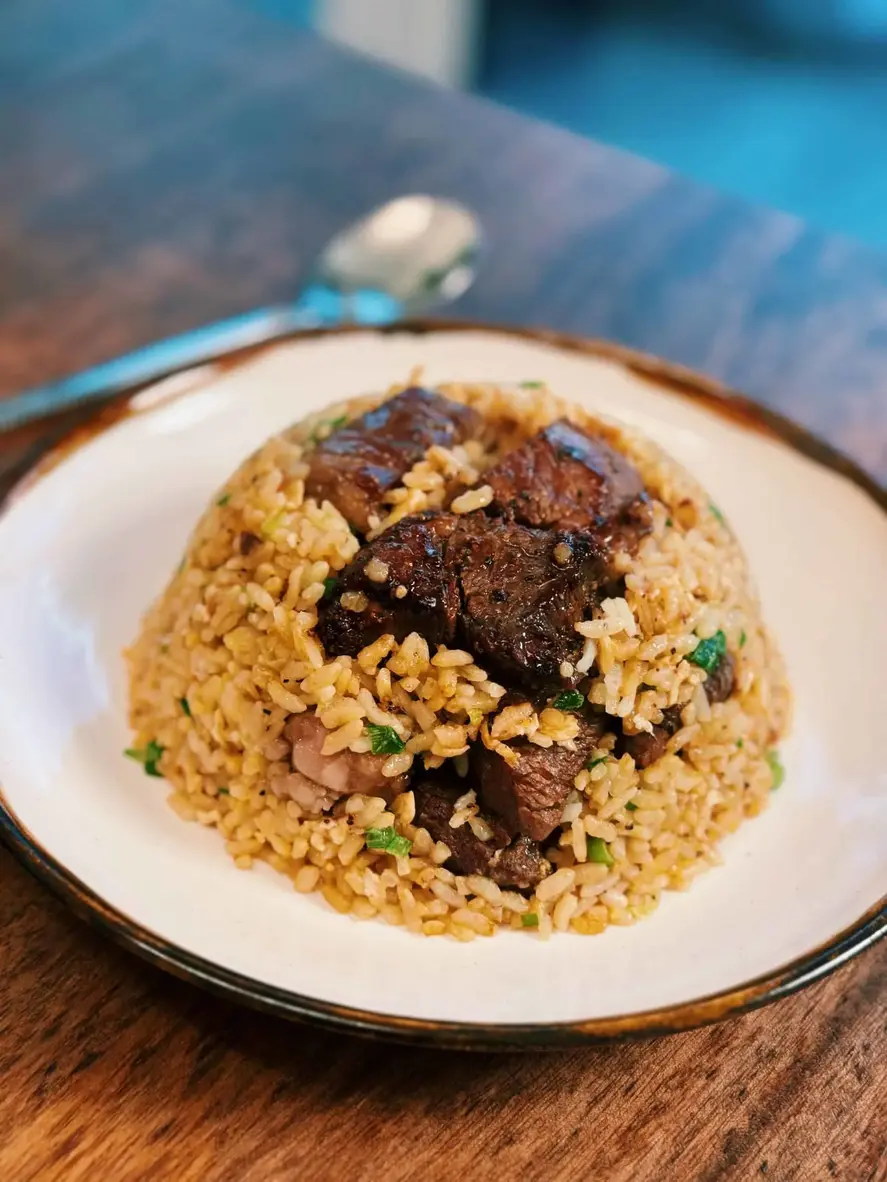
The Ultimate Freakin’ Fantastic Fried Rice: Your Secret to Weeknight Magic
Forget takeout forever. This Freakin’ Fantastic Fried Rice recipe unlocks the savory, satisfying secrets of your favorite restaurant dish, right in your own kitchen. It’s the perfect vehicle for leftovers, a 30-minute miracle, and a flavor-packed side or main that will have everyone asking for seconds.
Prep Time: 10 minutes
Cook Time: 20 minutes
Total Time: 30 minutes
Servings: 6
Difficulty: Easy
Why This Fried Rice is Freakin’ Fantastic
What transforms simple rice and veggies into a legendary, crave-worthy meal? It’s not magic—it’s technique. This Freakin’ Fantastic Fried Rice is engineered for maximum flavor and texture. We’re talking about distinct, fluffy grains of rice coated in a savory, umami-rich sauce, studded with sweet peas, crisp carrots, and soft scrambled eggs. It’s a symphony of simplicity that delivers complex taste in every single bite. Whether you’re a busy parent, a college student, or just someone who believes weeknight dinners should be exciting, this recipe is your new best friend. It’s forgiving, flexible, and consistently delicious, making it a cornerstone recipe for your culinary repertoire.
The Secret to the Best Fried Rice: It’s All in the Technique
Many fried rice recipes end up soggy, greasy, or bland. The key difference here is a focus on foundational cooking principles. First, we insist on cold, day-old rice. Freshly cooked rice is too moist and steamy, causing it to clump and become mushy in the skillet. Cold rice has dried out slightly, giving each grain structural integrity so it can fry properly and absorb flavors without getting gummy.
Second, we use high heat and a well-seasoned skillet or wok. This is crucial for achieving that signature “wok hei” or breath of the wok—a slight smokiness and char that elevates the dish. Cooking each component separately before combining ensures everything is perfectly cooked, not steamed. The butter (instead of a neutral oil) adds a rich, nutty base note that complements the soy sauce beautifully. This attention to detail is what makes this recipe not just good, but Freakin’ Fantastic.
💡 The Kitchen Team’s Pro Tip: For the absolute best texture, spread your cooked rice on a baking sheet and let it dry in the refrigerator, uncovered, for at least an hour. This mimics the effect of day-old rice in a fraction of the time!
Ingredients & Why They Work
This recipe uses humble, pantry-friendly ingredients that, when combined correctly, create something extraordinary. Here’s your complete shopping list and the role each component plays.
Ingredient
Quantity
Purpose & Note
Cold, Cooked Long-Grain White Rice (like Jasmine)
4 cups
The Foundation. Must be cold and day-old for dry, separate grains that fry perfectly.
Unsalted Butter
3 tablespoons
The Flavor Base. Adds rich, nutty depth that oil can’t match.
Yellow Onion, diced
1 medium
Aromatic Base. Provides sweetness and savory foundation.
Frozen Peas and Carrots Mix
12 oz bag
Color & Sweetness. Frozen veggies are flash-frozen at peak freshness and add convenience.
Soy Sauce (or Tamari for GF)
1/2 cup
Umami & Salt. The primary seasoning agent. Use low-sodium if preferred.
Large Eggs, beaten
3
Protein & Texture. Scrambled in the pan for tender, integrated ribbons.
Optional Garnishes: Green onions, sesame seeds, chili oil
For serving
Finish & Contrast. Adds freshness, crunch, and heat.
Step-by-Step Cooking Instructions
Follow these detailed steps for foolproof, fantastic results every single time.
Step 1: Prep Your Station
Ensure all ingredients are measured, chopped, and within arm’s reach of the stove. Fried rice cooks quickly, so there’s no time to search for the soy sauce. Place a large skillet, wok, or cast-iron pan over medium-high heat and let it get hot for a full minute.
Step 2: Sauté the Aromatics
Add the butter to the hot skillet. Once melted and foaming, add the diced onion. Cook for 3-4 minutes, stirring occasionally, until the onion is soft and translucent. This builds the flavor base.
Step 3: Cook the Vegetables
Add the entire bag of frozen peas and carrots directly to the skillet. No need to thaw! Stir and cook for 5-7 minutes, until the vegetables are heated through and any excess moisture from the frozen veggies has evaporated. A dry pan is critical here.
💡 The Kitchen Team’s Pro Tip: For crisper vegetables, you can quickly blanch fresh diced carrots in boiling water for 2 minutes before adding them with the peas. But frozen is perfectly fantastic for ease.
Step 4: Fry the Rice
Add the cold rice to the skillet. Use your spatula to break up any large clumps. Pour the soy sauce evenly over the rice. Stir-fry for 5-8 minutes, allowing the rice to heat thoroughly and soak up the sauce. You should hear a slight sizzle—this is the sound of frying, not steaming.
Step 5: Scramble the Eggs
Push the entire rice mixture to one side of the skillet, exposing the bare surface. Tilt the pan slightly so any excess butter pools there. Pour the beaten eggs into the empty space. Let them set for 30 seconds, then gently scramble them with your spatula until just cooked through but still soft.
Step 6: Combine and Finish
Once the eggs are scrambled, mix them thoroughly into the rice and vegetable mixture. Taste and adjust seasoning—you can add a splash more soy sauce if needed. Remove from heat immediately to prevent overcooking.
Step 7: Serve Hot
Transfer your Freakin’ Fantastic Fried Rice to a serving platter. Garnish generously with sliced green onions and a sprinkle of sesame seeds. Serve immediately while it’s piping hot and the textures are at their peak.
Serving & Presentation Ideas
This fried rice is a complete meal on its own, but it also plays incredibly well with others. For a classic takeout-style spread, pair it with Easy Egg Drop Soup, Air Fryer Crab Rangoon, or Honey Sesame Chicken. To make it a heartier main course, top it with a fried egg with a runny yolk, or stir in cooked, shredded chicken, shrimp, or diced ham during the final mixing stage. For presentation, serve it in a large, shallow bowl or on a platter, with garnishes arranged neatly on top. A small bowl of extra soy sauce, chili crisp, or sriracha on the side allows everyone to customize their heat level.
Storage, Reheating & Meal Prep
This recipe is a meal-prep superstar. Let the fried rice cool completely, then store it in an airtight container in the refrigerator for up to 4 days. For longer storage, you can freeze it for up to 2 months. The key to reheating is to restore texture, not just warmth. The microwave will make it soggy. Instead, reheat it in a skillet over medium heat with a tiny splash of water or broth, covered, for 4-5 minutes, stirring occasionally. You can also spread it on a baking sheet and reheat in a 350°F oven for 10-12 minutes. For meal prep, divide into single-serving containers for easy grab-and-go lunches.
Creative Recipe Variations
The beauty of this recipe is its adaptability. Once you’ve mastered the base, the world is your oyster sauce! Here are some inspired twists.
Pineapple & Ham “Hawaiian” Fried Rice
Add 1 cup of diced ham and 1 cup of fresh pineapple chunks (well-drained) with the vegetables. Use a slightly reduced amount of soy sauce and finish with a drizzle of teriyaki glaze.
Spicy Kimchi & Bacon Fried Rice
Cook 4 slices of chopped bacon first, then use the bacon fat instead of butter. Stir in 1 cup of chopped kimchi (with its juice) when you add the rice. Top with a fried egg and nori strips.
Thai Basil & Chicken Fried Rice
Stir-fry 1 lb of diced chicken breast first, then remove and set aside. Proceed with the recipe, adding 2 tbsp of oyster sauce with the soy sauce. Stir the cooked chicken and a big handful of fresh Thai basil leaves in at the very end.
Your Freakin’ Fantastic Fried Rice Questions Answered
Can I use freshly cooked rice?
We strongly advise against it. Fresh rice is too moist and will result in a gummy, clumpy fried rice. If you’re in a pinch, cook your rice with slightly less water, spread it thin on a tray, and chill it in the freezer for 30 minutes to dry it out.
What’s the best type of rice to use?
Long-grain varieties like Jasmine or Basmati are ideal because they have a lower starch content, leading to fluffier, less sticky results. Medium-grain rice can work but may be slightly clumpier. Avoid short-grain or sushi rice.
Can I make this gluten-free?
Absolutely! Simply substitute the soy sauce with an equal amount of tamari or a certified gluten-free soy sauce alternative. All other base ingredients are naturally gluten-free.
My fried rice is soggy. What went wrong?
The most common culprits are: 1) Using warm, moist rice, 2) Overcrowding the pan (which steams instead of fries), or 3) Adding too much liquid (soy sauce or from frozen veggies). Ensure your pan is hot, your rice is cold, and you cook off all excess moisture.
Can I add other vegetables?
Yes! Bell peppers, corn, broccoli florets, mushrooms, or snap peas are all excellent additions. For harder veggies (like broccoli), blanch or sauté them first to ensure they’re tender.
How can I add more protein?
Easy! Cook diced chicken, shrimp, beef, pork, or tofu separately first. Remove from the pan, then add it back when you mix in the eggs. You can also add extra eggs.
Is butter better than oil?
For this specific recipe, butter provides an irreplaceable, rich flavor that pairs wonderfully with the soy sauce. For a more traditional or vegan version, a neutral oil like avocado or peanut oil works fine.
Can I make this in advance?
You can prep all your ingredients in advance, but for the best texture, cook it just before serving. Leftovers reheat very well, as outlined in the storage section above.
Love This Recipe? Save It for Later!
Pin this image to your Dinner Ideas or Meal Prep board on Pinterest to keep this Freakin’ Fantastic Fried Rice recipe handy whenever the craving strikes!
Follow us on Pinterest:@cookingwithemy for more easy, flavor-packed recipes.
(Pinterest rich pin image and save button would be embedded here in a live WordPress environment)
This Freakin Fantastic Fried Rice recipe is a delicious and satisfying dish that combines fluffy rice with savory soy sauce, colorful vegetables, and scrambled eggs. It’s a perfect balance of flavors and textures that will leave you craving for more.
Ingredients
Scale
4 cups cold, cooked rice
3 tablespoons butter
1 onion, diced
12 oz frozen peas and carrots
1/2 cup soy sauce
3 eggs, beaten
Instructions
Heat butter in a large skillet, then add diced onions and cook until translucent. Add frozen peas and carrots and cook until heated through.
Stir in the cold, cooked rice and soy sauce. Cook for a few minutes, stirring occasionally.
Push the rice to one side of the skillet and pour beaten eggs into the other side. Cook until scrambled, then mix with the rice.
Enjoy your Freakin Fantastic Fried Rice hot and garnish with green onions or sesame seeds if desired.
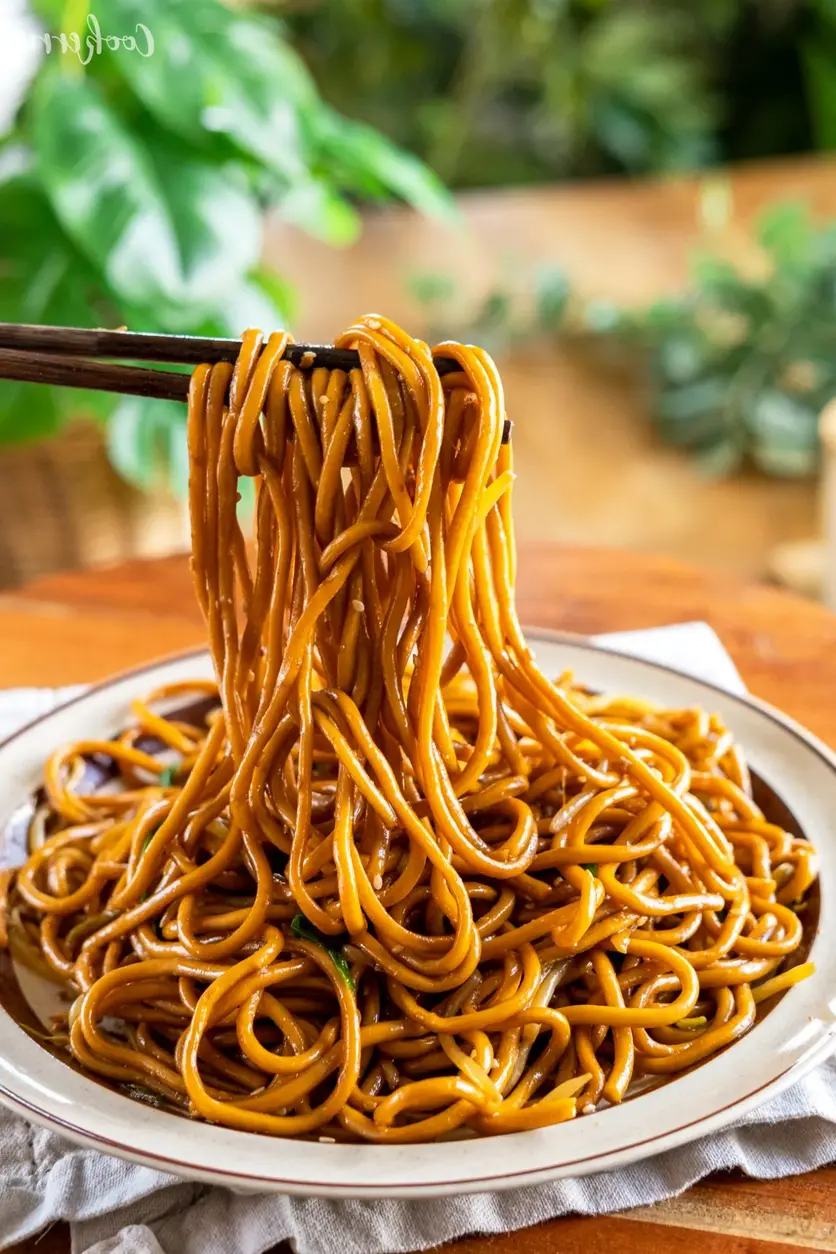
Better-Than-Takeout Easy Chicken Lo Mein Recipe (Ready in 30 Minutes!)
Prep Time 15 minutes
Cook Time 15 minutes
Total Time 30 minutes
Servings 4 people
Difficulty Easy
Craving the savory, satisfying flavors of your favorite Chinese restaurant but want to skip the greasy containers, high prices, and long delivery wait? You’ve landed in the right place. This Easy Chicken Lo Mein Recipe is our go-to solution for busy weeknights, delivering a complete, veggie-packed, and protein-rich meal to your table in under 30 minutes. Forget complicated techniques or hard-to-find ingredients—this recipe is all about simplicity without sacrificing an ounce of flavor.
At Cooking With Emy, we believe a great stir-fry is a cornerstone of home cooking. Lo Mein, which translates to “tossed noodles,” is a classic for a reason: it’s versatile, comforting, and endlessly customizable. Our version features tender, quick-marinated chicken stir-fried with a rainbow of crisp-tender vegetables, all tangled up with chewy lo mein noodles in a deeply savory, perfectly balanced sauce that clings to every strand. The aroma that fills your kitchen will have everyone gathered around the stove, plates in hand. Let’s make takeout a thing of the past and create a restaurant-quality meal that’s healthier, faster, and more delicious.
What Makes This The Best Easy Chicken Lo Mein Recipe
Not all lo mein recipes are created equal. Many end up soggy, bland, or overly complicated. We’ve perfected this version through countless tests to ensure it’s foolproof and delivers maximum flavor with minimal effort. Here’s why this recipe stands out:
The 30-Minute Promise: From fridge to fork in half an hour. The prep is quick, and the cooking process is a fast, sequential stir-fry.
Flavor-Packed Shortcut Sauce: Our sauce uses a combination of pantry staples—soy sauce, sesame oil, garlic—but the key is a brief marinade for the chicken that infuses it with flavor from the inside out.
Texture is Everything: We cook the chicken and vegetables separately to ensure everything is perfectly cooked—not steamed or mushy. The noodles stay chewy (al dente), and the veggies retain a pleasant crunch.
Built-In Customization: The recipe is a fantastic template. Don’t have bell peppers? Use broccoli. Want it spicier? Add chili crisp. We’ll guide you through all the possible swaps and variations.
💡 The Kitchen Team’s Pro Tip: The secret to great stir-fry is mise en place—a French term meaning “everything in its place.” Chop all your vegetables, mix your sauce, and have your noodles ready before you even turn on the stove. The cooking process moves fast, and having everything prepped prevents overcooking and ensures a smooth, enjoyable cooking experience.
Ingredients for Easy Chicken Lo Mein
Here’s your simple shopping list. We’ve included notes on potential swaps to make this recipe work with what you have on hand.
Ingredient
Quantity
Notes & Possible Substitutes
Boneless, Skinless Chicken Breast
1 lb (about 2-3 breasts)
Can use chicken thighs for more flavor and juiciness. Thinly slice against the grain for tender bites.
Lo Mein Noodles
8 oz
Fresh or dried. Spaghetti, linguine, or ramen noodles work in a pinch.
Red Bell Pepper
1, large
Any color bell pepper works. For a different veg, try sliced mushrooms or snap peas.
Yellow Bell Pepper
1, large
Adds sweetness and color. Can substitute with orange pepper or omit.
Carrots
2 medium
Peeled and julienned or thinly sliced. Pre-shredded carrots save time.
Green Onions
3-4
Separate white/light green parts (for cooking) and dark green tops (for garnish).
Low-Sodium Soy Sauce
1/4 cup
Using low-sodium allows you to control saltiness. Tamari for gluten-free.
Toasted Sesame Oil
1 tbsp
DO NOT substitute with regular oil. This is for flavor at the end. Find it in the Asian aisle.
Fresh Garlic
3-4 cloves, minced
Fresh is best! 1/2 tsp garlic powder can be used in a true emergency.
Neutral Oil
2 tbsp
For stir-frying. Use vegetable, canola, or peanut oil.
Optional Flavor Boosters
–
1 tsp grated fresh ginger, 1 tbsp oyster sauce, 1 tsp chili garlic sauce, or a pinch of white pepper.
How to Make Easy Chicken Lo Mein: Step-by-Step
Follow these simple steps for perfect results every single time.
Step 1: Prep & Marinate
Slice the chicken breasts thinly against the grain. Place in a bowl and toss with 1 tablespoon of the soy sauce. Let it sit while you prep the veggies. This quick 10-minute marinade adds foundational flavor. Meanwhile, slice the bell peppers into thin strips, julienne or thinly slice the carrots, and chop the green onions, keeping the white/light green parts separate from the dark green tops. Mince the garlic.
Step 2: Cook the Noodles
Bring a large pot of salted water to a boil. Cook the lo mein noodles according to package directions until al dente (usually 3-4 minutes for fresh, 4-5 for dried). Do not overcook. Drain, rinse briefly with cool water to stop cooking, and toss with a tiny bit of oil to prevent sticking. Set aside.
💡 The Kitchen Team’s Pro Tip: Rinsing the noodles after cooking removes excess starch, preventing them from becoming a sticky, gummy clump when you add them to the stir-fry. That quick cool-down also ensures they stay perfectly chewy.
Step 3: Stir-Fry the Chicken
Heat a large wok or skillet over medium-high heat. Add 1 tablespoon of neutral oil. Once shimmering, add the marinated chicken in a single layer. Let it sear undisturbed for 1-2 minutes to get a good color, then stir-fry for 4-5 minutes total until cooked through and no longer pink. Remove the chicken to a clean plate.
Step 4: Stir-Fry the Vegetables
In the same pan, add the remaining 1 tablespoon of oil. Add the carrots and stir-fry for 1 minute. Then add the bell peppers and the white/light green parts of the green onions. Stir-fry for 2-3 minutes until the vegetables are tender-crisp (they should still have a slight bite). Add the minced garlic and stir-fry for just 30 seconds until fragrant—be careful not to burn it.
Step 5: Combine & Sauce Everything
Return the cooked chicken and any accumulated juices to the pan with the vegetables. Add the cooked, drained noodles. Pour the remaining soy sauce and the toasted sesame oil over everything. If using any optional sauces (oyster, chili), add them now.
Step 6: The Final Toss
Using tongs or two large spoons, gently but thoroughly toss everything together until the noodles and ingredients are evenly coated in the sauce and heated through, about 1-2 minutes. The goal is to let the sauce coat and glaze everything without further cooking the veggies.
Step 7: Garnish & Serve
Remove from heat. Transfer to a serving platter or individual bowls. Garnish generously with the reserved dark green parts of the green onions. Serve immediately while hot and steaming.
Serving Suggestions & Perfect Pairings
This Easy Chicken Lo Mein is a complete meal on its own, packed with protein, carbs, and veggies. But if you’re looking to create a fuller Asian-inspired feast, here are some perfect pairings:
Simple Starters: Serve with store-bought or homemade egg rolls, steamed pork or vegetable dumplings, or a light cucumber salad with a rice vinegar dressing.
Side Dishes: A simple bowl of steamed jasmine rice is always welcome, or try our Easy Garlic Bok Choy for an extra green vegetable.
Condiments: Set out small bowls of chili oil, sriracha, hoisin sauce, or extra soy sauce so everyone can customize their bowl to their preferred spice and salt level.
For a Crowd: This recipe doubles beautifully. Use your largest wok or skillet, or cook in two batches to avoid overcrowding the pan, which leads to steaming instead of frying.
Storage, Reheating & Meal Prep Instructions
This dish makes fantastic leftovers and is a meal-prep superstar.
Storage: Allow leftovers to cool completely. Store in an airtight container in the refrigerator for up to 3-4 days.
Reheating (Best Methods):
Skillet/Stovetop (Recommended): Reheat in a non-stick skillet over medium heat with a splash of water or chicken broth. This restores the texture best and prevents the noodles from getting rubbery.
Microwave: Place in a microwave-safe dish, cover loosely, and heat in 60-second intervals, stirring between each, until hot. Adding a damp paper towel over the top can help keep it moist.
Meal Prep: You can prep components ahead! Slice the chicken and veggies up to 2 days in advance and store separately in containers in the fridge. Mix the sauce ingredients in a jar. When ready to cook, simply follow the steps—dinner will be on the table even faster.
💡 The Kitchen Team’s Pro Tip: We do not recommend freezing this dish. The cooked noodles and vegetables will become mushy and lose their pleasing texture upon thawing and reheating.
Creative Variations on Your Chicken Lo Mein
The beauty of this recipe is its adaptability. Use it as a blueprint and get creative based on your dietary needs or what’s in your fridge.
Variation
How-To
Shrimp or Beef Lo Mein
Substitute 1 lb of peeled large shrimp or thinly sliced flank/sirloin steak for the chicken. Cook shrimp for 2-3 minutes until pink; cook beef for 2-4 minutes until browned.
Vegetarian/Vegan Lo Mein
Omit chicken. Add extra firm tofu (pressed and cubed) or a can of drained chickpeas. Use tamari instead of soy sauce. Add more veggies like broccoli, snap peas, and water chestnuts.
Spicy Szechuan Lo Mein
Add 1-2 teaspoons of Szechuan chili oil or paste to the sauce. Garnish with crushed red pepper flakes.
Extra Veggie-Packed
Add 1 cup of sliced mushrooms, broccoli florets, or snow peas with the bell peppers. You may need to increase the sauce slightly.
Gluten-Free Lo Mein
Use 100% buckwheat soba noodles or rice noodles, and ensure your soy sauce is tamari or a certified gluten-free soy sauce.
Frequently Asked Questions (FAQ)
We’ve answered the most common questions to guarantee your success.
1. What’s the difference between Lo Mein and Chow Mein?
Great question! Both are Chinese noodle dishes. Lo Mein means “tossed noodles.” The boiled noodles are tossed with the sauce and ingredients. Chow Mein means “fried noodles.” The noodles are often parboiled and then pan-fried until crispy before being combined with toppings and sauce. Our recipe is for the softer, saucier Lo Mein style.
2. Can I use spaghetti noodles instead of Lo Mein noodles?
Absolutely! In a pinch, spaghetti, linguine, or even fettuccine make a decent substitute. The texture and flavor won’t be identical, but you’ll still get a delicious noodle dish. Cook them al dente according to package directions.
3. My stir-fry is sticking to the pan. What am I doing wrong?
Sticking usually means the pan isn’t hot enough before adding the oil/food, or the pan is overcrowded. Ensure your wok or skillet is preheated over medium-high heat until a drop of water sizzles and evaporates instantly. Also, cook in batches if needed—don’t overcrowd.
4. How can I make the sauce thicker and more “restaurant-style”?
Create a simple cornstarch slurry. Mix 1 teaspoon of cornstarch with 1 tablespoon of cold water or chicken broth until smooth. Add it during the final toss in Step 5. The sauce will thicken and become glossy as it heats.
5. Can I make this dish ahead of time?
You can prep all components ahead (chop veggies, mix sauce, slice chicken), but for the best texture, we recommend cooking it just before serving. Leftovers reheat well, but freshly made is ideal for the perfect noodle chew.
6. Is toasted sesame oil the same as regular sesame oil?
No. Toasted sesame oil is made from toasted sesame seeds and is dark brown, with an intense, nutty flavor. It’s used as a finishing oil. Regular/light sesame oil is made from raw seeds, is lighter in color and flavor, and can be used for frying. For this recipe, toasted sesame oil is essential for authentic flavor.
7. What can I use if I don’t have a wok?
A large, heavy-bottomed skillet (like cast iron or stainless steel) works perfectly. The key is having a pan with a large surface area to allow for quick evaporation and proper stir-frying.
8. How can I add more protein to this recipe?
Easy! Add a scrambled egg during the final toss, or include shelled edamame with the vegetables. You can also use a mix of chicken and shrimp.
We hope you love this Easy Chicken Lo Mein Recipe as much as we do! It’s a permanent fixture in our weeknight dinner rotation. If you tried it and enjoyed it, please share it with your friends and family! Tag us on social media @cookingwithemy—we love seeing your creations.
Love This Recipe? Save It for Later!
Pin this image to your favorite “Weeknight Dinners” or “Asian Recipes” board on Pinterest so you always have this easy recipe handy.
Experience the delightful flavors of this Chicken Lo Mein recipe! This dish features tender, marinated chicken stir-fried with vibrant vegetables and chewy lo mein noodles, all tossed in a savory sauce that captures the essence of Chinese cuisine. Perfect for weeknight dinners or special occasions, this easy-to-make meal requires minimal prep time and allows for customization based on your preferences. Enjoy the aroma wafting through your kitchen as you prepare this comfort food classic that will leave your family asking for seconds!
Ingredients
Scale
3–4 boneless, skinless chicken breasts
Lo Mein noodles (fresh or dried)
1 red bell pepper
1 yellow bell pepper
2 carrots (thinly sliced)
2 green onions (chopped)
¼ cup low-sodium soy sauce
1 tablespoon sesame oil
3 cloves fresh minced garlic
Instructions
Gather all ingredients and chop vegetables into bite-sized pieces. Cook lo mein noodles according to package instructions until al dente; drain and set aside.
Heat a large skillet or wok over medium-high heat. Add oil and sauté the chicken until golden brown and fully cooked, about 6-8 minutes. Remove from skillet.
In the same pan, stir-fry bell peppers, carrots, and green onions until tender yet crisp, about 3-4 minutes.
Return cooked chicken to the skillet with vegetables. Add lo mein noodles, soy sauce, sesame oil, minced garlic, and any additional spices. Toss everything together until well mixed.
Serve hot with extra soy sauce if desired.
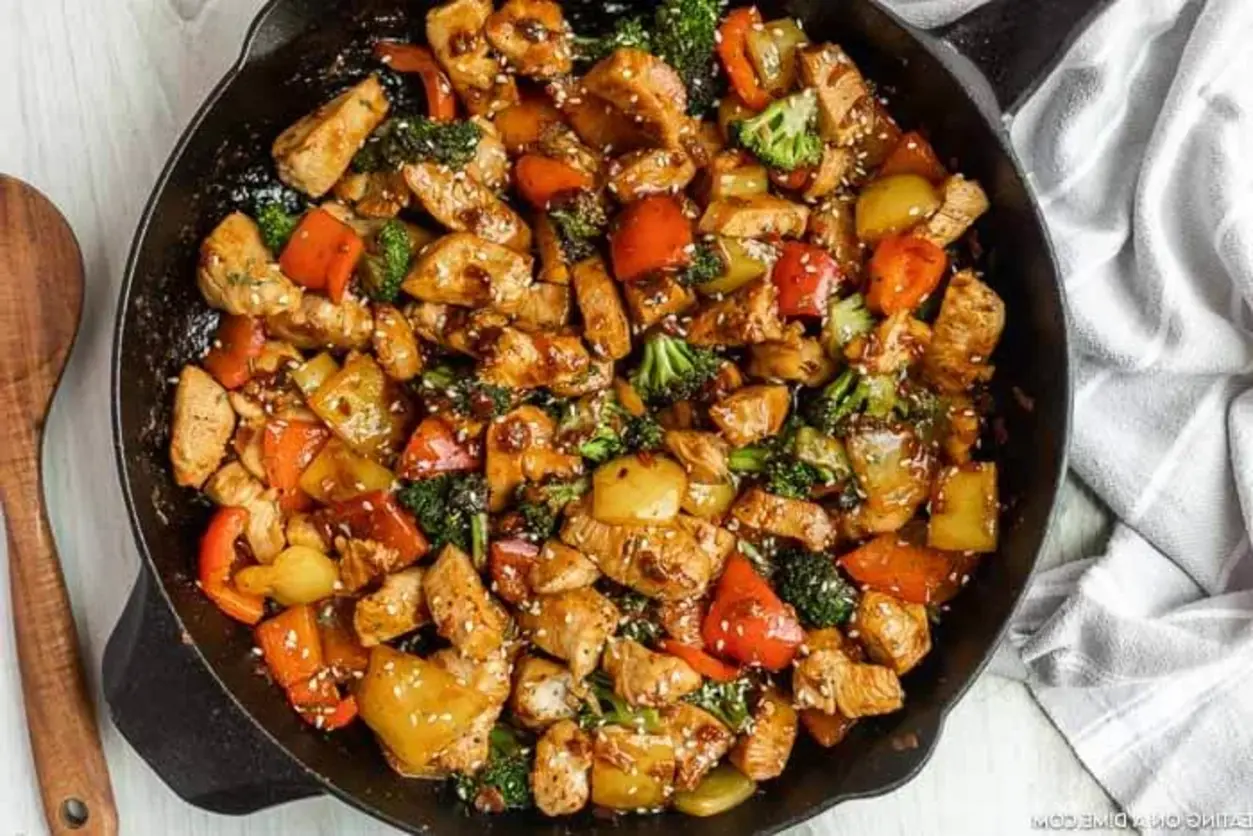
Why This Easy Chicken Stir Fry Beats Takeout (It’s the Sauce Ratio)
Why This Easy Chicken Stir Fry Beats Takeout (It’s the Secret Sauce Ratio)
Prep Time:
15 minutes
Cook Time:
15 minutes
Total Time:
30 minutes
Servings:
4 people
Difficulty:
Easy
Why This Recipe is a Game-Changer
Let’s be honest: the siren call of takeout is powerful. It’s late, you’re tired, and the thought of chopping and sautéing feels like a monumental task. But what if you could create a meal that’s faster than delivery, significantly healthier, more flavorful, and costs a fraction of the price? That’s the promise—and the reality—of this Easy Chicken Stir Fry. This isn’t just another stir-fry recipe. This is a meticulously crafted formula where every element, from the size of the chicken dice to the simmer time of the sauce, is designed for maximum flavor and perfect texture. The crown jewel? The sauce ratio. We’ve cracked the code on the perfect balance of salty, sweet, savory, and thick, so your homemade stir fry doesn’t just rival takeout—it decisively beats it. Welcome to your new kitchen staple.
Why This Easy Chicken Stir Fry Beats Takeout (It’s the Sauce Ratio)
The difference between a good stir fry and a great one lies in the sauce. Most takeout joints and home recipes get it wrong—it’s either a gloppy, cornstarch-heavy mess or a thin, flavorless wash. Our recipe is built on a golden ratio that creates a sauce with body, shine, and layered flavor that clings perfectly to every piece of chicken and vegetable.
Our sauce ratio of 1:1:2 (soy sauce : broth : honey), thickened with just enough cornstarch, is the secret. The soy sauce provides the essential umami saltiness. The chicken broth deepens the savory notes without making it taste like plain soup. The honey doesn’t just add sweetness; it caramelizes slightly in the hot pan, creating a complex depth and beautiful glaze that you simply cannot get from plain sugar. The cornstarch is the maestro, bringing it all together into a velvety coating rather than a pool at the bottom of your bowl.
Beyond the sauce, our method ensures success: cooking the protein and vegetables separately guarantees no steaming or overcooking. The high-heat sauté locks in juices and creates those desirable browned bits (fond) in the pan, which the sauce then deglazes, incorporating all that concentrated flavor. Takeout can’t compete with this level of care and fresh, crisp ingredients.
💡 The Kitchen Team’s Pro Tip: For an even more restaurant-quality sauce, swap the chicken broth for low-sodium beef broth. It adds a richer, more robust umami backbone that makes the flavor truly unforgettable.
Ingredients & Why They Matter
Using the right ingredients is just as important as the technique. Here’s what you’ll need and why each component is non-negotiable for the best stir fry.
Ingredient
Quantity
Purpose & Best Choice
Boneless, Skinless Chicken Breasts
3 (about 1.5 lbs)
Provides lean protein. Dicing to a consistent 1-inch ensures quick, even cooking. For more flavor, you can use chicken thighs.
Kosher Salt & Black Pepper
1/2 tsp each
Fundamental seasoning for the chicken. Kosher salt adheres better than table salt.
Olive Oil (divided)
2 tbsp
High smoke point for sautéing. Using it in two stages prevents overcrowding and ensures a good sear.
Broccoli Florets
2 cups (bite-size)
Adds crunch and earthiness. Cutting them small allows them to cook quickly and absorb sauce.
Yellow & Red Bell Pepper
1/2 each (1-inch pieces)
Provides sweetness, color, and a slight crunch. Using two colors enhances visual appeal.
Shredded Carrots
1/2 cup
Adds a touch of sweetness and vibrant color. Pre-shredded saves time, but fresh shreds have better texture.
Ground Ginger
1/2 tsp
Offers warm, aromatic spice. Fresh ginger (1 tbsp grated) can be used for a brighter, sharper kick.
Minced Garlic
2 tsp
The aromatic heart of the dish. Freshly minced is vastly superior to jarred.
Sesame Seeds
2 tbsp
Adds nutty flavor and final texture. Toast them lightly in a dry pan for 1 minute to maximize aroma.
Cornstarch
1 tbsp
The thickening agent. It must be mixed with cold liquid first to prevent lumps.
Low-Sodium Chicken Broth
1/4 cup
Forms the liquid base of the sauce. Low-sodium allows you to control the salt level.
Low-Sodium Soy Sauce
1/4 cup
The primary source of salt and umami. Low-sodium is crucial to avoid an overly salty sauce.
Honey
2 tbsp
Provides the perfect sweet balance and helps create a glossy, clinging sauce.
Step-by-Step Instructions for Perfect Stir Fry
Follow these steps precisely for a stir fry that comes out perfectly every single time. The key is mise en place—having all your ingredients prepped and within reach before you turn on the heat.
Step 1: Prepare the Magic Sauce
In a small bowl or liquid measuring cup, whisk together 1 tablespoon cornstarch and 1/4 cup cold chicken broth until completely smooth and no lumps remain. This is called a “slurry.” Then whisk in the 1/4 cup soy sauce and 2 tablespoons honey. Set this sauce aside. Having it ready prevents scrambling later.
💡 The Kitchen Team’s Pro Tip: Add a teaspoon of rice vinegar or a dash of toasted sesame oil to your sauce mixture for an extra layer of tangy or nutty complexity that will blow your mind.
Step 2: Cook the Chicken to Perfection
Pat your diced chicken breasts completely dry with paper towels. This is critical for browning, not steaming. Heat 1 tablespoon of olive oil in a large skillet or wok over medium-high heat until shimmering. Add the chicken in a single layer, season with salt and pepper, and let it cook undisturbed for 2-3 minutes to get a good sear. Then, sauté for another 4-5 minutes, stirring occasionally, until cooked through and browned on all sides. Remove the chicken to a clean plate.
Step 3: Sauté the Vegetables
Add the remaining 1 tablespoon of olive oil to the same skillet. Add the broccoli, bell peppers, and carrots. Stir-fry for 4-5 minutes. You want them tender-crisp—vibrant in color with a slight bite. Push the vegetables to the sides of the pan, creating a well in the center.
Step 4: Bloom the Aromatics
In the center of the pan, add the ground ginger and minced garlic. Cook for just 30-60 seconds until incredibly fragrant. This “blooms” their oils and intensifies their flavor. Be careful not to burn the garlic.
Step 5: Bring It All Together
Add the cooked chicken back to the skillet with the vegetables. Give your prepared sauce a quick re-whisk (the cornstarch may have settled) and pour it evenly over everything. Stir constantly. The sauce will begin to bubble and thicken almost immediately within 1-2 minutes, turning glossy and coating every piece beautifully.
Step 6: Final Garnish and Serve
Once the sauce has thickened to a luxurious, coating consistency, remove the skillet from the heat. Sprinkle with 2 tablespoons of sesame seeds. Give it one final gentle stir, and serve immediately over your base of choice.
Serving Suggestions: Beyond the Bowl
This stir fry is incredibly versatile. Here are our favorite ways to serve it:
Classic Steamed Rice: Jasmine or white rice is the perfect neutral canvas to soak up the extra sauce.
Cauliflower Rice: For a low-carb, veggie-packed option that’s just as satisfying.
Brown Rice or Quinoa: Adds a nutty flavor and boosts the fiber and protein content of the meal.
Lo Mein Noodles: Toss cooked noodles directly into the stir fry in the last minute for a hearty, takeout-style experience.
Lettuce Wraps: For a light, refreshing, and hands-on meal, spoon the stir fry into large butter lettuce leaves.
Storage & Reheating: Maximizing Your Leftovers
Properly stored, this stir fry makes fantastic leftovers for lunch the next day.
Refrigeration: Allow the stir fry to cool completely. Store in an airtight container in the refrigerator for up to 3-4 days.
Freezing: While possible, freezing can change the texture of the vegetables (broccoli may become softer). If freezing, store in a freezer-safe container for up to 2 months. Thaw overnight in the fridge.
Reheating Best Practices: Reheat in a skillet over medium heat with a splash of water or broth to loosen the sauce. Microwave reheating can make the vegetables mushy and the sauce separate. Stir frequently until heated through.
Creative Variations to Keep It Exciting
Once you’ve mastered the base recipe and the sacred sauce ratio, the world is your oyster! Try these easy swaps:
Protein Swap: Use thinly sliced beef (flank or sirloin), shrimp, tofu (extra-firm, pressed and cubed), or even sliced pork tenderloin.
Vegetable Bounty: Add or substitute with snap peas, sliced water chestnuts, baby corn, mushrooms, bok choy, or zucchini.
Sauce Twists:
Spicy: Add 1-2 teaspoons of sriracha or chili-garlic sauce to the sauce mix.
Teriyaki: Increase honey to 3 tbsp and add 1 tbsp mirin.
Orange: Replace the chicken broth with fresh orange juice and add 1 tsp orange zest.
Your Stir Fry Questions, Answered
Can I use frozen vegetables? Yes, but add them directly from frozen in Step 3. You may need to cook them an extra 1-2 minutes and pour off any excess liquid they release before adding the sauce, as it can dilute the flavor and prevent proper thickening.
My sauce didn’t thicken. What happened? The most common culprit is not pre-mixing the cornstarch with a cold liquid, causing lumps that don’t activate. Also, ensure your heat is high enough when you add the sauce—it needs a strong simmer to thicken properly. If it’s still thin, mix another 1 tsp cornstarch with 1 tbsp cold water and stir it in.
Can I make this gluten-free? Absolutely! Use tamari or a certified gluten-free soy sauce in place of regular soy sauce. Double-check that your chicken broth is also gluten-free.
What’s the best pan to use? A large, heavy-bottomed skillet or a wok is ideal. It provides even heat distribution and plenty of surface area for quick cooking. Non-stick is fine, but you may not get as much fond (browned bits) for flavor.
Can I prep this ahead of time? Yes! Chop all vegetables and chicken, and make the sauce, storing them separately in the fridge for up to 24 hours. Cooking from start to finish will then take just 15 minutes.
Is the honey necessary? Can I substitute it? The honey is key for balance and glaze. You can substitute with maple syrup, agave nectar, or brown sugar. The flavor profile will shift slightly, but it will still be delicious.
How can I make this dish more saucy? Simply increase the sauce ingredients by 50% (1.5 tbsp cornstarch, 6 tbsp broth, 6 tbsp soy sauce, 3 tbsp honey) while keeping the rest of the recipe the same.
My chicken is tough. How do I prevent that? This usually means it was overcooked. Ensure your pieces are a uniform 1-inch size and do not overcrowd the pan. Cook just until no longer pink in the center (about 6-7 minutes total). Using chicken thighs can also be more forgiving.
Love this recipe? Save it for later!
Pin the image below to your Dinner Ideas or Quick & Easy Meals board on Pinterest to always have it handy.
Image Description: A vibrant, glossy chicken stir fry with broccoli, red and yellow peppers, and carrots in a skillet, sprinkled with sesame seeds, served over fluffy white rice.
We hope this recipe becomes your new go-to for a quick, healthy, and incredibly satisfying meal. Remember, the secret is in the sauce ratio! Once you master it, you’ll never look at takeout the same way again. Happy cooking from The Kitchen Team at cookingwithemy.com!
Share this recipe with a friend who needs a break from takeout!
Easy Chicken Stir Fry Recipe is bursting with flavor but so simple to make. No need to grab take out when you can make this amazing dish in just minutes.
Ingredients
Scale
3 boneless chicken breasts ((diced into 1 inch pieces) )
1/2 tsp salt
1/2 tsp pepper
2 tbsp olive oil ((divided) )
2 cups broccoli florets ((diced into bite size pieces) )
1/2 Yellow Bell Pepper ((cut into 1 inch pieces) )
1/2 red bell pepper ((cut into 1 inch pieces) )
1/2 cup carrots ((shredded) )
1/2 tsp ground ginger
2 tsp minced garlic
2 tbsp sesame seeds
1 tbsp cornstarch
1/4 cup chicken broth
1/4 cup soy sauce
2 tbsp honey
Instructions
In a small bowl, whisk together 1 tablespoon cornstarch, ¼ cup chicken broth, ¼ cup soy sauce, and 2 tablespoons honey. Set the stir fry sauce aside.
Heat 1 tablespoon olive oil in a large skillet over medium-high heat. Add 3 boneless chicken breasts (diced into 1-inch pieces) and season with ½ teaspoon salt and ½ teaspoon pepper. Sauté the chicken for 35 minutes until browned and cooked through. Remove the chicken from the skillet to a separate plate.
Add the remaining 1 tablespoon olive oil to the skillet. Add 2 cups broccoli florets (cut into bite-size pieces), ½ yellow bell pepper (cut into 1-inch pieces), ½ red bell pepper (cut into 1-inch pieces), and ½ cup shredded carrots. Cook, stirring occasionally, until the vegetables are tender but still crisp.
Stir in ½ teaspoon ground ginger and 2 teaspoons minced garlic. Cook for 12 minutes until the garlic is fragrant.
Add the cooked chicken back to the skillet. Pour the prepared stir fry sauce over the chicken and vegetables and stir to coat evenly. Bring the mixture to a boil, stirring occasionally, and let it boil for 1 minute to thicken the sauce.
Top with 2 tablespoons sesame seeds and serve as is or over rice. Enjoy.
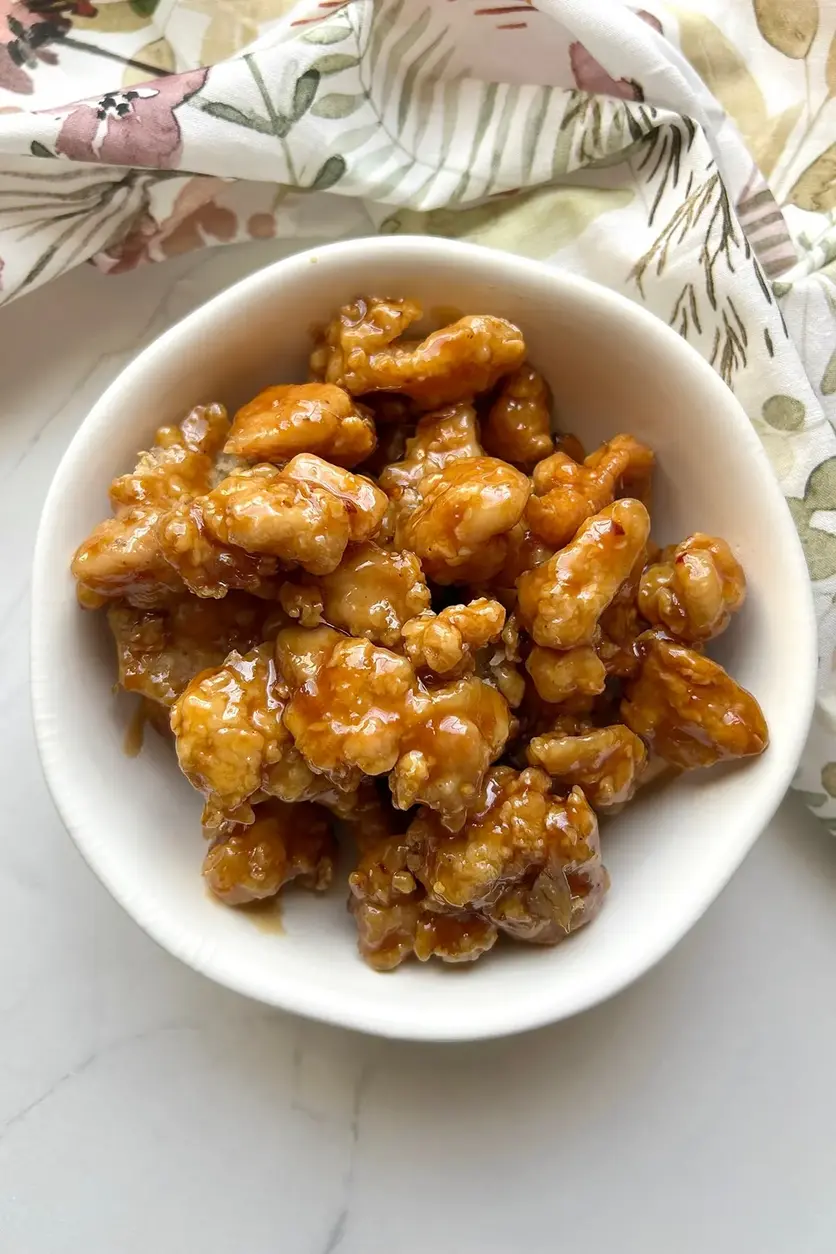
Panda Express Orange Chicken Recipe
Crispy Homemade Panda Express Orange Chicken
Craving that iconic, sweet, tangy, and crispy takeout favorite but want the satisfaction of making it at home? You’ve landed in the right kitchen. This Panda Express Orange Chicken recipe delivers that perfect combination of crunchy, golden-brown chicken pieces smothered in a glossy, intensely flavorful orange sauce that’s even better than the original. Forget waiting in line or paying delivery fees—this recipe unlocks the secrets to creating a restaurant-quality dish in your own kitchen, with ingredients you can pronounce and techniques that guarantee success every single time.
At CookingWithEmy.com, we believe the best meals are the ones you make with love and a little know-how. This recipe breaks down the process into simple, foolproof steps, from creating the ultimate crispy coating to simmering the signature sticky-sweet sauce. We’ll guide you through achieving that perfect balance of citrusy brightness, savory depth, and a hint of heat that makes Panda Express Orange Chicken so addictive. Get ready to impress your family and satisfy those cravings with a homemade version that’s fresher, more customizable, and deeply rewarding to create.
Prep Time
Cook Time
Total Time
Servings
Difficulty
⏱️25 minutes
🍳20 minutes
⏲️45 minutes
🍽️4-6 people
⭐Medium
Why This Is The Best Panda Express Orange Chicken Recipe
You might wonder why you should make this at home when you can just grab a box. The reasons are plentiful! First, you have complete control over the quality of ingredients. You choose fresh, high-quality chicken and avoid any preservatives or additives. Second, the flavor is remarkably superior. The sauce in this recipe is cooked from scratch, allowing the garlic, ginger, and citrus flavors to meld and deepen in a way a pre-made sauce simply cannot match. The result is a more complex, vibrant, and “real” orange flavor.
Furthermore, the texture is a game-changer. By double-coating and frying the chicken at the precise temperature, you achieve a shatteringly crisp exterior that holds up beautifully against the thick sauce, preventing sogginess. Many copycat recipes fail here, but our method ensures every bite is perfectly crunchy. Finally, this recipe is incredibly versatile. We’ll show you how to adjust the sweetness, heat, and even cooking method to suit your dietary needs and taste preferences. It’s not just a copy—it’s an upgrade.
Ingredients For Panda Express Orange Chicken
Gathering the right ingredients is the first step to success. Here’s what you’ll need, broken down into the chicken coating and the legendary orange sauce. Don’t be intimidated by the list—most are pantry staples!
For the Crispy Chicken:
2 lbs boneless, skinless chicken breasts or thighs: Thighs are our top pick for extra juiciness and flavor, but breasts work perfectly for a leaner option.
1 large egg: Acts as the glue for the coating.
1 Tbsp neutral oil (sunflower, vegetable, or canola): Adds fat to the egg wash for a richer coating.
1 ½ tsp salt: Seasons the chicken from the inside out.
1 tsp black pepper: For a foundational layer of spice.
¾ cup cornstarch: The secret to an ultra-crispy, light coating. Do not substitute with flour here.
⅓ cup all-purpose flour (heaping): Combined with cornstarch for the perfect texture.
Oil for frying: Peanut, vegetable, or avocado oil are excellent high-smoke-point choices.
For the Signature Orange Sauce:
½ cup white distilled vinegar: Provides the essential tangy backbone.
½ cup cane sugar (or granulated white sugar): Creates the classic sweet balance.
¼ cup water: Adjusts the sauce consistency.
¼ cup soy sauce (or coconut aminos for gluten-free): The savory, umami foundation.
½ tsp crushed red pepper flakes: Adds the signature mild heat. Adjust to taste!
2 cloves garlic, finely crushed or minced: Non-negotiable for aroma and flavor.
½ tsp fresh ginger root, peeled and zested or minced: The citrusy counterpart to orange.
1 Tbsp orange juice concentrate (or 3 Tbsp fresh orange juice): Concentrate gives a more intense flavor, but fresh works well.
1 Tbsp cornstarch + 1 Tbsp water: Mixed into a slurry to thicken the sauce.
1 tsp sesame oil: Added at the end for a nutty, aromatic finish.
1 tsp rice wine (or apple cider vinegar): A hint of extra acidity and depth.
Optional Garnishes: Thinly sliced green onions, toasted sesame seeds, and fresh orange zest.
💡 The Kitchen Team’s Pro Tip: For the absolute best orange flavor, use the zest of one whole orange in the sauce. The oils in the zest contain intense citrus essence that juice alone can’t provide. Just make sure to wash the orange thoroughly first!
How To Make Panda Express Orange Chicken: Step-by-Step
Step 1: Prepare the Chicken
Start by patting your chicken completely dry with paper towels. This is crucial—any surface moisture will steam the coating instead of letting it fry up crisp. Cut the chicken into uniform 1-inch bite-sized pieces. Consistency in size ensures even cooking.
Step 2: Create the Coating Stations
In one medium bowl, whisk together the egg, 1 Tbsp oil, salt, and pepper until smooth. In a separate shallow bowl or plate, thoroughly combine the cornstarch and all-purpose flour. Set up a workstation: bowl of chicken, egg wash, flour/cornstarch mix, and a clean plate for the coated chicken.
Step 3: Coat the Chicken
Working in batches, add chicken pieces to the egg wash, tossing to coat completely. Let any excess drip off, then transfer them to the flour/cornstarch mixture. Toss and press gently to ensure every nook and cranny is coated. Shake off the excess and place on the clean plate. Repeat until all chicken is coated.
💡 The Kitchen Team’s Pro Tip: For an extra-craggy, crunchy coating, let the breaded chicken sit on a wire rack for 10 minutes before frying. This allows the coating to hydrate and set, which helps it adhere better and creates more texture.
Step 4: Fry to Golden Perfection
In a large, heavy-bottomed pot, Dutch oven, or wok, heat 2-3 inches of oil to 350°F. Use a thermometer for accuracy—the right temperature is key. Too hot, and the coating burns before the chicken cooks; too cool, and the chicken absorbs oil and becomes greasy.
Carefully add the chicken in batches, avoiding overcrowding. Fry for 4-6 minutes, turning occasionally, until deeply golden brown and the internal temperature reaches 165°F. Transfer to a wire rack set over a baking sheet (this keeps them crisp better than paper towels). Repeat with remaining chicken.
Step 5: Craft the Orange Sauce
While the chicken rests, make the sauce. In a medium saucepan, combine the vinegar, sugar, water, soy sauce, red pepper flakes, garlic, ginger, and orange juice concentrate. Bring to a simmer over medium heat, stirring until the sugar dissolves. Let it simmer gently for 3-4 minutes to infuse the flavors.
In a small bowl, make a slurry by mixing 1 Tbsp cornstarch with 1 Tbsp cold water until smooth. While whisking the simmering sauce, slowly drizzle in the slurry. Continue to cook, whisking constantly, for 1-2 minutes until the sauce thickens to a glossy, syrupy consistency. Remove from heat and stir in the sesame oil and rice wine.
Step 6: The Grand Finale – Toss and Serve
In a large bowl, combine the crispy fried chicken and the warm orange sauce. Gently toss until every piece is evenly and generously coated. Transfer to a serving platter and immediately garnish with green onions and sesame seeds.
Serving Suggestions
This Panda Express Orange Chicken is a star that deserves a supporting cast. For a true takeout experience, serve it over a bed of steamed jasmine rice or fried rice to soak up every drop of the delicious sauce. Vegetable lo mein or chow mein make fantastic, hearty pairings. To balance the meal, add simple sides like steamed broccoli, sautéed snap peas, or a light Asian cucumber salad. Don’t forget the fortune cookies!
Storage & Reheating Instructions
Storage: Store leftover orange chicken in an airtight container in the refrigerator for up to 3 days. Store the sauce and chicken separately if possible for best texture upon reheating.
Reheating for Best Results: To restore crispiness, avoid the microwave. Instead, reheat chicken on a baking sheet in a 400°F oven for 10-15 minutes, or in an air fryer at 375°F for 5-7 minutes, until hot and re-crisped. Warm the sauce separately in a saucepan over low heat, then toss the reheated chicken in the warm sauce.
Recipe Variations & Customizations
Baked Orange Chicken: For a healthier version, place the breaded chicken on a greased wire rack over a baking sheet. Spray lightly with oil and bake at 400°F for 18-22 minutes, flipping halfway, until cooked through. Toss with the sauce as directed.
Spicy Orange Chicken: Double the red pepper flakes, add a teaspoon of sriracha to the sauce, or garnish with sliced fresh Thai chilies.
Gluten-Free: Use certified gluten-free tamari or coconut aminos instead of soy sauce. Ensure your cornstarch is gluten-free.
Extra Citrusy: Add the zest of one orange and one tablespoon of fresh orange juice at the very end of cooking the sauce.
Protein Swap: Try this with cauliflower florets, tofu, or shrimp for a delicious twist.
Panda Express Orange Chicken FAQ
Can I make Panda Express Orange Chicken ahead of time?
Yes, but with a strategy. You can bread the chicken and keep it covered in the fridge for a few hours before frying. The sauce can be made 2-3 days ahead and refrigerated. For best results, fry the chicken and toss it in the freshly warmed sauce just before serving.
What’s the difference between using orange juice and orange juice concentrate?
Concentrate has a more intense, sweeter, and tangier orange flavor because the water has been removed. It gives the sauce a more potent “orange” taste that closely mimics the restaurant version. Fresh juice is milder. We recommend concentrate for authenticity, but fresh works well too.
Why is my orange chicken sauce not thickening?
Your cornstarch slurry might not have been activated. Ensure the sauce is at a simmer when you add the slurry, and cook it for a full 1-2 minutes while whisking. Cornstarch needs to reach a near-boil to thicken properly. If it’s still thin, make another small slurry and repeat.
Can I use an air fryer for the chicken?
Absolutely! For air fryer orange chicken, spray the breaded chicken generously with oil. Air fry in a single layer at 400°F for 10-12 minutes, shaking halfway, until crispy and cooked through. Toss with the sauce as usual.
Is Panda Express Orange Chicken spicy?
The classic version has a very mild, background heat. This recipe uses ½ tsp of red pepper flakes for a gentle warmth. If you’re sensitive to spice, reduce it to ¼ tsp or omit it entirely. If you love heat, feel free to increase it.
What’s the best oil for frying?
Oils with a high smoke point and neutral flavor are best. Peanut oil is traditional and gives great flavor. Vegetable, canola, and avocado oil are also excellent choices.
Can I use chicken thighs instead of breasts?
Yes, and many enthusiasts prefer thighs! They are more forgiving, stay juicier, and have more flavor. The cooking time may be slightly shorter, so always check for an internal temperature of 165°F.
How do I prevent the chicken from getting soggy after adding the sauce?
The key is to ensure the chicken is very crispy to begin with (fry at the right temp) and to toss it in the sauce just before serving. If you’re serving a crowd, you can serve the sauce on the side for dipping to maintain maximum crunch.
Can I freeze homemade orange chicken?
We don’t recommend freezing the fully assembled dish, as the crispy coating will become soggy upon thawing and reheating. You can freeze the uncooked, breaded chicken on a sheet pan, then transfer to a freezer bag for up to 2 months. Fry from frozen, adding a few extra minutes to the cook time. The sauce can be frozen separately.
What can I substitute for rice wine? A dry sherry or a bit more apple cider vinegar make fine substitutes. In a pinch, you can even use a teaspoon of lemon juice for acidity.
Loved This Recipe? Share the Love!
Pin it to your favorite board to save for later. Follow us on Pinterest @cookingwithemy for more delicious inspirations!
Crispy homemade Orange Chicken, just like Panda Express! Pieces of boneless chicken breast are deep-fried and then cooked in a sweet, tangy orange sauce made from scratch. Panda Express Orange Chicken is not too spicy and so easy to make!
1 Tbsp sunflower oil ((or any neutral flavored oil) )
1 1/2 tsp salt
1 tsp pepper
3/4 cup cornstarch
1/3 cup all-purpose flour ((heaping))
1/2 cup white distilled vinegar
1/2 cup cane sugar
1/4 cup water
1/4 cup soy sauce ((or coconut liquid aminos) )
1/2 tsp crushed red pepper flakes
2 cloves garlic ((crushed))
1/2 tsp zested ginger root ((peeled))
1 Tbsp orange juice concentrate ((or 3 Tbsp orange juice))
1 Tbsp cornstarch
1 tsp sesame oil
1 tsp rice wine ((or apple cider vinegar))
Instructions
Cut the chicken into bite-sized pieces (about 1 inch thick). Then, preheat 2 inches of oil in a large pot or deep skillet.
Whisk together the egg, oil, salt, and pepper in a small bowl.
In a separate bowl, mix together the flour and cornstarch.
Dredge the chicken in the beaten egg mixture and then into the flour mixture. Shake off any excess flour.
Deep fry the chicken in batches in 350°F oil until crispy, and the internal temperature reaches 165°F. Transfer to a large plate lined with paper towels.
To make the orange chicken sauce, Combine all the sauce ingredients in a saucepan or large pot. Bring to a boil and simmer to desired thickness (1-2 minutes).
Add the fried chicken pieces to the sauce and toss to coat. Transfer to a serving dish and enjoy!
Sizzling Chinese Pepper Steak with Onions – CookTune
Sizzling Chinese Pepper Steak with Onions: Your 20-Minute Ticket to Takeout Bliss
This Sizzling Chinese Pepper Steak with Onions is the ultimate weeknight warrior recipe. Imagine tender, marinated beef strips, caramelized onions, and a glossy, savory-sweet sauce all coming together in one fiery pan. It’s faster than delivery and tastes infinitely better than anything from a takeout box. Serve it over fluffy rice or noodles for a complete, restaurant-quality meal that will have everyone asking for seconds.
Prep Time 15 minutes
Cook Time 15 minutes
Total Time 30 minutes
Servings 4 people
Difficulty Easy
Why This Pepper Steak is a Game-Changer for Busy Cooks
Let’s be honest: some nights, the thought of cooking feels like a chore. You’re tired, you’re hungry, and the siren call of the takeout menu is strong. That’s exactly why we created this Sizzling Chinese Pepper Steak recipe. It’s designed to be your culinary shortcut—a dish that delivers massive flavor with minimal effort and time. In about 20 minutes of active cooking, you can have a sizzling, aromatic platter of food that rivals your favorite Chinese restaurant.
The magic lies in the technique and balance. We’re not just stir-frying; we’re building layers of flavor. First, a quick marinade tenderizes the beef and gives it a deep, umami base. Then, we get those onions perfectly soft and sweet with a touch of caramelization. Finally, everything comes together in a sauce that’s the perfect trio of savory, sweet, and tangy. It’s a symphony in a skillet, and you’re the conductor.
This recipe is more than just dinner; it’s a confidence-builder. It teaches foundational stir-fry skills—high heat, quick movement, and sauce reduction—that you can apply to countless other dishes. Once you master this pepper steak, a whole world of Asian-inspired cooking opens up to you.
💡 The Kitchen Team’s Pro Tip: For the most authentic “wok hei” (breath of the wok) flavor at home, make sure your pan is screaming hot before you add the beef. Don’t crowd the pan—cook in batches if necessary—to ensure a good sear instead of steaming the meat.
What Makes This Recipe The Best Sizzling Chinese Pepper Steak
You might find other pepper steak recipes online, but ours stands out for several key reasons that guarantee success every single time.
1. The Double-Duty Marinade: Our marinade isn’t just for flavor; it’s a tenderizer. The combination of soy sauce, ginger, and garlic starts breaking down the beef’s proteins, ensuring every strip is melt-in-your-mouth tender, even when cooked quickly over high heat.
2. The Sauce Science: We’ve perfected the sauce ratio. The hoisin brings a sweet, fermented depth, the soy sauce provides salty umami, and the rice vinegar cuts through with a bright acidity. A small amount of cornstarch, dissolved first in the cold liquids, creates that glossy, cling-to-every-bite texture that defines great restaurant stir-fry.
3. Strategic Cooking Order: Many recipes have you cook everything at once. We cook the onions first, remove them, then cook the beef. This prevents the onions from becoming soggy and allows the beef to get a proper sear. Combining them at the end with the sauce ensures every component is cooked to perfection.
4. Flexibility & Forgiveness: No oyster sauce? Use more hoisin or a dash of fish sauce. No rice vinegar? Apple cider vinegar works. We provide a framework that delivers incredible results, even with common pantry swaps.
Ingredients & Shopping Guide
Great cooking starts with great ingredients. Here’s everything you need, along with our notes on selecting the best components for your Sizzling Chinese Pepper Steak.
Ingredient
Quantity
Notes & Best Picks
Beef (Sirloin or Ribeye)
1 lb (450g)
Look for “stir-fry” strips or slice a steak against the grain. Ribeye is more flavorful; sirloin is leaner.
Vegetable Oil
4 tbsp total (divided)
Use a high-smoke-point oil like avocado, canola, or peanut oil for stir-frying.
Garlic, minced
2 cloves
Fresh is best! Pre-minced jarred garlic can be used in a pinch.
Fresh Ginger, grated
1 tbsp (15g)
A microplane is perfect for grating. Keep a knob of ginger in the freezer for easy grating anytime.
Soy Sauce (regular)
3 tbsp total (divided)
We use regular soy sauce for marinade and sauce. For a gluten-free version, use tamari.
Oyster Sauce (optional)
1 tbsp (15g) for marinade
Adds a deep, savory flavor. Vegetarian oyster sauce (mushroom-based) is a great substitute.
Sesame Oil
1 tsp
Use toasted sesame oil for its intense nutty aroma. Add at the end of cooking for best flavor.
Hoisin Sauce
2 tbsp (30g)
The sweet, thick backbone of the sauce. Found in the Asian aisle of most supermarkets.
Rice Vinegar
2 tbsp (30g)
Provides essential acidity. Unseasoned is preferred.
Cornstarch
1 tbsp (15g)
The key to a glossy, thickened sauce. Must be dissolved in cold liquid first to avoid lumps.
Large Onion
1, sliced
Yellow or white onions work best for their balance of sweetness and pungency when cooked.
Salt & Black Pepper
To taste
Freshly cracked black pepper is ideal. Season the onions as they cook.
💡 The Kitchen Team’s Pro Tip: When slicing your beef, always cut against the grain. Look for the lines running through the meat and slice perpendicular to them. This shortens the muscle fibers, making each bite incredibly tender.
Step-by-Step Cooking Instructions
Follow these detailed steps for a flawless stir-fry. We recommend having all your ingredients prepped and within arm’s reach before you turn on the heat—this is called “mise en place,” and it’s crucial for stir-fry success.
Step 1: Marinate the Beef
In a medium bowl, whisk together 1 tablespoon of soy sauce, the optional oyster sauce (1 tbsp), grated ginger, minced garlic, and 1 teaspoon of sesame oil. Add the beef strips and toss thoroughly until every piece is coated. Let it sit at room temperature for 10-15 minutes. Don’t skip this step—it’s the flavor foundation.
Step 2: Caramelize the Onions
While the beef marinates, heat 1 tablespoon of vegetable oil in a large skillet, wok, or cast-iron pan over medium heat. Add the sliced onions and cook, stirring occasionally, for 6-8 minutes until they are soft, translucent, and have golden-brown edges. Season with a pinch of salt and pepper. Transfer the onions to a clean plate and set aside.
Step 3: Prepare the Sauce
In a small bowl or measuring cup, whisk together the remaining 2 tablespoons of soy sauce, hoisin sauce (2 tbsp), rice vinegar (2 tbsp), and cornstarch (1 tbsp). Whisk until the cornstarch is completely dissolved and no lumps remain. This is your magic glaze.
Step 4: Sear the Beef
Increase the heat to high. Add 2 tablespoons of vegetable oil to the now-empty pan. Once the oil is shimmering and very hot, add the marinated beef strips in a single layer. Let them sear undisturbed for 1 minute to develop a crust, then stir-fry for an additional 1-2 minutes until the beef is just browned on the outside but still slightly pink inside. It will continue to cook in the sauce.
Step 5: Create the Glaze & Combine
Give the prepared sauce a quick re-whisk (the cornstarch may have settled) and pour it over the seared beef in the pan. It will bubble and thicken almost immediately. Stir constantly for 30 seconds to 1 minute until the sauce is glossy and coats every piece of beef.
Step 6: Final Assembly
Add the cooked onions back into the pan with the beef and sauce. Toss everything together for 1-2 minutes until the onions are reheated and fully incorporated. Do a final taste test and adjust seasoning with a splash of soy sauce or a pinch of pepper if needed.
💡 The Kitchen Team’s Pro Tip: For an extra layer of flavor and color, add a sliced bell pepper (any color) in with the onions during Step 2. It adds a wonderful crunch and sweetness that complements the beef perfectly.
Serving Suggestions & Perfect Pairings
This Sizzling Chinese Pepper Steak is the star, but the supporting cast completes the meal. Here are our favorite ways to serve it.
The Classic Bed: Serve it over a large mound of steamed jasmine or white rice. The plain rice is the perfect canvas to soak up every last drop of the incredible sauce.
Noodle Alternative: Toss it with cooked lo mein noodles, chow mein noodles, or even spaghetti for a hearty pepper steak noodle bowl. Garnish with sliced green onions and sesame seeds.
For a Low-Carb Option: Serve it over cauliflower rice or alongside a big pile of steamed broccoli, snap peas, or bok choy. The sauce makes even the simplest vegetables taste amazing.
Garnish Galore: Elevate your plate with fresh toppings: thinly sliced green onions, a sprinkle of toasted sesame seeds, or a few extra drops of toasted sesame oil right before serving.
Storage & Reheating Tips
To Store: Allow leftovers to cool completely. Transfer to an airtight container and refrigerate for up to 3-4 days.
To Freeze: This dish freezes surprisingly well! Place cooled pepper steak in a freezer-safe container or bag for up to 2-3 months. Thaw overnight in the refrigerator before reheating.
To Reheat: The best method is on the stovetop. Add a splash of water or broth to a skillet over medium heat, add the leftovers, and stir until heated through. This prevents the sauce from becoming too thick or the beef from overcooking. You can also use the microwave, heating in 30-second intervals and stirring in between.
Creative Recipe Variations
Once you’ve mastered the base recipe, make it your own with these delicious twists.
Spicy Szechuan Pepper Steak: Add 1-2 teaspoons of Szechuan peppercorns (crushed) to the marinade and include 1-2 sliced fresh red chilies or a tablespoon of chili-garlic sauce in the stir-fry.
Mushroom Lover’s Version: Add a cup of sliced shiitake or cremini mushrooms when you cook the onions. They’ll soak up the sauce and add a wonderful meaty texture.
Pepper Steak with Broccoli: Add a cup of small broccoli florets to the pan after removing the onions. Stir-fry for 2-3 minutes until bright green and crisp-tender, then remove and add back with the onions at the end.
Pineapple Pepper Steak: For a sweet and tangy Hawaiian-inspired twist, add ½ cup of fresh pineapple chunks when you combine the onions and beef.
Your Questions Answered (FAQ)
1. Can I use a different cut of beef?
Absolutely. While sirloin and ribeye are ideal for their tenderness and flavor, flank steak or skirt steak are excellent, more economical choices. Just be sure to slice them very thinly against the grain.
2. I don’t have hoisin sauce. What can I substitute?
You can make a quick substitute by mixing 1.5 tablespoons of soy sauce with 1.5 tablespoons of brown sugar or honey, and a small dash of five-spice powder. It won’t be identical, but it will provide a similar sweet-savory balance.
3. Is this recipe gluten-free?
It can be easily made gluten-free! Use tamari instead of regular soy sauce, and ensure your hoisin and oyster sauces are certified gluten-free brands (or omit the oyster sauce). Cornstarch is naturally gluten-free.
4. Why did my sauce turn out gloopy or lumpy?
This happens if the cornstarch wasn’t fully dissolved in cold liquid before hitting the heat. Always whisk your cornstarch with the cold sauces and vinegar until completely smooth. If lumps form, you can push the sauce through a fine-mesh sieve.
5. Can I make this dish ahead of time?
You can prep the components ahead: slice the beef and onions, make the marinade and sauce, and store them separately in the fridge for up to 24 hours. The actual stir-frying is best done just before serving for optimal texture.
6. My beef got tough. What went wrong?
The two most common causes are overcooking and slicing with the grain. Stir-fry beef over very high heat for a very short time. Once it loses its pink color on the outside, it’s usually done. Also, always double-check that you’re slicing against the grain.
7. Can I use frozen beef strips?
Yes, but they must be fully thawed and patted very dry with paper towels before marinating. Excess moisture will cause the beef to steam instead of sear.
8. What’s the best pan to use?
A carbon steel wok is the traditional champion for stir-frying, but a large, heavy-bottomed skillet or cast-iron pan works beautifully. The key is a pan that can hold and distribute high heat evenly.
Loved This Recipe? Share the Love!
If this Sizzling Chinese Pepper Steak brought some delicious excitement to your dinner table, please share it with friends and family! Pin it to your Pinterest boards to save it for your next busy weeknight.
Save This “Sizzling Chinese Pepper Steak with Onions” Recipe
Don’t lose this easy 20-minute dinner recipe! Click the button below to save it directly to your favorite Pinterest food board so you can always find it when you need a quick, flavor-packed meal.
This Chinese Pepper Steak with Onions is a quick and flavorful dinner featuring tender beef strips, crisp onions, and a savory sauce thats perfect for a weeknight meal. Cooked to perfection in a sizzling stir-fry, this dish brings the bold flavors of Chinese cuisine straight to your table. Serve it over steamed rice or noodles for a satisfying, restaurant-quality meal at home.
Ingredients
Scale
1 lb (450g) beef strips (sirloin or ribeye)
2 tbsp (30g) vegetable oil
2 cloves garlic, minced
1 tbsp (15g) grated fresh ginger
1 tbsp (15g) soy sauce
1 tbsp (15g) oyster sauce (optional)
1 tsp sesame oil
Salt and pepper to taste
2 tbsp (30g) soy sauce
2 tbsp (30g) oyster sauce (optional)
2 tbsp (30g) hoisin sauce
2 tbsp (30g) rice vinegar
1 tbsp (15g) cornstarch
2 tbsp (30g) vegetable oil
1 large onion, sliced
1 tbsp (15g) vegetable oil
Salt and pepper to taste
Instructions
Prepare the Steak: In a bowl, whisk together soy sauce, oyster sauce, ginger, garlic, and sesame oil.
Toss the beef strips in the marinade and let sit for 10-15 minutes.
Cook the Onions: Heat 1 tbsp vegetable oil in a skillet over medium heat.
Add sliced onions and sauté until soft and slightly caramelized.
Season with salt and pepper, then remove from the pan and set aside.
Sear the Beef: In the same pan, heat 2 tbsp vegetable oil over high heat.
Add the marinated beef strips and stir-fry for 2-3 minutes until browned.
Make the Sauce: In a small bowl, whisk together soy sauce, hoisin sauce, rice vinegar, and cornstarch.
Pour the sauce over the beef and let simmer until it thickens.
Combine & Serve: Add the sautéed onions back into the pan, stirring to combine.
The Ultimate 10-Minute Pan Fried Noodles: Your New Go-To Weeknight Savior
Craving restaurant-quality stir-fried noodles but short on time and energy? Our foolproof 10-Minute Pan Fried Noodles recipe delivers maximum flavor with minimal effort, using a single pan and a handful of pantry staples. This is the secret weapon for busy cooks who refuse to compromise on taste.
Prep Time
Cook Time
Total Time
Servings
Difficulty
5 minutes
5 minutes
10 minutes
2 people
Easy
Why This Recipe is a Weeknight Game-Changer
Let’s be honest: after a long day, the last thing you want is a complicated recipe with a sink full of dishes. That’s where these 10-Minute Pan Fried Noodles come in. Born from the need for speed without sacrificing the deep, savory, slightly caramelized flavor of great takeout, this recipe is a cornerstone of practical home cooking. It leverages the power of high heat, a simple yet impactful sauce, and fresh noodles to create something truly special in the time it takes to boil water. At Cooking With Emy, we believe a fantastic meal shouldn’t be a project. It should be an accessible, joyful part of your day. This dish embodies that philosophy. It’s versatile enough to clean out the veggie drawer, substantial enough to be a full meal, and delicious enough to make you feel like a culinary genius. Whether you’re cooking for one, feeding a family, or need a impressively quick lunch, this recipe adapts to your life.
💡 The Kitchen Team’s Pro Tip: The true “10-minute” secret lies in mise en place—having all your ingredients measured, chopped, and ready to go by the stove before you turn on the heat. This recipe moves fast, so a little prep prevents burning and ensures perfectly cooked noodles every single time.
Why These Are the Best 10-Minute Pan Fried Noodles
You might see other “quick” noodle recipes online, but ours stands apart for several key reasons. First, we focus on fresh noodles (like refrigerated lo mein, ramen, or udon) instead of dried. This eliminates a boiling step and gives you that authentic, tender-yet-chewy texture that’s essential for proper pan-frying. Second, our sauce balance is meticulously tested. The combination of regular soy sauce for saltiness, dark soy sauce for color and depth, a hint of sugar for caramelization, and white pepper for a subtle kick creates a complex flavor profile that clings beautifully to each noodle strand. Third, we respect the technique: getting your pan screaming hot, cooking in stages, and finishing with a drizzle of sesame oil are non-negotiable steps for that coveted “wok hei” or breath of the wok flavor, even in a home kitchen. This isn’t just boiled noodles tossed in sauce; it’s a proper, quick stir-fry with texture, layers, and soul.
Ingredients & Customization Guide
Here’s your shopping list for this incredibly flexible dish. Don’t be afraid to swap and substitute based on what you have on hand.
Ingredient
Quantity
Notes & Substitutions
Fresh Noodles
10.5 oz (300g)
Key Ingredient. Look for refrigerated lo mein, chow mein, ramen, or udon noodles in the Asian aisle of your grocery store. Dried noodles can be used (cook first) but fresh is ideal.
Neutral Oil
2 tbsp
Avocado, vegetable, or canola oil. High smoke point is essential.
Garlic, minced
2 cloves
Fresh is best! Jarred minced garlic can be used in a pinch.
Green Onions
2 stalks
Separate white/light green parts (for cooking) from dark green tops (for garnish).
Bean Sprouts
1 cup
Or substitute with shredded cabbage, matchstick carrots, sliced bell peppers, or snap peas.
Soy Sauce
2 tbsp
Use low-sodium if preferred. Tamari for gluten-free.
Dark Soy Sauce
1/2 tbsp
Primarily for color & richness. Sub with 1/2 tbsp regular soy sauce + 1/4 tsp molasses.
Sugar
1/2 tbsp
White, brown, or even honey. Aids in caramelization.
White Pepper
1/8 tsp
Black pepper works fine, but white pepper is more authentic.
Water
1 tbsp
Helps the sauce distribute evenly without over-reducing too quickly.
Sesame Oil
1 tsp
Finishing oil. Add at the end for maximum aroma. Do not use for frying.
💡 The Kitchen Team’s Pro Tip: If using dried noodles, cook them until just shy of al dente (about 1 minute less than package directions). They will finish cooking in the pan. Rinse under cold water to stop the cooking process and drain very well to prevent a soggy stir-fry.
Step-by-Step Cooking Instructions
Follow these steps for perfect, non-sticky, gloriously caramelized noodles every time.
Prep Everything: In a small bowl, whisk together the soy sauce, dark soy sauce, sugar, white pepper, and 1 tbsp water until the sugar dissolves. Set your sauce aside. Separate the green onions, mince the garlic, and have your bean sprouts ready. If your fresh noodles are stuck together, rinse them briefly under warm water and toss to separate.
Heat the Pan: Place a large wok, cast-iron skillet, or non-stick pan over medium-high heat. Let it get hot for about 60 seconds. Add the neutral oil and swirl to coat.
Fry the Aromatics: Add the minced garlic and the white/light green parts of the green onions to the hot oil. Stir-fry for 30-60 seconds until incredibly fragrant but not browned.
Add the Noodles: Add the prepared fresh noodles to the pan. Using a pair of tongs or two spatulas, toss and stir to coat the noodles in the oil and mix with the aromatics. Let them sit for 30-second intervals to get a slight sear.
Pour in the Sauce: Give your sauce a quick re-stir and pour it evenly over the noodles. Immediately start tossing and stirring continuously. The sauce will bubble and reduce. Cook for 2-3 minutes, allowing the sauce to caramelize and coat every strand.
Add Veggies & Finish: Add the bean sprouts and the reserved dark green parts of the green onions. Toss for just 30-60 seconds until the veggies are slightly wilted but still crisp. Remove the pan from the heat. Drizzle the sesame oil over the top and give one final toss.
Serve Immediately: Transfer your 10-Minute Pan Fried Noodles to plates or bowls. Enjoy hot for the best texture and flavor!
Serving Suggestions & Pairings
While these noodles are a complete meal on their own, they also play wonderfully with others. For a simple protein boost, top with a soft-boiled or fried egg with a runny yolk. For a more substantial meal, serve alongside Quick Garlic Soy Chicken Thighs or 5-Spice Pan-Seared Tofu. A light, crisp side like a cucumber salad with rice vinegar balances the savory richness perfectly. If you love spice, offer chili crisp, sriracha, or sliced fresh chilies at the table. The beauty of this dish is its ability to be the star or a supporting player in your weekly meal lineup.
Storage & Reheating Instructions
Storage: Allow leftovers to cool completely. Store in an airtight container in the refrigerator for up to 3 days. The noodles will soften over time but will still taste delicious.
Reheating for Best Results: The microwave can make noodles rubbery. For best results, reheat in a pan: Add a tiny splash of water or broth to a non-stick skillet over medium heat. Add the cold noodles and cover with a lid. Let them steam for 2-3 minutes, then uncover and stir-fry for another minute to re-crisp slightly. This method revives the texture remarkably well.
Creative Variations to Try
Once you’ve mastered the base recipe, the world is your oyster (sauce)!
Protein Power: Add 1/2 lb of thinly sliced chicken breast, shrimp, or flank steak. Stir-fry the protein first until cooked through, remove from the pan, then proceed with the recipe. Add the cooked protein back in with the bean sprouts.
Vegetable Garden: Swap bean sprouts for broccoli florets, sliced mushrooms, baby corn, or water chestnuts. For harder veggies (like broccoli), blanch them for 1 minute in boiling water first.
Flavor Twists: Add 1 tsp grated ginger with the garlic. For a tangy kick, add 1 tbsp rice vinegar to the sauce. For a spicy version, add 1 tsp chili garlic sauce or a dried red chili to the oil with the garlic.
Thai-Inspired: Replace the soy sauces with 2 tbsp fish sauce and add 1 tbsp lime juice and a pinch of brown sugar. Finish with fresh cilantro and crushed peanuts.
Your Top Questions Answered (FAQ)
Can I use spaghetti or other dried pasta?
Yes, you can! Cook 8 oz of dried spaghetti or linguine to al dente. Drain, rinse with cold water, and toss with 1 tsp of oil to prevent sticking before adding to the pan. The texture will be different but still tasty.
My noodles keep sticking to the pan! What am I doing wrong?
Sticking is usually due to one of three things: 1) The pan isn’t hot enough before adding the oil and noodles. 2) You’re not using enough oil. 3) You’re stirring too infrequently in the beginning. Ensure a hot pan, adequate oil, and keep those noodles moving!
Is dark soy sauce absolutely necessary?
It’s highly recommended for its unique color and malty flavor, but not a deal-breaker. The substitution (regular soy sauce + a tiny bit of molasses) works well in a pinch.
Can I make this gluten-free?
Absolutely. Use 100% buckwheat soba noodles or rice noodles, and substitute the soy sauces with tamari (ensure it’s gluten-free) or a certified gluten-free soy sauce alternative.
Can I double or triple this recipe?
You can, but cook in batches for the best results. Overcrowding the pan steams the noodles instead of frying them, leading to a mushy texture. Cook one batch, remove it, then cook the next.
What’s the best type of pan to use?
A carbon steel wok is ideal, followed by a cast-iron skillet or a large, heavy-bottomed non-stick frying pan. The key is a pan that holds heat well and has plenty of surface area.
Can I add the sesame oil at the beginning with the other oil?
Please don’t! Sesame oil has a low smoke point and burns easily, becoming bitter. It’s a finishing oil meant to be drizzled on at the end to preserve its delicate, nutty aroma.
How can I make this recipe vegan?
It’s almost there! Just ensure your noodles don’t contain egg (many fresh Asian noodles are egg-free, but check the label) and use the sugar or maple syrup option. The sauce is already plant-based.
Made This Recipe? Share the Love!
If this 10-Minute Pan Fried Noodles recipe saved your weeknight, we’d be thrilled to see your creation! Tag us on social media @cookingwithemy or use the hashtag #CookingWithEmy. Your feedback makes our day and inspires future recipes!
📌 Love This Recipe? Save It For Later!
Pin the image below to your Quick Dinners or Asian Recipes board on Pinterest to always have this lifesaver recipe handy. Follow Cooking With Emy on Pinterest for more easy, flavor-packed ideas!
Recommended Pinterest Image Description: “10-Minute Pan Fried Noodles – The ultimate easy weeknight dinner! Savory, caramelized, and made in one pan. Faster than takeout!”
These quick & easy pan fried noodles are made with a handful of ingredients in a single pan, making it the perfect meal to add to your dinner rotation. Tossed in a savory sauce and aromatic vegetables, these stir-fried noodles are packed with flavor and can easily be customized to your liking.
Ingredients
Scale
300 g fresh noodles (see notes below)
2 tbsp neutral oil
2 cloves garlic (minced)
2 green onions (cut lengthwise in 2″ pieces)
1 cup bean sprouts (or other vegetables)
1 tsp sesame oil (to finish)
2 tbsp soy sauce
1/2 tbsp dark soy sauce
1/2 tbsp sugar
1/8 tsp white pepper (or black pepper)
1 tbsp water
Instructions
Combine the sauce ingredients in a bowl and prepare the noodles as per package instructions. Rinse the noodles under cold water, drain, and set aside.
Heat oil in a wok or a large pan over medium heat. Add garlic and white parts of green onion and cook until fragrant. Add noodles and mix to combine.
Pour in the sauce and cook for about 2-3 minutes until the noodles are caramelized. Add bean sprouts, reserved green onion, and sesame oil to finish. Enjoy!
The Ultimate Japanese Katsu Bowls with Tonkatsu Sauce: Crispy, Savory, & Unforgettable
Prep Time 20 minutes
Cook Time 15 minutes
Total Time 35 minutes
Servings 2 bowls
Difficulty Easy
The Ultimate Comfort Food Awaits
Imagine the perfect bite: a shatteringly crisp, golden-brown cutlet, its juicy interior giving way to a bed of steaming, fluffy rice, all brought together by a rich, savory-sweet tonkatsu sauce that dances on your palate. This is the magic of Japanese Katsu Bowls, a dish that transforms simple ingredients into a symphony of texture and flavor that feels both indulgent and comforting. At Cooking With Emy, we believe the best meals are those that transport you, and this recipe is your first-class ticket to a bustling Tokyo tonkatsu-ya (pork cutlet shop) or a cozy Kyoto kitchen.
More than just “fried meat on rice,” a proper katsu bowl (katsudon can refer to a specific egg-topped version, but the bowl concept is widely loved) is a study in contrasts. It’s a dish where meticulous preparation meets ultimate satisfaction. While it may seem like restaurant fare, we’re here to prove that creating authentic, incredibly delicious Japanese Katsu Bowls with Tonkatsu Sauce at home is not only possible but surprisingly straightforward. With our tested method and pro tips, you’ll achieve that signature crunch and complex sauce flavor that will have everyone asking for seconds.
Why This Is The Best Katsu Bowl Recipe You’ll Find
What sets this recipe apart? It’s built on the foundational techniques used in Japanese kitchens, adapted for the home cook without any compromise on quality. First, we focus on the texture of the panko crust. Many recipes don’t emphasize the crucial step of properly toasting or frying the panko for maximum crunch and color. Our method ensures a light, airy, and deeply golden crust that stays crispy even when sauced. Second, we demystify the tonkatsu sauce. While store-bought is perfectly fine, our simple homemade version balances sweet, tangy, and umami in a way that outshines most bottled brands, using pantry staples you likely already have.
Furthermore, we provide the flexibility to use chicken or pork, with precise cooking times for each, so your protein is always perfectly cooked—never dry, never greasy. The assembly of the bowl is also key; it’s not just dumping components together. The order and technique matter for the optimal eating experience. This recipe is the culmination of testing and passion, designed to deliver a result that is truly worthy of being called “the ultimate.”
Gathering Your Ingredients
Quality ingredients lead to an exceptional dish. Here’s what you’ll need to create these iconic bowls. The beauty lies in the simplicity of the list.
Ingredient
Quantity
Notes
Boneless Chicken Breasts or Pork Loin Cutlets
2 (about 6 oz each)
Pounded to an even ½-inch thickness. Pork is traditional for tonkatsu, but chicken (chicken katsu) is a fantastic alternative.
Panko Breadcrumbs
1 cup
Must be panko. Their large, flaky texture creates the signature airy crunch. Regular breadcrumbs will not yield the same result.
All-Purpose Flour
½ cup
For the initial dredge. It helps the egg wash adhere.
Large Eggs
2
Beaten well. This is the “glue” for the panko.
Cooked White Rice
3 cups
Short-grain sushi rice is preferred for its sticky, fluffy texture. Jasmine rice works in a pinch.
Neutral Oil for Frying
About 1-1.5 cups
Vegetable, canola, or peanut oil. You need enough for shallow frying, about ½-inch deep in your pan.
Salt & Black Pepper
To taste
For seasoning the meat.
For Homemade Tonkatsu Sauce (or use ½ cup store-bought):
Ketchup
3 tbsp
Provides sweetness and body.
Worcestershire Sauce
2 tbsp
The umami backbone. Use a good brand.
Soy Sauce
1 tbsp
Adds depth and saltiness. Use low-sodium if preferred.
💡 The Kitchen Team’s Pro Tip: For an extra-crispy and flavorful crust, toast your panko breadcrumbs in a dry skillet over medium heat for 3-4 minutes until lightly golden before using them for breading. This removes moisture and deepens their color and nutty flavor, preventing them from absorbing as much oil during frying.
Step-by-Step Cooking Instructions
Follow these steps carefully for a foolproof, restaurant-quality result. Mise en place (having everything prepared) is your best friend here.
1
Prepare the Protein
Place your chicken breasts or pork cutlets between two sheets of plastic wrap. Using a meat mallet, rolling pin, or even a heavy skillet, pound them to an even ½-inch thickness. This ensures quick, even cooking and maximizes the surface area for that delicious crust. Season both sides generously with salt and pepper.
2
Set Up Your Breading Station
Get three shallow bowls or plates. In the first, place the all-purpose flour. In the second, beat the two eggs until uniform. In the third, place the panko breadcrumbs. This assembly line is crucial for a clean, efficient breading process.
3
Bread the Cutlets
Working with one cutlet at a time, dredge it thoroughly in the flour, shaking off any excess. Next, dip it into the beaten egg, coating it completely and allowing the excess to drip off. Finally, place it in the panko breadcrumbs, pressing down gently and sprinkling crumbs over the top to ensure a complete, even coating. Transfer the breaded cutlet to a clean plate and repeat with the remaining cutlet.
4
Heat the Oil & Fry
Pour oil into a large, heavy-bottomed skillet (cast iron is ideal) to a depth of about ½ inch. Heat over medium-high heat until it reaches approximately 350°F (175°C). You can test it by dropping a small panko crumb in; it should sizzle vigorously. Carefully place the breaded cutlets in the hot oil. Do not overcrowd the pan; fry in batches if necessary. Fry chicken for 3-4 minutes per side, or pork for 2-3 minutes per side, until deeply golden brown and cooked through. The internal temperature should reach 165°F for chicken and 145°F for pork.
5
Drain & Rest
Transfer the fried cutlets to a wire rack set over a baking sheet or a plate lined with paper towels. This allows air to circulate and keeps the bottom from getting soggy. Let them rest for 2-3 minutes before slicing. This rest period lets the juices redistribute.
6
Make the Tonkatsu Sauce (If Homemade)
While the cutlets rest, whisk together the ketchup, Worcestershire sauce, soy sauce, and sugar in a small bowl until the sugar is dissolved. Taste and adjust sweetness or saltiness to your preference. For a smoother sauce, you can let it sit for 10 minutes to allow the flavors to meld.
7
Slice & Assemble the Bowls
Slice the rested katsu cutlets against the grain into 1-inch wide strips. Divide the warm, cooked rice between two bowls. Arrange the sliced katsu over the rice. Drizzle generously with the tonkatsu sauce. Garnish with your chosen toppings like green onions or sesame seeds.
💡 The Kitchen Team’s Pro Tip: For perfectly sliced katsu that doesn’t crush the crispy crust, use a sharp chef’s knife or serrated bread knife and a gentle sawing motion. Slice just before serving to maintain maximum crunch in every piece.
Serving & Presentation
Presentation is part of the joy of Japanese cuisine. Serve your katsu bowls immediately while the cutlets are hot and crisp. Alongside the bowl, traditional accompaniments include a small mound of finely shredded cabbage (which acts as a refreshing, crisp counterpoint), a wedge of lemon to squeeze over for brightness, and a small dish of extra tonkatsu sauce for dipping. For a more complete meal, consider starting with a simple miso soup or serving with a side of Japanese-style potato salad or pickled vegetables (tsukemono).
Storage & Reheating Tips
Storage: Store leftover components separately for best results. Place cooled, unsliced katsu cutlets in an airtight container in the refrigerator for up to 3 days. Store rice and sauce in separate containers.
Reheating for Best Crispness: The oven or air fryer is your friend. To reheat katsu, preheat your oven or air fryer to 375°F (190°C). Place the cutlets on a wire rack (to allow air flow) and heat for 8-12 minutes, or until hot and re-crisped. Avoid the microwave, as it will steam the crust and make it soggy. Reheat rice separately with a sprinkle of water, covered, in the microwave.
Delicious Recipe Variations
The katsu bowl is wonderfully adaptable. Here are some popular twists:
Katsu Curry Bowl (Katsu Karē): Instead of tonkatsu sauce, smother the katsu and rice with a rich, thick Japanese curry sauce.
Katsudon: After frying, simmer the sliced katsu in a mixture of dashi, soy, mirin, and sugar, then pour a beaten egg over the top. Cover until the egg is softly set, then serve over rice.
Cheese Katsu: Insert a slice of melty cheese (like mozzarella or gouda) into a pocket in the pork cutlet before breading and frying.
Vegetable Katsu: Use thick slices of sweet potato, eggplant, or even cauliflower steaks as the main component for a vegetarian version.
Different Proteins: Try this with turkey cutlets or even firm tofu (pressed well) using the same method.
Your Katsu Questions Answered (FAQ)
Question
Answer
Can I bake the katsu instead of frying?
Yes, for a lighter version. Place breaded cutlets on a wire rack over a baking sheet, spray generously with oil, and bake at 425°F (220°C) for 15-20 minutes, flipping halfway, until golden and cooked. The crust will be slightly less shatteringly crisp than fried but still delicious.
What’s the best substitute for panko?
There is no perfect 1:1 substitute. In a pinch, you can pulse regular breadcrumbs in a food processor to make them finer, but they will be denser. Crushed cornflakes or unsweetened cereal can provide crunch but offer a different flavor.
Can I make this gluten-free?
Absolutely. Use gluten-free all-purpose flour for dredging and certified gluten-free panko breadcrumbs (available at many stores). For the sauce, ensure your soy sauce, Worcestershire sauce, and ketchup are gluten-free brands, or use tamari instead of soy sauce.
How do I know when my oil is hot enough?
The ideal temperature is 350°F (175°C). Use a deep-fry or instant-read thermometer for accuracy. Without one, the “wooden chopstick test” works: dip the end of a wooden chopstick or spoon handle into the oil. If steady, vigorous bubbles form around it immediately, the oil is ready.
Why is my crust falling off?
This usually happens due to excess moisture or improper breading order. Ensure the cutlet is dry before flouring, shake off excess flour, let the excess egg drip off, and press the panko firmly onto the surface. Also, don’t move the cutlet in the oil for the first minute of frying to let the crust set.
Can I use an air fryer?
Yes! Spray the breaded cutlets liberally with oil on both sides. Air fry at 400°F (200°C) for 10-12 minutes, flipping halfway, until golden and cooked through. Results are excellent and much lower in oil.
What’s the difference between tonkatsu sauce and Worcestershire?
Tonkatsu sauce is a thicker, sweeter, fruitier, and more complex condiment that contains Worcestershire sauce as a base ingredient, along with fruits, vegetables, and spices. Worcestershire sauce alone is thinner, tangier, and less sweet.
How can I make the sauce spicier?
Add a pinch of cayenne pepper, a few drops of Sriracha, or a small amount of grated fresh ginger to the homemade sauce mixture.
Can I prepare the cutlets ahead of time?
You can bread the cutlets and refrigerate them on a parchment-lined tray, uncovered, for up to 2 hours before frying. This can actually help the coating set. For longer, freeze the breaded, uncooked cutlets on the tray, then transfer to a freezer bag for up to a month. Fry from frozen, adding a couple extra minutes per side.
Is this dish considered healthy?
As a fried dish, it’s an indulgent treat. You can make it healthier by using the baking or air frying method, choosing lean chicken breast, serving with a large portion of shredded cabbage or a side salad, and being mindful of the amount of sauce used.
We hope you love creating these Ultimate Japanese Katsu Bowls as much as we do! It’s a dish that’s sure to become a regular in your dinner rotation.
Love This Recipe? Save It For Later!
Pin this image to your Dinner Ideas or Japanese Food board on Pinterest to always have this ultimate guide handy.
Japanese Katsu Bowls with Tonkatsu Sauce are the ultimate comfort food, combining crispy, golden cutlets with fluffy rice and a savory-sweet sauce. This simple yet flavorful recipe is perfect for a quick weeknight dinner or an indulgent treat that feels like dining out.
Ingredients
Scale
2 boneless chicken breasts or pork loin cutlets (pounded to ½-inch thickness)
1 cup panko breadcrumbs
½ cup all-purpose flour
2 large eggs (beaten)
3 cups cooked white rice (sushi rice preferred)
½ cup tonkatsu sauce (store-bought or homemade*)
Oil for frying (vegetable or canola)
Fresh parsley or green onion for garnish (optional)
3 tbsp ketchup
2 tbsp Worcestershire sauce
1 tbsp soy sauce
1 tsp sugar
Instructions
Pound chicken to ½-inch thickness and season with salt and pepper.
Set up a breading station with three bowls: one for flour, one for beaten eggs, and one for panko breadcrumbs.
Coat each cutlet in flour, then dip in egg, and finally coat with panko breadcrumbs, pressing gently to adhere.
Heat oil in a large frying pan over medium-high heat to about 350°F (175°C).
Fry the cutlets for 3-4 minutes per side (for chicken) or 2-3 minutes per side (for pork) until golden and cooked through. Transfer to a paper towel-lined plate.
If making homemade tonkatsu sauce, mix ketchup, Worcestershire sauce, soy sauce, and sugar in a small bowl. Adjust sweetness to taste.
Assemble bowls by adding cooked rice, sliced cutlets, and a generous drizzle of tonkatsu sauce. Garnish with parsley or green onions, if desired. Serve immediately.
Golden Steak Fried Rice: The Ultimate Restaurant-Quality Dinner in 30 Minutes
Imagine the sizzle of a hot wok, the rich, savory aroma of seared steak mingling with garlic and soy sauce, and the sight of every single grain of rice gleaming with a perfect golden hue. This isn’t takeout—this is your kitchen on a weeknight. Welcome to the definitive guide for making the most incredible Golden Steak Fried Rice, a dish that masterfully blends the luxurious tenderness of steak with the comforting, crave-worthy magic of perfect fried rice. We’re not just tossing leftovers together; we’re engineering flavor and texture for a result that will make you forget your favorite Chinese restaurant. This recipe is your ticket to a quick, impressive, and deeply satisfying meal that feels like a celebration.
Prep Time15 minutes
Cook Time15 minutes
Total Time30 minutes
Servings4 people
DifficultyEasy
What Makes This The Best Golden Steak Fried Rice Recipe
Most fried rice recipes are an afterthought, a vehicle for leftovers. This recipe is the main event. The “golden” in the name isn’t just for show—it comes from a brilliant technique of coating cold rice in egg yolk before it hits the wok. This ensures each grain is separately gilded, flavorful, and never clumpy. Combined with our steak marinating method that uses a touch of baking soda for unbelievable tenderness, this recipe is built on professional kitchen secrets. We balance deep umami from oyster sauce, the salty punch of soy, the richness of butter, and the fresh bite of green onion. It’s a symphony of textures: tender beef, fluffy yet distinct rice, soft scrambled egg whites, and a slight crunch. This isn’t just another fried rice; it’s a masterclass in home cooking that delivers maximum impact with minimal, straightforward effort.
Golden Steak Fried Rice Ingredients & Why They Matter
Great dishes start with great ingredients and an understanding of their role. Here’s everything you’ll need, precisely measured for flawless results.
Ingredient
Quantity
Purpose & Notes
Steak (e.g., Sirloin, Ribeye)
12 oz (two 6 oz steaks)
Cut into cubes. Provides the hearty, protein-rich centerpiece. A well-marbled cut adds more flavor.
Soy Sauce (divided)
4.5 tbsp total
2 tbsp for marinade, 2.5 tbsp for cooking. The foundational salty, umami flavor. Use low-sodium if preferred.
Oyster Sauce
1.5 tbsp
Adds a deep, savory-sweet umami complexity that is essential to the dish’s profile.
Black Pepper
1 tsp
Freshly ground is best. Adds a sharp, aromatic heat to the steak marinade.
Baking Soda
1/2 tsp
The secret tenderizer. It raises the pH of the meat, helping it retain juices and become incredibly tender during quick cooking.
Baking Powder (optional)
1/2 tsp
Can promote additional browning and a slight crisp on the steak edges.
Cold Cooked Rice
4 cups
MUST be day-old and cold. Dried-out rice fries beautifully without turning to mush. Jasmine or medium-grain rice works perfectly.
Large Eggs
4
Separated. The yolks create the “golden” rice; the whites are scrambled separately for texture.
Unsalted Butter
2 tbsp
Added at the end for a rich, glossy finish and a nutty aroma that oil alone can’t provide.
Green Onions
3 stalks
Whites and greens separated. Whites sauté for aromatic base; fresh greens add color and fresh onion flavor as a garnish.
Garlic, minced
1.5 tbsp
The aromatic soul of the dish. Don’t skimp!
Neutral Oil (e.g., avocado, canola)
For cooking
Has a high smoke point, perfect for searing steak and stir-frying on high heat.
💡 The Kitchen Team’s Pro Tip: The single most important ingredient for success is cold, day-old rice. Freshly cooked rice is too moist and steamy, causing it to clump and become mushy in the wok. Plan ahead by cooking your rice the night before, or spread fresh rice on a baking sheet and chill it in the fridge for a few hours to dry it out.
Step-by-Step Instructions for Perfect Golden Steak Fried Rice
Step 1: Prepare & Marinate the Steak
Cut your steaks into uniform, bite-sized cubes, about 3/4-inch thick. In a bowl, combine the steak cubes with 2 tablespoons of soy sauce, 1.5 tablespoons of oyster sauce, 1 teaspoon of black pepper, 1/2 teaspoon of baking soda, and the optional 1/2 teaspoon of baking powder. Mix thoroughly until every piece is coated. Let this marinate on the counter while you prep the other ingredients (15-20 minutes). The baking soda will start working its tenderizing magic.
Step 2: Create the Golden Rice
This is the signature technique! Place your 4 cups of cold, day-old rice in a large bowl. Separate your 4 eggs. Add only the egg yolks to the rice. Using your hands, a spatula, or two forks, mix and mash vigorously until every single grain of rice is evenly coated in the bright yellow yolk. This will look like a bowl of yellow rice—that’s exactly what you want. Set aside. In a separate small bowl, lightly beat the 4 egg whites and set them aside as well.
Step 3: Cook the Steak to Perfection
Heat a large wok, cast-iron skillet, or non-stick pan over medium-high heat until very hot. Add 1-2 tablespoons of neutral oil. Carefully add the marinated steak cubes in a single layer, letting them sear undisturbed for about 30 seconds to form a crust. Then, stir-fry for 3-4 minutes total, until the steak is browned on all sides and cooked to your desired doneness (3-4 minutes for medium). Remove the steak with a slotted spoon and set it aside on a plate, leaving the flavorful drippings in the pan.
Step 4: Build the Fried Rice Base
In the same hot pan with the steak drippings, add the chopped white parts of the green onions and the minced garlic. Stir-fry for just 30 seconds until fragrant—be careful not to burn the garlic. Push the aromatics to one side of the pan. Pour the beaten egg whites into the cleared space. Let them set for about 20 seconds, then scramble them gently until just cooked through.
Step 5: The Grand Finale: Fry the Rice
Now, increase the heat to high. Add the yolk-coated rice and the remaining 2.5 tablespoons of soy sauce to the pan. Using a sturdy spatula, press, toss, and stir-fry the rice continuously for 2-3 minutes. You want to hear a slight sizzling sound as the rice heats through and dries out further. Break up any clumps. Add the cooked steak back into the wok and toss to combine and reheat the steak, about 1 minute.
Step 6: Finish with Butter & Garnish
Turn off the heat. Add the 2 tablespoons of cold butter and the chopped green onion greens. Toss everything until the butter is fully melted and coats the rice, creating a luxurious, glossy sheen. Taste and adjust seasoning with an extra dash of soy sauce if needed.
💡 The Kitchen Team’s Pro Tip: For authentic “wok hei” (the breath of the wok), don’t overcrowd the pan. If your skillet is smaller, cook in two batches. The high heat is crucial for evaporating moisture and creating that slightly smoky, restaurant-quality flavor.
How to Serve Your Golden Steak Fried Rice
Serve this glorious fried rice immediately while it’s piping hot and sizzling. Portion it into deep bowls. For a beautiful presentation, you can press it into a small bowl and invert it onto a plate for a dome shape. A final sprinkle of extra green onions or a drizzle of sesame oil adds a nice touch. This dish is a complete meal on its own, packed with protein, carbs, and veggies. For a fuller spread, pair it with simple sides like a quick cucumber salad, steamed broccoli, or egg drop soup. It’s the ultimate fast, fancy, and fulfilling dinner.
Storage & Reheating Instructions
Storage: Allow any leftovers to cool completely. Transfer to an airtight container and refrigerate for up to 3-4 days.
Reheating for Best Results: The microwave can make fried rice soggy. To restore its texture, reheat it in a wok or skillet over medium-high heat. A splash of water or broth can help steam and reheat it evenly. You can also spread it on a baking sheet and reheat in a 350°F oven for 10-15 minutes, stirring once. We do not recommend freezing, as the rice texture can become grainy and the steak tough upon thawing.
Delicious Variations to Try
The beauty of this recipe is its adaptability. Don’t be afraid to make it your own!
Spicy Kick: Add 1-2 teaspoons of chili-garlic sauce or Sriracha to the marinade or when you add the soy sauce to the rice.
Vegetable Boost: Stir-fry 1 cup of diced carrots, peas, or bell peppers with the green onion whites for added color and nutrition.
Different Protein: Swap the steak for chicken thighs, shrimp, or even cubed firm tofu (adjust cooking times accordingly).
Pineapple Fried Rice: Add 1 cup of diced fresh pineapple in the final 2 minutes of cooking for a sweet and savory tropical twist.
Kimchi Fried Rice: Replace the oyster sauce with 1/2 cup of chopped kimchi and a tablespoon of its juice for a tangy, fermented flavor.
Frequently Asked Questions (FAQ)
1. Can I use freshly cooked rice?
We strongly advise against it. Fresh rice contains too much moisture and will steam and clump in the wok, resulting in a mushy, gummy texture. The cold, dried-out grains of day-old rice are essential for achieving that perfect, separate, fried texture.
2. What’s the best cut of steak to use?
You want a cut that’s flavorful and tender when cooked quickly. Sirloin, ribeye, flank steak, or skirt steak are all excellent choices. If using a tougher cut like flank, be sure to slice it thinly against the grain.
3. Is the baking soda necessary?
It is highly recommended for incredibly tender steak, especially with leaner cuts. It’s a common restaurant technique. If you’re sensitive to its slight taste, you can rinse the marinated steak briefly under cold water before cooking, though you’ll lose some seasoning.
4. Can I make this gluten-free?
Absolutely! Use tamari or a certified gluten-free soy sauce in place of regular soy sauce, and ensure your oyster sauce is a gluten-free brand (or substitute with more tamari and a pinch of sugar).
5. Why separate the egg yolks and whites?
This two-part technique maximizes texture. Coating the rice in yolk gives it that uniform golden color and rich flavor. Adding the scrambled egg whites separately provides distinct, fluffy curds throughout the rice, creating a more interesting mouthfeel.
6. My rice is sticking to the pan. What did I do wrong?
This usually means the pan wasn’t hot enough, or there wasn’t enough fat. Ensure your wok is properly preheated before adding the rice. Don’t be shy with the initial oil for the steak, as those drippings also help prevent sticking.
7. Can I prep any parts ahead of time?
Yes! You can marinate the steak (up to 2 hours in the fridge), cook the rice a day ahead, separate your eggs, and chop your aromatics. When ready to eat, the actual stir-fry comes together in under 10 minutes.
8. What can I use instead of oyster sauce?
If you don’t have oyster sauce, you can use an equal amount of hoisin sauce (it’s sweeter) or a combination of extra soy sauce with a 1/4 teaspoon of sugar to mimic the sweet umami.
We hope you love this Golden Steak Fried Rice as much as we do! It’s a testament to how a few smart techniques can transform simple ingredients into something extraordinary. If you make it, be sure to share your creation with us!
Love this Recipe? Save it for Later!
Pin the image below to your Dinner Ideas or Asian Recipes board on Pinterest to keep this amazing Golden Steak Fried Rice recipe handy anytime you need a quick, impressive meal.
Follow us on Pinterest:@cookingwithemy for more delicious inspiration!
Click the ‘Save’ button on the image above or share this page with a friend who needs a great dinner idea!
One dish that never fails to deliver on both flavor and satisfaction is the glorious Golden Steak Fried Rice. There’s something comforting about a sizzling wok, the aroma of savory ingredients dancing in the air.
Ingredients
Scale
2 Steak (6 oz each, cube)
2 tablespoon Soy Sauce
1.5 tablespoon Oyster Sauce
1 tsp Black Pepper
0.5 tsp baking soda
0.5 tsp baking powder (optional)
4 Cups Cold Cooked Rice
4 Eggs (separate yolks and whites)
2 tbsp Butter
3 Green Onion (separate whites and greens)
1.5 tbsp Garlic (minced)
2.5 tbsp Soy Sauce
Instructions
Cut steak into bite-size cubes and marinate the steak with soy sauce, oyster sauce, black pepper, baking soda, and baking powder. Set it aside while you prep the rest of the ingredients.
Add the egg yolk to cold-cooked day-old rice and mix well to ensure every grain of rice is coated in the egg yolk.
In a pan, drizzle in oil and turn the heat to medium-high. Once the oil is hot, add in the beef.
Let it set for around 30 seconds before pan-frying for 3-4 minutes or until all sides of the steak are brown. You can add additional cooking time depending on how you like your steak! Remove and set aside.
In the same pan, add the white parts of the green onion and garlic. Saute for 30 seconds.
Push everything to the side, and add beaten egg whites. Let the egg whites sit for 20 seconds before scrambling them.
Next, add the rice and soy sauce. Saute on high heat for 2-3 minutes.
Finally, add butter, the rest of the green onion, steak, and saute on high heat for 1-2 minutes.
Cajun Sausage and Rice Skillet (One-Pan Dinner in 30 minutes!)
Table of Contents: Your Guide to a Perfect Skillet
The Ultimate 30-Minute Cajun Sausage and Rice Skillet: A One-Pan Flavor Explosion
If you’re searching for a dinner that delivers maximum flavor with minimal cleanup, you’ve hit the jackpot. This Cajun Sausage and Rice Skillet is more than just a recipe; it’s your secret weapon for busy nights. Imagine smoky, spiced sausage, tender rice, and crisp bell peppers all mingling in a single pan, ready in under 30 minutes. At Cooking With Emy, we believe weeknight dinners shouldn’t be a compromise, and this dish is proof. It’s hearty, customizable, and so incredibly satisfying that it’s guaranteed to earn a permanent spot in your dinner rotation. Let’s dive in and transform a few simple ingredients into a spectacular one-pan meal.
Prep Time 10 minutes
Cook Time 20 minutes
Total Time 30 minutes
Servings 4 people
Difficulty Easy
Welcome to the kind of dinner that solves problems. You’re tired, the family is hungry, and the sink is already full. This Cajun Sausage and Rice Skillet is the answer. It’s a complete meal built on the holy trinity of Cajun cooking—onions, bell peppers, and celery (we use a clever swap)—infused with garlic, smoked sausage, and bold seasoning. The magic happens in one skillet: the rice cooks directly in the flavorful broth, absorbing every drop of deliciousness. No boiling pots, no extra gadgets. Just one pan from stovetop to table. It’s the epitome of “set it and forget it” cooking, but with a result that tastes like you spent hours in the kitchen.
Why This is The Absolute Best Cajun Sausage & Rice Skillet Recipe
You might find other one-pan rice dishes, but this recipe stands apart. First, we focus on layering flavors. Browning the sausage first isn’t just about cooking it through; it’s about rendering those smoky fats into the pan to become the cooking base for your vegetables and rice. This creates a depth of flavor that you simply can’t achieve by throwing everything in at once.
Second, we insist on rinsing the rice. This crucial step removes excess surface starch, preventing your skillet from turning into a gummy, sticky mess. Instead, you get perfectly separate, tender grains. Third, our balance of seasoning is key. Using a robust homemade or high-quality store-bought Cajun blend ensures authentic heat and complexity without overpowering the other ingredients.
💡 The Kitchen Team’s Pro Tip: For an even deeper flavor, take an extra minute to get a really good sear on your sausage slices. Don’t crowd the pan! Let them sit undisturbed for a minute or two to develop a caramelized, crispy crust. Those browned bits (fond) left in the pan are liquid gold for flavor.
Ingredients for Cajun Sausage and Rice Skillet & Smart Swaps
This recipe’s beauty lies in its simplicity and flexibility. Here’s exactly what you need, along with our tested substitutions for every dietary need or pantry shortage.
Ingredient
Quantity
Purpose & Best Substitutes
Smoked Sausage (Andouille or Kielbasa)
12 oz
Provides smoky, savory base flavor. Use chicken sausage, smoked turkey sausage, or plant-based smoked sausage for lighter options.
Long-Grain White Rice (like Jasmine or Basmati)
1 cup
The hearty base. Rinse well! Can substitute with long-grain brown rice (add ½ cup extra broth and 10 mins cook time).
Bell Peppers (Red & Green)
1 of each, diced
Adds sweetness, color, and crunch. Use any color combo (orange, yellow) or add 1 diced celery stalk for classic “trinity.”
Yellow Onion
1 medium, diced
Aromatic base. White onion or a large shallot works in a pinch.
Garlic
3 cloves, minced
Essential for depth. ¾ tsp garlic powder can substitute in an emergency.
Chicken Broth
1 ½ cups
Cooking liquid for the rice. Vegetable broth, beef broth, or even water with 1 bouillon cube works.
Cajun Seasoning
2 tbsp
The flavor heart. Use store-bought or see our homemade blend in the FAQ.
Olive Oil
1 tbsp
For sautéing. Any neutral oil like avocado or canola oil is fine.
Salt & Black Pepper
To taste
For final seasoning. Remember, broth and seasoning may already contain salt.
Garnishes (Parsley, Green Onion, Hot Sauce)
Optional
Freshness and extra heat. Cilantro, a squeeze of lime, or a dollop of sour cream are also fantastic.
Step-by-Step Instructions for Perfect One-Pan Rice
Follow these simple steps for a foolproof skillet every single time. We’ve broken it down to ensure success, even if you’re new to one-pan cooking.
Step 1: Prep Like a Pro (10 minutes)
Gather all your ingredients. This “mise en place” is crucial for fast, seamless cooking. Slice the sausage into ½-inch rounds. Dice the bell peppers and onion into uniform pieces so they cook evenly. Mince the garlic. Now, rinse the rice in a fine-mesh strainer under cold running water for 1-2 minutes, until the water runs clear. This step is non-negotiable for perfect texture.
💡 The Kitchen Team’s Pro Tip: To dice an onion without tears, cut it in half from root to tip, leaving the root end intact. Make horizontal and vertical slices, then chop across. The root holds it together until the final cuts.
Step 2: Brown the Sausage (5-7 minutes)
Heat the olive oil in a large, deep skillet or Dutch oven over medium heat. Add the sausage slices in a single layer. Cook without moving for 2-3 minutes to get a good sear, then flip and cook for another 3-4 minutes until browned and crispy on the edges. Using a slotted spoon, transfer the sausage to a clean plate, leaving the flavorful oil and browned bits in the pan.
Step 3: Sauté the Vegetables (4-5 minutes)
In the same skillet with the sausage drippings, add the diced onion and bell peppers. Sauté, stirring occasionally, for about 3-4 minutes until they begin to soften and the onions turn translucent. Add the minced garlic and cook for just 1 more minute until incredibly fragrant. Be careful not to burn the garlic.
Step 4: Toast the Rice & Season (2 minutes)
Add the rinsed and drained rice to the skillet. Stir constantly for 1-2 minutes, coating each grain in the oil and toasting it slightly. This gives the rice a nutty flavor and helps it stay separate. Now, sprinkle the entire 2 tablespoons of Cajun seasoning over the rice and veggie mixture. Stir for another 30 seconds to “bloom” the spices in the heat.
Step 5: Simmer to Perfection (15-18 minutes)
Pour in the chicken broth and give everything a good stir, scraping up any browned bits from the bottom of the pan. Bring the liquid to a lively simmer. Once bubbling, reduce the heat to low, cover the skillet tightly with a lid, and let it cook undisturbed for 15 minutes. Do NOT peek! This lets the steam build up to cook the rice evenly.
Step 6: The Final Fluff & Serve (2 minutes)
After 15 minutes, remove the skillet from the heat. Keep it covered and let it rest for 5 minutes. This resting time is key—it allows the rice to finish steaming and absorb any last bit of liquid. Then, remove the lid, add the browned sausage back in, and fluff everything together with a fork. Taste and adjust seasoning with salt and pepper if needed. Garnish with fresh parsley or green onions and serve immediately with hot sauce on the side.
Serving Suggestions: How to Turn This Skillet into a Feast
This skillet is a complete meal on its own, but with a few simple sides, you can elevate it to a restaurant-worthy dinner.
With a Fresh Salad: A simple, crisp green salad with a tangy vinaigrette cuts through the richness of the dish perfectly. Try our Easy Lemon-Herb Salad.
With Cornbread: It’s a classic Southern pairing! A slice of sweet, buttery cornbread is ideal for soaking up any extra flavorful bits.
With Creamy Coleslaw: The cool, creamy crunch of coleslaw provides a wonderful textural and temperature contrast.
Topped with a Fried Egg: For an incredible brunch or breakfast-for-dinner twist, top each serving with a sunny-side-up egg. The runny yolk creates a luxurious sauce.
With Steamed Green Veggies: For extra nutrition, serve alongside simple steamed broccoli, green beans, or asparagus.
Storage, Reheating & Meal Prep Instructions
This dish is a champion for leftovers and meal prep.
Storage: Let the skillet cool completely. Transfer to an airtight container and refrigerate for up to 4 days.
Freezing: This dish freezes remarkably well. Portion into freezer-safe containers or bags, removing as much air as possible. Freeze for up to 3 months. Thaw overnight in the refrigerator before reheating.
Reheating (The Right Way): To restore moisture, reheat gently. Add a tablespoon of broth or water to a portion in a skillet over medium-low heat. Cover and heat, stirring occasionally, until piping hot. You can also microwave in a covered dish with a splash of water, stirring halfway through.
Meal Prep: This is a perfect Sunday prep meal. Cook the entire recipe, divide into 4 single-serving containers, and refrigerate. You’ve got lunches or dinners ready to grab and go all week.
💡 The Kitchen Team’s Pro Tip: When reheating, a quick refresh of seasoning can work wonders. A tiny pinch of salt or a dash of fresh Cajun seasoning sprinkled over the top after reheating wakes all the flavors right up.
7 Delicious Variations to Keep It Exciting
Once you’ve mastered the base recipe, make it your own with these crowd-pleasing twists:
Jambalaya-Style: Add ½ lb of peeled raw shrimp or diced chicken breast in the last 5 minutes of cooking.
Cheesy Cajun Skillet: Stir in 1 cup of shredded pepper jack or cheddar cheese during the final fluff until melted and gooey.
Creole Version: Add a 14.5 oz can of diced tomatoes (undrained) with the broth for a tangier, Creole-inspired dish.
Spicy “Dirty” Rice: Add ½ lb of ground beef or turkey with the vegetables, browning it before adding the rice.
Vegetarian Power Skillet: Omit sausage. Use vegetable broth and add a can of drained black beans or red kidney beans with the rice.
Spanish Chorizo Twist: Swap Andouille for Spanish chorizo (the cured, hard kind) and use smoked paprika in your seasoning for a different smoky profile.
Low-Carb “Cauli-Rice” Version: Replace the white rice with 4 cups of fresh or frozen riced cauliflower. Sauté it with the veggies, then add just ¼ cup of broth and cook covered for 5-7 minutes until tender.
Frequently Asked Questions (FAQ)
We’ve gathered the most common questions from our community to ensure your cooking success.
1. Can I use instant or minute rice?
We don’t recommend it. The cooking liquid and time are calibrated for traditional long-grain rice. Instant rice will become mushy. If you must, add it at the end with the sausage and just heat through.
2. My rice is still hard after 15 minutes. What happened?
This usually means the heat was too low, the lid wasn’t tight (letting steam escape), or you peeked! Ensure a solid simmer before covering, use a tight-fitting lid, and resist the urge to check. If it’s still undercooked, add 2-3 tbsp of hot broth, cover, and cook for another 5 minutes on low.
3. How do I make my own Cajun seasoning?
Easy! Mix: 2 tbsp paprika, 1 tbsp garlic powder, 1 tbsp onion powder, 1 tbsp dried oregano, 1 tbsp dried thyme, 2 tsp black pepper, 1-2 tsp cayenne pepper (to taste), and 1 tsp salt. This makes about ⅓ cup.
4. Is this dish spicy?
It has a kick, but it’s adjustable. Store-bought Cajun blends vary. Start with 1 tbsp if you’re sensitive to heat, then add more at the end. Serving with hot sauce lets everyone control their own spice level.
5. Can I make this in a rice cooker or Instant Pot?
Rice Cooker: Sauté sausage/veggies in a pan first, then transfer everything to the rice cooker and use the “white rice” setting. Instant Pot: Use Sauté function for steps 2-4. Add broth, seal, and cook on High Pressure for 5 minutes, then Natural Release for 10 minutes.
6. What’s the best type of sausage to use?
Andouille sausage is traditional and provides authentic smoky heat. Kielbasa is a great milder, smokier option. Any high-quality smoked sausage will work beautifully.
7. Can I use frozen bell peppers and onions?
Yes! You can use a 12-oz bag of frozen diced peppers and onions. No need to thaw—just add them directly to the skillet. They will release more water, so you may want to sauté for an extra minute or two.
8. How can I add more protein?
Diced chicken breast, shrimp, or even canned drained beans (like kidney or black beans) are excellent additions. For raw chicken/shrimp, add with the vegetables to ensure they cook through.
Love This Recipe? Share the Flavor!
If this Cajun Sausage and Rice Skillet saved your weeknight, please share it with friends and family! Pin it to your dinner board, or share it on Facebook.
Pin it | Share it | Cook it!
📌 Pin This Recipe for Later!
Don’t lose this easy 30-minute dinner idea! Save it to your “Quick Weeknight Dinners” or “One-Pan Meals” board on Pinterest so you always have it handy.
Imagine: A vibrant photo of the finished skillet in the pan, garnished with green onions, with text overlay: “30-Minute Cajun Sausage & Rice Skillet – One Pan!”
This Cajun Sausage and Rice Skillet is a one-pan wonder that’s as easy to make as it is full of bold, smoky flavors.With just a few ingredients, including smoked sausage, rice, bell peppers, and Cajun seasoning, you can have a satisfying meal on the table in under 30 minutes.
Ingredients
Scale
12 oz Smoked Sausage such as Andouille or Kielbasa (sliced into ½-inch rounds)
1 cup Rice (long-grain white rice, rinsed)
1 Bell Pepper (red, diced)
1 Bell Pepper (green, diced)
1 medium Onion (yellow or white, diced)
3 cloves Garlic (minced)
1 ½ cups Chicken Broth
2 tbsp Cajun Seasoning (store-bought or homemade)
1 tbsp Olive Oil
Salt and Pepper (to taste)
Fresh Parsley (optional, for garnish)
Green Onions (optional, for garnish)
Hot Sauce (optional, for serving)
Instructions
Slice the sausage into ½-inch rounds.
Dice the bell peppers and onion, and mince the garlic.
Rinse the rice under cold water until the water runs clear.
Heat 1 tablespoon of olive oil in a large skillet over medium heat.
Add the sliced sausage and cook for 5-7 minutes until browned and crispy on the edges. Remove the sausage from the skillet and set aside.
In the same skillet, add the diced onion and bell peppers. Sauté for about 3 minutes, until softened.
Add the minced garlic and cook for an additional minute until fragrant.
Add the rinsed rice to the skillet and stir to combine with the vegetables and oil. Toast the rice for about 2 minutes, stirring occasionally, until it starts to smell fragrant.
Pour in the chicken broth and sprinkle in the Cajun seasoning, stirring to combine. Bring to a boil.
Once boiling, reduce the heat to low, cover, and simmer for 15-20 minutes, or until the rice is tender and the liquid is absorbed.
Once the rice is cooked, add the sausage back to the skillet. Stir everything together to combine, and cook for an additional 3-5 minutes to allow the flavors to meld.
Serve hot, garnished with chopped parsley, green onions, and a drizzle of hot sauce if desired.
Hi I'm Emy
I’m passionate about sharing a diverse collection of sweet and savory recipes that I’ve meticulously tested and perfected in my own kitchen.