“`html
Corned Beef and Cabbage Recipe
Table of Contents
Introduction
Did you know that over 13 million pounds of corned beef are sold in the United States in the week leading up to St. Patrick’s Day alone? This staggering figure highlights the deep cultural and culinary significance of this beloved dish. Our traditional Corned Beef and Cabbage recipe is more than just a festive meal; it’s a comforting, one-pot wonder that brings families together around the dinner table. Featuring a tender, spice-rubbed corned beef brisket that slowly braises to perfection, this dish is layered with sweet, earthy carrots, creamy small red potatoes, and a large head of cabbage that soaks up all the savory, briny goodness. Whether you’re celebrating a holiday or simply craving a hearty, satisfying dinner, this recipe delivers flavor, tradition, and warmth in every bite. Let’s dive into how you can create this iconic meal in your own kitchen.
Ingredients List
Gathering the right ingredients is the first step to a perfect corned beef and cabbage. Here’s what you’ll need, along with sensory notes and smart substitutions.
- 1 (3-4 pound) corned beef brisket with its spice packet. (Look for a brisket with a good fat cap for maximum juiciness and flavor. The spice packet typically contains peppercorns, mustard seeds, coriander, and bay leaves.)
- 1 large yellow onion, quartered. (Provides a sweet, aromatic base for the broth.)
- 4 cloves garlic, smashed. (Adds a pungent, savory depth.)
- 1.5 pounds small red potatoes, halved if large. (Their waxy texture holds up beautifully during cooking, becoming tender but not mushy. Substitute with Yukon Gold potatoes for a similar creamy result.)
- 4-6 medium carrots, peeled and cut into 3-inch chunks. (Adds a natural sweetness and vibrant color. Parsnips make an excellent, slightly nutty-flavored substitute.)
- 1 large head of green cabbage (about 2-3 lbs), cut into 6-8 wedges with core intact. (The star vegetable that becomes meltingly tender and infused with broth. For a different twist, try savoy cabbage for a more delicate texture.)
- Optional for serving: Whole-grain mustard, prepared horseradish, fresh parsley.
Timing
20 minutes
3 hours
3 hours 20 minutes
While the total time for this Corned Beef and Cabbage recipe is just over 3 hours, the active hands-on time is minimal. Most recipes average 2.5 to 3.5 hours of cook time; our 3-hour simmer ensures the connective tissues in the brisket break down completely for that iconic “fork-tender” texture without the meat becoming stringy. The key is low and slow cooking, which can’t be rushed. Plan accordingly for a stress-free cooking experience where the pot does most of the work.
Step-by-Step Instructions
Step 1: Prepare the Brisket
Remove the corned beef brisket from its packaging and rinse it thoroughly under cold water. This step is crucial—it washes away some of the excess surface salt from the curing process, preventing your final dish from being overly salty. Pat the brisket completely dry with paper towels. Place the brisket, fat-side up, into a large Dutch oven or heavy-bottomed pot. Tuck the quartered onion and smashed garlic cloves around it. Sprinkle the contents of the spice packet evenly over the brisket.
Step 2: Simmer the Beef
Add enough cold water to the pot to just cover the brisket by about an inch. Bring the water to a boil over high heat. As soon as it boils, immediately reduce the heat to low to achieve the gentlest possible simmer. You should see only tiny bubbles occasionally breaking the surface. Cover the pot with a tight-fitting lid. Let the brisket simmer undisturbed for 2 hours. This long, slow cook time is what tenderizes the tough cut of meat. Resist the urge to peek too often, as this lets heat escape.
Step 3: Add the Vegetables
After 2 hours, carefully add the halved red potatoes and carrot chunks to the pot, submerging them in the flavorful broth. Cover again and continue to simmer for 30 minutes. The potatoes and carrots will start to become tender but won’t be fully cooked yet. Now, place the cabbage wedges on top of everything else. They will steam and braise in the savory liquid. Cover and cook for a final 20-30 minutes, or until the cabbage is tender and the potatoes and carrots are easily pierced with a fork.
Step 4: Rest and Slice
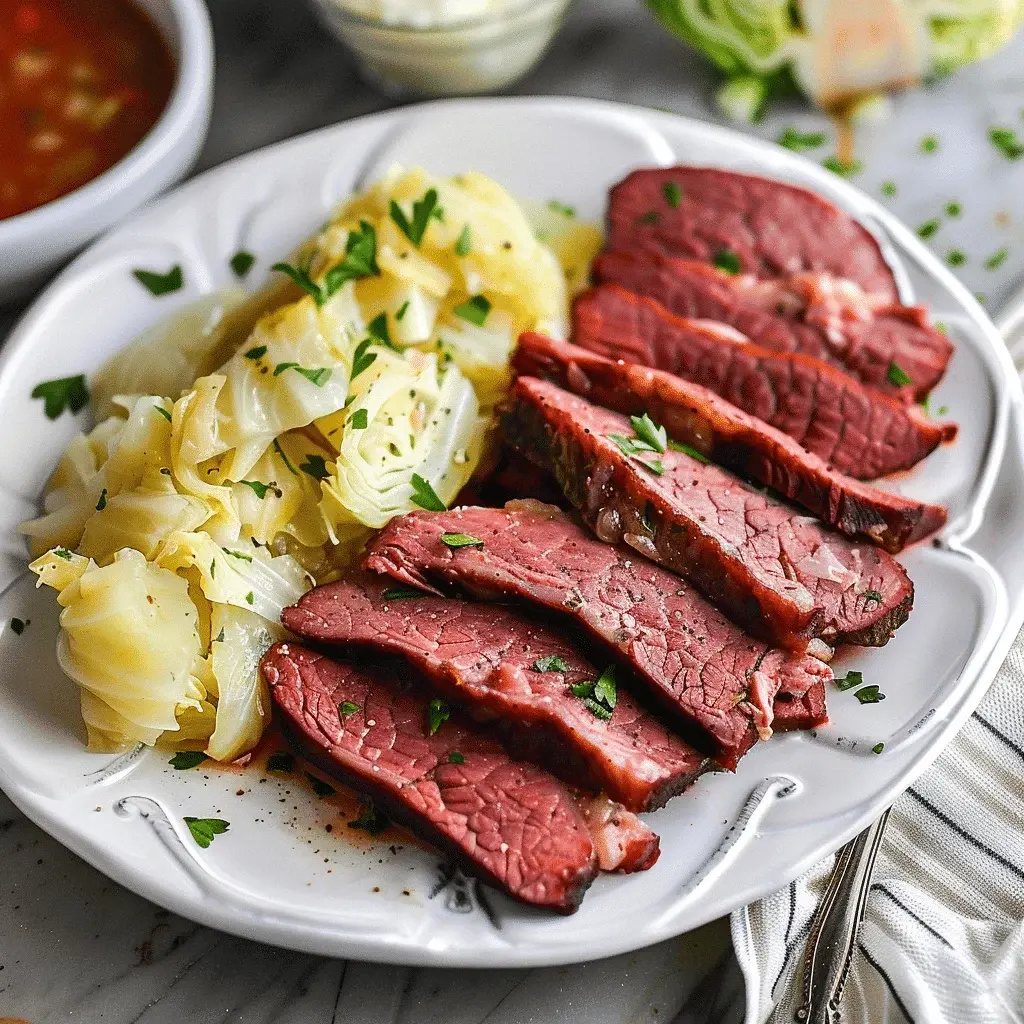
Using tongs or a large slotted spoon, carefully transfer the brisket to a clean cutting board. Tent it loosely with aluminum foil and let it rest for 15-20 minutes. This allows the juices to redistribute throughout the meat, ensuring every slice is moist. While the meat rests, use a slotted spoon to transfer the vegetables to a large serving platter. To serve, slice the brisket against the grain into ¼-inch thick slices. This cuts through the muscle fibers, making the meat incredibly tender to eat. Arrange the sliced beef alongside the vegetables.
Nutritional Information
(Per serving, based on 8 servings.)
- Calories: ~480 kcal
- Protein: 32g (Excellent source for muscle repair and satiety)
- Total Fat: 28g (A significant portion is from the brisket’s marbling)
- Saturated Fat: 9g
- Carbohydrates: 25g (Primarily from the nutrient-dense potatoes, carrots, and cabbage)
- Fiber: 6g (Aids digestion and promotes fullness)
- Sodium: ~960mg (Note: Sodium content can vary widely by brisket brand. Rinsing helps reduce this.)
Healthier Alternatives
You can enjoy this classic with a lighter touch without sacrificing the soul-warming flavors.
- Leaner Cut: Ask your butcher for a “flat cut” brisket, which is leaner than the “point cut.” After cooking, you can also trim any visible fat from the slices before serving.
- Low-Sodium Broth Boost: Replace half of the water with low-sodium beef broth. This adds rich flavor without relying solely on the salt from the brisket’s cure.
- Veggie Power: Increase the proportion of cabbage, carrots, and potatoes on your plate relative to the meat. These vegetables are high in fiber and vitamins, making the meal more balanced and filling.
- Salt-Smart Serving: Instead of adding extra salt, rely on acidic, flavorful condiments like a zesty whole-grain mustard or a kick of prepared horseradish to enhance each bite.
Serving Suggestions
This hearty meal is a complete feast on its own, but a few thoughtful additions can elevate it.
- Essential Condiments: Serve with small bowls of whole-grain mustard and prepared horseradish. The sharpness cuts through the richness of the beef beautifully.
- The Perfect Bread: Warm, crusty Irish soda bread or dense rye bread is ideal for sopping up the delicious cooking broth.
- For a Lighter Side: A simple, crisp green salad with a tart vinaigrette provides a refreshing contrast to the warm, savory main.
- Beverage Pairing: A malty Irish stout or ale complements the deep flavors. For a non-alcoholic option, sparkling apple cider or ginger beer works wonderfully.
Common Mistakes
- Boiling, Not Simmering: A rolling boil will toughen the meat. Maintain the gentlest simmer possible for tender results.
- Skipping the Rinse: Not rinsing the brisket can lead to an unpleasantly salty broth and finished dish.
- Overcooking the Vegetables: Adding all vegetables at once results in mushy potatoes and disintegrated cabbage. Stagger their addition as directed.
- Slicing With the Grain: Slicing the brisket along the direction of the muscle fibers makes it chewy and stringy. Always slice against the grain.
- Not Letting it Rest: Slicing immediately causes all the precious juices to run out onto the cutting board, leaving dry meat.
Storing Tips
- Refrigeration: Store leftover beef and vegetables separately in airtight containers for up to 4 days. The broth can be strained and stored separately as a fantastic soup base.
- Freezing: Sliced corned beef freezes exceptionally well for up to 3 months. Wrap portions tightly in plastic wrap and then foil, or use freezer bags, removing as much air as possible. Thaw in the refrigerator overnight.
- Reheating: Gently reheat slices of beef and vegetables in a covered skillet with a splash of the reserved broth or water to prevent drying out. You can also reheat in the microwave at reduced power.
- Leftover Magic: Transform leftovers into delicious corned beef hash for breakfast, a filling for Reuben sandwiches, or add to a hearty potato and cabbage soup.

Ground Beef Enchiladas Recipe

“`html
Table of Contents
Ground Beef Enchiladas Recipe
Introduction
Did you know that a recent survey by the National Restaurant Association found that Mexican-inspired dishes are among the top three most-craved comfort foods in American households? This Ground Beef Enchiladas Recipe is the answer to that craving, offering a perfect blend of savory, smoky, and cheesy flavors that come together in one satisfying pan. Forget the takeout menus and questionable canned sauces; this recipe guides you through creating a vibrant, homemade enchilada sauce that makes all the difference. The rich, aromatic sauce, combined with a perfectly seasoned beef filling and melted cheese, creates a dinner that’s not just a meal but an experience. Whether you’re feeding a hungry family on a busy weeknight or hosting a casual gathering, these enchiladas deliver maximum flavor with surprisingly simple steps. Let’s dive into how you can create this restaurant-quality favorite right in your own kitchen.
Ingredients List
Gathering fresh, quality ingredients is the first step to incredible enchiladas. Here’s what you’ll need, complete with sensory notes and smart substitutions.
- For the Homemade Enchilada Sauce:
- 2 tbsp vegetable oil – Creates a silky base for toasting the spices.
- 2 tbsp all-purpose flour – The thickening agent that gives the sauce its lush, clinging texture. For a gluten-free version, use an equal amount of cornstarch or a 1:1 GF flour blend.
- 2 tbsp chili powder – Use a good-quality, pure chili powder (not a blend) for a deep, earthy red color and authentic flavor. Ancho chili powder adds a lovely smoky-sweet note.
- 1 tsp ground cumin – Provides a warm, nutty aroma that is quintessential to Mexican cuisine.
- 1/2 tsp garlic powder & 1/2 tsp onion powder – For consistent, allium flavor throughout the sauce. You can substitute with 2 minced garlic cloves and 1/4 cup finely diced onion sautéed at the beginning.
- 1/4 tsp dried oregano – Mexican oregano is ideal for its slightly citrusy flavor, but Mediterranean oregano works in a pinch.
- 2 cups chicken or beef broth – The liquid foundation. Use low-sodium to control salt levels. Vegetable broth is a great vegetarian alternative.
- Salt to taste – Start with 1/2 tsp and adjust after simmering.
- For the Beef Filling & Assembly:
- 1 lb ground beef (80/20 blend recommended) – The slight fat content ensures a juicy, flavorful filling that won’t dry out. For a leaner option, use 90/10 or ground turkey/chicken. For a vegetarian twist, lentils or textured vegetable protein (TVP) are excellent.
- 1 medium yellow onion, finely diced – Sweetens as it cooks, balancing the spices.
- 2 cloves garlic, minced – Fresh garlic adds a pungent, aromatic kick that powder can’t match.
- 1 tsp ground cumin – Echoes the flavor in the sauce, tying the dish together.
- Salt and black pepper
- 8-10 corn tortillas – Corn tortillas are traditional and offer a delightful corn flavor and sturdy texture. To prevent cracking, warm them briefly. Flour tortillas can be used for a softer, more pliable result.
- 2 cups shredded cheese – A blend of Monterey Jack (for meltability) and sharp cheddar (for tang) is perfect. Queso fresco or cotija crumbled on top after baking adds a salty, crumbly finish.
- Optional toppings: Fresh cilantro, diced red onion, sliced jalapeños, sour cream, avocado, or a squeeze of lime juice for brightness.
Timing
This recipe clocks in at about 1 hour from start to finish. Compared to many enchilada recipes that rely on pre-made sauces and skip steps like toasting spices, our method adds only 10-15 extra minutes but multiplies the flavor exponentially. The active prep is straightforward, and the baking time is hands-off, allowing you to prepare sides or simply relax. It’s significantly faster than dining out and more rewarding than a frozen meal.
Step-by-Step Instructions
Step 1: Prepare the Homemade Enchilada Sauce
This is the soul of the dish. In a medium saucepan, heat the 2 tbsp of vegetable oil over medium heat. Whisk in the 2 tbsp of flour and cook for about 1 minute until it forms a smooth paste (this is a roux). Immediately add the 2 tbsp chili powder, 1 tsp cumin, 1/2 tsp garlic powder, 1/2 tsp onion powder, and 1/4 tsp oregano. Stir constantly for another 30-60 seconds. You’ll smell the spices blooming and becoming fragrant—this toasting step is crucial for depth of flavor. Gradually pour in the 2 cups of broth, whisking vigorously to prevent lumps. Bring the mixture to a simmer, then reduce heat to low. Let it cook for 10-15 minutes, stirring occasionally, until it thickens to a gravy-like consistency. Season with salt to taste. Remove from heat and set aside.
Step 2: Cook the Ground Beef Filling
While the sauce simmers, heat a large skillet over medium-high heat. Add the ground beef and break it up with a spatula. Cook until it’s no longer pink, about 5-7 minutes. Drain excess fat if desired, leaving about 1 tablespoon for flavor. Push the beef to the side of the skillet, add the diced onion to the center, and sauté for 3-4 minutes until softened. Add the minced garlic and cook for 30 seconds until fragrant. Stir everything together, then season with 1 tsp cumin, salt, and pepper. Pour in about 1/2 cup of the prepared enchilada sauce to the beef mixture, stirring to combine. This moistens the filling and marries the flavors. Remove from heat.
Step 3: Assemble the Enchiladas
Preheat your oven to 375°F (190°C). Lightly grease a 9×13 inch baking dish. Pour about 1/2 cup of the enchilada sauce into the bottom of the dish and spread it evenly. This prevents sticking and adds flavor to every bite. Warm the corn tortillas slightly—wrap them in a damp paper towel and microwave for 30 seconds, or heat individually in a dry skillet for 10 seconds per side. This makes them pliable and prevents tearing. Take one tortilla, dip both sides lightly into the sauce in the dish (or a separate shallow bowl of sauce), then place it on your work surface. Spoon a generous 2-3 tablespoons of the beef filling down the center, top with a pinch of shredded cheese, then roll it up tightly. Place it seam-side down in the baking dish. Repeat with remaining tortillas, packing them snugly side-by-side.
Step 4: Bake to Perfection
Once all enchiladas are nestled in the dish, pour the remaining sauce evenly over the top, ensuring every tortilla is covered. This keeps them moist during baking. Sprinkle the remaining shredded cheese generously over the top. Cover the dish loosely with aluminum foil. Bake for 20 minutes. Then, remove the foil and bake for an additional 10-15 minutes, or until the cheese is bubbly and slightly golden around the edges. Let the enchiladas rest for 5-10 minutes after removing them from the oven. This allows the sauce to set slightly, making them easier to serve without falling apart.
Nutritional Information
(Approximate values per serving, based on 8 enchiladas, using 80/20 beef and standard cheese):
- Calories: ~380 kcal
- Protein: 22g
- Carbohydrates: 28g
- Dietary Fiber: 4g
- Sugars: 3g
- Fat: 21g (Saturated Fat: 9g)
- Sodium: ~650mg (can be reduced with low-sodium broth and cheese)
Healthier Alternatives
You can easily adapt this recipe for dietary preferences without sacrificing the soul-satisfying flavor:
- Leaner Protein: Swap ground beef for 93% lean ground turkey or chicken. For a plant-based version, use 2 cups of cooked brown lentils or a plant-based ground “meat.” The spices and sauce ensure it’s still incredibly flavorful.
- Boost Veggies: Add 1 cup of finely diced bell peppers or zucchini to the beef as it cooks, or mix in a cup of fresh spinach with the filling off the heat.
- Lower-Carb/Low-Fat: Use low-fat cheese or reduce the amount by half, topping with extra fresh salsa for moisture. For fewer carbs, look for low-carb tortilla alternatives or make “enchilada bowls” by serving the beef and sauce over cauliflower rice.
- Dairy-Free: Use a high-quality vegan cheese shreds or simply omit the cheese—the flavorful sauce and filling are stars on their own.
Serving Suggestions
These enchiladas are a complete meal but pair beautifully with simple sides to create a festive spread:
- Classic Mexican Rice & Refried Beans: The ultimate trio for a comforting plate.
- Fresh & Crisp Salad: A simple salad of romaine, tomatoes, red onion, and a lime-cilantro vinaigrette cuts through the richness.
- Cooling Toppings Bar: Set out small bowls of diced avocado, pico de gallo, sour cream (or Greek yogurt), pickled red onions, and lime wedges so everyone can customize their plate.
- For a Crowd: Double the recipe and bake in two dishes. It’s a guaranteed hit at potlucks and game-day gatherings.
Common Mistakes
- Using Cold Tortillas: Skipping the warming step leads to cracked, difficult-to-roll tortillas. Always warm them first.
- Overfilling: It’s tempting to pack in the filling, but too much causes bursting and messy enchiladas. A moderate 2-3 tablespoon portion is perfect.
- Skimping on Sauce: