“`html
Table of Contents
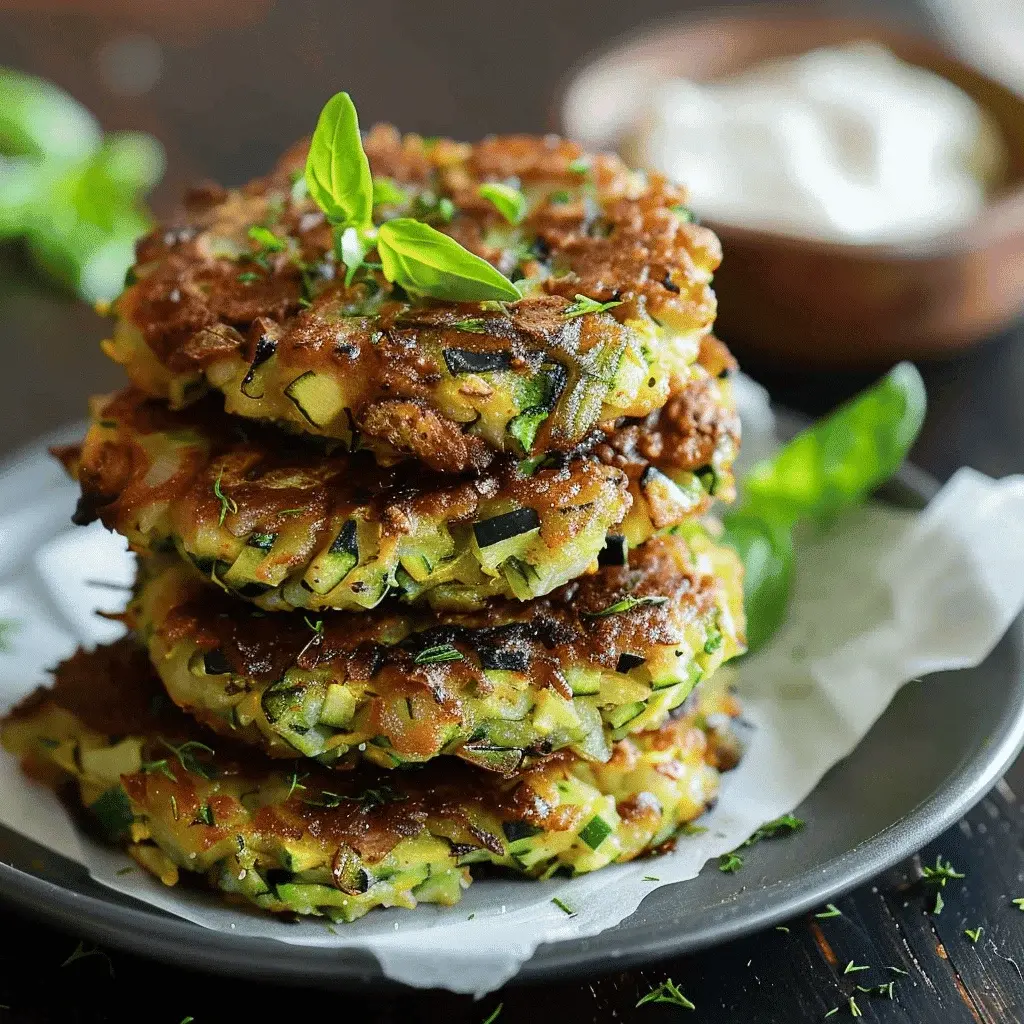
Zucchini Patties Recipe
Introduction
Did you know that the average American consumes less than half the recommended daily intake of vegetables? If you’re looking for a delicious, crowd-pleasing way to boost your veggie quota, you’ve found it. These zucchini patties are the perfect solution: a crispy, cheesy, and utterly satisfying dish that transforms humble summer squash into a star. More than just a side, these patties are a complete, healthy meal that comes together in minutes. The combination of nutty Parmesan and gooey Mozzarella creates a savory depth, while the grated zucchini ensures a tender, moist interior with every bite. Whether you need a quick weeknight dinner, a impressive appetizer for guests, or a make-ahead lunch, this versatile recipe delivers on flavor, texture, and nutrition without any fuss.
Ingredients List
Gather these simple, fresh ingredients for patties that are crispy on the outside and wonderfully tender inside.
- 2 medium zucchinis (about 1 lb) – Look for firm, glossy skins. The fresh, slightly sweet and earthy flavor is the foundation.
- 1 teaspoon salt – Crucial for drawing out moisture.
- 1 large egg – Acts as the binder, giving the patties structure. For an egg-free version, a “flax egg” (1 tbsp ground flax + 3 tbsp water) works well.
- 1/2 cup finely chopped yellow onion – Provides a subtle sweetness and aromatic base. A shallot can be substituted for a milder taste.
- 2 cloves garlic, minced – For that essential savory punch. Garlic powder (1/2 tsp) can be used in a pinch.
- 1/2 cup grated Parmesan cheese – Offers a salty, umami richness. Pecorino Romano is a sharper, saltier alternative.
- 1/2 cup shredded Mozzarella cheese – Creates delightful pockets of meltiness. Monterey Jack or a low-moisture part-skim Mozzarella are great swaps.
- 1/2 cup all-purpose flour or breadcrumbs – Flour yields a denser, cake-like texture, while breadcrumbs (Panko for extra crunch) make them lighter and crispier.
- 1/4 cup fresh parsley or basil, chopped – Adds a bright, herbal note. Dried herbs (1 tbsp) can be used but add them to the dry ingredients.
- 1/2 teaspoon black pepper
- 2-3 tablespoons olive oil or avocado oil, for frying – A high-smoke-point oil is essential for achieving a golden-brown, crispy crust without burning.
Timing
Compared to the average veggie burger or fritter recipe that can take over an hour with complex steps, this recipe is remarkably efficient. The 20-minute prep is mostly hands-off while the zucchini drains. The active cooking time is just 15 minutes, making the total time a swift 35 minutes from fridge to plate—perfect for busy schedules.

Step-by-Step Instructions
Step 1: Prepare the Zucchini
This is the most important step for success! Grate the zucchini using the large holes of a box grater or a food processor. Place the grated zucchini in a colander set over a bowl or in the sink. Toss thoroughly with 1 teaspoon of salt. Let it sit for at least 10 minutes—this draws out the excess water that would make your patties soggy. After resting, use your hands or a clean kitchen towel to squeeze the zucchini aggressively until no more liquid drips out. You’ll be amazed at how much water comes out! This should yield about 1 to 1.5 cups of firmly packed, dry zucchini.
Step 2: Combine the Base Mixture
In a large mixing bowl, lightly beat the egg. Add the squeezed-dry zucchini, chopped onion, minced garlic, both cheeses, flour (or breadcrumbs), chopped herbs, and black pepper. I like to use a fork to mix everything together until just combined. The mixture will be thick and slightly sticky, but it should hold together when pinched. Avoid overmixing, as this can make the patties tough.
Step 3: Form and Chill the Patties
Using slightly damp hands (this prevents sticking), scoop about 1/4 cup of the mixture. Form it into a ball, then gently flatten it into a patty about 1/2-inch thick. Place the formed patties on a parchment-lined plate or baking sheet. For best results, pop them in the refrigerator for 15-20 minutes. This chilling step helps them firm up, ensuring they don’t fall apart in the pan.
Step 4: Cook to Perfection
Heat 2 tablespoons of oil in a large non-stick or cast-iron skillet over medium heat. Once the oil shimmers (test with a tiny bit of mixture—it should sizzle gently), carefully add the patties. Don’t overcrowd the pan; cook in batches if necessary. Cook for 3-4 minutes per side, or until deeply golden brown and crispy. If the patties are browning too quickly, reduce the heat slightly. Transfer cooked patties to a wire rack set over a baking sheet—this keeps them crispy on all sides. Add more oil to the pan for the second batch if needed.
Nutritional Information
(Per serving, approximately 2 patties)
- Calories: ~220 kcal
- Protein: 12g – A satisfying amount from eggs and cheese.
- Carbohydrates: 15g – Primarily from zucchini and a small amount of flour.
- Dietary Fiber: 2g – Aiding digestion.
- Sugars: 3g (naturally occurring)
- Fat: 14g – Mostly healthy monounsaturated fats from olive oil.
- Vitamin A: 15% DV | Vitamin C: 35% DV | Calcium: 25% DV
Healthier Alternatives
You can easily tailor this recipe to various dietary needs without sacrificing the crispy, cheesy experience:
- Gluten-Free: Swap all-purpose flour for almond flour, oat flour, or a gluten-free 1:1 baking blend. The texture will be slightly more delicate.
- Lower-Carb/Keto: Use 1/4 cup of almond flour or crushed pork rinds instead of regular flour. Ensure your Mozzarella is full-fat and low-carb.
- Dairy-Free: Replace Parmesan with nutritional yeast (for cheesiness) and use a dairy-free Mozzarella shred that melts well. A tablespoon of chickpea flour can help bind.
- Baking Option: For an oil-free version, place patties on a parchment-lined baking sheet, lightly spray with oil, and bake at 400°F (200°C) for 20-25 minutes, flipping halfway. They’ll be less crispy but still delicious.
Serving Suggestions
These patties are incredibly versatile. Serve them as:
- A Main Course: On a bed of mixed greens with a lemon-tahini drizzle or atop whole-wheat buns with lettuce, tomato, and a garlic aioli for a fantastic veggie burger.
- A Hearty Side: Alongside grilled chicken, fish, or a simple pasta with marinara sauce.
- A Appetizer or Snack: With dipping sauces like tzatziki, marinara, or a spicy sriracha mayo.
- Breakfast: With a poached egg on top and a side of avocado for a power-packed start to your day.
Common Mistakes
- Skipping the Salting & Squeezing: This is the #1 reason for soggy, falling-apart patties. Don’t rush this step.
- Using Wet Ingredients: Ensure your grated zucchini is thoroughly dry, and pat your chopped onion dry if it seems wet.
- Overcrowding the Pan: This steams the patties instead of frying them, preventing a crispy crust. Give them space.
- Flipping Too Early: Be patient! Let a proper crust form before gently flipping. If they stick, they’re not ready.
- Overmixing the Batter: Mix until just combined. Overworking develops gluten (from flour) and can lead to toughness.
Storing Tips
- Refrigeration: Cool patties completely. Store in an airtight container in the fridge for up to 4 days.
- Freezing: Place cooled patties in a single layer on a baking sheet to flash-freeze for 1 hour. Then transfer to a freezer bag or container, separating layers with parchment. Freeze for up to 3 months. Reheat from frozen in a 375°F oven or toaster oven until hot and crispy.
- Reheating: To restore crispiness, reheat in a toaster oven, air fryer, or a skillet over medium heat. Avoid the microwave, which will make them soft.
Conclusion
These Zucchini Patties are proof that healthy eating doesn’t have to be bland or complicated. With their perfect contrast of a crispy, golden exterior and a tender, cheesy interior, they are a guaranteed hit for any meal. They’re forgiving, customizable, and a brilliant way to use up summer’s bounty of zucchini. I encourage you to make a double batch and freeze some for those nights when you need a wholesome meal in minutes. Now, it’s your turn! Grab those zucchinis and get cooking.
Loved this recipe? Share your crispy creations with us! Tag @spicemingle on social media or pin this recipe to your favorite board. We love seeing your kitchen triumphs!
FAQs
***Can I make these zucchini patties ahead of time?***
Absolutely! You can prepare the mixture, form the patties, and store them covered in the refrigerator for up to 24 hours before cooking. This can actually