Cheesy Tater Tot Meatloaf Casserole Recipe

“`html

Cheesy Tater Tot Meatloaf Casserole Recipe

Introduction

Did you know that over 75% of American families seek out comforting, one-dish meals for their weeknight dinners? If you’re looking for the ultimate crowd-pleaser that combines nostalgic flavors with minimal cleanup, you’ve found it. This Cheesy Tater Tot Meatloaf Casserole is the hearty, satisfying answer to the eternal “what’s for dinner?” question. It masterfully layers the savory, umami-rich goodness of a classic meatloaf with the crispy, golden appeal of tater tots, all bound together by a molten, savory cheese blend. It’s a dish that delivers on every promise of comfort food, making it perfect for busy family dinners, casual potlucks, or whenever you need a guaranteed hit on the table. Let’s dive into how to create this beloved classic with a fun, crispy twist.

Ingredients List

Gather these simple ingredients for a flavor-packed casserole. I’ve included notes on substitutions to accommodate dietary needs without sacrificing taste.

  • For the Meatloaf Layer:
    • 1.5 lbs lean ground beef (90/10): The star of the show, providing rich, meaty flavor. Substitution: Ground turkey or a plant-based ground crumble for a lighter or vegetarian option.
    • 1 large egg: Acts as the binder, holding the meatloaf together with a tender texture.
    • 1/2 cup plain breadcrumbs: Soaks up juices and adds structure. Substitution: Gluten-free panko or rolled oats for a gluten-free version.
    • 1/2 cup whole milk: Adds moisture and richness. Substitution: Any unsweetened non-dairy milk.
    • 1/2 cup finely diced yellow onion: Provides a sweet, aromatic base note.
    • 2 cloves garlic, minced: For that essential savory punch.
    • 2 tbsp ketchup + 2 tbsp for topping: Adds a touch of sweetness and tangy tomato flavor.
    • 1 tbsp Worcestershire sauce: The secret umami booster. Substitution: Soy sauce or coconut aminos.
    • 1 tsp dried parsley, 1/2 tsp paprika, 1 tsp salt, 1/2 tsp black pepper: The classic seasoning blend for depth and warmth.
  • For the Topping:
    • 1 (32 oz) bag frozen tater tots: The iconic crispy crown. No need to thaw!
    • 1.5 cups shredded cheese blend: I recommend a mix of sharp cheddar for bite and mozzarella for stretch. Substitution: Monterey Jack, Colby Jack, or a Mexican blend.
    • Optional garnish: Fresh chopped chives or parsley for a pop of color and freshness.

Timing

Prep Time20 minutes
Cook Time45 minutes
Total Time1 hour 5 minutes

Compared to the average meatloaf recipe which often requires 70+ minutes of total time and separate side dishes, this all-in-one casserole is a time-saver. The active prep is a quick 20 minutes, and the oven does the rest of the work, freeing you up to set the table or relax. The result is a complete meal—protein, starch, and cheesy goodness—in one dish.

Cheesy Tater Tot Meatloaf Casserole fresh from the oven, showing golden brown tots and melted cheese

This hearty casserole brings together the best of meatloaf and tater tots in one irresistible dish.

Step-by-Step Instructions

Step 1: Prepare the Meatloaf Base

Preheat your oven to 375°F (190°C). In a large mixing bowl, combine the ground beef, egg, breadcrumbs, milk, diced onion, minced garlic, 2 tablespoons of ketchup, Worcestershire sauce, and all the dried spices (parsley, paprika, salt, pepper). Here’s my pro tip: use your hands to mix! It might feel a bit messy, but it’s the best way to evenly distribute all the ingredients without overworking the meat, which can lead to a tough texture. Mix just until everything is incorporated—no more.

Step 2: Assemble the Casserole

Lightly grease a 9×13 inch baking dish. Transfer the meatloaf mixture into the dish and press it down firmly and evenly into a uniform layer. This creates a solid foundation. Next, spread the remaining 2 tablespoons of ketchup evenly over the meat layer. This adds a caramelized, tangy glaze. Now, for the fun part: arrange the frozen tater tots in neat, tightly-packed rows over the entire meatloaf layer. There’s no need to thaw them; they’ll cook perfectly from frozen.

Step 3: Bake to Perfection

Place the uncovered casserole in the preheated oven and bake for 35 minutes. This initial bake cooks the meatloaf through and starts crisping the tater tots. Carefully remove the dish from the oven (it will be hot!). Evenly sprinkle the shredded cheese blend over the hot tater tots. Return the casserole to the oven and bake for an additional 8-12 minutes, or until the cheese is fully melted, bubbly, and the tater tots are a deep golden brown.

Step 4: Rest and Serve

Once out of the oven, let the casserole rest for 5-10 minutes. This is a crucial step! Resting allows the juices in the meatloaf to redistribute, ensuring it holds its shape when you slice it, and gives the cheese a moment to set slightly. Garnish with fresh chives or parsley if desired, then slice and serve directly from the dish.

Nutritional Information

The following nutritional estimates are per serving (based on 8 servings):

  • Calories: ~480 kcal
  • Protein: ~28g
  • Carbohydrates: ~35g
  • Dietary Fiber: ~3g
  • Sugars: ~4g
  • Fat: ~25g
  • Saturated Fat: ~9g
  • Cholesterol: ~105mg
  • Sodium: ~950mg

Note: Values are approximate and can vary based on specific ingredient brands and substitutions used.

Healthier Alternatives

You can easily adapt this recipe for a lighter version without losing its comforting soul:

  • Leaner Protein: Swap the ground beef for 93% lean ground turkey or chicken.
  • Veggie Boost: Add 1 cup of finely grated zucchini or carrots to the meat mixture (squeeze out excess moisture first) for hidden vegetables.
  • Lower-Fat Dairy: Use skim milk and reduced-fat cheese. The melting texture will be slightly less creamy but still delicious.
  • Tater Tot Swap: Look for sweet potato tots or cauliflower tots in the freezer aisle for a nutrient-dense, lower-carb topping.
  • Reduced Sodium: Use low-sodium ketchup, Worcestershire sauce, and cheese, and reduce added salt by half.

Serving Suggestions

This casserole is a full meal on its own, but these sides can round out your dinner table beautifully:

  • For Freshness: A simple green salad with a bright vinaigrette, steamed green beans, or roasted broccoli cuts through the richness.
  • For Extra Comfort: Serve with a side of creamy coleslaw, applesauce, or warm dinner rolls.
  • Dipping Sauces: Offer small bowls of extra ketchup, ranch dressing, or barbecue sauce for dipping.

Common Mistakes

  • Overmixing the Meat: This develops the proteins too much, resulting in a dense, tough meatloaf. Mix until just combined.
  • Using a Smaller Dish: A 9×13 inch dish is ideal. A smaller one will crowd the ingredients, leading to steaming instead of crisping the tots and uneven cooking.
  • Skipping the Rest Time: Cutting in immediately will cause the cheesy meatloaf to fall apart. Let it set for clean slices.
  • Thawing the Tater Tots: Adding thawed tots will make them soggy. Always use them straight from the freezer for maximum crispiness.

Storing Tips

  • Refrigeration: Cool completely, then cover tightly or transfer to an airtight container. It will keep for 3-4 days.
  • Freezing: Assemble the casserole (without baking) up to the point of adding cheese. Wrap the entire dish tightly in plastic wrap and foil. Freeze for up to 2 months. To cook, bake from frozen, adding 15-20 minutes to the initial bake time before adding the cheese.
  • Reheating: For best results, reheat individual portions in the oven at 350°F (175°C) for 15-20 minutes or in an air fryer for 5-7 minutes to recrisp the tots. Microwave reheating will soften the topping.
Close-up slice of Cheesy Tater Tot Meatloaf Casserole showing layers of meat, cheese, and crispy tots

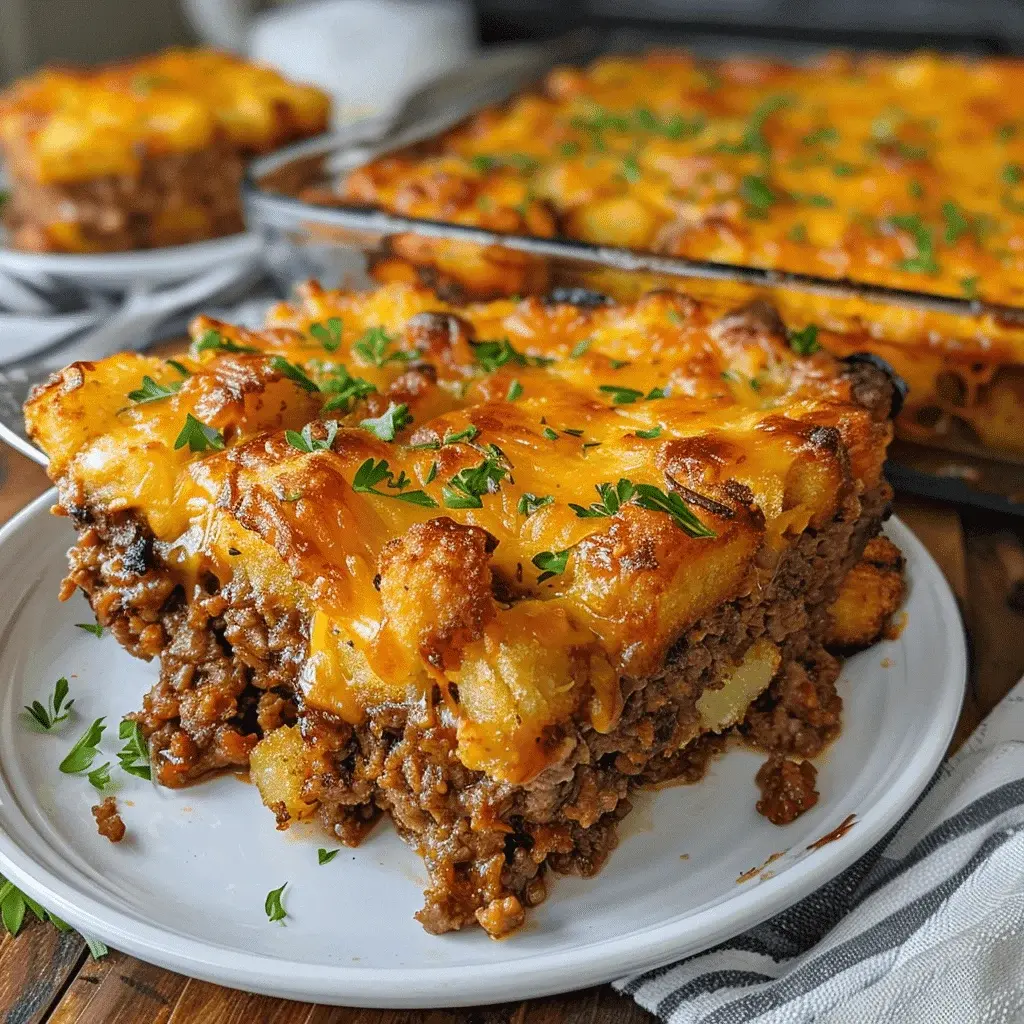
A cross-section reveals the perfect layers of savory meatloaf, melted cheese, and crispy potato.

Conclusion

This Cheesy Tater Tot Meatloaf Casserole is more than just a recipe; it’s a guaranteed path to happy faces around the dinner table. It combines simplicity, familiar flavors, and crowd-pleasing appeal in one easy-to-make dish

Chicken Tater Tot Casserole Recipe

“`html

Chicken Tater Tot Casserole Recipe

Introduction

Did you know that casseroles are one of the most-searched comfort food categories, with a 40% increase in recipe views during the colder months? In the quest for the perfect weeknight dinner that pleases everyone, have you found your ultimate Chicken Tater Tot Casserole recipe? If not, your search ends here. This dish is the glorious intersection of convenience, flavor, and pure, unadulterated comfort. It transforms simple ingredients—tender shredded chicken, rich sour cream, sharp cheddar, smoky bacon, and those iconic crispy tater tots—into a bubbling, golden-brown masterpiece that’s guaranteed to become a family favorite. It’s the answer to “What’s for dinner?” on busy nights, for potlucks, or when you simply crave something deliciously satisfying.

Ingredients List

This recipe is designed for flexibility. Here’s what you’ll need for the classic version, along with sensory notes and easy swaps.

  • 2 cups cooked chicken, shredded (about 1 lb raw): Use rotisserie chicken for ultimate ease and juicy flavor, or poach/roast your own. The chicken should be tender and easily pull apart with forks.
  • 1 (10.5 oz) can condensed cream of chicken soup: This is the flavor-packed glue. For a richer, homemade feel, substitute with a creamy bechamel sauce seasoned with chicken bouillon.
  • 1 cup sour cream (full-fat for maximum creaminess): Adds a delightful tang and velvety texture. For a lighter option, plain Greek yogurt works beautifully, maintaining the creaminess with a slight protein boost.
  • 1 ½ cups sharp cheddar cheese, shredded (divided): Sharp cheddar provides a bold, cheesy punch that cuts through the richness. Pre-shredded bags are convenient, but block cheese you shred yourself melts more smoothly and has a superior, non-gritty texture.
  • 6 slices bacon, cooked crisp and crumbled: This is your flavor bomb, offering smoky, salty, umami depth. The crisp texture is key. For a vegetarian twist, use ½ cup of sun-dried tomatoes (chopped) or 1 tsp of smoked paprika mixed into the filling.
  • 1 (32 oz) bag frozen tater tots: The iconic, crispy crown. Look for extra-crispy varieties. For a fun twist, try sweet potato tots or cauliflower tots for a lower-carb option (note: baking time may vary).
  • ½ cup milk (any kind): Thins the mixture to a perfect, spreadable consistency. The steam from the milk also helps cook the casserole evenly.
  • 1 tsp garlic powder: Provides a warm, aromatic base note without the fuss of mincing fresh garlic.
  • ½ tsp black pepper & ¼ tsp salt: Season to taste, remembering the bacon, cheese, and soup already contain salt.
  • Fresh chives or green onions, for garnish (optional): A pop of fresh color and a mild onion flavor that brightens the entire dish.

Timing

Prep Time 15 minutes
Cook Time 45 minutes
Total Time 1 hour

Compared to the average casserole recipe, which often requires 20-30 minutes of active prep for chopping and sautéing, this Chicken Tater Tot Casserole is remarkably streamlined. The 15-minute prep is largely “dump and stir,” making it about 30% faster to get into the oven than many layered casseroles. The 45-minute bake time is standard, allowing the flavors to meld and the tots to achieve that perfect golden-brown, crispy exterior.

Close-up of a golden brown Chicken Tater Tot Casserole fresh from the oven, showing crispy tots and melted cheese
The golden, crispy crown of tater tots is the signature of this comforting casserole.

Step-by-Step Instructions

Step 1: Prepare Your Chicken

If you’re not using a store-bought rotisserie chicken, this is your first task. Place 1 lb of boneless, skinless chicken breasts or thighs in a pot and cover with water or broth. Bring to a simmer, cover, and cook for 12-15 minutes until cooked through. Let it cool slightly, then use two forks to shred the meat into bite-sized pieces. You should have about 2 packed cups. Pro Tip: For extra flavor, shred the chicken directly into the pot and let it soak up the cooking liquid for a minute before draining.

Step 2: Mix the Creamy Base

Preheat your oven to 375°F (190°C). In a large mixing bowl, combine the cream of chicken soup, sour cream, and milk. Whisk them together until you have a smooth, homogenous mixture. Now, stir in the garlic powder, black pepper, and salt (if using). Fold in the shredded chicken, 1 cup of the shredded cheddar cheese, and all of the crumbled bacon. The mixture will be thick, creamy, and incredibly fragrant. This is the heart of your casserole.

Step 3: Layer the Casserole

Lightly grease a 9×13 inch baking dish with butter or cooking spray. Transfer the creamy chicken mixture into the dish and use a spatula to spread it into an even, flat layer. Ensure it reaches the corners for consistent cooking. This layer should be about 1 to 1.5 inches thick.

Step 4: Add the Tater Tot Crown

Take your frozen tater tots directly from the freezer and arrange them in neat, tightly packed rows over the entire surface of the chicken mixture. There’s no need to thaw them—in fact, going from freezer to oven helps them stay crisp. Once the layer is complete, evenly sprinkle the remaining ½ cup of shredded cheddar cheese over the top of the tater tots. This creates a double-cheese effect: melty cheese within and a crispy, cheesy crust on top.

Step 5: Bake to Perfection

Place the uncovered casserole dish in the preheated oven. Bake for 40-50 minutes. You’re looking for three key visual cues: the filling should be bubbling vigorously around the edges, the tater tots should be a deep, golden brown and very crisp, and the cheese on top should be fully melted and possibly starting to blister in spots. If your tots aren’t browning to your liking, switch the oven to broil for the final 1-2 minutes, but watch it like a hawk!

Nutritional Information

(Approximate values per serving, assuming 8 servings)

  • Calories: 480-520
  • Total Fat: 28-32g
  • Saturated Fat: 10-12g
  • Cholesterol: 75-85mg
  • Sodium: 950-1100mg
  • Total Carbohydrates: 35-38g
  • Dietary Fiber: 2-3g
  • Sugars: 2-3g
  • Protein: 22-25g

Healthier Alternatives

You can easily adapt this recipe for a lighter version without sacrificing the core comforting experience:

  • Swap the Soup: Use a low-sodium or “healthy request” condensed soup, or make a simple sauce with 1 tbsp butter, 1 tbsp flour, 1 cup low-sodium chicken broth, and ½ cup milk.
  • Lighten the Dairy: Substitute full-fat sour cream with light sour cream or plain, non-fat Greek yogurt. Use reduced-fat cheddar cheese (though be aware it may not melt as smoothly).
  • Boost Veggies: Stir 1-2 cups of thawed, squeezed-dry frozen spinach or chopped steamed broccoli into the chicken mixture for added nutrients and color.
  • Alternative “Tots”: Use frozen cauliflower tots or a mix of regular and sweet potato tots for different vitamin profiles. For a truly low-carb top, try a layer of thinly sliced potatoes or a sprinkle of almond flour and Parmesan for crunch.
  • Leaner Protein: Use all chicken breast and opt for turkey bacon or simply omit the bacon, using a dash of liquid smoke or smoked paprika for that signature flavor.

Serving Suggestions

This casserole is a hearty meal on its own, but these pairings can round out your dinner table:

  • For Freshness: A simple green salad with a bright vinaigrette (like lemon or apple cider vinegar) is the perfect counterbalance to the richness.
  • For Extra Veggies: Steamed green beans, roasted asparagus, or glazed carrots make excellent, colorful sides.
  • For Dipping: Serve with small bowls of extra sour cream, ranch dressing, or a spicy sriracha mayo for those who want an extra kick.
  • Perfect for a Crowd: This dish is a potluck superstar. Pair it with other comfort classics like baked beans, cornbread, or a fruit salad.

Common Mistakes

  • Overmixing the Filling: Once you add the chicken, fold gently. Overmixing can break down the chicken shreds into a mushy texture.
  • Using Thawed Tater Tots: Always use frozen tots straight from the freezer. Thawed tots will steam and become soggy instead of crisping up.
  • Underseasoning: Taste your filling mixture before adding it to the dish. Remember, the tots and cheese on top are not seasoned, so the flavor needs to come from within.
  • Wrong Dish Size: Using a dish that’s too small will make the casserole too deep, leading to a soupy middle and burnt top. A 9×13 is ideal.
  • Not Letting it Rest: Allow the casserole to

Easy Hobo Casserole Recipe

“`html

Easy Hobo Casserole Recipe

Introduction

Did you know that casseroles are one of the top 5 most-searched comfort food categories in the United States, with a 40% increase in searches during the fall and winter months? This Easy Hobo Casserole recipe is the perfect answer to that craving for a warm, filling, and fuss-free family meal. Born from the resourceful spirit of campfire cooking, this modern take brings all the rustic, savory goodness to your kitchen table with minimal effort. It’s a hearty, comforting dish featuring layers of seasoned ground beef, thinly sliced potatoes that soak up all the flavor, and a rich, velvety cheesy sauce that binds everything together in delicious harmony. Whether you’re a busy parent juggling schedules or someone who simply loves a no-fuss dinner, this casserole delivers maximum flavor with minimal cleanup. Let’s dive into how you can create this crowd-pleaser that’s sure to become a regular in your weekly rotation.

Ingredients List

Gather these simple, flavorful ingredients. I’ve included sensory notes and easy substitutions to make this recipe your own.

  • 1.5 lbs lean ground beef (85/15): The star protein, providing a savory, meaty base. Substitution: Ground turkey, chicken, or a plant-based crumble for a lighter or vegetarian option.
  • 1 large yellow onion, diced: Adds a sweet, aromatic foundation. You’ll smell it caramelizing and know the flavor is building.
  • 3-4 medium russet potatoes (about 2 lbs), thinly sliced: The hearty backbone. Thin slices ensure they cook through and become tender, absorbing the sauce. Substitution: Yukon Gold potatoes for a buttery flavor, or sweet potato slices for a vitamin-rich twist.
  • 2 cloves garlic, minced: For that essential punch of pungent, aromatic flavor.
  • 1 (10.5 oz) can condensed cream of mushroom soup: The secret to a rich, creamy sauce without making a roux. Substitution: Cream of celery, chicken, or a homemade creamy mushroom sauce.
  • 1 cup beef broth: Deepens the savory flavor and creates the perfect saucy consistency.
  • 1 cup shredded cheddar cheese: For that irresistible, gooey, golden-brown topping. Substitution: A Mexican blend, Monterey Jack, or pepper jack for a kick.
  • 1/2 cup milk (whole or 2%): Thins the soup mixture to a pourable, silky consistency.
  • 1 tbsp Worcestershire sauce: Adds a complex, umami depth you can’t quite place but would miss if it were gone.
  • 1 tsp smoked paprika: Provides a subtle smokiness and beautiful color.
  • Salt and black pepper to taste: Essential for seasoning every layer.
  • 1 tbsp olive oil or butter: For sautéing.
  • Fresh parsley, chopped (optional garnish): Adds a pop of fresh color and a mild herbal note.

Timing

Prep Time20 minutes
Cook Time1 hour
Total Time1 hour 20 minutes

Compared to the average casserole recipe that can take nearly 2 hours from start to finish, this Easy Hobo Casserole is streamlined for efficiency. The 20-minute active prep time is a game-changer for weeknights. While it bakes for an hour, that’s largely hands-off time you can use to set the table, help with homework, or simply relax. The total time of 80 minutes is well-invested for a complete, satisfying meal that feeds a family.

Easy Hobo Casserole ingredients laid out on a rustic kitchen counter

All the simple ingredients you need for a comforting family dinner.

Step-by-Step Instructions

Step 1: Prepare the Ingredients

Preheat your oven to 375°F (190°C). This ensures it’s perfectly heated when your casserole is ready to bake. Grab your potatoes and scrub them clean—no need to peel them, the skin adds texture and nutrients. Using a sharp knife or a mandoline slicer (carefully!), slice the potatoes into 1/8-inch thick rounds. Place them in a bowl of cold water to prevent browning. Dice your onion and mince the garlic. Having everything measured and ready (mise en place) makes the cooking process smooth and enjoyable.

Step 2: Brown the Beef

In a large skillet over medium-high heat, warm the olive oil or butter. Add the diced onion and sauté for 3-4 minutes until it becomes translucent and fragrant. Now, add the ground beef, breaking it apart with a wooden spoon. Cook for 6-8 minutes until it’s no longer pink. In the last minute, stir in the minced garlic—this prevents it from burning and becoming bitter. Season generously with salt, pepper, and the smoked paprika. Drain any excess grease for a less greasy, more refined final dish.

Step 3: Layer the Casserole

Drain the potato slices and pat them dry with a clean kitchen towel. This step is crucial for a non-watery sauce. In a 9×13 inch baking dish, start your first layer. Spread half of the sliced potatoes evenly across the bottom. Season lightly with a pinch of salt and pepper. Next, spoon all of the cooked ground beef and onion mixture over the potatoes, spreading it into an even layer. Top with the remaining potato slices, arranging them neatly or just scattering them for a rustic look. Season again.

Step 4: Create the Sauce

In a medium bowl, whisk together the condensed cream of mushroom soup, beef broth, milk, and Worcestershire sauce until completely smooth and lump-free. This creamy, tan-colored mixture is the magic elixir that will cook the potatoes and flavor the entire casserole. Slowly and evenly pour this sauce over the entire layered casserole, aiming to cover as much surface area as possible. Gently shake the dish to help the sauce seep down through the layers.

Step 5: Bake to Perfection

Cover the baking dish tightly with aluminum foil. This creates a steamy environment that perfectly tenderizes the potatoes. Place it in the preheated oven and bake for 45 minutes. After this time, carefully remove the foil—watch out for the steam! The casserole should be bubbling at the edges. Now, evenly sprinkle the shredded cheddar cheese over the top. Return the dish to the oven, uncovered, for the final 15-20 minutes. Bake until the cheese is melted, golden, and bubbly, and the potatoes are easily pierced with a fork. Let it rest for 5-10 minutes before serving; this allows the sauce to thicken slightly and makes for cleaner slices.

Nutritional Information

(Approximate values per serving, based on 6 servings)

  • Calories: ~420 kcal
  • Total Fat: 22g
  • Saturated Fat: 9g
  • Cholesterol: 85mg
  • Sodium: 750mg
  • Total Carbohydrates: 28g
  • Dietary Fiber: 3g
  • Sugars: 4g
  • Protein: 28g

Healthier Alternatives

You can easily adapt this Hobo Casserole to fit various dietary needs without sacrificing the comforting essence.

  • Leaner Protein: Swap ground beef for 93% lean ground turkey or chicken. The flavor profile will be milder, so consider adding an extra teaspoon of Worcestershire sauce or a dash of soy sauce for umami.
  • Lighter “Cream” Sauce: Use a low-sodium condensed soup and low-fat milk. For a from-scratch version, make a roux with 2 tbsp flour, 1 tbsp butter, and 1.5 cups of low-sodium broth, then stir in 1/2 cup of plain Greek yogurt at the end for creaminess and protein.
  • Boost Veggies: Add a layer of thinly sliced carrots, zucchini, or bell peppers with the potatoes for extra vitamins, fiber, and color.
  • Reduce Sodium: Use no-salt-added broth and a low-sodium soup. Rely more on herbs like thyme, rosemary, and the smoked paprika for flavor.

Serving Suggestions

This casserole is a complete meal in one dish, but a few simple sides can elevate it:

  • With a Crisp Salad: A simple green salad with a tangy vinaigrette cuts through the richness beautifully.
  • With Crusty Bread: A warm baguette or dinner rolls are perfect for sopping up every last bit of the delicious sauce.
  • With a Bright Vegetable: Steamed green beans, roasted broccoli, or honey-glazed carrots add a fresh, colorful component to the plate.

Common Mistakes

  • Not Draining the Beef Grease: This can make the final dish overly greasy. Take the extra minute to drain it.
  • Skipping the Potato Soak/Dry: Potatoes hold water. Skipping the soak and dry step can lead to a watery sauce instead of a creamy one.
  • Cutting Potatoes Too Thick: Thick slices won’t cook through in the allotted time, leaving you with crunchy potatoes. Aim for 1/8-inch uniformity.
  • Not Letting it Rest: Cutting in immediately causes the saucy layers to run everywhere. Letting it sit for 5-10 minutes allows everything to set.

Storing Tips

  • Refrigeration: Cool completely, then cover tightly or transfer to an airtight container. It will keep for 3-4 days in the refrigerator.
  • Freezing: This casserole freezes exceptionally well. Assemble and bake it, but cool it completely first. Wrap the entire dish (or individual portions) tightly in plastic wrap and then foil. Label and freeze for up to 3 months. Thaw overnight in the fridge before reheating.
  • Reheating: Reheat individual

Air Fryer Chicken Tenders Recipe

“`html

Air Fryer Chicken Tenders Recipe

Introduction

Did you know that air fryer recipes can reduce fat content by up to 70-80% compared to traditional deep frying? This fact alone makes the quest for the perfect Air Fryer Chicken Tenders recipe more than just a culinary trend—it’s a smarter way to enjoy the crispy, golden-brown comfort food we all love without the guilt. Gone are the days of greasy, soggy tenders. With the magic of rapid air circulation, we can achieve an irresistibly crunchy exterior and a juicy, tender interior using just a fraction of the oil.

This recipe is your ticket to a quick, family-friendly meal that doesn’t compromise on flavor or texture. We’re using a simple blend of Panko breadcrumbs and pantry spices to create a coating that shatters with every bite, locking in the natural juices of the chicken. Whether you’re preparing a quick weeknight dinner, a game-day snack, or a protein-packed lunch for the kids, these tenders are incredibly versatile and consistently delicious. Let’s dive into how you can make the best air fryer chicken tenders right in your own kitchen.

Ingredients List

Gather these simple, flavorful ingredients. Each plays a specific role in creating the perfect texture and taste.

  • 1.5 lbs chicken breast tenders (or boneless, skinless chicken breasts cut into 1-inch strips). Look for plump, pink tenders with minimal visible fat for the best results.
  • 1 cup all-purpose flour. This is the foundation of our dredge, helping the egg wash adhere. For a gluten-free swap, use a 1:1 gluten-free flour blend.
  • 2 large eggs, beaten. They act as the “glue” for the breadcrumbs, creating a seamless, golden crust.
  • 1.5 cups Panko breadcrumbs. The star of the show! Panko’s larger, flakier crumbs create an airier, crispier crust than regular breadcrumbs. For a finer texture, you can pulse them briefly in a food processor.
  • 1 tsp garlic powder. Provides a warm, savory depth without the bitterness of raw garlic.
  • 1 tsp paprika (sweet or smoked). Adds a subtle sweetness and a beautiful red hue. Smoked paprika will give a deeper, BBQ-like flavor.
  • 1/2 tsp onion powder. Offers a sweet, aromatic base note that complements the garlic.
  • 1/2 tsp dried oregano or thyme. Introduces an herby, slightly floral complexity. Fresh herbs can be used (triple the amount), but add them to the egg wash, not the dry breadcrumbs.
  • 1 tsp salt, plus more for seasoning chicken.
  • 1/2 tsp black pepper.
  • Cooking spray (avocado or olive oil). Essential for achieving that all-over crispiness. A high-smoke point oil spray works best.

Timing

Prep Time 15 minutes
Cook Time 10-12 minutes
Total Time ~27 minutes

One of the most compelling advantages of this Air Fryer Chicken Tenders recipe is its speed. Traditional oven-baking can take 20-25 minutes, not including preheating time, and deep-frying involves lengthy oil heating and messy cleanup. From pantry to plate in under 30 minutes, the air fryer streamlines the process dramatically. The rapid cooking also means the chicken retains more moisture, preventing the dryness that can plague slower cooking methods.

Crispy golden air fryer chicken tenders arranged on a white plate with dipping sauce

Golden, crispy air fryer chicken tenders fresh from the basket, ready for dipping.

Step-by-Step Instructions

Step 1: Prepare the Chicken

Pat your chicken tenders completely dry with paper towels. This is a non-negotiable step! Any surface moisture will steam the chicken and create a barrier, preventing the breading from sticking properly. Once dry, season both sides lightly with a pinch of salt and pepper. Let them sit for 5 minutes while you set up your dredging station—this allows the seasoning to penetrate slightly.

Step 2: Create the Dredging Stations

Set up three shallow bowls or plates in an assembly line. In the first bowl, place the all-purpose flour. In the second bowl, beat the two eggs until uniform and frothy. I like to add a tablespoon of water or milk here to thin it out slightly for easier coating. In the third bowl, combine the Panko breadcrumbs, garlic powder, paprika, onion powder, dried herbs, salt, and black pepper. Use a fork or your fingers to mix thoroughly, ensuring the spices are evenly distributed throughout the Panko.

Step 3: Bread the Tenders

Working with one tender at a time, dredge it in the flour, shaking off any excess. Next, dip it fully into the egg wash, letting the excess drip back into the bowl. Finally, press it firmly into the seasoned Panko mixture, coating all sides. Use your dry hand to sprinkle and pat extra crumbs onto any bare spots. The key here is a firm press to ensure maximum adhesion. Place the breaded tender on a wire rack or parchment-lined tray. Repeat with all tenders. This “dry-wet-dry” method is your secret to a crust that won’t fall off.

Step 4: Air Fry to Perfection

Preheat your air fryer to 400°F (200°C) for 3-5 minutes. Lightly spray the basket with cooking spray. Arrange the tenders in a single layer without overcrowding—they should not touch to allow for proper air circulation. You will likely need to cook in batches. Lightly spray the tops of the tenders with oil. This final mist is what gives you that beautiful, all-over golden color and crunch. Air fry for 6 minutes, then carefully flip each tender. Spray the second side lightly and cook for another 4-6 minutes, or until the coating is deep golden brown and the internal temperature of the chicken reaches 165°F (74°C) on a meat thermometer.

Nutritional Information

(Per serving, based on 4 servings. Values are approximate.)

  • Calories: ~320 kcal
  • Protein: 35g
  • Carbohydrates: 25g
  • Dietary Fiber: 1g
  • Sugars: 1g
  • Fat: 8g (Saturated Fat: 2g)
  • Sodium: ~650mg

Compared to a traditional deep-fried version which can easily contain 25g+ of fat and 450+ calories per serving, this air-fried method offers a significantly lighter yet equally satisfying alternative.

Healthier Alternatives

You can easily tailor this recipe to fit various dietary needs without sacrificing the crave-worthy crunch:

  • For a Keto/Low-Carb Version: Swap the Panko for crushed pork rinds or finely grated Parmesan cheese mixed with almond flour. The result is a deeply savory, ultra-crispy coating.
  • For Whole30/Paleo: Use almond flour or tapioca flour for the initial dredge, and replace Panko with a mixture of crushed plantain chips or almond meal. Ensure all spices are compliant.
  • To Reduce Sodium: Omit the added salt in the breadcrumb mixture and use a salt-free seasoning blend. The natural savoriness of the spices and chicken often provides enough flavor.
  • For an Extra Fiber Boost: Use whole wheat Panko breadcrumbs or mix regular Panko with a few tablespoons of ground flaxseed or oat fiber.

Serving Suggestions

These versatile tenders are a blank canvas for your favorite flavors!

  • Classic Dipping Trio: Serve with honey mustard, barbecue sauce, and ranch dressing.
  • Make it a Meal: Pile them on a bed of crisp greens for a protein-packed salad, tuck them into brioche buns with coleslaw, or serve alongside air-fried sweet potato fries and roasted broccoli.
  • Global Twist: Drizzle with sriracha mayo and sesame seeds for an Asian-inspired kick, or sprinkle with grated Parmesan and serve with marinara for a “chicken parm” experience.

Common Mistakes

  • Skipping the Preheating: Putting food into a cold air fryer can lead to uneven cooking and a soggy crust. Always preheat.
  • Overcrowding the Basket: This is the #1 cause of steaming instead of frying. Cook in batches for the crispiest results.
  • Not Using a Light Oil Spray: The breadcrumbs need a tiny amount of fat to crisp up and brown beautifully. Don’t skip the spray, but don’t drench them either.
  • Forgetting to Flip: Flipping halfway through ensures even browning and cooking on all sides.

Storing Tips

  • Refrigeration: Allow leftovers to cool completely, then store in an airtight container in the fridge for up to 3-4 days.
  • Freezing: Freeze cooked, cooled tenders in a single layer on a baking sheet before transferring to a freezer bag. They’ll keep for 2-3 months. Reheat directly from frozen in the air fryer at 375°F for 5-8 minutes.
  • Reheating: To restore crispiness, always reheat in the air fryer at 375°F for 3-4 minutes. The microwave will make them soft and rubbery.
Close-up of a crispy air fryer chicken tender being dipped into a bowl of honey mustard sauce

The perfect bite: a crispy, well-seasoned tender dipped in creamy honey mustard.

Conclusion

This Air Fryer Chicken Tenders recipe proves that you don’t need a vat of oil to achieve supremely crispy, flavorful, and juicy chicken. With a handful of simple ingredients and about half an hour, you can create a crowd-pleasing dish that’s both delicious and a healthier choice. The combination of the air fryer’s efficiency and the clever use of Panko breadcrumbs and spices delivers restaurant-quality results right at home.

Air Fryer Mozzarella Sticks Recipe

“`html

Air Fryer Mozzarella Sticks Recipe

Introduction

Did you know that over 65% of home cooks now own an air fryer, seeking healthier ways to enjoy their favorite fried foods? This surge in popularity makes finding the perfect Air Fryer Mozzarella Sticks recipe more relevant than ever. Forget the greasy, deep-fried versions of your past. Today, we’re unlocking the secret to creating irresistibly crispy, golden-brown mozzarella sticks with a molten, stretchy center—all with a fraction of the oil and mess. This recipe is designed for maximum flavor and crunch, proving that your favorite appetizer can be both indulgent and smart.

Whether you’re hosting a game-day party, need a quick after-school snack, or are simply craving a cheesy treat, these air fryer mozzarella sticks deliver. The beauty lies in the customization: swap cheeses, adjust seasonings, or go gluten-free without sacrificing that satisfying texture. Ready to transform a block of cheese into a crowd-pleasing masterpiece in just minutes? Let’s dive in.

Ingredients List

Gather these simple ingredients for the classic version, with expert notes and substitutions for every need.

  • 12 Mozzarella String Cheese Sticks: The star. Use full-fat for the best melt and stretch. For a sharper flavor, try low-moisture mozzarella blocks cut into ½-inch sticks.
  • ½ cup All-Purpose Flour: Creates the initial adhesive layer for the breading. For a gluten-free option, use 1:1 gluten-free flour blend or almond flour for a nuttier taste.
  • 2 large Eggs: Beaten. The “glue” that helps the breadcrumbs stick. For an egg-free version, a thick flax egg (1 tbsp ground flax + 2.5 tbsp water per egg) works well.
  • 1 cup Italian-Seasoned Panko Breadcrumbs: The key to ultimate crunch. Panko’s larger flakes create a lighter, airier crust. For plain panko, add 1 tsp garlic powder, 1 tsp dried oregano, and ½ tsp salt.
  • ½ cup Grated Parmesan Cheese: Mixed into the breadcrumbs for a savory, umami depth. Pecorino Romano offers a saltier punch.
  • Cooking Spray (Avocado or Olive Oil): Essential for achieving that golden, crispy finish in the air fryer.
  • Marinara Sauce, for serving: The classic dip. Warm it up with a pinch of red pepper flakes for a subtle kick.

Timing

Prep Time15 minutes
Cook Time8 minutes
Total Time23 minutes (plus freezing)

Compared to traditional deep-frying methods, which require 10-15 minutes of active frying time and additional time for oil to heat, this air fryer method is significantly faster and more energy-efficient. The active hands-on time is under 10 minutes, with the air fryer doing the heavy lifting. The mandatory 30-minute freeze ensures no cheese leakage—a step that saves you from a messy cleanup later.

Crispy golden air fryer mozzarella sticks on a plate with marinara sauce
Crispy, golden-brown air fryer mozzarella sticks ready for dipping.

Step-by-Step Instructions

Step 1: Prepare the Breading Station

Set up three shallow bowls or plates in an assembly line. In the first, place the flour. In the second, beat the two eggs until smooth and frothy. In the third, combine the panko breadcrumbs and grated Parmesan cheese, mixing thoroughly with your fingers to break up any clumps. This “standard breading procedure” (flour, egg, crumbs) is non-negotiable for a perfect, cohesive crust that won’t slide off.

Step 2: Coat the Cheese Sticks

Working with one mozzarella stick at a time, roll it in the flour, shaking off any excess. This dry layer helps the egg adhere. Next, dip it fully into the beaten egg, letting the excess drip back into the bowl. Finally, roll it in the panko-Parmesan mixture, pressing gently to ensure an even, generous coating. For an extra-thick crust, you can repeat the egg and breadcrumb steps once more. Place the coated stick on a parchment-lined baking sheet.

Step 3: Freeze for Success

This is the most critical step for air fryer success! Place the entire baking sheet in the freezer for at least 30 minutes, or up to 2 hours. Freezing solidifies the cheese and sets the breading, which prevents blowouts and ensures the cheese melts without leaking during cooking. If making ahead, you can transfer the frozen sticks to a freezer bag after this step and store for up to 2 months.

Step 4: Air Fry to Perfection

Preheat your air fryer to 400°F (200°C) for 3 minutes. Lightly spray the basket with oil. Arrange the frozen mozzarella sticks in a single layer, ensuring they are not touching. Lightly spray the tops of the sticks with oil—this promotes browning and crispiness. Air fry for 6-8 minutes, flipping halfway through, until the exterior is deeply golden and crisp. No need to thaw; cook directly from frozen!

Nutritional Information

(Per serving, approx. 2 sticks)

  • Calories: ~280 kcal
  • Total Fat: 16g
  • Saturated Fat: 8g
  • Cholesterol: 75mg
  • Sodium: 620mg
  • Total Carbohydrates: 18g
  • Dietary Fiber: 1g
  • Sugars: 2g
  • Protein: 17g

Note: Values are estimates. Using part-skim mozzarella, egg whites only, and baking spray can reduce fat and calories by up to 30%.

Healthier Alternatives

Craving the crunch without the guilt? These swaps maintain fantastic flavor and texture:

  • Breading: Use whole-wheat panko or pulse rolled oats in a food processor for a fiber boost. For a low-carb, keto-friendly version, use pork rind crumbs or crushed almond flour mixed with Italian seasoning.
  • Cheese: Opt for part-skim mozzarella sticks to reduce saturated fat. For a dairy-free version, use vegan mozzarella blocks that are designed to melt.
  • Cooking Method: The air fryer itself is the healthiest swap, using up to 80% less oil than deep frying. For even less oil, use a high-quality non-stick basket and rely on the lightest mist of spray.
  • Dipping Sauce Swap marinara for a Greek yogurt-based ranch or a spicy salsa for added protein and fewer calories.

Serving Suggestions

Elevate your mozzarella sticks from snack to sensation:

  • Dipping Trio: Offer marinara, creamy garlic aioli, and a spicy chipotle ranch for a flavor adventure.
  • Appetizer Platter: Serve alongside air fryer chicken wings, vegetable crudités, and cured meats for a full spread.
  • Salad Topper: Slice sticks in half and place on a fresh Caesar or garden salad for a warm, crunchy protein element.
  • Game Day: Pair with sliders, nachos, and cold beverages for the ultimate party lineup.

Common Mistakes

  • Skipping the Freeze: This leads to cheese erupting from the breading, creating a mess. Always freeze.
  • Overcrowding the Basket: Sticks need space for hot air to circulate. Cook in batches for even crispiness.
  • Using Wet Cheese: Pat string cheese sticks dry with a paper towel before breading to help the flour adhere.
  • Not Preheating the Air Fryer: A cold start leads to soggy breading. Always preheat for the crispiest results.

Storing Tips

  • Make-Ahead/Freezing: After breading and freezing on the tray, transfer sticks to an airtight freezer bag or container. They’ll keep for 2-3 months. Cook directly from frozen, adding 1-2 minutes to the air fry time.
  • Leftovers: Reheat in the air fryer at 375°F for 3-4 minutes to restore crispiness. The microwave will make them soggy.
  • Uncooked Breading: The flour-egg-breadcrumb coating can be prepared and frozen on the sticks, but do not refrigerate uncooked breaded sticks as the coating will become gummy.
Close-up of a crispy air fryer mozzarella stick being pulled apart to show the melted cheese
The ultimate test of a perfect mozzarella stick: the glorious, stretchy cheese pull.

Conclusion

Mastering these Air Fryer Mozzarella Sticks means you have a guaranteed hit for any occasion—a recipe that’s faster, cleaner, and healthier than the deep-fried original without compromising on that addictive crunch and gooey center. With the flexibility to customize for dietary needs and the pro tips to avoid common pitfalls, you’re equipped for cheesy success every time.

Air Fryer Mozzarella Sticks Recipe

“`html

Air Fryer Mozzarella Sticks Recipe

Introduction

Did you know that the average American consumes over 35 pounds of cheese per year? With such a love for cheese, it’s no wonder that mozzarella sticks are a perennial favorite. But what if you could enjoy that same crispy, gooey, irresistible snack with up to 70% less oil than traditional deep-frying? That’s the magic of the Air Fryer Mozzarella Sticks recipe. This method delivers that perfect golden-brown crunch we all crave, while keeping things surprisingly light and manageable in your kitchen. Whether you’re hosting game day, need a quick after-school snack, or want a crowd-pleasing appetizer that won’t leave you feeling weighed down, this recipe is your new secret weapon. Let’s dive into how you can create this restaurant-quality treat right at home, with endless options for customization to suit every diet and palate.

Ingredients List

Gather these simple ingredients for the ultimate crispy, melty snack. Each plays a crucial role in texture and flavor.

  • 12 Mozzarella String Cheese Sticks: The star! Their low-moisture, pre-portioned form is ideal. For a sharper flavor, try part-skim mozzarella blocks cut into ½-inch sticks.
  • 1/2 cup All-Purpose Flour: Creates the initial dry layer that helps the egg adhere. For a gluten-free option, use a 1:1 gluten-free flour blend or almond flour for a nuttier taste.
  • 2 large Eggs: The “glue” for the breadcrumbs. Lightly beaten until smooth and frothy.
  • 1 cup Italian-Seasoned Panko Breadcrumbs: The key to an ultra-crispy, shattering crust. Panko’s larger flakes create more surface area. For plain panko, add 1 tsp garlic powder, 1 tsp dried oregano, and ½ tsp salt.
  • 1/2 cup Plain Breadcrumbs: Mixed with panko for a more cohesive, golden coating.
  • 1/2 tsp Garlic Powder & 1/2 tsp Onion Powder: Flavor boosters that permeate the crust. Smoked paprika (¼ tsp) is a fantastic addition for a subtle kick.
  • Non-Stick Cooking Spray: Essential for achieving that all-over crispiness in the air fryer without deep frying.
  • Marinara Sauce, for serving: The classic dip. Warm it up with a pinch of red pepper flakes for an extra dimension.

Timing

Prep Time 15 minutes
Cook Time 8 minutes
Total Time 23 minutes (plus 30 min freeze)

Compared to the average fried mozzarella stick recipe, which involves heating a large pot of oil and longer cook times, this air fryer version slashes active cooking time significantly. The 30-minute freeze is non-negotiable for structure but is mostly hands-off. From start to finish, you’re looking at under an hour for a result that rivals any pub or restaurant, making it a vastly more efficient choice for busy home cooks.

Crispy golden Air Fryer Mozzarella Sticks arranged on a plate with a bowl of marinara sauce for dipping

Step-by-Step Instructions

Step 1: Prepare the Breading Station

Set up three shallow bowls or plates in an assembly line. In the first, place the all-purpose flour. In the second, beat the two eggs until uniform. In the third, combine the panko breadcrumbs, plain breadcrumbs, garlic powder, and onion powder. Mix the crumbs thoroughly with a fork to distribute the seasonings evenly. This “standard breading procedure” is your roadmap to a perfect, non-soggy crust.

Step 2: Bread the Mozzarella Sticks

Working with one mozzarella stick at a time, roll it in the flour until lightly coated, shaking off any excess. This dry layer is crucial—it helps the egg stick. Next, dip it into the beaten egg, letting the excess drip back into the bowl. Finally, roll it firmly in the breadcrumb mixture, pressing gently to ensure a thick, even coating. I like to use one hand for dry steps and one for wet to avoid “club fingers.” Place the breaded stick on a parchment-lined baking sheet. Repeat with all sticks.

Step 3: Freeze for Success

This is the most important step for preventing a cheese explosion! Place the entire baking sheet in the freezer for at least 30 minutes, or until the sticks are completely firm. You can freeze them for up to 3 months at this stage if wrapped well. Freezing solidifies the cheese and sets the coating, ensuring it crisps up before the cheese has a chance to melt and leak out.

Step 4: Air Fry to Perfection

Preheat your air fryer to 400°F (200°C) for 3 minutes. Lightly spray the basket with cooking spray. Arrange the frozen mozzarella sticks in a single layer, ensuring they are not touching. Lightly spray the tops of the sticks with oil—this promotes browning. Air fry for 6-8 minutes, flipping halfway through, until they are deep golden brown and crispy. No need to thaw! Serve immediately with warm marinara sauce.

Nutritional Information

(Per serving, 2 mozzarella sticks, approximate values)

  • Calories: ~280 kcal
  • Total Fat: 14g
  • Saturated Fat: 7g
  • Carbohydrates: 22g
  • Fiber: 1g
  • Sugar: 2g
  • Protein: 16g
  • Sodium: 580mg

Note: Values are estimates. Using low-fat cheese, egg whites, and whole-wheat breadcrumbs can alter these numbers significantly.

Healthier Alternatives

Craving the crunch without the guilt? These swaps deliver big flavor while cutting calories and fat:

  • Cheese Swap: Use part-skim mozzarella string cheese or even light string cheese. The flavor remains milky and mild, with a noticeable reduction in saturated fat.
  • Breading Revolution: Replace half the breadcrumbs with crushed whole-grain cereal (like bran flakes) or pork rinds for a low-carb, high-fiber crust. For a purely gluten-free, low-carb option, use a mixture of almond flour and grated Parmesan cheese (2:1 ratio).
  • Egg Wash Substitute: For a lighter bind, use ¼ cup of buttermilk or even a simple wash of Dijon mustard thinned with a teaspoon of water. It adds tang and helps the coating stick.
  • “Fry” Smarter: Omit the cooking spray for an oil-free version. The crust will be slightly less golden but still very crisp, especially with panko.

Serving Suggestions

Move beyond the basic marinara! These crispy sticks are a versatile canvas for dipping and pairing.

  • Dipping Sauces: Creamy ranch, spicy sriracha mayo, balsamic glaze, warm pizza sauce, or a quick garlic-herb yogurt dip.
  • Meal Integration: Crumble them over a Caesar salad for the ultimate crunchy topping, serve alongside a bowl of Italian wedding soup, or use them as a fun, hands-on component of a charcuterie board.
  • For a Crowd: Set up a “mozzarella stick bar” with small bowls of different sauces (marinara, pesto, alfredo) and toppings like grated Parmesan and chopped fresh basil for a DIY appetizer experience.

Common Mistakes

  • Skipping the Freeze: This leads to molten cheese leaking everywhere. The coating needs a head start to set.
  • Overcrowding the Basket: Sticks need space for hot air to circulate. Cook in batches for the crispiest results.
  • Using Fresh, High-Moisture Mozzarella: The water content is too high. Always opt for low-moisture string cheese or blocks.
  • Not Preheating the Air Fryer: A cold start leads to uneven cooking and a less crispy exterior.

Storing Tips

  • Make-Ahead/Freezing: After breading and freezing on the tray, transfer the solid sticks to a freezer-safe bag or container for up to 3 months. Cook directly from frozen, adding 1-2 minutes to the air fry time.
  • Leftovers: Reheat in the air fryer at 375°F for 3-4 minutes to restore crispiness. The microwave will make them soggy.
  • Uncooked Breading: The flour, egg, and crumb mixtures can be prepared a day ahead and stored covered in the fridge.
Close-up view of a crispy Air Fryer Mozzarella Stick being pulled apart to reveal the hot, stretchy melted cheese inside

Conclusion

Mastering Air Fryer Mozzarella Sticks is about more than just a recipe—it’s about unlocking a quick, healthier, and deeply satisfying way to enjoy a classic comfort food. With the power of your air fryer, you get all the crunch without the greasy mess, and the flexibility to make them gluten-free, lower-carb, or simply packed with your favorite herbs and spices. The process is straightforward, the results are consistently impressive, and they’re guaranteed to be a hit with family and friends. So, what are you waiting for? Grab that air fryer basket and get ready for the perfect pull-apart cheese moment.

Frequently Asked Questions (FAQs)

***Can I use regular mozzarella cheese instead of string cheese?***

Yes, but it must be low-moisture, block mozzarella (often labeled “for pizza”). Cut it into ½-inch by 3-inch sticks. Avoid fresh mozzarella packed in water, as it will make the coating soggy and cause leaks.

***Why are my mozzarella sticks exploding in the

Air Fryer Meatballs Recipe

“`html

Air Fryer Meatballs Recipe

Introduction

Did you know that using an air fryer can reduce the fat content in meatballs by up to 70% compared to pan-frying? If you’re searching for a quick, easy, and delicious way to get perfectly juicy, golden-brown meatballs on the table in under 20 minutes, you’ve found your answer. This air fryer meatballs recipe is a game-changer for busy weeknights, meal prep, or even party appetizers. Forget about messy splatters and uneven cooking—the air fryer circulates hot air to create a beautifully caramelized exterior while locking in all the savory juices inside. Using simple, pantry-staple ingredients like ground beef, breadcrumbs, and Italian seasoning, this recipe delivers maximum flavor with minimal effort. Let’s dive in and transform how you make one of the most beloved comfort foods.

Ingredients List

Gather these simple ingredients for meatballs that are tender, flavorful, and perfectly cooked every time. I’ve included sensory notes and substitutions to help you customize.

  • 1 lb (450g) Ground Beef (80/20 blend): The 20% fat content is key for juicy, succulent meatballs. For a leaner option, use 90/10, but know they may be slightly less moist. Substitution: Ground turkey, chicken, pork, or a plant-based ground meat alternative.
  • 1/2 cup Fine Breadcrumbs: Acts as a binder, absorbing juices and creating a tender texture. Substitution: Panko breadcrumbs for extra crispiness, or gluten-free breadcrumbs/rolled oats for dietary needs.
  • 1/4 cup Grated Parmesan Cheese: Adds a salty, umami depth and helps with browning. Substitution: Pecorino Romano or a nutritional yeast for a dairy-free version.
  • 1 Large Egg: The essential binder that holds everything together. Substitution: For an egg-free binder, mix 1 tbsp ground flaxseed with 3 tbsp water and let sit for 5 minutes.
  • 1/4 cup Whole Milk or Beef Broth: Milk adds richness and moisture. Broth is a great dairy-free alternative that boosts savory flavor.
  • 2 tsp Italian Seasoning: The aromatic heart of the recipe—a blend of oregano, basil, thyme, and rosemary. Substitution: 1/2 tsp each of dried oregano and basil, plus a pinch of red pepper flakes for heat.
  • 2 cloves Garlic, minced: For that essential pungent, savory kick. Substitution: 1/2 tsp garlic powder.
  • 1/4 cup Fresh Parsley, finely chopped (optional but recommended): Adds a bright, fresh, herbal note and vibrant color.
  • 1 tsp Kosher Salt & 1/2 tsp Black Pepper: Seasoning fundamentals. Always taste your mixture before forming balls.

Timing

Prep Time10 minutes
Cook Time10-12 minutes
Total Time~22 minutes

One of the most compelling advantages of this air fryer meatballs recipe is its incredible speed. Traditional oven-baked meatballs can take 25-30 minutes, not including preheating time. Stovetop methods require constant attention and flipping. Here, from mixing bowl to plate takes just over 20 minutes. The air fryer’s rapid air circulation cooks the meatballs evenly and quickly, shaving at least 15 minutes off the average recipe time. This efficiency makes it ideal for last-minute dinners or when you need to feed a hungry crowd fast.

Golden brown air fryer meatballs in a basket, ready to be served

Step-by-Step Instructions

Step 1: Prepare Your Meatball Mixture

In a large mixing bowl, combine the ground beef, breadcrumbs, grated Parmesan, egg, milk (or broth), Italian seasoning, minced garlic, chopped parsley, salt, and pepper. Now, here’s my pro tip: use your hands to mix! It might feel a bit messy, but using a fork or spoon can overwork the meat, leading to tough meatballs. Gently fold and combine just until all ingredients are evenly distributed. You should have a moist, cohesive mixture that holds together when pinched. Avoid compacting or kneading the meat.

Step 2: Form Uniform Meatballs

Lightly wet your hands with water or a bit of oil to prevent sticking. Scoop out about 1 to 1.5 tablespoons of the mixture for each meatball. Gently roll them between your palms to form smooth, round balls, about 1 to 1.5 inches in diameter. Consistency is crucial here for even cooking—try to make them all the same size. You should end up with 18-20 meatballs. Place them on a plate or baking sheet as you work.

Step 3: Preheat and Arrange

Preheat your air fryer to 400°F (200°C) for about 3 minutes. This ensures a hot cooking environment for immediate searing and prevents sticking. Lightly spray or brush the air fryer basket with a neutral oil (like avocado or canola). Arrange the meatballs in a single layer in the basket, ensuring they are not touching. They need space for the hot air to circulate freely. You will likely need to cook in batches to avoid overcrowding.

Step 4: Air Fry to Perfection

Cook the meatballs at 400°F (200°C) for 10-12 minutes. I recommend checking at the 8-minute mark. Shake the basket gently at the halfway point (around 5-6 minutes) to promote even browning on all sides. The meatballs are done when they are deeply golden brown on the outside and have reached an internal temperature of 165°F (74°C) when checked with a meat thermometer. The exterior should be slightly crisp, giving way to a tender, juicy interior.

Step 5: Rest and Serve

Once cooked, use tongs to transfer the meatballs to a clean plate. Let them rest for 2-3 minutes before serving. This short resting period allows the juices to redistribute throughout the meatball, ensuring every bite is moist and flavorful. Serve immediately with your favorite sauce, pasta, or as an appetizer.

Nutritional Information

(Approximate values per meatball, based on a batch of 20):

  • Calories: 70 kcal
  • Protein: 5g
  • Total Fat: 4g (Saturated Fat: 1.5g)
  • Carbohydrates: 3g
  • Fiber: 0.2g
  • Sugar: 0.2g
  • Sodium: 120mg

Note: Using an air fryer significantly reduces added fat compared to pan-frying in oil, making this a healthier cooking method.

Healthier Alternatives

You can easily adapt this recipe for various dietary needs without sacrificing the delicious, savory flavor that makes these meatballs so good.

  • Leaner Protein: Swap the 80/20 beef for 93% lean ground turkey or chicken. Add 1 tbsp of olive oil or an extra splash of broth to the mixture to compensate for the lower fat content and maintain moisture.
  • Gluten-Free: Use certified gluten-free breadcrumbs, crushed gluten-free crackers, or almond flour.
  • Low-Carb/Keto: Replace breadcrumbs with 1/4 cup of finely grated Parmesan cheese (the powdery kind) or crushed pork rinds for an excellent, crispy, carb-free binder.
  • Dairy-Free: Omit the Parmesan cheese and use a dairy-free Parmesan alternative or 1 tbsp of nutritional yeast. Use beef or vegetable broth instead of milk.

Serving Suggestions

These versatile air fryer meatballs are the star of countless meals.

  • Classic Spaghetti & Meatballs: Toss with your favorite marinara sauce and serve over a bed of al dente pasta with extra Parmesan.
  • Meatball Subs: Pile them into a toasted hoagie roll, smother with marinara and melted provolone or mozzarella cheese.
  • Appetizer Platter: Serve on a platter with toothpicks and dipping sauces like marinara, creamy garlic aioli, or a spicy Sriracha mayo.
  • Over Polenta or Mashed Potatoes: Create a comforting bowl with creamy polenta or mashed potatoes, topped with meatballs and a rich gravy.
  • In a Soup: Add to a pot of Italian wedding soup or a simple vegetable broth for a hearty twist.

Common Mistakes

  • Overmixing the Meat: This is the #1 cause of tough, dense meatballs. Mix just until combined.
  • Overcrowding the Basket: Meatballs need space for air circulation. Cook in batches for the best browning and texture.
  • Skipping the Preheat: Starting with a cold basket can lead to sticking and uneven cooking.
  • Not Checking Internal Temperature: Guessing doneness can lead to undercooked or dry meatballs. A quick-read thermometer is your best friend.
  • Using Meat Straight from the Fridge: Letting your ground meat sit at room temperature for 10-15 minutes before mixing makes it easier to handle and blend with other ingredients.

Storing Tips

  • Refrigeration: Let cooked meatballs cool completely. Store in an airtight container in the refrigerator for up to 3-4 days.
  • Freezing for Meal Prep: Place cooled meatballs in a single layer on a baking sheet and freeze until solid (about 1-2 hours). Then transfer to a freezer-safe bag or container. They will keep for up to 3 months. Reheat directly from frozen in the air fryer at 375°F for 8-10 minutes or until heated through.
  • Reheating: The air fryer is the best tool to recrisp the exterior. Reheat at 350°F for 3-5 minutes until warm. You can also microwave, but they will lose their crispy texture.
Close-up of juicy air fryer meatballs served with pasta and sauce

Conclusion

This air fryer meatballs recipe proves that

Air Fryer French Fries Recipe

“`html

Air Fryer French Fries Recipe

Introduction

Did you know that air fryer french fries can contain up to 80% less fat than their deep-fried counterparts, according to a 2023 study in the Journal of Food Science? This simple fact is revolutionizing how we enjoy our favorite crispy, golden snack. Forget soggy, greasy disappointments—today, we’re unlocking the secret to achieving that perfect, restaurant-style crunch using just your air fryer and a handful of wholesome ingredients. Whether you’re a busy parent, a health-conscious foodie, or simply craving a delicious side dish, this Air Fryer French Fries recipe is your ticket to guilt-free indulgence.

The magic lies in the method. By using hot, circulating air, the air fryer mimics deep frying’s crispiness without submerging your potatoes in oil. The result? Fries that are irresistibly crunchy on the outside, fluffy and tender on the inside, and packed with flavor from customizable seasonings. Let’s dive in and transform humble potatoes into the star of your next meal.

Ingredients List

Gather these simple ingredients for the foundation of your perfect fries. Each plays a crucial role in texture and flavor.

  • 2 large Russet or Yukon Gold potatoes (about 1.5 lbs)Russets are the classic choice for a fluffy interior and crisp exterior, while Yukon Golds offer a naturally buttery flavor and creamy texture.
  • 1 ½ tablespoons olive oil or avocado oilThis light coating helps the seasonings adhere and promotes even browning. Avocado oil has a higher smoke point for an extra-crispy finish.
  • 1 teaspoon kosher saltEssential for enhancing the potato’s natural flavor. Kosher salt dissolves evenly.
  • ½ teaspoon garlic powderAdds a savory, aromatic depth without burning. Substitution: Use 1 teaspoon of minced fresh garlic, but toss carefully to avoid clumping.
  • ½ teaspoon smoked paprikaProvides a subtle smokiness and beautiful red hue. Substitution: Sweet paprika or a pinch of cayenne for heat.
  • Optional for garnish: 2 tablespoons freshly chopped parsley or chives, and a sprinkle of grated Parmesan cheese.

Timing

Prep Time
15 minutes
Cook Time
18-22 minutes
Total Time
~35 minutes

Compared to traditional deep-frying, which involves heating a large volume of oil and careful temperature monitoring, this air fryer method is significantly quicker from start to finish. You save at least 15 minutes on active cooking time and eliminate the lengthy oil cooling and cleanup process.

Crispy golden air fryer french fries in a white basket, ready to eat

Step-by-Step Instructions

Step 1: Prepare the Potatoes

Thoroughly scrub your potatoes under cold water to remove any dirt. I prefer to leave the skin on for extra fiber, texture, and nutrients, but you can peel them if desired. Using a sharp knife or a mandoline for uniformity, cut the potatoes into ¼ to ½-inch thick sticks. Consistent size is the #1 secret to even cooking—no one wants a mix of burnt and undercooked fries!

Step 2: Soak and Dry

This step is non-negotiable for ultimate crispiness! Place the cut fries in a large bowl and cover them with cold water. Let them soak for at least 30 minutes (or up to 2 hours in the fridge). Soaking pulls out excess surface starch, which prevents gummy fries and promotes that satisfying crunch. After soaking, drain and rinse the potatoes. Now, dry them intensely. Use a clean kitchen towel or paper towels and pat them until they are completely bone-dry. Any residual moisture will steam the fries instead of frying them.

Step 3: Season and Toss

Transfer your perfectly dry fries to a dry, large bowl. Drizzle with the olive oil. In a small dish, mix together the salt, garlic powder, and smoked paprika. Sprinkle the seasoning mix over the potatoes. Now, use your hands to toss everything together, ensuring every single fry is lightly and evenly coated. This hands-on method guarantees no bland bites.

Step 4: Air Fry to Perfection

Preheat your air fryer to 380°F (193°C) for 3 minutes. Arrange the fries in the air fryer basket in a single layer—do not overcrowd! Work in batches if necessary. Cook for 12 minutes. Then, shake the basket or use tongs to flip the fries. Increase the temperature to 400°F (204°C) and cook for an additional 6-10 minutes, watching closely until they reach your desired level of golden-brown perfection. The two-temperature method ensures a cooked-through interior and a super-crispy exterior.

Nutritional Information

(Per serving, recipe serves 4)

  • Calories: ~180 kcal
  • Total Fat: 5g (compared to 15g+ in deep-fried)
  • Saturated Fat: 0.7g
  • Carbohydrates: 32g
  • Dietary Fiber: 3g
  • Sugars: 1g
  • Protein: 4g
  • Sodium: 590mg

Healthier Alternatives

You can easily tailor this recipe to fit specific dietary needs without sacrificing flavor:

  • Oil-Free Option: For an ultra-low-fat version, omit the oil entirely. Toss the dried fries with 1 tablespoon of aquafaba (chickpea brine) or a spritz of vegetable broth before seasoning. The result will be slightly less crispy but still delicious.
  • Lower Sodium: Reduce salt to ½ teaspoon and amplify flavor with 1 teaspoon of nutritional yeast, which adds a cheesy, umami punch.
  • Root Vegetable Swap: Substitute half the potatoes with sweet potatoes or parsnips for a vitamin boost and a delightful sweetness that pairs beautifully with smoked paprika.

Serving Suggestions

These versatile fries are far more than just a burger sidekick!

  • Classic Comfort: Serve alongside a juicy cheeseburger, crispy chicken tenders, or a classic meatloaf.
  • Gourmet Poutine: Top with cheese curds and a rich beef or mushroom gravy for a Canadian-inspired treat.
  • Breakfast Fries: Top with fried eggs, crumbled bacon, and a drizzle of sriracha for a hearty breakfast bowl.
  • Dipping Bar: Set out an array of dips: truffle aioli, sriracha mayo, classic ketchup, garlic herb yogurt, or spicy barbecue sauce.

Common Mistakes

  • Skipping the Soak: This leads to fries that are limp and stick together. The soak is crucial for removing starch.
  • Inadequate Drying: Wet fries steam instead of fry. Be meticulous with your towel-drying.
  • Overcrowding the Basket: Fries need space for air to circulate. Cook in single-layer batches for consistent results.
  • Not Preheating: A hot air fryer ensures immediate crisping. Always preheat.
  • Using Wet Seasonings Too Early: Adding fresh herbs or cheese before cooking can cause burning. Add these in the last minute of cooking or immediately after.

Storing Tips

  • Best Served Fresh: Fries are at their peak right out of the air fryer.
  • Refrigerating: Let leftovers cool completely, then store in an airtight container for up to 3 days.
  • Reheating: To restore crispiness, never use the microwave. Reheat in a preheated air fryer at 375°F for 3-5 minutes until hot and crisp again.
  • Freezing (Uncooked): After soaking and drying, you can freeze the raw, cut potatoes in a single layer on a baking sheet before transferring to a freezer bag. Cook directly from frozen, adding 3-5 extra minutes to the cooking time.
Close-up of crispy air fryer french fries with seasoning, served on a plate with dipping sauce

Conclusion

Mastering the art of Air Fryer French Fries is a game-changer for any home cook. With just a few simple ingredients, a crucial soaking step, and the magic of hot air circulation, you can create a snack or side dish that is undeniably crispy, flavorful, and significantly healthier than takeout. This recipe proves you don’t need a vat of oil to achieve fried food satisfaction.

Frequently Asked Questions (FAQs)

***Why do I need to soak the potatoes?***

Soaking removes excess surface starch. If this starch isn’t removed, it can cause the fries to stick together and result in a gummy, less crispy texture. It’s the secret to achieving that perfect, separate

Air Fryer Lemon Chicken Recipe

“`html

Air Fryer Lemon Chicken Recipe

Introduction

Did you know that air fryer cooking can reduce fat content by up to 80% compared to traditional frying? This incredible efficiency makes our Air Fryer Lemon Chicken not just a quick weeknight hero but a genuinely healthier choice for your family. If you’re searching for a dinner that delivers restaurant-quality flavor with minimal effort and cleanup, you’ve found your match. This recipe transforms simple chicken pieces into a zesty, juicy, and utterly satisfying meal. The magic lies in the bright, tangy lemon sauce that caramelizes slightly in the hot air, creating a sticky, flavorful glaze that clings to every tender bite. Perfect for those busy evenings when time is scarce but taste is non-negotiable, this dish proves that healthy eating doesn’t mean sacrificing flavor. Let’s dive into how you can create this vibrant, delicious dinner in no time.

Ingredients List

Gather these simple, flavorful ingredients. I’ve included sensory notes and substitutions to ensure success with what you have on hand.

  • 1.5 lbs (680g) boneless, skinless chicken breasts or thighs – Thighs will yield a juicier, more forgiving result with a richer flavor, while breasts are leaner. Look for pieces of even thickness for consistent cooking.
  • 3 tablespoons fresh lemon juice – The star of the show! Use freshly squeezed juice for a vibrant, tangy punch. Bottled juice lacks the bright, aromatic oils and can taste flat.
  • Zest of 1 large lemon – This is where the intense lemon fragrance lives. Use a microplane for fine zest that disperses evenly.
  • 3 cloves garlic, minced – Provides a savory, pungent base. For a milder flavor, use 1/2 teaspoon garlic powder.
  • 2 tablespoons olive oil – Helps with browning and carries flavors. Avocado oil is a great high-smoke-point substitute.
  • 1 tablespoon honey or maple syrup – A touch of sweetness balances the acidity and promotes beautiful caramelization. Agave nectar works too.
  • 1 teaspoon dried oregano – Offers an earthy, slightly bitter note that complements the lemon. Fresh thyme or rosemary (1 tbsp chopped) are excellent swaps.
  • 1/2 teaspoon paprika (smoked or sweet) – Adds color and a subtle warmth. Smoked paprika introduces a delightful, smoky depth.
  • Salt and freshly ground black pepper – Season to taste. I recommend starting with 3/4 tsp salt and 1/2 tsp pepper.
  • Fresh parsley or dill, for garnish (optional) – A sprinkle of green herbs adds a fresh, colorful finish.

Timing

Prep Time 10 minutes (plus 15-30 min marinating)
Cook Time 12-15 minutes
Total Time ~40 minutes

Compared to traditional oven-baked lemon chicken, which can take 45-60 minutes, the air fryer slashes cooking time by over 60%. The active prep is remarkably short—most of the “work” is hands-off marinating. This efficiency is a game-changer for weeknights, getting a flavorful, healthy protein on the table in less time than it takes for delivery to arrive.

Air Fryer Lemon Chicken cooking in the air fryer basket, showing golden brown edges and vibrant lemon slices

Step-by-Step Instructions

Step 1: Prepare the Lemon Marinade

In a medium bowl, whisk together the fresh lemon juice, lemon zest, minced garlic, olive oil, and honey. Take a moment to inhale—the bright, citrusy aroma is your first hint of the deliciousness to come. Whisk vigorously until the honey is fully dissolved and the mixture is emulsified (slightly thickened and unified). This forms the flavor foundation of your dish.

Step 2: Season and Marinate the Chicken

Pat your chicken pieces completely dry with paper towels. This is a crucial step for achieving a good sear, as moisture steams instead of browns. Place the chicken in a large resealable bag or shallow dish. Season both sides generously with salt, pepper, dried oregano, and paprika. Pour the lemon marinade over the chicken, ensuring every piece is well-coated. Seal the bag or cover the dish and let it marinate in the refrigerator for at least 15 minutes. For deeper flavor penetration, you can marinate for up to 4 hours. The acid in the lemon will gently tenderize the meat.

Step 3: Preheat and Arrange in Air Fryer

Preheat your air fryer to 380°F (193°C) for about 3 minutes. A quick preheat ensures immediate, even cooking. While it heats, remove the chicken from the marinade, letting any excess drip off. Reserve the leftover marinade in the bowl. Arrange the chicken pieces in a single layer in the air fryer basket, ensuring they are not touching or overlapping. Crowding leads to steaming, not crisping. If necessary, cook in batches.

Step 4: Air Fry to Perfection

Air fry the chicken for 10 minutes. Then, carefully open the basket. The chicken should be starting to turn golden. Brush or spoon some of the reserved marinade over the top of each piece. This mid-cook baste adds an extra layer of flavor and helps build that gorgeous glaze. Close and cook for an additional 2-5 minutes, or until the internal temperature of the chicken reaches 165°F (74°C) and the exterior is caramelized with dark golden spots.

Step 5: Rest and Serve

Once cooked, transfer the chicken to a clean plate or cutting board. Let it rest for 5 minutes. This allows the juices to redistribute throughout the meat, guaranteeing a moist and tender bite with every slice. While resting, you can quickly warm the remaining marinade in a small saucepan over medium heat for 1-2 minutes to create a simple sauce to drizzle over the top. Garnish with fresh chopped parsley or dill for a pop of color and freshness.

Nutritional Information

(Per serving, based on 4 servings with chicken breast)

  • Calories: ~245 kcal
  • Protein: 35g (Excellent source for muscle repair and satiety)
  • Carbohydrates: 6g (Primarily from honey and lemon)
  • Dietary Fiber: 0.5g
  • Sugars: 4g (Naturally occurring)
  • Fat: 9g (Mostly heart-healthy monounsaturated from olive oil)
  • Saturated Fat: 1.5g
  • Sodium: ~450mg (Adjustable based on salt used)

Healthier Alternatives

You can easily tweak this recipe to fit various dietary needs without losing its signature zing:

  • Lower Sugar: Replace honey with a pinch of granulated erythritol or monk fruit sweetener, or simply omit it. The caramelization will be less pronounced, but the lemon flavor will still shine.
  • Reduced Sodium: Use a low-sodium soy sauce alternative (like coconut aminos) in place of some of the salt, or rely heavily on garlic, pepper, and herbs for flavor.
  • Oil-Free: Substitute the olive oil with 2 tablespoons of low-sodium chicken broth. The browning will be less intense, but the chicken will still be flavorful and moist.
  • Higher Protein/Lower Fat: Stick with chicken breasts and use an oil spray instead of liquid oil for coating the basket.

Serving Suggestions

This versatile chicken is the perfect centerpiece for countless meals:

  • Over Greens: Slice and serve atop a big bed of spinach or arugula with cherry tomatoes, cucumber, and a light vinaigrette for a satisfying salad.
  • With Grains: Fluffy quinoa, couscous, or brown rice are ideal for soaking up the delicious lemon sauce. Add roasted broccoli or asparagus on the side.
  • Pasta Perfection: Toss with cooked pasta, a splash of pasta water, extra lemon zest, and Parmesan cheese for a quick lemon chicken pasta.
  • In Wraps or Bowls: Dice the chicken and add it to a whole-wheat wrap with hummus, lettuce, and feta, or create a nourishing bowl with rice, black beans, corn, and avocado.

Common Mistakes

  • Skipping the Preheating: Putting food into a cold air fryer can lead to uneven cooking and a lack of that initial sear. Always preheat.
  • Overcrowding the Basket: This is the #1 reason food doesn’t get crispy. Air needs to circulate. Cook in batches if needed.
  • Not Patting the Chicken Dry: Surface moisture is the enemy of browning. Dry chicken = golden, crispy edges.
  • Skipping the Rest Time: Cutting in immediately lets all the flavorful juices run out onto the plate, leaving drier meat.
  • Using Bottled Lemon Juice: The flavor difference is stark. Fresh lemons provide a brighter, cleaner citrus note.

Storing Tips

  • Refrigeration: Store leftover lemon chicken in an airtight container in the refrigerator for up to 3-4 days.
  • Freezing: For longer storage, place cooled chicken in a freezer-safe bag or container. It will keep for 2-3 months. Thaw overnight in the fridge before reheating.
  • Reheating: To retain crispness, reheat in the air fryer at 350°F for 3-5 minutes until warmed through. The microwave will work in a pinch but will soften the exterior.
Plated Air Fryer Lemon Chicken with lemon slices and fresh herbs, served alongside roasted vegetables

Conclusion

This Air Fryer Lemon Chicken recipe is more than just a meal; it’s a testament to how simple ingredients, when treated right, can create something extraordinary. It delivers on every promise: health, speed, flavor, and simplicity. The tangy lemon, savory garlic, and tender chicken come together in a dish that feels both comforting and vibrant. I encourage you to make it your own—try the herb substitutions, pair it with your favorite sides, and enjoy the compliments. Once you experience how easy and delicious it is, it’s sure to become a regular

Air Fryer Salmon Bites Recipe

“`html

Air Fryer Salmon Bites Recipe

Introduction

Did you know that according to the American Heart Association, eating two servings of fatty fish like salmon per week can reduce your risk of heart disease by up to 36%? Yet, many home cooks are intimidated by preparing this nutritional powerhouse. What if you could create a restaurant-worthy, heart-healthy salmon dish in under 20 minutes with minimal cleanup? Enter the ultimate solution for busy food lovers: Air Fryer Salmon Bites. This recipe transforms simple salmon into crispy, golden-brown morsels of joy, paired with a luxurious creamy garlic sauce that will make you forget you’re eating something so good for you. Perfect for a quick, healthy meal, these bites deliver gourmet flavor with weeknight ease, proving that nutritious eating doesn’t have to be bland or time-consuming.

Ingredients List

Gather these simple, flavorful ingredients. Each plays a specific role in creating the perfect texture and taste.

  • For the Salmon Bites:
    • 1 lb (450g) fresh salmon fillet, skinless – The star of the show. Look for bright orange-pink flesh with firm texture and a fresh, oceanic scent (not fishy). Substitution: Frozen, thawed salmon works perfectly. For a different flavor, try arctic char.
    • 1 tbsp low-sodium soy sauce – Adds a deep, savory umami base without overwhelming saltiness. Substitution: Tamari (gluten-free) or coconut aminos for a soy-free option.
    • 1 tsp garlic powder – Provides consistent, mellow garlic flavor that clings to every bite.
    • ½ tsp freshly ground black pepper – Adds a subtle warmth and complexity.
    • 1 tbsp olive oil or avocado oil – Helps the seasoning adhere and promotes even, crispy browning in the air fryer.
  • For the Creamy Garlic Sauce:
    • 2 tbsp unsalted butter – Creates a rich, velvety base for the sauce.
    • 3-4 cloves garlic, minced – Fresh garlic provides a pungent, aromatic kick that powder can’t match.
    • ¼ cup dry white wine (like Sauvignon Blanc) – Deglazes the pan and adds a bright, acidic note that cuts through the richness. Substitution: Chicken or vegetable broth with 1 tsp of lemon juice.
    • ½ cup heavy cream – The foundation for the sauce’s luxurious, silky texture. Substitution: Full-fat coconut milk for a dairy-free version (adds a subtle coconut flavor).
    • ¼ cup freshly grated Parmesan cheese – Melts into the sauce, adding a salty, nutty depth. Use the real stuff, not the canned powder.
    • 1 tbsp fresh lemon juice – The essential bright finish that balances the sauce and enhances the salmon’s flavor.
    • Salt and pepper to taste
    • Fresh parsley or dill, chopped (for garnish) – Adds a pop of color and fresh herbal aroma.

Timing

Prep Time 10 minutes
Cook Time 8-10 minutes
Total Time ~20 minutes

Compared to traditional oven-baked salmon, which can take 15-20 minutes just to cook, this air fryer method slashes the active cooking time by over 50%. The sauce comes together in the time it takes the salmon to cook, making the entire process incredibly efficient. Most “quick” salmon recipes still hover around 30 minutes total; this one delivers gourmet results in half the time, making it a true game-changer for hectic schedules.

Air Fryer Salmon Bites with creamy garlic sauce plated elegantly on a white plate with lemon wedge garnish

Step-by-Step Instructions

Step 1: Prepare the Salmon

Pat your salmon fillet completely dry with paper towels. This is the most crucial step for achieving a crispy exterior, as any surface moisture will steam the fish instead of letting it brown. Using a sharp knife, cut the salmon into 1-inch cubes. I find that slightly uneven, rustic bites have more texture and hold sauce better than perfectly uniform cubes.

Step 2: Season the Bites

In a medium bowl, gently toss the salmon cubes with the low-sodium soy sauce, garlic powder, black pepper, and oil. Use your hands or a spoon to ensure every piece is lightly coated. The soy sauce will start to “cure” the salmon slightly, enhancing its flavor from the inside out. Let it sit for 5 minutes while you preheat your air fryer to 400°F (200°C). This short rest allows the flavors to meld.

Step 3: Air Fry to Perfection

Arrange the salmon bites in a single layer in your air fryer basket, ensuring they aren’t touching. This allows for maximum hot air circulation and even cooking. Air fry for 8-10 minutes. At the 8-minute mark, check for doneness—the bites should be golden brown on the outside and flake easily with a fork, but still be moist and tender inside. Remember, they will continue to cook slightly after removal. Avoid overcrowding; cook in batches if necessary for the crispiest results.

Step 4: Create the Creamy Garlic Sauce

While the salmon cooks, make the sauce. In a small saucepan over medium heat, melt the butter. Add the minced garlic and sauté for just 30-60 seconds until fragrant—be careful not to burn it, or it will turn bitter. Pour in the white wine (or broth), let it bubble for a minute to cook off the alcohol and reduce slightly. Reduce heat to low and stir in the heavy cream. Let it simmer gently for 2-3 minutes until it thickens enough to coat the back of a spoon. Remove from heat and whisk in the grated Parmesan until melted and smooth. Finish by stirring in the fresh lemon juice. Taste and adjust seasoning with salt and pepper.

Step 5: Serve and Enjoy

Transfer the hot, crispy salmon bites to a serving platter or individual plates. You can drizzle the creamy garlic sauce over the top, serve it on the side for dipping, or create a pool of sauce on the plate and place the bites on top. Garnish generously with fresh chopped parsley or dill and an extra wedge of lemon. The contrast of the hot, crispy salmon with the cool, rich sauce is divine.

Nutritional Information

(Per serving, based on recipe serving 4 people)

  • Calories: ~380 kcal
  • Protein: 25g (Excellent source, supporting muscle repair)
  • Healthy Fats: 28g (Rich in Omega-3s from salmon)
  • Carbohydrates: 4g
  • Fiber: 0.5g
  • Sugar: 1g
  • Sodium: ~320mg (Controlled by using low-sodium soy sauce)

This meal is a powerhouse of high-quality protein and heart-healthy fats, with minimal carbs, making it suitable for various dietary approaches like keto or low-carb.

Healthier Alternatives

You can easily tailor this recipe to fit specific dietary needs without sacrificing the core luxurious experience:

  • Lighter Sauce: Swap heavy cream for half-and-half or whole milk mixed with 1 tsp of cornstarch (a slurry) to thicken. Use a light, spreadable cheese like Laughing Cow instead of Parmesan for fewer calories but maintained creaminess.
  • Dairy-Free/Vegan: For the salmon, use extra oil. For the sauce, use olive oil instead of butter, and replace heavy cream with full-fat canned coconut milk. Use 2 tbsp of nutritional yeast instead of Parmesan for a cheesy flavor.
  • Lower Sodium: Use coconut aminos instead of soy sauce and reduce or omit added salt in the sauce. The Parmesan and lemon provide plenty of flavor.

Serving Suggestions

  • Over Greens: Serve atop a bed of baby spinach or arugula. The warm salmon and sauce will slightly wilt the greens, creating a fantastic warm salad.
  • With Grains: Spoon over fluffy quinoa, brown rice, or cauliflower rice to soak up every drop of the delicious sauce.
  • As an Appetizer: Skewer the bites with toothpicks and serve with the sauce as a dip for an elegant party starter.
  • Pasta Topper: Toss with cooked fettuccine or zucchini noodles for a quick salmon Alfredo.

Common Mistakes

  • Not Drying the Salmon: This leads to steaming, not crisping. Always pat dry thoroughly.
  • Overcrowding the Air Fryer Basket: This prevents proper air circulation, resulting in unevenly cooked, soggy bites. Cook in batches if needed.
  • Overcooking the Sauce: If the heat is too high, the cream can separate or the Parmesan can become grainy. Keep it on a gentle simmer.
  • Skipping the Fresh Lemon Juice: The acidity is non-negotiable. It balances the richness and brightens the entire dish.

Storing Tips

  • Refrigeration: Store leftover salmon bites and sauce separately in airtight containers for up to 2 days.
  • Reheating: Reheat salmon bites in the air fryer at 350°F for 2-3 minutes to restore crispiness. Gently warm the sauce in a saucepan over low heat, adding a splash of cream or water if it has thickened too much.
  • Freezing: Freezing is not recommended for the cooked salmon bites or the cream sauce, as texture will suffer significantly.
Close-up of crispy Air Fryer Salmon Bites being dipped into a bowl of creamy garlic sauce

Conclusion

This Air Fryer Salmon Bites recipe is more than just a meal; it’s a testament to how modern cooking tools can help us eat spectacularly well, even on our busiest days. In about 20 minutes, you can create a dish that feels indulgent yet is packed with nutrients, featuring crispy, flavorful salmon paired with a rich, tangy creamy garlic sauce. It’s versatile enough for a casual family dinner