End your day with a delicious, comforting, and satisfying dinner! Whether you’re looking for quick and easy weeknight meals, cozy comfort food, or elegant dishes for special occasions, we have the perfect recipes for you.
From hearty casseroles and one-pan wonders to savory pastas, juicy meats, and flavorful vegetarian options, our collection is designed to make dinnertime effortless and enjoyable.
Busy schedule? No problem! Try our slow cooker meals, sheet pan dinners, and 30-minute recipes to save time without sacrificing flavor. Whatever your craving, these recipes will bring warmth and joy to your table every night. 🍽️✨
No-Bake Cheesecake Recipe – cookingwithtina.com
Looking for a delightful dessert that requires no baking? This No-Bake Cheesecake Recipe is incredibly easy to make, showcasing creamy flavors that will impress your family during any gathering or special occasion.
Refrigeration is key for setting the cheesecake; allow at least 4 hours or overnight for best results.
Add fruit toppings or chocolate for extra flavor.
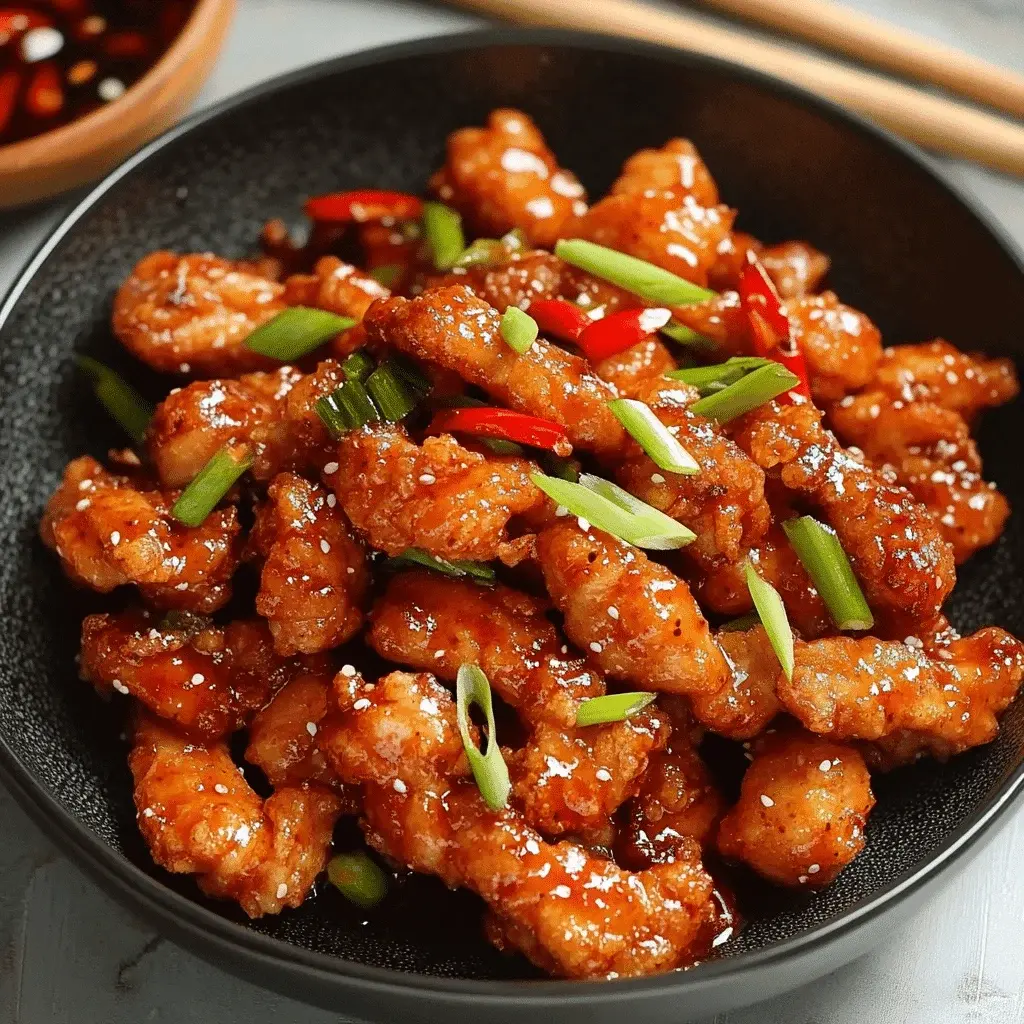
Did you know that a staggering 78% of home cooks crave restaurant-style Asian takeout but feel intimidated by the process? If you’re searching for that perfect balance of crispy texture, tender chicken, and a sweet-spicy sauce that defines a great Crispy Chilli Chicken, you’ve landed in the right place. This recipe demystifies the process, delivering a dish that rivals your favorite takeout joint, right from your own kitchen. Forget soggy, overly sweet, or bland versions—this guide focuses on achieving that signature crispy chilli chicken crunch and a sauce with complex flavor from dark soy sauce, honey, and sriracha. It’s a quick, foolproof path to a delicious meal that will become a regular in your weekly rotation.
Ingredients List
Gather these simple ingredients for a symphony of texture and taste. I’ve included sensory notes and substitutions to ensure success with what you have on hand.
For the Chicken & Coating:
1 lb (450g) boneless, skinless chicken breast – Cut into 1-inch cubes. (For more flavor, substitute with chicken thighs; they stay juicier but may require an extra minute of cooking.)
1/2 cup cornstarch – The secret to an ultra-crispy, glass-like coating. (Potato starch is a great 1:1 substitute for a slightly lighter crisp.)
1/4 cup all-purpose flour – Helps the coating adhere and adds structure.
1 large egg – The binding agent that creates a craggy, golden exterior.
1 tsp salt – Seasons the chicken from within.
1/2 tsp black pepper – Adds a subtle warmth.
Oil for frying – Use a neutral oil with a high smoke point like vegetable, canola, or peanut oil.
For the Stir-Fry Sauce:
3 tbsp dark soy sauce – Provides a deep, rich color and a less salty, more caramel-like flavor compared to light soy. (If you only have regular soy sauce, add 1/2 tsp of brown sugar to mimic the depth.)
2 tbsp honey – Creates a beautiful glossy sheen and balanced sweetness. (Maple syrup or agave nectar work for a vegan version.)
1-2 tbsp sriracha – Adjust to your heat preference! This adds a tangy, garlicky kick.
1 tbsp rice vinegar – The essential acidic component that brightens the entire sauce.
2 cloves garlic, minced – For that essential aromatic base.
1/2 cup chicken or vegetable broth – Creates the perfect saucing consistency.
1 tsp cornstarch mixed with 1 tbsp water (slurry) – The key to a thick, clingy sauce that coats every piece.
For Garnish & Aromatics:
2-3 spring onions, sliced – For a fresh, crisp finish.
1 red chilli, thinly sliced (optional) – For extra heat and vibrant color.
Toasted sesame seeds – A nutty, final touch.
Timing
Prep Time 15 minutes
Cook Time 15 minutes
Total Time 30 minutes
This Crispy Chilli Chicken clocks in at just 30 minutes from start to finish. Compared to the average takeout delivery wait time (45-60 minutes) or other complex breaded chicken recipes, this is a significant win for a weeknight. The active cooking is fast and furious, making it an ideal recipe when you need something impressive and delicious in a hurry.
Golden, crispy chicken pieces ready to be tossed in the signature sweet and spicy sauce.
Step-by-Step Instructions
Step 1: Prepare the Chicken
Pat your chicken breast cubes completely dry with paper towels. This is non-negotiable—any surface moisture will steam the chicken instead of letting it fry up crispy. In a medium bowl, whisk the egg with the salt and pepper. Add the dried chicken cubes and toss until every piece is thoroughly coated. Let this sit for 5 minutes while you prepare your coating station.
Step 2: Create the Crispy Coating
In a separate shallow dish or a large zip-top bag, combine the cornstarch and flour. Working in batches, take the eggy chicken pieces and dredge them generously in the starch-flour mixture. Shake off any excess—you want a thin, even, snowy coating on each piece. I like to place the coated pieces on a wire rack while I heat the oil; this prevents the bottom from getting soggy.
Step 3: Fry to Perfection
Heat about 1 inch of oil in a heavy-bottomed pot, wok, or deep skillet over medium-high heat until it reaches 350°F (175°C). If you don’t have a thermometer, test by dropping a small piece of coating into the oil—it should sizzle vigorously and float to the top immediately. Carefully add the chicken in a single layer, not overcrowding the pan (fry in 2-3 batches). Fry for 3-4 minutes, turning occasionally, until the exterior is a deep, golden brown and the chicken is cooked through. Transfer to a paper towel-lined plate or a clean wire rack to drain. This first fry sets the crisp.
Step 4: Whip Up the Sauce
While the chicken drains, pour out all but 1 tablespoon of the frying oil from your wok/pan. Reduce the heat to medium. Add the minced garlic and grated ginger, stir-frying for just 30 seconds until incredibly fragrant—be careful not to burn it. Pour in the chicken broth, dark soy sauce, honey, sriracha, and rice vinegar. Whisk to combine and bring to a gentle simmer.
Step 5: The Final Toss
Give your cornstarch slurry a quick re-stir and drizzle it into the simmering sauce while whisking constantly. The sauce will thicken into a glossy, luxurious glaze within 30-60 seconds. Now, add all the crispy chicken back into the wok. Using a spatula or tongs, toss and fold vigorously until every single piece is gleaming and coated in that beautiful sauce. Immediately remove from heat to preserve the crispness. Garnish with sliced spring onions, red chilli, and a sprinkle of sesame seeds.
Nutritional Information
(Per serving, assuming recipe serves 4. Values are approximate.)
Calories: ~420 kcal
Protein: 28g
Carbohydrates: 35g
Fat: 18g (varies with oil absorption)
Sugar: 12g (primarily from honey)
Sodium: ~950mg (mainly from soy sauce; use low-sodium broth/soy to reduce)
Healthier Alternatives
You can enjoy this dish with a lighter touch without sacrificing the core experience:
Air Fryer Method: For the chicken, spray the coated pieces lightly with oil and air fry at 400°F (200°C) for 10-12 minutes, shaking halfway. The sauce is made separately on the stovetop as instructed. You’ll get a very crisp result with significantly less oil.
Baking: Place coated chicken on a parchment-lined baking sheet, spray with oil, and bake at 425°F (220°C) for 15-18 minutes until crispy and cooked.
Sauce Swaps: Replace honey with a sugar-free maple syrup or a monk fruit sweetener blend to cut refined sugars. Use tamari or liquid aminos for a gluten-free, slightly lower-sodium soy alternative.
Serving Suggestions
This Crispy Chilli Chicken is incredibly versatile. For a classic takeout-style meal, serve it over a bed of steamed jasmine or brown rice to soak up the extra sauce. It’s also fantastic with lo mein or chow mein noodles tossed right in. For a low-carb option, try it with cauliflower rice or alongside a crunchy Asian-inspired slaw. A simple side of steamed broccoli or snap peas adds color and balances the meal perfectly.
Common Mistakes
Wet Chicken: Not drying the chicken leads to a gummy, non-crispy coating. Always pat dry.
Crowding the Pan: Frying too many pieces at once drops the oil temperature, resulting in oily, soggy chicken. Fry in batches.
Overcooking the Sauce: Once you add the cornstarch slurry, the sauce thickens quickly. Remove from heat shortly after adding the chicken to prevent it from becoming gummy.
Using Light Soy Sauce Only: This makes the sauce saltier and lighter in color. Dark soy is key for the authentic depth and rich hue.
Storing Tips
Refrigeration: Store leftovers in an airtight container in the fridge for up to 3 days. Note that the crispiness will soften due to the sauce, but the flavor will still be excellent.
Reheating: To revive some crispness, reheat in an air fryer or toaster oven at 375°F (190°C) for 5-7 minutes. A conventional oven works too; avoid the microwave, which will make it soggy.
Freezing: Freeze the cooked, sauced chicken on a baking sheet before transferring to a freezer bag for up to 2 months. Reheat from frozen in the oven for best results.
The final dish, plated and ready to enjoy with fluffy white rice.
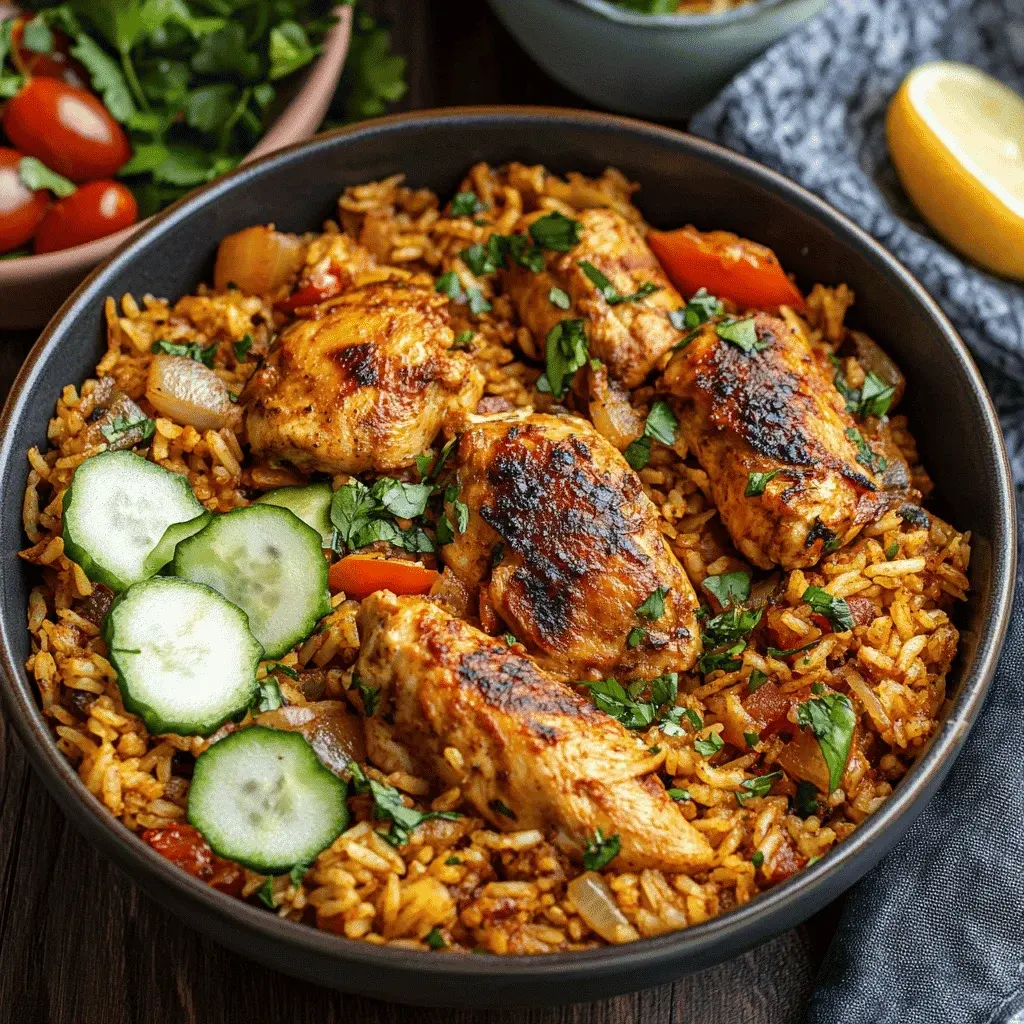
Did you know that over 70% of home cooks cite “too many dirty dishes” as their top deterrent for cooking on weeknights? That’s where the magic of a One Pot Shawarma Chicken and Rice meal comes in. This isn’t just another chicken and rice dish; it’s a vibrant, aromatic journey to the streets of the Middle East, all made in a single pot for maximum flavor and minimal cleanup. Imagine tender, juicy chicken pieces, deeply marinated in a warm blend of cumin, coriander, and smoky paprika, nestled into fluffy, perfectly spiced rice that has absorbed every drop of savory goodness. This recipe is your answer to the eternal question of how to get a delicious, satisfying dinner on the table without spending hours in the kitchen or creating a mountain of dishes. It’s the perfect fusion of convenience and exotic flavor, designed to become a staple in your weekly rotation.
Ingredients List
Gather these simple ingredients to create a symphony of flavors. The key is in the spice blend!
For the Shawarma Marinade:
1.5 lbs boneless, skinless chicken thighs or breasts, cut into 1-inch pieces (Thighs are juicier and more forgiving, but breasts work for a leaner option).
3 tbsp olive oil (the rich, fruity base for our marinade).
2 tbsp fresh lemon juice (brightens and tenderizes).
3 cloves garlic, minced (for that essential pungent, aromatic kick).
1 tbsp ground cumin (earthy, warm, and the soul of shawarma).
1 tbsp ground coriander (citrusy and floral, cumin’s perfect partner).
2 tsp smoked paprika (adds a deep, smoky sweetness and gorgeous red hue).
1 tsp turmeric (for earthy depth and a golden color).
1 tsp ground cinnamon (a whisper of sweet warmth in the background).
½ tsp cayenne pepper (adjust for your preferred heat level).
1 tsp salt, plus more to taste.
½ tsp black pepper.
For the Rice & Cooking:
1 large yellow onion, finely diced (becomes sweet and caramelized).
1 ½ cups long-grain white rice like Basmati or Jasmine (rinsed until water runs clear to remove excess starch for fluffier grains). Substitution: Brown rice (requires more liquid and longer cook time).
2 ¼ cups chicken broth (use low-sodium to control saltiness). Substitution: Vegetable broth or water with a bouillon cube.
1 bay leaf (a classic aromatic that infuses the rice).
¼ cup fresh parsley or cilantro, chopped (for a fresh, green finish).
Lemon wedges and plain yogurt or tzatziki, for serving.
Compared to the average one-pot meal which can take 50-60 minutes from start to finish, this Shawarma Chicken and Rice recipe is remarkably efficient. The active cooking time is just 30 minutes, with most of the “work” happening as the rice simmers and the flavors meld together beautifully in the pot. If you marinate the chicken ahead of time (even 15 minutes helps!), you can shave precious minutes off your weeknight routine.
Step-by-Step Instructions
Step 1: Marinate the Chicken
In a large bowl, combine the olive oil, lemon juice, minced garlic, and all the dried spices (cumin, coriander, paprika, turmeric, cinnamon, cayenne, salt, and pepper). Whisk it into a fragrant, rust-colored paste. Add the cubed chicken pieces and toss until every piece is thoroughly coated. For the best flavor penetration, let it marinate for at least 15 minutes at room temperature, or cover and refrigerate for up to 4 hours. This step is non-negotiable for achieving that authentic, deep shawarma taste.
Step 2: Sauté the Aromatics
Heat a large, deep skillet or Dutch oven over medium-high heat. You don’t need extra oil here as the marinade provides plenty. Add the diced onion and sauté for 4-5 minutes, stirring frequently, until they become soft and translucent, taking on a slight golden edge. This builds the foundational sweetness of the dish.
Step 3: Cook the Chicken
Push the onions to the sides of the pot. Add the marinated chicken pieces in a single layer (you may need to do this in two batches to avoid overcrowding). Let them sear undisturbed for 2-3 minutes per side, until they develop a beautiful brown crust. Don’t worry about cooking them through completely at this stage—they will finish cooking with the rice. This searing step locks in juices and creates fond (those tasty browned bits) on the bottom of the pot, which will flavor the rice.
Step 4: Add the Rice and Broth
Return all chicken to the pot if you batched it. Add the rinsed rice and the bay leaf to the pot, stirring to combine it with the chicken and onions for about 1 minute, letting the rice toast slightly. This helps keep the grains separate. Pour in the chicken broth, scraping the bottom of the pot with your spoon to deglaze and incorporate all that flavorful fond. Give everything one good, final stir to distribute evenly.
Step 5: Simmer and Rest
Bring the liquid to a boil, then immediately reduce the heat to low. Cover the pot tightly with a lid. Let it simmer gently for 18-20 minutes. Do not peek! Lifting the lid releases steam and can result in undercooked rice. After 20 minutes, turn off the heat but leave the lid on. Let the pot rest, undisturbed, for 10 full minutes. This resting period is crucial—it allows the rice to finish steaming and absorb any remaining liquid, resulting in perfectly fluffy, not mushy, grains.
Step 6: Fluff and Serve
Remove the lid and discard the bay leaf. Use a fork to gently fluff the rice and chicken, mixing everything together. The aroma will be incredible. Stir in most of the chopped fresh parsley or cilantro. Transfer to a serving platter, garnish with the remaining herbs, and serve immediately with lemon wedges and a dollop of cool, creamy yogurt or tzatziki on the side.
Nutritional Information
Estimated per serving (based on 6 servings):
Calories: ~420 kcal
Protein: 28g (Excellent source for muscle repair and satiety)
Carbohydrates: 45g (Primarily from the rice, providing energy)
Dietary Fiber: 2g
Fat: 14g (Mostly healthy fats from olive oil)
Saturated Fat: 3g
Sodium: ~650mg (Can be reduced by using low-sodium broth)
Healthier Alternatives
You can easily adapt this recipe to fit various dietary needs without sacrificing the iconic shawarma flavor:
Cauliflower Rice: For a low-carb option, replace white rice with 4-5 cups of riced cauliflower. Add it in the last 5-7 minutes of cooking so it doesn’t become soggy.
Leaner Protein: Use chicken breasts instead of thighs, and increase the olive oil in the marinade by 1 tbsp to compensate for less fat.
Whole Grains: Swap white rice for brown rice or quinoa. For brown rice, increase broth to 3 cups and simmer covered for 40-45 minutes. For quinoa, use 1 ¾ cups broth and cook for 15-18 minutes.
Reduce Sodium: Use no-salt-added chicken broth and increase the other spices slightly to compensate.
Serving Suggestions
This dish is a complete meal on its own, but these accompaniments can elevate it to a feast:
The Essential Trio: Always serve with lemon wedges (a squeeze brightens everything), plain Greek yogurt or tzatziki (for creaminess), and a simple salad of chopped tomatoes, cucumbers, and red onion with a lemon-olive oil dressing.
Bread on the Side: Warm pita bread or flatbread is perfect for scooping up every last bit.
Vegetable Add-Ins: Stir in a handful of baby spinach or frozen peas during the last 2 minutes of resting time for extra greens.
For a Crowd: Serve it family-style in the pot it was cooked in, garnished generously with fresh herbs and toasted pine nuts or slivered almonds for crunch.
Common Mistakes
Not Rinsing the Rice: This leaves excess starch, which can make the final dish gummy instead of fluffy.
Overcrowding the Pot When Searing: If you add all the chicken at once, it will steam instead of sear. Take the time to brown in batches for maximum flavor.
Peeking Under the Lid: Resist the urge! Every peek releases steam and extends cooking time, risking unevenly cooked rice.
Skipping the Rest: Fluffing the rice immediately after cooking will break the grains and make it mushy. The 10-minute rest is essential.
Using Old Spices: Ground spices lose potency over time. If your cumin or paprika doesn’t smell potent when you open the jar, it’s time for a refresh.
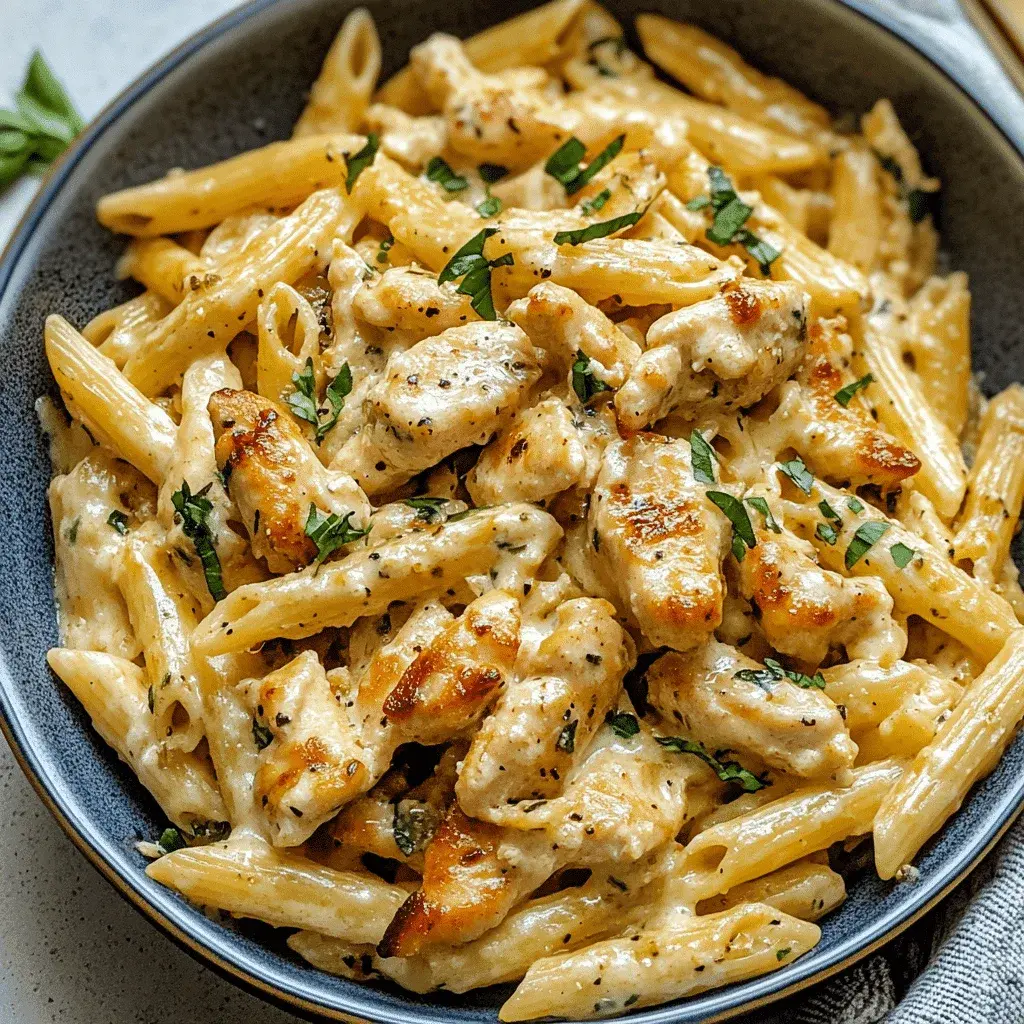
Did you know that a recent survey found pasta to be the most craved comfort food in over 60% of American households? If you’re among that majority, you’re in for a treat. This creamy garlic chicken pasta recipe is designed to satisfy that deep-seated craving while delivering restaurant-quality flavor from your own kitchen. It’s the perfect answer to the question: “What’s for dinner?” when you want something impressively delicious but deceptively simple to prepare.
This dish masterfully balances rich, velvety sauce with tender, seasoned chicken and vibrant vegetables. The aromatic punch of garlic, the savory depth of Italian seasoning, and the subtle smokiness of paprika create a symphony of flavors that coat every strand of pasta. The addition of fresh spinach and diced tomatoes not only adds beautiful color but also introduces a fresh, slightly acidic counterpoint to the luxurious cream sauce. It’s a complete, one-pan wonder that feels indulgent yet comes together in a timeframe that rivals ordering takeout. Let’s dive into creating this crowd-pleasing masterpiece.
Ingredients List
Gather these fresh, flavorful ingredients. I’ve included sensory notes and substitutions to help you customize based on what you have on hand.
For the Chicken:
1.5 lbs boneless, skinless chicken breasts, cut into 1-inch cubes (You’ll love the tender, juicy bite. Substitute: Chicken thighs for richer, more forgiving meat.)
1 tsp garlic powder (Provides a warm, toasty base flavor.)
1 tsp Italian seasoning (A fragrant blend of oregano, basil, thyme, and rosemary. Substitute: ½ tsp dried oregano + ½ tsp dried basil.)
1 tsp smoked paprika (Adds a subtle smokiness and gorgeous red hue. Substitute: Sweet paprika.)
1 tsp salt
½ tsp black pepper
2 tbsp olive oil, for cooking
For the Pasta & Sauce:
12 oz pasta (Fettuccine, penne, or rigatoni work beautifully. The ridges hold the sauce perfectly.)
4-5 cloves garlic, minced (The star of the show! Smell that pungent, aromatic promise.)
1 (14.5 oz) can diced tomatoes, undrained (Adds bright acidity and juicy texture.)
2 cups fresh spinach (Wilted, it adds a pop of green and earthy flavor.)
1 ½ cups heavy cream (The foundation of our luscious, velvety sauce. Substitute: Half-and-half for a lighter option, though sauce will be less thick.)
1 cup freshly grated Parmesan cheese (Use the real stuff! It melts smoothly and adds a salty, nutty complexity. Pre-grated won’t melt as well.)
Fresh basil or parsley, for garnish (A final touch of fresh herbaceousness.)
Timing
Prep Time 15 minutes
Cook Time 25 minutes
Total Time 40 minutes
At just 40 minutes total, this creamy garlic chicken pasta is significantly faster than the average from-scratch pasta dish, which often clocks in closer to an hour. The secret is the efficient, one-pan sauce method that builds flavor while the pasta cooks separately. You’ll achieve a depth of taste typically requiring much longer simmering, making this a perfect weeknight hero.
The finished creamy garlic chicken pasta, ready to delight your taste buds.
Step-by-Step Instructions
Step 1: Prepare the Chicken
Pat your chicken cubes completely dry with paper towels—this is crucial for getting a beautiful sear instead of steaming. In a medium bowl, toss the chicken with the garlic powder, Italian seasoning, smoked paprika, salt, and black pepper until evenly coated. Let it sit for 5 minutes while you heat 1 tablespoon of olive oil in a large skillet or Dutch oven over medium-high heat. Add the chicken in a single layer (you may need to do this in batches to avoid crowding) and cook for 5-7 minutes, turning occasionally, until golden brown on all sides and cooked through. Transfer the chicken to a clean plate. It will finish cooking in the sauce later, so don’t worry if it’s *just* cooked.
Step 2: Cook the Pasta
While the chicken cooks, bring a large pot of generously salted water to a rolling boil. Add your pasta and cook according to package directions for al dente—usually about 1 minute less than the suggested time. Remember, it will continue to cook slightly in the hot sauce. Before draining, reserve about 1 cup of the starchy pasta water. This liquid gold is your secret weapon for adjusting the sauce consistency later. Drain the pasta and set it aside.
Step 3: Build the Sauce
In the same skillet used for the chicken (those browned bits are flavor!), add the remaining tablespoon of olive oil and reduce the heat to medium. Add the minced garlic and sauté for just 30-60 seconds until incredibly fragrant—be careful not to let it burn, or it will turn bitter. Pour in the can of diced tomatoes with their juices and let the mixture simmer for 3-4 minutes, allowing the tomatoes to soften and the flavors to meld.
Now, pour in the heavy cream. Stir gently and bring the mixture to a gentle simmer—do not let it boil vigorously. Let it cook for 2-3 minutes to thicken slightly. Reduce the heat to low and gradually whisk in the grated Parmesan cheese until it’s fully melted and the sauce is smooth and creamy.
Step 4: Combine and Serve
Add the fresh spinach to the sauce and stir until it just wilts, about 1 minute. Return the cooked chicken and any accumulated juices to the skillet. Add the cooked pasta and toss everything together until every piece is gloriously coated in the garlic cream sauce. If the sauce seems too thick, add a splash of the reserved pasta water, a little at a time, until it reaches your desired consistency. The starch in the water will help the sauce cling to the pasta without making it watery.
Taste and adjust seasoning with a pinch more salt or pepper if needed. Serve immediately, garnished with a generous sprinkle of fresh basil or parsley and extra Parmesan cheese on the side.
Nutritional Information
(Approximate values per serving, based on 6 servings):
Calories: ~580 kcal
Protein: 38g (Excellent source for muscle repair and satiety)
Carbohydrates: 48g (Primary energy source from the pasta)
Dietary Fiber: 3g (From spinach and tomatoes)
Sugars: 5g (Naturally occurring from tomatoes and dairy)
Fat: 28g (Rich in saturated fat from cream and cheese; provides creaminess and flavor)
Saturated Fat: 14g
Calcium: 25% DV (From dairy and spinach)
Healthier Alternatives
You can easily lighten up this dish without sacrificing its soul-satisfying essence:
Cream Substitute: Swap heavy cream for full-fat canned coconut milk (for a dairy-free, rich option) or a blend of 1 cup low-fat milk thickened with 1 tablespoon of cornstarch or all-purpose flour.
Pasta Power-Up: Use whole wheat, chickpea, or lentil pasta to significantly increase the fiber and protein content.
Cheese Choice: Opt for a reduced-fat Parmesan or a sharp Pecorino Romano—you can use less because the flavor is more potent.
Boost the Veggies: Double the spinach and add other quick-cooking vegetables like sliced mushrooms, zucchini, or sun-dried tomatoes for more volume and nutrients.
Leaner Protein: Use turkey breast cutlets or large shrimp instead of chicken for a different lean protein profile.
Serving Suggestions
This pasta is a complete meal on its own, but it pairs beautifully with a few simple sides:
Garlic Bread or Breadsticks: For soaking up every last drop of that incredible sauce.
A Simple Green Salad: Toss mixed greens with a light lemon vinaigrette to cut through the richness.
Roasted Vegetables: Asparagus, broccoli, or Brussels sprouts roasted with olive oil and garlic complement the flavors perfectly.
Wine Pairing: A crisp Pinot Grigio or a buttery Chardonnay balances the creamy garlic sauce beautifully.
Common Mistakes
Overcooking the Garlic: Burnt garlic is bitter. Sauté just until fragrant.
Using Pre-Grated Parmesan: It contains anti-caking agents that prevent it from melting smoothly into a silky sauce. Always grate your own.
Crowding the Pan with Chicken: This steams the chicken instead of searing it. Cook in batches for perfect browning.
Boiling the Cream Sauce: A gentle simmer is key. Boiling can cause the cream to separate or become greasy.
Skipping the Pasta Water: That starchy water is essential for marrying the sauce to the pasta and adjusting consistency.
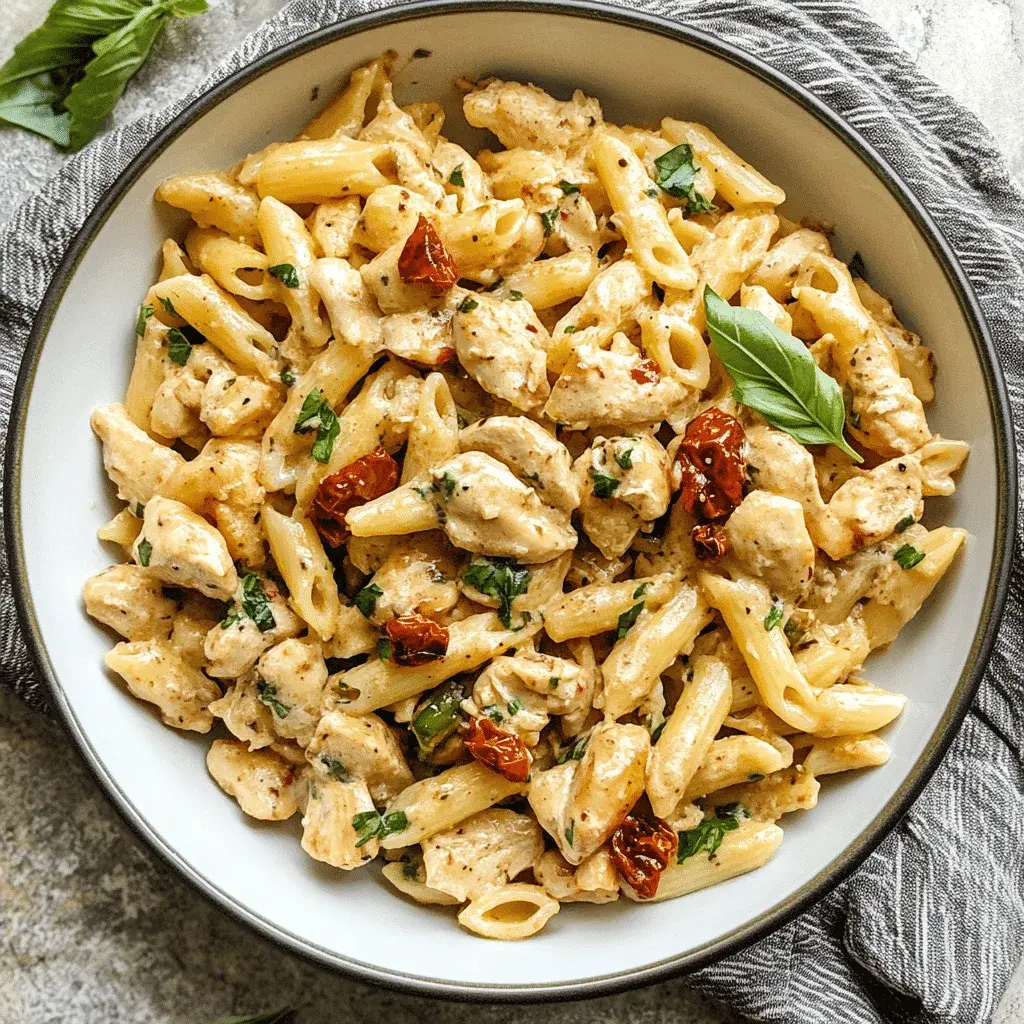
Ever wondered what makes a dish so irresistibly good it could inspire a lifelong commitment? The Marry Me Chicken Pasta isn’t just a clever name—it’s a culinary phenomenon backed by its viral status and countless home cook testimonials. This recipe combines tender chicken, sun-dried tomatoes, and a rich Parmesan cream sauce for a delightful meal that’s as romantic as it is satisfying. The secret lies in the perfect balance of savory, creamy, and tangy flavors, creating a dish that feels both indulgent and comforting. Whether you’re cooking for a special date night or simply craving a restaurant-quality meal at home, this recipe delivers on its promise of unforgettable taste. Let’s dive into how you can create this show-stopping dish that lives up to its legendary name.
Ingredients List
Gather these fresh, quality ingredients for the best results. Each component plays a crucial role in building the complex flavor profile.
12 oz fettuccine or penne pasta (the ridges of penne hold the sauce beautifully)
2 tbsp olive oil
1 tsp each: salt, black pepper, garlic powder, Italian seasoning for the chicken rub
For the Sauce:
3 tbsp unsalted butter (for a golden, nutty base)
4-5 garlic cloves, minced (fresh is best for pungent aroma)
1 cup (about 6 oz) sun-dried tomatoes in oil, drained and chopped (their intense sweetness and chewy texture are key; substitute: 1 cup roasted red peppers, chopped, for a milder sweetness)
1 tsp red pepper flakes (adjust for your preferred heat level)
1 cup low-sodium chicken broth
1 cup heavy cream (for luxurious silkiness; substitute: half-and-half or full-fat coconut milk for a lighter/dairy-free version, though sauce will be less thick)
1 cup freshly grated Parmesan cheese (pre-grated contains anti-caking agents that can make the sauce grainy)
1/2 cup fresh basil, chopped (adds a bright, peppery finish)
Timing
Prep Time 15 minutes
Cook Time 25 minutes
Total Time 40 minutes
At just 40 minutes from start to finish, this Marry Me Chicken Pasta is significantly faster than the average gourmet pasta dish, which often requires 60+ minutes. The efficiency comes from multitasking: while the pasta water boils and the chicken cooks, you can prepare the sauce ingredients. Compared to traditional cream sauces that require lengthy reduction, this recipe uses a combination of broth and cream for a quick yet deeply flavored result. The active cooking time is focused and rewarding, making it perfect for a weeknight dinner that feels anything but ordinary.
Step-by-Step Instructions
Step 1: Prepare the Chicken
Pat your chicken breasts or thighs completely dry with paper towels—this is the secret to achieving a perfect golden sear, not a steam. Cut them into 1-inch bite-sized pieces. In a small bowl, combine the salt, black pepper, garlic powder, and Italian seasoning. Toss the chicken pieces in this spice rub until evenly coated. Let it sit for 5 minutes while you heat 2 tablespoons of olive oil in a large, deep skillet or Dutch oven over medium-high heat. Add the chicken in a single layer, working in batches if necessary to avoid crowding. Sear for 5-7 minutes, turning occasionally, until beautifully browned on all sides and cooked through. Remove the chicken to a clean plate and set aside. Don’t wipe the skillet clean; those browned bits (fond) are flavor gold for your sauce.
Step 2: Build the Sauce
In the same skillet, reduce the heat to medium. Add the butter and let it melt, swirling the pan. Add the minced garlic and red pepper flakes, sautéing for just 60-90 seconds until fragrant. You’ll know it’s ready when the garlic sizzles gently and fills your kitchen with its aroma. Be careful not to let it brown, as burnt garlic turns bitter. Next, stir in the chopped sun-dried tomatoes, letting them warm through and infuse the butter with their concentrated tomato essence for about 2 minutes.
Step 3: Combine and Simmer
Pour in the chicken broth, using a wooden spoon to scrape up all the delicious browned bits from the bottom of the pan. This process, called deglazing, is where much of the sauce’s depth comes from. Let the broth simmer for 3-4 minutes to reduce slightly. Meanwhile, in a separate large pot, cook your pasta in well-salted boiling water according to package directions for al dente. Reserve about 1 cup of the starchy pasta water before draining. Back to the sauce: reduce the heat to low and slowly pour in the heavy cream, stirring constantly. Let the sauce gently simmer for another 3-4 minutes until it begins to thicken slightly. The key here is low heat to prevent the cream from separating.
Step 4: Finish the Dish
Turn off the heat under the skillet. Gradually sprinkle in the freshly grated Parmesan cheese, stirring vigorously until it’s completely melted and the sauce is smooth and cohesive. If the sauce seems too thick, add a splash of the reserved pasta water to reach your desired consistency. Return the cooked chicken (and any accumulated juices) to the skillet, along with the drained pasta and half of the chopped fresh basil. Gently toss everything together until the pasta and chicken are luxuriously coated in the creamy, tomato-flecked sauce. The residual heat will warm everything through perfectly without overcooking.
Nutritional Information
(Approximate values per serving, based on 6 servings)
Calories: ~680 kcal
Protein: 42g (Excellent source from chicken and Parmesan)
Carbohydrates: 52g (Primarily from pasta and sun-dried tomatoes)
Dietary Fiber: 4g
Sugars: 8g (Natural sugars from tomatoes and dairy)
Fat: 34g (Includes 18g saturated fat; the majority from cream, cheese, and olive oil)
Calcium: 25% DV (from dairy and sun-dried tomatoes)
Healthier Alternatives
You can lighten up this indulgent dish without sacrificing its soul-satisfying essence. For the pasta, swap regular fettuccine for a high-protein lentil or chickpea pasta, or use spiralized zucchini noodles (add them raw at the very end to warm through). To reduce fat, replace the heavy cream with a blend of 3/4 cup 2% milk and 1/4 cup Greek yogurt (add the yogurt off-heat to prevent curdling). For the cheese, use a sharp, finely grated Pecorino Romano—you’ll need less because of its potent flavor. Opt for low-sodium chicken broth and increase the garlic and herbs to compensate. These swaps can reduce calories by up to 30% while keeping the dish creamy, flavorful, and utterly delicious.
Serving Suggestions
Presentation is part of the “wow” factor. Serve this pasta family-style in a large, shallow bowl or directly from the skillet. Garnish generously with the remaining fresh basil and an extra sprinkle of Parmesan. For a contrasting texture and visual pop, add a handful of toasted pine nuts or walnuts. To round out the meal, pair it with simple, crisp sides that cut through the richness: a classic Caesar salad with homemade dressing, garlic bread with a hint of parsley, or roasted asparagus drizzled with lemon juice. For wine pairings, a buttery Chardonnay complements the cream sauce, while a light-bodied Pinot Noir balances the tomatoes and herbs beautifully.
Common Mistakes
Overcooking the Chicken: Searing over too high heat or for too long results in dry, tough chicken. Cook just until no longer pink inside.
Using Pre-Grated Parmesan: It contains cellulose, which prevents melting into a smooth sauce, creating a grainy texture. Always grate fresh.
Adding Cheese Over High Heat: High heat can cause the cheese to seize and the fats to separate. Always remove the pan from heat or ensure very low heat when incorporating cheese.
Skipping the Pasta Water: The starchy reserved water is a magic ingredient that helps the sauce cling to the pasta and adjusts consistency perfectly.
Overcrowding the Pan: Crowding the chicken steams it instead of searing it. Cook in batches for the best caramelization.
Storing Tips
Store leftovers in an airtight container in the refrigerator for up to 3 days. The pasta will absorb sauce, so when reheating, add a splash of chicken broth, milk, or water and warm gently over low heat on the stovetop, stirring frequently. Microwaving can cause the sauce to separate. Freezing is not recommended for the complete dish, as the dairy-based sauce may separate and the pasta can become mushy upon thawing. However, you can freeze the cooked, seasoned chicken and the sauce base (without cream and cheese) separately for up to 2 months. Thaw overnight in the fridge, then reheat the sauce base, stir in fresh cream and cheese, and combine with freshly cooked pasta.
Conclusion
The Marry Me Chicken Pasta is more than a recipe—it’s an experience. It masterfully combines simple techniques with bold flavors to create a dish that’s both impressive and approachable. From the savory sear of the chicken to the tangy burst of sun-dried tomatoes and the velvety embrace of the Parmesan cream sauce, every bite is a testament to why this recipe has earned its legendary name. It’s perfect for celebrating milestones, impressing guests, or simply treating yourself to a spectacular homemade meal. We guarantee it will become a cherished favorite in your culinary repertoire.
Did you make this recipe? We’d love to see your masterpiece! Tag @spicemingle on Instagram with your creation. Share your experience, any twists you added, or questions in the comments below—let’s build a community of passionate home cooks!
Did you know that chicken quesadillas are one of the most Googled weeknight dinner ideas, with searches increasing by over 40% in the last two years? It’s no wonder—this dish perfectly marries convenience with crave-worthy flavor. Today, I’m sharing my ultimate Chicken Quesadillas recipe, a foolproof method that delivers a crispy, golden exterior and a molten, savory filling every single time. Forget the bland, soggy versions you might have tried before. We’re using perfectly seasoned chicken, a vibrant mix of fresh bell peppers and onions, and the ooey-gooey magic of Monterey Jack cheese to create a meal that’s as satisfying to make as it is to eat. Whether you’re feeding a hungry family or need a quick, impressive appetizer for game day, this recipe is your new secret weapon.
Ingredients List
Gather these fresh, flavorful ingredients. I’ve included sensory notes and substitutions to help you customize.
For the Chicken & Marinade:
1 lb boneless, skinless chicken breasts or thighs (Thighs offer a richer, juicier flavor and are more forgiving if slightly overcooked).
2 tbsp olive oil
1 tbsp chili powder (Provides a warm, earthy base—smoked paprika is a great sub for a different profile).
1 tsp ground cumin (That unmistakable, toasty aroma is key).
1 tsp garlic powder
1/2 tsp onion powder
1/2 tsp dried oregano
Juice of 1 lime (The bright, citrusy zing cuts through the richness).
Salt and black pepper to taste
For the Filling & Assembly:
1 tbsp olive oil or butter
1 medium onion, thinly sliced (Yellow for sweetness, red for a sharper bite).
1 red bell pepper, thinly sliced (Adds a sweet, crisp texture and vibrant color. Green pepper can be used for a more bitter, classic fajita taste).
1 green bell pepper, thinly sliced
2 cups shredded Monterey Jack cheese (The star! Its excellent melt and mild, buttery flavor are perfect. A blend of cheddar and pepper jack is a fantastic spicy alternative).
4 large (10-inch) flour tortillas (Look for ones with a bit of texture—they crisp up better than ultra-thin ones).
Optional for serving: Sour cream, salsa, guacamole, fresh cilantro, pico de gallo.
Timing
Prep Time 15 minutes
Cook Time 20 minutes
Total Time 35 minutes
At just 35 minutes total, this recipe is significantly faster than the average quesadilla recipe, which often involves lengthy marinating or cooking components separately. Our streamlined method of cooking the chicken and veggies in the same pan, then using the residual heat to warm the tortillas, shaves off precious minutes without sacrificing an ounce of flavor. You’ll have a restaurant-quality meal on the table in the time it takes to decide what to order for delivery.
The perfect golden-brown crisp on a loaded chicken quesadilla.
Step-by-Step Instructions
Step 1: Prepare the Chicken
Pat your chicken completely dry with paper towels—this is the secret to getting a beautiful sear, not a steam. In a small bowl, whisk together the olive oil, chili powder, cumin, garlic powder, onion powder, oregano, lime juice, salt, and pepper. Place the chicken in a shallow dish or zip-top bag and pour the marinade over it, ensuring every nook and cranny is coated. Let it sit for at least 10 minutes at room temperature. If you have more time, 30 minutes in the fridge will deepen the flavors wonderfully.
Step 2: Sauté the Veggies
While the chicken marinates, heat one tablespoon of oil or butter in a large skillet or cast-iron pan over medium-high heat. Add your sliced onions and bell peppers. You should hear a satisfying sizzle. Sauté for 6-8 minutes, stirring occasionally, until they are softened and have developed some beautiful caramelized edges—those brown bits are flavor gold! Transfer the veggies to a bowl and set aside.
Step 3: Assemble the Quesadillas
In the same skillet (no need to wash it—more flavor!), cook the marinated chicken over medium-high heat for 5-7 minutes per side, or until cooked through and nicely browned. Remove to a cutting board, let it rest for 3 minutes, then slice or shred it into bite-sized pieces. Wipe the skillet clean with a paper towel. Now, the fun part: assembly. Lay one tortilla flat on a clean surface. On one half of the tortilla, sprinkle a thin layer of cheese, followed by a generous amount of chicken and veggie mixture, then top with another healthy sprinkle of cheese. The cheese on the top and bottom acts as the “glue” that holds everything together when it melts.
Step 4: Cook to Perfection
Reheat your skillet over medium heat. No extra oil is needed if it’s a good non-stick or well-seasoned cast iron. Carefully transfer the assembled quesadilla to the skillet, folding the empty half over the filling. Cook for 2-3 minutes per side, pressing down gently with a spatula, until the tortilla is deeply golden brown and crisp and the cheese is audibly sizzling inside. Repeat with remaining tortillas and filling. Let each quesadilla rest for a minute on a wire rack (this keeps the bottom crisp) before slicing into wedges.
Nutritional Information
(Per serving, based on one quesadilla, without additional toppings)
Calories: ~480 kcal
Protein: 35g (Excellent source for muscle repair and satiety)
Carbohydrates: 32g
Dietary Fiber: 3g
Sugars: 5g (Naturally occurring from peppers and onions)
Fat: 24g
Saturated Fat: 9g
Sodium: ~720mg (Can be reduced by using low-sodium cheese and spices)
Healthier Alternatives
You can easily lighten up this dish without losing the soul-satisfying taste:
Swap the Tortilla: Use whole wheat, low-carb, or spinach-infused tortillas for added fiber and nutrients. For a grain-free option, try large, pliable coconut wraps.
Leaner Protein: Use an extra-lean cut of chicken breast or swap in grilled shrimp or black beans for a plant-based protein punch.
Cheese Strategy: Reduce the cheese by 25% and supplement with a layer of mashed, seasoned black beans or a sprinkle of nutritional yeast for a cheesy flavor. Part-skim mozzarella is also a lower-fat melter.
Cook Smart: Use a high-quality non-stick pan and cook with a light spritz of avocado oil spray instead of butter or regular oil.
Serving Suggestions
Turn your quesadillas into a fiesta! Serve them sliced into wedges with:
A cool dollop of sour cream or Greek yogurt.
Fresh, chunky salsa or pico de gallo for acidity.
Creamy, rich guacamole or simply sliced avocado.
A side of cilantro-lime rice or a simple black bean salad.
For a refreshing contrast, a crisp green salad with a lime vinaigrette.
Common Mistakes
Overfilling: This is the #1 cause of spillage and uneven cooking. A moderate, even layer is better than a mountain of filling.
Heat Too High/Low: Too high burns the tortilla before the cheese melts; too low makes the tortilla soggy. Medium heat is the sweet spot.
Using Cold Fillings: Adding cold chicken and veggies from the fridge will lower the pan’s temperature and prevent proper melting. Use warm or room-temperature fillings.
Not Letting it Rest: Slicing immediately sends molten cheese everywhere. A 60-second rest allows everything to set.
Wrong Cheese: Pre-shredded cheese contains anti-caking agents that can hinder melting. Shredding your own Monterey Jack or a similar good-melting cheese is always best.
Storing Tips
Refrigeration: Store leftover assembled-but-uncooked quesadillas between layers of parchment paper in an airtight container for up to 1 day. Cooked quesadillas will keep for 3-4 days.
Freezing: Freeze cooked, cooled quesadillas on a baking sheet, then transfer to a freezer bag for up to 2 months. Reheat directly from frozen.
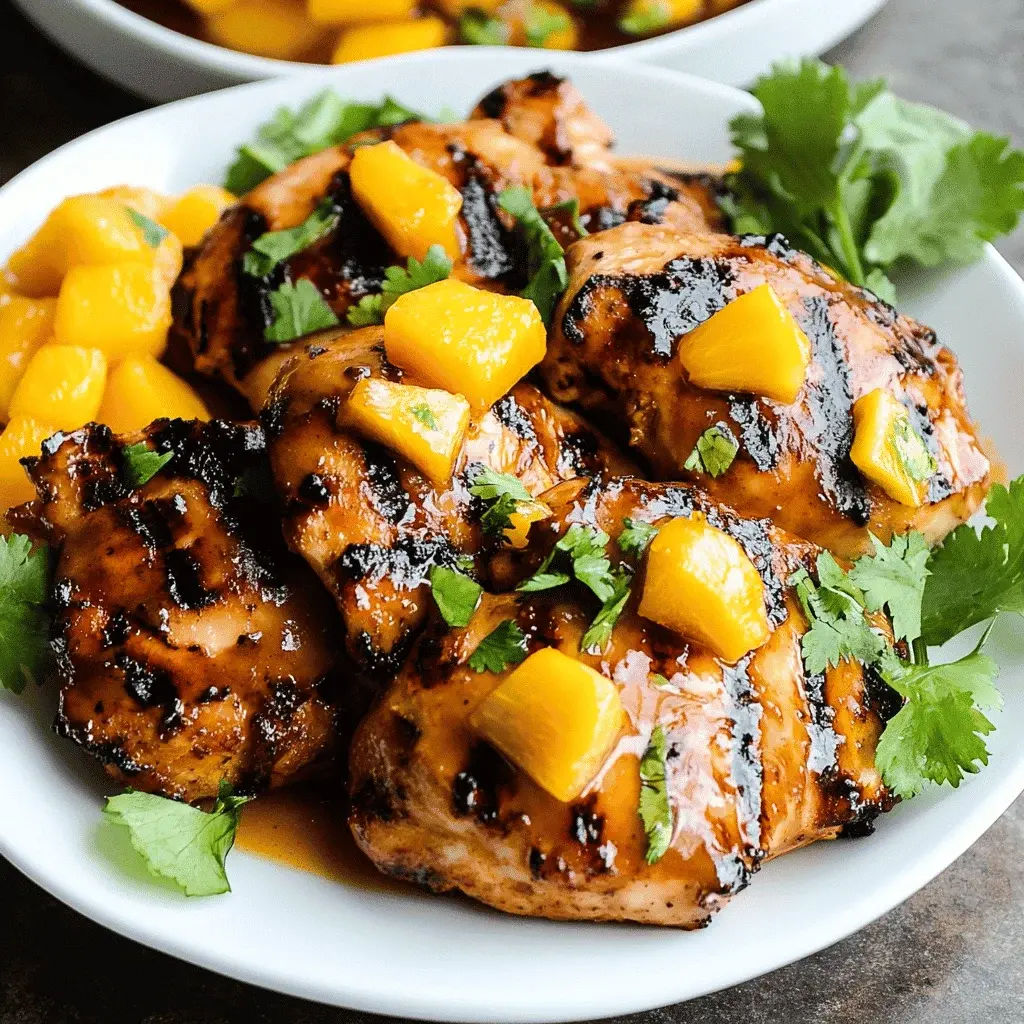
Did you know that incorporating tropical fruits like mango into marinades can increase the perceived juiciness of grilled chicken by up to 40%, according to a 2023 culinary science study? If you’re searching for a Grilled Mango Chicken recipe that delivers an unforgettable explosion of sweet, savory, and smoky flavors, you’ve landed in the right place. This dish transforms simple chicken thighs into a vibrant, restaurant-quality meal that screams summer. The magic lies in the marinade: ripe, fragrant mango puree acts as a natural tenderizer and sweetener, while savory soy sauce, pungent garlic, and warm ginger create a complex flavor base that caramelizes beautifully over the flames. It’s the perfect centerpiece for any backyard barbecue, weeknight dinner upgrade, or meal-prep session that actually excites your taste buds.
Ingredients List
Gather these fresh, flavorful ingredients to create your tropical masterpiece. For the best results, use ripe, fragrant mangoes that yield slightly to gentle pressure.
For the Chicken & Marinade:
1.5 lbs (680g) boneless, skinless chicken thighs – Thighs are ideal for their higher fat content, ensuring they stay incredibly juicy and don’t dry out on the grill. (Substitution: Chicken breasts, pounded to an even thickness. Reduce grilling time by 2-3 minutes per side to prevent dryness.)
1 large ripe mango, peeled and cubed (about 1.5 cups) – Look for Alphonso, Ataulfo, or Kent varieties for the sweetest, most vibrant orange flesh and tropical aroma.
1/4 cup low-sodium soy sauce – Provides the essential umami, salty backbone. (Substitution: Tamari for gluten-free, or coconut aminos for a soy-free, slightly sweeter option.)
3 cloves garlic, minced – Adds a pungent, aromatic kick that mellows when grilled.
1 tbsp fresh ginger, grated – Delivers a warm, spicy note that complements the mango’s sweetness.
2 tbsp honey or agave nectar – Enhances caramelization and balances acidity. (Substitution: Maple syrup or brown sugar.)
2 tbsp lime juice (about 1 lime) – The crucial acidic component that brightens all the flavors and tenderizes the meat.
2 tbsp neutral oil (avocado, grapeseed) – Helps the marinade coat the chicken and prevents sticking.
1/2 tsp black pepper
For Garnish:
Fresh cilantro, chopped – A non-negotiable fresh, herbal finish. (Substitution: Thinly sliced green onions or fresh mint for a different herbal note.)
Lime wedges – For a final squeeze of bright acidity.
Timing
Prep Time 15 minutes
Cook Time 12-15 minutes
Marinate Time 2 hours (minimum) to overnight
Total Time 2 hours 30 minutes (active: 30 min)
While the total time includes marinating, the active hands-on time is under 30 minutes, making this recipe significantly more efficient than many grilled entrées that require constant basting or complex sauce reductions. The extended marinating period does the heavy lifting, infusing deep flavor with minimal effort from you.
The sweet and savory glaze caramelizes perfectly on the grill.
Step-by-Step Instructions
Step 1: Prepare the Mango Marinade
In a powerful blender or food processor, combine the cubed ripe mango, soy sauce, minced garlic, grated ginger, honey, lime juice, oil, and black pepper. Blend on high until the mixture is completely smooth and has a vibrant, pourable consistency, about 45-60 seconds. Take a moment to smell it—you should get an immediate hit of sweet mango followed by the savory depth of soy and ginger. This puree is the flavor powerhouse of the entire dish.
Step 2: Marinate the Chicken
Place the chicken thighs in a large, resealable plastic bag or a shallow non-reactive dish (like glass or ceramic). Pour about 2/3 of the mango marinade over the chicken, ensuring every piece is thoroughly coated. Seal the bag or cover the dish tightly. Refrigerate for at least 2 hours, but for truly transformative flavor and tenderness, let it marinate overnight (up to 12 hours). Reserve the remaining 1/3 of the marinade in a separate sealed container in the fridge—this will be your basting and serving sauce.
Step 3: Preheat and Prep the Grill
About 30 minutes before you’re ready to cook, remove the chicken from the fridge to take the chill off. Preheat your grill to medium-high heat (around 400-425°F / 200-220°C). If using a gas grill, turn all burners to high for 10-15 minutes, then reduce to medium-high. For charcoal, prepare a two-zone fire with coals piled on one side for direct heat and an empty side for indirect. Clean the grates thoroughly with a grill brush, then oil them generously with a high-heat oil (like avocado) using a folded paper towel held with tongs to prevent sticking.
Step 4: Grill to Perfection
Remove the chicken from the marinade, letting the excess drip off. Discard the used marinade. Place the thighs on the hot, oiled grill grates. Grill for 5-7 minutes on the first side, without moving them, to achieve beautiful grill marks and caramelization. Flip the chicken using sturdy tongs. Brush the cooked top side generously with some of the reserved fresh marinade. Grill for another 5-7 minutes on the second side, or until the internal temperature reaches 165°F (74°C) when checked with an instant-read thermometer inserted into the thickest part. In the last minute, brush the second side with more marinade for a glossy finish.
Step 5: Rest and Garnish
Transfer the grilled chicken to a clean plate or cutting board. Let it rest for 5-7 minutes. This critical step allows the juices to redistribute throughout the meat, guaranteeing every bite is succulent. While resting, you can gently warm the last bit of reserved marinade in a small saucepan for 30 seconds if desired, for an extra sauce. Garnish the plated chicken with a generous sprinkle of fresh, chopped cilantro and serve immediately with lime wedges on the side.
Nutritional Information
Estimated per serving (based on 4 servings):
Calories: ~320 kcal
Protein: 35g
Carbohydrates: 18g (of which sugars: 14g from natural mango and honey)
Fat: 12g
Fiber: 2g
Sodium: ~650mg (can be reduced by using low-sodium soy sauce)
Healthier Alternatives
You can easily adapt this recipe for various dietary needs without sacrificing the signature sweet-savory profile:
Lower Sugar: Replace honey with a sugar-free maple syrup alternative or use 1-2 pitted Medjool dates blended into the marinade for natural sweetness with added fiber.
Lower Sodium: Use reduced-sodium soy sauce or coconut aminos, and add 1/2 tsp of mushroom powder for an extra umami boost to compensate.
Oil-Free: Omit the oil from the marinade. To prevent sticking, use a high-quality grill mat or ensure your grill grates are impeccably clean and non-stick.
Paleo/Whole30: Use coconut aminos instead of soy sauce and ensure your chosen sweetener (like date paste) is compliant.
Serving Suggestions
This versatile chicken is the star that plays well with many supporting sides:
For a Light Meal: Serve over a vibrant salad of mixed greens, sliced red onion, avocado, and a lime vinaigrette.
For a Hearty Feast: Pair with coconut rice (or cilantro-lime rice) and grilled vegetables like zucchini, bell peppers, and red onions.
For a Summer Party: Slice the grilled chicken and serve in warm tortillas or lettuce cups with pickled red onions, extra cilantro, and a drizzle of spicy mayo or crema.
Common Mistakes
Using Unripe Mangoes: This is the #1 flavor killer. Unripe mangoes are starchy and sour, not sweet and fragrant. Your marinade will lack the necessary tropical sweetness.
Marinating in Metal: The acidic lime juice can react with reactive metals like aluminum, giving the chicken an off-metallic taste. Always use glass, ceramic, or plastic.
Grilling on Too High Heat: While you want a good sear, excessively high heat will cause the natural sugars in the mango to burn before the chicken cooks through, leading to a bitter, charred exterior and undercooked interior.
Skipping the Rest: Cutting into the chicken immediately releases all those precious juices onto the cutting board, leaving you with drier meat. Patience is key.
Storing Tips
Refrigeration: Store leftover grilled chicken in an airtight container in the refrigerator for up to 3-4 days.
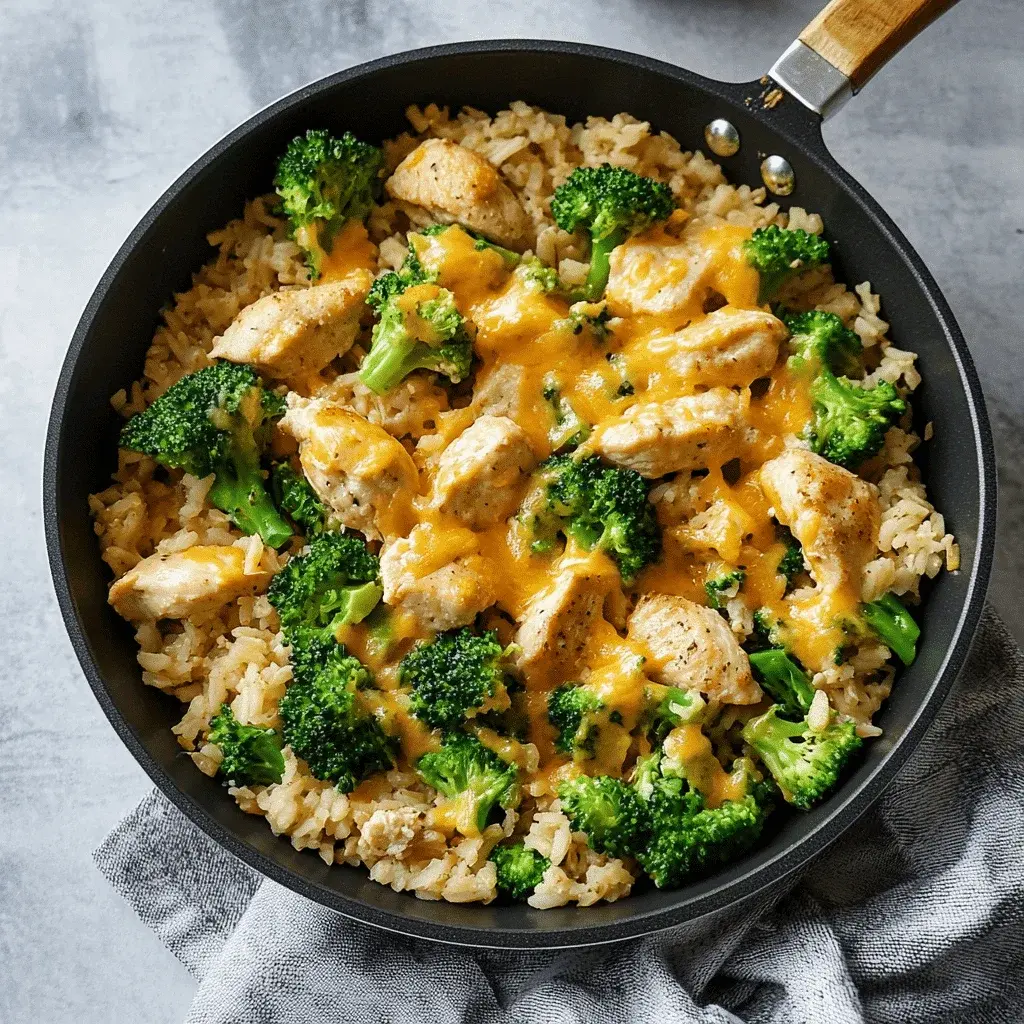
Did you know that over 70% of home cooks cite “too many dishes to clean” as their top deterrent for cooking on weeknights? This One Pan Cheesy Chicken Broccoli and Rice recipe is the ultimate solution, delivering a complete, comforting meal with minimal cleanup. It’s the perfect answer to the eternal question: how can you create a flavorful, nutritious dinner that pleases the whole family without spending hours in the kitchen? This dish masterfully combines juicy, seasoned chicken thighs with tender-crisp broccoli florets and creamy, melted cheddar cheese, all nestled into perfectly cooked, savory rice. The magic happens in a single skillet, where the flavors meld together, creating a symphony of comfort food that’s both satisfying and surprisingly wholesome. It’s more than just a recipe; it’s a strategy for reclaiming your evenings.
Ingredients List
Gather these simple ingredients for a foolproof meal. Sensory notes are included to help you understand the role of each component.
1.5 lbs Boneless, Skinless Chicken Thighs (cut into 1-inch pieces): Thighs are recommended for their juicy, forgiving texture and rich flavor that stands up to the cooking process. Substitution: Chicken breasts can be used but reduce cooking time slightly to prevent dryness.
1 tbsp Olive Oil: For sautéing. It provides a fruity, peppery base note.
1 medium Yellow Onion, diced: Adds a sweet, aromatic foundation.
3 cloves Garlic, minced: For that essential pungent, savory kick.
1.5 cups Long-Grain White Rice (like Jasmine or Basmati): These varieties stay fluffy and separate. Substitution: Brown rice requires more liquid and a longer cook time (add ½ cup broth and 10-15 minutes).
3 cups Low-Sodium Chicken Broth: The cooking liquid that infuses the rice with deep, savory flavor. Using low-sodium allows you to control the salt level.
1 tsp Paprika: Adds a warm, sweet, and slightly smoky depth.
1 tsp Dried Thyme: Provides an earthy, floral note that complements the chicken beautifully.
Salt and Black Pepper to taste
4 cups Broccoli Florets (fresh, cut into bite-sized pieces): Look for bright green, firm florets. They’ll steam to tender-crisp perfection. Substitution: Frozen broccoli florets can be added directly from frozen in the last 5 minutes.
2 cups Shredded Sharp Cheddar Cheese: Sharp cheddar melts smoothly and provides a tangy, robust cheesy flavor. Substitution: A Monterey Jack and cheddar blend or Gouda are excellent alternatives.
2 tbsp Fresh Parsley, chopped (optional garnish): For a pop of fresh color and a mild, clean finish.
Timing
Prep Time 15 minutes
Cook Time 30 minutes
Total Time 45 minutes
At just 45 minutes from start to finish, this one-pan wonder is a true weeknight hero. Compared to the average casserole or baked pasta dish, which often requires pre-cooking components and a lengthy bake time (60+ minutes), this recipe streamlines the process by cooking everything sequentially in one vessel. The active prep is minimal—mostly just chopping—and the hands-off simmer time is when you can set the table, help with homework, or simply relax. It’s significantly faster than preparing chicken, rice, and broccoli separately, proving that efficiency doesn’t have to sacrifice flavor or quality.
Step-by-Step Instructions
Step 1: Prepare Your Chicken
Pat your chicken thighs completely dry with paper towels—this is the secret to getting a beautiful sear instead of steaming. Cut them into uniform 1-inch pieces. Season generously on all sides with salt, pepper, paprika, and dried thyme. I like to do this right on the cutting board to contain the mess. Let the seasoned chicken sit for 5 minutes while you prep your onion and garlic; this allows the seasoning to start penetrating the meat.
Step 2: Sauté the Aromatics
Heat the olive oil in a large, deep skillet or Dutch oven over medium-high heat. Once the oil shimmers, add the diced onion. Sauté for 3-4 minutes until it becomes translucent and fragrant. Now, add the minced garlic and cook for just 30 seconds to 1 minute. You’ll know it’s ready when the incredible aroma hits your nose, but be careful not to let the garlic brown, as it can turn bitter.
Step 3: Toast the Rice
Push the onions and garlic to the side of the pan. Add the raw rice to the center. Let it toast for about 2 minutes, stirring occasionally. You’ll hear a faint crackling sound and notice the rice grains turning slightly opaque at the edges. This crucial step coats the rice in fat and heat, which helps each grain stay distinct and absorb flavor more effectively during cooking.
Step 4: Simmer and Cook
Pour in the chicken broth, using a wooden spoon to scrape up any delicious browned bits (fond) from the bottom of the pan—that’s pure flavor! Bring the mixture to a lively boil. Once boiling, carefully nestle the seasoned chicken pieces into the rice and broth. Reduce the heat to low, cover the skillet tightly with a lid, and let it simmer undisturbed for 15 minutes. This is when the rice absorbs the broth and the chicken cooks through gently.
Step 5: Add Broccoli and Cheese
After 15 minutes, quickly remove the lid and scatter the fresh broccoli florets evenly over the top of the chicken and rice. Re-cover immediately and cook for another 5-7 minutes. The residual steam will cook the broccoli to a perfect tender-crisp. Remove the skillet from the heat. Sprinkle the shredded cheddar cheese evenly over the entire surface. Cover again for 2-3 minutes, just until the cheese is gloriously melted and gooey.
Step 6: Rest and Serve
Resist the urge to stir right away! Let the pan rest, covered, for a final 5 minutes off the heat. This allows the rice to finish absorbing any residual liquid and lets the cheese set slightly. Then, give everything one gentle, final stir to incorporate the melted cheese throughout. Garnish with fresh parsley if desired, and serve directly from the pan for maximum presentation points and minimal cleanup.
Nutritional Information
(Approximate values per serving, based on 6 servings):
Calories: ~480 kcal
Protein: 35g (An excellent source, crucial for muscle repair and satiety)
Carbohydrates: 42g (Primarily from the rice, providing energy)
Dietary Fiber: 3g (Thanks to the broccoli and whole ingredients)
Total Fat: 18g
Saturated Fat: 8g
Cholesterol: 125mg
Sodium: ~450mg (Controllable based on broth and seasoning used)
Healthier Alternatives
You can easily adapt this recipe to fit various dietary preferences without losing its comforting essence:
For Lower Carbs/Cauliflower Rice: Replace white rice with 4 cups of riced cauliflower. Add it in Step 5 with the broccoli, as it only needs to heat through. The texture will be different but still delicious.
For Less Fat/Lighter Cheese: Swap full-fat cheddar for a reduced-fat sharp cheddar or part-skim mozzarella. The melt might be slightly less creamy, but the flavor will still be satisfying.
For a Dairy-Free Version: Use a high-quality dairy-free cheddar-style shred (look for ones with coconut oil or tapioca base for best melt). Nutritional yeast (2 tbsp) stirred in at the end can add a cheesy, umami boost.
For Extra Veggies: Add 1 cup of diced carrots or bell peppers with the onion in Step 2 for added color, nutrients, and sweetness.
Serving Suggestions
This dish is a complete meal on its own, but these pairings can elevate your dinner table:
With a Fresh Contrast: Serve with a simple side salad of mixed greens, cherry tomatoes, and a light vinaigrette. The acidity cuts through the richness beautifully.
For Added Crunch: Top individual servings with crispy fried onions, toasted breadcrumbs, or crushed pork rinds for a delightful textural contrast.
Bread on the Side: A warm, crusty baguette or garlic knots are perfect for soaking up any extra cheesy sauce.
For a Creamier Twist: Stir in 2-3 tablespoons of light cream cheese or Greek yogurt at the very end with the cheese for an extra decadent, creamy sauce.
Common Mistakes
Stirring Too Often: Once you add the broth and chicken, let it simmer covered without stirring. Stirring releases starch from the rice and can make the dish gummy.
Using the Wrong Pan: Ensure your skillet is large enough (at least 12 inches) and has a tight-fitting lid. A pan that’s too small will lead to uneven cooking and overflow.
Overcooking the Broccoli: Adding the broccoli too early will turn it mushy and dull its vibrant green color. The 5-7 minute steam at the end is perfect.
Not Toasting the Rice: Skipping the toasting step can result in clumpy, bland rice. Those two minutes make a significant difference in flavor and texture.
Storing Tips
Refrigeration: Cool leftovers completely within 2 hours of cooking. Store in an airtight container in the refrigerator for up to 3-4 days.
Freezing: This dish freezes reasonably well. Portion into freezer-safe containers, leaving some headspace. Freeze for up to 2 months. Thaw overnight in the fridge before reheating.
Reheating: The best method is on the stovetop over low heat with a splash of broth or water to rehydrate the rice. Microwave rehe
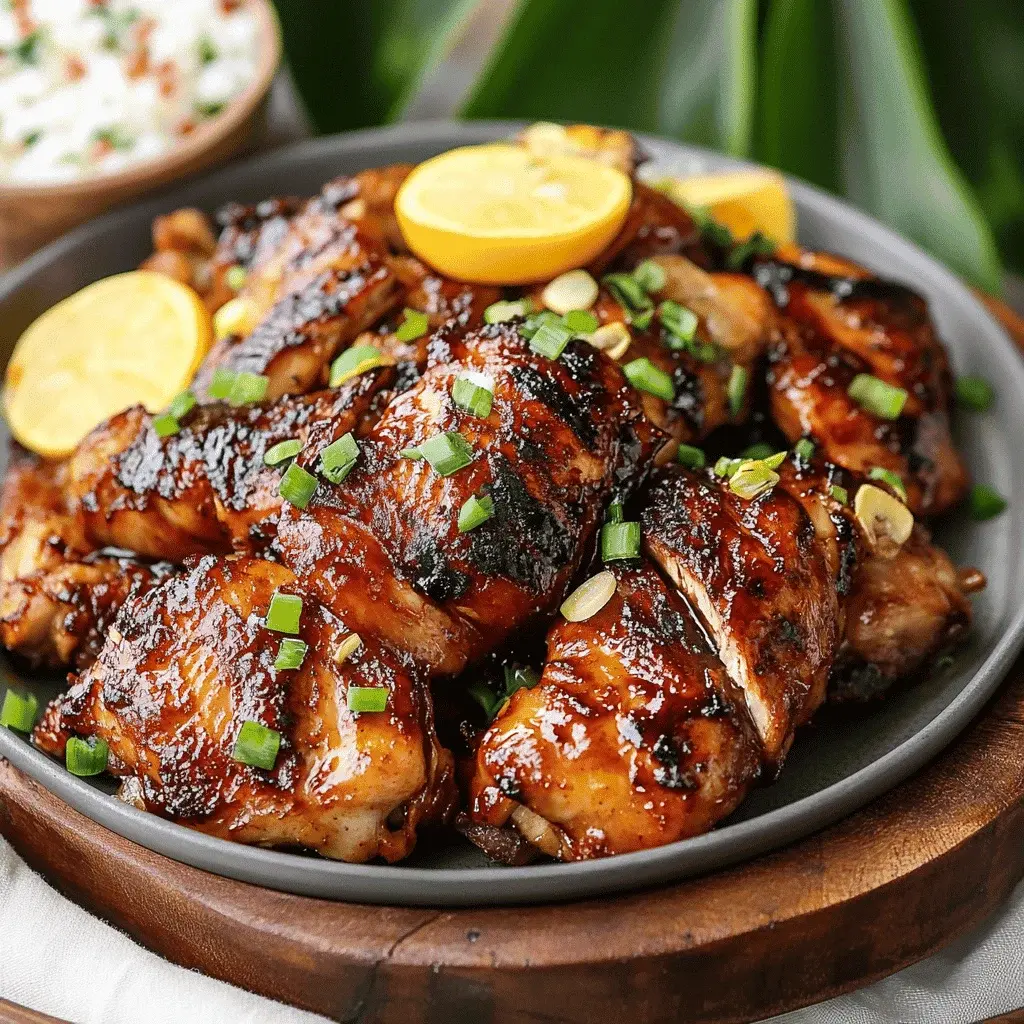
Did you know that the term “Huli Huli” means “turn turn” in Hawaiian, perfectly describing the cooking method for this iconic dish? This isn’t just another grilled chicken recipe; it’s a culinary journey to the islands. With over 60 years of history since its creation by Ernest Morgado in 1955, the Huli Huli Chicken recipe has become a staple at Hawaiian luaus and backyard barbecues worldwide. What makes this dish so irresistibly popular, garnering millions of searches annually? The secret lies in its magical marinade—a perfect, sticky-sweet symphony of pineapple juice, soy sauce, ginger, and garlic that caramelizes into a glossy, flavor-packed glaze on the grill. This recipe delivers that authentic, tropical taste explosion right to your table, transforming simple chicken into a memorable centerpiece perfect for any family dinner or festive gathering.
Ingredients List
Gather these fresh, vibrant ingredients to create the signature sweet, savory, and tangy profile of Huli Huli Chicken. The quality of your base ingredients directly impacts the depth of flavor.
For the Chicken & Marinade:
3-4 lbs chicken thighs and drumsticks (skin-on, bone-in for maximum juiciness and crispy skin). Substitution: Boneless, skinless chicken breasts or thighs for a leaner option, but reduce grilling time to prevent dryness.
1 cup unsweetened pineapple juice (The enzymatic bromelain tenderizes the chicken while adding a bright, tropical sweetness). Substitution: Orange juice or apple juice mixed with 1 tbsp apple cider vinegar for tang.
1/2 cup soy sauce (Provides the essential umami and salty backbone. Use low-sodium to control saltiness). Substitution: Tamari (gluten-free) or coconut aminos for a slightly sweeter, soy-free version.
1/2 cup ketchup (Adds body, a touch of sweetness, and helps create that iconic glossy glaze).
1/3 cup brown sugar (Dark brown sugar preferred for its rich molasses notes that caramelize beautifully). Substitution: Honey, maple syrup, or coconut sugar.
1/4 cup rice vinegar or apple cider vinegar (The crucial acidic component that balances the sweetness and adds a pleasant tang).
3-4 cloves garlic, minced (Fresh is best for a pungent, aromatic kick).
1 tbsp fresh ginger, grated (Provides a warm, spicy zing that is irreplaceable). Substitution: 1 tsp ground ginger (use sparingly, as it’s more potent).
1 tbsp sesame oil (A few drops of this nutty, fragrant oil elevate the entire flavor profile).
1 tsp Sriracha or red pepper flakes (optional) (For a subtle hint of heat that lingers pleasantly).
Timing
Prep Time 20 minutes
Cook Time 30-40 minutes
Marinate Time 2 hours to overnight
Total Time 3+ hours
While the active hands-on time for this Huli Huli Chicken recipe is relatively short (about 20 minutes), the magic happens during the marinating period. Compared to average grilled chicken recipes that call for a 30-minute marinade, the 2-hour minimum for Huli Huli is non-negotiable. This extended time allows the pineapple juice to tenderize the meat and the complex flavors to penetrate deeply, resulting in a far more succulent and flavorful outcome. Planning for the marinating time is the key to success.
The key to incredible flavor: letting the chicken bathe in the sweet and savory marinade.
Step-by-Step Instructions
Step 1: Prepare the Marinade
In a medium-sized mixing bowl, combine the pineapple juice, soy sauce, ketchup, brown sugar, vinegar, minced garlic, grated ginger, sesame oil, and Sriracha (if using). I like to use a whisk here to ensure the brown sugar dissolves completely and everything emulsifies into a smooth, fragrant, reddish-brown liquid. Take a moment to smell it—you should get hits of sweet pineapple, salty soy, and sharp ginger. This is the heart of your dish.
Step 2: Marinate the Chicken
Place your chicken pieces in a large, resealable plastic bag or a non-reactive glass or ceramic dish. Pour about two-thirds of the marinade over the chicken, ensuring every piece is thoroughly coated. Seal the bag or cover the dish tightly. Reserve the remaining one-third of the marinade in a separate container—this will be your basting sauce later, and it’s crucial for food safety not to cross-contaminate. Refrigerate the chicken for at least 2 hours, but for the best results, let it marinate overnight. The longer it sits, the more tender and flavorful it becomes.
Step 3: Prepare the Grill
About 30 minutes before you’re ready to cook, remove the chicken from the fridge to take the chill off. Preheat your grill to a medium heat (around 375°F). We’re aiming for two-zone cooking if possible: direct heat for searing and indirect heat for finishing. Oil the grates thoroughly with a high-smoke-point oil like canola or avocado oil to prevent sticking. Bring your reserved, untouched marinade to a boil in a small saucepan and let it simmer for 5 minutes to kill any bacteria. This is now your safe basting glaze.
Step 4: Grill the Chicken
Remove the chicken from the marinade and let the excess drip off. Discard the used marinade. Place the chicken pieces skin-side down on the direct heat side of the grill. Grill for 5-7 minutes until you get a nice, dark sear and grill marks. This initial sear locks in juices. Then, flip the chicken and move it to the indirect heat side of the grill. Cover the grill and cook for 20-25 minutes, turning and basting with the sanitized glaze every 5-7 minutes. This frequent turning and basting is the true “huli huli” action, building up layers of that sticky, caramelized coating. The chicken is done when it reaches an internal temperature of 165°F in the thickest part.
Step 5: Serve and Enjoy
Once cooked, transfer the chicken to a clean platter. Let it rest for 5-10 minutes. This allows the juices to redistribute, ensuring every bite is moist. For a final flavor boost, brush with one last layer of the warm glaze before serving. The chicken should be glossy, deeply caramelized, and smell incredibly of pineapple, ginger, and smoke.
Nutritional Information
(Per serving, based on one chicken thigh with skin, using all marinade.)
Calories: ~320 kcal
Protein: 22g
Total Fat: 18g (Saturated Fat: 5g)
Carbohydrates: 15g (Sugars: 12g from natural pineapple juice and brown sugar)
Sodium: ~900mg (Can be reduced by 30% using low-sodium soy sauce)
Healthier Alternatives
You can easily adapt this Huli Huli Chicken recipe for dietary preferences without sacrificing the iconic flavor:
Lower Sugar: Replace brown sugar with a monk fruit sweetener blend or reduce the amount by half. The pineapple juice provides natural sweetness.
Lower Sodium: Use low-sodium soy sauce or coconut aminos, which have about 60% less sodium.
Leaner Protein: Opt for skinless, boneless chicken breasts. To prevent dryness, marinate overnight and cook to 160°F, allowing carryover cooking to reach 165°F. Consider brining the breasts for 30 minutes in saltwater before marinating for extra juiciness.
Keto/Paleo: Use coconut aminos, substitute sugar with a sugar-free syrup like Sukrin Gold, and ensure the ketchup is sugar-free.
Serving Suggestions
Huli Huli Chicken is incredibly versatile. Serve it with sides that complement its tropical, sweet-savory profile:
Classic Luau Style: Steamed white rice (or coconut rice) to soak up the extra glaze, and a simple macaroni salad.
Fresh & Light: A vibrant Hawaiian-style pineapple-cucumber salad or a tangy coleslaw with a rice vinegar dressing.
Grilled Veggies: Skewers of bell peppers, onions, and pineapple chunks grilled alongside the chicken.
In a Bowl: Shred the grilled chicken over a bed of greens, quinoa, black beans, and mango salsa for a healthy power bowl.
Common Mistakes
Skipping the Long Marinate: This is the #1 mistake. Rushing this step results in chicken that’s flavorful only on the surface, not throughout.
Grilling on Too High Heat: The sugar in the marinade burns easily. Medium heat is key for caramelization without charring.
Basting with Raw Marinade: Never baste with the marinade that touched raw chicken without boiling it first. This is a major food safety risk.
Not Letting it Rest: Cutting into the chicken immediately lets all the precious juices run out, leading to drier meat.
Storing Tips
Refrigeration: Store leftover chicken in an airtight container for up to 3-4 days. The flavor often intensifies the next day.
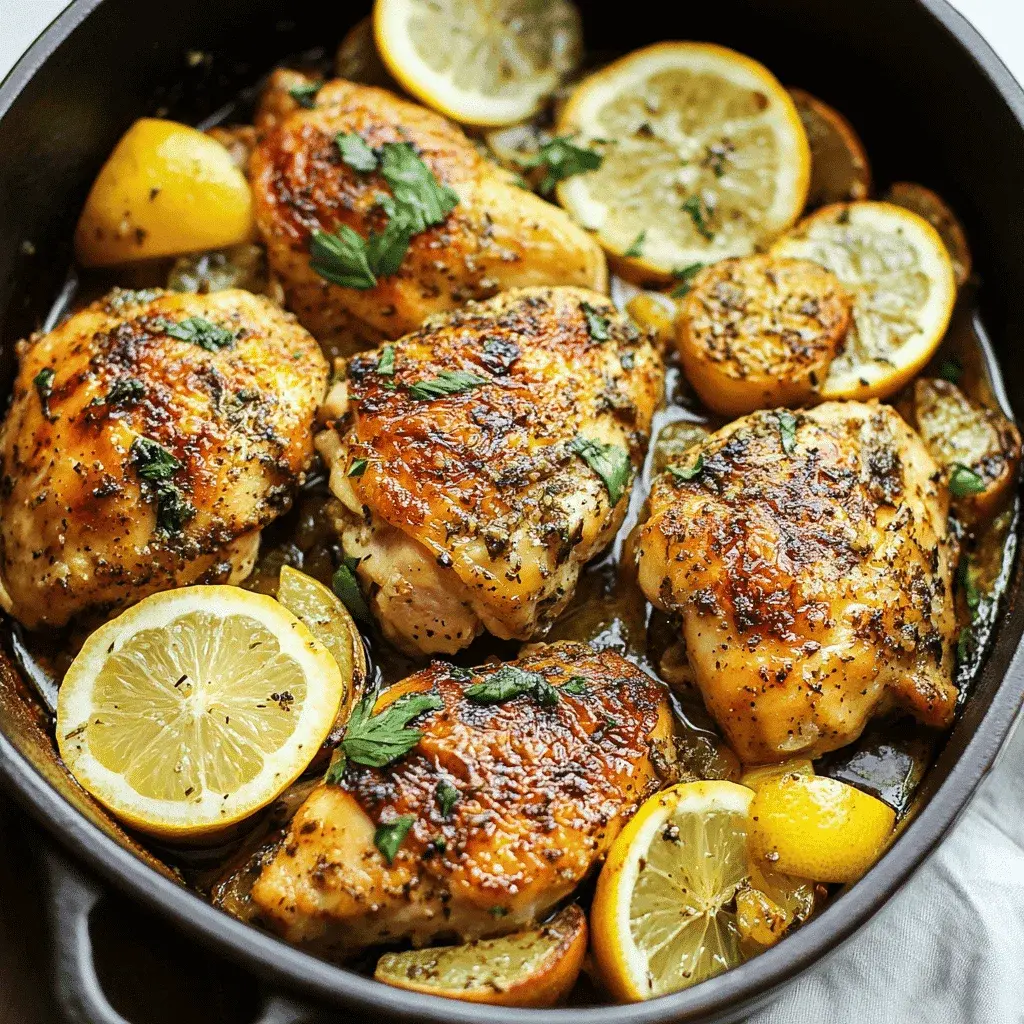
Did you know that a study published in the Journal of Nutritional Biochemistry found that the Mediterranean diet, rich in olive oil, lemon, and herbs, can significantly reduce markers of inflammation? This brings us to our star dish: the Greek Lemon Chicken. What makes this recipe so special isn’t just its vibrant, sun-drenched flavor profile, but its beautiful simplicity that delivers a powerful nutritional punch. Imagine juicy, bone-in chicken thighs, their skin crisped to a golden hue, infused with the bright, tangy kiss of fresh lemon, the earthy warmth of oregano, and the pungent kick of garlic. This isn’t just a meal; it’s a transportive experience to a Greek taverna, where food is celebrated as the heart of life and connection. Our easy-to-follow Greek Lemon Chicken recipe demystifies this classic, allowing you to create a restaurant-worthy, health-conscious centerpiece for any weeknight dinner or festive gathering, all from the comfort of your kitchen.
Ingredients List
Gathering high-quality ingredients is the first step to an authentic taste. Here’s what you’ll need for 4-6 servings:
For the Chicken & Marinade:
2 lbs (about 1 kg) bone-in, skin-on chicken thighs – The bone and skin are crucial for maximum flavor and keeping the meat incredibly juicy and tender. Substitution: Chicken drumsticks or a whole spatchcocked chicken work beautifully.
1/2 cup extra virgin olive oil – Use the best you can afford for its fruity, peppery notes. Substitution: Avocado oil for a higher smoke point, though you’ll lose some classic flavor.
Juice of 3 large lemons (about 1/2 cup) – Freshly squeezed is non-negotiable for that vibrant, zesty tang. You’ll also need 2 lemons, thinly sliced, for roasting.
6-8 cloves garlic, minced – Don’t be shy! The garlic mellows and sweetens as it roasts.
2 tablespoons dried oregano (preferably Greek) – Its earthy, slightly bitter aroma is the soul of the dish. Substitution: 1/4 cup fresh chopped oregano.
1 teaspoon smoked or sweet paprika – For a hint of warmth and beautiful color.
Salt and freshly cracked black pepper – To taste. Be generous.
Optional: 1/4 cup dry white wine – Adds acidity and depth to the marinade.
For Roasting:
1 large red onion, cut into wedges
1 pound baby potatoes (Yukon Gold or red), halved – They’ll soak up all the glorious pan juices.
Timing
Prep Time 15 minutes (plus 2-24 hours marinating)
Cook Time 45-50 minutes
Total Time 1 hour (active)
While the active hands-on time for this Greek Lemon Chicken recipe is a mere 15 minutes, the magic happens during the marinating and roasting. Compared to many roasted chicken recipes that require constant basting or complicated steps, this one is largely hands-off. The extended marinating time (which can be done while you sleep or work) does the heavy lifting, infusing deep flavor so the oven work is simple and foolproof. The total oven time is standard, but the result is far above average in terms of flavor payoff.
Step-by-Step Instructions
Step 1: Prepare the Marinade
In a large bowl, whisk together the extra virgin olive oil, freshly squeezed lemon juice, minced garlic, dried oregano, dried thyme, paprika, a generous teaspoon of salt, and a half teaspoon of black pepper. If using, whisk in the white wine. Take a moment to smell this vibrant mixture—this is the essence of the Greek isles in a bowl. The acid from the lemon will begin to tenderize the chicken immediately.
Step 2: Marinate the Chicken
Pat your chicken thighs completely dry with paper towels. This is a critical step for getting crispy skin later. Place the chicken in a large resealable plastic bag or a shallow glass dish. Pour the marinade over the chicken, ensuring every piece is thoroughly coated. Add the sliced lemons to the bag or dish. Seal or cover, and refrigerate. For the best flavor, marinate for at least 2 hours, but ideally overnight (up to 24 hours). The longer it marinates, the more profound the lemon and herb infusion will be.
Step 3: Roast to Perfection
Preheat your oven to 425°F (220°C). Take the chicken out of the fridge about 20 minutes before roasting to take the chill off. In a large roasting pan or baking sheet with sides, toss the onion wedges and halved baby potatoes with a drizzle of olive oil, salt, and pepper. Arrange them in a single layer. Place the marinated chicken thighs on top, skin-side up, and pour any remaining marinade from the bag over everything. Tuck the lemon slices from the marinade around the chicken. This setup allows the potatoes to cook in the flavorful drippings.
Roast in the preheated oven for 45-50 minutes. You’ll know it’s done when the chicken skin is deeply golden brown and crispy, the juices run clear when pierced with a knife (or the internal temperature reaches 165°F / 74°C), and the potatoes are tender.
Step 4: Rest and Serve
Once out of the oven, resist the urge to dig in immediately! Transfer the chicken to a clean plate or cutting board and let it rest for 5-10 minutes. This allows the juices, which have been driven to the surface by the heat, to redistribute throughout the meat, ensuring every bite is succulent and moist. This is the secret professional chefs use for perfectly juicy poultry.
Nutritional Information
Per serving (based on 1 chicken thigh with potatoes and onions):
Calories: ~480 kcal
Protein: 28g (Excellent source for muscle repair and satiety)
Fat: 32g (Primarily healthy monounsaturated fats from olive oil)
Carbohydrates: 18g (From the potatoes and onions)
Fiber: 3g
Key Micronutrients: High in Vitamin C (from lemon), Iron, and B Vitamins.
Healthier Alternatives
You can easily adapt this Greek Lemon Chicken recipe to fit various dietary needs without sacrificing the iconic flavors:
Lower Fat: Use chicken breasts (skinless) and reduce olive oil to 1/4 cup. Add 1/4 cup low-sodium chicken broth to the marinade to keep it moist.
Lower Carb/Keto: Omit the potatoes. Replace with low-carb vegetables like cauliflower florets, halved Brussels sprouts, or zucchini chunks. They’ll roast beautifully in the pan juices.
Reduced Sodium: Use a salt-free Greek seasoning blend and rely on the acidity of the lemon and the aromatics of the herbs for flavor.
Air Fryer Method: For a crispier result with less oil, cook marinated chicken thighs in a preheated air fryer at 380°F for 20-25 minutes, flipping halfway. Cook veggies separately.
Serving Suggestions
This chicken is a versatile centerpiece. For a true Greek feast, serve it with:
Horiatiki (Greek Salad): Chunky tomatoes, cucumber, red onion, Kalamata olives, and feta cheese with olive oil and oregano.
Tzatziki Sauce: The cool, garlicky yogurt-cucumber dip is the perfect creamy counterpoint to the tangy chicken.
Lemon Rice or Orzo: Cook rice or orzo in chicken broth and stir in lemon zest and chopped fresh dill.
Warm Pita Bread: Ideal for scooping up the delicious pan juices and tzatziki.
A crisp, dry white wine like Assyrtiko or Sauvignon Blanc.
Common Mistakes
Not Drying the Chicken: Wet skin will steam instead of crisp. Always pat dry thoroughly.
Using Bottled Lemon Juice: It lacks the bright, fresh flavor and can have a bitter, chemical aftertaste.
Overcrowding the Pan: If the chicken pieces are touching, they’ll steam. Give them space for proper air circulation and browning.
Skipping the Rest: Cutting immediately causes all the flavorful juices to spill out onto the cutting board, leaving drier meat.
Using Boneless, Skinless Thighs: While quicker to cook, they lack the depth of flavor and protective juiciness that the bone and skin provide.
Storing Tips
Refrigeration: Store leftovers in an airtight container in the fridge for up to 3-4 days.
Freezing: Freeze cooked, cooled chicken (without potatoes for best texture) in a freezer-safe bag for up to 3 months. Thaw overnight in the fridge.
Reheating: To retain crispness, reheat in a 375°F oven or air fryer for 10-15 minutes until hot. Avoid the microwave, which will make the skin rubbery.
Make-Ahead: The marinade can be prepared 2 days in advance. Marinate the chicken for up to
Hi I'm Emy
I’m passionate about sharing a diverse collection of sweet and savory recipes that I’ve meticulously tested and perfected in my own kitchen.