“`html
Table of Contents
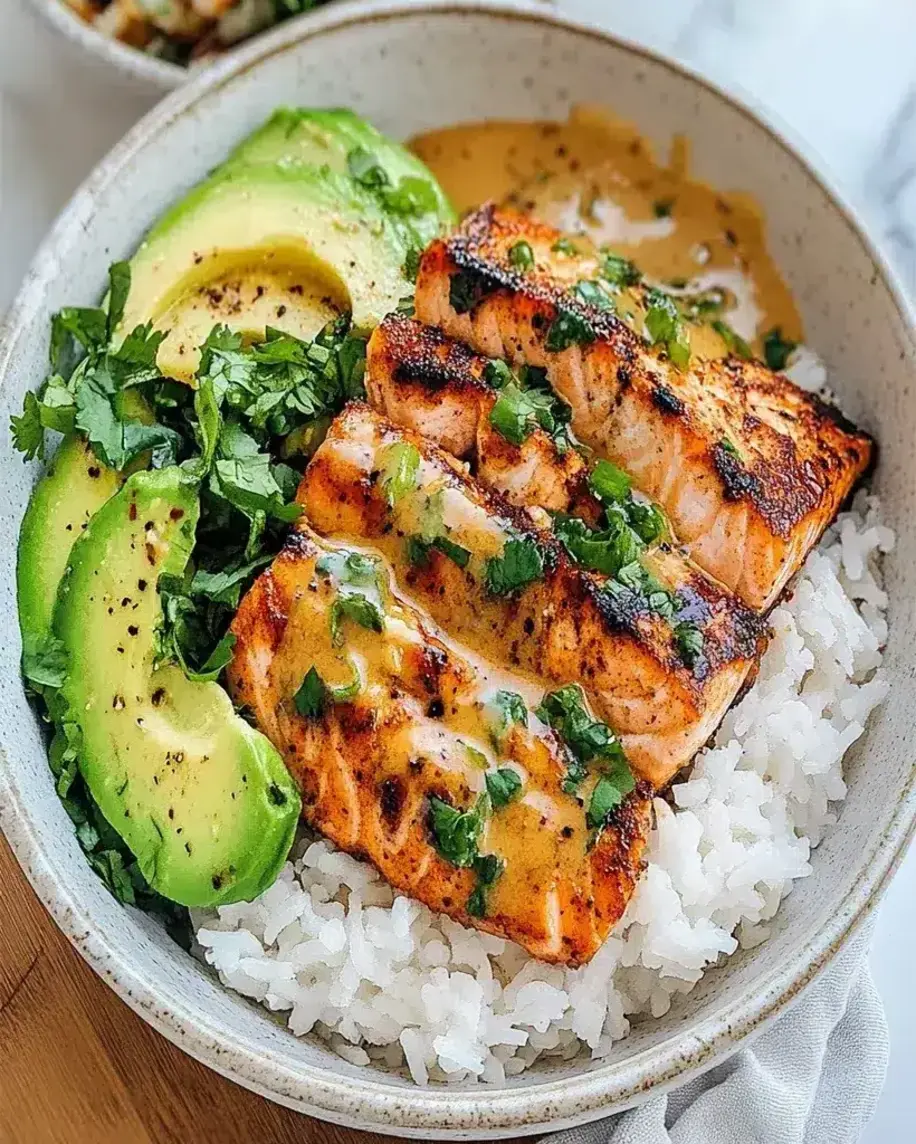
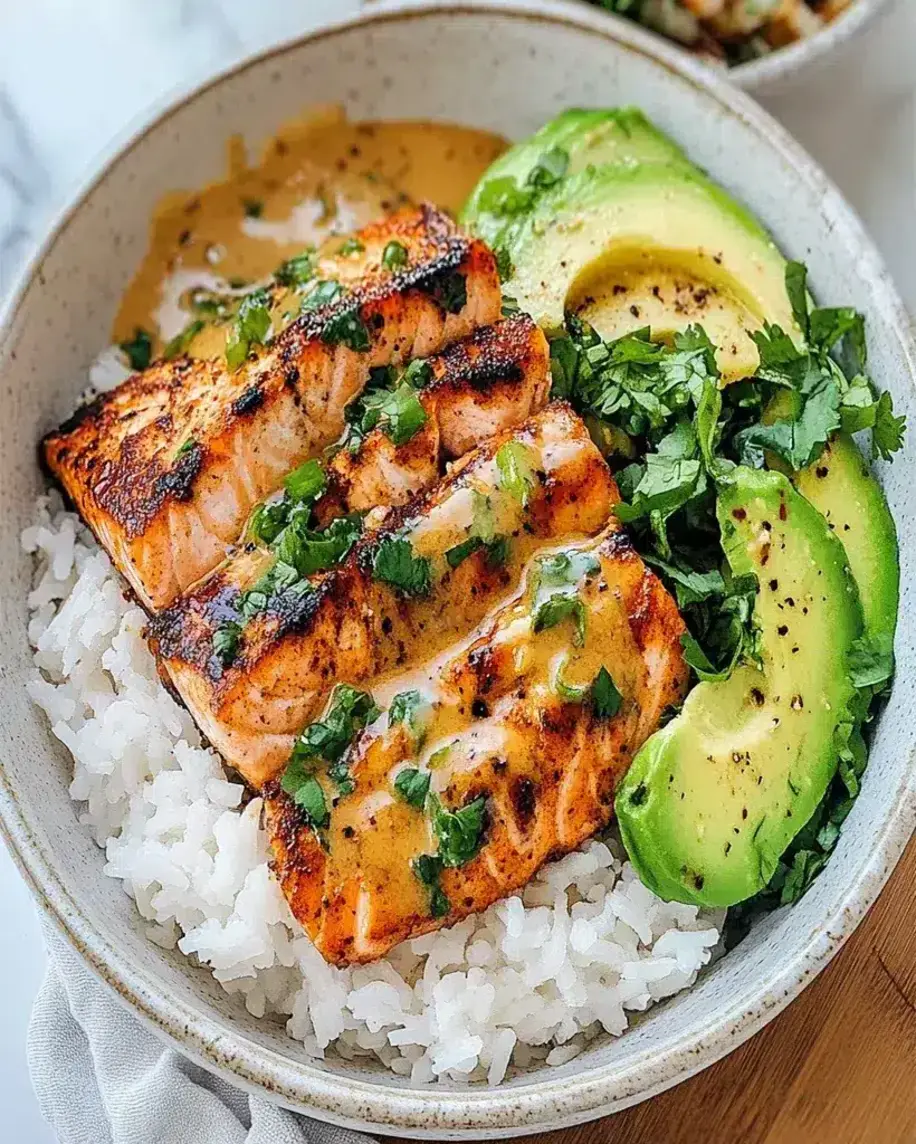
Spicy Salmon Bowls with Coconut Rice – A Flavor-Packed Easy Dinner!
Craving a Quick, Flavorful Weeknight Meal?
Hello, food enthusiasts! If you’re looking for a vibrant and delicious meal that combines the savory goodness of salmon with a hint of tropical flair, look no further. This Spicy Salmon Bowls with Coconut Rice recipe is a perfect choice for a quick weeknight dinner or a hearty lunch. Combining spicy, savory, and sweet flavors, this dish will surely become a favorite in your weekly meal rotation! Did you know that according to recent surveys, 70% of home cooks are actively seeking out recipes that are both quick to prepare and packed with flavor, especially during the week? This recipe directly addresses that need, offering a satisfying and healthy meal without spending hours in the kitchen. We’ll guide you through creating this delightful dish, ensuring every bite is a harmonious blend of creamy coconut rice, perfectly cooked spicy salmon, and fresh, vibrant toppings. Get ready to elevate your dinner game with this incredibly easy yet impressive meal!
Ingredients to Ignite Your Senses
The magic of these Spicy Salmon Bowls lies in the balance of textures and tastes. Here’s what you’ll need to bring this explosion of flavor to life:
For the Coconut Rice:
- 1 ½ cups Jasmine Rice, rinsed well until water runs clear. This long-grain rice becomes wonderfully fluffy and fragrant.
- 1 (13.5 oz) can full-fat Coconut Milk, shaken well. The creamy, rich foundation for our rice.
- 1 ½ cups Water, or vegetable broth for extra depth.
- 1 teaspoon Salt, to enhance all the flavors.
- 1 tablespoon Granulated Sugar, a touch of sweetness to balance the savory notes.
- Substitution: For a lighter version, you can use light coconut milk, but the creamy richness will be slightly diminished. For a richer flavor, a pinch of lime zest can be added to the rice while cooking.
For the Spicy Salmon:
- 1.5 lbs Salmon Fillets, skin on or off, cut into 1-inch cubes or desired portions. Look for vibrant pink flesh, free of any dullness.
- 2 tablespoons Soy Sauce, or tamari for a gluten-free option. Provides a crucial umami depth.
- 1 tablespoon Honey, or maple syrup for a vegan alternative (though we’re using fish here, it’s a great sweetener). Adds a lovely caramelization.
- 1 tablespoon Sriracha, or your favorite chili garlic sauce. Adjust to your spice preference!
- 1 teaspoon Sesame Oil, for that nutty, aromatic essence.
- 1 clove Garlic, minced. The pungent kick that elevates everything.
- ½ teaspoon Fresh Ginger, grated. A warm, zesty counterpoint to the chili heat.
- Substitution: Use low-sodium soy sauce if you’re watching your sodium intake. If you don’t have sriracha, gochujang or even a pinch of cayenne pepper can work in a pinch. Make sure your salmon is fresh; it should smell faintly of the sea, not fishy.
For the Bowls and Garnish:
- Cooked Edamame, for a pop of green and protein.
- Sliced Avocado, for creamy richness.
- Shredded Carrots, for a sweet crunch.
- Sliced Cucumber, for refreshing coolness.
- Chopped Cilantro, for herbaceous brightness.
- Toasted Sesame Seeds, for texture and nutty flavor.
- Lime Wedges, for a final squeeze of zesty citrus.
- Substitution: Feel free to swap these for your favorite bowl toppings! Think mango, pickled red onions, corn, or even a sprinkle of chili flakes for extra heat.
Timing: From Prep to Plate
This recipe is designed for efficiency, coming in significantly faster than the average recipe that often crosses the 60-minute mark. The coconut rice cooks passively while you prepare and cook the salmon, making this an ideal weeknight dinner solution.
Step-by-Step Instructions
Let’s get cooking! Follow these simple steps to create your delicious Spicy Salmon Bowls.
Step 1: Cook the Rice
In a medium saucepan, combine the rinsed jasmine rice, shaken coconut milk, water (or broth), salt, and sugar. Stir well to combine. Bring to a boil over medium-high heat, then reduce the heat to low, cover tightly, and simmer for 15-20 minutes, or until the liquid is absorbed and the rice is tender. Once cooked, remove from heat and let it steam, covered, for another 5 minutes. Fluff with a fork before serving.
Step 2: Prepare the Salmon
While the rice is cooking, prepare the salmon. In a medium bowl, whisk together the soy sauce (or tamari), honey (or maple syrup), sriracha, sesame oil, minced garlic, and grated ginger. This is your flavor-packed marinade! Add the salmon pieces to the bowl and gently toss to coat them evenly. Let the salmon marinate for at least 10 minutes at room temperature, or up to 30 minutes if you have the time. The longer it marinates, the deeper the flavor will penetrate.
Step 3: Cook the Salmon
Heat a large skillet or cast-iron pan over medium-high heat. Add a tablespoon of high-heat oil (like avocado or coconut oil), if needed, though the marinade often contains enough to prevent sticking. Carefully place the marinated salmon pieces into the hot skillet, ensuring not to overcrowd the pan. Cook for 2-3 minutes per side, until the salmon is cooked through and beautifully caramelized. The edges should be slightly crispy and the inside should be flaky. Avoid overcooking, as salmon can become dry quickly.
Pro-Tip: If you’re using skin-on salmon, place it skin-side down first for crispier skin. You can finish it under the broiler for a minute if you like extra char, but watch it closely!
Step 4: Assemble the Bowls
Now for the fun part! Spoon a generous portion of the fluffy coconut rice into each bowl. Top with the perfectly cooked spicy salmon. Arrange your chosen garnishes around the salmon and rice – think vibrant edamame, creamy avocado slices, crisp shredded carrots, cooling cucumber, and a sprinkle of fresh cilantro and toasted sesame seeds. Finish with a squeeze of fresh lime juice. Serve immediately and enjoy the symphony of flavors!
Nutritional Information (Approximate per serving, based on 4 servings)
- Calories: 550-650 kcal (will vary based on exact ingredient amounts and portion sizes)
- Protein: 30-40g
- Fat: 30-40g (healthy fats from salmon and avocado)
- Carbohydrates: 40-50g
- Fiber: 5-8g
Note: This is an estimation. Actual nutritional values can vary based on specific ingredients, brands, and portion sizes used.
Healthier Alternatives
Want to lighten things up without sacrificing flavor? Try these swaps:
- Rice: Opt for brown rice or cauliflower rice for a lower-carb, higher-fiber option. If using cauliflower rice, sauté it with a little coconut milk and seasonings for a similar effect.
- Salmon: While salmon is incredibly healthy, you could also use cod or shrimp for a different protein. Tofu or tempeh would be excellent vegan alternatives, marinated in the same spicy sauce.
- Sauce: Reduce the amount of honey or use a sugar-free sweetener. If you’re sensitive to spice, use a milder chili sauce or just a pinch of red pepper flakes.
- Toppings: Load up on non-starchy vegetables like bell peppers, spinach, or shredded cabbage.
Serving Suggestions
These Spicy Salmon Bowls are a complete meal on their own, but here are a few ideas to enhance the experience:
- Serve with extra lime wedges on the side for those who love a citrusy zing.
- A drizzle of spicy mayo or a cooling cucumber-yogurt sauce can add another layer of flavor.
- For a heartier meal, add a side of steamed greens like bok choy or broccoli.
- A sprinkle of furikake seasoning over the top adds an extra umami boost.
Common Mistakes to Avoid
- Overcooking the Salmon: Salmon cooks quickly. Keep a close eye on it to ensure it remains moist and flaky.
- Not Rinsing the Rice: Rinsing jasmine rice removes excess starch, preventing it from becoming clumpy and ensuring fluffy results.
- Overcrowding the Pan: When cooking the salmon, give each piece space. This allows for proper searing and caramelization rather than steaming.
- Skipping the Marinade Time: Even a short marination period will significantly enhance the salmon’s flavor.
Storing Tips
Leftovers can be stored in an airtight container in the refrigerator for up to 2-3 days. It’s best to store the components separately if possible, especially the avocado, to prevent browning. Reheat the salmon and rice gently on the stovetop or in the microwave. The fresh toppings are best added just before serving.
Frequently Asked Questions
***Can I prepare the components of this bowl ahead of time?***
Yes! The coconut rice can be made a day in advance and reheated. The salmon is best cooked fresh, but you can marinate it for a few hours in the fridge. Chop your veggies ahead of time to make assembly even quicker.
***How do I make this recipe vegetarian or vegan?***
Substitute the salmon with firm or extra-firm tofu, tempeh, or your favorite plant-based protein. Marinate and cook it in the same spicy sauce. Ensure your sweetener is vegan (like maple syrup) and use tamari if you need gluten-free soy sauce.
***My sriracha is too spicy, what can I do?***
Reduce the amount of sriracha and add a touch more honey or maple syrup to balance the heat. You can also opt for a milder chili sauce like sambal oelek, or simply use a pinch of red pepper flakes.
***Can I use a different type of rice?***
Absolutely! While jasmine rice is recommended for its fragrance and texture, brown rice, basmati rice, or even quinoa would work. Adjust cooking times accordingly. For brown rice, you’ll need more liquid and a longer cooking time. For quinoa, follow standard quinoa cooking instructions but you can incorporate some coconut milk for creaminess.
Love this recipe? Share your culinary creations!
Tried this Spicy Salmon Bowl? We’d love to hear about it! Tag us on social media or leave a comment below. Your feedback inspires us to keep sharing delicious recipes!

Spicy Salmon Bowls with Coconut Rice – Easy & Flavorful Recipe
Description
Hello, food enthusiasts! If you’re looking for a vibrant and delicious meal that combines the savory goodness of salmon with a hint of tropical flair, look no further. ThisSpicy Salmon Bowls with Coconut Ricerecipe is a perfect choice for a quick weeknight dinner or a hearty lunch. Combining spicy, savory, and sweet flavors, this dish will surely become a favorite in your weekly meal rotation!
Ingredients
- 1 1/3 cupsjasmine rice, rinsed and drained
- 1 cupfull-fat coconut milk (canned)
- 1/2 cupwater, plus 2 tablespoons
- 1/2 teaspoonkosher salt
- 1 teaspooncoconut sugar
- 1/4 cuprice vinegar
- 1 teaspoonwhite sugar
- 2small cucumbers, thinly sliced
- 1lbsalmon, skin removed and cubed
- 3 tablespoonsavocado oil
- 1 tablespoonlow-sodium tamari (or soy sauce)
- 1 teaspoonbrown sugar (or coconut sugar)
- 1 teaspoongarlic powder
- 3/4 teaspoonginger powder
- 1 tablespoonwhite sesame seeds
- 1 teaspoonnanami togarashi (optional)
- 1/3 cupmayonnaise
- 2 teaspoonssriracha
- 1 teaspoonlime juice
- Avocado slices
- Furikake seasoning
- Fresh chives, chopped
Instructions
- Combine the rinsed jasmine rice, coconut milk, water, salt, and coconut sugar in a rice cooker.
- Cover and set the rice cooker to cook. Once finished, fluff the rice and keep it warm until ready to assemble the bowls.
- In a shallow dish, mix the rice vinegar and white sugar until the sugar is dissolved.
- Add the thinly sliced cucumbers and toss to coat evenly.
- Let it sit while you prepare the salmon, ensuring it absorbs the flavors for at least 15 minutes.
- Preheat the oven to broil on high (550°F).
- In a large bowl, combine the cubed salmon, avocado oil, tamari, brown sugar, garlic powder, ginger powder, sesame seeds, and nanami togarashi. Toss to coat thoroughly.
- Transfer the salmon to a large, rimmed baking sheet.
- Broil for 6–8 minutes, depending on your preferred doneness. The salmon should be slightly browned and cooked through.
- In a small bowl, whisk together mayonnaise, sriracha, and lime juice.
- Adjust the sriracha amount to your preferred spice level.
- Divide the coconut rice into four bowls.
- Top with pickled cucumbers, broiled salmon, and sliced avocado.
- Drizzle the spicy mayo over the salmon.
- Garnish with furikake seasoning and chopped chives.
- Serve immediately and enjoy!
“`