“`html
Table of Contents
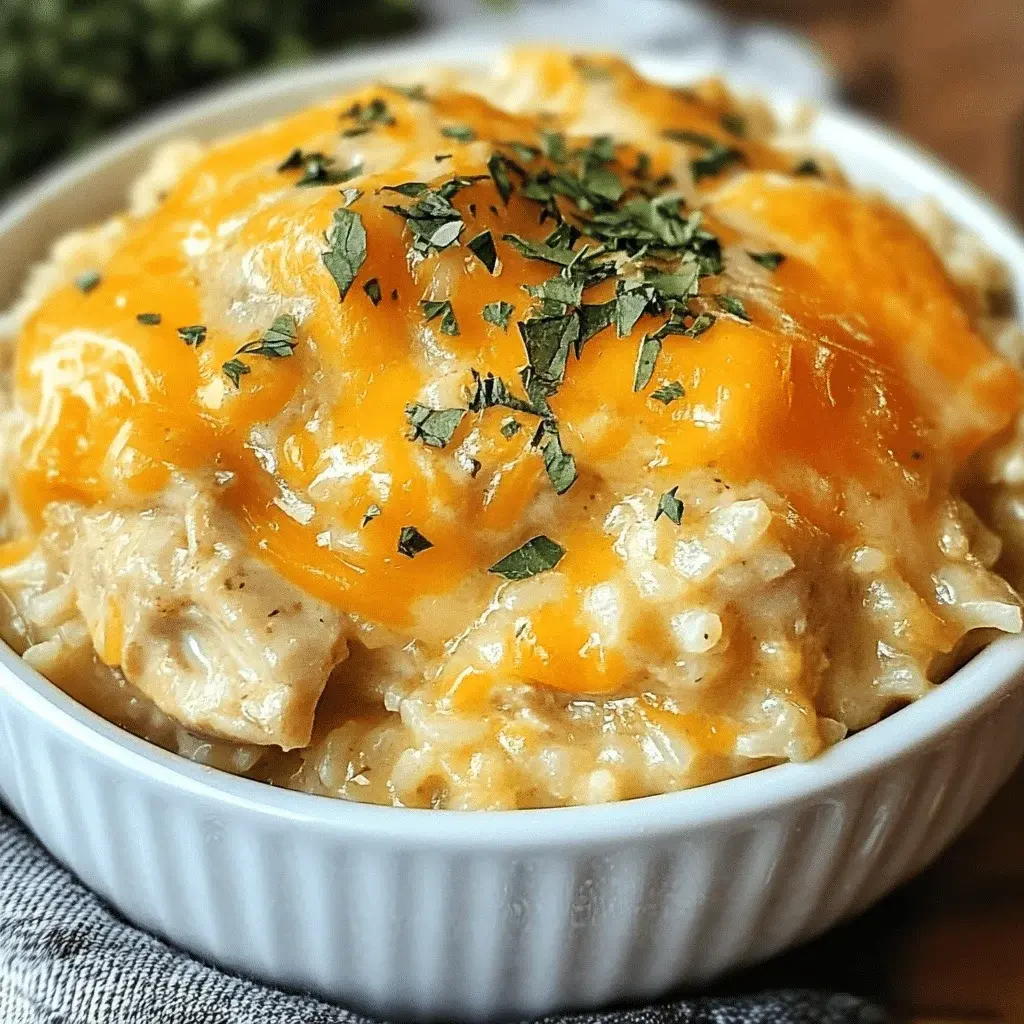
Crockpot Cheesy Chicken and Rice Recipe
Introduction
Did you know that over 80% of home cooks report feeling stressed about weeknight dinners? In the quest for a solution, the humble slow cooker has emerged as a hero, transforming simple ingredients into comforting meals with minimal effort. This Crockpot Cheesy Chicken and Rice recipe is the ultimate answer to that dinner-time dilemma. Imagine coming home to the irresistible aroma of tender chicken thighs simmering in a creamy, cheesy sauce with perfectly cooked rice—a complete, hearty meal that cooked itself while you were busy. This isn’t just another casserole; it’s a foolproof path to a satisfying dinner that will have everyone asking for seconds. The magic lies in the slow melding of flavors, where the richness of the cheese complements the savory chicken and the rice absorbs every bit of deliciousness.
Ingredients List
Gather these simple ingredients for a flavor-packed meal. Sensory notes are included to help you understand the role of each component.
- 2 lbs boneless, skinless chicken thighs – Thighs are preferred for their higher fat content, which keeps them incredibly juicy and tender through the long cook time. (Substitution: Use 2 lbs of boneless, skinless chicken breasts for a leaner option, but reduce cook time by 1 hour to prevent dryness).
- 1 cup long-grain white rice, uncooked – Provides the perfect starchy base that soaks up the creamy sauce. (Substitution: Use brown rice for more fiber, but note it will require an extra ½ cup of broth and may need longer cooking).
- 1 (10.5 oz) can cream of chicken soup – The cornerstone of the creamy sauce, offering a savory, velvety texture. (Substitution: For a homemade touch, blend ¼ cup butter, ¼ cup flour, 1 cup chicken broth, and ½ cup milk, simmered until thick).
- 1 ½ cups chicken broth – Infuses the dish with deep, savory flavor and ensures the rice cooks perfectly.
- 1 cup shredded cheddar cheese – Melts into gooey, tangy pockets of joy. Use sharp cheddar for a more pronounced flavor.
- 1 cup shredded Monterey Jack cheese – Adds a creamy, mild meltability that balances the cheddar.
- 1 medium yellow onion, diced – Becomes sweet and translucent, building a foundational aromatic layer.
- 3 cloves garlic, minced – Provides a pungent, earthy kick that cuts through the richness.
- 1 tsp paprika – Adds a subtle smokiness and a beautiful red hue.
- ½ tsp black pepper – For a gentle, warming spice.
- ½ tsp salt – Enhances all the other flavors. Adjust to taste after cooking.
- Fresh parsley or chives for garnish (optional) – A pop of green color and fresh flavor for serving.
Timing
Compared to the average stovetop chicken and rice recipe, which requires about 45 minutes of active monitoring and stirring, this Crockpot method saves you significant hands-on time. The “set-it-and-forget-it” nature means you gain back nearly an hour of your evening. The longer, slower cook time at a low temperature is the secret to achieving fall-apart tender chicken and rice that’s infused with flavor, rather than just boiled.

Step-by-Step Instructions
Step 1: Prepare Your Chicken
Pat your chicken thighs completely dry with paper towels. This simple step is crucial—it helps the seasonings stick and promotes better browning (if you choose to sear) and texture. Season both sides generously with the salt, pepper, and paprika. For an extra flavor boost, I sometimes quickly sear the thighs in a hot skillet for 2 minutes per side until golden. This isn’t mandatory for the slow cooker, but it adds a wonderful depth of flavor that permeates the entire dish.
Step 2: Layer the Aromatics
Spread the diced onion evenly across the bottom of your 6-quart or larger slow cooker. Scatter the minced garlic over the onions. This creates a fragrant bed that will steam and sweeten as it cooks, flavoring the chicken from below. Place the seasoned chicken thighs on top of this aromatic layer in a single layer if possible.
Step 3: Add the Liquid and Rice
In a medium bowl, whisk together the uncooked rice, cream of chicken soup, and chicken broth until well combined. The mixture will be thick. Pour this evenly over the chicken and onions in the slow cooker. Use a spatula to gently spread it, ensuring the rice is mostly submerged in the liquid. Do not stir at this point. We want the chicken to remain on the bottom, directly over the heat source, to cook through properly.
Step 4: The Slow Cook Magic
Cover with the lid and cook on LOW for 4 hours or on HIGH for 2 to 2.5 hours. The key here is patience—resist the urge to open the lid and stir, as this releases heat and steam and can significantly increase cooking time. The dish is done when the chicken reaches an internal temperature of 165°F and the rice is tender and has absorbed most of the liquid.
Step 5: The Cheesy Finish
Once the chicken and rice are fully cooked, use two forks to shred the chicken thighs directly in the pot. They should be so tender they practically fall apart. Now, stir in the shredded cheddar and Monterey Jack cheeses until they are completely melted and create a luxuriously creamy sauce. Let it sit for 5-10 minutes with the lid off to thicken slightly. Garnish with fresh parsley or chives for a vibrant finish.
Nutritional Information
Estimated values per serving (based on 6 servings):
- Calories: ~520 kcal
- Protein: ~38g
- Carbohydrates: ~35g
- Dietary Fiber: ~1g
- Sugars: ~2g
- Fat: ~25g
- Saturated Fat: ~11g
- Cholesterol: ~165mg
- Sodium: ~950mg
Healthier Alternatives
You can easily adapt this recipe to fit various dietary needs without sacrificing the comforting, cheesy essence:
- Lower-Fat/Lower-Sodium: Use a 98% fat-free cream of chicken soup, low-sodium chicken broth, and reduced-fat cheese blends. The texture will be slightly less creamy but still delicious.
- Higher Protein/More Veggies: Add 1-2 cups of frozen mixed vegetables (peas, carrots, corn) or fresh chopped broccoli florets during the last 30 minutes of cooking. You can also use quinoa instead of rice for a complete protein boost.
- Dairy-Free: Substitute the cream of chicken soup with a dairy-free condensed “cream” soup alternative (often made with coconut milk). Use a meltable dairy-free cheese shreds or a creamy sauce made from blended silken tofu, nutritional yeast, and lemon juice.
Serving Suggestions
This dish is a complete meal in a bowl, but it pairs beautifully with simple sides to round out the dinner table:
- A crisp, green salad with a tangy vinaigrette to cut through the richness.
- Steamed green beans, broccoli, or asparagus.
- A loaf of crusty garlic bread or warm dinner rolls for dipping.
- For a fun twist, serve it in a baked potato shell or use it as a hearty filling for burritos or wraps.
Common Mistakes
- Using Instant Rice: This will turn to mush. Always use regular, long-grain white rice.
- Stirring During Cooking: This disrupts the cooking process and can make the rice gummy. Trust the process!
- Overcooking on High: Cooking on HIGH for too long can cause the chicken to dry out and the rice to become mushy. Stick to the recommended times.
- Not Letting it Rest: Adding the cheese and letting the dish sit for 5-10 minutes off heat allows the sauce to thicken and the flavors to settle.
Storing Tips
- Refrigeration: Store leftovers in an airtight container in the refrigerator for up to 4 days. The rice will continue to absorb moisture, so you may want to add a splash of broth or milk when reheating.
- Freezing: This dish freezes reasonably well for up to 2 months. Thaw overnight in the refrigerator. Reheat gently on the stovetop or in the microwave, stirring often and adding liquid as needed to restore the creamy consistency.
- Reheating: Reheat individual portions in the microwave, covered, stirring every 60 seconds. For larger amounts, reheat on the stovetop over low heat, adding a little broth or milk to prevent sticking and drying out.
Conclusion
This Crockpot Cheesy Chicken and Rice recipe is more than just a meal; it’s a reliable strategy for reclaiming your weeknights. It delivers maximum comfort with minimal effort, proving that a delicious, home-cooked dinner doesn’t have to be complicated. The combination of tender chicken, creamy cheese, and fluffy rice is a timeless crowd-pleaser that both kids and adults will love. Give it a try this week, and experience the joy of walking into a kitchen filled with the promise of a ready-made feast.
Made this recipe? We’d love to see your creation! Tag @spicemingle on social media or leave a comment below with your experience and any clever twists you added. Your feedback helps our community grow!