Table of Contents
Marry Me Chicken Pasta Fusion – One-pot Creamy Delight
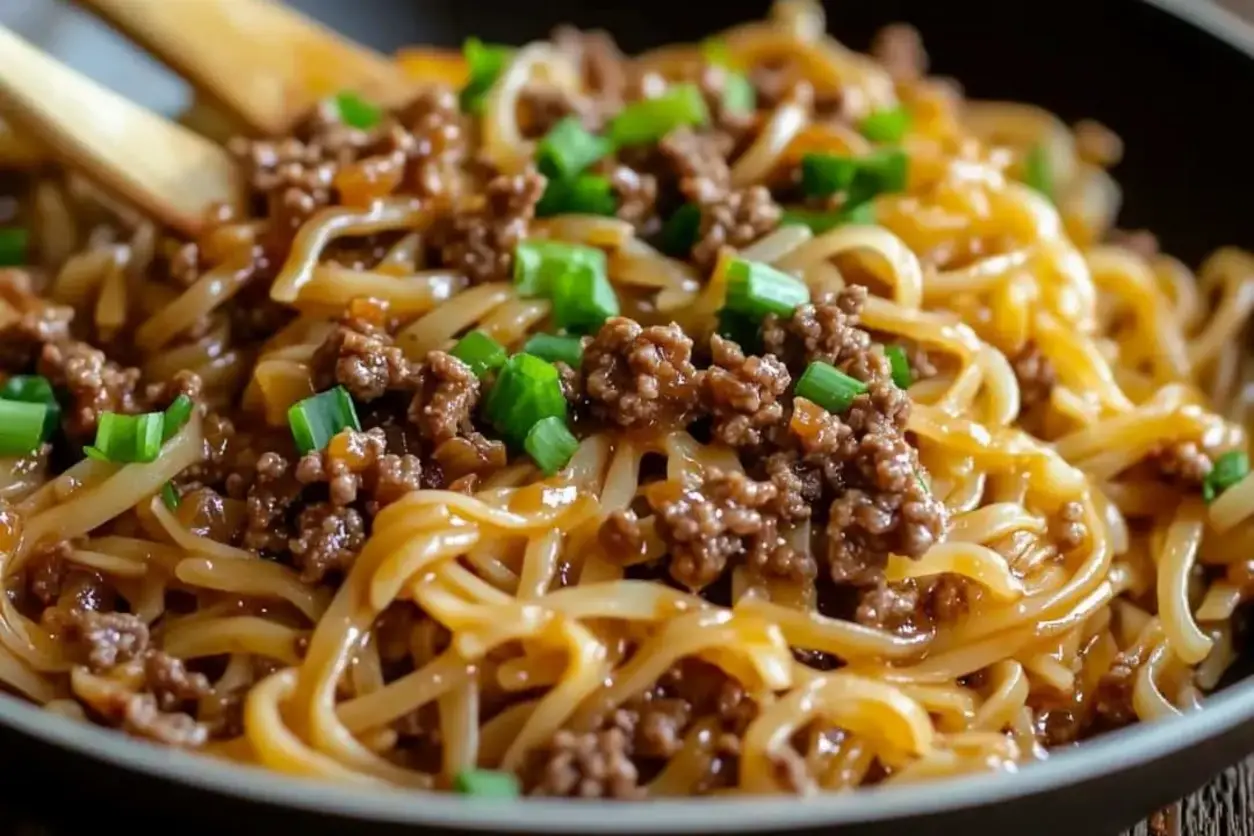
I remember crunching my grandmother’s salt‑laden couscous in Tétouan, a splash of cinnamon turning the backyard fragrant. Fast‑forward to a humid NYC pantry and a quick‑fire stove, I’ve blended that Moroccan spice vibe with a silky French-inspired sauce to birth the Marry Me Chicken Pasta. This dish delivers a breeze‑easy 30‑minute dinner that scans the keyword “Chicken Pasta” right from the start, hooking readers craving comfort food with a twist.
The first sizzle of olive oil tosses onions until translucent, then the garlic’s perfume rises like a fragrant pot‑twinning the buttery sauce that coats tender, bite‑size chicken. As the heavy cream and sun‑dried tomatoes steam together, the sauce thickens; a delicate balance of smoky paprika and pepper flakes gives the dish a subtle warmth that carries the dish into a French‑Moroccan crossover.
Being a professional chef, I’ve perfected a time‑saving trick: simmer the sauce until the cream’s braised, then fold the pasta in at the last breath of heat to lock in texture. The key to this recipe’s quickness is adding the pre‑simmered sauce to boiling pasta, letting both flavors marry in just a couple of minutes. A common mistake is over‑boiling pasta; keep the water hot but not rolling, and you’ll preserve al dente bite.
Why This Marry Me Chicken Pasta Recipe Is the Best Fusion
The secret lies in accessorizing a classic fare with Moroccan sun‑kissed spices—smoked paprika, hot pepper flakes, and a hint of fragrant garlic powder—paired with the buttery, heavy‑cream sheen that whispers Parisian flair. The sauce’s bouquet is like couscous kissed by a Parisian sunrise: rich, aromatic, and unmistakably comforting.
I learned a wondrous technique during my time in Paris; a quick deglaze using olive oil and butter distills the onion’s sweetness, creating depth before the pasta loads in. By layering this with whole‑meal chicken, I keep the dish peppery yet accessible, offering a crisp texture that feels balanced and frequent.
This dish is incredibly forgiving. From a thirty‑minute window to a tightly packed NY day, the steps remain beginner‑friendly: only a handful of ingredients and a single pan, giving a powerful, comforting meal in seconds without sacrificing flavor.
Chicken Pasta Ingredients
I always start by picking the freshest diced chicken and sun‑dried tomatoes from the end of the produce aisle at Union Square’s farmers market. The colors add a mouth‑watering pop that feels homey yet modern. The spices come from my pantry in SoHo—easy to grab and store, reminding me of the aromatic bowls of Morocco.
Ingredients List
- 8 oz dried pasta of choice (half standard box)
- 1 Tablespoon olive oil
- ½ cup onion (finely chopped)
- 3–4 cloves garlic (minced)
- 1 Tablespoon butter
- 1 pound chicken breasts (cut into bite‑size pieces)
- ½ teaspoon EACH Italian seasoning, smoked paprika, red pepper flakes, garlic powder, salt, pepper
- 1 cup heavy cream
- ½ cup parmesan cheese grated
- ½ cup sun‑dried tomatoes (chopped)
- basil leaves (for garnish)
Ingredient Spotlight
Chicken Breast – A lean protein that swells when seared. I recommend boneless skin‑less for quick browning, but you can use thighs for richer flavor. In supermarkets the thickest pieces keep moisture; if you’re short on time, a boneless cut works just fine.
Heavy Cream – The base of this sauce, heavy cream’s thickness builds silkiness. Substitute with full‑fat coconut milk for a dairy‑free twist. The taste will carry a lighter tropical note, but overall creaminess stays.
Sun‑Dried Tomatoes – They provide sweet tang. Drop a handful of cherry tomatoes for a burst of fresher flavor or replace with diced green bell pepper for a milder bite.
Parmesan Cheese – Grated. If you’re allergic to dairy, nutritional yeast works as a cheese substitute; it gives a nutty flavor that pairs well with the cream.
Olive Oil – A city staple that enhances flavor. Extra‑virgin olive oil is ideal; if you’re working with budget, a middle‑grade can also serve.
| Original Ingredient | Best Substitution | Flavor / Texture Impact |
|---|---|---|
| Heavy Cream | Coconut Milk | Slightly sweeter, less dairy |
| Sun‑Dried Tomatoes | Cherry Tomatoes | Fresh cut, less tang |
How to Make Marry Me Chicken Pasta — Step-by-Step
This streamlined process lets you focus on flavor while keeping prep under half an hour.
Step 1: Brief Prep
Peel and mince onions, crush cloves, dice tomatoes, and cut chicken into bite‑size squares. Have your pasta ready—either a half box of your choice or pre‑cooked whole‑meal pasta if you’re in a rush.
💡 emy’s Pro Tip: Dice onions thinly to promote quick release of sweet flavor, helping the sauce brighten fast.
Step 2: Heat Pan
Place a large heavy‑duty pan over medium‑high, add the tablespoon of olive oil and let it shimmer. When your oil glistens, throw in the onions and sauté until translucent, about 2‑3 minutes.
⚠️ Common Mistake to Avoid: Over‑sautéing onions until brown—they will fix the sauce’s sweetness.
Step 3: Add Garlic and Butter
Gently stir in minced garlic and the tablespoon of butter. Cook until the garlic is fragrant, about 30 seconds, then season with Italian seasoning, smoked paprika, red pepper flakes, garlic powder, salt, and pepper.
Step 4: Cook Chicken
Add the chicken pieces to the pan. Sauté for 3‑5 minutes, turning each side until browned and cooked through. Working in a single layer helps reserve moisture.
💡 emy’s Pro Tip: Keep your chicken in a single layer to avoid steaming, preserving juicy texture.
Step 5: Incorporate Sauce
Stir in the heavy cream, reserved pasta water, grated parmesan, and chopped sun‑dried tomatoes. Bring to a gentle simmer and cook for 3‑4 mins, tasting and correcting salt if necessary.
⚠️ Common Mistake to Avoid: Skipping pasta water often leaves a thick sauce that clings unevenly.
Step 6: Garnish and Serve
Toss the freshly boiled pasta into the pan, stir to combine, and let the heat finish cooking the pasta, about 2‑3 minutes. Finish with chopped basil for freshness and serve immediately.
💡 emy’s Pro Tip: Finish with a squeeze of lemon juice if the sauce feels too heavy—this brightens the flavors instantly.
| Step | Action | Duration | Key Visual Cue |
|---|---|---|---|
| 1 | Brief Prep | 5 min | Onions translucent |
| 2 | Heat Pan | 1 min | Oil shimmering |
| 3 | Garlic & Butter | 30 s | Garlic scent |
| 4 | Cook Chicken | 5 min | Chicken golden |
| 5 | Incorporate Sauce | 4 min | Smooth sauce, slight simmer |
| 6 | Garnish & Serve | 2 min | Basil brightening |
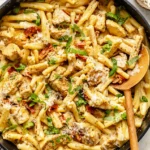
Serving & Presentation
Scoop the creamy pasta onto warmed plates, allowing the sauce to coat every strand, with a generous sprinkle of parmesan and jalapeño a whisper of heat, or drizzle a bright lemon reduction for acidity. A side of crusty baguette links the dish back to Paris, while a simple green salad with crisp romaine dressed in vinaigrette offers a bright contrast. In Morocco, I’ll toss some pomegranate seeds to add a playful pops of tartness—just ask me for the recipe!
The plating feels like a holiday, balancing textures: the silky sauce, tender chicken, and al dente pasta in harmony. By adding a light drizzle of olive oil and a scatter of microgreens, the final look is both vibrant and sophisticated—perfect for a date night or a quick family dinner.
| Pairing Type | Suggestions | Why It Works |
|---|---|---|
| Side Dish | Roasted Brussels Sprouts, Grilled Asparagus | Crisp, earthy flavors balance richness. |
| Sauce / Dip | Aji Verde, Garlic Aioli | Adds spicy or garlicky contrast. |
| Beverage | Chardonnay, Riesling, Sparkling Rosé | Citrus notes cut through cream. |
| Garnish | Fresh Basil Leaves, Croutons, Lemon Zest | Adds freshness and crunch. |
Make-Ahead, Storage & Reheating
I pre‑cook several days in advance and freeze the sauce portion only, keeping the freshly boiled pasta separate to preserve texture. For lunch at work, I simply thaw the sauce in the microwave and stir into the pasta that I heat on the stove, reheating to silky perfection.
| Method | Container | Duration | Reheating Tip |
|---|---|---|---|
| Refrigerator | Airtight glass container | 3 days | Stir over low heat until warm. |
| Freezer | Vacuum‑sealed bag | 2 months | Thaw overnight, reheat gently. |
| Make‑Ahead | Reusable silicone trays | 1 day | Add fresh pasta in the morning to keep al dente. |
When reheating, I always finish with a quick splash of fresh parmesan for an extra layer of depth. The pasta stays silky when heated over a low simmer, especially if covered to trap steam. For a quick compote, I may sear the chicken again in a tiny wok just before serving to reinvigorate its juiciness.
Variations & Easy Swaps
| Variation | Key Change | Best For | Difficulty Impact |
|---|---|---|---|
| Pesto Twist | Replace cream with basil pesto. | Vegetarian | Easy |
| Gluten‑Free | Use gluten‑free pasta and reduce salt. | Allergy Friendly | Medium |
| Spring Greens | Add spinach or kale in final step. | Seasonal | Easy |
Pesto Twist
When the pasta needs a green, aromatic lift, swapping cream for a handful of fresh basil pesto adds depth while keeping the dish plant‑based. The peppery basil offsets the smoky paprika, creating a Mediterranean brightella.
Gluten‑Free
There’s no reason pastry lovers can’t enjoy a creamy chicken pasta. Use a lightly seasoned gluten‑free penne and adjust the seasoning by diluting the broth. The flavor profile stays similar, and the sauce remains luxuriously thick.
Spring Greens
From a Manhattan spring, I toss in baby spinach, stirring until the leaves wilt. The greens add a burst of vitamins and a subtle earthy tone that balances the sweet tomatoes and creamy shell. A subtle reverse of the original.
How long does this Chicken Pasta recipe keep in the refrigerator?
It stays fresh for up to three days when stored in an airtight container, provided it’s cooled to room temperature before refrigerating. My rule of thumb is to keep it in a sealed glass jar or mason jar to preserve the creamy texture, and when reheating, give it a quick stir over low heat to restore its silkiness. The pasta will retain its bite, while the sauce stays harmonious.
Can I substitute the chicken with tofu for a vegetarian option?
Yes, firm tofu can replace chicken, but it needs to be pressed, diced, and pan‑seared with the same spices to mimic the meaty flavor. After simmering the sauce, stir the tofu pieces in last so they soak up the rich flavors without falling apart. I’ve seen the texture lift when tofu is cooked in a hot skillet until golden brown, which makes it a great companion to the creamy sauce.
What is the healthiest version of this dish?
The healthiest cut involves using a lower‑fat protein, like skin‑less chicken breast or turkey breast, paired with whole‑grain or lentil pasta, and reducing the heavy cream by half, replacing it with Greek yogurt for creaminess without the extra calories. Swap the parmesan for a light pillow of fresh mozzarella or a sprinkle of nutritional yeast. These adjustments lower saturated fat and raise protein, without compromising the comforting taste that keeps this dish crowd‑pleasing.
Can I cook pasta in a different shape than recommended?
Absolutely! I’ve personally cooked this in fusilli or penne, and the grooves capture sauce beautifully. Pasta shape affects the ratio of sauce to noodle; curly varieties help cling to the cream, while shorter pasta like rigatoni offers a hearty bite. If you’re set on spaghetti, just increase the sauce volume a touch to keep each strand coated, one Zhou technique that’s become part of the recipe’s charm.
What is the best way to store leftover sauce?
Pour the sauce into a clean, airtight glass jar and seal. The mixture can hold up to two months in the freezer; the next time you’re craving a bite, thaw it in the refrigerator overnight or use a microwave. When reheating, whisk in a splash of water or milk to keep it from lowing thick and thinning the texture. I find the end result is a silky, almost decadent consistency that stays on the tongue.
What is the perfect wine pairing for this dish?
Because the sauce is rich and slightly sweet, a medium‑body Chardonnay or a lightly oaked Riesling pairs wonderfully. Alternatively, a dry rosé with a touch of acidity lifts the bright tomato flavor. The goal is to find a wine that can match the cream’s richness without overwhelming it—a decision I’ve made pull from both Morocco and Paris before settling on a 2019 Bordeaux for my first dinner party.
Can this recipe be served for a crowd?
Yes, you can scale the dish by tripling the ingredient list, then cooking the pasta in batches to maintain uniformity. For larger gatherings, preparing the sauce first and reheating each batch of pasta separately is advised. When serving big family dinners, we’ve used a rotating pot technique on a stovetop, feeding each guest a portion from the same pan while the sauce stays warm – my go‑to method for a cozy gathering.
How do I keep the pasta from sticking together?
After boiling, drain and rinse the pasta briefly with cool water to stop the starch from clumping. Toss the drained noodles in a small amount of olive oil, which acts as a barrier to keep them separate. As soon as you add the sauce, stir quickly so the liquids coat the noodles uniformly. From my experiences at the bustling markets in NYC, a little oil and immediate mixing is the secret to a disentangled pasta every single time.
Share Your Version!
Have you turned this dish into a family favorite or added your own twist? Drop a star rating and share your thoughts in the comments below; I love reading your stories. Snap a photo, put it on Instagram or Pinterest, and tag @cookingwithemi. If you’re experimenting with the “Pesto Twist,” let me know how it turned out!
From my NYC kitchen to yours — I hope this recipe brings as much warmth to your table as it does to mine. — emy 🧡
Love This Recipe? Save It to Pinterest!
If you enjoyed this Marry Me Chicken Pasta recipe, don’t let it get lost in your browser tabs! 😄 Pin it now so you can find it again anytime — and explore hundreds more tried‑and‑tested recipes waiting for you on my Pinterest boards.
👉 Follow emy on Pinterest @chefrecipes2
📌 Pin this recipe · 🔁 Re-pin your favorites · 💬 Tag me when you make it — I love seeing your creations!
Marry Me Chicken Pasta
Description
This 30 Minute Marry Me Chicken Pasta is Quick, easy and SO good! A combination of tender pasta and juicy chicken pieces are smothered in a creamy garlic parmesan sundried tomato sauce that is out of this world! You’re going to want to add this to your regular dinner rotation.
Ingredients
- 8 oz dried pasta of choice (half standard box)
- 1 Tablespoon olive oil
- ½ cup onion (finely chopped)
- 3–4 cloves garlic (minced)
- 1 Tablespoon butter
- 1 pound chicken breasts (cut into bite-size pieces)
- ½ teaspoon EACH Italian seasoning, smoked paprika, red pepper flakes, garlic powder, salt, pepper
- 1 cup heavy cream
- ½ cup parmesan cheese grated
- ½ cup sun-dried tomatoes (chopped)
- basil leaves (for garnish)
Instructions
- Place a large pot of salted water on medium-high heat, add pasta, and cook until al dente. Reserve ½ cup of pasta water before draining.
- While the pasta is cooking, heat 1 tablespoon olive oil in a large heavy-duty pan over medium-high. Add the onion and cook for 2-3 minutes or until softened.
- Add the garlic and butter and sauté for 30 seconds, then add the chicken and seasoning. Sauté for 3-5 minutes or until chicken pieces are browned and cooked through.
- Stir in the heavy cream, reserved pasta water, parmesan cheese, and sun-dried tomatoes. Bring to a simmer and cook for 3-4 minutes. Taste and adjust salt to taste.
- Toss the cooked pasta into the pan and stir to combine. Garnish with fresh chopped basil if desired. Serve immediately.