Table of Contents
Buffalo Chicken Sliders – Spicy, Cheesy on Sweet Hawaiian Rolls
When I first arrived in New York from my childhood home in Casablanca, I carried with me the scent of ras el hanout from my mother’s kitchen and the memory of roast chicken from the street stalls of Marrakech. It wasn’t long before I discovered that the city’s love for game‑day finger food could be elevated by blending those North African spices with a touch of French sophistication—turning a simple rotisserie chicken into a luxurious, creamy buffalo sensation. That’s why I created this recipe for Buffalo Chicken Sliders that marry spicy, cheesy flavors with the buttery sweetness of Kings Hawaiian rolls.
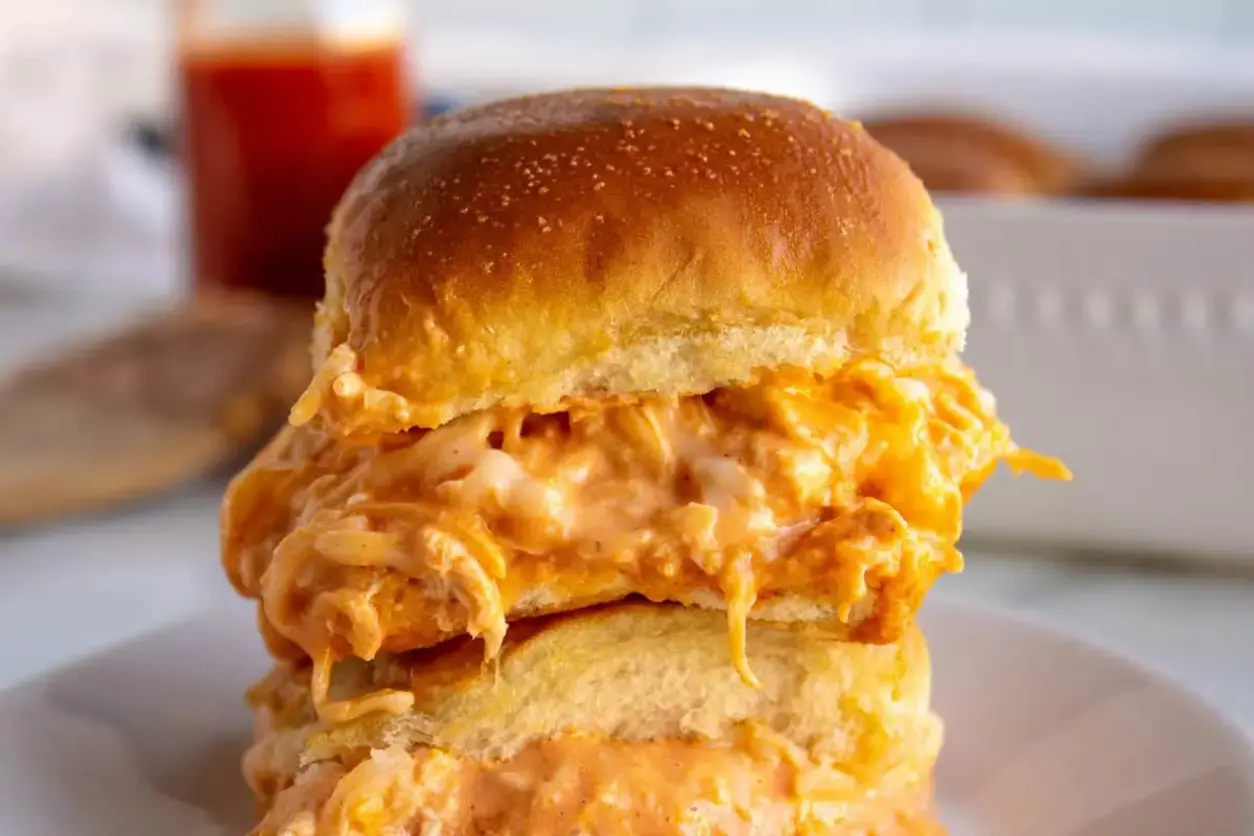
Picture the moment each slider slices open, releasing a steaming whirl of golden melted cheese and a buttery, garlicky butter glaze that hits your tongue. The tender, shredded chicken is coated in a bold, slightly sweet buffalo sauce, while the ranch dressing adds cool, creamy contrast. The sweet Hawaii rolls puff up with the salty and buttery butter glaze, creating a harmonic blend of spicy, savory, sweet, and velvety textures that dance across the palate.
I’ve experimented with countless chicken slider recipes in NYC’s food markets and beyond; what sets this version apart is the two‑cheese blend and the subtle garlic‑butter swirl that tames the heat. Try not to over‑mix the chicken mixture—just enough to keep the pieces intact—and don’t forget to lightly brush the buns with butter before baking. Those small details prevent sogginess and lock in flavor, turning a quick snack into a comforting, crowd‑pleasing masterpiece.
Why This Buffalo Chicken Sliders Recipe Is the Best
My Moroccan upbringing taught me that a single spice can transform a dish. By adding a pinch of smoked paprika to the buffalo sauce, I enhance the depth of flavor without overwhelming the bite. The French technique of double‑cooking—first sautéing the butter‐garlic glaze, then finishing the sliders under the broiler—creates a caramelized crust that elevates each bite beyond the ordinary.
The texture is perfected by using a blend of cheddar and mozzarella. Cheddar offers firm, tangy chewiness, while mozzarella melts into a silky, stretchy layer that bonds each component together. The result is sliders that stay firm yet moist, with a melt‑in‑your-mouth experience that keeps guests coming back for more.
Even if you’re a beginner, this recipe is foolproof. The preparation requires just a few simple mixing steps, and the oven does most of the work. With clear, step‑by‑step instructions—and a quick reference table—you’ll see how easy it is to whip up a crowd‑pleaser in half an hour.
Buffalo Chicken Sliders Ingredients
I always head to the Queens market for fresh, high‑quality ingredients. The rotisserie chicken I use comes from a local farm that sells the wings as well; its lean, flavorful meat is perfect for shredding. The Kings Hawaiian rolls, with their slight sweetness, add a caramelized, buttery finish that contrasts beautifully with the spicy sauce.
Ingredients List
- 3 cups rotisserie chicken (shredded)
- 1 package Kings Hawaiian Rolls (12 count)
- 1/2 cup Ranch dressing
- 1/2 cup Frank’s Buffalo sauce
- 1/4 cup butter (melted)
- 1/2 teaspoon garlic powder
- 1 cup cheddar cheese (shredded)
- 1 cup mozzarella cheese (shredded)
Ingredient Spotlight
Rotisserie Chicken: The secret to a juicy chicken slider starts here. Look for a lightly seasoned rotisserie that already has caramelized skin for extra flavor. If you prefer fresh, use a 3‑pound chicken breast; shred it after it’s roasted to about 375°F for best texture.
Ranch Dressing: The cool, tangy base balances the heat. To make it lighter, replace half the ranch with Greek yogurt and add a dash of dill. The yogurt keeps the sliders creamy while cutting some sodium.
Frank’s Buffalo Sauce: This classic sauce gives the sliders their signature kick. For a milder version, blend equal parts Frank’s and mild hot sauce; for extra heat, simply pour in a splash more Frank’s.
| Original Ingredient | Best Substitution | Flavor / Texture Impact |
|---|---|---|
| Rotisserie Chicken | Cooked Chicken Breast | Slightly drier, but tender; add 1 tsp butter for moisture. |
| Franks Buffalo Sauce | Sriracha with Butter | Softer, sweeter heat; still rich. |
| Margarine | Rendered Butter | Adds depth, less artificial fat. |
How to Make Buffalo Chicken Sliders — Step-by-Step
With all the ingredients prepped, you’re ready to assemble this game‑day classic. Let’s dive in!
Step 1: Preheat Oven
Preheat your oven to 350°F. A steady temperature ensures even melting and a golden crust.
💡 emy’s Pro Tip: Use a 9×13 baking dish sprayed with non‑stick spray for easy cleanup.
Step 2: Melt Butter and Garlic Powder
In a small bowl, mix melted butter with 1/2 teaspoon of garlic powder. Set aside; this glaze will keep the buns tender.
⚠️ Common Mistake to Avoid: Over‑blending the butter mixture can create a thin, greasy coating; stir gently.
Step 3: Combine Chicken and Sauces
In another bowl, combine shredded chicken, ranch dressing, ½ cup of each cheese, and Frank’s buffalo sauce. Let it rest for 2 minutes so the flavors mingle.
💡 emy’s Pro Tip: For richer flavor, add a spoonful of smoked paprika to the mixture.
Step 4: Split and Prepare Rolls
Halve the Hawaiian rolls crosswise. Place the bottoms into the prepared baking dish. Arrange them so they sit snugly next to each other.
⚠️ Common Mistake to Avoid: Leaving a space between buns can cause uneven baking.
Step 5: Spread Chicken Mixture
Spread a generous layer of the chicken mixture over each bun bottom and top with the remaining cheese.
💡 emy’s Pro Tip: Keep the cheese cover light—enough to bind but not overload.
Step 6: Brush Tops with Butter Glaze
Brush the tops of the buns with the garlic‑butter glaze; this will help them caramelize beautifully.
⚠️ Common Mistake to Avoid: Neglecting to brush the tops can result in dry buns.
Step 7: Cover and Bake
Cover the dish with foil and bake for 15 minutes. The foil keeps moisture in for a tender result.
💡 emy’s Pro Tip: Place the dish on the middle rack for even heat distribution.
Step 8: Remove Foil and Finish Baking
Remove the foil and bake for an additional 5 minutes, or until the tops are golden brown.
⚠️ Common Mistake to Avoid: Overbaking can dry out the cheese; watch closely.
Step 9: Slice and Serve
Once done, remove the dish from the oven, cut the sliders into individual portions, and serve hot.
💡 emy’s Pro Tip: Serve on a parchment‑lined plate to keep the bottom crumbs tidy.
| Step | Action | Duration | Key Visual Cue |
|---|---|---|---|
| 1 | Preheat oven to 350°F | 5 mins | Oven indicator light turns on |
| 2 | Melt butter with garlic powder | 2 mins | Glaze looks glossy |
| 3 | Combine chicken and sauces | 3 mins | Mixture is evenly coated |
| 4 | Halve rolls and arrange in dish | 2 mins | Buns sit snugly with no gaps |
| 5 | Spread chicken and cheese | 3 mins | Creamy layer visible |
| 6 | Brush tops with glaze | 1 min | Tops look shiny |
| 7 | Cover & bake | 15 mins | Steam rising from dish |
| 8 | Remove foil & finish baked | 5 mins | Buns glow golden |
| 9 | Slice & serve | 1 min | Each slider is cleanly separated |
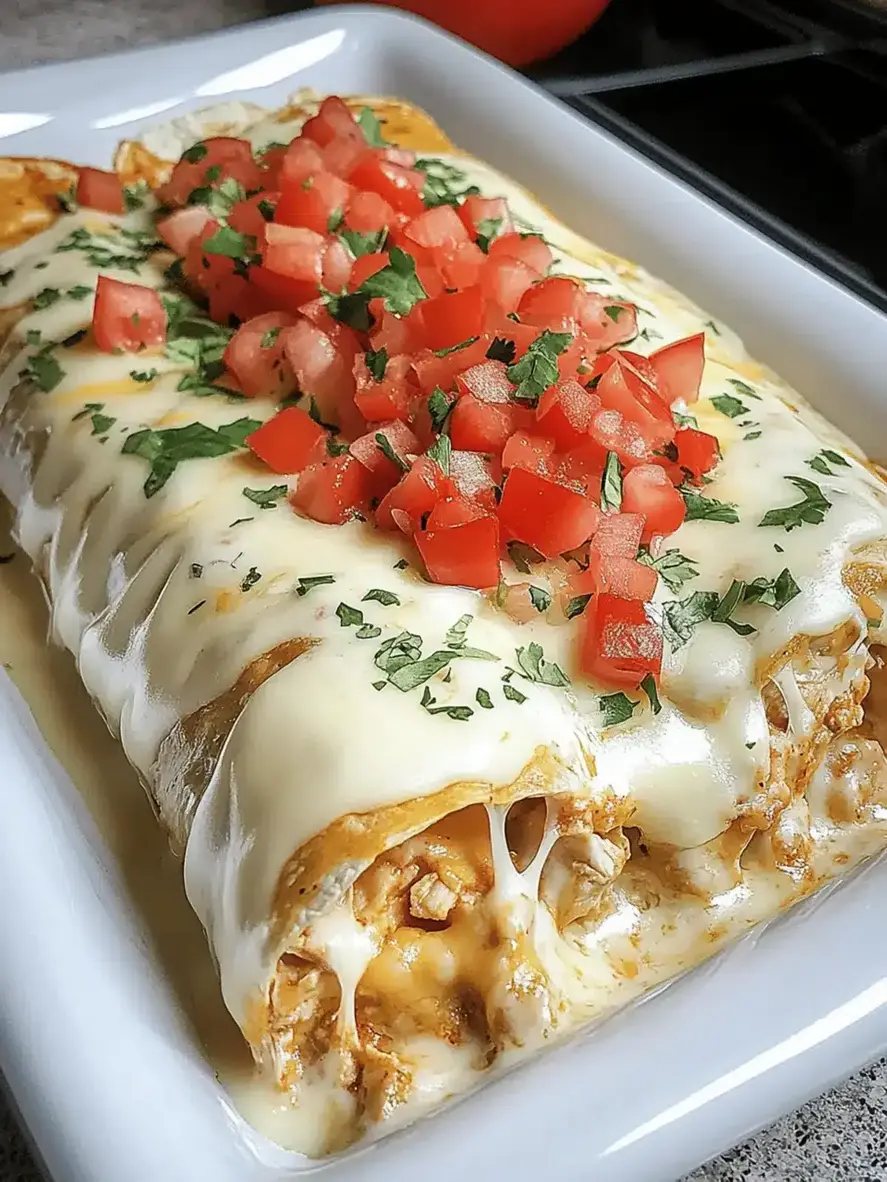
Serving & Presentation
Serve these sliders warm on a rustic wooden platter with a drizzle of extra ranch for dipping. A sprinkle of fresh chopped cilantro gives a pop of color reminiscent of a Moroccan courtyard. Pair the sliders with a side of tangy coleslaw or a crisp cucumber salad. For a full New York vibe, offer them alongside a cold glass of local craft IPA or a chilled sparkling rosé to cut through the heat.
The presentation can be elevated by arranging the sliders in a staggered row, each bite showing layers of cheese, chicken, and the buttery glaze. Toss a handful of toasted almonds on top for nutty crunch—this is a twist I first tried at a Brooklyn foodie meetup.
| Pairing Type | Suggestions | Why It Works |
|---|---|---|
| Side Dish | Coleslaw, Sweet Potato Fries, Pickled Onions | Crisp acidity and sweetness balance the heat. |
| Sauce / Dip | Blue Cheese Dressing, Ranch, Buffalo Honey Mustard | Adds creaminess or a sweet-heat contrast. |
| Beverage | Cold IPA, Sparkling Rosé, Peach Lemonade | Coolers soothe the palate and cut the spice. |
| Garnish | Fresh cilantro, Toasted almonds, Pickled jalapeños | Fresh herbs and crunch brighten flavor. |
Make-Ahead, Storage & Reheating
I always have a batch ready for Friday game nights, thanks to this modular prep. Assemble the sliders the night before, cover each bun in foil and refrigerate. When it’s time to serve, reheat in a 350°F oven for 8–10 minutes—you’ll get that fresh, crispy edge without drying out the cheese.
| Method | Container | Duration | Reheating Tip |
|---|---|---|---|
| Refrigerator | Sealed zip‑lock bag | 2–3 days | Reheat at 350°F for 8 minutes. |
| Freezer | Paper bag with parchment | 2 months | Thaw in fridge 12 hours then reheat 10 mins. |
| Make‑Ahead | Assembled but not baked | 2 days ahead | Cover tops with foil; bake when needed. |
I’ve found that reassembling the sliders the morning of the event gives a fresh mouthfeel. Just a quick 5‑minute bake at 350°F, and they’re ready to serve. For extra crunch, I like to finish them under a broiler for 1–2 minutes.
Variations & Easy Swaps
| Variation | Key Change | Best For | Difficulty Impact |
|---|---|---|---|
| Cajun Kick | Add Cajun seasoning to the chicken mix | Craving a deeper Southern heat | Same |
| Gluten‑Free / Dairy‑Free | Use gluten‑free buns, vegan cheese | Allergies/vegan | Easy |
| Summer BBQ Twist | Swap buffalo sauce for smoky BBQ glaze | Summer potlucks or BBQ parties | Same |
Cajun Kick
Add a tablespoon of Cajun seasoning to the chicken mix for a spice profile reminiscent of New Orleans. The paprika and cayenne give the sliders that deep, smoky heat, while the butter glaze keeps them soft.
Gluten‑Free / Dairy‑Free
Swap the Hawaiian rolls for certified gluten‑free buns and replace the cheddar with plant‑based cheddar. For dairy‑free, use coconut‑milk mozzarella. The overall taste remains close, but the texture may become slightly firmer; that’s a trade‑off for dietary needs.
Summer BBQ Twist
Replace Frank’s sauce with a thick, tomato‑based BBQ glaze and add a pop of maple syrup for sweetness. When baked, the sliders develop a caramelized crust that pairs perfectly with a backyard grill and fresh summer vegetables.
Can I use fresh chicken instead of rotisserie?
Absolutely! Fresh chicken offers a cleaner flavor, but it needs to be cooked first. Bake a 3‑pound chicken breast or thighs at 375°F until the internal temperature hits 165°F, then shred it. Pat the meat dry to avoid excess moisture that could make the sliders soggy. If you prefer a faster route, buy pre‑shredded chicken from a local market and skip the roasting step.
How long can I store these sliders in the fridge?
You can keep pre‑assembled but unrefrigerated sliders in the fridge for up to 3 days. Wrap them tightly with foil or store in a zip‑lock bag. When ready to serve, reheat at 350°F for 6–8 minutes or until the cheese is melted and the buns start to brown. For a crispier top, finish them under the broiler for 1–2 minutes.
Do I need to brush the buns with butter before baking?
Brushing the buns in the garlic‑butter glaze after placing the chicken does two things: it adds flavor and helps the buns develop a golden, caramelized crust. If you skip this step, the tops may turn out a bit dry or pale. You can still apply a light dusting of melted butter on top after baking, but for the best results, brush it in just before the final bake.
What’s a good side dish for these sliders?
The classic pairing is a creamy coleslaw that cuts through the heat, but fresh green salad or sliced cucumber with a splash of vinaigrette also works wonderfully. For a heartier option, try baked sweet potato fries with a honey‑mustard dip. If you’re looking for a more rustic feel, a roasted carrot and chickpea salad brings in North African flavors that complement the sliders.
Can I make these sliders vegetarian?
You can substitute the chicken with finely chopped sautéed mushrooms, tofu, or a plant‑based crumbled “chicken” that mimics the texture. Keep the same sauce mix; the mushrooms absorb the ranch and buffalo while the tofu gives a silky consistency. For a truly vegetarian version, use a dairy‑free cheese blend and a gluten‑free bun to complete the dish.
What’s the best way to serve these at a party?
Arrange the sliders on a wooden board in a single staggered row, each bite showing the layers of cheese, chicken, and buttery glaze. Provide a ramekin of ranch or blue cheese for dipping. For a more festive touch, decorate the platter with fresh herbs, sliced jalapeños, or a sprinkle of toasted almonds. Keep the sliders warm in a low‑heat oven or a heat‑proof platter until ready to serve.
Can I freeze the assembled sliders?
Yes—lay the unbaked sliders flat on parchment and freeze them for up to 2 months. When ready, bake directly from the freezer at 350°F for 20–25 minutes, then broil for 2 minutes to crisp the tops. Alternatively, assemble a fresh batch each day for the freshest flavor.
What’s the best cheese mix in these sliders?
The combination of sharp cheddar for its bite and mozzarella for its melt creates a balanced mouthfeel—cheese that stays firm yet stretches with a silky finish. If you prefer a sharper flavor, increase cheddar to ¾ cup. For a milder taste, reduce cheddar and add extra mozzarella. Some people enjoy a sprinkle of pepper jack for a gentle kick, but the overall texture remains similar.
Share Your Version!
I’d love to hear how you tweak this recipe for your own home. Drop a comment below, rate the slider on a scale of one to five stars, and tell me what twist you added—did you use a different sauce, or swap the cheese for a vegan version? If you’ve captured the sliders in a snapshot, tag me on Instagram or Pinterest and share your proud moment.
From my NYC kitchen to yours — I hope this recipe brings as much warmth to your table as it does to mine. — emy 🧡
Love This Recipe? Save It to Pinterest!
If you enjoyed this Buffalo Chicken Sliders recipe, don’t let it get lost in your browser tabs! 😄 Pin it now so you can find it again anytime — and explore hundreds more tried‑and‑tested recipes waiting for you on my Pinterest boards.
👉 Follow emy on Pinterest @exorecipe
📌 Pin this recipe · 🔁 Re‑pin your favorites · 💬 Tag me when you make it — I love seeing your creations!
Got a unique tweak or a story about how these sliders made your game day unforgettable? Drop a comment below and let’s keep the flavor conversation going!

Buffalo Chicken Sliders
Description
These Buffalo Chicken Sliders are a hit for game day or any day of the week! They’re spicy, cheesy, and perfect served on sweet Hawaiian rolls.
Ingredients
- 3 cups rotisserie chicken (shredded)
- 1 package Kings Hawaiian Rolls (12 count)
- 1/2 cup Ranch dressing
- 1/2 cup Franks buffalo sauce
- 1/4 cup butter (melted)
- 1/2 teaspoon garlic powder
- 1 cup cheddar cheese (shredded)
- 1 cup mozzarella cheese (shredded)
Instructions
- Preheat oven to 350° F.
- In a small bowl, mix together the melted butter, garlic powder. Set aside.
- In another bowl, mix together the chicken, ranch, ½ of the cheeses, and buffalo sauce.
- Split your rolls in half, place the bottom half in a prepared 9×13 baking dish sprayed with cooking spray.
- Spread chicken mixture on bottom half of rolls and top with remaining cheese.
- Place the top half of the buns on top and brush the top of the rolls with the melted butter mixture.
- Cover the dish with foil and bake for 15 minute.
- Remove foil, and bake for an additional 5 minutes (or until the tops of the sliders turn a golden brown.
- Remove from oven, slice and serve!