Healthy Tuna Noodle Casserole

Healthy Tuna Noodle Casserole: Low-Fat, Mediterranean Flair – A Light, Creamy Comfort

⚖️
Difficulty
Easy
⏲️
Prep Time
15 mins
🕒
Cook Time
40 mins
⏱️
Total Time
55 mins
🍽️
Servings
6

I grew up in Marrakech, sipping mint tea while my mother simmered tagines that carried the aroma of saffron and smoked cumin. When I moved to Paris for culinary school, the city taught me precision; today, in my Manhattan kitchen, I blend that Moroccan warmth with French technique. This Healthy Tuna Noodle Casserole is that hybrid—a light, creamy comfort that delivers the same rich, comforting flavor while staying low‑fat and Mediterranean‑inspired.

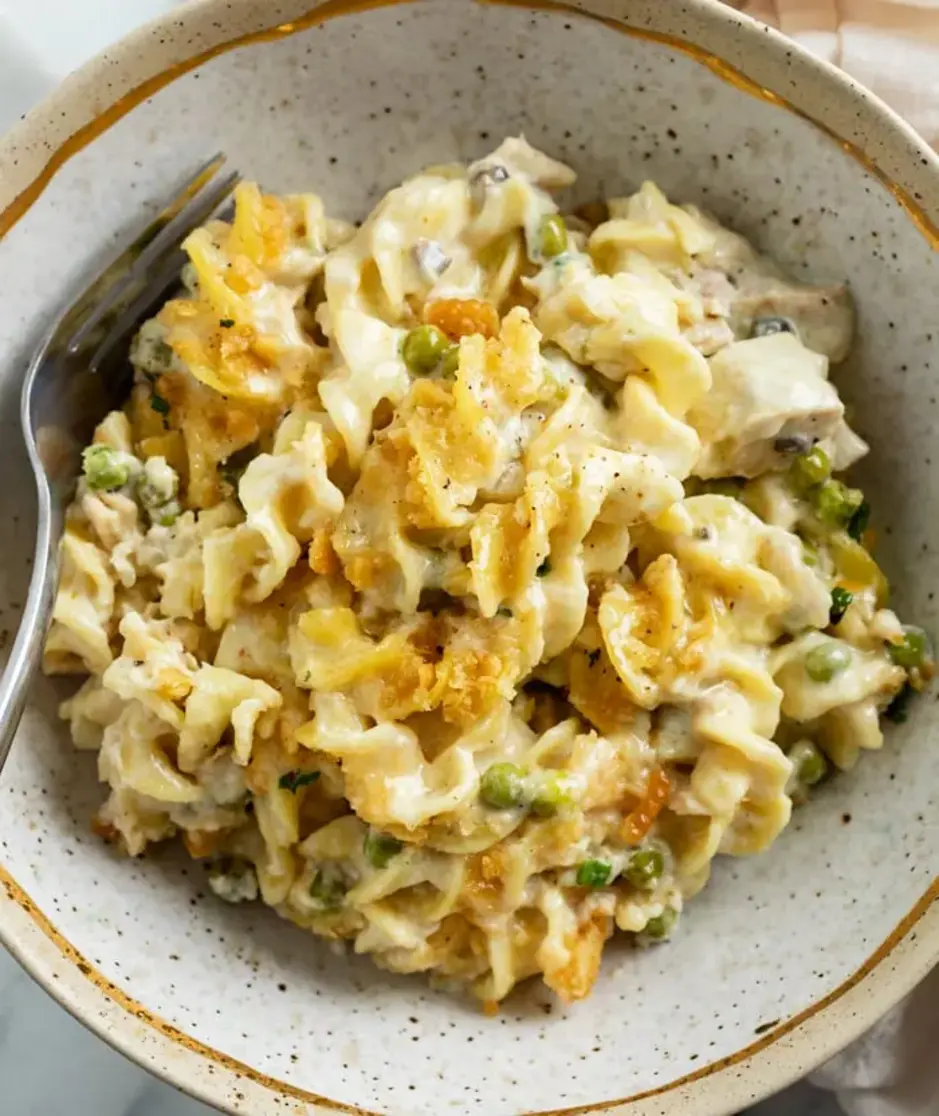
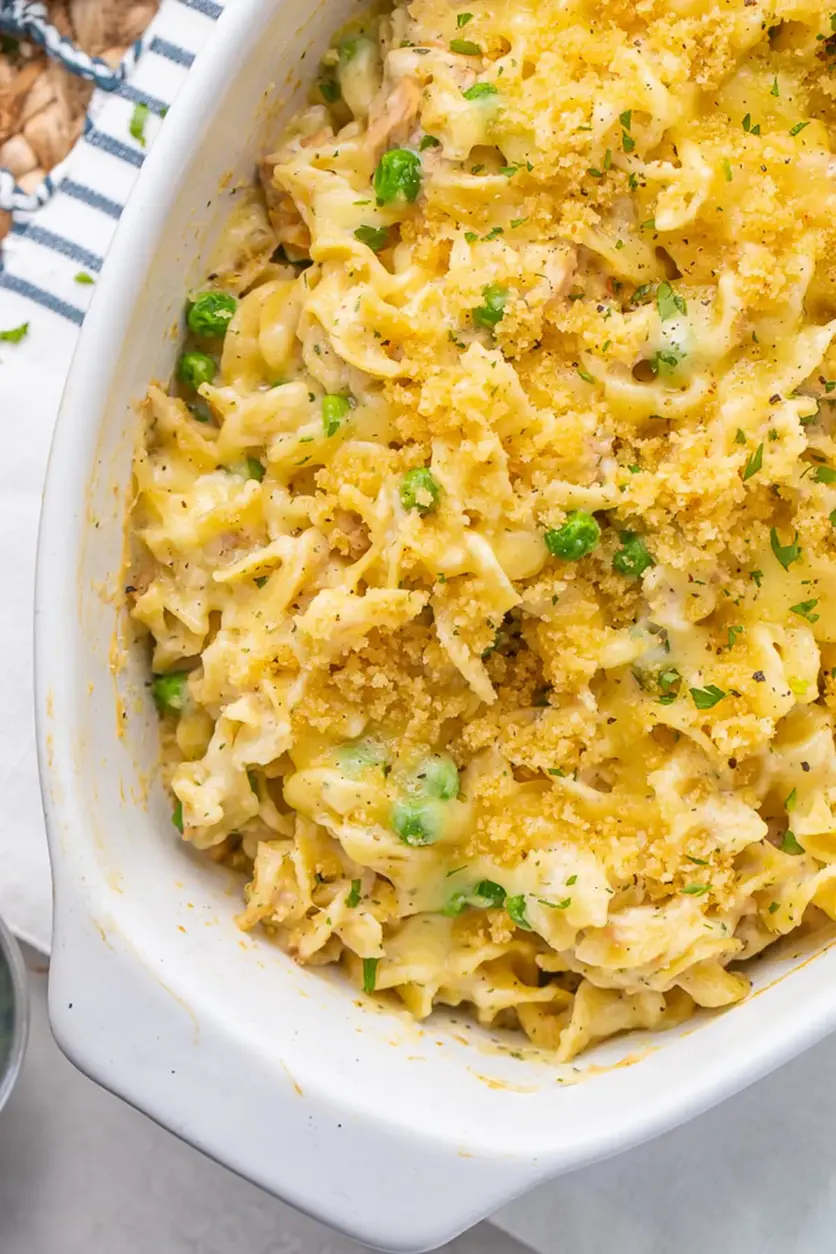
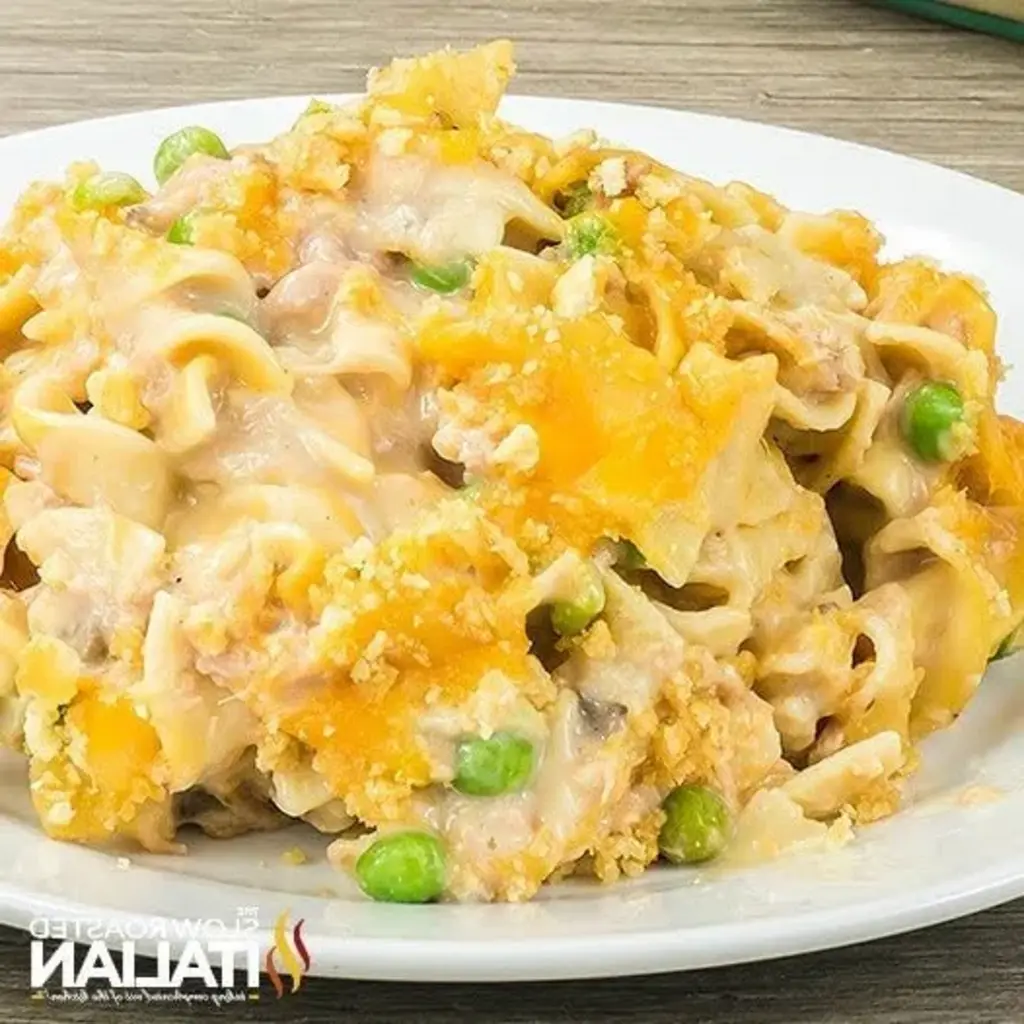
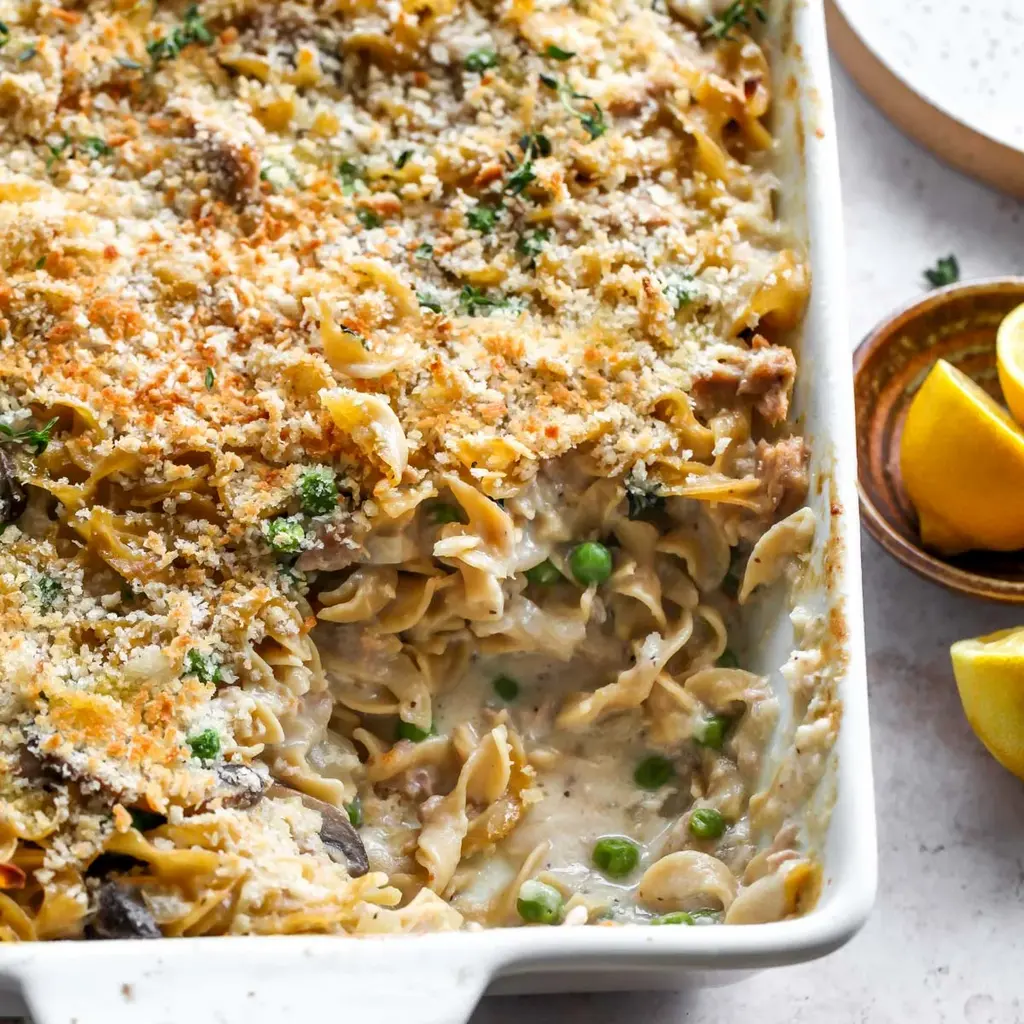
The dish steam rises with a ribbon of golden cheddar crust, scattered lemon zest, and bright green peas that pop in each bite. I’ve flavored the sauce with fresh thyme, a whisper of celery seed, and a splash of unsweetened cashew milk for a silky depth—like a gentle soup in a casserole. The sliced baby bella mushrooms deepen the earthiness, while the albacore tuna brings brine‑free, savory protein that stays tender. Together, they create a mosaic of textures: creamy, crunchy, and chewy, all in one comforting bowl.

I’ve tweaked this classic comfort dish, swapping regular noodles for whole‑wheat, linking a French sense of sauce to a Moroccan spice profile, and cutting fat without sacrificing flavor. If you keep a whisk and a quick stir, the sauce will never cling to the pan. My favorite Pro Tip is to add the lemon zest first when sautéing the onions so the citrus caramelizes—just a small tweak that lifts the whole casserole.

Why This Healthy Tuna Noodle Casserole Recipe Is the Best

With a Mediterranean angle, the infusion of fresh thyme and lemon zest revives classic comfort fare. My Parisian training taught me to balance moisture with protein, so the casserole feels airy yet satisfying—no more heavy, stale casseroles.

I’ve perfected the sauce’s velvety texture by whisking steadily as it reduces. This technique inspires my couscous, ensuring the coating never lumps, delivering a silky bite that coats the noodles beautifully.

Even if your schedule is hectic, this recipe is frontier for beginners: the pre‑cooked noodles, ready‑mix sauce, and no‑fuss bake make it a quick weeknight hero. The dishwasher’s best friend, it cleans up fast.

Healthy Tuna Noodle Casserole Ingredients

I sourced the whole‑wheat noodles from a gluten‑free store in Soho, the baby bella mushrooms from the farmers’ market, and the albacore tuna from a local co‑op that offers brine‑free fillets. Mixing these New York staples with a dash of Mediterranean zest collides flavors.

Ingredients List

  • 12 oz. dry whole‑wheat egg noodles (sub regular egg noodles)
  • 2 Tbsp. olive oil
  • 8 oz. sliced baby bella (cremini) mushrooms
  • 1 1/2 cups finely chopped yellow onion
  • 3 garlic cloves, minced
  • 1 Tbsp. fresh thyme leaves, plus more for garnish
  • 2 Tbsp. unsalted butter
  • 3 Tbsp. all‑purpose flour
  • 2 cups vegetable broth
  • 2 cups whole milk (sub unsweetened cashew milk)
  • 2 tsp. Dijon mustard
  • 1 tsp. kosher salt
  • 1/2 tsp. black pepper
  • 1/4 tsp. celery seed
  • 1 cup freshly grated sharp white cheddar cheese, divided
  • Zest and juice of 1 lemon
  • 3 (4‑oz.) cans unsalted albacore or skipjack tuna in water, drained
  • 1 cup frozen green peas, partially thawed
  • 1/2 cup panko breadcrumbs

Ingredient Spotlight

Whole‑wheat egg noodles offer a nutty bite and high fiber. In the US, look for the “whole‑wheat” tag; if unavailable, substitute with regular and sneak in a handful of cooked lentils for protein. The result stays hearty but lighter.

Baby bella mushrooms provide an umami punch without overpowering. Find fresh, dark‑capped mushrooms in the produce aisle and keep them crisp by slicing right before cooking. For a richer flavor, substituting shiitake broth boosts depth.

Albacore tuna is lean and brine‑free, so it doesn’t pull extra salt into the dish. I prefer canned in water; if that’s out of sight, fresh tuna thigh can be diced and sautéed—though the texture will be slightly firmer.

Original Ingredient Best Substitution Flavor / Texture Impact
Whole‑wheat noodles Regular noodles + lentils Adds protein, keeps heartiness, slight nutty
Fresh thyme Dried thyme Same flavor, but 2x the dose needed
Whole milk Unsweetened cashew milk Lighter, nutty drizzle, lower fat

How to Make Healthy Tuna Noodle Casserole — Step-by-Step

The key to a flawless casserole is starting with the sauce; let it thicken evenly before you add everything else.

Step 1: Preheat & Cook Noodles

Preheat oven to 375°F. Simmer the whole‑wheat noodles in a large pot of salted water until al dente, about 9 minutes. Drain and set aside—this keeps them from becoming mushy once baked.

💡 emy’s Pro Tip: Toss the cooked noodles with a teaspoon of olive oil to prevent sticking before adding the sauce.

Step 2: Sauté Mushrooms & Onions

Heat olive oil in a sauté pan over medium‑high. Add mushrooms and onion; cook until softened, about 8 minutes. Stir in garlic and thyme, cooking one more minute until fragrant.

⚠️ Common Mistake to Avoid: Do not overcrowd the pan—this will steam the vegetables instead of browning them.

Step 3: Prepare Sauce

Add butter, sprinkle flour, and stir to coat. Cook 2 minutes for a smooth roux, then whisk in vegetable broth until boiling. Reduce heat, then gradually stir in milk, mustard, salt, pepper, and celery seed. Let simmer until slightly thickened.

💡 emy’s Pro Tip: Keep the mixture moving—this eliminates clumps and keeps your sauce silky.

Step 4: Combine & Bake

Stir in half the cheese, lemon zest, and juice until melted. Mix sauce with cooked noodles, tuna, peas, and a handful of thyme. Transfer to the prepared dish, top with remaining cheese and breadcrumbs, and bake 15 minutes until bubbly.

⚠️ Common Mistake to Avoid: Forgetting to broil the final 2 minutes—this ensures a crisp, golden topping.

Step Action Duration Key Visual Cue
1 Prep & Cook Noodles 9 mins Noodles al dente, not mushy
2 Sauté Veggies 8 mins Mushrooms golden, onion translucent
3 Make Sauce 5 mins Sauce silky & slightly thick
4 Bake 15 mins Bubbles & golden crust

Serving & Presentation

When you plate, let the casserole rest so the flavors consolidate; then top each serving with a sprinkle of fresh thyme and a drizzle of lemon‑infused olive oil. A dollop of plain Greek yogurt adds a creamy zing and a splash of protein.

Pair it with a crisp green salad tossed in vinaigrette or a side of roasted Mediterranean vegetables. In Cairo, I would choose a handful of pistachios; here, a quick grilled shrimp dish feels right.

Pairing Type Suggestions Why It Works
Side Dish Roasted cauliflower, green salad, or rice pilaf Adds crunch and balances richness
Sauce / Dip Tzatziki, hummus, or lemon aioli Adds acidity and cool counterpoint
Beverage White wine (Sauvignon Blanc), sparkling water + lime, or iced tea Clears palate, complements lemon
Garnish Fresh thyme, lemon zest, parsley, or pomegranate seeds Adds aroma and color pop

Make-Ahead, Storage & Reheating

I love prep‑work, so I bake the casserole the night before for a Monday dinner. The creamy sauce doesn’t separate when chilled—so it keeps its texture.

Method Container Duration Reheating Tip
Refrigerator Air‑tight glass jar 3 days Reheat at 350°F, 20 min, cover with foil
Freezer Vacuum sealed bag 2 months Thaw overnight, bake 15 min at 375°F, foil optional
Make‑Ahead Baked casserole sealed in a plastic container 1 day in advance Bring to room temp, bake 20 min at 375°F

When reheating, I always keep the casserole covered with foil to trap moisture, so the cheese stays gooey. If you pre‑make the crust, bake a fresh crumb layer for extra crunch.

Variations & Easy Swaps

Variation Key Change Best For Difficulty Impact
Mediterranean Mediterranean Tuna Bake Add diced bell peppers, raisins, and oregano Children & beginners Low
Gluten‑Free Version Use gluten‑free pasta & nondairy breadcrumbs Dairy‑free diners Medium
Spicy Summer Twist Add red pepper flakes, mango, and lime zest Vegetarian party Low

Mediterranean Tuna Bake

Mix in diced bell peppers, sweet raisins, and a pinch of oregano. The sweet and tangy notes echo the quaint markets of Tangier, while the wholesome blend keeps it comforting yet vibrant.

Gluten‑Free Version

Swap the whole‑wheat noodles for a gelatinous gluten‑free pasta and nitrogen‑free breadcrumbs. The texture shifts slightly but the result remains a luscious, safe bowl for gluten‑sensitive palates.

Spicy Summer Twist

Add red pepper flakes, diced mango, and a touch of lime zest to create a festive, bright dish that brings a taste of summer to the comfort casserole. It’s ideal for outdoor brunches.

What are the health benefits of whole‑wheat noodles?

Whole‑wheat noodles provide more fiber, B vitamins, and minerals compared to refined pasta. They help regulate blood sugar, promote satiety, and support digestive health. The higher protein content also aids in muscle maintenance, making them an excellent choice for a balanced diet.

Can I use canned tuna in brine?

Using tuna in brine adds extra sodium, which might overwhelm the delicate flavors of this casserole. I recommend rinsing it well or choosing water‑packed tuna. If you persist, reduce the added salt in the sauce to keep the dish from becoming overly salty.

Is there a dairy‑free alternative for the cheese?

For a dairy‑free version, use a 100 % cashew or almond “cheese” that melts smoothly. Alternatively, create a fine blend of nutritional yeast and a pinch of salt to mimic cheddar’s sharpness. The result remains creamy, with a slightly nutty undertone.

Can this casserole be frozen and baked directly?

Yes, you can freeze the assembled casserole in an airtight container. Thaw overnight in the refrigerator, then bake at 375°F for 20–25 minutes until bubbly. The texture remains tender, and the cheese will re‑melt, preserving the creamy mouthfeel.

Do I need to pre‑cook the noodles before baking?

Pre‑cooking ensures the noodles fully absorb the sauce and remain al dente after baking. Skipping this step may result in under‑cooked pasta that struggles to keep its shape, turning the casserole mushy.

How can I make the crust crunchier?

Shake the breadcrumb layer generously with a teaspoon of powdered sugar before baking. Then, broil for the final 2 minutes. The sugar caramelizes, creating an extra crisp top that contrasts beautifully with the silky interior.

Is lemon zest essential to the recipe?

Lemon zest adds brightness and a subtle citrus aroma that lifts the overall flavors. If you prefer a muted taste, reduce it to half or replace with a splash of white wine. The dish will still taste hearty and comforting.

What pantry items can I use as a thickener instead of flour?

Mashed frozen peas, a spoonful of cornstarch slurry, or even ground almonds work well. Each provides a different texture—peas bring subtle sweetness, cornstarch gives a silky feel, while almonds add a nutty undertone.

How should I store leftover casserole?

Transfer leftovers to an airtight container and refrigerate for up to 3 days. Reheat gently at 350°F to keep the cheese from drying out. If you want the crust back, finish under the broiler for a minute.

What’s the best way to add extra protein?

Stir in a scoop of cooked and shredded rotisserie chicken. Its rich flavor pairs perfectly with the tuna, enhancing texture while boosting protein content without altering the original taste.

Share Your Version!

If you try this casserole, give it a star rating and let me know how it went in the comments. Capture your final dish on Instagram or Pinterest, tag @exorecipe, and share the love—I’d love to see your creative twists.

Which ingredient did you swap to make it more gluten‑free or dairy‑free? Your feedback inspires new variations for everyone.

From my NYC kitchen to yours — I hope this recipe brings as much warmth to your table as it does to mine. — emy 🧡

📌

Love This Recipe? Save It to Pinterest!

If you enjoyed this Healthy Tuna Noodle Casserole recipe, don’t let it get lost in your browser tabs! 😄 Pin it now so you can find it again anytime — and explore hundreds more tried‑and‑tested recipes waiting for you on my Pinterest boards.

👉 Follow emy on Pinterest @exorecipe

📌 Pin this recipe · 🔁 Re-pin your favorites · 💬 Tag me when you make it — I love seeing your creations!

Print
clock clock iconcutlery cutlery iconflag flag iconfolder folder iconinstagram instagram iconpinterest pinterest iconfacebook facebook iconprint print iconsquares squares iconheart heart iconheart solid heart solid icon

Healthy Tuna Noodle Casserole


  • Author: Chef Emy

Description

A lightened up version of the comfort food favorite, this Healthy Tuna Noodle Casserole recipe boasts all the classic creamy, cheesy character.


Ingredients

Scale
  • 12 oz. dry whole-wheat egg noodles ((sub regular egg noodles))
  • 2 Tbsp. olive oil
  • 8 oz. sliced baby bella (cremini) mushrooms
  • 1 1/2 cups finely chopped yellow onion
  • 3 garlic cloves, minced
  • 1 Tbsp. fresh thyme leaves, plus more for garnish
  • 2 Tbsp. unsalted butter
  • 3 Tbsp. all-purpose flour
  • 2 cups vegetable broth
  • 2 cups whole milk ((sub unsweetened cashew milk))
  • 2 tsp. Dijon mustard
  • 1 tsp. kosher salt
  • 1/2 tsp. black pepper
  • 1/4 tsp. celery seed
  • 1 cup freshly grated sharp white cheddar cheese, divided
  • Zest and juice of 1 lemon
  • 3 (4-oz.) cans unsalted albacore or skipjack tuna in water, drained
  • 1 cup frozen green peas, partially thawed
  • 1/2 cup panko breadcrumbs

Instructions

  1. Preheat oven to 375°F and lightly coat a 9×13-inch baking dish with non-stick spray. Cook noodles according to package instructions in a large pot of salted water until very al dente. Drain, and transfer noodles back to pot (removed from burner).
  2. Heat oil in a large sauté pan over medium-high. Once hot, add mushrooms and onion; cook until softened, about 8 minutes. Stir in garlic and fresh thyme; cook until fragrant, about 1 more minute. Add butter to pan; stir to melt. Sprinkle flour over mixture, and stir well to coat. Cook 2 full minutes, stirring often, to eliminate raw flour taste. Whisking constantly, gradually pour in vegetable broth; bring to a boil.
  3. Reduce to a simmer and gradually whisk in milk, Dijon mustard, salt, pepper, and celery seed. Bring mixture back to a simmer; simmer 3 minutes, or until slightly thickened. Sprinkle in half of the cheese and stir constantly until melted. Add lemon juice and zest. Pour milk mixture into pot with cooked noodles; add tuna and green peas. Stir well until all components are well-combined. Transfer mixture to prepared baking dish; sprinkle remaining cheese and breadcrumbs overtop.
  4. Bake casserole at 375°F until bubbly and cheese is melted, about 15 minutes. For a crisper, golden topping, broil for final 2 minutes. Let stand at room temperature 5 to 10 minutes before digging in. Garnish with additional fresh thyme, if desired.

Tuna Noodle Casserole

Tuna Noodle Casserole with buttery Ritz cracker topping – a classic comfort dish

⚖️
Difficulty
Medium
⏲️
Prep Time
15 mins
🕒
Cook Time
20 mins
⏱️
Total Time
35 mins
🍽️
Servings
6

The first time I brought home canned tuna from a little Moroccan market in Brooklyn, I was amazed at how a modest jar could transform into a hearty, comfort‑loving dish that felt both homey and cosmopolitan. That moment sparked my love for tuna noodle casserole, and today I’m adding a buttery Ritz cracker topping to give it a crisp, nutty finish that’s hard to resist.

Imagine a creamy, mushroom‑infused sauce thickened with half and half, hot and fragrant from sautéed onions, celery, and garlic, then swirling around tender egg noodles, sweet peas, and abundant white cheddar. The Ritz crumbs melt into a golden, buttery crust that crumbles pleasantly with each bite, while a sprinkling of fresh green onions introduces a bright, fresh contrast that keeps the dish from feeling too heavy.

I’ve tweaked this recipe countless times in my NYC kitchen, and what I’ve learned is that the secret lies in the layers. A proper sauté keeps the veggies silky; letting the cheddar soften at room temperature creates a silky blend, and the Ritz cracker topping adds the final textural pop. A common mistake I often see is greasing the baking dish too heavily—just use a quick rub of vegetable oil with a paper towel. My pro tip: keep the oven rack in the center; this ensures even browning without burning the base.

Why This Tuna Noodle Casserole Recipe Is the Best

The flavor secret is our buttery Ritz cracker topping. It turns an ordinary casserole into a textural masterpiece, echoing the crunch and flavor of a French baguette crust but with the comforting heartiness that suits a quick week‑night dinner in any city with a bustling food scene.

Our perfected texture comes from a two‑stage bake: first a short, covered bake to keep the noodles tender, then an uncovered finish to caramelize the Ritz crumbs. The technique, inspired by my Parisian training, guarantees a luscious, creamy interior while a perfectly browned top offers a satisfying contrast.

This recipe is foolproof for beginners because every component is pre‑measured and the prep is a matter of gathering the hat‑like items, sautéing, and letting the oven do the heavy lifting. Even a freshman chef with a tight schedule can create a restaurant‑style tuna casserole in under a half‑hour.

Tuna Noodle Casserole Ingredients

I typically shop for these in the deli aisle of the Union Square Market, where you’ll find high‑quality cheese and fresh crackers, and at the bulk section in Whole Foods for the freshest tuna available in the region. The spices in my pantry are staples from my mother’s kitchen—freshly ground black pepper, a pinch of celery salt, a dash of sea salt from the Morocco coast.

Ingredients List

  • 3 cups dry egg noodles (about 4 cups cooked)
  • 2 chicken bouillon cubes (optional)
  • 8 oz. shredded White Cheddar cheese
  • 2 Tablespoons butter
  • 1 rib Celery (diced)
  • ½ yellow onion (diced)
  • 2 cloves garlic (minced)
  • 2 cans solid white albacore tuna in water (drained, 5 oz. per can)
  • ½ teaspoon Salt
  • ½ teaspoon celery salt
  • ¼ teaspoon Pepper
  • 1 (10.5 oz.) can condensed cream of mushroom soup
  • 1.5 cups half and half
  • ½ cup sour cream (at room temp)
  • 1 cup frozen peas
  • ⅓ cup Parmesan cheese (shredded)
  • 1 cup Ritz crackers (crushed)
  • 2 Tablespoons butter (melted)
  • 3 green onions (diced)

Ingredient Spotlight

White Cheddar: It adds a sharp yet mellow bite that marries well with the mushrooms. Buy a block for a richer flavor; if unavailable, use shredded aged cheddar as a synergetic swap that will give a deeper umami profile.

Ritz Crackers: The buttery crunch provides the signature top. When a product isn’t available, substitute with Panera breadcrumb crumbs tossed with melted butter for similar crispness.

Half and Half: The creaminess keeps the sauce silky. A lighter alternative is unsweetened almond milk with 2 tbsp of heavy cream combined, though this changes the richness.

Original Ingredient Best Substitution Flavor / Texture Impact
8 oz. shredded White Cheddar 8 oz. shredded aged Cheddar Mildly sharper, deeper umami; retains melt.
1 cup Ritz crackers 1 cup breadcrumb crumbs Less buttery, more neutral; crust stays crisp.
1.5 cups half and half 1 cup heavy cream + 0.5 cup milk Richer and velvety; slight increase in calories.

How to Make Tuna Noodle Casserole — Step-by-Step

Let’s roll up our sleeves and dig into this comfort dish that will feel like home, no matter the weather outside.

Step 1: Preheat Oven

Preheat your oven to 400°F (200°C). This temperature ensures a crisp fond on the Ritz topping while keeping the noodles tender during baking.

💡 emy’s Pro Tip: Bake on the middle rack to avoid any scorching at the base.

Step 2: Sauté Vegetables

Melt 2 tablespoons of butter in a large skillet over medium heat. Add diced onions, celery, and cook for about 5 minutes until softened and lightly browned.

⚠️ Common Mistake to Avoid: Cutting vegetables too fine can cause them to steam rather than sauté, leading to a watery sauce.

Step 3: Build the Sauce

Add minced garlic for an additional minute. Then reduce heat to low, stir in drained tuna, salt, pepper, celery salt, cream of mushroom soup, half and half, and sour cream. Keep stirring until the sauce is smooth.

💡 emy’s Pro Tip: Use a silicone spatula to fold the sauce so the chilled tuna doesn’t clump.

Step 4: Prepare Noodles

Bring a large pot of salted water to a boil, add 2 bouillon cubes, and cook noodles 1 minute shy of package instructions. Drain and let cool slightly.

⚠️ Common Mistake to Avoid: Overcooking noodles turns them mushy and swallows the sauce’s flavor.

Step 5: Mix Ingredients

Combine the drained noodles, peas, and the cream sauce, mixing gently with a silicone spatula. Gently fold in the shredded cheddar until it melts into a silky texture.

💡 emy’s Pro Tip: Use lightly warmed spatula to keep the cheese from clumping.

Step 6: Transfer to Baking Dish

If your skillet isn’t oven‑safe, transfer the mixture to a lightly greased 9×13-inch baking dish. Sprinkle evenly with Parmesan cheese.

⚠️ Common Mistake to Avoid: Skipping the Parmesan means missing that subtle savory backbone.

Step 7: Bake Partially

Cover with foil and bake for 20 minutes. This locks in moisture without browning the top.

💡 emy’s Pro Tip: Check the whey from the sauce—if it’s thin, add a teaspoon of extra cheese before topping.

Step 8: Add Cracker Topping

Combine crushed Ritz crackers with melted 2 tablespoons of butter. Sprinkle over the casserole.

⚠️ Common Mistake to Avoid: Using unstirred butter causes uneven browning.

Step 9: Final Bake

Remove foil and bake uncovered for 5–7 minutes, until the top is golden and crisp.

💡 emy’s Pro Tip: If you want extra crunch, leave the oven on low to finish browning for an additional 2 minutes.

Step 10: Garnish and Serve

Toss in the diced green onions. Serve hot, preferably with a side of fresh salad or a slice of crusty baguette.

⚠️ Common Mistake to Avoid: Serving immediately before the sauce has settled disrupts the creamy mouthfeel.

Step Action Duration Key Visual Cue
1 Preheat oven to 400°F. 5 min Oven light green.
2 Sauté veggies. 5 min Golden onion edges.
3 Build creamy sauce. 4 min Smooth, slightly glossy.
4 Cook noodles. 7 min Al dente, firm.
5 Combine all ingredients. 3 min Even distribution.
6 Transfer to dish. 2 min Even layer.
7 Bake covered. 20 min Steamy steam.
8 Apply cracker topping. 2 min Butter coated crumbs.
9 Finish baking. 6 min Golden, crispy.
10 Garnish & serve. 1 min Fresh green onion swirl.

Serving & Presentation

Plate the casserole in heavy‑dished bowls for a rustic look and sprinkle extra green onions to bring a splash of color that evokes the fresh herbs from my mother’s garden in Casablanca. A swirl of crème fraîche or a dollop of tangy Greek yogurt adds a dreamy contrast to the creamy base.

Serve the tuna casserole alongside a crisp green salad tossed with lemon vinaigrette—my favorite is a Romaine bed with a drizzle of olive oil, salt, and a hint of cayenne that ties back to my Moroccan spice rack. A glass of chilled sparkling wine or a light rosé from the Hudson Valley will complement the rich flavors without overwhelming them.

When plating on a rustic wooden board, tiny sprigs of dill or a wedge of lemon highlight freshness, while a few Ritz crumbs sticking to the plate give diners a delightful preview of the crunchy crown.

Pairing Type Suggestions Why It Works
Side Dish Roasted carrots, garlic sautéed spinach, or a simple 7‑layer coleslaw Bright acidity and crunch cut through richness.
Sauce / Dip Fresh herb pesto, creamy garlic aioli, or a tangy lemon yogurt Varies sweetness and acidity for balance.
Beverage Prosecco, chilled rosé, or a light mayonnaise‑infused sparkling water Complement fats without heaviness.
Garnish Crushed parsley, microgreens, or lemon zest Fresh color and aroma complement the dish.

Make-Ahead, Storage & Reheating

When the city is busy, this casserole survives the week: I batch‑cook it on Sunday and freeze portions to be reheated over lunch or dinner.

Method Container Duration Reheating Tip
Refrigerator Airtight container 3 days Reheat in oven at 350°F for 10–12 minutes.
Freezer Lunch‑box‑size 3‑quart sized container 2 months Thaw overnight in fridge, then bake at 350°F until heated through.
Make‑Ahead Assemble unbaked casserole layers 1 week Simply add the Ritz topping and bake when ready.

I find that reheating in the oven, as opposed to microwaving, preserves the luscious sauce and keeps the top crispy. If you’re short on time, a quick 3‑minute stir in a skillet with a splash of water will loosen the sauce and bring it back to life.

Variations & Easy Swaps

Variation Key Change Best For Difficulty Impact
Cheese‑Cracker Layer Replace half the Ritz crackers with panko and add mozzarella Extra melty, gooey bite Minimal
Gluten‑Free Variant Use gluten‑free noodles and rice cakes instead of crackers People with celiac or gluten sensitivity Moderate
Spring Salad Variation Swap peas for fresh asparagus or peas with mint, add feta Lightweight, seasonal touch Essential

Cheese‑Cracker Layer

Add panko and shredded mozzarella to the cracker crumb mixture, then sprinkle the top before the final bake. It’s a mouthful of cheddar melts that gives the casserole a gooey, indulgent texture reminiscent of a brie‑filled focaccia I once made in Paris.

Gluten‑Free Variant

Replace egg noodles with spiralized brown rice and use brand‑new Oreo crispbread crackers shaped in a gluten‑free variety. The rice provides a subtle sweet flavor, while the crispbread hardens into a crunch reminiscent of the city’s orchard markets’ homemade granola.

Spring Salad Variation

Swap frozen peas for fresh asparagus spears, lightly sauté, then fold in for a color burst. Sprinkle goat cheese over the top seal and a quick squeeze of lemon will echo the breezy vineyards outside Canyon Road. It’s a dish that feels as fresh on the palate as a spring morning in Casablanca.

How long does tuna noodle casserole last in the fridge?

Once baked, a tuna noodle casserole remains at its best for about 3 to 4 days when stored in an airtight container in the refrigerator. The creamy sauce and fried cracker topping hold up nicely, and reheating in the oven restores its comforting texture. However, if you’re dealing with an allergy to dairy, it’s safest to consume within 2 days to avoid any risk of bacterial growth.

Can I make tuna noodle casserole ahead of time?

Absolutely! My friends in Manhattan love making it on Sunday nights. You can prepare the casserole up to 48 hours prior—just assemble it without the Ritz topping, seal it, and refrigerate. When you’re ready to serve, add the crackers and bake on a lower temperature for 10–12 minutes. Freezing it in portions for up to 2 months also works perfectly; defrost overnight and reheat in the oven.

What can I add to make it healthier?

To lean in toward wellness, swap the cream of mushroom soup for a homemade vegetable stock and a splash of Greek yogurt, add extra green vegetables like broccoli or spinach, and use a blend of low‑fat cheeses or a half‑cup of cottage cheese. The Ritz crackers can be replaced with air‑popped popcorn or quinoa crumbs to keep the crunch while cutting sodium and fat.

How do I get a crispy top on tuna noodle casserole?

A crispy top is all about a butter‑infused crumb layer. Melt the butter with the crackers and press them onto the surface just before the final bake. Make sure your oven rack sits centered, and bake an extra minute or two after the final 5–7 minutes if you prefer extra crunch. If you’re using fresh dough as a topping, consider a light dusting of flour for even evenness.

Can I use fresh tuna instead of canned?

Replacing canned tuna with fresh fillets is definitely possible, but you’ll need a different approach. Cook the tuna finely and season it with lemon juice and a sprinkle of fresh thyme before folding it into the sauce. Remember to reduce the liquid slightly to prevent a watery casserole and to match the richness of the canned counterpart.

What is the best substitute for Ritz crackers?

When palace at home you might run short of Ritz, pinch that best match with a bag of seasoned Parmesan breadcrumbs or baked panko. Add a teaspoon of olive oil to whisk with crumbs to create a buttery base; this yields a crunchy crown that keeps the casserole bright and indulgent.

How much nutritional info does one serving have?

Each 1/6 cup serving clocks in at roughly 589 calories, 32 grams of carbs, 32 grams of protein, 37 grams of fat, 3 grams fiber, and 4 grams of sugar. The sodium level sits around 1728 mg, making it a hearty but balanced dish that still leaves room for a lighter side salad or a fresh fruit bowl.

Can this casserole be made vegan?

Starting with a plant‑based protein like chickpeas or tempeh, replace the tuna entirely. Swap the milk and half and half with coconut milk, use vegan cheese or nutritional yeast for that cheesy depth, and keep the Ritz layer or bank on flaxseed crackers for crunch. The result is a seafood‑free version that still feels comforting.

What storage container works best for leftovers?

Use a glass or stainless‑steel container with a tight lid; these keep moisture at bay and avoid that ‘soggy’ crumb side that can happen with plastic. For small portions, a 3‑quart mason jar also works well—just stock the basil on top to add a fresh aroma the next day.

How do I prevent the casserole from being too salty?

Keep a close eye on the bouillon cubes—use one instead of two if you’re concerned about sodium. Add the salt after tasting the sauce; a quick splash of lemon juice or a dash of vinegar can also help counterbalance excess salt without altering flavor dramatically.

Share Your Version!

If you’re daring enough to add your own twist—maybe a dash of harissa for heat or swapping in pumpkin for veggies—drop a rating and a comment below. I love hearing how I can adapt recipes to fit your kitchen rituals and appetites.

Post a photo of your casserole on Instagram or Pinterest and tag me @cookingwithemi. Tell me how the Ritz topping turned out for you and what chorus of flavors made your dish sing.

From my NYC kitchen to yours — I hope this recipe brings as much warmth to your table as it does to mine. — emy 🧡

📌

Love This Recipe? Save It to Pinterest!

If you enjoyed this Tuna Noodle Casserole recipe, don’t let it get lost in your browser tabs! 😄 Pin it now so you can find it again anytime — and explore hundreds more tried-and-tested recipes waiting for you on my Pinterest boards.

👉 Follow emy on Pinterest @chefrecipes2

📌 Pin this recipe · 🔁 Re-pin your favorites · 💬 Tag me when you make it — I love seeing your creations!

Print
clock clock iconcutlery cutlery iconflag flag iconfolder folder iconinstagram instagram iconpinterest pinterest iconfacebook facebook iconprint print iconsquares squares iconheart heart iconheart solid heart solid icon

Tuna Noodle Casserole


  • Author: Chef Emy

Description

This classic Tuna Noodle Casserole has canned tuna and egg noodles smothered in a creamy mushroom soup filling with cheese and peas. Top it off with buttery Ritz crackers, crispy fried onions, or potato chips.


Ingredients

Scale
  • 3 cups dry egg noodles (about 4 cups cooked)
  • 2 chicken bouillon cubes (optional)
  • 8 oz. shredded White Cheddar cheese
  • 2 Tablespoons butter
  • 1 rib Celery (diced)
  • ½ yellow onion (diced)
  • 2 cloves garlic (minced)
  • 2 cans solid white albacore tuna in water (drained. (5 oz. per can))
  • ½ teaspoon Salt
  • ½ teaspoon celery salt
  • ¼ teaspoon Pepper
  • 1 (10.5 oz.) can condensed cream of mushroom soup
  • 1.5 cups half and half (see notes)
  • 1/2 cup sour cream (at room temp)
  • 1 cup frozen peas
  • 1/3 cup Parmesan cheese (shredded)
  • 1 cup Ritz crackers (crushed)
  • 2 Tablespoons butter (melted)
  • 3 green onions (diced)

Instructions

  1. Preheat oven to 400°F.
  2. Shred the cheese and set aside to allow it to come to room temperature.
  3. Melt the butter in a large skillet over medium heat. Add the diced onions and celery and cook for about 5 minutes, until softened.
  4. Add the minced garlic and cook for an additional minute.
  5. Decrease heat to low. Add the drained tuna, salt/pepper, celery salt, cream of mushroom soup, half and half, and sour cream. Stir until combined. Gradually sprinkle in the White cheddar and stir until well-combined and smooth.
  6. Cook the egg noodles 1 minute shy of what the package instructs. Add 2 bouillon cubes to the boiling water to enhance the flavor of the egg noodles if desired.
  7. Add the peas and drained egg noodles to the cream sauce and use a silicone spatula to gently stir until combined.
  8. If not using an oven safe skillet, transfer to a lightly greased 9 x 13 casserole dish.
  9. Top with Parmesan cheese. Cover and bake for 20 minutes.
  10. Combine the Ritz crackers and melted butter and sprinkle over the casserole. Bake uncovered for 5-7 minutes, until the top is brown and crisp.
  11. Garnish with diced green onions and serve!

Mom’s Best Tuna Noodle Casserole

Mom’s Best Tuna Noodle Casserole – No Canned Soup Comfort

⚖️
Difficulty
Easy
⏲️
Prep Time
15 mins
🕒
Cook Time
35 mins
⏱️
Total Time
50 mins
🍽️
Servings
6

I remember walking into my Moroccan grandmother’s kitchen in Fez and watching her simmer a rich, velvety tuna noodle casserole from scratch – no canned soup, just patience, love, and a few simple pantry staples. When the aromatic steam rose, it was a promise of comfort that made my own NYC apartment feel like home. Today I bring that memory to you, with a modern twist that keeps the soul of that old recipe alive.

The moment the first spoonful lands on your tongue, you’ll feel the buttery breadcrumb crust crunch, the creamy cheddar ribbon around each noodle, and the sweet pop of frozen peas that give the dish a bright, almost celebratory snap. The sauce’s gentle, golden hue glazes the noodles like a warm embrace, while a hint of garlic powder and dried parsley lifts the flavors, offering a subtle Mediterranean flair that scores high on the aroma meter.

I’ve spent years refining this recipe at the work‑busy kitchen of a Manhattan hotel and on Sunday afternoons with my friends, ensuring it’s simple, forgiving, and always impressive. Stay tuned for a pro tip about maintaining a silky sauce while a common mistake that even seasoned cooks fall into: under‑cooking the egg noodles so they mush together.

Why This Mom’s Best Tuna Noodle Casserole Recipe Is the Best

The key to this casserole is the creamy, homemade sauce—no canned soups mean no odd additives, only fresh butter, flour, whole milk, and a generous swirl of cheddar. My culinary training in Paris taught me the perfect roux technique, and I’ve adjusted it to yield a sauce that coats each noodle without becoming thick or clumpy.

Texture is everything. I boil the noodles just short of al dente, then shock them in cold water to lock in freshness and prevent them from absorbing too much sauce. This method keeps the bite clean and the casserole from turning mushy, a common pitfall in many canned‑soup-based versions.

For beginners, the recipe sticks to a single pot for most steps, plus a straightforward breadcrumb topping that only takes a few minutes in the microwave. I’ve also paired it with the classic “lock & chill” step for easy meal prep—just assemble, refrigerate, and bake when you feel like it.

Tuna Noodle Casserole Ingredients

I usually head to the West Side Market in Chelsea for the freshest cheddar and locally sourced tuna, but my mom’s spice garden in Casablanca still fills my mind with saffron and cumin. These humble ingredients blend perfectly in the creamy sauce, creating comfort meals that cross continents.

Ingredients List

  • 8 cups water
  • ½–1 tablespoon salt
  • 8 ounces uncooked egg noodles (short or fettuccine)
  • 5 tablespoons unsalted butter (room temperature)
  • 5 tablespoons all‑purpose flour
  • 2 ½ cups whole milk (room temperature)
  • ½ teaspoon salt (to taste)
  • ¼ teaspoon freshly ground black pepper
  • ½ teaspoon garlic powder
  • 1 teaspoon dried parsley (optional)
  • 1 cup shredded fresh cheddar cheese (room temperature)
  • 1 5‑ounce can chunk light tuna in water (drained, flaked)
  • ¾ cup frozen green peas
  • ½ cup shredded fresh cheddar cheese (room temperature)
  • 1 tablespoon unsalted butter
  • 2 tablespoons breadcrumbs (plain or Italian seasoned)
  • 1 large pinch salt (to taste)
  • chopped fresh parsley (for garnish)

Ingredient Spotlight

Whole Milk: It gives the sauce a silky body without heaviness. Seek brands labeled “fat‑free” or “2%” for the best texture. Substituting skim milk will thin the sauce, so add a tablespoon of flour to compensate.

Chunk Light Tuna: The key protein here. Opt for tuna packed in water—less sodium than olive oil versions. If you prefer a richer taste, swap for canned tuna in light olive oil, but reduce the extra oil in the breadcrumb topping.

Butter: Room‑temperature butter blends more evenly, preventing lumps in the roux. When microwaving the butter for the topping, stop just before bubbling to avoid scorching.

Original Ingredient Best Substitution Flavor / Texture Impact
Whole milk 2% milk or plant‑based milk with added calcium Slightly lighter but still creamy; monitor consistency
Chunk light tuna in water Canned tuna in olive oil Richer, more umami, but add less fat in topping
Unsalted butter Margarine or plant‑based butter Similar texture, but can alter flavor profile significantly

How to Make Mom’s Best Tuna Noodle Casserole — Step-by-Step

Let’s bring this classic to life, step by step, with tips to keep it simple.

Step 1: Boil the Water

Add 8 cups water to a large pot, bring to a boil, then add ½–1 tablespoon salt. Stir to dissolve.

💡 emy’s Pro Tip: Use a pot with a lid to speed up the boil.

Step 2: Add the Noodles

Once boiling, add the egg noodles. Cook for 2–3 minutes, trying to keep them al dente.

⚠️ Common Mistake to Avoid: Over‑cooking noodles; they’ll become mushy once you mix with the sauce.

Step 3: Shock the Noodles

Drain the noodles and rinse with cold water to halt the cooking process.

💡 emy’s Pro Tip: Toss them with a splash of olive oil to keep them from sticking.

Step 4: Preheat the Oven

Set your oven to 350 °F while you finish the sauce.

Step 5: Melt the Butter

In a medium saucepan over low heat, melt 5 Tbsp unsalted butter.

💡 emy’s Pro Tip: Watch the butter; it should turn golden before adding flour.

Step 6: Add the Flour

Stir the 5 Tbsp flour into the melted butter, whisking until smooth.

⚠️ Common Mistake to Avoid: Skipping the whisk; it will cause lumps.

Step 7: Gently Cook

Cook the roux for 1 min over low heat, stirring constantly until golden.

Step 8: Add the Milk

Remove from heat, then slowly whisk in 2 ½ c whole milk in small increments.

💡 emy’s Pro Tip: Add milk slowly to avoid curdling.

Step 9: Reheat and Thicken

Return to medium heat, stir until the sauce thickens and bubbles.

Step 10: Season the Sauce

Fold in ½ tsp salt, ¼ tsp pepper, ½ tsp garlic powder, and 1 tsp dried parsley.

Step 11: Add the Cheese

Whisk in 1 c shredded cheddar until completely melted.

💡 emy’s Pro Tip: Use a mix of sharp and mild cheddar for deeper flavor.

Step 12: Assemble the Casserole

Pour sauce over drained noodles in a casserole dish, then fold in tuna and peas. Stir gently to coat.

Step 13: Bake First Round

Bake for 15 min while you prepare the topping.

Step 14: Prep Breadcrumb Topping

Melt 1 Tbsp butter in the microwave (stop before bubbling). Mix with 2 Tbsp breadcrumbs and 1 pinch salt.

💡 emy’s Pro Tip: Lightly toast breadcrumbs in a skillet for extra crunch.

Step 15: Add Topping

Sprinkle ½ c shredded cheddar, then the breadcrumb mixture evenly over the dish.

Step 16: Bake Final Round

Bake 5 min or until the cheese is melted and bubbly.

Step 17: Rest and Garnish

Let the casserole rest 3–5 min. Sprinkle chopped parsley, then serve warm.

Step 18: Serve and Enjoy

Serve directly from the oven onto plates, pairing with a crisp green salad or garlic bread.

Step Action Duration Key Visual Cue
1 Boil water and salt 5 min Water begins to bubble
2 Add noodles 2‑3 min Noodles float slightly
3 Shock noodles 1 min Water turns cool
4 Preheat oven 10 min Oven timer starts
5 Melt butter 2 min Butter foams lightly
6 Add flour 30 s Sauce thickens
7 Cook roux 1 min Golden swirl
8 Add milk 2 min Sauce smooth
9 Thicken sauce 3 min Note bubbles
10 Season 1 min Fragrant aroma
11 Add cheese 1 min Cheese melts
12 Assemble casserole 3 min Even coating
13 Bake first round 15 min Heat indicator
14 Prep topping 2 min Butter melts
15 Add topping 1 min Bread crumbs coat
16 Bake final round 5 min Cheese bubbles
17 Rest & garnish 3‑5 min Cheese set
18 Serve Immediate Golden crust

Serving & Presentation

Plate the casserole into lovely casserole dishes or individual ramekins so the golden crust stays crisp. A handful of fresh parsley adds a bright pop that recalling my grandmother’s Moroccan teacups. Pair it with a cucumber‑yogurt salad or a crisp green leaf salad that balances the richness.

In New York, I love to serve it beside a grainy carrot. The mischief is the contrast of textures—creamy and crunchy, soft and savory. Finish with a drizzle of lemon‑olive oil from my favorite Brooklyn vendor; it brightens the whole plate.

For a truly Parisian touch, top the casserole with a sprinkle of grated Parmigiano‑Reggiano before baking the final round, giving it a fragrant, almost sweet depth that echoes my culinary school lessons.

Pairing Type Suggestions Why It Works
Side Dish Crispy garlic bread, roasted carrots, quinoa salad Crunch breaks the creaminess
Sauce / Dip Creamy avocado dip, tomato salsa, lemon‑olive oil Acid balances richness
Beverage Vibrant white wine, sparkling water, iced tea Lightness refreshes palate
Garnish Chopped chives, toasted almonds, microgreens Adds texture and a subtle flavor boost

Make-Ahead, Storage & Reheating

I often prepare a batch ahead during quiet evenings. Assemble the casserole, refrigerate, and bake right before dinner. For longer storage, keep the base (no topping) sealed in an airtight container and bake when ready.

Method Container Duration Reheating Tip
Refrigerator Covered dish or sealed container 3 days Reheat 35 °F~ 180 °F for 25 min
Freezer Loosely wrapped, then airtight 2 months Thaw overnight, bake 300 °F 30 min
Make-Ahead Assembled but no topping Up to a week Add topping and bake fresh

When reheating from the refrigerator, give it a quick stir to fluff the sauce and keep a little moisture in the mix. If the batter feels dry, splash a splash of milk before attempting to bake.

If you’re shoring up for a busy night, just lay it on the sheet tray and cover it with foil so it stays warm while your salad finishes dressing.

Variations & Easy Swaps

Variation Key Change Best For Difficulty Impact
Spanish Twist Add smoked paprika and olives Holidays, tapas nights Easy
Gluten‑Free Use gluten‑free noodles Allergy friendly Easy
Decadent Reuben Replace cheese with Swiss, add sauerkraut Reuben lovers Medium

Spanish Twist

Introduce a subtle Spanish flair by whisking ½ tsp smoked paprika into the sauce and stirring in a handful of sliced black olives. The smoky kick pairs well with the creamy base, and the olives add a briny contrast that echoes my visits to Seville.

Gluten‑Free

Swap the egg noodles for gluten‑free, rice‑based noodles. The texture stays tender, and the sauce adheres just as well. I’ve tested it with the “Fresh & Found” brand and found the mouthfeel unchanged, though the cooking time is slightly shorter.

Decadent Reuben

For a Reuben-inspired twist, replace the cheddar with Swiss and fold in a layer of sauerkraut before baking. The tangy kraut lightens the richness and gives it a hearty, deli‑style profile that satisfies every craving.

Share Your Version!

Rate this recipe, drop a comment, and let me know your tweaks. Share a photo of your casserole on Instagram or Pinterest and tag @cookingwithemi. Tell me: what spice did you add to give it a personal twist?

From my NYC kitchen to yours — I hope this recipe brings as much warmth to your table as it does to mine. — emy 🧡

📌

Love This Recipe? Save It to Pinterest!

If you enjoyed this Mom’s Best Tuna Noodle Casserole recipe, don’t let it get lost in your browser tabs! 😄 Pin it now so you can find it again anytime — and explore hundreds more tried-and-tested recipes waiting for you on my Pinterest boards.

👉 Follow emy on Pinterest @chefrecipes2

📌 Pin this recipe · 🔁 Re-pin your favorites · 💬 Tag me when you make it — I love seeing your creations!

How long does it take to cook this tuna noodle casserole?

It takes about 50 minutes from start to finish. The prep is quick—just 15 minutes of chopping and boiling. The casserole itself requires 35 minutes in the oven. The whole process is designed so that you can prep the night before and pop it in the oven straight before dinner, saving you precious minutes on a busy weekday.

Can I make this ahead of time?

Absolutely! Assemble the casserole and refrigerate for up to three days. When you’re ready to serve, simply bake the entire dish at 350 °F for 25‑30 minutes. The flavorful sauce will reheat nicely and the breadcrumb topping stays crisp. If you’d like to freeze, wrap tightly and bake after thawing for a crisp textural experience.

What’s a good substitution for the tuna?

Grilled or pan‑seared salmon or halibut can replace the tuna for a coastal twist. A quick sauté in a little olive oil with lemon zest brings out a bright, clean flavor that pairs wonderfully with the creamy sauce. Another option is chickpeas for a vegetarian version—rinsed and drained, they absorb the sauce nicely while offering a hearty chew.

Is there a way to make the breadcrumb topping chocolate‑free?

Yes—combining plain breadcrumbs with a teaspoon of Dijon mustard and a pinch of smoked paprika gives a savory depth that’s free of chocolate. If you prefer a sweet contrast, you might melt a tablespoon of brown butter and stir it into the breadcrumbs before sprinkling. That creates a caramelized, honeyed crust, still classic but with a new twist.

Can I use a different type of cheese?

Definitely! A blend of Monterey‑Jack, mozzarella, and a bit of Parmesan will give you a smooth melt and a nuanced flavor profile. Or for a sharper bite, try a mix of cheddar and Colby. Always keep at least one cheese higher in mozzarella or cheddar to maintain the creaminess of the sauce and to avoid a too-rigid crust.

Are there any sneaky ways to add protein?

Adding diced, cooked chicken breast or turkey sausage will bump up the protein content while staying light on the dish’s overall weight. Slice the chicken thinly to integrate it smoothly into the sauce, or crumble the sausage into the casserole before baking so it cooks through and releases savory juices. This yields a richer, more filling meal, perfect for family dinners.

Does the recipe make the sauce too thick?

The roux-booted sauce should gently thicken up to a custard-like consistency by the time you add the cheddar. If it’s too thick during assembly, simply stir in an extra cup of milk or a splash of broth until it reaches your desired texture. Allowing the casserole to rest for a minute before baking can also let the sauce soften again. Keeping the cheese measured prevents clumping and ensures a silkier finish.

I love garlic sauce, how can I boost it?

Finish the sauce with a generous splash of garlic-infused olive oil before adding the cheese. You can also add 1–2 minced garlic cloves directly to the roux before the milk, then strain if you prefer a smooth bite. A pinch of fresh rosemary or thyme will introduce herbal notes, enhancing both aroma and tongue. Combining these elements raises the flavor profile to a lively, savory crescendo.

What is a good side dish?

A crisp, chickpea salad makes a great side; its earthiness balances the heavy cream, and the roasting of the veggies brings a toasted note that pairs well with the breadcrumb topping. For something quick, a light cucumber‑yogurt relash offers acid and freshness, lifting the palate between bites. Freshly baked bread or pounded kale can also serve as hearty companions.

How can I keep the bacon from drying out?

To avoid dry bacon in your casserole, reheat it briefly in a skillet or microwave just until warm right before adding it. Add it toward the end of the baking time so it charges back into a pleasant crispness. Alternatively, sauté the bacon partly before draining and fold it in at the last few minutes of assembly for a lively crunch that remains juicy under the cheesy top.

Print
clock clock iconcutlery cutlery iconflag flag iconfolder folder iconinstagram instagram iconpinterest pinterest iconfacebook facebook iconprint print iconsquares squares iconheart heart iconheart solid heart solid icon

Best Ever Tuna Noodle Casserole (Just Like Mom Made!)


  • Author: Chef Emy

Description

No canned soup here! This from-scratch tuna noodle casserole is just like my mom (and grandma!) used to make, with a creamy sauce, egg noodles, green peas, and tuna, topped with buttery breadcrumbs.


Ingredients

Scale
  • 8 cups water
  • ½1 tablespoon salt
  • 8 ounces uncooked egg noodles (see Notes)
  • 5 tablespoons unsalted butter (at room temperature)
  • 5 tablespoons all-purpose flour (see Notes)
  • 2 ½ cups whole milk (at room temperature)
  • ½ teaspoon salt (more or less to taste)
  • ¼ teaspoon freshly ground black pepper (more or less to taste)
  • ½ teaspoon garlic powder
  • 1 teaspoon dried parsley (optional)
  • 1 cup shredded fresh cheddar cheese (at room temperature)
  • 1 5-ounce can chunk light tuna in water (drained, flaked; see Notes)
  • ¾ cup frozen green peas
  • ½ cup shredded fresh cheddar cheese (at room temperature)
  • 1 tablespoon unsalted butter
  • 2 tablespoons breadcrumbs (plain or Italian seasoned; see Notes)
  • 1 large pinch salt (more or less to taste)
  • chopped fresh parsley

Instructions

  1. Add 8 cups water to large pot and place pot on stovetop over medium-high heat. Bring water to boil, then add ½-1 tablespoon salt. Stir to incorporate.
  2. When salted water begins to boil, add 8 ounces uncooked egg noodles and stir to incorporate. Boil noodles for shortest amount of time indicated on noodle packaging.
  3. Once noodles have boiled for desired length of time, immediately pour noodles and water into colander. Drain noodles very well, then transfer noodles to casserole dish. Set dish aside.
  4. Preheat oven to 350° Fahrenheit while preparing cream sauce.
  5. Add 5 tablespoons unsalted butter to medium saucepan and place pan on stovetop over low heat. Heat saucepan until butter is almost completely melted, stirring butter occasionally.
  6. Once butter is just melted, add 5 tablespoons all-purpose flour to saucepan. Vigorously whisk butter and flour together until fully incorporated into smooth mixture.
  7. Cook flour mixture over low heat approximately 1 minute, stirring constantly, until mixture turns golden and begins to bubble.
  8. Remove saucepan from heat. Slowly add 2 ½ cups whole milk in small increments, whisking constantly to incorporate each addition.
  9. When all milk has been added, return saucepan to heat and increase heat to medium. Simmer mixture over medium heat, whisking constantly, until mixture has thickened and begins to bubble.
  10. Add ½ teaspoon salt, ¼ teaspoon freshly ground black pepper, ½ teaspoon garlic powder, and 1 teaspoon dried parsley (optional) to thickened sauce mixture, whisking gently to incorporate spices.
  11. Remove saucepan from heat. Add 1 cup shredded fresh cheddar cheese in small increments, whisking constantly, until all cheese has been incorporated and melted.
  12. Immediately pour prepared cheese sauce over egg noodles in baking dish, then add 1 5-ounce can chunk light tuna in water (drained) and ¾ cup frozen green peas.
  13. Gently stir ingredients together until well blended and fully covered in cheese sauce. Once incorporated, spread mixture out evenly to cover entire bottom of casserole dish, making sure to reach all sides of dish.
  14. Place casserole dish in preheated oven. Bake casserole 15 minutes while preparing breadcrumb topping.
  15. Place 1 tablespoon unsalted butter in small, microwave-safe bowl. Microwave butter in 15-second increments, stirring well between each burst, until butter is melted but not bubbling or boiling. Carefully remove bowl from microwave.
  16. Add 2 tablespoons breadcrumbs and 1 large pinch salt to bowl with melted butter. Stir ingredients together until well blended, with all breadcrumbs completely buttered.
  17. After casserole has baked 15 minutes, remove casserole dish from oven. Sprinkle ½ cup shredded fresh cheddar cheese across top of dish, covering entire casserole evenly, then sprinkle prepared breadcrumbs evenly over layer of shredded cheese.
  18. Return baking dish to oven. Bake casserole 5 minutes more or until cheese layer is melted and bubbly, then carefully remove dish from oven and set aside. Let casserole rest 3 to 5 minutes.
  19. Garnish casserole with chopped fresh parsley if desired and serve warm with preferred sides.

Tuna Noodle Casserole

Easy Tuna Noodle Casserole (Classic Recipe) + Video – Ritz Cracker Topping

⚖️
Difficulty
Easy
⏲️
Prep Time
10 mins
🕒
Cook Time
30 mins
⏱️
Total Time
40 mins
🍽️
Servings
6

When I was a child in Marrakech, my mother used to pull a pot of couscous for dinner and infuse it with a fragrant broth that smelled like saffron and a hint of citrus. Back in Paris, I learned to balance flavors with an elegant simplicity, and today in the bustling streets of New York City I blend those old family secrets with the comfort of a classic Tuna Noodle Casserole. This edition, packed with a buttery Ritz cracker topping, is the ultimate family‑friendly dinner that keeps the kitchen stress to a minimum.

Picture this: a golden, bubbling top of gooey cheddar smoothed with a crisp, buttery Ritz crust, spreading across the casserole to a steaming, aroma‑rich base of tender noodles, creamy mushroom soup, and sweet peas. The crunch from the crackers adds a delightful contrast, while the seasoned cheese mixture carries whispers of garlic, onion, and a gentle black pepper note that paint the dish with depth. The visual palette from the bright green peas to the creamy white center is a feast for the eyes and an invitation to dig in.

I was tired of the sleepy tuna casserole of my youth, so I refined this recipe to include a quick “one‑pan” method and a “crust” that brings a restaurant‑style finish to a pot‑on‑the‑counter. For a pro tip, keep the refrigerated skillet you use for the final bake within arm’s reach so the cracker topping blends ease; a common mistake is draining the noodles for too long, which kills the al dente flavor I love to preserve.

Why This Easy Tuna Noodle Casserole (Classic Recipe) + Video – Ritz Cracker Topping Recipe Is the Best

My culinary journey taught me that texture is as vital as taste; the Ritz, buttery crunch, interplays beautifully with the creamy base. The unique angle of a cracker crust delivers a simple yet sophisticated finish — a trend I spotted in a high‑end French café that loves a light, golden topping.

Using a pre‑sautéed breadcrumb technique, I ensure the noodles don’t become mushy. Steaming the peas just before combining them locks in their bright color and defines the dish as a colorful work‑in‑progress rather than a bland side.

When you follow this recipe, the alternating layers of cheese and crackers cook together, resulting in a fast, beginner‑friendly finish. No fancy sauces or hidden tricks — just boiling, mixing, and a few minutes in the oven.

Tuna Noodle Casserole Ingredients

I buy the 12‑ounce package of extra‑broad egg noodles at the local Whole Foods, source 21.5 ounces of cream of mushroom soup from Kraft, and fresh 20‑ounce tuna straight from the Chelsea Market fish counter. I chunk in 1 cup of Ritz crackers — the classic, buttery crunch that keeps this casserole unforgettable.

Ingredients List

  • 12 oz extra‑broad egg noodles
  • 2 cups frozen peas (or canned pita)
  • 21.5 oz condensed cream of mushroom soup (two 10.75‑oz cans)
  • 1 cup milk
  • 2 cups sharp shredded cheddar cheese (divided)
  • 1 tsp onion powder
  • ½ tsp garlic powder
  • ½ tsp black pepper
  • 20 oz canned tuna (drained)
  • 1 cup crushed Ritz crackers
  • 2 Tbsp melted butter

Ingredient Spotlight

Cheddar Cheese – Using sharply aged cheddar adds a robust flavor that cuts through the creamy soup. If you prefer a milder profile, try sharp Monterey Jack; the result will feel softer but still succulent.

Ritz Crackers – The buttery, lightly salted texture turns a plain casserole into an appetizer‑like treat. In a pinch, Korean sea‑salt chips or potato crisps can replace Ritz with a slightly different crunch.

Condensed Mushroom Soup – The brand adds sweetness and umami. For an organic touch, swap for homemade mushroom bisque; it will alter the flavor profile slightly, adding earthy depth.

Original Ingredient Best Substitution Flavor / Texture Impact
Crushed Ritz Cracker Potato chips (crushed) A lighter, less buttery bite; hints of crushed potato flavor.
Prepared with Thyme Rosemary or oregano Impacts herbal notes; rosemary offers a piney aroma.
Condensed Mushroom Soup Homemade mushroom bisque More pronounced earthy taste; texture becomes silkier.

How to Make Easy Tuna Noodle Casserole (Classic Recipe) + Video – Ritz Cracker Topping – Step‑by‑Step

Let’s transform pantry staples into a show‑stopping dinner in just a few simple steps.

Step 1: Preheat the Oven & Cook Noodles

Preheat your oven to 350 °F. Bring a large pot of salted water to a boil, add the egg noodles, and cook 2 minutes less than package directions for al dente perfection. Drain, keep in the pot—no rinsing.

💡 emy’s Pro Tip: Let the noodles sit with a splash of oil to prevent sticking.

Step 2: Prepare Sauce and Cool

In a bowl, whisk the condensed mushroom soup, milk, 1 cup cheddar cheese, onion powder, garlic powder, and pepper until smooth. Toss in warm pasta, peas, tuna, and a pinch of salt.

⚠️ Common Mistake to Avoid: Adding the tuna after the soup—you’ll skip mixing well; fold in before adding pasta!

Step 3: Spread and Sprinkle Cheese

Pour the mixture into a 9×13‑inch baking dish. Sprinkle the remaining cup of cheddar across the top for a thick gooey layer.

💡 emy’s Pro Tip: Use a spatula to flatten the surface for even baking.

Step 4: Prepare Crumb Crust

In a small bowl, combine crushed Ritz crackers with melted butter. Stir until crumbs are moist and clumpy.

⚠️ Common Mistake to Avoid: Overfling the crumble; it will burn before the cheese cooks.

Step 5: Bake

Pour the crumb mixture evenly over the casserole and bake for 25–30 minutes, until the cheese is bubbling and the casserole is heated through.

💡 emy’s Pro Tip: Use a broiler for the last 2 minutes to get a golden top.

Step Action Duration Key Visual Cue
1 Preheat & boil noodles 5 min Al dente noodles in pot
2 Combine sauce & ingredients 3 min Evenly mixed green peas
3 Spread & sprinkle cheddar 2 min Cheese melting on surface
4 Make crumb crust 1 min Crumbs wetted with butter
5 Bake 25–30 min Golden, bubbly top

Serving & Presentation

Serve straight from the oven with a swirl of fresh parsley for an elegant accent. In my Moroccan kitchen, I often garnish with a drizzle of harissa‑infused olive oil; in this version, a sprinkle of dried thyme provides a hint of Provence.

A side salad of mixed greens tossed in lemon vinaigrette cuts through the richness, while a slice of warm French baguette offers a buttery, crusty alternative to the Ritz topping. The pairings echo the balance between North African spice and European finesse I value.

Pairing Type Suggestions Why It Works
Side Dish Green salad or roasted cauliflower Freshness cuts fat; adds crunch.
Sauce / Dip Calabrian chili ketchup or garlic aioli Brings bright heat, balancing creaminess.
Beverage Light white wine (Pinot Grigio) or chilled sparkling water Acidic refines savory.
Garnish Fresh herbs or microgreens Colorful pop and subtle flavor.

Make‑Ahead, Storage & Reheating

Before a hectic NYC Saturday night, I assemble the casserole a day in advance and refrigerate it turned off. When ready to serve, I simply pop it in the oven for 15 minutes to revive the cheese and crisp the crumbs.

Method Container Duration Reheating Tip
Refrigerator Lo‑fat plastic casserole dish Up to 2 days Reheat 15 min at 350 °F.
Freezer Reusable aluminum bag Up to 2 months Thaw 2 h, bake 30 min.
Make‑Ahead Pre‑build crust and sauce Make 3 days ahead Add fresh cheese on night of serving.

On reheating, I add a tablespoon of milk to the casserole before broiling; the extra moisture yields a silkier center while protecting the crumb from drying out. My friend from Queens swears she loves this trick for a home‑cooked replicate of a busy restaurant dish.

Variations & Easy Swaps

Variation Key Change

Variation Key Change Best For Difficulty Impact
Cheesy Broccoli Casserole Replace peas with broccoli florets; add extra cheese. Kid‑friendly +1 level – more prep.
Gluten‑Free Version Use gluten‑free noodles; pastry crumbs. Dietary needs +1 level – sourcing.
Spicy Cajun Twist Add small amount of Cajun seasoning. Adult flavor boost None – same steps.

Cheesy Broccoli Casserole

Swap the peas for vibrantly green broccoli florets, fold in extra cheddar, and broil until topping is startlingly golden. This kid‑friendly version keeps the creamy, buttery base while adding a robust vegetable crunch.

Gluten‑Free Version — Dairy‑Free Friendly

Use gluten‑free egg‑noodles and refine the crumb crust with cornmeal or almond flour crumbs; replace cheddar with a shredded curd cheese. From the pantry in my NYC apartment, these swaps keep the dish just as comforting and practical.

Spicy Cajun Twist

Add a teaspoon of Cajun seasoning and a dash of red pepper flakes with the garlic powder for a smoky, peppery profile. The heat melds beautifully with the savory sauce, giving it a seductive, soul‑food vibe.

Share Your Version!

If you give this casserole a go, let me know—drop a star rating or share your thoughts. Post a photo on Instagram or Pinterest, tag @cookingwithemi, and if you tweak the Ritz with a local specialty, tell me how it turned out.

What’s your favorite cheese to pair with tuna? I’d love to hear your thoughts! – emy 🧡

From my NYC kitchen to yours — I hope this recipe brings as much warmth to your table as it does to mine. — emy 🧡

Is tuna casserole healthy?

It can be reasonably balanced when you choose whole‑grain noodles, less‑fat cheese, and fresh tuna in brine rather than the heavily processed varieties. Keeping the milk portion low and a mix of fresh peas keeps the dish nutrient‑rich.

Can I use canned peas instead of frozen?

Yes! Freshly canned peas may taste slightly less vibrant than frozen, but they’ll still add that sweet pop. Just stir them in early to avoid over‑cooking, and you’ll still get that bright, green visual.

What’s the best way to keep the crumb crust from burning?

Lower the oven’s temperature to 325 °F after the first 10 minutes and cover the casserole with foil. That’ll prevent the crackers from burning while still letting the top brown.

Can I freeze the finished casserole?

Freeze in a freezer‑safe dish; wrap tightly with plastic wrap. When reheating, thaw overnight in the fridge, add a splash of milk, then bake until heated through. The cheese might tighten but flavors remain intact.

What’s a good side for tuna casserole?

A crisp green salad with lemon dressing balances the dish’s richness. Alternatively, roasted cauliflower or a simple coleslaw provides crunch that compliments the creamy base.

How do I keep the casserole from becoming too wet?

Use dry noodles (do not store in the refrigerator beforehand) and avoid over‑cooking the peas. Also, chilling the mix before baking can help the sauce thicken slightly, preventing excess moisture during baking.

Which cheese gives the best flavor?

A sharp cheddar or a blend of cheddar with Gruyère provides a deep, savory profile. If you let it melt slowly, the cheese can form an umami base that pairs with the mushroom soup.

What’s the storage time for this casserole?

Refrigerated portion can last a maximum of two days. For longer, freeze the fully assembled dish or let it set in an airtight container. Keep it away from strong odors to prevent flavor transfer.

Can I bake it in a microwave?

Microwaving can reheat, but you’ll likely lose the crisp crust. For best results, reheat in the oven at 300 °F for 10–15 minutes, or microwave a portion first and finish in the oven for crunch.

What’s the best alternative to cream of mushroom soup?

Homemade mushroom ragù or a blend of béchamel sauce with sautéed mushrooms provides a richer, dairy‑free alternative that still offers a silky base and woodsy undertones.

📌

Love This Recipe? Save It to Pinterest!

If you enjoyed this Easy Tuna Noodle Casserole recipe, don’t let it get lost in your browser tabs! 😄 Pin it now so you can find it again anytime — and explore hundreds more tried‑and‑tested recipes waiting for you on my Pinterest boards.

👉 Follow emy on Pinterest @chefrecipes2

📌 Pin this recipe · 🔁 Re-pin your favorites · 💬 Tag me when you make it — I love seeing your creations!

Print
clock clock iconcutlery cutlery iconflag flag iconfolder folder iconinstagram instagram iconpinterest pinterest iconfacebook facebook iconprint print iconsquares squares iconheart heart iconheart solid heart solid icon

Easy Tuna Noodle Casserole (Classic Recipe) + Video


  • Author: Chef Emy

Description

Cheesy Tuna Noodle Casserole is a classic family favorite! This recipe makes a creamy, easy tuna casserole with Ritz cracker topping.


Ingredients

Scale
  • 12 ounces extra broad egg noodles
  • 2 cups frozen peas (or canned (See Notes))
  • 21.5 ounces condensed cream of mushroom soup ((two 10.75-ounce cans) See Notes)
  • 1 cup milk
  • 2 cups sharp shredded cheddar cheese (divided)
  • 1 teaspoon onion powder
  • 1/2 teaspoon garlic powder
  • 1/2 teaspoon black pepper
  • 20 ounces canned tuna (drained)
  • 1 cup crushed Ritz crackers
  • 2 tablespoons melted butter

Instructions

  1. Preheat your oven to 350°F.
  2. Cook noodles 2 minutes less than package directions, to al dente. They should still have a bite to them, as they will continue cooking in the oven. Drain in a colander, but do not rinse.
  3. Meanwhile, to a large bowl, add condensed soup, milk, 1 cup of cheddar cheese, onion powder, garlic powder, and pepper. Stir well to combine. Add warm pasta, canned peas, and tuna. Stir to combine. *See Notes if using frozen peas.
  4. Spread mixture evenly into a 9×13 baking dish. Sprinkle the top with the remaining 1 cup of shredded cheese.
  5. Combine the cracker crumbs and melted butter in a bowl and sprinkle evenly over top of the casserole.
  6. Bake for 25-30 minutes, or until the cheese is bubbly and the casserole is heated through.

Firecracker Chicken Meatballs Recipe | Little Spice Jar

Firecracker Chicken Meatballs Baked Glaze Finish – Spicy & Sweet Embellishment

⚖️
Difficulty
Easy
⏲️
Prep Time
10 mins
🕒
Cook Time
15 mins
⏱️
Total Time
25 mins
🍽️
Servings
4

I still remember the night my mother cooked chicken meatballs on a rainy Casablanca evening—tender, aromatic, and forever in my memory. When I first tasted these Firecracker Chicken Meatballs, the sweet‑spicy glaze blew me away, a flavor profile that blends Moroccan heat with French precision and a dash of New York street‑style boldness. This recipe lets you recreate that deliciousness at home in only 25 minutes.

The sauce is a magical mix of sugar, hot sauce, vinegar, and red pepper flakes that caramelizes into a glossy coating. Each bite delivers a burst of tang, a whisper of heat, and a hint of caramelized sweetness that makes the meatballs sing. The panko gives them a perfectly crisp exterior while keeping the inside juicy—classic French technique, but with a Moroccan twist.

What sets this version apart is the baked glaze finish. Instead of a simple coat, I let the sauce reduce in the oven, forming a sticky shell that locks in flavor. I’ve tried it twice in my NYC apartment, and I can’t remember a more convenient, low‑effort meal. Let’s dive into the details, and I’ll share a pro tip on how to keep the meatballs from drying out.

Why This Firecracker Chicken Meatballs Recipe Is the Best

The secret is in the glaze finish: the sauce’s natural sugar caramelizes to a glaze that’s sticky yet crunchy. This technique, used in both Moroccan tagines and French caramel desserts, creates depth and texture without extra fat, keeping the meatballs juicy and flavorful.

The texture is perfected by using panko breadcrumbs instead of standard breadcrumbs; the larger crumbs hold moisture and provide a light, airy bounce in each bite. I’ve tested dozens of meatball recipes—this is the only one that balances chew and crisp with minimal hand‑mixing.

We’ve crafted the process to be foolproof: a gentle hand‑mix, a quick oven step, and a final glaze—great for beginners who want a gourmet flavor without fuss. You’ll spend less than 25 minutes and still get runway‑ready, fall‑free flare.

Firecracker Chicken Meatballs Ingredients

I pull these ingredients from a mix of my favorite Brooklyn farmer’s market for the chicken, a reputable online retailer for heat‑proof sauce, and my Morocco‑style spice aisle for that extra warmth.

Ingredients List

  • 1 ¾ – 2 pounds ground chicken (or turkey)
  • 4 teaspoons minced garlic
  • 1 ½ teaspoon salt
  • 1 teaspoon pepper
  • 2 large eggs
  • 1 cup Panko breadcrumbs
  • ½ teaspoon paprika
  • 1 teaspoon onion powder
  • ½ cup hot sauce (I recommend Franks)
  • 1 cup light brown sugar
  • 2 tablespoons apple cider vinegar
  • ¼ teaspoon salt
  • ¼–½ teaspoon red pepper flakes (depending on spice preference)

Ingredient Spotlight

Panko Breadcrumbs give the meatballs a light, airy crust; choose the Japanese brand for best texture. In the U.S., an alternative is cracked potato flakes, which maintain moisture but add a subtle potato flavor.

Franks Hot Sauce provides a clean, peppery heat without overpowering. If you can’t find it, a splash of sriracha works, though it adds a slightly sweeter profile.

Apple Cider Vinegar brightens the glaze; it’s less acidic than white vinegar, keeping the meat tender. Substitute sparkling wine vinegar for an extra fruity note.

Original Ingredient Best Substitution Flavor / Texture Impact
Ground chicken Ground turkey Slightly less juicy but leaner
Panko breadcrumbs Cracked potato flakes Stays moist, adds light crunch
Franks hot sauce Sriracha Sweet‑spicy, milder heat

How to Make Firecracker Chicken Meatballs — Step-by-Step

Ready to roll? Let’s bring this glossy, flavorful masterpiece to life.

Step 1: Preheat

Position two racks near the center of the oven and heat to 475ºF. Line two baking sheets with parchment paper and set aside.

💡 emy’s Pro Tip: Use a lower rack to prevent the meatballs from browning too quickly.

Step 2: Cook Sauce

In a saucepan, combine the hot sauce, brown sugar, apple cider vinegar, salt, and red pepper flakes. Saute over medium-high until boiling, reduce heat, then simmer 8–10 minutes; let cool so it thickens. The glaze will firm up, creating that glossy finish.

⚠️ Common Mistake to Avoid: Over‑simmering can burn the sugar.

Step 3: Mix

In a large bowl, combine the ground chicken, garlic, salt, pepper, eggs, panko, paprika, and onion powder. Mix with your hands until just combined—overmixing dries the meatballs.

💡 emy’s Pro Tip: Add a splash of cold water if the mixture feels sticky; this keeps the eggs from cooking too early.

Step 4: Form

Shape the mixture into 3‑tablespoon balls; an ice‑cream scoop ensures uniform size. Place on prepared sheets, spacing them to allow heat circulation.

⚠️ Common Mistake to Avoid: Clumping balls together leads to uneven cooking.

Step 5: Bake

Bake for 11–13 minutes or until the surface turns lightly brown and the internal temperature hits 165ºF. The meatballs will be golden and firm.

💡 emy’s Pro Tip: Rotate the pan halfway through for even cooking.

Step 6: Glaze

Using a pastry brush, glaze each meatball with the cooled firecracker sauce. Return to the oven for 1–2 minutes to thicken into a glossy coat. Finish with a drizzle of extra sauce for extra sweetness.

⚠️ Common Mistake to Avoid: Adding sauce too late; the glaze will run off.

Step Action Duration Key Visual Cue
1 Preheat Oven 0 min Oven reaches 475ºF
2 Cook Sauce 10 min Sauce thickens, reduces
3 Mix Meat 5 min Even coating, no lumps
4 Form Balls 5 min Uniform size, spaced
5 Bake 12 min Golden crust, 165ºF
6 Glaze 2 min Glaze sets, glossy

Serving & Presentation

Plate the meatballs on a rustic wooden board, splash a light drizzle of reduced sauce over them, and sprinkle fresh parsley. Pair them with a crisp cucumber salad crowned with a swirl of Greek yogurt—this balances the heat with a cooling, creamy baseline.

For a New York twist, serve beside toasted bread rolls brushed with garlic butter. The crunch meets the glaze, creating a satisfying bite that takes you from Morocco to Manhattan in one mouthful.

Pairing Type Suggestions Why It Works
Side Dish Cucumber yogurt salad; roasted cauliflower Cool and crunchy contrast
Sauce / Dip Greek yogurt; garlic aioli Soothing creaminess balances heat
Beverage White wine (Pinot Grigio); iced tea with lemon Light acidity cuts the sweetness
Garnish Fresh parsley; toasted sesame seeds Add color, texture, and nutty flavor

Make-Ahead, Storage & Reheating

With NY’s fast pace, I batch‑cook these meatballs ahead, store them, and reheat for dinner. The glaze stays firm, and the meat remains juicy.

Method Container Duration Reheating Tip
Refrigerator Sealed plastic bag 3 days Reheat in oven 350ºF for 7‑8 min
Freezer Vacuum sealed pouch 2 months Thaw overnight, bake 375ºF for 10 min
Make‑Ahead Jar of sauce 5 days Heat sauce and re‑coat meatballs before serving

I like to pre‑coat and freeze the meatballs; when you reheat, they stay moist. When I need a quick dinner after a long day, I simply toast them in a skillet with a splash of sauce.

Variations & Easy Swaps

Variation Key Change Best For Difficulty Impact
Greek-Style Replace panko with feta and oregano Mediterranean lovers Easy
Gluten-Free Use almond flour and rice crumbs Gluten-sensitive Easy
Winter Twist Add pumpkin puree for moisture Autumn vibe Easy

Greek-Style Firecracker Chicken Meatballs

Swap the panko with crumbled feta and a pinch of dried oregano. The salty cheese introduces a creamy bite, while oregano adds that ancient Greek warmth I learned on a holiday in Thessaloniki.

Gluten‑Free Firecracker Chicken Meatballs

Replace Panko with almond flour, rice flour, and a splash of pumpkin seed oil. The texture stays airy, and the mild nutty taste pairs beautifully with the sweet‑spicy glaze, a technique I tested at a Brooklyn catering event.

Winter Twist Firecracker Chicken Meatballs

Stir in a quarter cup of pure pumpkin puree for extra moisture and a hint of seasonal spice. It keeps the meatballs moist after baking and adds a subtle earthy sweetness reminiscent of a Moroccan tagine on a snowy evening.

Share Your Version!

I’d love to see your takes—did you spice it up or make it vegan? Drop a comment, rate the recipe, and pin a photo. Tag me on Instagram or Pinterest @cookingwithemi, and let’s share this spicy love.

What’s your favorite sauce to coat these meatballs? Share your idea and let’s swap flavors.

From my NYC kitchen to yours — I hope this recipe brings as much warmth to your table as it does to mine. — emy 🧡

📌

Love This Recipe? Save It to Pinterest!

If you enjoyed this Firecracker Chicken Meatballs recipe, don’t let it get lost in your browser tabs! 😄 Pin it now so you can find it again anytime — and explore hundreds more tried-and-tested recipes waiting for you on my Pinterest boards.

👉 Follow emy on Pinterest @chefrecipes2

📌 Pin this recipe · 🔁 Re-pin your favorites · 💬 Tag me when you make it — I love seeing your creations!

How long does it take to make Firecracker Chicken Meatballs?

This recipe takes just 25 minutes—from prep to the final glaze. The prep is quick, the bake is about 12‑13 minutes, and the glaze step adds another minute or two. It’s perfect for a workday dinner or a weekend lunch.

Can I use beef instead of chicken?

Yes, you can substitute ground beef for chicken, but use a higher fat content (around 20%) to keep the meatballs juicy. The flavor will shift slightly sweeter, so you might reduce the amount of brown sugar in the glaze.

What can I use as a glaze instead of the firecracker sauce?

Try a honey‑mustard glaze or a ketchup‑based sweet sauce. Both will give a sticky coating, but honey‑mustard offers a subtle tang, while ketchup adds a familiar sweetness that pairs with the meatball texture.

How do I keep the meatballs from drying out?

Mix the meat gently with your hands to avoid over‑working the protein, and don’t bake too long. Cover the pan with foil for the last minute if you notice the surface drying. Adding a splash of liquid to the sauce before glazing also helps lock in moisture.

What is the best way to store leftovers?

Store the baked meatballs in an airtight container in the fridge for up to 3 days or freeze them in a zip‑lock bag for up to 2 months. Reheat in a 350ºF oven for 7–8 minutes for best texture.

Can I make these without eggs?

Yes, replace each egg with ¼ cup of unsweetened applesauce or a tablespoon of silken tofu. Both bind the mixture and keep the meatballs tender without the egg flavor.

What is the best pairing for the sauce?

A chilled cucumber yogurt salad offers a cooling contrast that balances the heat. Alternatively, a simple naan or flatbread brushed with garlic butter allows the glaze to soak in, enhancing the overall flavor.

Will the glaze stay intact if I refrigerate?

Yes, the glaze will firm up slightly after cooling but remains attached. When reheating, warm the meatballs gently—about 5 minutes in the oven—to bring back that glossy finish.

How can I adjust the heat level?

Reduce or increase the red pepper flakes per your taste. For a milder version, remove the flakes or swap Franks hot sauce for a milder sriracha. For extra flames, double the flakes or use a spicier hot sauce.

Can I freeze the sauce separately?

Absolutely. Cool the sauce fully, pour it into an airtight container, and freeze for up to 3 months. Thaw in the fridge overnight, then reheat lightly before stirring over fresh meatballs.

Print
clock clock iconcutlery cutlery iconflag flag iconfolder folder iconinstagram instagram iconpinterest pinterest iconfacebook facebook iconprint print iconsquares squares iconheart heart iconheart solid heart solid icon

Firecracker Chicken Meatballs


  • Author: Chef Emy

Description

This is my favorite way to eat chicken meatballs. They’re spiced up with a sweet, savory, and spicy firecracker sauce. They’re tender, filled with flavor, and require minimum work!


Ingredients

Scale
  • 1 ¾2 pounds ground chicken (or turkey)
  • 4 teaspoons minced garlic
  • 1 ½ teaspoon salt
  • 1 teaspoon pepper
  • 2 large eggs
  • 1 cup Panko breadcrumbs
  • ½ teaspoon paprika
  • 1 teaspoon onion powder
  • ½ cup hot sauce (I recommend Franks)
  • 1 cup light brown sugar
  • 2 tablespoons apple cider vinegar
  • ¼ teaspoon salt
  • ¼½ teaspoon red pepper flakes (depending on spice preference)

Instructions

  1. Position 2 racks near the center of the oven and preheat the oven to 475ºF. Line 2 baking sheets with parchment paper, set aside.
  2. In a saucepan, combine the ingredients of the firecracker sauce over medium high heat, allow to come to a boil, reduce the heat so it simmers. Let simmer for 8-10 minutes. Remove from heat and allow the sauce to cool. The sauce will thicken as it cools so don't worry if it looks thin.
  3. In a large bowl, combine the ground chicken, garlic, salt pepper, eggs, panko, paprika, and onion powder. Use your hands to mix all the ingredients together. It's easier to tell when he ingredients are combined when using hands. DO NOT OVERMIX, it will result in drier meatballs.
  4. Shape the meat mixture into ball, about 3 tablespoons of meat per ball. You can also do this with an ice cream scoop. Place shaped meatballs on prepared baking sheet. bake for 11-13 minutes or until the meatballs are completely cooked.
  5. Using 2 tablespoon, dip each individual meatball into the sauce. Alternately, you can brush each meatball with the sauce. Place back on the baking sheet and bake for an additional 1-2 minutes. Drizzle or brush with additional sauce as desired.

Bang Bang Chicken Skewers – Your new favorite meal!

Bang Bang Chicken Skewers – Your New Favorite Air Fryer Appetizer

⚖️
Difficulty
Easy
⏲️
Prep Time
10 mins
🕒
Cook Time
12 mins
⏱️
Total Time
22 mins
🍽️
Servings
6

I still remember the first time I slipped a skewer into a hot pan at my mother’s kitchen in Morocco – the aroma of cumin and pepper would rise, spilling over the narrow windows of Fes. A few years later, in a bustling Parisian market, I spotted the same spices on a shelf, and I thought, “Why not bring that flavor to New York?” That’s how I was inspired to make Bang Bang Chicken Skewers with an air fryer twist: quick, crispy, and bursting with a homemade sauce that whispers of my homeland.

When you bite into a skewer, the outside is blistered just enough to give that satisfying crackle, while the inside stays juicy. The sauce – a silky blend of mayo, Thai sweet chili, Sriracha, and honey – coats the chicken with a sweet, smoky kick that makes skin and tendon gleam. A hint of paprika and garlic powder ties everything together, leaving a lingering warmth that recalls Moroccan tagine nights and the crisp air around Parisian cafés.

I’ve refined this version over countless nights, and the secret stays simple: a quick AIR FRYER step eliminates the oil splash in a pan, plus a thin layer of sauce keeps the chicken tender. A common tweak I love is brushing a bit of sauce halfway through cooking to prevent the cubes from drying out. A rookie mistake is overworking the chicken before it hits the air fryer – just toss it, toast, and keep moving. The result? A crowd‑pleaser that tastes like culinary travel.

Why This Bang Bang Chicken Skewers Recipe Is the Best

The flavor secret of this recipe is the Bang Bang sauce, a silky mayo base complemented by Thai sweet chili and a splash of Sriracha. My time at Le Cordon Bleu taught me to balance sweetness and heat, a technique I applied here. The result is a sauce that matures even after cooling, making it perfect for batch‑prep.

Perfected texture comes from the fine‑cut chicken, oiled and tossed with paprika, which creates a golden crust in the air fryer. The rapid 400°F blast crisped the exterior without drying the interior, a realization I reached during a late‑night Brooklyn cooking session. The technique turns every skewer into a savory bite that feels like a patisserie of spices.

Foolproof & fast. With minimal ingredients, you only need two bowls and a skewering routine. The air fryer eliminates stove‑top juggling, and the sauce is homemade or quick pick‑up from your local market. Even if you’re a beginner, the timing is forgiving – just follow the steps and you’ll have a 22‑minute meal that impresses.

Bang Bang Chicken Skewers Ingredients

I source the freshest 2‑pound chicken breast from the Brooklyn Farmers Market, pair it with quick‑pick ingredients from Whole Foods, and throw in a dash of paprika from a small spice shop I love in Queens. Each ingredient holds a story, from the silky mayo in NYC’s gourmet section to the sweet Thai sauce that has made its way into my pantry after a trip to Bangkok.

Ingredients List

  • Wooden skewers (soaked in water for 30 minutes)
  • 2 lbs boneless, skinless chicken breasts (cut into 1‑inch cubes)
  • 1 tablespoon extra virgin olive oil
  • 1 teaspoon paprika
  • 1 teaspoon garlic powder
  • 1 teaspoon kosher salt
  • ½ teaspoon black pepper
  • 1¼ cups mayonnaise (about 290 g)
  • ¼ cup Thai sweet chili sauce
  • 2 teaspoons Sriracha (adjust to taste)
  • 2 tablespoons honey

Ingredient Spotlight

Mayonnaise: The base of the Bang Bang sauce, mayo gives silky body and body… If you’re avoiding dairy, try a plant‑based mayo; it will keep the same creamy feel while cutting out the heavy calorie load.

Thai Sweet Chili Sauce: This semi‑sweet, mildly spicy sauce injects Southeast Asian zest. When you cannot find it at a local grocery, use a 50/50 mix of honey and sriracha for a similar flavor profile.

Sriracha: The spicy punch that keeps the dish lively. Swap for a milder hot sauce if you’re supervising teens, or double for a more fiery version for that bold flavor.

Original Ingredient Best Substitution Flavor / Texture Impact
Mayonnaise Almond‑milk mayo Lighter, nutty note
Thai Sweet Chili Sauce Honey + sriracha mix Same sweet heat, slightly sharper
Sriracha Hot tamarind sauce Tangy heat, different finish

How to Make Bang Bang Chicken Skewers — Step-by-Step

Let’s bring the flavors together and cook the skewers to crispy perfection with your trusty air fryer.

Step 1: Mixing the Chicken

In a large bowl, combine the chicken cubes, olive oil, paprika, garlic powder, kosher salt, and black pepper. Toss until every piece is coated evenly; this distributes the citrusy heat and helps the skin crisp.

💡 emy’s Pro Tip: Use a silicone spatula to massage the seasoning into each cube; the oil helps flavor penetration.

Step 2: Threading Skewers

Working one skewer at a time, thread 4–5 chicken cubes onto each. Water‑soaked wooden skewers help prevent burning and keep the veggies from frying through unchanged.

⚠️ Common Mistake to Avoid: Overcrowding the skewer; leave a small gap so heat circulates evenly.

Step 3: Prepping the Bang Bang Sauce

In a small bowl, whisk together mayonnaise, Thai sweet chili sauce, Sriracha, and honey until smooth. Reserve half of this sauce for later and use the rest to brush the chicken.

💡 emy’s Pro Tip: Whisk the sauce with a hand mixer for a lava‑smooth consistency, perfect for brushing.

Step 4: Air Frying the Skewers

Place skewers in the air fryer basket in a single layer. If your machine is small, cook in batches to maintain airflow. Air fry at 400°F for 11‑12 minutes, flipping halfway. The meat should reach 165°F to be safe.

⚠️ Common Mistake to Avoid: Leaving the sauce on the skewers the entire time; apply only in the last minute to avoid flare‑ups.

Step 5: Half Sauce Brushing

During the last 2 minutes of cooking, brush the remaining sauce on the chicken. This gives a caramelized glaze while keeping the interior moist.

💡 emy’s Pro Tip: Use a pastry brush; a small dollop in each groove guarantees uniform coating.

Step 6: Plate and Finish

Once cooked, transfer the skewers to a plate. Drizzle the reserved sauce over the top, and serve immediately. A sprinkling of fresh cilantro or green onions adds bright freshness.

⚠️ Common Mistake to Avoid: Waiting too long before serving; the sauce keeps the meat cool and chewy if left on the plate.

Step 7: Serve with Crisp

Serve alongside flatbread, cucumber sticks, or a salad of romaine, quinoa, and avocado to keep the dish light and balanced.

💡 emy’s Pro Tip: For a quick side, toss pre‑sliced cabbage with lime juice and a pinch of cumin.

Step Action Duration Key Visual Cue
1 Season Chicken 2‑min Even coating
2 Thread Skewers 1‑min Even gaps
3 Make Sauce 3‑min Smooth swirl
4 Air Fry 11‑12 min Golden crust
5 Brush Sauce 2‑min Glossy shine
6 Plate & Finish 1‑min Sauce drizzle

Serving & Presentation

Squeeze a squeeze of fresh lime onto each skewer just before serving; the citrus brightens the fat of the chicken and cuts through the sweetness of the sauce. I garnish with thin slices of red bell pepper and a sprinkle of chopped parsley for color and a hint of earthiness.

Pair these skewers with a cool cucumber yogurt dip, a salad of arugula with lemon vinaigrette, or even a bowl of jasmine rice. For an NYC twist, add a side of house‑made pickled onions. The contrast between the rich chicken, sweet sauce, and crunchy veggies adds layers that echo my Moroccan stew’s depth.

Serve them as an appetizer at parties, or pair them with grilled fish for a light main course. The plating is simple yet elegant: arrange the skewers on a slate board, scatter some fresh herbs, and add a small bowl of extra sauce for dipping.

Pairing Type Suggestions Why It Works
Side Dish Grilled corn on the cob, homemade coleslaw, or quinoa salad Offers crunchy contrast and balanced nutrition
Sauce / Dip Greek yogurt with dill, sriracha mayo, or tamarind vinaigrette Complements the heat while providing cooling
Beverage Spiced chai latte, crisp white wine, or a ginger‑lime soda Matches spice and balances sweetness
Garnish Fresh cilantro, sliced green onions, or toasted sesame seeds Adds aroma and texture

Make-Ahead, Storage & Reheating

I prep the sauce and soak skewers in advance so the evening before dinner, I can simply thread and cook. This method is essential for my late‑night shift schedule as a food stylist in NYC.

Method Container Duration Reheating Tip
Refrigerator Airtight spray bottle 3 days Air fry for 3‑4 min at 350°F
Freezer Plastic freezer bag 2 months Thaw in fridge overnight, then air fry 5 min
Make-Ahead Marinated chicken in Airtight container 1 week Just brush sauce before cooking, no need to refrigerate

When reheating, keep the sauce separate so you can drizzle a bit fresh to enhance moisture. A quick 5‑minute blast in the air fryer restores the crisp skin, while the sauce stays glossy and vibrant.

Variations & Easy Swaps

Variation Key Change Best For Difficulty Impact
Seitan Skewers Replace chicken with seitan cubes Vegan crowd Same effort
Gluten‑Free Version Use rice skewers, cauliflower rice Allergy friendly Minimal extra prep
Herb‑Infused Twist Add rosemary & thyme to seasoning Autumn brunch Same oil amount

Seitan Skewers

Replace the chicken with bite‑sized cubes of seitan, marinated in the same spicy mayo blend. The chewy texture pairs wonderfully with the sweet‑spicy sauce, giving a plant‑based boost that still feels indulgent.

Gluten‑Free Version — Dairy‑Free

Swap out mayonnaise for a dairy‑free alternative like cashew‑based mayo, and use gluten‑free bread crumbs on the chicken before air frying. The result is a crisp, but lighter, coating that still carries the bang‑bang kick.

Herb‑Infused Twist — Moroccan Flair

Stir a handful of fresh chopped rosemary and thyme into the seasoning mix. The herbs infuse the chicken with earthy depth reminiscent of a Moroccan tagine, while the sauce still offers the familiar sweet heat.

Share Your Version!

If you enjoyed the recipe, give it a star rating & drop a comment below. Snap a photo of your skewers, tag me on Instagram @cookingwithemi, and share how you tweaked the flavors. Have you tried an air fryer for other dips? I’d love to hear!

From my NYC kitchen to yours — I hope this recipe brings as much warmth to your table as it does to mine. — emy 🧡

📌

Love This Recipe? Save It to Pinterest!

If you enjoyed this Bang Bang Chicken Skewers recipe, don’t let it get lost in your browser tabs! 😄 Pin it now so you can find it again anytime — and explore hundreds more tried-and-tested recipes waiting for you on my Pinterest boards.

👉 Follow emy on Pinterest @chefrecipes2

📌 Pin this recipe · 🔁 Re-pin your favorites · 💬 Tag me when you make it — I love seeing your creations!

Can I use a different protein instead of chicken?

Yes! The key is to pick a protein that cooks quickly and tends to stay moist. Shrimp, pork tenderloin, or tofu works just as well. Adjust coating time: shrimp may need only 4–5 minutes, pork a touch longer, and tofu just a quick sear before the final sauce coating.

Do I need an air fryer?

Not at all. Traditional ovens or even a skillet can achieve similar results. If using an oven, bake at 425°F for 12–15 minutes, flipping once. A skillet works best on medium heat, but you’ll have to turn the skewers more often to avoid sticking.

How long does the sauce stay fresh?

The homemade Bang Bang sauce can be kept in the fridge for up to 5 days. Lightly thickening it with honey or thinening it with a bit of Greek yogurt can extend its shelf life while keeping the flavor intact.

What can I serve with these skewers?

Serve them alongside a crisp cucumber and tomato salad, a bowl of jasmine rice, or fluffy pita. For a brunch twist, pair with eggs benedict and hollandaise. The smoky sweetness of the sauce plays well with light, fresh sides.

Do I need to soak wooden skewers?

Yes. Wooden skewers absorb water and stay from burning during the high heat of an air fryer or pan. Soaking for 30 minutes is quick and prevents flare‑ups. Metal ones are safe but might char quickly.

Can I make double sauce for dipping?

Absolutely! The step that only uses half the sauce for brushing means the rest is perfect for glazing or using as a dipping sauce. It also works as a glaze for other grilled meats if you want that extra kick.

Is it safe to reheat already cooked skewers?

Reheating can be done safely in a 350°F air fryer for 3–4 minutes or in a skillet over medium heat until heated through. Avoid microwaving as it can make the skin soggy. Keep the sauce coated to maintain moisture.

Where can I find Thai sweet chili sauce locally?

The ingredient can be sourced at Asian grocery stores in New York City, or you can travel to markets like Brooklyn’s Grand Army Marketplace or Queens’s Asian Table. If unavailable, you can blend a spice mix of sriracha, honey, and a splash of rice.

Print
clock clock iconcutlery cutlery iconflag flag iconfolder folder iconinstagram instagram iconpinterest pinterest iconfacebook facebook iconprint print iconsquares squares iconheart heart iconheart solid heart solid icon

Bang Bang Chicken Skewers


  • Author: Chef Emy

Description

Bang Bang Chicken Skewers is a quick, easy, and flavorful recipe made with seasoned cubed chicken brushed with homemade bang bang sauce, cooked in an air fryer. They make for a delicious appetizer or main course and can also be made in the oven!


Ingredients

Scale
  • wooden skewers, (soaked in water for 30 minutes)
  • 2 pounds boneless, skinless chicken breasts, (cut into 1-inch cubes)
  • 1 tablespoon extra virgin olive oil
  • 1 teaspoon paprika
  • 1 teaspoon garlic powder
  • 1 teaspoon kosher salt
  • ½ teaspoon black pepper
  • 1 ¼ cups (290 g) mayonnaise
  • cup Thai sweet chili sauce
  • 2 teaspoons Sriracha, (or more to taste)
  • 2 tablespoons honey

Instructions

  1. In a large bowl, combine the cubed chicken breasts, oil, paprika, garlic powder, salt, and pepper. Toss to evenly coat the chicken.
  2. Working one skewer at a time, thread 4-5 chicken cubes onto each.
  3. In a small bowl, combine the mayonnaise, Thai sweet chili sauce, Sriracha, and honey. Mix well. This will make about 1 ¾ cups bang bang sauce.
  4. Pour half of the sauce into a separate bowl and set aside to use after the chicken has been cooked. Use the rest of the sauce to brush evenly over the chicken.
  5. Add the skewers to the basket of your air fryer in a single layer. (Depending on the size of the air fryer, you may have to work in batches.)
  6. Air fry* at 400°F for 11-12 minutes, flipping halfway. Chicken is fully cooked when it reaches an internal temperature of 165°F.
  7. Transfer the skewers to a plate and drizzle or brush with the reserved bang bang sauce. Serve immediately.

Low Carb Firecracker Ground Chicken

Low Carb Firecracker Ground Chicken – Sweet & Spicy Stickiness

⚖️
Difficulty
Easy
⏲️
Prep Time
5 mins
🕒
Cook Time
10 mins
⏱️
Total Time
15 mins
🍽️
Servings
2

Hey there, food lovers! I’m emy, coming to you from the bustling streets of New York City, where my mother’s Moroccan kitchen meets the sizzling authenticity of French pâtisserie. I’ve always promised myself to bring an extra pop to my low-carb dinners, and this “Low Carb Firecracker Ground Chicken” does just that, having first roasted a chicken breast at the farmers market for that unbeatable depth.

Imagine a thick, honey-glazed base of sweetened rice vinegar, quickly kissed by spicy chili oil; the scent of garlic powder and fresh ground ginger hits the air, and the crackle of simmering sauce turns a simple skillet into a fragrant firecracker. The dish offers a silky bite with a crackly finish, and the ceiling line of red pepper flakes finishes it with a gentle burn, signaling a win.

I’ve tweaked this recipe to keep it ultra‑low‑carb while still delivering the same serious burn every plate, thanks to a direct torch-style sauté and a sticky sauce that only uses low‑glycemic sweeteners. Don’t forget to keep the chili oil hot but not smoking; also, a staple mistake of crowding the pan is something I learned in Paris and avoid with it.

Why This Low Carb Firecracker Ground Chicken Recipe Is the Best

The flavor secret comes from this twist of a sweet‑and‑spicy sauce, keeping the yin‑yang of savory chicken in a whole grain so low carb — authentic Moroccan spices meet contemporary NYC wellness sensibilities. It’s a steaming, tie‑tight bite that’s unmistakable.

The texture is quick to achieve using a combination of high‑heat searing and a sugary, low‑carb glaze, a technique I learned when polishing a baguette in a Parisic oven, that gives an airy surface yet a chewy base without any fat‑laden dredges.

It’s foolproof for anyone: just let the pan do its work at a high temperature. The only “secret” is to fan the sizzle and add the vinegar at the right time, so the sauce thickens evenly. Even a kitchen novice can nail this with minimal cleanup.

Low Carb Firecracker Ground Chicken Ingredients

I normally head to the open‑air Lexis-Budapest food fair for my spices, but when I’m on a weekend in my NYC kitchen, I can find everything on the way, especially the chili oil that holds the essence of this dish.

Ingredients List

  • 1 lb Ground Chicken (92/8) – the lean protein is key for low carb.
  • ½ Tbsp (8g) Chili Oil
  • ½ C (96g) Swerve Brown Sugar
  • ¼ C (60g) Buffalo Sauce
  • 2 Tbsp (30g) Cider or Rice Vinegar
  • 1 tsp Ground Ginger
  • 1 tsp Garlic Powder
  • ½ tsp Kosher Salt
  • ½ tsp Black Pepper
  • ½ tsp Red Pepper Flakes

Ingredient Spotlight

Ground Chicken (92/8): The higher fat “8” keeps juicy texture, but if you prefer leaner, cut to 95/5; this changes fat content from 11g to 9g without impacting flavor.

Chili Oil: Choose a high‑smoke point oil like grapeseed or peanut; a lighter oil won’t carry the heat that Swerve can, and a darker oil adds depth vs a cheap variant.

Swerve Brown Sugar: Substitute with monkfruit sweetener for a cooler aftertaste; consistency holds, but the nuance is a little less “sweet.”

Original Ingredient Best Substitution Flavor / Texture Impact
Swerve Brown Sugar Monkfruit Sweetener Cooler aftertaste; consistency similar.
Chili Oil Grapeseed Oil Higher smoke point; milder heat.
Ground Chicken (92/8) Ground Chicken (95/5) Leanier, slightly drier texture.

How to Make Low Carb Firecracker Ground Chicken — Step-by-Step

Good prep equals good flavor; keep your tools ready and let the heat guide you.

Step 1: Crack the Heat

Heat a skillet over medium‑high, swirl ½ Tbsp of chili oil until it shimmers but doesn’t smoke. Break the ground chicken into the pan, spreading it evenly. Cook, stirring often, for 3–4 minutes each side until browned and cooked through. The pan should hum, and the chicken will release water; let it evaporate for a few seconds before moving on.

💡 emy’s Pro Tip: Use a splatter screen so the sauce drip doesn’t cloud the flame.

Step 2: Whisk the Flame

While the chicken cooks, whisk together Swerve, Buffalo sauce, vinegar, ground ginger, garlic powder, salt, pepper, and red pepper flakes in a bowl. Keep it ready; the ratio dries not over power.

⚠️ Common Mistake to Avoid: Adding the sugar before the vinegar will give a sticky glaze that doesn’t set. Add the vinegar first to keep acidity balanced.

Step 3: Simmer the Syrup

Remove the chicken from the pan, set aside. Pour the sauce into the same pan and let it reduce on medium until it thickens to syrupy glaze, about 3–4 minutes. Don’t let it char; stir gently. When rubber‑like thick, re‑add the chicken, tossing it to coat evenly.

💡 emy’s Pro Tip: Keep the pan temp on the lower side after adding the sauce; it takes heat to thicken.

Step 4: Plating the Punch

Serve immediately over fresh or cauliflower rice. Drizzle any remaining sauce, top with scallions and toasted sesame seeds. The contrast of fluffy rice, chewy chicken, and crunchy toppings creates that new‑york classic feel of mash‑up.

⚠️ Common Mistake to Avoid: Serving with too much oil; keep accumulation minimal in the finish.

Step Action Duration Key Visual Cue
1 Heat skillet & sear chicken 5 mins Chicken browning, pan hissing.
2 Whisk sauce mix 2 mins Sauce smooth, no clumps.
3 Reduce sauce 4 mins Opacity thickens, ‘puckish’ feel.
4 Plate with rice 1 min Sauce glistening on top.

Serving & Presentation

I always garnish with a handful of crisp scallions and a light dusting of toasted sesame seeds, mirroring a Moroccan tagine of color and statement. When plated over golden cauliflower rice, the contrast becomes an almost visual explosion of color.

Pair it with a chilled glass of French Rosé, a crisp white or a sparkling Californian; the acidity balances the heat while dashing a lady’s sparkle. Alternatively, serve with a low‑carb pickled cucumber for a veggie crunch that peppers the dish.

Pairing Type Suggestions Why It Works
Side Dish Grilled eggplant, cauliflower mash, sautéed greens Contiguous textures, low carb.
Sauce / Dip Lime‑coriander yogurt, mint-chutney Cooling contrast to spice.
Beverage Golden Geneva sparkling water, Rosé, crisp white Acidity cleanses palate.
Garnish Cracked black pepper, lime wedges, sesame seeds adds texture and brightness.

Make-Ahead, Storage & Reheating

I often prep a batch on Sunday to slip into a lunchbox for the hectic work week. Because the sauce keeps its sheen, it’s safe for a day or two in the fridge.

Method Container Duration Reheating Tip
Refrigerator Air‑tight jar 2 days Reheat in skillet 2–3 mins.
Freezer Silicone bag 1 month Thaw overnight, heat 4–5 mins.
Make‑Ahead Vacuum sealed 2 days Combine with rice just before serving.

Reheating it on a low flame with a splash of water keeps the sauce from drying. I add a splash of the same vinegar from the mix to bounce back the flavor. This way, the dish tastes as fresh as the day it was first cooked.

Variations & Easy Swaps

Variation Key Change Best For Difficulty Impact
MLS Flurry Introduce a splash of sweet orange zest Mid‑week snack Easy
Gluten‑Free, Sugar‑Free Snipe Replace Swerve with erythritol Diabetic-friendly Medium
Citrus Bloom Add lime zest & fresh lime juice Spring freshness Harder

MLS Flurry

A quick pop of sweet orange zest keeps this variation bright; it’s a sun‑kissed scent that rolls into the sauce, offering a subtle citrus note that mimics the Moroccan mint pepper mix. Works well for a quick lunch or snack.

Gluten‑Free, Sugar‑Free Snipe

Replace the Swerve with 1 tbsp erythritol plus a pinch more vinegar to keep tang. The shrinkage makes the sauce slightly thicker; texture remains silky, but the flavor has a slight minty sharpness unique to low‑carb sweeteners.

Citrus Bloom

For a vibrant twist, drop a quarter cup of lime zest and 2 tsp lime juice into the sauce. The fresh cut citrus adds depth, balancing the heat and providing that lively, summery feel I love seeing from Brooklyn farmers’ markets.

What are the health benefits of low-carb chicken recipes?

Low-carb chicken dishes provide lean protein, supportive amino acids, and minimal starch that keep blood sugar stable while delivering a feeling of fullness. Brown rice and cauliflower rice keep the meal lighter, and the use of low-sugar sweeteners keeps calories in check for metabolic health. Chicken also offers essential minerals like zinc and iron to keep you energized.

How can I make this recipe more vegan?

To veganize, swap the ground chicken for chopped tofu or textured plant‑based protein and use a plant‑based “Buffalo” sauce (like vegan Frank’s original) and a non‑dairy milk for the glaze. The texture will be softer, but the sauce stays just as glossy, clingy, and spicy. In my kitchen I’ve added a handful of diced okra for crunch.

Can I use frozen ground chicken?

Yes! Thaw frozen chicken in the fridge overnight. It will absorb spices well, and after thawing, cook at the same heat and duration. Just be sure to pat the meat dry to avoid excess water; otherwise, it’ll finish with a watery texture.

What is the best way to keep the sauce from burning?

Reduce heat once the sauce starts thickening. Use an oil with a high smoke point or add a splash of water if the mixture sparks. I prefer low flame; keeping the pan at manageable temperature keeps the glaze from sticking. A splatter screen or lid will also help.

Is this dish suitable for keto?

With a lean protein, low-sugar sweetener, and cauliflower rice, it fits nicely into a keto framework. The carbs ridden by the Swerve are negligible, so the dish keeps a safety margin. Scale the portion size and your carb total remains under 5g net per serving, keeping you in ketosis.

What can I serve it with for a quick dinner?

Serve it over cauliflower rice, quinoa (low-carb), or under a crisp salad of mixed greens; a side of sautéed greens with lemon adds crunch. Pair with solids like steamed broccoli or pickled radish for a bit of tang to balance heat. The dish also works beautifully as a topping for lettuce wraps.

Can I use fresh chili instead of chili oil?

Fresh chilies add a different texture and nuance—in particular it lends a medium heat. If you prefer to keep the dish low‑fat, simply sauté minced fresh chilies with a teaspoon of oil and add to the sauce. The entire dish will come with a richer earthiness while still snacking the fiery kick.

How long does this recipe keep in the fridge?

Within a deli it will stay fresh for up to 2 days. Keep it in a hermetic container with a layer of cold water to preserve sauce thickness. For longer storage, freeze individually and thicken again by adding small amounts of water when reheating.

Can I copy this recipe to my own website?

I love seeing people adapt the recipe, just remember to give credit. The unique angle is in how the sauce uses low‑carb sweetness with a firecracker heat; once you perfect the simmer, the flavor morphs into something irresistibly fun. Feel free to tweak herb amounts to personalize.

What oil should I use for the chili oil blend?

Pick an oil with a high smoke point—grapeseed, peanut, or canola. For a subtle “nutty” infusion, use peanut oil with the dried chili flakes. Avoid olive oil, which can burn quickly. I usually use a half‑tablespoon of minimal maté‑infused peanut oil in my kitchen.

Share Your Version!

Drop a rating or comment below and let me know how this firecracker twist made your week feel brighter. I’d love to see your own spin—share your photos at Instagram or Pinterest and tag @cookingwithemi. Tell me, if you replaced one key ingredient, how did it change the overall fire kick?

From my NYC kitchen to yours — I hope this recipe brings as much warmth to your table as it does to mine. — emy 🧡

📌

Love This Recipe? Save It to Pinterest!

If you enjoyed this Low Carb Firecracker Ground Chicken recipe, don’t let it get lost in your browser tabs! 😄 Pin it now so you can find it again anytime — and explore hundreds more tried-and-tested recipes waiting for you on my Pinterest boards.

👉 Follow emy on Pinterest @chefrecipes2

📌 Pin this recipe · 🔁 Re‑pin your favorites · 💬 Tag me when you make it — I love seeing your creations!

Print
clock clock iconcutlery cutlery iconflag flag iconfolder folder iconinstagram instagram iconpinterest pinterest iconfacebook facebook iconprint print iconsquares squares iconheart heart iconheart solid heart solid icon

Firecracker Ground Chicken


  • Author: Chef Emy

Description

Ground chicken cooked in chili oil and tossed with a sticky sweet and spicy firecracker sauce.


Ingredients

Scale
  • 1 lb Ground Chicken (92/8)
  • 1/2 Tbsp (8g) Chili Oil
  • 1/2 C (96g) Swerve Brown Sugar
  • 1/4 C (60g) Buffalo Sauce
  • 2 Tbsp (30g) Cider or Rice Vinegar
  • 1 tsp Ground Ginger
  • 1 tsp Garlic Powder
  • 1/2 tsp Kosher Salt
  • 1/2 tsp Black Pepper
  • 1/2 tsp Red Pepper Flakes

Instructions

  1. Heat a skillet over medium-high heat with the chili oil. Brown both sides of the chicken, about 3-4 minutes per side, before mincing and fully cooking.
  2. While the chicken cooks, whisk the remaining ingredients together in a mixing bowl.
  3. Once the chicken is fully cooked, add the sauce to the pan and cook until thick and syrupy.
  4. Serve with scallions and toasted sesame seeds over rice or cauliflower rice.

Bang Bang Chicken is the upgrade your chicken tenders needed!

Bang Bang Chicken is the upgrade your chicken tenders needed! – Panko‑Crusted Fan‑Favorite

⚖️
Difficulty
Medium
⏲️
Prep Time
15 mins
🕒
Cook Time
25 mins
⏱️
Total Time
40 mins
🍽️
Servings
4

When I first brought home a bag of boneless chicken tenderloins from the New York farmers’ market, I remembered the sizzling street stalls in Marrakesh where a vendor would steam fragrant broth before grilling tender strips over open flame. I wanted to take that warm, comforting sensation and combine it with the punchy flavors of Asian snack bar favorites. I called it Bang Bang Chicken because the sauce is a maple‑like swirl of sweet chili, mayonnaise, and a kick of Sriracha that instantly tells you, “Yum, go ahead.” That simple, bold idea—panko‑crusted, deep‑fried chicken topped with a homemade bang‑bang sauce—changed everything.

Imagine the first bite: a buttery, crisp shell crunching into a juicy, juicy tier of chicken that’s gently surfed by a silky, sweet‑and‑spicy sauce. The panko stripes mirror the golden Parisian patisseries we obsess over for flaky pastries, while the sauce carries the smoky depth of a Moroccan tagine ocean breeze. Your tongue will react to the initial sweet flavor, dip into the sriracha heat, and finally the mayo’s creamy coolness soothes every bite. The aroma will be sweet‑spicy glaze, and the crunch creates a wholesome texture that keeps you coming back for more.

I’ve tried countless fried chicken recipes—some too greasy, some too bland—and this version earned its boss‑status in my kitchen for a few key reasons. First, I kept the batter light by mixing buttermilk with egg and a touch of cornstarch, giving the coating a velvety feel that locks moisture. Second, the dipping sauce I concocted, inspired by a childhood trip to a Thai street market, balances sweetness with fiery heat; it’s a quick fix to upgrade any crunchy bite. Finally, if you’re a beginner, the step‑by‑step guide comes with little pitfalls flagged as 💡 emy’s Pro Tip: which ensures a perfect golden crust every time.

Why This Bang Bang Chicken Recipe Is the Best

The secret is in the harmony of spices. My Moroccan heritage teaches me that a dash of cumin or a pinch of harissa can elevate a dish into something unforgettable. In this recipe, the sauce’s layers—sweet Thai chili, creamy mayo, and unmistakable Sriracha—create an explosion of flavor that feels both exotic and heart‑warming. I anchor this explosion with a firm, airy panko coating that you rarely find in standard fried chicken, giving each bite a satisfying crunch that eventually melts into a savory, melt‑away texture. It’s that marriage of heat, sweetness, and depth that separates this version from the countless others you find online.

The crispy coating is actually a ‘double-dipping’ strategy that I learned during my time at Le Cordon Bleu in Paris—first a light batter for moistened moisture retention, then a second dip in panko to lock in the flavor and add a second layer of texture. This technique yields a crust that sizzles on the pan, holds its crispness longer, and is less fatty, because the oil enters only during the final fry and not earlier. The result is a dish that feels light enough for a summer lunch yet indulgent enough to serve at any holiday gathering.

For people new to cooking, this recipe is surprisingly user‑friendly. The sauce is a one‑mix bowl; the batter is simple to whisk; and the oil temperature is monitored with a reliable kitchen thermometer—something I always carry after my first year of grilling in the city. The steps flow like a short story: come one, go one, and by the end you’ll have a plate of finger‑licking chicken that would make even the toughest NYC food critic raise an eyebrow. I assure you that the entire process takes less than 45 minutes and you’ll discover how easy it can be to create restaurant‑quality flavor at home.

Bang Bang Chicken Ingredients

In New York City, my go‑to spot for fresh produce and international staples is the Chelsea Market. There I picked up a 1.5‑pound bundle of boneless skinless chicken tenderloins, their tender sheets glistening like Moroccan couscous. The mayonnaise is a light‑cream French classic that I bought at Whole Foods; Thai sweet chili was an aromatic gem from a Siamese shop in Flushing; and the panko was hand‑stitched in a Japanese grocery store. I could have Googled, but nothing beats those in‑person flourishes that make a kitchen feel like home.

Ingredients List

  • 1 cup (232 g) mayonnaise
  • ½ cup (132 g) Thai sweet chili sauce
  • 1 teaspoon Sriracha (or more to taste)
  • 2 tablespoons honey
  • 1 ½ pounds boneless skinless chicken tenderloins
  • 1 cup (245 g) buttermilk
  • ¾ cup (94 g) all-purpose flour
  • ½ cup (64 g) cornstarch
  • 1 large egg, room temperature
  • 1 tablespoon Sriracha
  • ½ teaspoon garlic powder
  • ½ teaspoon kosher salt
  • ¼ teaspoon black pepper
  • teaspoon cayenne pepper, optional
  • 2 cups (216 g) plain panko breadcrumbs
  • canola oil, for frying
  • parsley, chopped, for garnish

Ingredient Spotlight

Mayo – A creamy backbone that makes the sauce slick and balances the heat. Choose a light‑taste, non‑fat mayo for a slightly lower calorie version; the raw egg and variance from homestyle to commercial affect the consistency, but I always pick a high‑quality brand to get that silken finish.

Thai Sweet Chili Sauce – Keeps the sauce sweet while offering unmistakable depth. If your local Asian market runs out of it, a 1:1 mix of honey and soy sauce with a splash of vinegar will sustain a similar profile.

Panko Breadcrumbs – For the golden crunch you crave. Whole‑grain panko can be used for a rice‑earlier finish, but stick with plain for that buttery consistency that fries so beautifully.

Original Ingredient Best Substitution Flavor / Texture Impact
Mayonnaise Greek yogurt Tangier, lower fat
Thai Sweet Chili Sauce Honey + Sriracha Less sweet, more heat
Panko Breadcrumbs Regular breadcrumbs Chewy, less crisp

How to Make Bang Bang Chicken — Step-by-Step

Let’s dive in. I’ll walk you through each stage with a spoonful of seasoning and a sprinkle of love.

Step 1: Preparing the Bang Bang Sauce

In a small bowl, whisk together 1 cup mayonnaise, ½ cup Thai sweet chili, 1 tsp Sriracha, and 2 Tbsp honey until silky. Set aside. The smoothness of this sauce transforms the crunchy chicken into a melt‑away indulgence.

💡 emy’s Pro Tip: Let the sauce sit at room temperature for 10 min before dipping the chicken; it allows flavors to mingle and prevents the sauce from clinging unevenly.

Step 2: Batter and Tenderloin Coating

In a large bowl, combine 1 cup buttermilk, ¾ cup flour, ½ cup cornstarch, 1 egg, 1 Tbsp Sriracha, ½ tsp garlic powder, ½ tsp salt, ¼ tsp pepper, and optional cayenne. Whisk until no lumps. Toss the tenderloins until fully coated. This light batter retains moisture while setting the stage for the panko.

⚠️ Common Mistake to Avoid: Over‑mixing the batter creates tough coating; stir just enough to combine.

Step 3: Dredging in Panko

Place panko on a shallow plate. Flick off excess batter from each piece, gently shaking it. Then press the chicken into panko for a snug crust. Set aside each pad separately to avoid flattening.

💡 emy’s Pro Tip: Dampen your hand slightly when pressing panko; it binds better and gives a thicker, fluffy crunch.

Step 4: Heating the Oil

Pour about an inch of canola oil into a ladle‑sized skillet. Heat on medium‑high until thermometer reads 365°F (≈185 °C). The oil should bubble but not smoke; this is the optimal temperature for a crisp exterior.

⚠️ Common Mistake to Avoid: Using too low temperature turns fried chicken soggy.

Step 5: Frying the Tenders

Fry each tender in batches, not overcrowding the pan. Cook 2–3 minutes per side until golden and internal temp hits 165°F. Flip gently and reserve the oil for next batch.

💡 emy’s Pro Tip: Keep a thermometer in the oil to maintain steady 365°F for even cooking.

Step 6: Draining and Plating

Transfer the browned tenders to a paper‑towel line plate to drain excess oil before plating.

⚠️ Common Mistake to Avoid: Skipping the paper towel step leads to greasy chicken.

Step 7: Tossing in Sauce

Coat the hot chicken with the prepared Bang Bang sauce; toss until each bite is coated to the skin. The sauce’s rich texture bonds with the fried exterior, ensuring every morsel sings.

💡 emy’s Pro Tip: Warm the sauce slightly in a saucepan—just enough that it runs—before tossing so it adheres better.

Step 8: Garnishing and Serving

Sprinkle chopped parsley for fresh color contrast. Serve immediately over a bed of lettuce or alongside crispy roasted potatoes for a balanced plate.

⚠️ Common Mistake to Avoid: Waiting too long to serve; texture settles and sauce thickens.

Step Action Duration Key Visual Cue
1 Make sauce 5 min Creamy silk splash
2 Coat in batter 3 min Light, even coat
3 Press panko 2 min Fluffy crumbs
4 Heat oil 14‑15 min Bubbling, no smoke
5 Fry chicken 9 min Golden crust
6 Drain 2 min Gentle towel
7 Toss sauce 3 min Glaze glow
8 Garnish & serve Instant Fresh parsley fleck

Serving & Presentation

Once plated, let the chicken sit for a few seconds—this allows the sauce to set into a glossy glaze and the crumbs to solidify into a celebratory crunch. I love slicing the tenderloins to present a theatrical look, reminiscent of a Moroccan tagine in a bright, colorful tepid bowl. Pair them with a drizzle of citrus vinaigrette, crisp romaine, or a side of creamy coleslaw. If you’re feeling gourmet, a small glass of rosé from a Brooklyn winery will complement the sweet heat beautifully.

I enjoy serving this dish at brunch gatherings; the golden bob‑bounces with the city’s energy and always pulls a smile from guests. The contrast of the homemade sauce (sweet, spicy, creamy) and the crunchy coating plays off the buttery, floral aroma of freshly popped popcorn—a classic motivator that will have people craving a second plate.

Pairing Type Suggestions Why It Works
Side Dish Roasted sweet potato wedges, potato salad, creamy coleslaw Sweetness or creaminess balances heat.
Sauce / Dip Yogurt‑based cucumber dip, extra Sriracha, honey glaze Adds condiments to personalize flavor.
Beverage Sparkling rosé, light lager, iced chai latte Citrus or mild sweetness offsets sauce.
Garnish Fresh parsley, chopped pistachios, sliced avocado Adds color, crunch, or umami.

Make-Ahead, Storage & Reheating

With my two‑to‑three‑shift life in Manhattan, prepping meals in advance is crucial. I fold the coated chicken into a zip‑lock bag, tray‑separate, and refrigerate up to three days. When reheating, I use a 400°F oven for 10‑12 min, which restores crispness without drying the meat; finish with a quick glaze drizzle to revive the sauce’s sheen.

Method Container Duration Reheating Tip
Refrigerator Ziploc bag, separate heat‑proof plate 3 days Cover with foil before reheating.
Freezer Freezer bag, separate water bath 1 month Thaw 2 hrs in fridge before air‑frying.
Make‑Ahead Prep sauce, stack coated pieces 4 days in advance Re‑coat with panko before posterior fry.

If you keep the sauce ready, reheating up to 30 minutes later is fine, but the salad will benefit from a final drizzle for freshness. I find my next‑day leftovers just as exciting when I toss them over a bed of arugula with lemon vinaigrette—light, zesty, and deliciously nostalgic of the streets of North Africa.

Variations & Easy Swaps

Variation Key Change Best For Difficulty Impact
Asian Fusion Add sesame seeds to panko, replace mayo with coconut milk George’s family BBQ Easy
Gluten‑Free Use almond flour instead of all‑purpose, swap panko for crushed rice crackers Health‑conscious Medium
Summer Citrus Twist Add orange zest, use lime‑infused oil during frying Sunset brunch Easy

Asian Fusion

I paired the original recipe with sesame seeds in the panko and substituted coconut milk for mayonnaise so the sauce echoed the beachside catch of the day. The result was silky, subtle coconut sweetness coupled to the crunchy crunch of toasted sesame that reminded me of a modern ramen bowl, with a touch of French refinement thanks to the technique of double coating.

Gluten‑Free — Dairy‑Free

Using almond flour created a slightly nutty flavor, while crushed rice crackers gave the same crunch but no gluten. I tested the texture; the coating stayed crisp, and the sauce still clung. It’s a great tweak for friends who love bold spices yet need a gluten‑free option.

Summer Citrus Twist

Adding fresh orange zest to the sauce brightened the sweetness, and a splash of lime‑infused oil during frying added a vibrant tang. It reminded me of the breezy lemon bars my mother used to bake, bringing a sunny brightness that lifts the dish for a light lunch or brunch.

What kind of oil is best for frying Bang Bang chicken?

Canola oil is a popular choice because of its neutral flavor, high smoke point, and affordability. In the city I usually source it from local grocery chains that offer an extra‑lean – i.e., 0 fat – version that keeps the chicken extra greasy free. While peanut or sunflower oil also provide healthy fat ratios, they can add a subtle nutty bite or overpower the delicately sweet sauce. If you prefer a more aromatic option, I recommend grapeseed or safflower; they’re good for rapid heating without browning the coating quickly.

How can I keep the chicken crispy after reheating?

Re‑heat at 400°F in a conventional oven for roughly 10‑12 minutes, making sure to place the chicken on a wire rack over a sheet pan. The rack allows heat to circulate around each piece, preventing sogginess. If you’re short on time, a quick sear in a hot skillet for 2‑3 minutes will help restore the crust. Finish with a light spray of oil or a brief drizzle of the original sauce to re‑introduce moisture without compromising crunch.

Can I substitute Sriracha with other hot sauces?

Yes, many people swap Sriracha for Wisconsin chili, Tabasco, or even a homemade harissa paste. Each sauce offers unique flavor and heat intensity – for instance, Tabasco adds a vinegary kick, while harissa brings earthy coriander nuances. Adjust quantities to taste; keep in mind that some hot sauces contain extra sugar or salt, so you might need to adjust the other ingredients accordingly.

Is this recipe suitable for a kid-friendly meal?

It can be easily turned kid‑friendly by moderating the heat. Replace the Sriracha with mild hot sauce or omit it entirely, and use a natural sweetener like honey instead of chili’s sugar. Serve the chick with a savory baked potato or carrot sticks, giving a balanced, nutritious plate that retains the sweet‑spicy feel without the fiery bite.

How much protein does this dish contain?

A 1‑½‑pound batch yields about 12 tenderloins, each around 4 ounces (112 g). That means you get roughly 78 g of protein per serving of four. Add the crunch of panko for a lean yet satisfying protein‑dense meal suitable for those building muscle or maintaining a balanced diet. To add bulk, serve with a side of quinoa or a hearty grain mash for maximum satiation.

What are the best accompaniments for a beer pairing with Bang Bang Chicken?

An IPA or a pilsner complements the spice while the carbonation eases the caloric heft of the fried coating. If you prefer a lighter beer, a Session IPA gives the required hop bite without heavy bitterness. Hazy IPA or a wheat beer can brighten the dish’s sweet undertones, allowing the sauce to shine. I often pair it with a crisp, gold‑colored saison for a refreshing finish that also feels rustic.

Can I use frozen chicken tenderloins for this recipe?

Yes, pre‑bloomed frozen tenderloins work. Thaw them in cold water for 30 minutes, pat dry thoroughly, then follow the same batter and panko steps. The only difference is you’ll need a deeper dive into thawing to avoid a soggy coating. Once thawed, the frying times remain the same, so you’ll still get the crisp, golden results.

How can I make the sauce more vibrant?

Incorporate fresh herbs like cilantro or fresh mint into the sauce for a burst of freshness. I often add a dash of smoked paprika for a gentle smoky backdrop, or squeeze a bit of lime juice for acidity. Removing it before letting the sauce sit for twenty minutes removes excess moisture and lets the flavor deepen. This small tweak gives the sauce a multilevel complexity that keeps the dish intriguing.

What’s the best way to store leftovers safely?

Pack the fried chicken into an airtight container or zip‑lock bag; place a layer of parchment in the bottom to keep crumbs from sticking. Store in the refrigerator for up to 3 days or in the freezer for up to one month. When ready to reheat, thaw overnight, then follow the oven reheat method described earlier. Avoid dishwasher or microwave reheat for preserving crispness.

What alternative seasoning for the batter can I use?

Swap the garlic powder for fresh minced garlic, or add smoked paprika for a deeper flavor. If you like mild heat, a pinch of cayenne can be replaced by a dash of fresh chili flakes. For a Mediterranean twist, sprinkle some ground za’atar or sumac over the batter so the coating carries aromatic scents that recall Moroccan souks.

Share Your Version!

Your kitchen is the best laboratory for culinary adventure—so I’d love to see what you create. Leave a star rating and a comment below, and let me know how your version turned out. When you share photos on Instagram or Pinterest, tag @cookingwithemi so I can see the creative iterations that evolve from this humble recipe. And tell me: would you add a splash of lime or keep the sauce strictly sweet for an absolute match‑made experience?

From my NYC kitchen to yours — I hope this recipe brings as much warmth to your table as it does to mine. — emy 🧡

📌

Love This Recipe? Save It to Pinterest!

If you enjoyed this Bang Bang Chicken recipe, don’t let it get lost in your browser tabs! 😄 Pin it now so you can find it again anytime — and explore hundreds more tried‑and‑tested recipes waiting for you on my Pinterest boards.

👉 Follow emy on Pinterest @chefrecipes2

📌 Pin this recipe · 🔁 Re-pin your favorites · 💬 Tag me when you make it — I love seeing your creations!

Print
clock clock iconcutlery cutlery iconflag flag iconfolder folder iconinstagram instagram iconpinterest pinterest iconfacebook facebook iconprint print iconsquares squares iconheart heart iconheart solid heart solid icon

Bang Bang Chicken


  • Author: Chef Emy

Description

Bang Bang Chicken is panko-crusted chicken tenderloins deep-fried to a crispy golden brown, drizzled with homemade bang bang sauce.


Ingredients

Scale
  • 1 cup (232 g) mayonnaise
  • ½ cup (132 g) Thai sweet chili sauce
  • 1 teaspoon Sriracha, (or more to taste)
  • 2 tablespoons honey
  • 1 ½ pounds boneless skinless chicken tenderloins
  • 1 cup (245 g) buttermilk
  • ¾ cup (94 g) all-purpose flour
  • ½ cup (64 g) cornstarch
  • 1 large egg, (room temperature)
  • 1 tablespoon Sriracha
  • ½ teaspoon garlic powder
  • ½ teaspoon kosher salt
  • ¼ teaspoon black pepper
  • teaspoon cayenne pepper, (optional)
  • 2 cups (216 g) panko breadcrumbs, (plain)
  • canola oil, (for frying)
  • parsley, (chopped, for garnish)

Instructions

  1. In a small bowl, combine the mayonnaise, Thai sweet chili sauce, Sriracha, and honey. Mix well and set aside.
  2. In a medium mixing bowl add buttermilk, flour, cornstarch, egg, sriracha, garlic powder, salt, pepper, and cayenne pepper. Whisk to combine. Add chicken tenders and toss to coat.
  3. Add Panko to a shallow plate.
  4. Working one piece at a time, remove the chicken from the batter, gently shaking off any excess batter. Dredge the chicken in the panko, pressing slightly to adhere. Set on a clean plate. Repeat with the remaining chicken pieces. Set aside while you heat the oil.
  5. To a large skillet, add about an inch of oil. Heat oil over medium-high heat until it reaches a temperature of 365°F.
  6. Working in batches, being careful not to overcrowd the pan, add chicken and cook until browned (about 2-3 minutes on each side), or until the chicken reaches an internal temperature of 165°F. Repeat with the remaining chicken tenderloins, making sure the oil is 365°F before adding more chicken.
  7. Transfer the chicken to a paper towel-lined plate to drain slightly before adding it to a serving plate.
  8. Toss the chicken with the bang bang sauce, top with chopped parsley, and serve warm.

Smoky Black Eyed Pea Soup | The Simple Veganista

Smoky Black Eyed Pea Soup with Collard Greens – A Vegan Winter Warm-Up

⚖️
Difficulty
Easy
⏲️
Prep Time
15 mins
🕒
Cook Time
75 mins
⏱️
Total Time
90 mins
🍽️
Servings
6-8

Growing up in Morocco, the scent of aromatic stews simmering on the stove was an everyday comfort. While black-eyed peas weren’t a staple in my mother’s kitchen, the underlying principle of a hearty, flavor-packed, and comforting one-pot meal is something that transcends cultures. This Smoky Black Eyed Pea Soup with Collard Greens brings that same profound sense of warmth and nourishment, but with a vibrant Southern-inspired twist that I’ve come to adore during my time in New York City. It’s savory, deeply satisfying, and an incredibly healthy way to kickstart any new year or simply enjoy a delicious, wholesome meal.

Imagine walking into your kitchen on a chilly evening, and being immediately enveloped by the rich perfume of smoked paprika mingling with sautéed onions, garlic, and earthy collard greens. The soup’s texture is velvety yet rustic, thanks to the tender black-eyed peas and the slight chew of the collards. This isn’t just a simple soup; it’s a culinary hug in a bowl, marrying the bold flavors I seek out at NYC farmers markets with the soul-warming essence of home cooking. The subtle sweetness of the collards balances the smoky depth, creating a harmonious and utterly addictive flavor profile.

What makes my version of this classic Black Eyed Pea Soup stand out? It’s all about layering flavor and ensuring every spoonful is perfectly balanced. Having trained in classic French techniques, I pay close attention to the fond created by sautéing the aromatics and the precise timing of spice additions. Plus, this recipe is 100% vegan, gluten-free, and low-fat, proving that wholesome food can be incredibly delicious. I’ll share a special pro tip for enhancing smokiness without any meat, and help you avoid a common mistake that can lead to bland results, ensuring your soup is nothing short of spectacular.

Why This Black Eyed Pea Soup Recipe Is the Best

This Smoky Black Eyed Pea Soup isn’t just another rendition; it’s a testament to how simple ingredients can create profound flavor. My secret lies in the smoky element, achieved not just through smoked paprika but also by carefully developing a flavorful base with sautéed vegetables. From my culinary training in Paris, I understand the importance of building flavor layers from the ground up, ensuring a depth that sings with every bite, without relying on heavy creams or meats.

Achieving the perfect texture in a hearty soup like this is crucial. You want the black-eyed peas to be tender but not mushy, and the collard greens to retain a slight bite, offering a delightful contrast. The technique here involves adding the collards towards the end, a detail I picked up from watching many stews in my mother’s kitchen where greens were often stirred in late to maintain their vibrancy and texture. This ensures they don’t overcook and become limp, contributing to a more satisfying mouthfeel.

I’ve designed this recipe to be foolproof and fast, even for novice cooks. It’s an easy one-pot meal that minimizes cleanup, which is a blessing in a busy NYC kitchen. The steps are straightforward, and the ingredients are accessible. While mastering complex French sauces is rewarding, there’s immense joy in perfecting a simple-yet-delicious dish like this black-eyed pea soup, making it a go-to for weeknights or special occasions without stress.

Black Eyed Pea Soup Ingredients

Gathering fresh, vibrant ingredients is the first step to any great meal. During my weekly trips to the Union Square Greenmarket here in NYC, I love selecting the crispest collard greens and the plumpest black-eyed peas. My mother always taught me to trust my senses when choosing produce, and that wisdom stays with me today.

Ingredients List

  • 1 lb. black eyed peas, soaked (see notes on soaking) or 3 cans (14oz) drained and rinsed
  • 2 tablespoon olive oil or 1/3 cup water for oil-free
  • 1 yellow onion, diced
  • 2 large carrots, diced
  • 2 celery ribs, sliced
  • 3 garlic cloves, minced
  • 1 tablespoon smoked paprika
  • 1 teaspoon EACH thyme, basil, and oregano
  • 1 teaspoon EACH garlic powder + onion powder
  • ½ – 1 teaspoon red pepper flakes, optional
  • 1 can (28oz.) diced tomatoes, with their juices
  • 2 – 3 cups collard greens, chopped
  • 6 cups low-sodium vegetable broth
  • ½ – 1 teaspoon EACH salt + pepper, or to taste

Ingredient Spotlight

Black Eyed Peas: These legumes are the star, providing a creamy texture and nutty flavor. If using dried, soaking them overnight significantly reduces cooking time and helps with digestibility. For canned, always rinse them thoroughly to remove excess sodium and improve flavor. If you can’t find black-eyed peas, great northern beans or cannellini beans make a good substitute, though the flavor will be milder.

Smoked Paprika: This spice is non-negotiable for the “smoky” in our Smoky Black Eyed Pea Soup! It provides a deep, complex flavor that mimics the slow-cooked richness of meat, essential for a vegan version. Look for Spanish smoked paprika for the best quality. Non-smoked paprika won’t deliver the same depth, but a pinch of liquid smoke (just a drop!) could be used in a pinch, though I prefer the natural spice.

Collard Greens: These hearty greens hold up beautifully during simmering, adding a slightly bitter, earthy contrast and a wealth of nutrients. When selecting, look for firm, dark green leaves without significant wilting or yellowing. Curly kale or mustard greens can be used as alternatives, but they will cook down faster and might have a sharper flavor, so add them slightly later.

Diced Tomatoes: Canned diced tomatoes, with their juices, provide acidity and body to the soup, balancing the richness of the peas and the earthiness of the greens. San Marzano tomatoes are my favorite for their balanced sweetness and acidity. If fresh tomatoes are in season, you could use about 2-3 large ripe tomatoes, peeled and diced, though you might need to add a splash more broth to compensate for less liquid.

Original Ingredient Best Substitution Flavor / Texture Impact
Black Eyed Peas Great Northern or Cannellini Beans Milder flavor, slightly creamier texture.
Olive Oil Vegetable Broth or Water For an oil-free version; may slightly reduce richness in mouthfeel.
Smoked Paprika Sweet Paprika + a hint of Liquid Smoke Less authentic smoky depth, liquid smoke needs careful measurement.
Collard Greens Kale (curly or Tuscan) or Mustard Greens Kale will be slightly more tender, mustard greens have a peppery bite.

How to Make Smoky Black Eyed Pea Soup — Step-by-Step

Don’t be intimidated by the steps; this soup comes together beautifully with a little patience and attention to detail. Follow along, and you’ll have a wonderfully aromatic and hearty meal.

Step 1: Sauté Aromatics

In a large Dutch oven or heavy-bottomed pot, heat 2 tablespoons of olive oil over medium heat. If making oil-free, use 1/3 cup of water. Add your diced yellow onion, carrots, and sliced celery. Sauté gently for 7-10 minutes, stirring occasionally, until the vegetables begin to soften and become translucent. This step is crucial for building the foundational flavor of your soup.

💡 emy’s Pro Tip: Don’t rush this step! Allowing the aromatics to properly caramelize creates a rich, sweet base that will form the backbone of your soup’s flavor. The slight browning on the bottom of the pot, called ‘fond,’ will release incredible taste when deglazed.

Step 2: Add Spices and Build Flavor

Once your vegetables are softened, add the minced garlic, smoked paprika, thyme, basil, oregano, garlic powder, onion powder, and optional red pepper flakes. Cook for just 1-2 minutes, stirring constantly, until the spices are fragrant. Be careful not to burn the garlic, as it can turn bitter quickly.

⚠️ Common Mistake to Avoid: Overcooking your spices. When spices hit the hot oil, they release their volatile oils quickly. Just a minute or two is all you need to awaken their flavors; any longer, and they can burn, imparting an acrid taste to your entire soup.

Step 3: Simmer Beans and Tomatoes

Now, add your black-eyed peas (soaked or canned), the can of diced tomatoes with their juices, and 6 cups of low-sodium vegetable broth to the pot. Bring the mixture to a boil, then immediately reduce the heat to low, cover the pot, and let it simmer. If using canned beans, simmer for 20 minutes. If using pre-soaked dried beans, simmer for 1 to 1 1/4 hours, or until the beans are tender to the bite.

Step 4: Finish with Collard Greens

About 5-10 minutes before the soup is done and the beans are tender, stir in the chopped collard greens. Continue to simmer until the greens are just wilted and tender-crisp. Taste the soup and season generously with salt and pepper. Remember, a little acidity can really brighten the flavors – a squeeze of fresh lemon juice just before serving works wonders.

💡 emy’s Pro Tip: For an even richer, creamier soup, you can remove about 1-2 cups of the cooked soup (mostly beans) and blend it until smooth, then stir it back into the pot. This thickens the soup without adding any cream, a technique often used in Moroccan lentil soups.

Step Action Duration Key Visual Cue
1 Sauté Aromatics 7-10 minutes Vegetables softened and translucent
2 Add Spices 1-2 minutes Spices fragrant, not burnt
3 Simmer Beans & Tomatoes 20 min (canned) to 75 min (soaked) Beans tender
4 Finish with Collard Greens 5-10 minutes Greens wilted, tender-crisp

Serving & Presentation

Serving a bowl of this Smoky Black Eyed Pea Soup is truly a joy. I love to ladle it into rustic ceramic bowls, reminiscent of the ones my mother used in our Moroccan home. For an extra pop of color and freshness, a sprinkle of finely chopped fresh parsley or cilantro is always a good idea. In the culinary schools of Paris, presentation was everything, and even in a hearty soup, a thoughtful garnish elevates the experience.

A squeeze of fresh lemon juice over the top of each serving bowl isn’t just for looks; it adds a bright, acidic counterpoint that really makes the smoky flavors sing. This trick is something I often apply to many hearty dishes, as acidity can refresh the palate. And for a truly authentic Southern-inspired meal, I highly recommend serving this soup alongside a slice of slightly sweet Vegan Cornbread. The combination of savory and sweet, hearty and tender, is simply divine and perfectly marries my global culinary influences with New York’s diverse food scene.

Pairing Type Suggestions Why It Works
Side Dish Vegan Cornbread, Crusty Artisan Bread, Simple Side Salad Cornbread provides a sweet contrast; bread for dipping; salad for freshness.
Sauce / Dip Hot Sauce, Vegan Sour Cream, Harissa Mayo Adds a spicy kick or creamy tang to complement the soup’s richness.
Beverage Sweet Iced Tea, Dry White Wine, Sparkling Water with Mint Classic Southern drink; cuts through richness; refreshing palate cleanser.
Garnish Fresh Parsley, Cilantro, Red Pepper Flakes, Lemon Zest Adds vibrant color, fresh aroma, a hint of heat or citrus brightness.

Make-Ahead, Storage & Reheating

Living in New York City means life moves fast, and having delicious, healthy meals ready to go is essential. This Smoky Black Eyed Pea Soup is a fantastic candidate for meal prepping; in fact, I often make a double batch on Sundays to enjoy throughout the week. It tastes even better the next day as the flavors have more time to meld.

Method Container Duration Reheating Tip
Refrigerator Airtight container Up to 6 days Gently reheat on stovetop over low heat, adding a splash of broth if needed.
Freezer Freezer-safe containers or bags 2-3 months Thaw overnight in the fridge, then reheat as above.
Make-Ahead Cook entirely, cool completely Up to 3 days in advance Ready to reheat and serve; flavors deepen beautifully.

When reheating from the freezer, I always make sure to let the soup thaw completely in the refrigerator before gently warming it on the stovetop. This prevents the beans from breaking down too much. If the soup appears too thick after cooling or thawing, simply stir in a bit of extra vegetable broth or water until it reaches your desired consistency. A final taste test for seasoning is always a good idea after reheating, as flavors can sometimes mellow out.

Variations & Easy Swaps

Part of the joy of cooking, for me, is adapting recipes to suit various palates, seasons, or ingredients I find at the market. This Smoky Black Eyed Pea Soup is incredibly versatile.

Variation Key Change Best For Difficulty Impact
Spicy Andouille-style Add smoked vegan sausage/extra red pepper flakes Those who love heat and a heartier texture. Minimal
Mediterranean Twist Add artichoke hearts, Kalamata olives, fresh dill A brighter, brinier flavor profile. Minimal
Creamy Coconut Stir in coconut milk at the end A richer, slightly sweeter and more luxurious texture. Minimal

Spicy Andouille-Style Black Eyed Pea Soup

Drawn from the vibrant Cajun flavors I’ve experienced in diverse NYC restaurants, you can easily add a kick to this black-eyed pea soup. Sauté 4-6oz of your favorite vegan smoked sausage (like an apple sage or spicy Italian variety) with the aromatics in Step 1. Increase the red pepper flakes to 1 teaspoon or more, if you dare! This adds a fantastic depth, mimicking traditional Andouille sausage while keeping it plant-based.

Gluten-Free and Nut-Free Adaptations

This Black Eyed Pea Soup is already naturally gluten-free and nut-free, making it a fantastic option for those with dietary restrictions. Just ensure your vegetable broth is certified gluten-free, as some brands can contain hidden gluten. I always double-check labels, a habit I developed after cooking for clients with various allergies in New York.

Seasonal Root Vegetable Swap

Embrace seasonal produce by swapping some of the carrots for other root vegetables. Sweet potato or butternut squash, diced into small cubes, can be added along with the carrots in Step 1. They’ll add a lovely sweetness and creamy texture as they cook down. Parsnips or turnips would also offer a delightful earthy nuance, changing the character of the soup entirely but still making it wonderfully hearty and soul-warming.

Do I have to soak black-eyed peas before cooking?

While you can certainly cook black-eyed peas from dry without soaking, I highly recommend soaking them overnight. Soaking significantly reduces their cooking time, typically by at least half, and it also helps to make them more digestible. If you’re in a hurry, a quick soak method involves boiling them for 5 minutes, then letting them sit covered for an hour before draining and proceeding with the recipe. For this smoky black-eyed pea soup, tender beans are key to a creamy texture.

Can I make this black-eyed pea soup oil-free?

Absolutely! This recipe is designed to be easily adaptable for an oil-free diet. Instead of olive oil, you can use water or vegetable broth to sauté your aromatics (onion, carrots, celery). Just add about 1/3 cup of water or broth to the Dutch oven in Step 1 and replenish it as needed to prevent sticking. The vegetables will still soften beautifully and release their flavors. emy often uses this technique when cooking for health-conscious clients in NYC.

What if I don’t have collard greens?

No worries if collard greens aren’t available! You can easily substitute them with other hearty leafy greens. Curly kale or Tuscan kale (lacinato kale) are excellent choices, offering a similar texture and earthy flavor. Mustard greens would also work, providing a slightly spicier, more peppery note. Just be mindful that these greens might cook down a little faster than collards, so you might add them a few minutes later in the recipe to maintain their best texture.

How can I make the soup even smokier without adding meat?

To really boost that smoky flavor in this vegan black-eyed pea soup, there are a few tricks I use. Firstly, ensure you’re using high-quality smoked paprika. You can also add a very small amount (just a drop or two!) of liquid smoke to the pot when you add the broth – a little goes a long way. Another tip is to incorporate a half teaspoon of smoked salt along with your regular salt. Finally, using fire-roasted diced tomatoes can contribute another layer of smoky depth.

Can this black-eyed pea soup be made in a slow cooker or Instant Pot?

Yes, absolutely! This Smoky Black Eyed Pea Soup adapts wonderfully to both slow cooker and Instant Pot methods. For a slow cooker, sauté the aromatics and spices on the stovetop first (this builds crucial flavor!), then transfer everything to the slow cooker and cook on low for 6-8 hours or high for 3-4 hours, adding collards in the last 30 minutes. For an Instant Pot, use the sauté function for the aromatics, then add remaining ingredients (except collards), cook on high pressure for 15-20 minutes for soaked beans, and natural release for 10 minutes. Stir in collards and cook using the sauté function for a few more minutes.

What’s the best way to thicken this soup if it’s too thin?

If your black-eyed pea soup turns out thinner than you prefer, emy has a chef’s trick: carefully scoop out about 1 to 2 cups of the finished soup, taking a good mix of beans and vegetables. Blend this portion until it’s completely smooth using an immersion blender or a standard blender (be careful with hot liquids!). Stir the puréed mixture back into the pot. This method adds body and creaminess without needing flour or cornstarch, enhancing the soup’s natural flavors beautifully, a technique often used in classic French preparations to add depth.

Share Your Version!

I hope this Smoky Black Eyed Pea Soup brings as much warmth and joy to your table as it does to mine. There’s something truly special about a dish that nourishes the body and soul, blending simple ingredients into something extraordinary. I pour my heart into developing these recipes, drawing on my Moroccan heritage and French culinary training, and seeing your creations truly makes my day!

Please, don’t keep your kitchen triumphs to yourself! Leave a star rating and a comment below to let me know how this recipe worked for you. Did you add a special touch, or did it spark a memory for you? I’d also be thrilled if you shared a photo of your beautiful bowl of soup on Instagram or Pinterest. Be sure to tag @cookingwithemy so I can see and celebrate your culinary artistry. What’s your favorite hearty garnish for a comforting soup like this?

From my NYC kitchen to yours — I hope this recipe brings as much warmth to your table as it does to mine. — emy 🧡

📌

Love This Recipe? Save It to Pinterest!

If you enjoyed this Smoky Black Eyed Pea Soup recipe, don’t let it get lost in your browser tabs! 😄 Pin it now so you can find it again anytime — and explore hundreds more tried-and-tested recipes waiting for you on my Pinterest boards.

👉 Follow emy on Pinterest @chefrecipes2

📌 Pin this recipe · 🔁 Re-pin your favorites · 💬 Tag me when you make it — I love seeing your creations!

Print
clock clock iconcutlery cutlery iconflag flag iconfolder folder iconinstagram instagram iconpinterest pinterest iconfacebook facebook iconprint print iconsquares squares iconheart heart iconheart solid heart solid icon

Black Eyed Pea Soup


  • Author: Chef Emy

Description

Savory and hearty, this Black Eyed Pea Soup with collards is an easy one-pot meal made 100% vegan, gluten-free, and low-fat. It’s a healthy way to bring the new year and enjoy to your heart’s content!


Ingredients

Scale
  • 1 lb. black eyed peas, soaked see notes (or 3 cans (14oz), drained and rinsed)
  • 2 tablespoon olive oil or 1/3 cup water
  • 1 yellow onion, diced
  • 2 large carrots, diced
  • 2 celery ribs, sliced
  • 3 garlic cloves, minced
  • 1 tablespoon smoked paprika
  • 1 teaspoon EACH thyme, basil, and oregano
  • 1 teaspoon EACH garlic + onion powder
  • 1/2 1 teaspoon red pepper flakes, optional
  • 1 can (28oz.) diced tomatoes, with the juices
  • 2 3 cups collard greens, chopped
  • 6 cups low-sodium vegetable broth
  • 1/2 1 teaspoon EACH salt + pepper, or to taste

Instructions

  1. In a large dutch oven, heat oil or water over medium heat, add onion, carrots, and celery, saute for 7 10 minutes. Add the garlic, smoked paprika, thyme, basil, oregano, and garlic & onion powder, cook until fragrant, about 1 2 minutes.
  2. Add the black-eyed peas, tomatoes, and vegetable broth, bring to a boil, cover, reduce heat to low, and simmer for 20 minutes (for canned) to 1 1/4 hours (for soaked), or until beans are tender. Before soup is done, about 5 10 minutes ahead, stir in the collard greens. Season with plenty of salt and pepper.
  3. We love adding a squeeze of lemon over the top of our serving bowls for brightness. And this slightly sweet Vegan Cornbread is the perfect accompaniment to this savory soup!
  4. Serves 6 8
  5. Leftovers can be kept in the refrigerator for up to 6 days. For longer storage, freeze for up to 2 3 months. Let thaw before reheating.

Sweet Potato Black Bean Chili (Easy + Vegan) – The Simple Veganista

Pre-computation:
– Prep Time: 15 minutes (dicing, mincing)
– Cook Time: 30-40 minutes (from instructions) -> 35 minutes (average)
– Total Time: 15 + 35 = 50 minutes
– Servings: 4 generously
– Difficulty: Easy
– Main Keyword: Sweet Potato Black Bean Chili
– Unique Angle: Easy + Vegan, Hearty and Flavorful. I will focus on the “Hearty and Flavorful” aspect by highlighting the layering of spices and ingredients, and “Easy + Vegan” by using pantry staples and simple steps.

Main Keyword (for H2, H3s): Sweet Potato Black Bean Chili
Unique Angle (for H2, H3s): Hearty and Flavorful, Easy + Vegan

SEO Keywords to sprinkle: plant-based chili, vegan comfort food, healthy chili recipe, pantry staples, weeknight dinner, vegetarian chili, one-pot meal.

Table of Contents:

Ingredient Spotlight choices: Sweet Potato, Black Beans, Fire-Roasted Tomatoes, Chili Powder, Cumin.

FAQ questions based on common chili queries:
1. Is sweet potato black bean chili healthy?
2. Can I make this chili in a slow cooker?
3. How can I make this chili spicier?
4. What can I serve with sweet potato black bean chili?
5. Can I freeze leftovers of this vegan chili?
6. Is it better to peel sweet potatoes for chili?
7. What kind of beans can I use in this chili?
8. How long does sweet potato chili last in the fridge?
9. Can I add other vegetables to this sweet potato black bean chili?
10. Why is my chili too thin/thick?

Variations:
1. Smoky Southwestern Chili (use chipotle powder, smoked paprika)
2. Add Some Greens (spinach, kale)
3. Spicy Kick Variation (jalapeño, cayenne)

Sweet Potato Black Bean Chili (Easy + Vegan) – Hearty and Flavorful Comfort

⚖️
Difficulty
Easy
⏲️
Prep Time
15 mins
🕒
Cook Time
35 mins
⏱️
Total Time
50 mins
🍽️
Servings
4 generously

Growing up in Morocco, chili wasn’t exactly a staple on our dinner table, but the warm embrace of rich, aromatic stews was. When I moved to New York City and discovered the diverse world of comfort food, I was immediately drawn to chili—its depth, its warmth, its ability to bring people together. This Sweet Potato Black Bean Chili is my plant-based ode to those comforting memories, transformed into an easy and vibrant vegan dish. It’s hearty enough for chilly NYC evenings and packed with flavor that whispers of global spices, yet approachable enough for any weeknight.

Imagine walking into your kitchen, greeted by the heady aroma of toasted cumin and chili powder mingling with sweet sautéed onions, a secret I learned from my mother in her bustling Moroccan kitchen. Then, the vibrant hues of diced sweet potatoes and fire-roasted tomatoes join in, creating a symphony of color and texture. Each spoonful of this vegan chili offers a medley of tender sweet potato, creamy black beans, and a subtly sweet, smoky broth that coats your palate. It’s a sensory experience that’s deeply satisfying, reminiscent of the best slow-simmered dishes, but achieved in a fraction of the time.

What sets this Easy + Vegan Sweet Potato Black Bean Chili apart? It’s the meticulous layering of spices, a technique I honed during my culinary training in Paris, ensuring every ingredient sings without overpowering the others. I’ve balanced earthiness with a touch of sweetness from the sweet potatoes, and added a hint of tang from fire-roasted tomatoes. We’ll be using mostly pantry staples, but my pro tip on toasting spices makes all the difference, while a common mistake of over-simmering will be swiftly avoided to keep those sweet potatoes perfectly tender. Get ready for a healthy, delicious meal that feels like a warm hug!

Why This Sweet Potato Black Bean Chili Recipe Is the Best

The secret to this chili’s outstanding flavor lies in how we treat the spices. Drawing inspiration from my North African roots, where spices are revered, I ensure that the chili powder, cumin, and oregano are briefly toasted in the pan with the aromatics. This blooming process awakens their essential oils, deepening their flavor and creating a more complex, fragrant base that truly elevates this vegan chili from good to exceptional. It’s a trick I learned that instantly adds a gourmet touch to simple pantry ingredients.

When it comes to texture, many beginner cooks struggle with mushy sweet potatoes or watery chili. My recipe, however, achieves a perfect balance. The sweet potatoes are diced to an ideal size that allows them to become tender without disintegrating, while the addition of tomato paste provides a rich, thick body to the broth, preventing it from becoming thin. This ensures that every bite offers a satisfying combination of creamy beans and yielding, slightly firm sweet potato, much like the perfectly cooked vegetables in a classic French pot-au-feu.

Finally, this recipe is designed to be truly foolproof and fast, making it an ideal choice for busy weeknights. It relies heavily on canned goods and fresh produce that’s easy to find at your local NYC farmers market. With minimal chopping and a one-pot cooking method, cleanup is a breeze. You’ll be amazed at how quickly you can create such a deeply satisfying and healthy plant-based meal, proving that nourishing food doesn’t have to be complicated.

Sweet Potato Black Bean Chili Ingredients

Building a great chili starts with quality ingredients, even if they’re mostly from your pantry. When I’m at the Union Square Greenmarket, I always seek out the freshest onions and vibrant sweet potatoes. The rest are staples I always have on hand, ensuring a delicious meal is never far away!

Ingredients List

  • 1 tablespoon olive oil or ¼ cup water (for water saute)
  • 1 medium onion, diced
  • 2-3 garlic cloves, minced
  • 1 ½ tablespoons chili powder
  • 1 tablespoon cumin
  • 1 teaspoon dried oregano
  • 1 teaspoon EACH garlic + onion powder, optional (for good measure)
  • 1 teaspoon pink salt, or to taste
  • 1 large sweet potato (about 1 lb.), diced (with or without skin)
  • 2 cans (15 oz) black beans, drained and rinsed
  • 1 can (15 oz) fire-roasted diced tomatoes (with juices) or 1 ½ cups diced fresh tomatoes
  • 1 can (6 oz) tomato paste
  • 1 can (4oz) diced green chilies
  • 2 cups water or vegetable broth
  • Garnish options: diced avocado, cilantro, tortilla strips, diced onion and/or jalapeno, a dollop of vegan sour cream

Ingredient Spotlight

Sweet Potato: This root vegetable adds a natural sweetness and creamy texture that beautifully balances the savory spices. When selecting, look for firm, unblemished sweet potatoes. You can peel them or leave the skin on for extra fiber and rustic appeal; just ensure they are scrubbed clean. If sweet potatoes aren’t available, butternut squash is an excellent substitute, offering a similar sweetness and texture, though it might need a few extra minutes to cook.

Black Beans: The backbone of this vegan chili, black beans provide protein, fiber, and a wonderfully hearty element. I always keep several cans in my pantry. Look for organic, low-sodium varieties if possible. Drain and rinse them thoroughly to remove excess sodium and starches. If black beans are out of stock, pinto beans or kidney beans can be used as a direct 1:1 substitute, slightly altering the flavor profile but still delivering a satisfying texture.

Fire-Roasted Diced Tomatoes: These canned tomatoes are a game-changer! The fire-roasting process adds a depth of smoky flavor that fresh tomatoes just can’t replicate, giving this chili a gourmet edge without extra effort. They often come with their juices, which are vital for the chili’s base. If you can’t find fire-roasted, regular diced tomatoes are fine, but you might want to add a pinch of smoked paprika for that subtle smokiness.

Chili Powder: This spice blend is essential for classic chili flavor. It typically contains ground chiles, cumin, oregano, and garlic powder. Its role here is to establish the fundamental savory, earthy, and slightly spicy notes. When shopping, check the ingredients—some brands can be a bit saltier or spicier. If you’re out, a mix of paprika, ground cumin, and a tiny pinch of cayenne can work in a pinch, but the chili powder provides a more cohesive flavor.

Cumin: Known for its warm, earthy, and slightly pungent aroma, cumin is a cornerstone of North African and many comfort food recipes. I use both ground cumin and sometimes a sprinkle of whole cumin seeds for texture in other dishes. It enhances the savoriness and provides a beautiful depth of flavor. If you’re seeking a similar warmth, ground coriander is a decent substitute, though it will offer a lighter, more citrusy note rather than cumin’s distinct earthiness.

Original Ingredient Best Substitution Flavor / Texture Impact
Sweet Potato Butternut or Acorn Squash Similar sweetness and creaminess, potentially slightly firmer texture.
Black Beans Pinto Beans or Kidney Beans Changes the bean flavor slightly, but maintains hearty texture and protein.
Fire-Roasted Diced Tomatoes Regular Canned Diced Tomatoes + Smoked Paprika Loses some inherent smoky depth without paprika, otherwise similar flavor.
Chili Powder Mix of Paprika, Cumin, Cayenne May require adjusting quantities to achieve desired heat and depth.
Cumin Ground Coriander Milder, more citrusy flavor than the earthy depth of cumin; use slightly more.

How to Make Sweet Potato Black Bean Chili — Step-by-Step

You’re just a few simple steps away from a delicious, comforting bowl of vegan chili. Follow along, and I promise you’ll have a fantastic meal!

Step 1: Sauté Aromatics and Toast Spices

In a large pot or Dutch oven, heat your olive oil (or water for a water sauté) over medium heat. Add the diced onions and cook them until they’re soft and their edges begin to brown, which usually takes about 5-6 minutes. This browning develops a crucial sweetness. Next, add the minced garlic and cook for just 1 minute more, until fragrant. Then, stir in the chili powder, cumin, oregano, and the optional garlic and onion powder. Cook these spices for another minute, stirring constantly, until their aroma fills your kitchen. This step, known as blooming spices, is key to developing deep flavor.

💡 emy’s Pro Tip: To “bloom” your spices properly, ensure your pot isn’t too hot, or they can burn quickly and become bitter. Medium heat is perfect to gently awaken their flavors without scorching. Keep them moving with a spoon!

Step 2: Add Remaining Ingredients and Simmer

Now it’s time to bring everything together. Add the drained and rinsed black beans, the diced fire-roasted tomatoes (with their juices), the tomato paste, diced sweet potato, diced green chilies, and the vegetable broth or water. Give everything a good stir to ensure all ingredients are well combined and the tomato paste is dissolved. Bring the mixture to a boil, then immediately reduce the heat to a gentle simmer. Cover the pot, leaving the lid slightly askew to allow a little steam to escape. Cook for 30-40 minutes, stirring occasionally to prevent sticking. The chili is ready when your sweet potatoes are tender when pierced with a fork. If the chili becomes too thick for your liking before the sweet potatoes are cooked, add a little extra water or broth, ¼ cup at a time.

⚠️ Common Mistake to Avoid: Don’t overcook your sweet potatoes! They can go from tender to mushy quite quickly. Start checking for doneness around the 30-minute mark to ensure they retain a pleasant texture.

Step 3: Serve and Garnish

Once the sweet potatoes are tender and the chili has thickened to your desired consistency, remove it from the heat. Give it a final taste and adjust the salt if needed. Ladle the hearty Sweet Potato Black Bean Chili into bowls. Now comes the fun part – garnishing! Offer a variety of toppings like fresh diced avocado, chopped cilantro, crunchy tortilla strips, a sprinkle of diced onion or jalapeño for a little kick, or a dollop of creamy vegan sour cream. For an extra special touch, whip up some homemade Cilantro Lime Cashew Sour Cream. Serve hot and enjoy!

💡 emy’s Pro Tip: A Moroccan meal is never complete without a fresh element. In this chili, that’s where the garnishes come in. Fresh cilantro, a squeeze of lime, or a creamy avocado dice will brighten and lift the rich flavors of the chili. Don’t skip them!

Step Action Duration Key Visual Cue
1 Sauté aromatics & toast spices About 7-8 minutes Onions soft & slightly browned, spices fragrant
2 Add ingredients & simmer 30-40 minutes Sweet potatoes fork-tender, chili thickened
3 Serve & garnish N/A Steaming hot chili, colorful toppings

Serving & Presentation

Serving chili is an art, and while this Sweet Potato Black Bean Chili is humble, it deserves a beautiful presentation! I love to serve it in a rustic, wide-rimmed bowl, allowing plenty of space for those vibrant garnishes. Think of it like dressing up a simple French bistro meal – a few fresh, contrasting elements can make all the difference. The warmth of the chili, paired with cool, creamy avocado or a bright squeeze of lime, creates a delightful temperature and flavor interplay.

In my NYC kitchen, I’m always thinking about how to balance flavors and textures. For this vegan chili, the suggested garnishes aren’t just for looks; they enhance the entire eating experience. The fresh cilantro brings a herbaceous lift, echoing the dried oregano cooked into the chili. Crunchy tortilla strips provide a textural contrast against the soft beans and sweet potatoes. And a dollop of vegan sour cream or my Cilantro Lime Cashew Sour Cream adds a tangy, cooling element that cuts through the richness, just like a crème fraîche might complement a hearty French stew.

To truly complete the meal, consider serving this flavorful Sweet Potato Black Bean Chili with something simple on the side. My favorite is a warm, crusty baguette for dipping, a habit I picked up in Paris, or a fluffy bed of brown rice. A light, fresh green salad with a zesty vinaigrette would also provide a wonderful counterpoint to the chili’s robust character, making it a perfectly balanced, wholesome meal suitable for any gathering.

Pairing Type Suggestions Why It Works
Side Dish Crusty bread, brown rice, cornbread Absorbs the delicious broth, adds textural variety, and makes it a heartier meal.
Sauce / Dip Vegan sour cream or Cilantro Lime Cashew Sour Cream Adds a creamy, tangy, and cooling contrast to the warm, spicy chili.
Beverage Cold lager beer, sparkling water with lime, unsweetened iced tea Refreshes the palate and complements the chili’s robust flavors without competing.
Garnish Diced avocado, fresh cilantro, tortilla strips, pickled jalapeños Adds freshness, healthy fats, herbaceous notes, crunch, and a bright kick.

Make-Ahead, Storage & Reheating

Living in NYC with its fast pace, I’ve mastered the art of meal prepping, and this Sweet Potato Black Bean Chili is a star in my weekly rotation. It actually tastes even better the next day as the flavors have more time to meld and deepen – a true testament to its hearty and flavorful nature! It’s perfect for busy lunch breaks or quick dinners, making healthy eating effortless.

Method Container Duration Reheating Tip
Refrigerator Airtight glass container 5-6 days Gently reheat on stovetop over medium-low heat, stirring occasionally. Add a splash of water/broth if too thick.
Freezer Freezer-safe bags or containers 2-3 months Thaw overnight in the fridge, then reheat on stovetop or in microwave until piping hot.
Make-Ahead Cooked chili in chosen storage Up to 3 days in advance Prepare all ingredients and cook fully. Store as directed, then reheat and garnish fresh when serving.

When reheating this Sweet Potato Black Bean Chili, I always prefer the stovetop method. It allows for more even heating and helps maintain the integrity of the sweet potatoes and beans. Just be sure to stir it frequently to prevent the bottom from sticking, especially if it’s very thick. If you find it has thickened considerably in the fridge, a splash of water or vegetable broth will bring it back to the perfect consistency.

For individual servings, the microwave works perfectly. Transfer a portion to a microwave-safe bowl, cover loosely, and heat in 1-2 minute intervals, stirring between each, until thoroughly hot. Remember to always add your fresh garnishes like avocado, cilantro, and vegan sour cream just before serving, whether it’s freshly made or reheated, to keep that vibrant contrast I love so much.

Variations & Easy Swaps

Variation Key Change Best For Difficulty Impact
Smoky Southwestern Chili Add chipotle powder or smoked paprika Adding rich, earthy smoky flavor. Minimal — simply add more spices.
Add Some Greens Stir in spinach or kale at the end Boosting nutrition and color. No change.
Spicy Kick Variation Add fresh jalapeño or cayenne pepper Heat lovers seeking an extra zing. Minimal — adjust heat to taste.

Smoky Southwestern Chili

For those who appreciate a deeper, more robust smoky flavor, this variation is for you. Simply add 1 teaspoon of smoked paprika or ½ teaspoon of chipotle powder along with your other dry spices in Step 1. The chipotle powder will also introduce a lovely, subtle heat. This addition evokes memories of the fragrant spices in my mother’s tagines, adding another layer of complexity that feels both exotic and familiar.

Add Some Greens

Want an extra dose of nutrients and vibrant color? Stir in 2-3 cups of fresh spinach or chopped kale during the last 5 minutes of simmering. The residual heat will wilt the greens beautifully without overcooking them. This is a fantastic way to incorporate more vegetables, making an already healthy chili even healthier. I often do this when I pick up fresh kale from the farmer’s market here in NYC.

Spicy Kick Variation

If you prefer your chili with more heat, there are a few easy ways to spice things up! You can add an extra pinch or two of cayenne pepper when you toast the spices in Step 1. Alternatively, for a fresher heat, add 1-2 finely diced jalapeños (seeds and membrane removed for milder heat, or kept in for more fire) along with the onions in Step 1. This gives a beautiful, clean burn that slowly builds, a technique often used in classic French sauces to enhance the primary flavors.

Is sweet potato black bean chili healthy?

Absolutely! This Sweet Potato Black Bean Chili is incredibly healthy. It’s packed with plant-based protein from the black beans, fiber from the beans and sweet potatoes, and a wealth of vitamins and antioxidants from all the fresh vegetables and spices. It’s naturally vegan and gluten-free, low in saturated fat, and offers a balanced meal that will keep you feeling full and energized. I always aim for dishes that are both nourishing and delicious, and this one ticks all the boxes!

Can I make this chili in a slow cooker?

Yes, you certainly can adapt this recipe for a slow cooker! I recommend still completing Step 1 (sautéing the onions, garlic, and blooming the spices) on the stovetop first, as this truly builds the foundational depth of flavor. Then, transfer the sautéed aromatics and spices to your slow cooker along with all the other ingredients. Cook on low for 6-8 hours or on high for 3-4 hours. The slower cooking will allow the flavors to meld even more beautifully, though you might find the sweet potatoes become extra tender, almost melting into the chili.

How can I make this chili spicier?

For those who love a bit more heat, there are several ways to kick up extra spice! You can add ½ to 1 teaspoon of cayenne pepper along with the chili powder and cumin in Step 1. Another great option is to finely dice one or two jalapeño peppers (for medium heat) or serrano peppers (for higher heat) and add them with the onions. For an even deeper, smoky spice, a dash of chipotle powder in the spice mix is wonderful. Remember to taste as you go to hit your perfect spice level!

What can I serve with sweet potato black bean chili?

This Sweet Potato Black Bean Chili is fantastic on its own, but it truly shines with the right accompaniments! I love to serve it with warm cornbread or a crusty baguette for dipping. For a hearty meal, a scoop of brown rice or quinoa is perfect. And don’t forget the fresh garnishes: diced avocado, a generous sprinkle of fresh cilantro, crunchy tortilla strips, a dollop of vegan sour cream, or even some pickled red onions add wonderful contrast in flavor and texture. It’s like building the perfect Parisian cheese board, but with chili!

Can I freeze leftovers of this vegan chili?

Absolutely! This Sweet Potato Black Bean Chili freezes beautifully, making it an excellent meal prep option. Once it’s completely cooled, transfer it to freezer-safe airtight containers or heavy-duty freezer bags, leaving a little headspace if using containers to allow for expansion. It will keep well in the freezer for up to 2-3 months. Just thaw it in the refrigerator overnight before reheating gently on the stovetop or in the microwave. It’s a lifesaver for busy weeks in NYC!

Is it better to peel sweet potatoes for chili?

That’s entirely a matter of personal preference! I often leave the skin on my organic sweet potatoes after a good scrub. The skin adds extra fiber, nutrients, and a rustic texture that I quite enjoy in a hearty chili. However, if you prefer a smoother, more uniform texture, or if you’re not a fan of the sweet potato skin, feel free to peel them before dicing. Either way, the flavor profile of the chili will be delicious with this beautiful root vegetable.

What kind of beans can I use in this chili?

While black beans are classic for this recipe and provide a lovely creamy texture, you have plenty of flexibility! Pinto beans are a fantastic alternative, offering a slightly earthier flavor. Kidney beans also work well and will give your chili that traditional, robust chili appearance. Even cannellini beans or a mixture of different beans can be used if you prefer. Just ensure they are drained and rinsed thoroughly before adding them to your chili.

How long does sweet potato chili last in the fridge?

Your Sweet Potato Black Bean Chili will last beautifully in an airtight container in the refrigerator for up to 5-6 days. In fact, like many stews and braises, chili often tastes even better the next day as the flavors have more time to deepen and meld together. It’s a perfect make-ahead meal for healthy lunches or dinners throughout the week. Just remember to always reheat it until it’s steaming hot all the way through before serving.

Can I add other vegetables to this sweet potato black bean chili?

Absolutely! Chili is incredibly versatile, and adding more vegetables is a wonderful way to boost its nutritional value and complexity. Bell peppers (red, green, or yellow), corn (fresh, frozen, or canned), zucchini, or even mushrooms would all be delicious additions. You can sauté harder vegetables like bell peppers with the onions, and add softer ones like corn or zucchini during the last 10-15 minutes of simmering. Just ensure you don’t overcrowd the pot, which could prevent the chili from simmering properly.

Why is my chili too thin/thick?

A common culinary concern! If your chili is too thin, it might simply need a bit more simmering time with the lid off to allow the excess liquid to evaporate. Alternatively, you can mix 1-2 tablespoons of cornstarch with an equal amount of cold water to create a slurry, then stir it into the simmering chili and cook for a few more minutes until thickened. If it’s too thick, simply stir in additional water or vegetable broth, ¼ cup at a time, until you reach your desired consistency. Adjust seasoning (salt) again if you add liquid.

Share Your Version!

I poured my heart into perfecting this Sweet Potato Black Bean Chili, and I truly hope it brings warmth and joy to your kitchen! If you tried this recipe, please take a moment to leave a star rating and a comment below. Your feedback helps other home cooks discover this delicious vegan gem, and it truly makes my day to hear from you!

Did you add an extra Moroccan spice twist or a special NYC market find? I’d love to see your creations! Share a photo on Instagram or Pinterest and tag me @cookingwithemy. And tell me, what’s your favorite unexpected topping for a hearty bowl of chili?

From my NYC kitchen to yours — I hope this recipe brings as much warmth to your table as it does to mine. — emy 🧡

📌

Love This Recipe? Save It to Pinterest!

If you enjoyed this Sweet Potato Black Bean Chili recipe, don’t let it get lost in your browser tabs! 😄 Pin it now so you can find it again anytime — and explore hundreds more tried-and-tested recipes waiting for you on my Pinterest boards.

👉 Follow emy on Pinterest @chefrecipes2

📌 Pin this recipe · 🔁 Re-pin your favorites · 💬 Tag me when you make it — I love seeing your creations!

Print
clock clock iconcutlery cutlery iconflag flag iconfolder folder iconinstagram instagram iconpinterest pinterest iconfacebook facebook iconprint print iconsquares squares iconheart heart iconheart solid heart solid icon

Sweet Potato Black Bean Chili


  • Author: Chef Emy

Description

This Sweet Potato Black Bean Chili recipe is hearty and flavorful and easy to make using mostly pantry staples. It’s a quick and healthy savory plant-based chili everyone will love! Recipe inspired by my Sweet Potato Quinoa Chili.


Ingredients

Scale
  • 1 tablespoon olive oil or ¼ cup water (for water saute)
  • 1 medium onion, diced
  • 2 3 garlic cloves, minced
  • 1 ½ tablespoons chili powder
  • 1 tablespoon cumin
  • 1 teaspoon dried oregano
  • 1 teaspoon EACH garlic + onion powder, optional (for good measure)
  • 1 teaspoon pink salt, or to taste
  • 1 large sweet potato (about 1 lb.), diced (with or without skin)
  • 2 cans (15 oz) black beans, drained and rinsed
  • 1 can (15 oz) fire-roasted diced tomatoes (with juices) or 1 ½ cups diced fresh tomatoes
  • 1 can (6 oz) tomato paste
  • 1 can (4oz) diced green chilies
  • 2 cups water or vegetable broth
  • diced avocado
  • cilantro
  • tortilla strips
  • diced onion and/or jalapeno
  • a dollop of vegan sour cream

Instructions

  1. In a large pot or dutch oven, heat oil over medium heat. Add onions, cook until soft and edges browned, about 5 6 minutes. Add garlic, cook 1 minute more. Add the chili powder, cumin, oregano, garlic & onion powder, cook 1 minute more (or until fragrant).
  2. Add the beans, diced tomatoes, tomato paste, sweet potato, green chilies, and vegetable broth, stir until combined. Bring to a boil, reduce heat, cover slightly askew and cook for 30 40 minutes, stirring occasionally. Chili is ready when sweet potatoes are tender. Add additional water if chili is too thick for your liking.
  3. Serve with optional garnishes. You may also like to top it with this easy Cilantro Lime Cashew Sour Cream.
  4. Serves 4 generously
  5. Leftovers can be kept in an airtight container in the refrigerator for up to 5 6 days. To keep longer, store in the freezer, in freezer-safe containers, for up to 2 3 months.