Table of Contents
Garlic Butter Pasta (One Pot!) – Easy Herb-Infused One-Pot Pasta
Growing up in Morocco, I watched my mother effortlessly toss fragrant spices into bubbling pots — no measuring spoons, just instinct. That instinct stayed with me through culinary school in Paris and now follows me around my New York City kitchen. This Garlic Butter Pasta (One Pot!) is the kind of easy, weeknight dish that bridges all those worlds: it’s deeply flavorful, ridiculously simple, and the whole thing comes together in a single pot. The secret? A whisper of lemon juice and Parmesan lifts the rich butter and garlic into something truly special — and the one-pot method means minimum cleanup, maximum flavor.
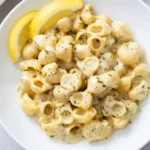
Imagine this: tender shellbow pasta swirled in a luscious, creamy sauce that’s been infused with fresh garlic, a medley of dried herbs, and a touch of mustard powder for a warm, earthy kick. The butter foams just right, carrying the aromas of basil, oregano, and parsley through your kitchen. Every bite is silky, with a subtle tang from fresh lemon juice brightening the finish and a gentle nuttiness from Parmesan. The sauce clings to every curve of the pasta — it’s pure comfort, but with a chef’s polish.
I’ve tested this recipe more times than I can count, and the version I’m sharing today is foolproof. Unlike many one-pot pastas that end up gummy or bland, mine uses a simple technique: cook the pasta uncovered in seasoned broth and cream, then finish with butter and cheese off the heat. That keeps the texture al dente and the sauce perfectly emulsified. I’ll also share an emy’s Pro Tip for preventing pasta from sticking and a common mistake that can make your sauce split. Stick with me — I promise you’ll never go back to boiled-and-drained pasta again.
Why This Garlic Butter Pasta Recipe Is the Best
The Flavor Secret – My Moroccan roots taught me that spice blends are the heart of a dish. Here, a careful mix of basil, oregano, parsley, mustard powder, thyme, onion powder, and pepper creates an herbaceous depth that’s amplified when bloomed in foaming butter. A splash of soy sauce (yes, you read that right) adds an umami backbone without tasting like soy — it’s a trick I picked up in Paris from a saucier friend. And fresh lemon juice and Parmesan finish it with brightness and saltiness that balance the richness.
Perfected Texture – Cooking the pasta directly in the seasoned liquid (chicken broth, half and half, and a touch of bouillon) means the pasta absorbs all those flavors while releasing starch that naturally thickens the sauce. Running a silicone spatula along the bottom of the pot while it boils prevents any sticking, and removing the pot from heat before adding the cheese and final butter ensures a silky, non-greasy sauce. This is technique I learned in Paris: always finish sauces off the heat.
Foolproof & Fast – Even if you’ve never made a one-pot pasta before, this recipe works. There’s no draining, no separate pans, and no complicated steps. Just measure everything first (trust me, the recipe moves quickly), then let the pasta do its thing. The hardest part is waiting for it to cook. In under 30 minutes, you’ll have a meatless main or a stellar side dish that tastes like it simmered for hours.
Garlic Butter Pasta Ingredients
When I’m shopping for this dish in my neighborhood in Brooklyn, I head to the Italian deli on Court Street for fresh Parmigiano-Reggiano and a good half and half. The dried herbs I keep in bulk from the Spice House — they’re the same ones my mother used to buy at the souk in Marrakech, but in a New York way. Fresh garlic is non-negotiable; jarred minced garlic won’t do the trick here.
Ingredients List
- ¾ teaspoon EACH: dried basil, oregano, parsley, mustard powder
- ¼ teaspoon EACH: dried thyme, onion powder, pepper
- 4 tablespoons butter (divided)
- 4 cloves fresh garlic (minced)
- 2 ¾ cups chicken broth
- ¾ cup half and half
- 1 teaspoon soy sauce
- ½ chicken bouillon cube
- ¾ cup Parmesan cheese (freshly grated)
- 2 tablespoons fresh lemon juice
- ½ lb. Shellbow pasta (see notes)
Ingredient Spotlight
Butter – Use unsalted European-style butter for the best flavor. It has a higher fat content, which gives the sauce a richer mouthfeel and helps the garlic and spices bloom without burning. Salted butter can also work, but omit the salt in the recipe if you use it.
Parmesan – Freshly grated Parmesan from a block is essential. Pre-grated cheese often contains cellulose and anti-caking agents that can make the sauce grainy. It melts into the sauce beautifully, adding umami and a silky thickness.
Shellbow Pasta – This medium shell shape (conchiglie) or any short pasta like penne, rotini, or farfalle works well. The curves hold the sauce perfectly. Avoid long strands like spaghetti; they don’t cook as evenly in the one-pot method.
Lemon Juice – Always use fresh lemon juice (about half a lemon yields 2 tablespoons). Bottled lemon juice adds a metallic, acidic note that can throw off the balance.
| Original Ingredient | Best Substitution | Flavor / Texture Impact |
|---|---|---|
| Butter | Olive oil + 1 tbsp vegan butter | Less rich, slightly fruitier, still good but not as creamy |
| Half and half | Whole milk + 2 tbsp heavy cream | Similar consistency, slightly less richness; avoid skim milk |
| Chicken broth | Vegetable broth or water + extra bouillon | Slightly less savory; add ½ tsp more soy sauce to compensate |
| Parmesan | Pecorino Romano or nutritional yeast (for dairy-free) | Pecorino is saltier and sharper; nutritional yeast gives a cheesy, nutty flavor but won’t melt |
How to Make Garlic Butter Pasta — Step-by-Step
Don’t be intimidated by the steps — this recipe is designed to flow quickly once you have your ingredients ready. I’ll walk you through each stage with visual cues and pro tips to guarantee success.
Step 1: Prepare the Seasonings
Combine the ¾ teaspoon each of dried basil, oregano, parsley, and mustard powder with ¼ teaspoon each of dried thyme, onion powder, and pepper in a small bowl. Measure out all other ingredients (chicken broth, half and half, soy sauce, bouillon cube, Parmesan, lemon juice, and butter). Everything moves fast once you start, so being organized is key.
💡 emy’s Pro Tip: Place the bouillon cube in a small dish and crumble it with your fingers before adding to the pot — this helps it dissolve evenly without clumps.
Step 2: Bloom Garlic and Spices
Add 3 tablespoons of the butter to a soup pot over medium heat. Once it melts and starts to foam (but not brown), add the minced garlic and the seasoning blend. Stir continuously for about 60–90 seconds until the butter is fragrant and the garlic turns pale golden. Do not let the garlic brown, as that will introduce bitterness.
⚠️ Common Mistake to Avoid: Stirring too slowly or using high heat will quickly burn the garlic. Keep the heat at medium and move the spatula constantly.
Step 3: Add Liquids
Pour in the chicken broth, half and half, soy sauce, and crumbled bouillon cube. Stir to combine, scraping any bits from the bottom of the pot. The liquid will appear slightly cloudy — that’s fine.
💡 emy’s Pro Tip: For a richer sauce, use a full ½ cup of half and half and reduce the chicken broth by ¼ cup. Adjust accordingly if you want a creamier consistency.
Step 4: Cook the Pasta
Bring the liquid to a boil, then add the pasta. Return to a gentle boil and cook uncovered according to package instructions (usually 10–12 minutes for shellbow). Stir occasionally and run a silicone spatula along the bottom of the pot to prevent sticking. Taste-test the pasta for doneness before proceeding. It should be al dente — tender but with a slight bite.
⚠️ Common Mistake to Avoid: Overcooking will make the pasta mushy and absorb too much liquid, leaving the sauce too thick. Start testing 2 minutes before the package says.
Step 5: Finish the Sauce
Reduce heat to low. Gradually sprinkle in the grated Parmesan cheese, stirring constantly until it melts completely. Remove the pot from the heat and add the fresh lemon juice. Stir gently to incorporate.
💡 emy’s Pro Tip: Always add cheese off the heat to prevent curdling. The residual heat is enough to melt it perfectly.
Step 6: Rest and Serve
Add the remaining 1 tablespoon of butter to the pot and cover immediately. Let it sit for 2–3 minutes — the butter will melt and gently emulsify into the sauce. Uncover, give it a final gentle stir, and serve. The sauce will continue to thicken as it stands.
| Step | Action | Duration | Key Visual Cue |
|---|---|---|---|
| 1 | Prepare seasonings and measure all ingredients | 5 mins | Spices combined in a small bowl, all liquids measured |
| 2 | Bloom garlic and spices in butter | 1–2 mins | Butter foams, garlic turns pale golden |
| 3 | Add broth, half and half, soy sauce, bouillon | 1 min | Liquid simmers and combines |
| 4 | Cook pasta in liquid | 10–12 mins (al dente) | Pasta is tender with a slight bite; liquid reduces slightly |
| 5 | Stir in Parmesan and lemon juice off heat | 2 mins | Cheese melts into a silky sauce |
| 6 | Add remaining butter, cover, rest | 3 mins | Butter melts, sauce becomes glossy |
Serving & Presentation
This Garlic Butter Pasta is incredibly versatile. As a meatless main, I love serving it with a crisp green salad dressed with a simple lemon vinaigrette — the brightness cuts through the creamy pasta. As a side dish, it pairs beautifully with grilled chicken, seared salmon, or a juicy steak. In my home, I often serve it in big shallow bowls, topped with an extra shower of freshly grated Parmesan and a few cracks of black pepper. A sprinkle of fresh parsley or basil adds a pop of color and freshness.
If I’m feeling nostalgic for Morocco, I’ll dust the top with a touch of sumac — that tangy, deep red spice that reminds me of my mother’s tagines. For a Parisian touch, a drizzle of high-quality extra-virgin olive oil just before serving adds a lovely fruitiness. And because I’m in NYC, I sometimes add a pinch of red pepper flakes for heat — it’s amazing with the garlic butter.
| Pairing Type | Suggestions | Why It Works |
|---|---|---|
| Side Dish | Grilled chicken, seared salmon, roasted vegetables | The creamy sauce complements lean proteins and veggies |
| Sauce / Dip | Extra lemon wedges, garlic bread, crusty bread | Adds acidity and crunch to scoop up sauce |
| Beverage | Dry white wine (Pinot Grigio), sparkling water with lemon | Crisp acidity balances richness |
| Garnish | Fresh parsley, basil, sumac, red pepper flakes | Adds color, freshness, or heat |
Make-Ahead, Storage & Reheating
Living in NYC means my schedule is always packed, so I’m a big fan of prepping this pasta ahead. It keeps beautifully in the fridge for up to 4 days, and the flavors actually deepen overnight. Here’s how to store and reheat for best results.
| Method | Container | Duration | Reheating Tip |
|---|---|---|---|
| Refrigerator | Airtight container (preferably glass) | Up to 4 days | Add a splash of milk or broth when reheating to restore creaminess |
| Freezer | Freezer-safe bag or container, remove as much air as possible | Up to 3 months | Thaw overnight in fridge, then reheat gently with a little extra liquid |
| Make-Ahead | Prepare up to step 4 (cook pasta), but undercook by 1 minute | 1 day in advance | When ready, reheat liquid, add pasta, finish cooking then add cheese and butter |
To reheat, I always opt for the stovetop over the microwave: place the pasta in a skillet with a splash of milk or broth over medium-low heat, stirring often until warmed through. The sauce reconstitutes beautifully, and you won’t get any graininess. Avoid boiling — that can cause the sauce to separate. For leftovers, you might find the pasta has absorbed more liquid, so adding that splash is essential.
One of my favorite ways to use up leftover Garlic Butter Pasta is to turn it into a frittata: whisk eggs, add the cold pasta, pour into a buttered skillet, and bake until set. It’s a genius brunch or quick dinner hack!
Variations & Easy Swaps
This recipe is a fantastic canvas for creativity. Here are some of my go-to variations, each tested in my kitchen and approved by my family. Feel free to experiment!
| Variation | Key Change | Best For | Difficulty Impact |
|---|---|---|---|
| Moroccan Spiced | Add 1 tsp ras el hanout and ½ tsp turmeric | A warming, aromatic twist | Easy |
| Gluten-Free / Dairy-Free | Use gluten-free pasta, replace butter with vegan butter, half and half with oat cream | Dietary restrictions | Medium (pasta texture varies) |
| Add Protein | Sauté 8 oz sliced mushrooms or add shredded rotisserie chicken | Hearty main dish | Easy |
Moroccan Spiced Variation
When I want to bring a taste of home, I stir in 1 teaspoon of ras el hanout (a Moroccan spice blend) and ½ teaspoon of turmeric along with the dried herbs. The floral, slightly sweet notes of the ras el hanout pair beautifully with the garlic butter and lemon. Finish with toasted sesame seeds and fresh cilantro — it’s like a tagine in pasta form. This is a version I often make for dinner parties; everyone asks for the recipe.
Gluten-Free / Dairy-Free Option
I’ve tested this with gluten-free pasta (I recommend lentil or brown rice pasta) and it works beautifully. Use a good quality vegan butter (like Miyoko’s) and an oat-based creamer or full-fat coconut cream for the half and half. The sauce may be slightly less rich, so add an extra tablespoon of nutritional yeast for a cheesy note. Be sure to cook the gluten-free pasta only until al dente — it softens faster and can become mushy if overcooked.
Add Protein for a Hearty Meal
This pasta is fantastic as is, but sometimes I want a complete meal in a bowl. Fold in 8 ounces of sautéed cremini mushrooms (sliced and browned in a little butter) or 1½ cups of shredded rotisserie chicken after adding the Parmesan. The mushrooms add an earthy depth reminiscent of a Parisian forest, while chicken makes it a family-friendly weeknight staple. Both options take less than 5 minutes to incorporate.
Can I use pre-minced garlic from a jar instead of fresh?
I really don’t recommend jarred minced garlic for this recipe. Fresh garlic is one of the main flavor components, and jarred garlic tends to be less pungent and can have a slightly sour aftertaste due to preservatives. Sauteing fresh garlic in butter creates that iconic aroma that makes this dish so special. If you’re in a pinch, you can use garlic paste from a tube — it’s closer to fresh but still a step down.
Why is my sauce not creamy? It looks separated.
The most common reason for a separated sauce is adding the Parmesan over high heat. Always remove the pot from the heat before stirring in the cheese. Another culprit is using pre-shredded Parmesan that contains cellulose, which doesn’t melt smoothly. Finally, make sure you’re using full-fat half and half — low-fat or skim products have less emulsifying power and can curdle. If your sauce does separate, whisk in a splash of cold half and half or a teaspoon of mustard powder — it often brings it back together.
Can I make this pasta without chicken broth? What can I substitute?
Absolutely! You can swap the chicken broth for vegetable broth, or even use water plus an additional bouillon cube (vegetable or mushroom). The flavor profile will change slightly — chicken broth adds savory depth, while vegetable broth is lighter and more herb-forward. For an ultra-vegetable version, I sometimes use water plus a teaspoon of miso paste (dissolved in a little hot water). The miso brings umami similar to the bouillon.
How do I keep the pasta from sticking together while it cooks?
This is one of the most common questions I get about one-pot pasta. The key is to stir and scrape the bottom of the pot every few minutes with a silicone spatula. Using a pasta shape with ridges (like shellbow or penne) also helps because the ridges create space between the pieces. Also, be sure the liquid is at a gentle boil — not a violent boil — before adding the pasta. And always cook uncovered; covering traps steam and makes the pasta gluey.
Can I double this recipe for a crowd?
Yes! This recipe scales beautifully. Use a large Dutch oven or stockpot and increase all ingredients by half or double. Be aware that cooking time may increase by a few minutes because the larger volume of liquid takes longer to come back to a boil. Also, keep the heat at medium — you don’t want to rush and risk burning the garlic. The rest of the steps remain the same. You can serve it as a main for 8 people or a side for 12.
Is it necessary to add soy sauce? I don’t have any.
The soy sauce might seem odd in an Italian-style pasta, but it’s a secret flavor enhancer that adds savory depth without tasting like soy. You can skip it, but the dish will be less complex. A good substitute is ½ teaspoon of Worcestershire sauce (if not vegetarian) or an extra pinch of salt plus a splash of balsamic vinegar. For a completely neutral alternative, use a pinch of MSG or an additional ¼ teaspoon of mustard powder.
Can I use milk instead of half and half?
You can, but the results are different. Whole milk (3.25% fat) is the closest option — it will still be creamy, though slightly thinner. Skim or 2% milk will result in a much thinner sauce that may not coat the pasta as well. If using milk, I recommend adding an extra tablespoon of butter to compensate for the lost richness. Also, be careful not to boil the milk; it can curdle more easily than half and half.
What is the best pasta shape for this recipe?
I love shellbow (conchiglie) because the shells trap the sauce beautifully, but any short, sturdy pasta works. Penne, rotini, farfalle, or cavatappi are all excellent choices. Avoid delicate shapes like angel hair or long strands like spaghetti — they don’t cook evenly in the one-pot method and can break apart. If you use a different shape, cook it for the time indicated on the package minus 1 minute, as the residual heat will continue cooking it off the stove.
Share Your Version!
I hope this Garlic Butter Pasta becomes a beloved staple in your kitchen, just as it is in mine. If you make it, I’d love to hear how it turned out. Leave a star rating and a comment below — did you add a twist? Did your family ask for seconds? That’s the best compliment a cook can get.
Snap a photo of your pasta and tag me on Instagram or Pinterest @cookingwithemi. I can’t wait to see your creations! And if you’re wondering about one specific thing: how did the lemon and Parmesan balance in your version? Let me know — I’m always learning from your kitchens.
From my NYC kitchen to yours — I hope this recipe brings as much warmth to your table as it does to mine. — emy 🧡
Love This Recipe? Save It to Pinterest!
If you enjoyed this Garlic Butter Pasta recipe, don’t let it get lost in your browser tabs! 😄 Pin it now so you can find it again anytime — and explore hundreds more tried-and-tested recipes waiting for you on my Pinterest boards.
👉 Follow emy on Pinterest @exorecipe
📌 Pin this recipe · 🔁 Re-pin your favorites · 💬 Tag me when you make it — I love seeing your creations!
⭐️ Loved this recipe? Leave a star rating below — it helps other home cooks find it, and it makes my day! 💛
Garlic Butter Pasta (One Pot!)
Description
This one pot Garlic Butter Pasta recipe has the best herb-infused sauce with fresh garlic and a hint of Parmesan and lemon juice. It’s a great meatless meal or side dish recipe!
Ingredients
- ¾ teaspoon EACH: dried basil, oregano, parsley, mustard powder
- ¼ teaspoon EACH: dried thyme, onion powder, pepper
- 4 tablespoons butter (divided)
- 4 cloves fresh garlic (minced)
- 2 ¾ cups chicken broth
- ¾ cup half and half
- 1 teaspoon soy sauce
- ½ chicken bouillon cube
- ¾ cup Parmesan cheese (freshly grated)
- 2 tablespoons fresh lemon juice
- ½ lb. Shellbow pasta (see notes)
Instructions
- Combine the seasonings and set aside. Measure out remaining ingredients before beginning. This recipe goes quick, so you want to be ready.
- Add 3 tbsps. of the butter to a soup pot over medium heat. Add the garlic and seasonings. Stir continuously until the butter starts to foam.
- Add the chicken broth, half and half, soy sauce, and bouillon cube.
- Bring to a boil and add the pasta. Bring back to a gentle boil and cook uncovered according to package instructions. Run a silicone spatula along the bottom of the pot throughout cooking to lift any pasta that may be settling to the bottom. Taste-test the pasta for doneness before proceeding.
- Reduce heat to low and gradually stir in the Parmesan cheese. Remove from heat and add the lemon juice.
- Add the remaining 1 tablespoon of butter and cover the pot to let it melt. Gently stir it into the pasta and serve!